
- home
- Products
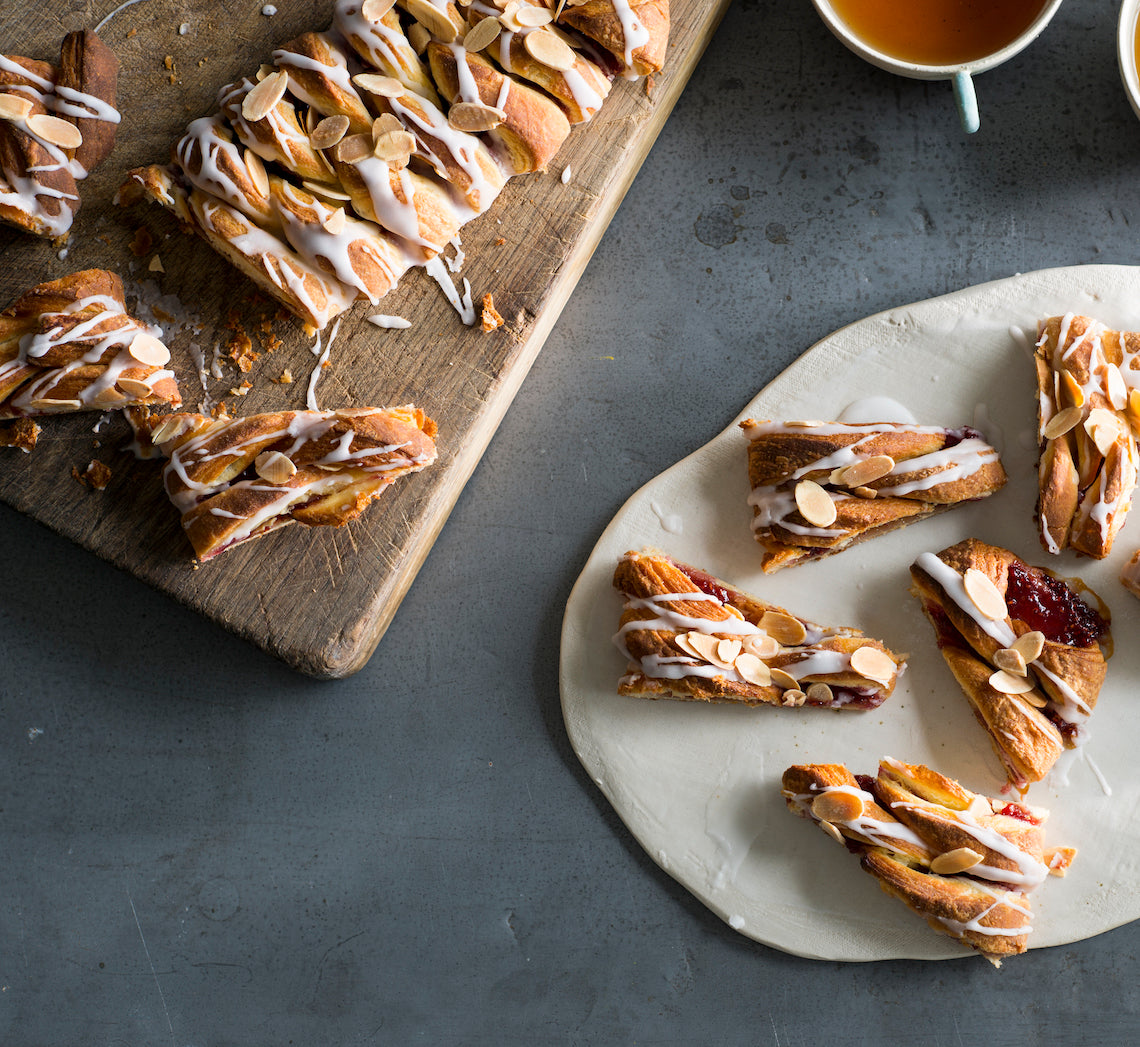
Prep 30min (+overnight +45min resting timeBake 20-25minMakes 12
Danish pastries are possibly Denmark’s most well-recognized food specialty, even though it is Austria that should actually be credited for originally creating them! Traditionally based on a leavened puff pastry (basically a puff pastry made with a yeast dough) the making of them is quite an involved process. Luckily, the pastry used here is a short-cut one with chunks of butter already incorporated into the pastry when initially mixed which cuts out the process of interleaving it with the pastry dough as you fold it – if you haven’t made puff pastry before, this is a great recipe to start with.
Ingredients
- 125ml (½ cup) lukewarm milk
- 7g (1 sachet) dried yeast
- 250g (1⅔ cups) plain flour
- 185g butter, chilled and cut into 2 cm cubes
- 1 egg, at room temperature, lightly whisked
- 2 tablespoons caster sugar
- ¼ teaspoon ground cardamom
- 5 tablespoons good-quality raspberry jam
- 2 tablespoons flaked almonds, toasted, to decorate
Icing
- 125g (1 cup) pure icing sugar
- 1 tablespoon boiling water
- ¼ teaspoon natural almond extract
Method
- Put the milk in a large bowl and sprinkle the yeast over the top. Set aside for 5 minutes.
- Put the flour and butter into the bowl of a food processor and use the pulse button to process until the butter is cut into 1 cm pieces (make sure your don’t process any further). Transfer to a large bowl.
- Add the egg, sugar and cardamom to the milk mixture and stir to combine. Add the flour and butter mixture and use a wooden spoon and then your hands to mix until it is just combined. Cover the bowl with plastic wrap and place in the fridge overnight.
- Turn the dough onto a lightly floured surface and bring together with your hands. Knead for 30 seconds or until smooth. Shape into a rectangle and then use a lightly floured rolling pin to roll the out until about 40 x 25cm, keeping the edges as straight as possible. With a long side nearest to you, fold the right third of the dough in to cover the centre third and then fold the left side in also. Turn the dough clockwise a quarter turn. Fold the dough into thirds as before to make a small rectangle. Flip the dough over on the bench and repeat the rolling and folding process again. You will finish with a small rectangle. Wrap well in plastic wrap and chill for 30 minutes.
- Preheat the oven to 200°C. Line a baking tray with non-stick baking paper.
- Roll out the pastry with a lightly floured rolling pin on a lightly floured surface to a rectangle about (30 x 35cm) and about 5mm thick. Cut in half to make two 15 x 35cm rectangles. Spread the raspberry jam down the centre to cover the centre third of both rectangles. Cut the pastry diagonally into 2cm-wide strips down both sides of the jam and then fold the strips, alternating form each side, into the centre over the jam. Transfer the pastries on the lined tray. Cover loosely with a slightly damp tea towel and set aside in a warm, draught-free place for 15 minutes or until the pastry is ‘puffy’.
- Bake in preheated oven for 20-25 minutes or until the pastry is golden, crisp and cooked through. Remove from oven and cool on the tray.
- To make the Icing, put the icing sugar in a medium bowl and stir in the water and almond extract to make a smooth pouring consistency. Drizzle over the cooled pastry and sprinkle with the almonds and set aside to set. Serve at room temperature cut into slices.
Baker's Tips
- This Danish Pastry is best eaten the day it is baked but will keep in an airtight container for up to 2 days.
This recipe is from Anneka's SBS Food online column, Bakeproof: Danish Baking.
CLICK HERE for more Bakeproof recipes.
Photography by Alan Benson.
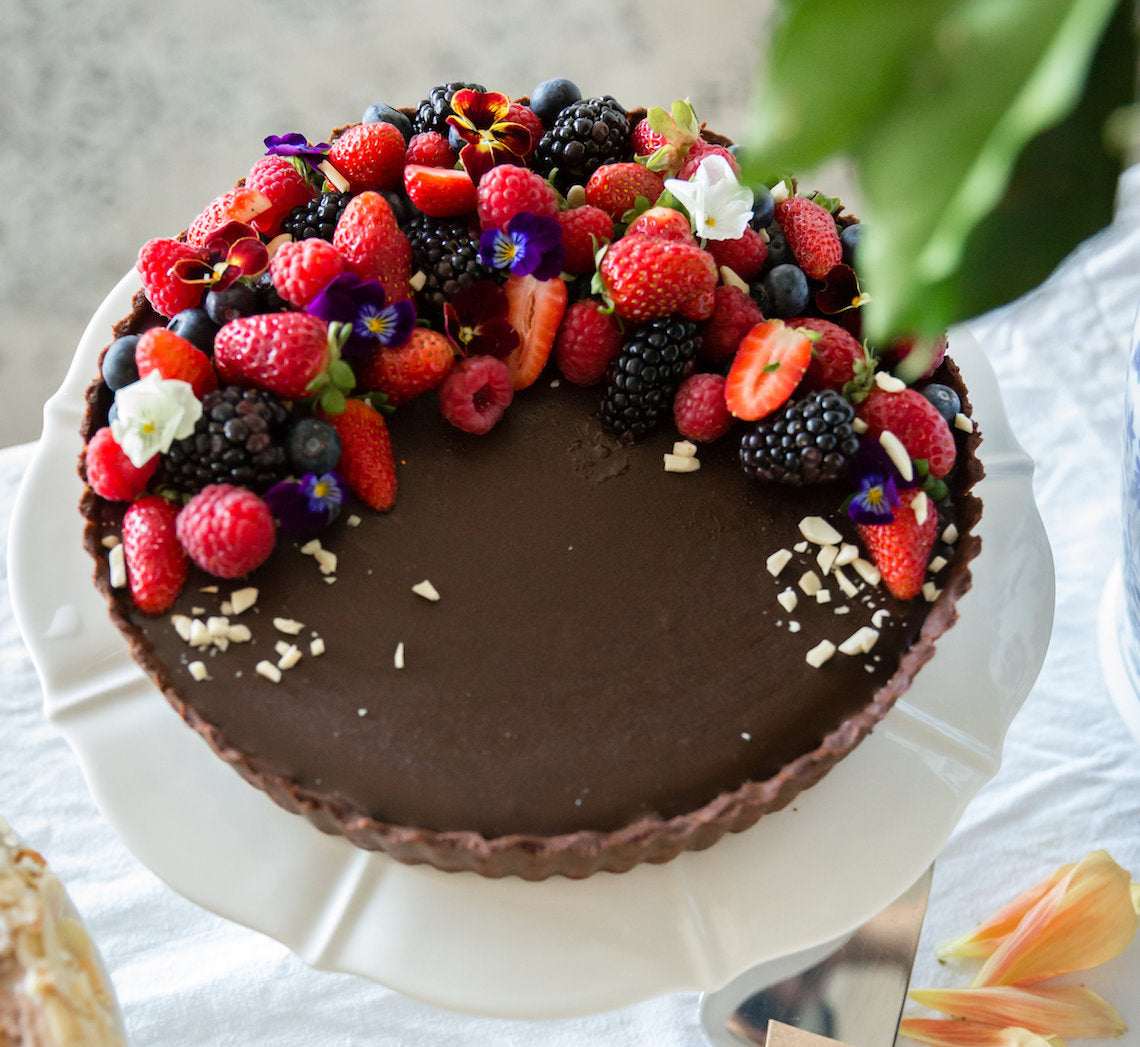
Prep 1hr 15min (+ cooling and chilling time)Bake 45-75minMakes 8-10 serves
One of our Make Me a Baker graduates, Dimi Jayawardene, baked this beautiful tart at her graduation ceremony – chocolate pastry filled with a chocolate custard and topped with chocolate ganache, it's the definition of decadent!
Ingredients
To Serve
Raspberries, blueberries and strawberries
Slivered almonds
Gold leaf
Edible flowers
Whipped cream
Chocolate Shortcrust Pastry
200g (1⅓ cups) plain flour
Good pinch salt
3 tablespoons icing sugar, sifted
2 tablespoons cocoa powder, sifted
150g chilled unsalted butter, cubed
3-3½ tablespoons iced water
Chocolate Custard Filling
4 egg yolks
1 tablespoon custard powder
2 tablespoons caster sugar
200g good-quality dark chocolate, chopped
300ml thin cream
250ml (1 cup) milk
Chocolate Ganache
125ml (1/2 cup) thickened cream
250g good-quality dark chocolate, chopped
20g butter
2-3 tablespoons Tia Maria, or to taste
Method
- To make the pastry, combine the flour, salt, icing sugar and cocoa powder in a large mixing bowl. Add the chilled butter. With your palms facing upwards, use your fingertips to rub in the butter until the mixture resembles fine breadcrumbs with some larger pieces of butter still visible.
- Sprinkle 3 tablespoons of the iced water over the flour and butter mixture. Use a round-bladed knife in a cutting motion to mix until evenly combined and the mixture starts holding together. Press a little of the mixture between your fingers – if it holds together easily, there is no need to add more water; If it doesn’t add the remaining ½ tablespoon water and combine. The pastry should be soft but not sticky.
- Bring the pastry together with your hands and transfer to a lightly floured, cool bench top. Lightly knead the pastry with your fingertips for about 10 seconds or until it comes together but isn’t completely smooth. Shape the pastry into a disc, wrap well in plastic wrap and place in the fridge for 20 minutes to rest.
- Preheat oven to 200°C (180°C fan-forced). Roll pastry on a lightly floured surface to a 4mm-thick disc. Line the base and side of a 23cm (base measurement) round, fluted tart tin with removable base, pressing into the sides. Roll the rolling pin over the top to trim any excess pastry. Place in the fridge for 15 minutes to rest.
- Place the tart tin on an oven tray. Line the pastry with baking paper and fill with baking beads, or dried rice or beans. Bake in preheated oven for 10-15 minutes. Remove the rice or beans and bake for a further 5-10 minutes or until pastry is just cooked through. Reduce oven temperature to 180°C (160°C fan-forced).
- Meanwhile, to make the Chocolate custard filling, combine the egg yolks, custard powder and sugar in a saucepan. Add the chocolate, cream and milk and place over low heat. Cook, stirring occasionally with a balloon whisk, for 5 minutes or until chocolate melts and mixture is smooth. Remove from heat.
- Pour the chocolate custard mixture into the pastry case (see Baker's Tips). Reduce oven temperature to 180°C (160°C fan-forced) and bake for 20-40 minutes or until custard is just set. (The baking time will depend on your oven and a the depth of your tart tin.) Remove from oven and set aside to cool completely in the tin.
- While the tart is cooling, make the Chocolate ganache. Heat the cream for 30-50 seconds or until bubbling in the microwave. Place the chocolate, butter and Tia Maria in a bowl. Pour the cream into the bowl. Let it sit for 1-2 minutes until chocolate is melted and then start mixing with a small balloon whisk or spoon until the mixture is beautiful and smooth (the butter gives the ganache a lovely glossy look). Pour the ganache over the layer of custard and place in the fridge to set.
- Transfer the tart to a serving plate. Top with berries and slivered almonds, decorate with gold leaf and edible flowers. Serve with whipped cream.
Baker's Tips
- Adding the filling to the pastry cases while still sitting in the oven on the tray will mean you can fill the tart completely and minimise the chance of it spilling when transferring it to the oven.
- This recipe makes one large tart or it can make 8 individual tarts in 10-11cm tins.
- The tart can be made the day before. Leave the decorating for the day of serving.
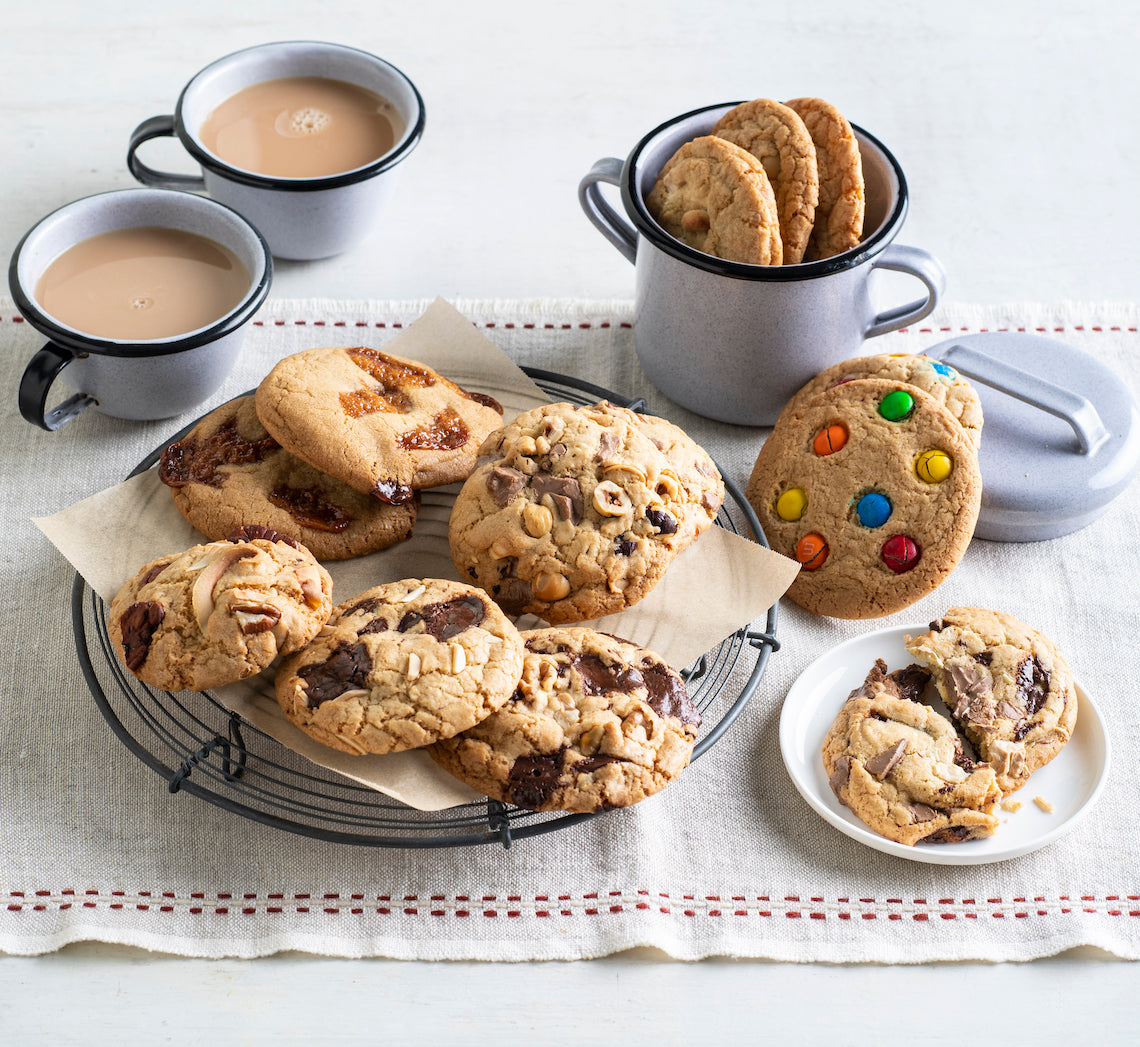
Prep 20minBake 15-25 minMakes about 12 large cookies
This great basic cookie recipe (requiring only a bowl and a wooden spoon to mix) can be customised depending on your flavour and texture preferences… Choose from the suggested ingredients to add your twist and to personalise the cookies – the variation options are only limited by your imagination (and a little baking science)!
Ingredients
Base
125g (4½oz) salted butter, melted
110g (½ cup/4oz) caster sugar
110g (½ cup, firmly packed/4oz) brown sugar
1 egg, at room temperature
185g-225g (6½oz-8oz) plain flour (see Baker's Tips)
½ teaspoon bicarbonate of soda
Ingredients for flavour (choose at least 1)
1-2 teaspoons vanilla essence or extract or vanilla bean paste
½ teaspoon ground cinnamon
1 orange, lemon or lime, zest finely grated
Sea salt flakes, to taste
Ingredients for texture (choose at least 1)
100g (3½oz) chocolate (dark, milk, white or a combination), chopped – 150g if not using nuts also
100g (3½oz) toasted nuts (macadamias, pecans, salted peanuts, peeled hazelnuts, almonds, walnuts or pistachios), coarsely chopped
150g (5¼oz) Smarties or M&M's
100g (3½oz) soft caramels, chopped
1 cup shredded or flaked coconut
Method
- Preheat oven to 180°C/350°F (160°C/315°F fan-forced). Line a large oven tray with non-stick baking paper.
- Combine the butter, caster sugar and brown sugar in a medium bowl and beat with a wooden spoon until smooth and well combined. Add the egg (and vanilla and/or citrus zest if using) and beat with the wooden spoon until the mixture becomes pale, creamy and thickens slightly (this will take 1-2 minutes).
- Sift together the flour (see Baker’s Tips) and bicarbonate of soda (and cinnamon if using). Add to the butter mixture and stir until well combined. Add the chocolate, nuts, Smarties, M&M's and/or caramels and stir to combine evenly.
- Roll 2 level tablespoonfuls (see Baker's Tips) of the cookie dough into balls and place on the lined oven tray about 10cm (4in) apart (see Baker's Tips).
- Bake in preheated oven for 5 minutes. Lift the baking tray on one side and let it fall back onto the oven rack 3 times (see Baker’s Tips). Sprinkle with coconut or finely chopped nuts if using. Bake for 5 minutes longer then lift the baking tray on one side and let it fall back onto the oven rack 3 times again. Bake for a further 5-15 minutes (see Baker’s Tips).
- Cool the cookies on the trays for 5 minutes or until firm enough to transfer to a wire rack to cool completely. Repeat with the remaining cookie dough.
Variation
Brown Butter, Milk Chocolate & Pecan Cookies - Replace the butter with 125g (4½oz) brown butter, cooled but melted. Use 2 teaspoons vanilla essence. Add 100g (3½oz) coarsely chopped milk chocolate and 100g (3½oz) toasted pecans.
Baker's Tips
- Using less flour (185g/6½oz) will mean that your cookies will spread more and be thinner than if you use more flour (225g/8oz).
- To bake smaller cookies, roll 1 tablespoon measure of dough into balls and place on the oven trays at least 7.5cm (3in) apart. Bake as per recipe.
- You can use a small ice-cream scoop to scoop your cookie dough and place it straight onto the oven trays but you will find the cookies will be more evenly shaped if rolled before baking.
- Chilling the balls of dough for 30 minutes before baking will give your cookies more contrast in texture between a softer centre and a more crisp outer edge.
- Banging the trays on the oven racks during baking will give the cookies a ‘crinkled’ appearance once baked and will also be thinner than those that aren’t.
- You can determine the texture of these cookies by adjusting the baking time. 15 minutes will give you a cookie with a soft, chewy centre and crisp outer; 20 minutes will give you a slightly soft centre and crisp outer; while 25 minutes will mean the cookies are crisp all the way through.
- These cookies will keep in an airtight container at room temperature for up to 1 week.
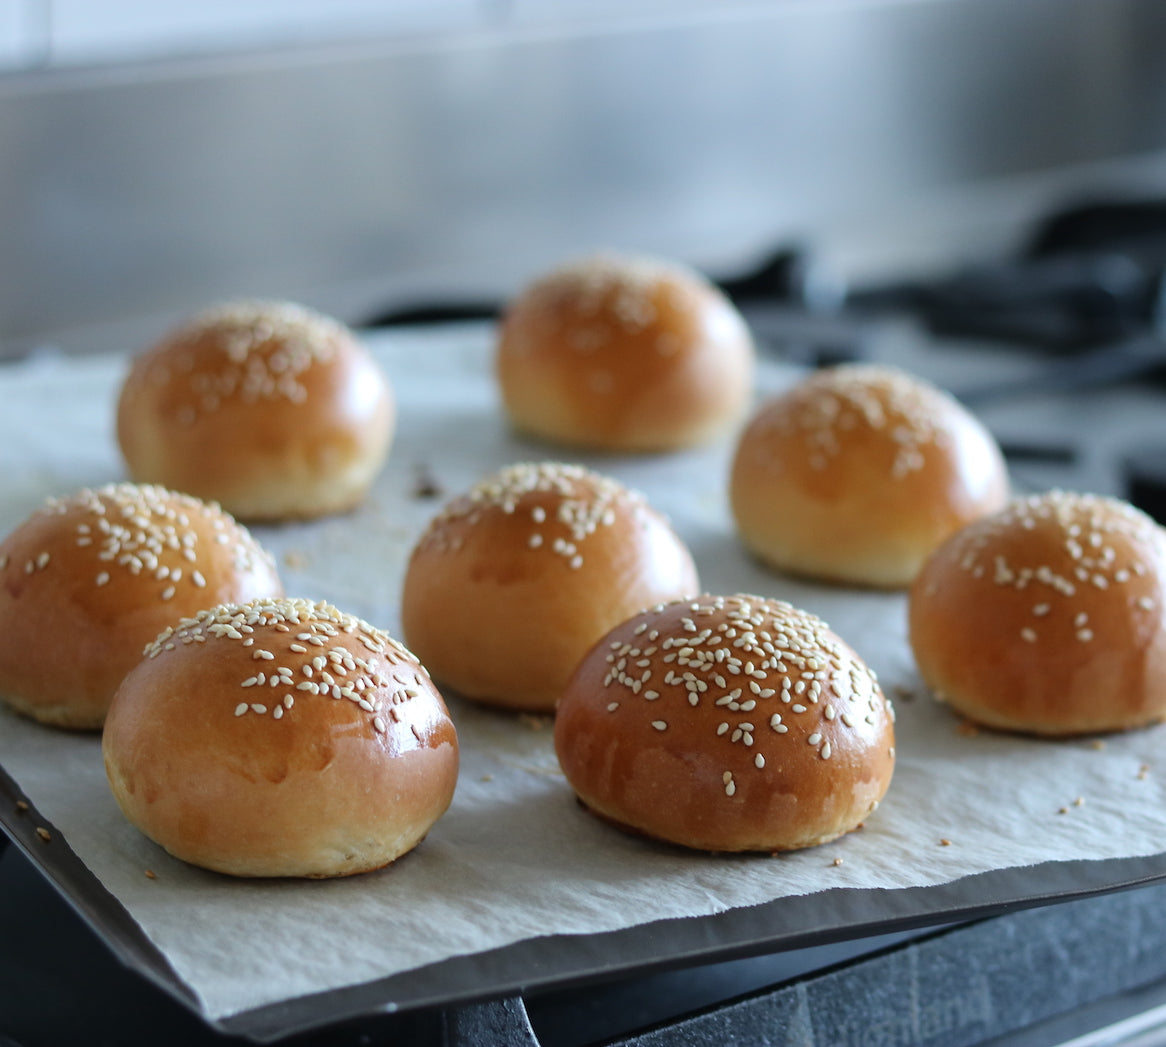
Prep 30min (+ 1hr 30min proving time)Bake 25-30minMakes 16
There is nothing quite like a really good, simple white bread roll. These ones have a lovely soft crumb and a thin crust, perfect (as their name suggests) for dinner or as the Italians do, for breakfast with lashings of butter and jam or cheese.
Ingredients
500g (3⅓ cups) strong bread or pizza flour, plus extra to dust
1 tablespoon caster sugar
1 x 7g sachet instant dried yeast
1 teaspoon salt
375ml (1½ cups) lukewarm water
40g butter, melted and cooled, plus extra to grease
1 egg yolk whisked with 1 tablespoon milk, to glaze
Sesame and/or poppy seeds, to sprinkle
Method
-
Combine the flour, sugar, yeast and salt in a large bowl and make a well in the centre. Combine the water and butter, then add to the flour mixture. Use a wooden spoon and then your hands to mix to a soft dough.
-
Turn the dough onto a lightly floured surface and knead for 8-10 minutes or until it is smooth and elastic and springs back when you push your finger into it.
-
Brush a large bowl with melted butter to grease. Add the dough turning it to coat lightly with the butter. Cover with plastic wrap and place in a warm, draught-free place for 1 hour or until doubled in size.
-
Preheat oven to 200°C (180°C fan-forced). Line two oven trays with non-stick baking paper.
-
Knock back the dough by punching it in the centre with your fist. Turn onto a lightly floured surface and knead for 2-3 minutes or until smooth and elastic. Divide the dough into 16 equal portions. Shape each portion into a ball by rolling it on the bench and place on the lined trays leaving about 5cm between each. Cover with a slightly damp tea towel and set aside in a warm draught-free place for 30 minutes or until well risen.
-
Brush the rolls with the egg wash to glaze, sprinkle with sesame or poppy seeds and then bake in preheated oven for 25-30 minutes, swapping the trays halfway through baking, or until golden and sound hollow when tapped on the base. Transfer to a wire rack to cool.
Variations
- Oval Rolls: In Step 5, roll each portion of dough into an oval shape about 7cm long. Use a small sharp knife to cut a slit, about 1cm deep, along the length of the roll, starting and finishing about 1cm from each end, then continue with the recipe.
- Knot rolls: In Step 5, roll each portion of dough into a sausage shape about 30cm long. Tie into a loose knot and continue with the recipe.
Baker's Tips
- These rolls are best eaten the day they are made however they do freeze well – seal in a freezer bag and freeze for up to 1 month. Thaw at room temperature.

Prep 25min (+1hr 30min proving time)Bake 25minMakes 12
An updated version of the traditional favourite, these hot cross buns are studded with chunks of dark chocolate and tart, dried cherries. They're simply too hard to resist – especially when served warm with lashings of butter!
Ingredients
750g (5 cups/1lb 10½oz) strong bread or pizza (high protein) flour (see Baker's Tips)
55g (¼ cup/2oz) caster sugar
2 x 7g sachets (4 teaspoons) instant dried yeast
1½ teaspoons mixed spice
1½ teaspoons ground cinnamon
1 teaspoon salt
150g (1 cup/5¼oz) dried cherries (see Baker's Tips)
75g (½ cup/2¾oz) currants
435ml (1¾ cups/14¾fl oz) milk
60g (2fl oz) salted butter, cubed, plus extra, to grease and serve
2 eggs, at room temperature
1 teaspoon natural vanilla essence or extract
100g (3½oz) good-quality dark chocolate, chopped
Flour paste
75g (½ cup/2¾oz) plain flour
75ml (2½fl oz) water
Glaze
55g (¼ cup/ 2oz) caster sugar
2 tablespoons water
Method
- Put the bread flour, sugar, yeast, mixed spice, cinnamon and salt in a large bowl and mix to combine. Stir through the dried cherries and currants.
- Heat the milk and butter in a small saucepan over medium heat until the butter has just melted and the milk is lukewarm. Whisk one of the eggs with the vanilla and add to the milk mixture. Whisk to combine. Add to the dry ingredients and use a wooden spoon and then your hands to mix to a soft dough.
- Turn out onto a lightly floured bench top. Knead for 8-10 minutes or until smooth and elastic. Lightly grease a clean large bowl with a little butter, add the dough and turn to coat the dough. Cover with plastic wrap and set aside in a warm, draught-free place for 1 hour or until doubled in volumn.
- Line a large baking tray with baking paper. Punch the centre of the dough down with your fist. Turn onto a lightly floured bench top. Knead for 2-3 minutes or until smooth. Knead in the chocolate until evenly combined. Divide the dough into 12 equal portions. Roll each portion into a ball and place on the tray, allowing a little room for spreading. Cover with a damp tea towel and set aside in a warm, draught-free place for 30 minutes or until almost doubled in size.
- Preheat the oven to 180°C/350°F (160°C/315°F fan-forced). Meanwhile, make the Flour Paste. Combine the flour and water in a bowl and beat with a wooden spoon until smooth. Spoon into a small, good-quality snap-lock bag and seal.
- Whisk the remaining egg and brush the tops of the buns with it. Snip a small hole in the corner of the snap-lock bag containing the Flour Paste and pipe crosses on the buns.
- Bake in the preheated oven for 25 minutes or until the buns are cooked and sound hollow when tapped on the base.
- Meanwhile, make the Glaze. Combine the sugar and water in a small saucepan over medium heat and stir until the sugar dissolves. Bring to a simmer and simmer for 1 minute. Transfer the hot cross buns to a wire rack and brush the tops with the glaze. Serve warm, spread with butter.
Baker's Tips
- Bread and pizza flour (also known as 'strong' flour) has a higher gluten content than regular plain flour. This type of flour is more suited to use in yeast-based bread recipes like these buns and will give you a better final texture (the resulting bread will be more 'bread-like' with a slightly chewy texture rather than a fine, cake-like texture). Look for a protein content of around 11-13 percent for the best results with this recipe.
- Dried cherries are available at selected supermarkets, delicatessens, grocery shops and specialty food stores. You can replace them with good-quality dried cranberries.
- These hot cross buns are best eaten the day they are made although they will freeze well. To freeze, wrap in plastic wrap and then seal in an airtight container or freezer bag and freeze for up to 3 months. Thaw them at room temperature or split while still frozen and toast.
Recipe from BakeClass by Anneka Manning (Murdoch Books).
Photography by Alan Benson.
Prep 20min (+2hr cooling time)
Bake 30-35minMakes 15
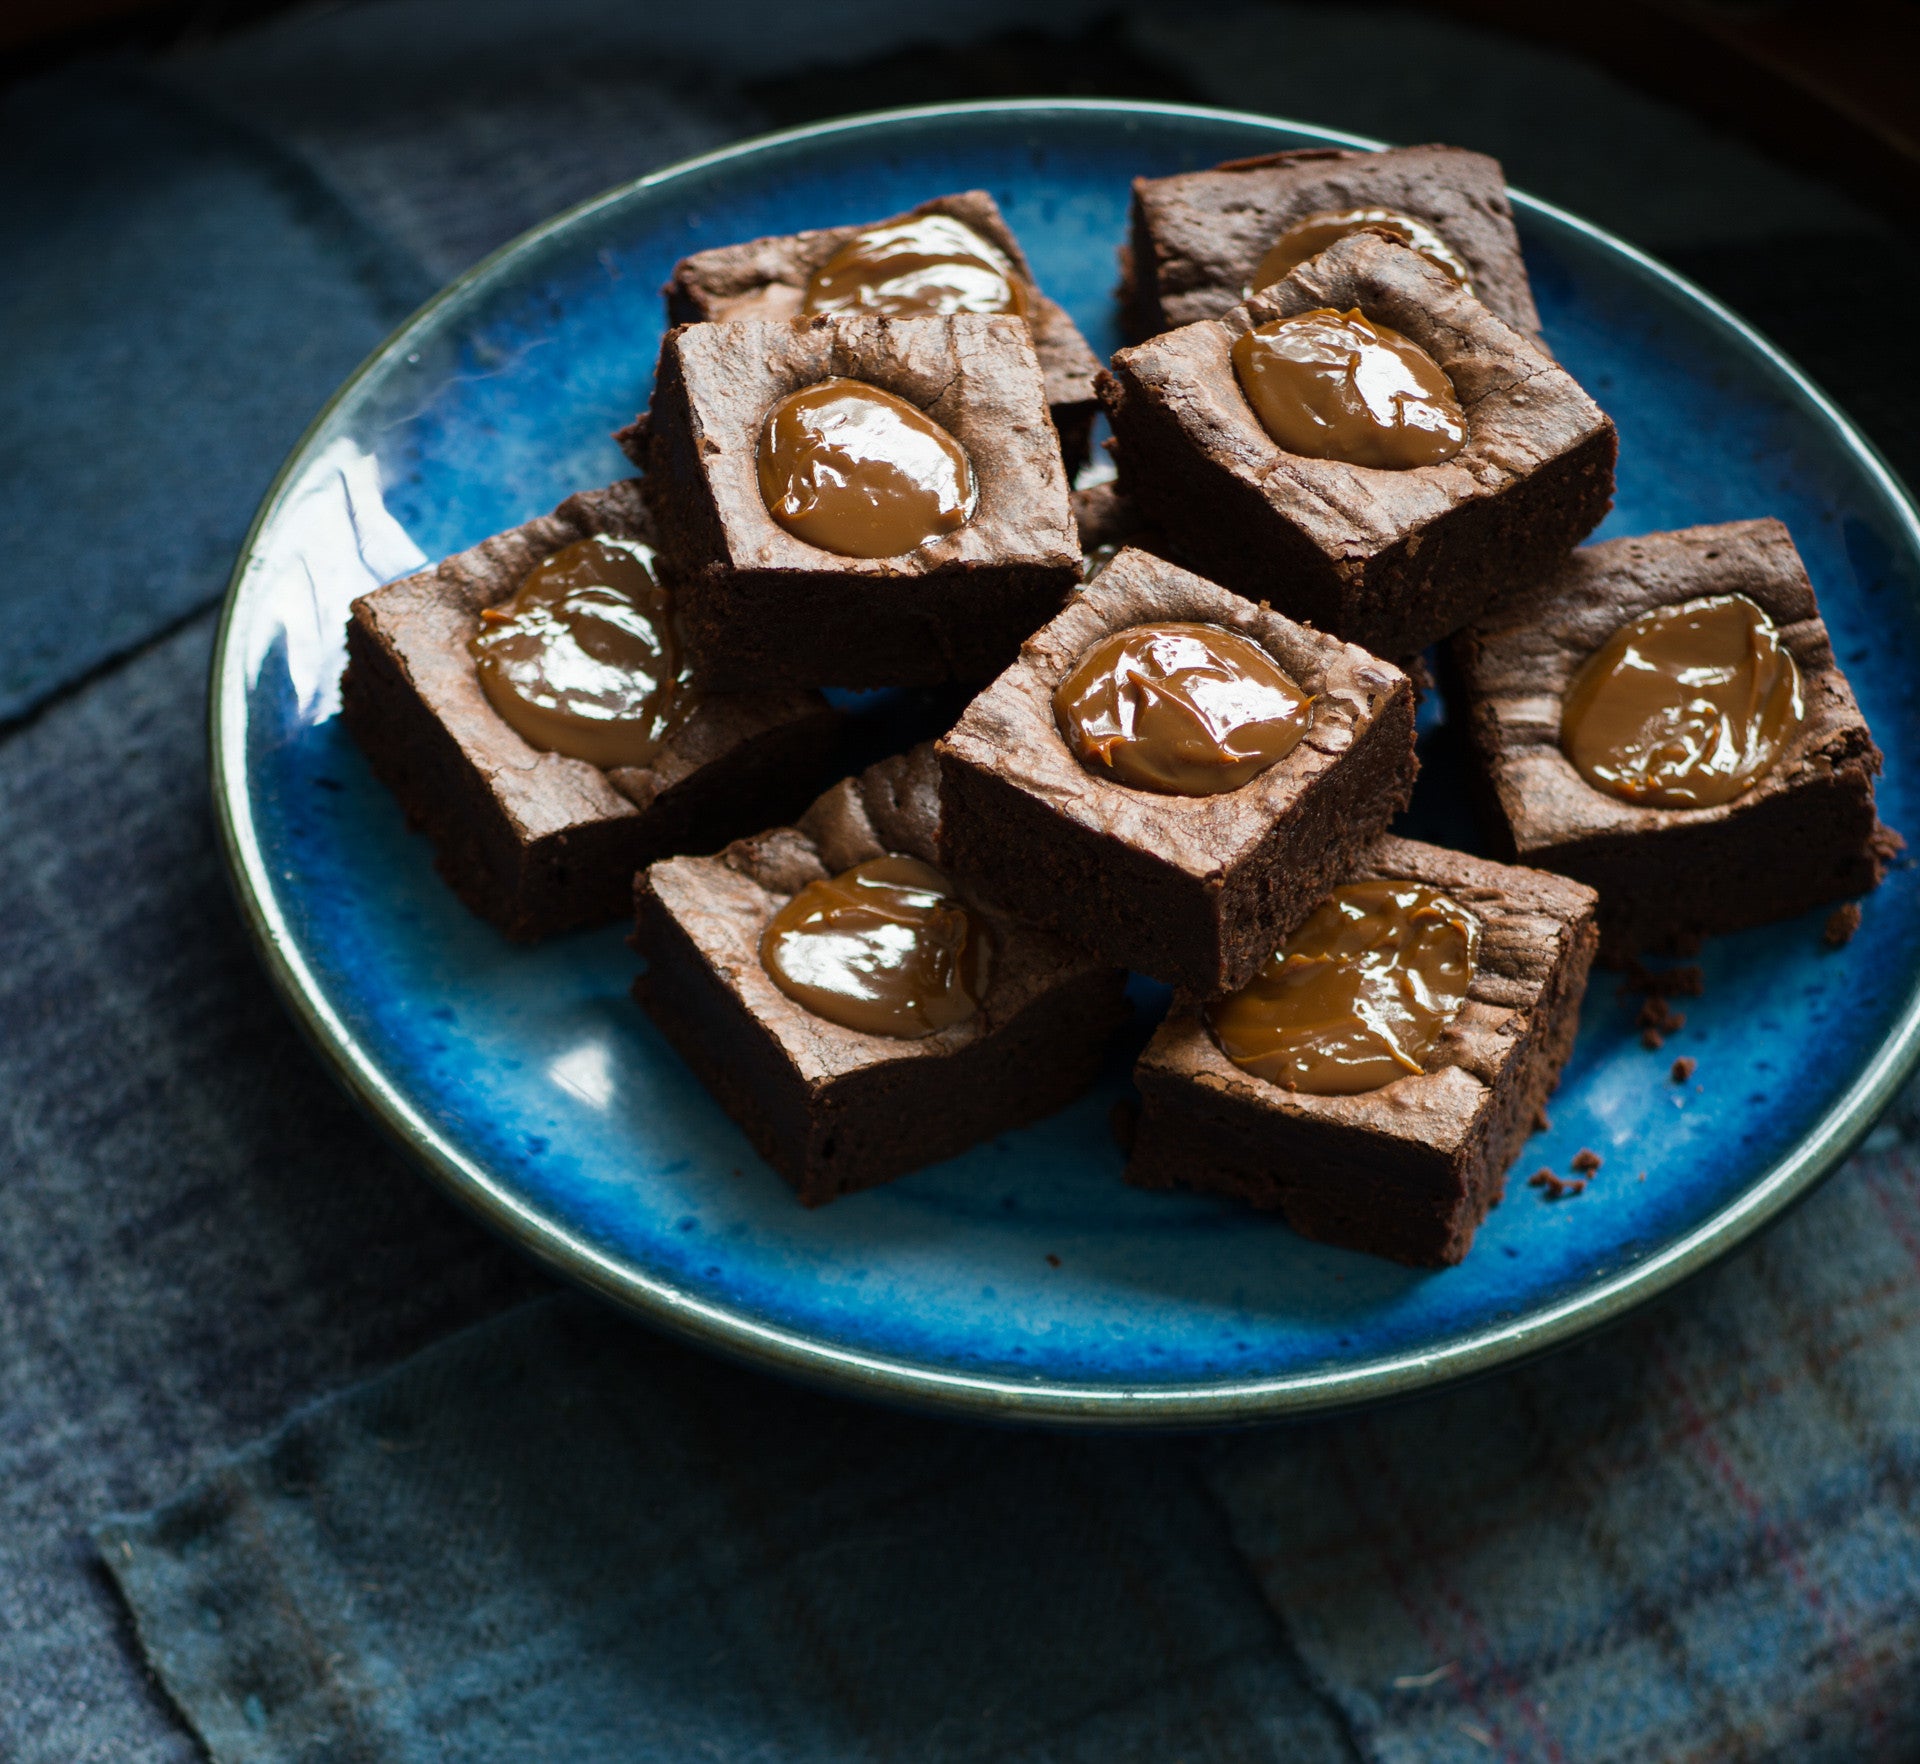
Brownie lovers, take note: with every portion holding its very own generous dollop of dulce de leche, this is the brownie you have been searching for all your life! For a particularly wicked dessert, serve it drizzled with warmed extra dulce de leche and topped with a generous scoop of vanilla ice-cream.
Ingredients
Melted butter, to grease
250g (9oz) good-quality dark chocolate (45-54% cocoa), chopped
200g (7oz) salted butter, cubed
3 eggs, at room temperature, lightly whisked
165g (¾ cup, firmly packed/5¾oz) brown sugar
1½ teaspoons natural vanilla essence or extract
110g (¾ cup/4oz) plain flour
30g (¼ cup/1oz) cocoa powder
½ teaspoon baking powder
250g (9oz) jar dulce de leche
Cocoa powder or icing sugar (optional), to sprinkle
Method
- Preheat oven to 160°C/315°F (140°C/285°F fan-forced). Grease a 16cm x 26cm (6¼in x 10½in) shallow slice tin with melted butter and line the base and long sides with one piece of baking paper.
- Place the chocolate and butter in a medium heatproof bowl over a saucepan of gently simmering water (don't let the base of the bowl touch the water). Stir occasionally until chocolate and butter melt and the mixture is smooth. Remove bowl from saucepan and set aside.
- Use an electric mixer with a whisk attachment to whisk the eggs and sugar until thick and pale. Add the melted chocolate mixture and vanilla and whisk to combine.
- Sift together the flour, cocoa powder and baking powder. Add to chocolate mixture and whisk on low speed until just combined. Pour mixture into prepared tin and spread evenly with the back of a spoon.
- Dot the brownie mixture with spoonfuls of the dulche de leche, dividing evenly. Tap the tin on the benchtop to settle the mixture. Bake in preheated oven for 30-35 minutes or until moist crumbs cling to a skewer inserted in the brownie part. Remove from the oven and cool in tin on a wire rack (this will take about 2 hours).
- Remove brownie from the tin using the baking paper to lift it out. Cut into portions and sprinkle with cocoa powder or icing sugar to serve, if desired.
Baker's Tip
- These brownies will keep in an airtight container in the fridge, for up to 5 days. Serve at room temperature.
Photography by Alan Benson.
Prep 30min (+2hr cooling and overnight chilling time)Bake 45-50minMakes 8-10 serves
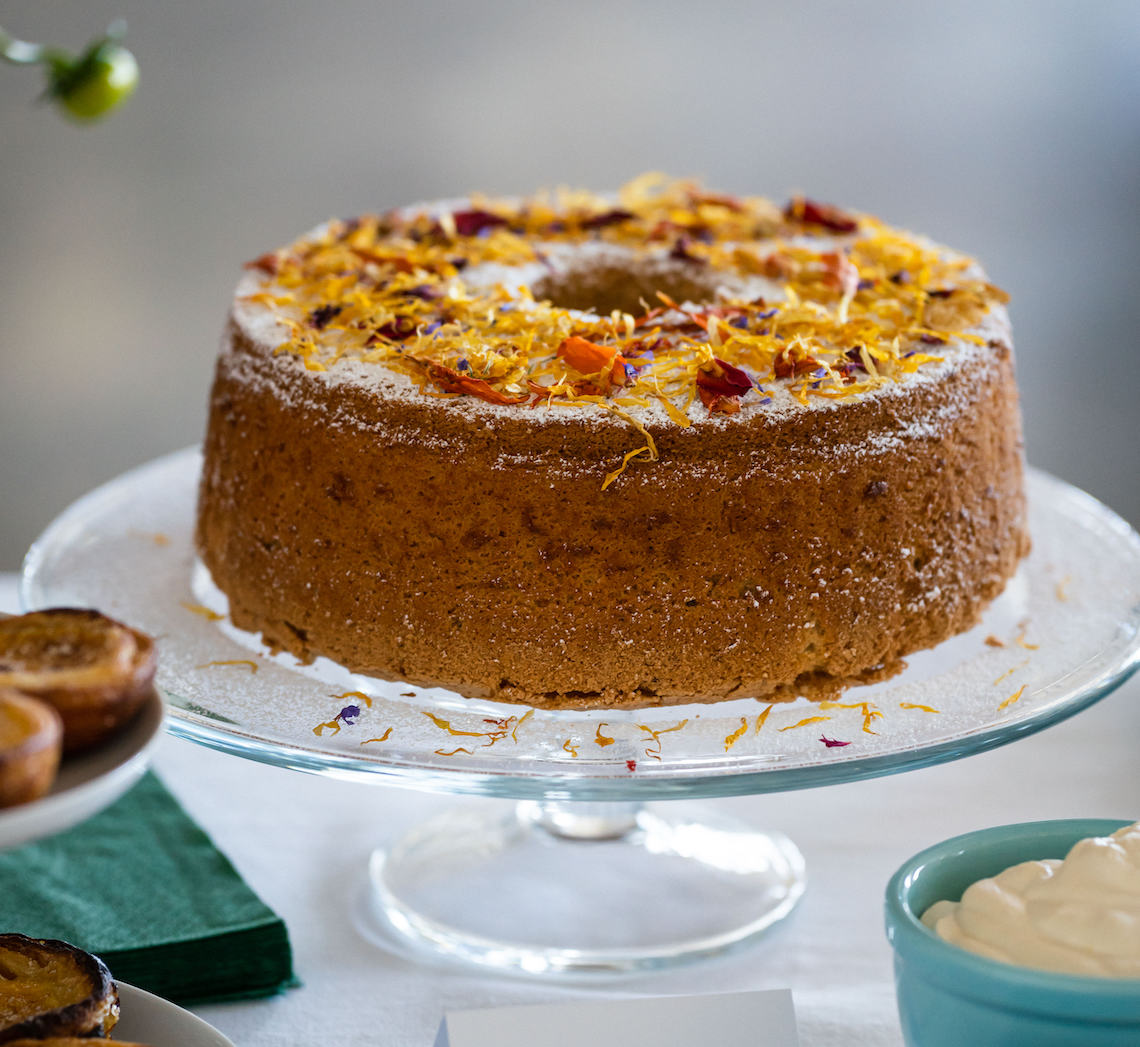
Created by Make Me a Baker student Jenny Wong for her graduation, this gorgeous cake is 'tea time' in a cake bringing together orange-scented chiffon cake and the subtle floral notes of French Earl Grey tea. And to make it complete, it's served with an Earl Grey tea-infused whipped cream and, of course a cup of freshly brewed French Earl Grey tea.
You will need a 21cm (base measurement) specialty angel food cake tin (basically a deep ring tin with a removable base and small 'feet' around the top rim) to make this recipe and they are available from specialty kitchenware stores. The key to achieving the classic feather-like texture of a chiffon cake is to make sure you leave it suspended in the inverted tin until cooled completely so that it doesn’t compress as it cools.
Ingredients
- 6 x T2 French Earl Grey tea bags
- 160ml ( ⅔ cup) boiling water
- 185g (1¼ cups) self-raising flour
- 30g (¼ cup) cornflour
- 1 teaspoon cream of tartar
- ½ teaspoon salt
- 6 x 59g eggs, at room temperature, separated
- 200g caster sugar, plus 110g (½ cup) extra
- 2 teaspoons finely grated orange zest
- 1 teaspoon natural vanilla essence or extract
- 100ml vegetable oil
- Icing sugar, to dust
- Dried edible flowers, to decorate (optional) (see Baker's Tips)
Earl Grey Whipped Cream
- 125ml (½ cup) full-cream milk
- 4 x T2 French Earl Grey tea bags
- 300ml thickened cream
- 1 ½ teaspoons finely grated orange zest
- 1 ½ teaspoons natural vanilla essence or extract
Method
- To make the Earl Grey Whipped Cream, place the milk and tea bags in a small saucepan and heat over medium heat until hot but not boiling. Remove form the heat and allow to cool. Transfer to a container or bowl, cover and place in the fridge to chill (preferably overnight).
- Preheat oven to 180°C (160°C fan-forced). Place an ungreased 21cm (base measurement) angel food cake tin on an oven tray.
- Place the tea bags in a jug, pour the boiling water over and set aside to infuse until the water is warm.
- Sift the flour, cornflour, cream of tartar and salt onto a piece of baking paper twice.
- Use an electric mixer with a whisk attachment to whisk the egg yolks and 200g caster sugar on high speed until thick and pale. Whisk in the orange zest and vanilla.
- Squeeze the tea bags to extract as much flavour as possible into the warm tea-infused water and measure 125ml ( ½ cup) - it should be dark in colour and very fragrant.
- Combine the warm tea and oil. Add the oil mixture to the egg mixture and whisk on low speed until well combined, scraping the side and the base of the bowl if necessary. With the motor running on low speed, add the flour mixture all at once and whisk gently until just combined. Transfer the mixture to a separate large bowl and set aside. Clean and dry the whisk and mixing bowl.
- Use the electric mixer with the whisk attachment to whisk the egg whites on medium-high speed until soft peaks form. Add the remaining 110g caster sugar and whisk until thick and glossy and the sugar has dissolved. Add about a third of the egg whites to the yolk mixture and use a large metal spoon or spatula to fold through until well combined. Add the remaining egg white mixture and fold until just combined.
- Spoon the mixture into the ungreased tin and gently smooth the surface with the back of a metal spoon. Bake in the lower third of the preheated oven for 45-50 minutes or until well risen, golden, and a skewer inserted into the cake comes out clean.
- Immediately turn the cake upside down on a wire rack and set aside, still in the tin so it is suspended, for 2 hours or until it is completely cool – don’t be tempted to remove it while still warm (see Baker's Tips).
- To finish the Earl Grey Whipped Cream, squeeze the tea bags to extract as much flavour as possible and then measure 60ml (1/4 cup) of the milk – it should be a pale Masala Chai colour and very fragrant. Use a balloon whisk the cream in a medium bowl until soft peaks form. Add the orange zest and vanilla and then whisk in the chilled Earl Grey-infused milk until soft peaks form again. Cover and chill until serving.
- Carefully run a small palette knife around the side of the tin to release the cake. Invert the cake onto a serving plate or cake stand, and gently shake the tin to release the cake. Then use the palette knife to release the cake from the base of the tin and remove (see Baker's Tips). Serve dusted liberally with icing sugar and edible flowers (if using), and accompanied by the Earl Grey Whipped Cream.
Baker's Tips
- The key to the classic light-as-air texture of a chiffon cake is to suspend the baked cake in an inverted tin until it cools completely so that the crumb texture doesn’t compress as it cools. That is why it is so important that the tin isn't greased or lined so that the cake sticks to the tin and that it doesn't fall out of the tin during cooling. However, because of this, once cooled you will need to carefully release it by running a small palette knife between the cake and the tin. You won’t get a perfect looking crust, but this will be overlooked as the result will be a beautifully airy crumb texture that can’t be achieved without using this technique.
- This cake is best cut with a sharp knife using a sawing action.
- This cake will keep for up to 2 days in an airtight container at room temperature but is best eaten on the day it is made.
- Jenny used sun-dried organic edible flowers from Percaya Farm
$100.00/pp
more info- Products -
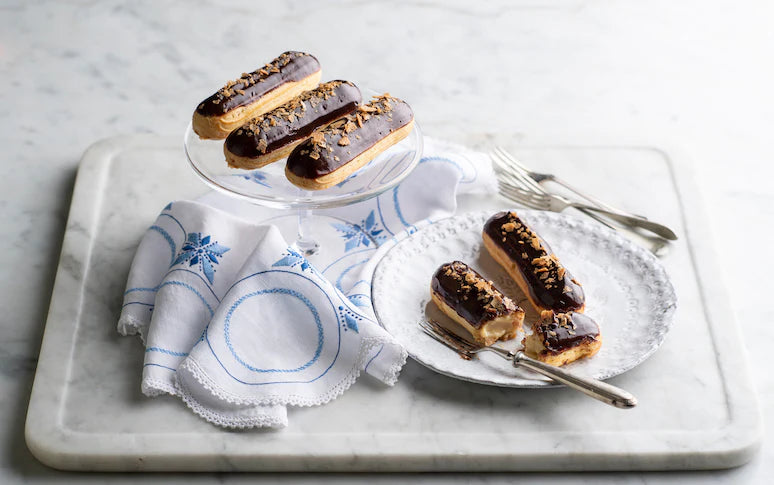
Éclairs is a self-paced online course which will cover the ins and outs of making éclairs, from perfect choux pastry to stunning decorations.
You will bake the most delicious eclairs you’ve ever had – in your own home!
Jessica, Sydney
Learn to create stunning classic éclairs – right in your very own kitchen!
Éclairs is an online course where you will learn everything you need to know to make to-die-for éclairs – in your own time, at your own pace – all from your own home kitchen!
Made up of a combination of demonstration videos, printable recipes and invaluable resources that you can study at your own pace, this fun and accessible course will cover all things éclairs from perfect choux pastry and luscious fillings, to stunning glazes and decorations. Not only will you learn how to bake three gorgeous base recipes, but also included is a comprehensive guide to different flavour combinations which will have you experimenting with a variety of fillings, icings and decorations.
The series of videos included in this course come from a recording of a fun and informative online session hosted by Anneka Manning. An enthusiastic group of bakers baked along with Anneka as she demonstrated and explained step-by-step the technique of making Choux Pastry (Pâte à Choux) and Classic Chocolate Éclairs. The videos also include all of Anneka's practical hints, tips and tricks as well as on-the-spot troubleshooting and invaluable question and answer sessions.
At the end of this course, you will come away not only with new-found confidence but all the knowledge and skill you need to create stunning, mouth-watering eclairs whenever the mood strikes!
How to enrol
Éclairs is a self-paced course and is now open for enrolment.
To have someone of Anneka’s calibre virtually in my kitchen was invaluable and well worth the time and cost ... Just enrol and do it. You will not be disappointed.
Carole, online class student
Cost
$100
Who is this class suitable for?
This class is, quite simply, suitable for everyone – from beginners to more experienced bakers who want to brush up on their choux and éclair-making skills. As this class is completed online, it is suitable for students from all over the world.
What will I get?
- Instructional videos and downloadable resources and recipes that will take you through the entire process of making your own éclairs
- A handy printable template to help guide you when piping your éclairs
- Membership to BakeClub's exclusive The Kitchen Table online group
- Access to Anneka's 35+ years of baking experience and knowledge through The Kitchen Table and the ability to ask any baking-related questions
- A thorough understanding of how to make éclairs and how to apply what you’ve learnt to be able to troubleshoot in the future and ensure baking success
- Lifetime access to the videos and course material
- A chance to (virtually) meet like-minded people and share your baking with The Kitchen Table online group
- Baking confidence, knowledge and skill to use regularly at home
What will I learn?
- Essential equipment needed for eclair making
- The importance of balancing your ingredients when making choux pastry
- Making choux pastry by hand and with a stand mixer
- How to tell when your choux is ready to be piped
- Piping techniques (including the best piping tips to use) for good-looking, evenly shaped éclairs
- How to achieve well 'puffed' éclairs
- Filling options including pastry cream (crème pâtissière), creme diplomat (crème diplomate) and chantilly cream
- Different techniques for filling your éclairs including both 'hidden' and 'visible' fillings
- Icing options including chocolate glazes and glacé icings
- How to get the best glaze finish on your éclairs and decorating inspiration
- How to store and freeze your éclairs
How does a self-paced course work?
This online course is completely self-guided. Upon enrolment, you will gain access to the course content which you can work through at your own pace. You can log on whenever it is convenient for you and watch the video and bake the recipes entirely in your own time. You will have lifetime access to all the recipes, videos and printable information sheets.
There is the option to connect with Anneka and other bakers via Facebook through BakeClub's exclusive The Kitchen Table membership groups. This way you can share your experience and support each other as your confidence and skills grow.
If you are interested in joining a future LIVE class, please fill out your details below and we will be in touch when new dates are released.

Prep 20minBake 17-20minMakes about 24
Ingredients
1 quantity Shortcrust Pastry, divided into 2 portions before wrapping and chilling
Filling
1½ rashers bacon, trimmed and finely choppedMethod
- With a lightly floured rolling pin, roll out one portion of pastry on a lightly floured surface until about 2mm thick. Use a 7cm round cutter to out 12 circles and then carefully ease them into an ungreased 12-hole mini (1½ tablespoon capacity) muffin tray, pleating the pastry 4-5 times to help shape it. Repeat with the remaining pastry and another 12-hole mini muffin tray to make 24 tartlet cases in total. Use a fork to prick the base of each tartlet case twice. Place the muffin trays in the freezer for at least 30 minutes or until ready to bake.
- Preheat oven to 200°C (180°C fan-forced).
- Meanwhile, to make the filling, cook the bacon in a non-stick frying pan over medium heat for 5 minutes, stirring occasionally, or until starting to crispen. Transfer the bacon to a medium bowl and add the cheese and parsley. Whisk together the egg and cream, add to the bacon mixture and stir with a fork to combine. Season with pepper.
- Bake the unfilled frozen tartlet cases straight from the freezer in preheated oven for 12 minutes or until golden.
- Use a teaspoon to fill each pre-baked tartlet case with a small amount of the the filling, making sure you get a good amount of the bacon, cheese and egg mixture in each. Return to the oven and bake for 5-8 minutes or until the filling is just set.
- Serve warm or at room temperature garnished with a tomato slice, if desired.
Baker's Tips
- You can make these tartlets up to 2 days ahead of serving. Cool and then store in an airtight container in the fridge. Place the tartlets back in the tins before reheating in an oven preheated to 160°C (140°C fan-forced) for 10 minutes or until heated through.
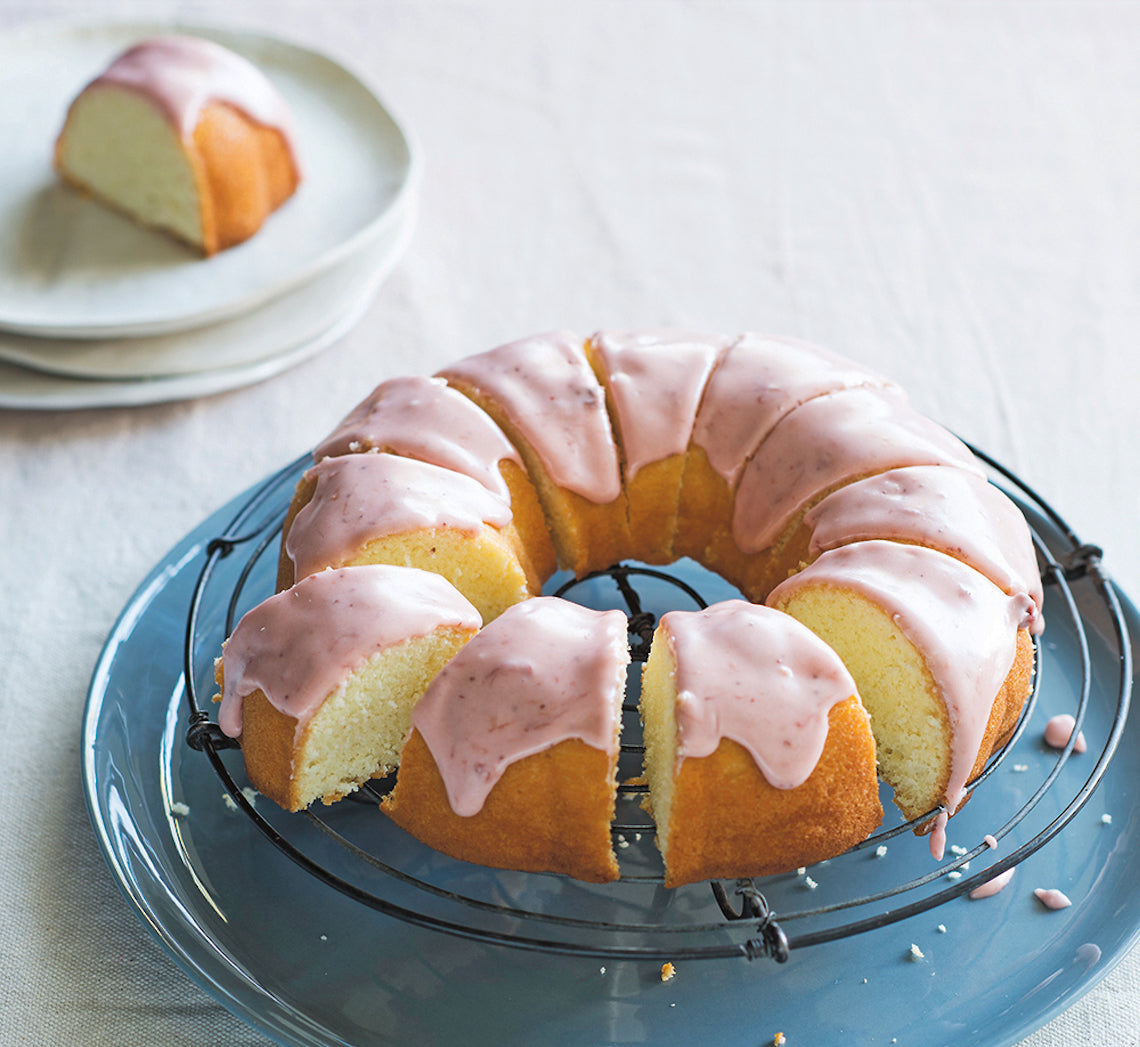
Prep 20min (+ 1hr cooling and 40min standing time)Bake 30minMakes 10 serves
This cake really seems to have its method all mixed up but I promise you it works – and works beautifully, at that!
Ingredients
Melted butter, extra, to grease
220g (1 cup) caster (superfine) sugar
150g (1 cup) plain (all-purpose) flour
1½ tablespoons cornflour (cornstarch)
1 teaspoon baking powder
6 egg whites, at room temperature
100g unsalted butter, melted and cooled
Strawberry icing
125g (1 cup) pure icing (confectioners') sugar
1½ tablespoons smooth strawberry jam
2–2¼ teaspoons water
Method
- Preheat the oven to 180°C (160°C fan-forced). Brush a 2.5 litre (10 cup) capacity fluted ring (bundt) tin with melted butter to grease.
- Sift together the sugar, flour, cornflour and baking powder.
- Use an electric mixer with a whisk attachment to whisk the egg whites on medium or medium–high speed in a clean dry bowl until soft peaks just form.
- Sift the dry ingredients again over the egg whites and use a large metal spoon or spatula to fold until just combined. Pour over the melted butter and fold in until just combined.
- Pour the mixture into the greased tin and smooth the surface with the back of a spoon. Bake in the preheated oven for 30 minutes, or until a skewer inserted in the cake comes out clean. Leave the cake to stand in the tin for 10 minutes before turning out onto a wire rack to cool for about 1 hour.
- To make the Strawberry icing, sift the icing sugar into a medium bowl. Combine the jam and 2 teaspoons of the water, add to the icing sugar and stir until smooth and a thick coating consistency, adding the remaining ¼ teaspoon water if needed.
- Spoon the icing over the cooled cake, allowing it to dribble down the sides. Set aside for about 30 minutes, or until the icing is set. Serve in slices.
Baker's Tips
- This cake will keep in an airtight container at room temperature for up to 3 days.
- You can replace the strawberry jam with another jam of your choice – blackberry, raspberry and plum all work well.
Prep 40min (+ 30min cooling time)Bake 30minMakes 8-10 serves
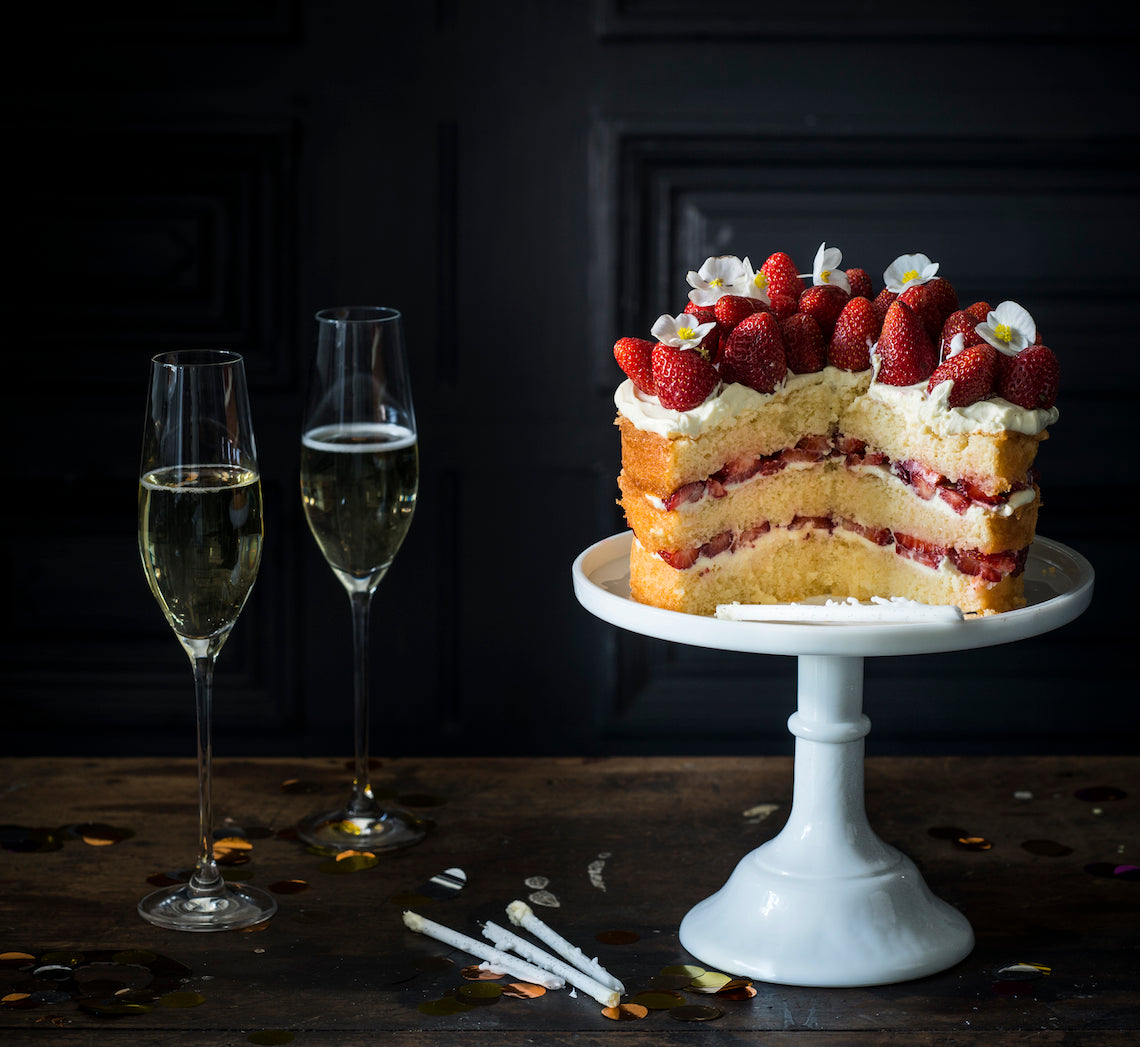
If there ever was a cake that epitomised the flavours of England this would be it! The combination of elderflower, strawberries and gin not only make this chic sponge cake uniquely special but also incredibly lust-worthy.
Ingredients
250g ripe strawberries, hulled and sliced
500g small ripe strawberries, to serve
icing sugar, to dust
fresh elderflowers (optional), to decorate (see Baker’s Tips)
Mascapone cream
185ml pure (thin/pouring) cream
250g mascarpone
2 tablespoons undiluted elderflower cordial /drink concentrate, or to taste
Sponge layers
Melted butter, to grease
4 fresh eggs, at room temperature
1½ teaspoons natural vanilla essence or extract
165g (¾ cup) caster sugar
60ml (¼ cup) milk
30g butter, diced
110g (¾ cup) self-raising flour
30g (¼ cup) cornflour
Elderflower and gin syrup
165ml (¾ cup) undiluted elderflower cordial /drink concentrate
60ml (¼ cup) strained fresh lemon juice
80ml (⅓ cup) gin
Method
- To make the sponge layers, place the oven rack in the oven so that the cake tins will sit in the middle of the oven and then preheat it to 180°C (160°C fan-forced). Brush three 18cm non-stick springform tins with a melted butter to grease.
- Use an electric mixer with a whisk attachment on medium-high speed to whisk the eggs and vanilla in a large bowl until frothy. Add the sugar a spoonful at a time, whisking well between each addition, until the mixture is very thick and pale and the sugar has dissolved (this will take about 8 minutes). Lift the whisk out of the mixture and slowly draw a figure eight, if the trail stays on the surface long enough for you to finish drawing then the mixture is ready. If not, continue to whisk for a further minute and then test again.
- Meanwhile, heat the milk and butter in a small saucepan over medium heat until the butter melts and mixture is almost simmering. Remove from the heat. Pour the hot milk mixture down the side of the bowl then quickly sift the flour and cornflour together over the whole surface of the egg mixture. Immediately whisk briefly again with the electric mixer on low speed, until the flour mixture is just incorporated (make sure there is no flour caught at the bottom of the bowl and be careful not to overmix).
- Divide the mixture evenly between the cake tins and gently tap the tins on the bench top three times to settle the mixture. Bake in preheated oven for 15 minutes or until the cakes are a pale golden colour, spring back when lightly touched in the centre and start pulling away from the sides of the tins. Remove from the oven and stand for 1 minute before turning onto a wire rack over a tray, top side up.
- Meanwhile, to make the Elderflower and gin syrup combine the elderflower cordial /drink concentrate and lemon in a small saucepan and heat over medium heat until hot but not simmering. Remove from heat and stir through the gin.
- Use a skewer to prick the warm sponge layers all over. Gradually pour the hot syrup over the warm cake, allowing it to soak in. Set aside to cool completely (this will take about 30 minutes).
- When ready to assemble, use a hand-held electric mixer with a whisk attachment or a balloon whisk to whisk the cream in a medium mixing bowl on medium-low speed until soft peaks form. Add the mascarpone and elderflower cordial /drink concentrate and whisk on low speed briefly until just combined and thickened to a medium whipped cream consistency. Place one layer of the sponge on a serving plate or cake stand and dollop a third of the mascarpone cream evenly over the top. Use the back of a metal spoon to gently spread the cream from the centre of the cake towards the outside to cover, leaving about a 1cm border around the edge. Then top with half the sliced strawberries. Top with another sponge layer, half of the remaining cream and remaining sliced strawberries. Top with the remaining sponge layer and spread with the remaining cream. Decorate with the whole strawberries.
Baker's Tips
- I used white Waxed Leaf Bergonias to decorate this cake.
- This cake can be assembled about 2 hours before serving. Stand at room temperature in a cool spot.
- The sponge cake layers will keep in airtight container, divided by baking paper, at room temperature for up to 2 days.
How to cut a multi-layer sponge cake
Cakes with multiple layers, especially those made up of various textures such as sponge cakes, can be tricky to cut the traditional way – cutting downwards often squashes the cake, causing the softer filling to ooze unevenly out the side and leaving you with an unsightly mess.
The trick to avoid this, is to use a sharp serrated knife that has a pointed end and is at least the length of the height of the cake.
Insert it into the centre of the cake vertically and use a gentle, slow sawing action to cut the cake. The layers will miraculously stay intact as each slice is cut and removed from the cake.
This recipe is from Anneka's SBS Food online column Bakeproof: Celebration Cakes. Click here for more Bakeproof columns and recipes.
Photography by Alan Benson.
Prep 50min (+10min cooling, 15min chilling and 2hrs proving time)Bake 30minMakes 12 serves
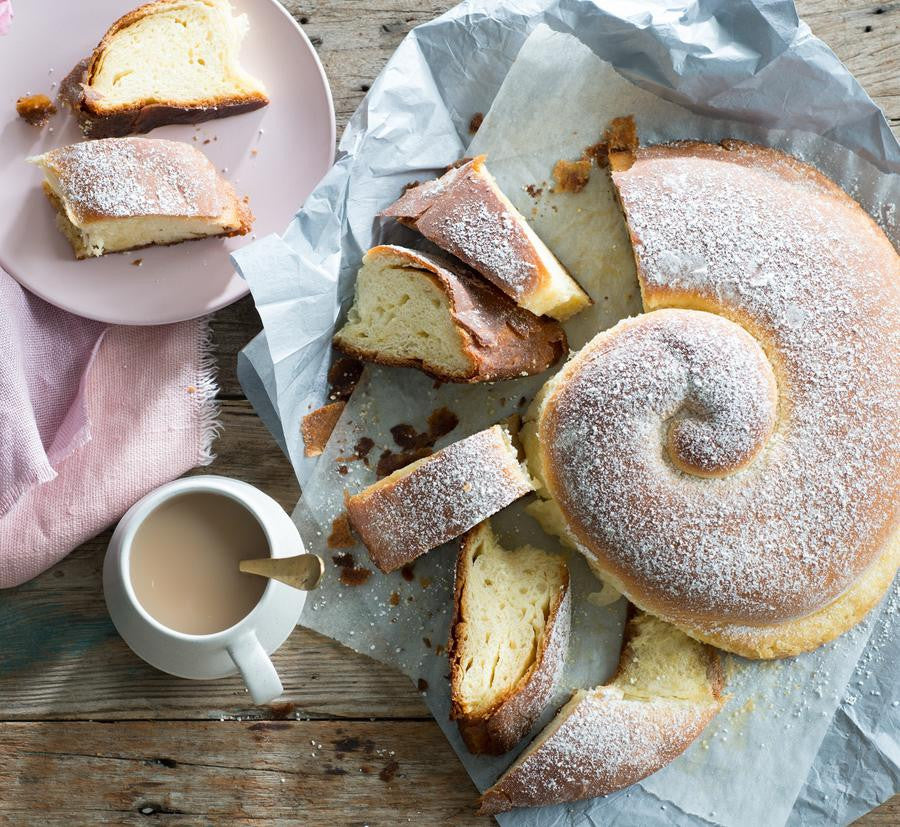
This amazing Spanish bread is reminiscent of the croissant from neighbouring France – traditionally layered with lard (although I make mine with butter) this brioche-like bread has a wonderful flakiness and rich buttery flavour that is simply too hard to resist. Originally from the Isle of Mallorca it is traditionally served at festivals and celebrations such as Easter however, these days, it is often found on the breakfast table – trust me, it really is too good to keep for special occasions!
Ingredients
200ml (7fl oz) lukewarm milk
1 x 7g sachet (2 teaspoons) instant dried yeast
110g (½ cup/4oz) caster sugar
2 eggs, at room temperature
450g (3 cups/15¾oz) strong bread or pizza (high-protein) flour, plus extra to dust (see Baker's Tips)
¼ teaspoon fine salt
Melted butter, to grease
200g (7oz) salted butter, cubed, softened (see Baker’s Tips)
Icing sugar, to dust
Method
- Combine the milk, yeast and 1 teaspoon of the sugar in a jug. Stir to combine and set aside in a warm draught-free place for 5 minutes or until frothy. Add the eggs and use a fork to whisk to combine.
- Combine the flour, remaining sugar and salt in the bowl of a stand mixer. On low speed gradually add the milk mixture and knead with a dough hook. Continue to knead on low speed for 6-8 minutes or until the dough is smooth and elastic.
- Brush a medium bowl with melted butter to grease. Place the dough in the bowl, turning it to coat lightly with the butter. Cover with plastic wrap and place in a warm, draught-free place for 1 hour or until doubled in volume.
- Line a large oven tray with non-stick baking paper.
- When the dough has doubled in size knock it back by punching it in the centre with your fist. Turn onto a lightly floured surface and knead for 1-2 minutes or until it returns to its original volume.
- Use a lightly floured rolling pin to roll out the dough on a lightly floured surface to a 45cm/18in square. Working quickly, use a palette knife to carefully spread the butter all over the dough to cover evenly, leaving a 2cm/¾in border. Roll up the dough into a roll to enclose the butter and then press the ends to seal. With an end closest to you, gently roll out the dough again to a rectangle about 60cm/24in long and 15cm/6in wide, dusting the dough with a little flour if the butter breaks through. Starting from a long end, roll up the dough again to form a long roll.
- Loosely coil the roll onto the lined baking tray. Cover with a slightly damp tea towel and chill for 15 minutes. Remove form the fridge and set aside in a warm draught-free place for 1 hour or until well risen.
- Preheat oven to 180°C/350°F (160°C/315°F fan-forced).
- Bake the Ensaïmada in preheated oven for 30 minutes or until cooked through and golden. Place the baking tray on a wire rack and set aside on the tray for at least 10 minutes to cool slightly before serving warm or cool completely. Serve dusted liberally with icing sugar.
Baker's Tips
- The butter for this recipe needs to be soft enough to spread but not so soft that is starts melting when you spread it.
- This bread is best eaten on the day it is made but will keep in an airtight container for up to 2 days.
This recipe is from Anneka's SBS Food online column Bakeproof: Easter Treats. Click here for more Bakeproof columns and recipes.
Photography by Alan Benson.


