
- home
- BAKERECIPES
BakeRecipes
Bringing real baking into your home with deliciously simple recipes.

Prep 30minBake 25-30minMakes 10
There’s something deeply comforting about a classic Anzac biscuit – but this version takes it somewhere truly special. By browning the butter first, you unlock a rich, nutty depth that weaves through every bite, enhancing the caramel notes of the sugars and golden syrup. The result is a beautifully balanced biscuit: generously sized, with crisp golden edges, and a slightly soft, chewy centre. It’s a simple twist, but one that transforms a familiar favourite into something a little more indulgent and irresistible.
Ingredients
150g (1 cup/5¼oz) plain flour
120g (1¼ cups/4¼oz) rolled oats (see Baker's Tips)
65g (¾ cup/2¼oz) desiccated coconut
110g (½ cup, firmly packed/4oz) brown sugar
75g (⅓ cup/2¾oz) caster sugar
160g (5¾oz) salted butter, diced
2 tablespoons golden syrup
2 tablespoons (40ml/1⅓fl oz) water
1 teaspoon bicarbonate of soda
1 teaspoon natural vanilla essence or extract
Method
- Preheat oven to 160°C/315°F (140°C/285°F fan-forced). Line 2 large oven trays with baking paper.
- Put the flour, rolled oats, coconut, brown sugar and caster sugar in a large mixing bowl and stir to combine.
- To make the brown butter, place the butter in a small saucepan or frying pan. Heat over medium-low heat until the butter melts and starts to bubble and sizzle. Continue to cook gently over medium-low heat until the butter goes quiet and starts to foam, and the milk solids start to turn a golden brown. During cooking it’s important to stir frequently (a wooden spoon, spatula or whisk will all work well) at the start and then constantly towards the end so that the butter browns evenly and the milk solids don’t get caught on the base of the saucepan and burn. Once the milk solids have turned a deep golden brown and you notice a nutty aroma, remove immediately from the stove and pour the butter into a heatproof bowl – this will stop the butter from browning further and prevent it from becoming bitter.
- Add the golden syrup and water to the hot browned butter and stir to combine. Add the bicarbonate of soda and stir to combine – this mixture will foam. Add to the dry ingredients and stir with the wooden spoon until well combined.
- Roll large spoonfuls of the mixture (75g/2¾oz each) into balls and place 5 on each of the lined trays, allowing plenty of room between them for spreading. Use your fingers to flatten the balls until about 1cm/½in thick and about 8cm/3¼in diameter.
- Place the trays of biscuits in the preheated oven and bake for 12 minutes. Remove the biscuits from the oven and use a 10cm/4in round cutter to draw the edges of a biscuit towards the centre so that the cutter can fit around the biscuit. Then use a gentle rotating motion to shape the biscuit into a uniformed round. Repeat with the remaining biscuits while they are still hot. (See Baker's Tips.)
- Return the biscuits to the oven, swapping the trays, and bake for a further 13-18 minutes or until deep golden and cooked through (the longer they are baked the more crisp they will be once cooled). Remove the biscuits from the oven and allow to cool on the trays.
Baker's Tips
- Rolled oats can vary in thickness and texture between brands. I find Uncle Toby’s oats are thinner and softer than most, and they work particularly well in these biscuits.
- Using a round cutter to reshape the biscuits during baking helps create a more even shape and thickness, so they bake more uniformly. If you prefer, you can skip this step and simply swap the trays after 12 minutes – the biscuit edges will just be a little thinner, crisper and more deeply golden once baked.
- These biscuits will keep in an airtight container at room temperature for up to 1 week.
Prep 10min (+soaking and cooling time)Bake 1hrMakes 8 serves
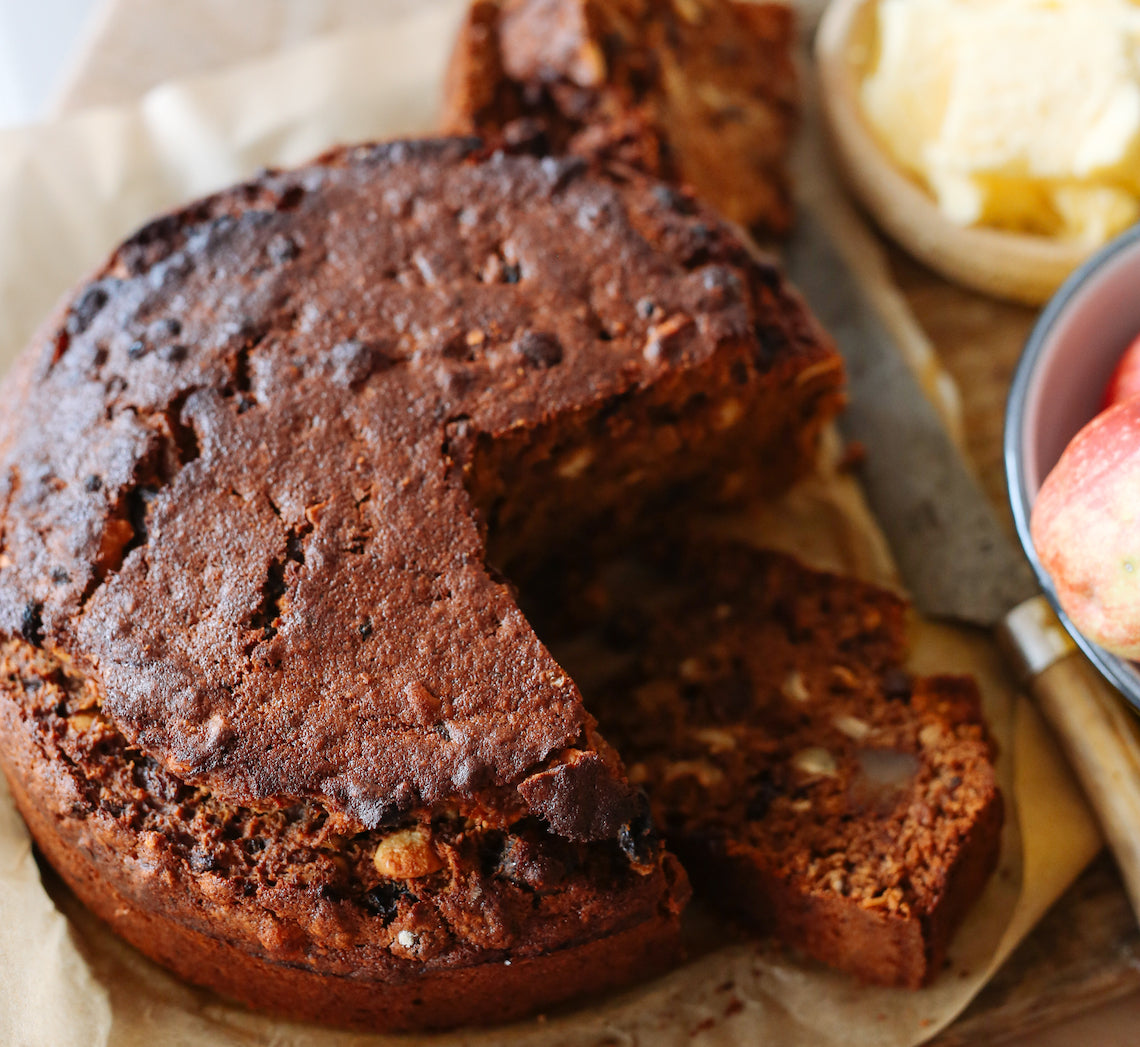
I found this in my late grandmother Helen’s recipe box, written out in her beautiful cursive. And with that heading, of course I had to try it. She was right. It is easy – almost entirely made in one saucepan, with just one wooden spoon. But it’s also wonderfully delicious, lasts for ages and, thanks to the soaked fruit and spices, could also pass as a Christmas cake.
I’ve made a few adjustments over the years, adding the nuts and soaking the fruit in brandy, which makes it feel a bit more special, but you could leave both those steps out, and it will still be great.
Ingredients
½ cup (125ml) brandy
2 cups (370g) mixed dried fruit (see Baker's Tip)
½ cup (125g) butter, cubed
¾ cup (165g) brown sugar
2 tablespoons treacle, or honey
1 teaspoon mixed spice
1 teaspoon ground ginger
1 teaspoon ground cinnamon
1 teaspoon bicarbonate of soda
2 eggs, lightly beaten
½ cup (70g) walnuts (ideally dry-toasted in the oven and roughly chopped)
1 cup (150g) plain flour
1 cup (150g) self-raising flour
Method
- Heat the brandy in a saucepan until just simmering. Remove from the heat and add the dried fruit. Leave to plump up for at least 30 minutes.
- To your soaked dried fruit, add the butter, sugar, treacle, spices, bicarbonate of soda and 1/2 cup (125 ml) water. Place over medium–high heat and bring to the boil, stirring as you go. Set aside to cool for 10 minutes.
- Grease and line a 22–24 cm cake tin with paper. Preheat the oven to 180°C.
- Add the eggs and mix to combine. Fold in the flours and a pinch of salt. Pour into the cake tin and bake for 1 hour, or until a skewer inserted in the centre comes out clean.
- Remove from the oven and cool for 10 minutes before gently removing from the tin.
Baker's Tip
- Gran didn’t specify which fruit to use, but I like a mixture of dried chopped apricots, figs, currants and cranberries. Just sultanas would also be great.
This recipe is from What Can I Bring by Sophie Hansen (Murdoch Books, RRP $49.99).
You can read more about what Sophie is baking this winter here.

Takes 2hr (+30min for the fruit)Makes a cake for 6–8 and approximately 800g (1lb 12oz) fruit and syrup
Coconut Sugar Pavlova Roll
Reasons why my meringue preference is for a roll over a classic dome: 1. The crust quotient (CQ) is higher. More crunch balances the soft inside and creamy parts. 2. No shaping surprises with a flat pavlova. The proud dome you shape with meringue can sometimes end up baking into an askew beret! 3. Faster! No slooowww cool down keeping you from putting a slice of pavlova on your plate a minute longer than necessary.
Ingredients
Cooking oil spray
300g (10½oz) caster (superfine) sugar
70g (2½oz) coconut sugar
5g (⅛oz/½ teaspoon) vanilla paste
5g (⅛oz) cornflour (cornstarch)
5g/ml (⅛oz) white or apple-cider vinegar
2g (¹⁄₁₆oz/¼ teaspoon) fine sea salt
225g (8oz) egg white (from approx. 12 eggs)
2g (¹⁄₁₆oz/¼ teaspoon) cream of tartar
600g/ml (1lb 5oz) cream (45% milkfat)
1 × batch Spiced Grilled Blood Plums (below), chilled
Method
- Preheat the oven to 140°C (285°F). Lightly spray a flat and heavy 30cm × 40cm (12in × 15¾in) shallow baking tray with cooking oil, then lay a piece of baking paper on the tray, to cover the entire surface. Don’t spray again.
- Weigh the caster sugar into a small bowl with a small scoop. Weigh the coconut sugar separately. Next, weigh the vanilla, cornflour vinegar and salt together and stir together, then set aside. Coconut sugar impedes getting a stiff meringue structure, so we will add it at the end – when the meringue is strong.
- Put the egg white and cream of tartar in the bowl of an electric stand mixer. Using the whisk attachment, whip on speed 8 (under high) for 3–5 minutes. Once the whites have changed from foamy to stiff and white, start adding the caster sugar, 1 tablespoon at a time, over 3 minutes to make a very shiny and rigid meringue.
- Turn the mixer off and add the coconut sugar. Slowly turn the mixer on, increasing up to speed 8 (under high) for 5 seconds. Stop the mixer and add the cornflour/vinegar mixture. Re-whip for 5 seconds. Take the bowl off the mixer and use your fingers to push the meringue off the whisk back into the bowl. Give it a final and thorough mix with a plastic spatula so the colour is a uniform pale malt brown. Don’t worry that the meringue has sugary speckles.
- Scrape the mix out onto the prepared baking tray. Using an offset spatula, smooth it evenly over the tray, leaving a 1.5cm (½ in) border around the edges to allow for some expansion during baking. Bake for 1 hour until the top feels like a crunchy pillow that cracks when gently pressed. Remove and allow to cool at room temperature on the tray, until ready to roll (see Baker's Tips). Moving it off the tray while it’s hot makes the sheet prone to breaking.
- While the meringue cools, whip the cream to billowy soft and cut most of the grilled plum pieces into smaller pieces (four pieces per plum half). Reserve a few slices or whole pieces for the top.
- To roll, lay two overlapping pieces of plastic wrap on the work surface to make a sheet slightly larger than the meringue sheet. Carefully flip the meringue sheet off the tray, with the shortest side closest to you, and peel off the baking paper. The meringue should now be crunchy top side down and the underside, now exposed, should feel soft and a little sticky.
- Keeping the short side closest to you, evenly spread 400g (14 oz) of the cream over the meringue, but only smooth a light smear over the 2cm (¾ in) strip at the top of the sheet. This will become the seal, so it’s best not to overload it with cream that will ooze out upon rolling. Scatter the grilled plums evenly over the cream (except for the strip along the top). Tear the pieces up a little if they are too big, as big pieces make a lumpy roll.
- Take a firm hold of the plastic wrap closest to you and use a repetitive ‘lift and roll’ motion to gradually roll the meringue, until you do a final full roll to reach the end, with the seam underneath. Form a spine of reserved cream then plum pieces. Drizzle the reserved syrup on top.
Baker's Tips
-
Takes: Two hours from start to serve. Or you can bake the meringue sheet the day before and fill the next day
- Keeps: Always best served just after rolling. When filled, this will keep refrigerated for 1 day, well covered or in an airtight container. Unfilled, the meringue will hold for up to 3 days, but give it a 10 minute re-crisp in a 140°C (285°F) oven, then cool before filling.
- Overbaked meringue will be uber-crisp and unbending, threatening to snap. To repair, place the cream and fruit on the sheet and chill for an hour, then roll. If your meringue is underbaked, bake the meringue sheet for another 20 minutes at 140°C (285°F), even if you do this the day after. If the sheet has cracked irreparably, stack large shards with the cream and fruit in an avant-garde (but totally meant it) way.
Adaptrix
Other fruit:
- Use a similar weight of raspberries or strawberries in place of the plums. The Sumac blackberries are also incredible here!
- Toffeed bananas are a year-round fruity friend … and add fresh passionfruit to bring the zing.
- Roasted quinces or toffee figs are my autumnal go-to, and coconut is such a bosom buddy to them both. With quince, this roulade is beyond next level.
Spiced Grilled Blood Plums
These plums are another example of Christine Manfield’s (tysm) dessert genius! The grill char imparts a seductive smokiness. The syrup floods them while warm and they absorb all the honey sweetness and glorious spices and fresh citrus zing. These plums love to be served with chocolate mousse, panna cottas or store-bought gelato. I can’t help falling in love with this recipe every time the syrup sizzles on the fruit.
Ingredients
750g (1lb 11oz) blood plums, still firm, not yieldingly ripe (around 8)
30g (1oz) demerara sugar
Spiced syrup
1 orange
1 lemon
100g (3½oz) caster (superfine) sugar
40g (1½oz) honey
40g/ml (1½oz) cold water
4 star anise
2 whole allspice berries few grinds black pepper
1–2 fresh bay leaves (optional)
Method
- To start the spiced syrup, peel four wide strips each from the orange and the lemon and place into a small, non-reactive saucepan. Set the fruit aside (you’ll add their juice to the syrup later).
- Add the remaining syrup ingredients to the saucepan. Bring to the boil over a medium–high heat, stirring at first to loosen the sugar. When it boils, turn it down to a simmer and cook for 3–4 minutes until syrupy like maple syrup. Remove from the heat and cool to room temperature.
- While the syrup cools, heat your grill (broiler) to High (100%). Cut the plums in half, following their natural seam. Twist and pull apart and remove the stone (if it doesn’t prise out easily, cut around it with a small, pointy knife). Place the plums, cut-side up, on a non-reactive, ovenproof, shallow-lipped tray (or line a tray with foil). Sprinkle the demerara sugar evenly over the plums, then grill for 10–12 minutes, until the cut side has blistered and some have a collar of blackened flesh (see Baker's Tips).
- Remove the plums from the grill. Squeeze the juice from the orange and lemon into the syrup and pour over the plums. Adding the juice when the syrup has cooled will retain the fresh acidity. Overheated juice loses vibrancy.
- Allow to stand for 30 minutes, turning once in the syrup. Cool to room temperature before using.
Baker's Tips
- Takes: 30 minutes. Can be served warm or cool to fill the Coconut sugar pavlova roll
- Keeps: Chilled for up to 4 days. Can be frozen after that and defrosts pretty well!
- If you don’t have a grill, halve the plums, remove the stones and set in a baking tray. Scatter the sugar on the cut sides and caramelise with a blowtorch until dark brown. If the plums are large and still firm, bake for 10–15 minutes in a 180°C (360°F) oven until they soften but hold their shape.
Adaptrix
Peaches, nectarines
- Substitute in any peak-season ripe stone fruit. Exclude apricots from grilling – they need a gentle and less scorching treatment.
This is an edited extract from Beatrix Bakes: Another Slice by Natalie Paull (Hardie Grant Books, RRP $50.
Photographer: © Rochelle Eagle 2024
You can read more about what Natalie is baking this winter here.
Makes 8 serves
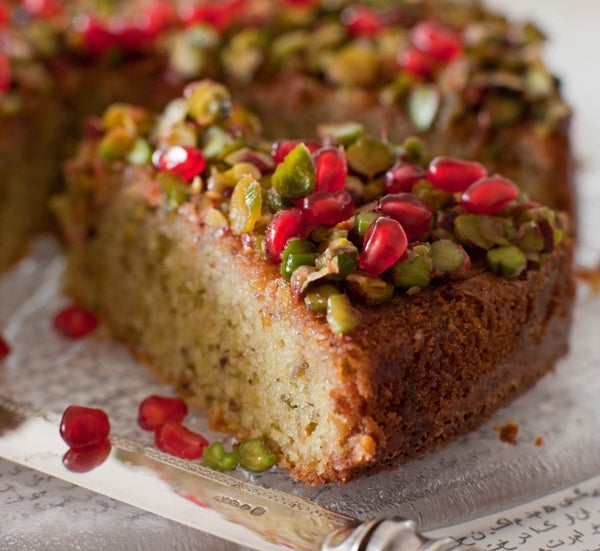
The recipe for this lovely, tangy cake was given to me by the wonderful food writer and cooking teacher Elise Pascoe, and I have made it time and again since she passed it on to me. The original version was made with lemons; however, as our lime trees are such bountiful providers for so much of the year, I tend to make it with limes instead. It’s a gorgeous, simple cake: light, tangy and so eye-catching with its mantel of pistachios and pale-green hue. In season, translucent beads of pomegranate look extraordinarily beautiful scattered over the cake, giving it a mysterious, exotic quality.
Just a note about the pistachios for this cake – to grind them, I pulse them in the food processor with a tablespoon of flour from the recipe, as the flour helps prevent them becoming oily and forming a paste. Nonetheless, you do have to be watchful as they can go from being perfectly chopped to pasty in the blink of an eye.
Ingredients
60g plain flour
1 teaspoon baking powder
100g pistachios, finely ground
finely grated zest of 3 large limes
120g almond meal
250g unsalted butter, at room temperature
200g caster sugar
4 (60g) eggs, at room temperature
⅓ cup (80g) pomegranate seeds, to decorate, optional
softly whipped cream or thick Greek-style yoghurt, to serve
Pistachio and lime syrup topping
90g caster sugar
½ cup (125ml) fresh lime juice (from approximately 3 large limes), strained
90g pistachios, roughly chopped
Method
- Preheat your oven to 170°C. Butter a 22–24cm round cake tin, line the base with buttered baking paper then dust the tin with flour. (I use a torte tin that I’ve had for years to make this – it has slightly sloping sides and measures 24cm across the top and 22cm across the base.)
- Tip the flour, baking powder, ground pistachios, lime zest and almond meal into a medium-sized bowl. Whisk them together with a balloon whisk for a minute or so, then set the bowl aside.
- Put the butter and sugar into the bowl of an electric mixer (or use a hand-held electric beater) and beat them on medium speed for about 4 minutes, stopping and scraping down the sides occasionally, until the mixture looks creamy. Beat in the eggs, one at a time, allowing each egg to be absorbed before adding the next. (Don’t worry if the mixture looks a little curdled after adding the last egg – it will come together again when you add the dry ingredients.) Tip in the flour mixture and mix everything together on low speed just until it is combined – be careful not to over-mix it, or the cake may be a bit tough. Scrape the batter into the prepared tin and smooth the top.
- Bake the cake for 45–50 minutes, or until it springs back when lightly pressed in the centre and a skewer inserted in the middle comes out clean. Transfer it to a wire rack and leave it to cool a little in the tin.
- When the cake is lukewarm, make the syrup. To do this, put the sugar and lime juice into a small saucepan over low heat and stir until the sugar dissolves. Add the chopped pistachios, increase the heat and bring the mixture to the boil.
- Turn the cake out onto a serving plate and peel away the paper. Slowly spoon the hot pistachio and lime syrup evenly over the top, then leave the cake to cool completely. Just before serving, scatter it with pomegranate seeds, if using. Serve with softly whipped cream or yoghurt.
This recipe is from Belinda Jeffery's In Belinda's Kitchen.
You can read more about what Belinda is baking this winter here.
Makes one 22cm cake
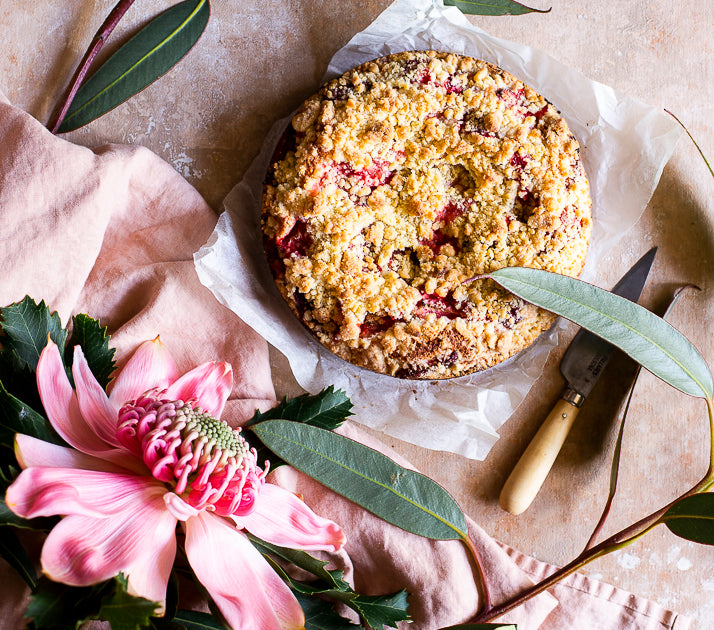
I don’t know about you, but lately I have taken great comfort in the known; in tried and tested cakes, and all things familiar. This cake is a real favourite of mine – simple, delicious and easily adaptable (surely good qualities for navigating life in general, really). I make it often with strawberries as pictured, or plums, but raspberries or ripe apricots would be equally lovely. It’s inspired by the streusel cakes I ate in Germany when I was an exchange student, and in the absence of seeing old friends there, I’ll eat this cake.
Ingredients
Streusel topping
60g butter, cubed
½ teaspoon vanilla bean paste
55g caster sugar
75g plain flour
Pinch of salt
Cake
125g unsalted butter, melted and cooled
3 eggs
1 teaspoon vanilla bean paste
100g plain flour
1 teaspoon baking powder
Pinch of salt
150g almond meal
185g caster sugar
375g strawberries, hulled and quartered
Method
- Preheat oven to 170°C (fan-forced) and grease a 22cm round springform tin well with butter and line the base with baking paper.
- Place streusel ingredients into a small mixing bowl and use your fingertips to work butter and vanilla through the sugar, flour and salt until mixture resembles large breadcrumbs. Set aside.
- Place melted butter, eggs and vanilla in a medium mixing bowl and whisk to combine. In a separate large bowl, sift together flour and baking powder, before stirring in salt, almond meal, and caster sugar. Make a well in the centre of the dry ingredients and pour in the melted butter and egg mixture, stirring gently to combine.
- Spoon batter into lined baking tin and smooth the top with a spatula before scattering with strawberry quarters. Sprinkle with streusel topping and bake for 55-60 minutes or until cake is cooked through and streusel is starting to colour.
- Allow cake to cool in the tin for 10 minutes or so before carefully releasing from the tin and placing on a wire rack to cool further.
- Slice into large wedges and serve cake warm with ice-cream or cream. Whilst best eaten the day it is made, any leftover cake will keep happily in an air-tight container in the fridge for a day or two, just warm slightly before serving.
This recipe is from Tilly Pamment's The Plain Cake Appreciation Society (Murdoch Books, RRP $39.99).
You can read more about what Tilly is baking this winter here.
Prep 20min (+2-2.5hr proving and 3hr cooling time)Bake 1hr 10minMakes 1 loaf
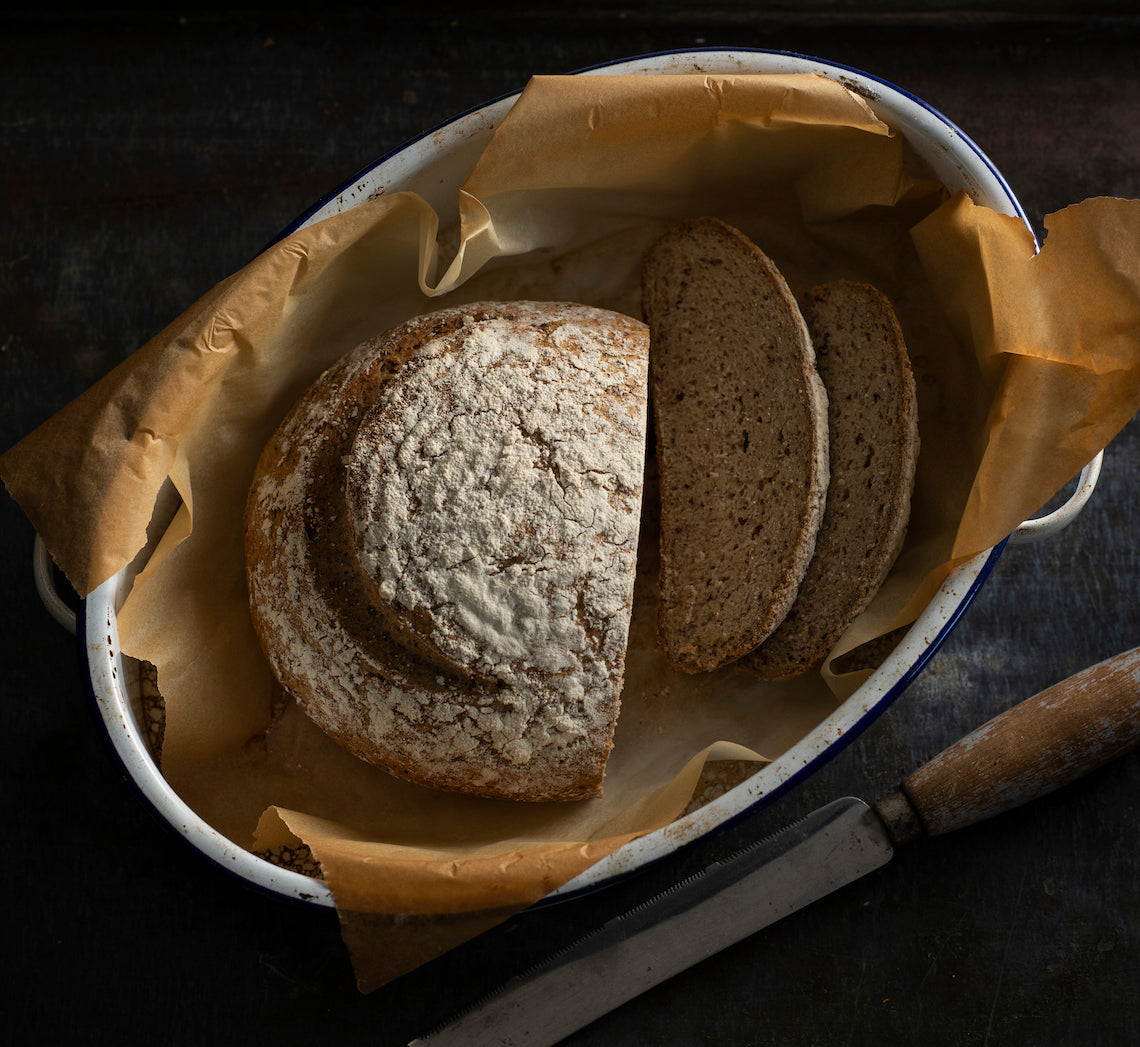
This loaf has a beautifully soft crumb and a crisp crust all thanks to a clever combination of gluten-free flours and ingredients. It is great served fresh on the day of baking or toasted after that. This recipe uses a Dutch oven (cast iron pot) or covered enamel roaster which also contributes to the lovely crisp crust and good volume, but it can also be baked in a loaf tin if you wish (see instructions for this at the end of the recipe).
Ingredients
120g (4¼oz) fine brown rice flour, plus extra to dust
100g (3½oz) sorghum flour
60g (2¼oz) potato starch
60g (2¼oz) sweet (glutinous) rice flour
1 teaspoon fine salt
1 x 7g sachet (2 teaspoons/¼oz) instant dried yeast
550ml (18½fl oz) warm water
1 tablespoon honey
20g (¾oz) psyllium husks
20g (¾oz) ground linseeds (ground flaxseed)
Method
- Line a medium 1.5 litre (2⅓pt) capacity bowl with a cloth or clean tea towel and sprinkle the cloth with extra brown rice flour (see Baker’s Tips). Set aside.
- Sift together the brown rice flour, sorghum flour, potato starch, sweet (glutinous) rice flour and salt in a large bowl. Add the yeast and mix to combine. Combine the warm water and honey in a separate medium bowl. Add the psyllium husks and ground linseeds and stir immediately – it will form a gel-like mixture. Add the wet ingredients to the dry ingredients and use a wooden spoon to mix to a soft dough.
- Turn the dough out onto a lightly floured surface and knead for 1-2 minutes or until the dough becomes smooth and pliable. Transfer to a medium bowl, cover with plastic wrap and set aside in a warm, draught-free place for 1 hour or until doubled in size.
- Turn the dough onto a lightly floured surface and knead for about 1 minute or until the dough becomes smooth and pilable again. Shape into a ball and lightly coat the outside of the dough with rice flour. Transfer to the lined bowl, seam side up and cover the dough lightly with any overhanging cloth. Place the bowl in a plastic bag and seal the bag. Set aside in a warm, draught-free place for 1-1½ hours or until the dough has doubled in size.
- About 30 minutes before baking the bread preheat oven to 250°C/480°F (230°C/440°F fan-forced). If using a Dutch oven (cast iron pot) place this on the middle rack in your oven to preheat (if using an enamel roaster there is no need to preheat the roaster).
- Line an oven tray with a piece of non-stick baking paper. Uncover the dough in the bowl and then place the upturned lined oven tray on top and invert the dough
onto the tray. Use a small sharp knife or bread lame to score the top of the loaf with a 1cm (½in) deep cut. Use the baking paper to carefully transfer the dough to the preheated Dutch oven or enamel roaster. Add about 2 tablespoons of water to the pot or roaster under the baking paper. Cover with the lid immediately and place in the preheated oven. Bake for 30 minutes. Remove the lid, reduce the temperature to 230°C/440°F (210°C/410°F fan-forced) and bake for a further 40 minutes or until the loaf is baked through and sounds hollow when tapped on the top. (See Baker's Tips.) - Use the baking paper to remove the bread from the pot and transfer to a wire rack to cool completely before slicing (this will take about 3 hours).
Baker's Tips
- You can use a banneton (traditional bread proving basket) instead of the bowl to shape the loaf if you wish, lining it with a rice flour- dusted cloth.
- A soft, open-weave tea towel or cloth (preferably linen or muslin) is best to use to line the bowl or banneton.
- You will notice that the baking time for this bread is quite lengthy. This is because gluten-free breads, due to the flours they use, need a lot more moisture than their gluten-containing counterparts made with wheat flour. This extended baking will ensure that most of this moisture evaporates so the final crumb texture doesn't end up unpleasantly gummy. Also, as tempting as it may be, don’t slice the loaf until it has cooled completely – if you do, the crumb will compress and, again, it will give it a gummy texture.
- This bread will keep in a paper or cloth bag for up to 2 days.
- To freeze whole or in slices, seal in a plastic bag and freeze for up to 3 months. Thaw at room temperature or toast straight from the freezer.
Variation
Gluten-free Sandwich Bread
This dough can also be baked in a loaf tin. In Step 4 shape the dough into a log and place in a 9.5cm x 19.5cm (3¾in x 7¾in), base measurement, loaf tin that has been greased with olive oil and sprinkled with 1 tablespoon sesame seeds. Prove as in Step 4. Brush the top of the loaf with a little more olive oil and then sprinkle with more sesame seeds. Bake in preheated oven at 200°C/400°F (180°C/350°F fan-forced) for 1 hour and 20 minutes or until baked through and the loaf sounds hollow when tapped on the top. Remove from the oven and allow to stand for 5 minutes before transferring the loaf to a wire rack to cool completely.
Photography by Alan Benson.
This recipe is from our Gluten-free Baking Essentials online course, a no-fuss 'real' guide to the world of gluten-free baking.

Prep 10min (+30min cooling time)Bake 35-40minMakes 300g ( 10½oz)
These aromatic and extremely more-ish nuts bring together rosemary, orange, cumin and salt in a wonderful combination. They are dead-easy to whip up and are a great accompaniment to an evening drink or make the perfect edible gift.
Ingredients
1 tablespoon (4 teaspoons) dark brown sugar
1 tablespoon (4 teaspoons) finely shredded orange zest
1½ teaspoons ground cumin
1½ teaspoons sea salt flakes, lightly crushed
½ teaspoon freshly ground black pepper
300g (10½oz) unsalted raw cashews
½ teaspoon olive oil
1 tablespoon (4 teaspoons) finely chopped rosemary
Method
- Preheat oven to 150°C/300°F (130°C/265°F fan-forced). Line a large oven tray with non-stick baking paper.
- Combine the sugar, orange zest, salt, cumin, salt and pepper in a medium bowl and toss to combine evenly. Rinse the cashews in a colander under running water and shake off any excess water. Add to the sugar mixture and toss to combine evenly.
- Heat the olive oil and rosemary in a small saucepan over low heat for 1 minute or until aromatic. Pour over the nut mixture and toss to combine evenly. Spread on the lined tray in a single layer.
- Bake in preheated oven for 35-40 minutes, tossing the nuts every 10 minutes, until aromatic and the nuts are a deep golden. Cool the nuts on the tray (this will take about 30 minutes) before serving or storing.
Baker's Tip
- These nuts will keep in an airtight jar or container in a cool dark spot for up to 3 weeks.

Prep 40min (+1.5hr chilling and 20min standing time)Bake 18-22min (per batch)Makes about 40
These delicious biscuits get their name from the pepper that, along with the ginger, gives them their "warming" flavour. I’ve made these as reindeer, but you can make them any shape you wish. Also, have fun experimenting with the icing decoration, giving them your own creative touch.
Ingredients
150g (5¼oz) unsalted butter, softened
150g (5¼oz/¾ cup, lightly packed) brown sugar
2 tablespoons golden syrup
2 tablespoons treacle
1 egg yolk, chilled
450g (3 cups/15¾oz) plain flour
2 teaspoons ground ginger
1 teaspoon ground cinnamon
½ teaspoon ground cardamom
½ teaspoon ground cloves
¼ teaspoon finely ground black pepper
½ teaspoon baking powder
½ teaspoon bicarbonate of soda
60ml (¼ cup/2fl oz) milk
Icing
375g (3 cups/13¼oz) pure icing sugar
2-3 tablespoons (40-60ml/1⅓fl oz-2fl oz) water
Method
- Use an electric mixer to beat the butter and sugar until just pale and creamy. Add the golden syrup, treacle and egg yolk and beat to combine.
- Sift together the flour, ginger, cinnamon, cardamom, cloves, pepper, baking powder and bicarbonate of soda. Add half the flour to the butter mixture and beat on lowest possible speed until just combined. Mix in the milk and then the remaining flour until just combined and a soft dough forms.
- Divide the dough into 4 portions. Shape each into a disc, wrap in plastic wrap and place in the fridge for 1 hour or until firm enough to roll.
- Preheat the oven to 170°C/340°F (150°C/300°F fan-forced). Line 3 large oven trays with non-stick baking paper.
- Use a lightly floured rolling pin to roll out one portion of dough on a lightly floured surface until 3mm/⅛in thick.
- Use a cutter/s of your choice to cut out shapes from the rolled dough and use a palette knife to carefully transfer to a lined tray, leaving a little room between each. Repeat with the remaining dough portions, rerolling any leftover dough. Place the trays of biscuits in the fridge for 30 minutes to chill.
- Bake two trays of biscuits in preheated oven for 18-22 minutes, swapping the trays halfway through baking, or until they start to colour around the edges and are cooked through. Cool on the trays. Bake the remaining tray of biscuits as before.
- To make the icing, sift the icing sugar into a medium bowl. Gradually add 2 tablespoons (40ml/1⅓fl oz) of the water and mix until smooth. The icing should be a piping consistency (see Baker’s Tips). If it's too thick, stir in the remaining water ½ tsp at a time until the icing reaches the correct consistency. Divide the icing between two resealable plastic bags, seal and then cut a small hole in one of the corners of each to pipe through.
- Use the icing to decorate the cooled biscuits as desired. Set aside for about 20 minutes or until the icing sets before serving or storing.
Baker's Tips
- To test if the icing is the correct consistency for piping, drizzle a little on a plate and set aside for a few minutes. If it keeps its shape, it's ready.
- These biscuits are lovely iced with a lemon icing. Replace the water in the icing with strained fresh lemon juice.
- These biscuits will keep in an airtight container or jar at room temperature for up to 1 week.
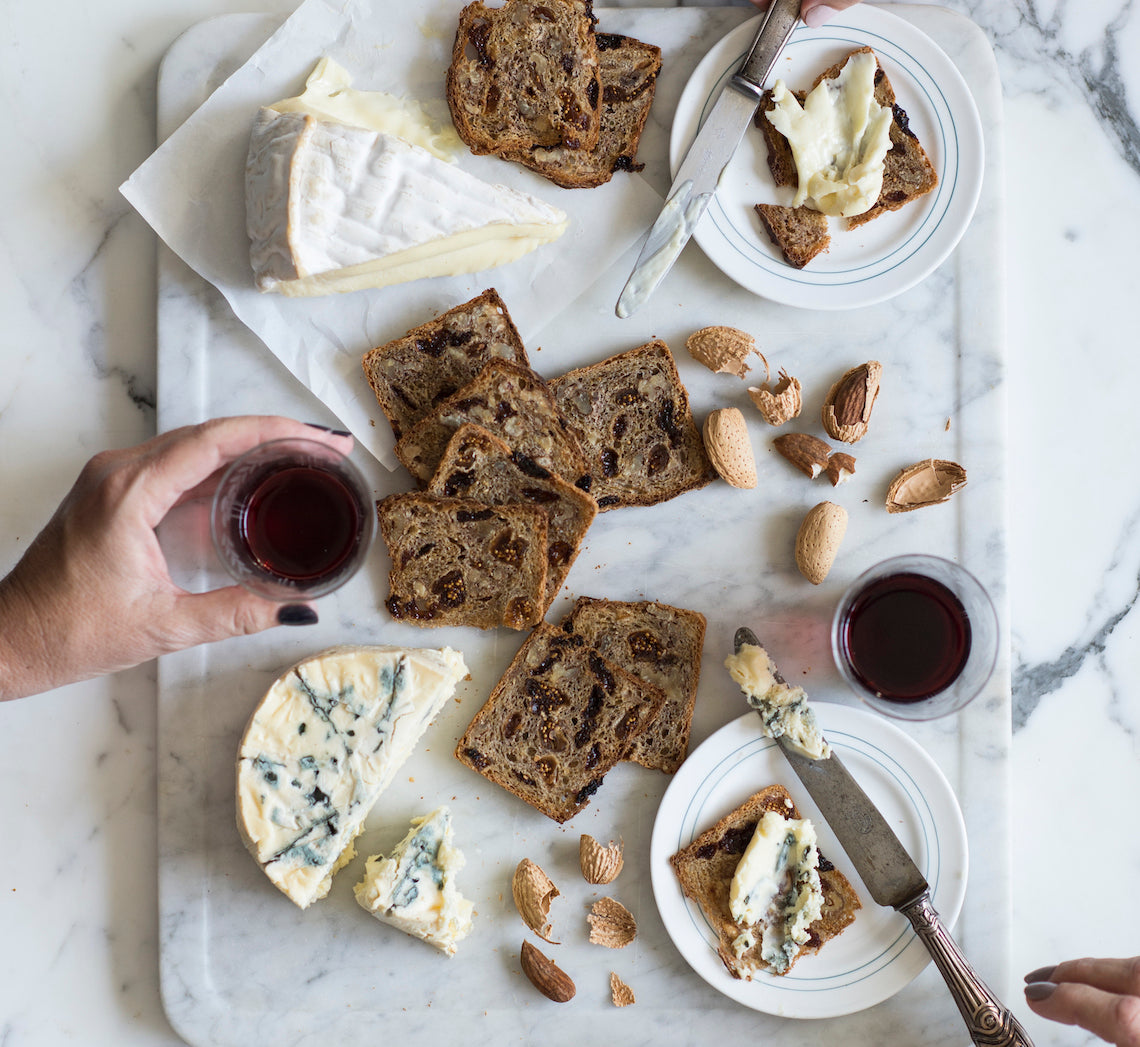
Prep 40min (+1hr 45min-2hr 15min proving and 1 hour cooling time) Bake 55-60 minMakes about 50 slices
These crackers are based on one of my favourite bread recipes. Baked in small loaf tins then sliced and double baked they make the perfect cracker for a cheese plate. They are perfect to serve alongside a creamy ripe brie, a soft goat’s cheese, or a more robust blue vein cheese.
Ingredients
300g (2 cups) strong bread or pizza flour150g (1 cup) plain wholemeal or wholemeal spelt flour
7g sachet (2 teaspoons) instant dried yeast
1 teaspoon fine salt
1½ teaspoons ground cinnamon
1 orange, zest finely grated
300ml water
90g (60ml / ¼ cup) honey
1 teaspoon natural vanilla essence or extract
150g dried figs, coarsely chopped
125g seedless raisins
150g walnuts, toasted and coarsely chopped
Melted butter, to grease
2 tablespoons poppy seeds
Method
- Combine the flours, yeast, salt, cinnamon and orange zest in a large bowl. Make a well in the centre. Heat the water and honey a small saucepan over low heat, stirring occasionally, for 2-3 minutes or until lukewarm and combined. Remove from heat and add the vanilla. Add to the flour mixture and use a wooden spoon and then your hands to mix to a soft dough.
- Turn the dough onto a lightly floured bench top and knead for 8-10 minutes or until it is smooth and elastic and springs back when you push your finger into it. Add the figs, raisins and walnuts and knead until evenly distributed through the dough.
- Brush a large bowl with melted butter. Add the dough, turning it to coat lightly with the butter. Cover with plastic wrap and place in a warm, draught-free place for 1-1½ hours or until doubled in size.
- Meanwhile, brush two 7.5cm x 22cm or 9cm x 19cm loaf tins (or one of each) with butter and sprinkle with poppy seeds.
- When the dough has doubled in size, knock it back by punching it in the centre with your fist. Turn onto a lightly floured bench top and knead for 2-3 minutes or until reduced to its original size. Divide the dough in half, shape each half into a log about the length of each tin. Place a dough log into each of the tins. Brush the tops of the loaves with a little water and sprinkle with some more poppy seeds. Cover with a light tea towel and set aside in a warm draught-free place for 45 minutes or until the dough has doubled in size.
- Preheat oven to 200°C (180°C fan-forced). Bake the loaves in preheated oven for 35 minutes or until they sound hollow when tapped on the top. Stand in the tins for 5 minutes before turning out onto a wire rack to cool completely.
- Line two large baking trays with non-stick baking paper. Reduce oven to 150°C (130°C fan-forced).
- Once cool, cut the loaves into very thin slices and place in a single layer on the lined trays. Bake in preheated oven for 10 minutes, turn the slices over and bake for a further 10-15 minutes or until crisp around the edges (they will become crisper as they cool). Cool on the trays.
Baker's Tips
- These crackers will keep in an airtight container for up to 1 month. They may soften over time because of the figs. If they do, refresh them in an oven preheated to 150°C (130°C fan-forced) in a single layer on a lined tray for 10-15 minutes.
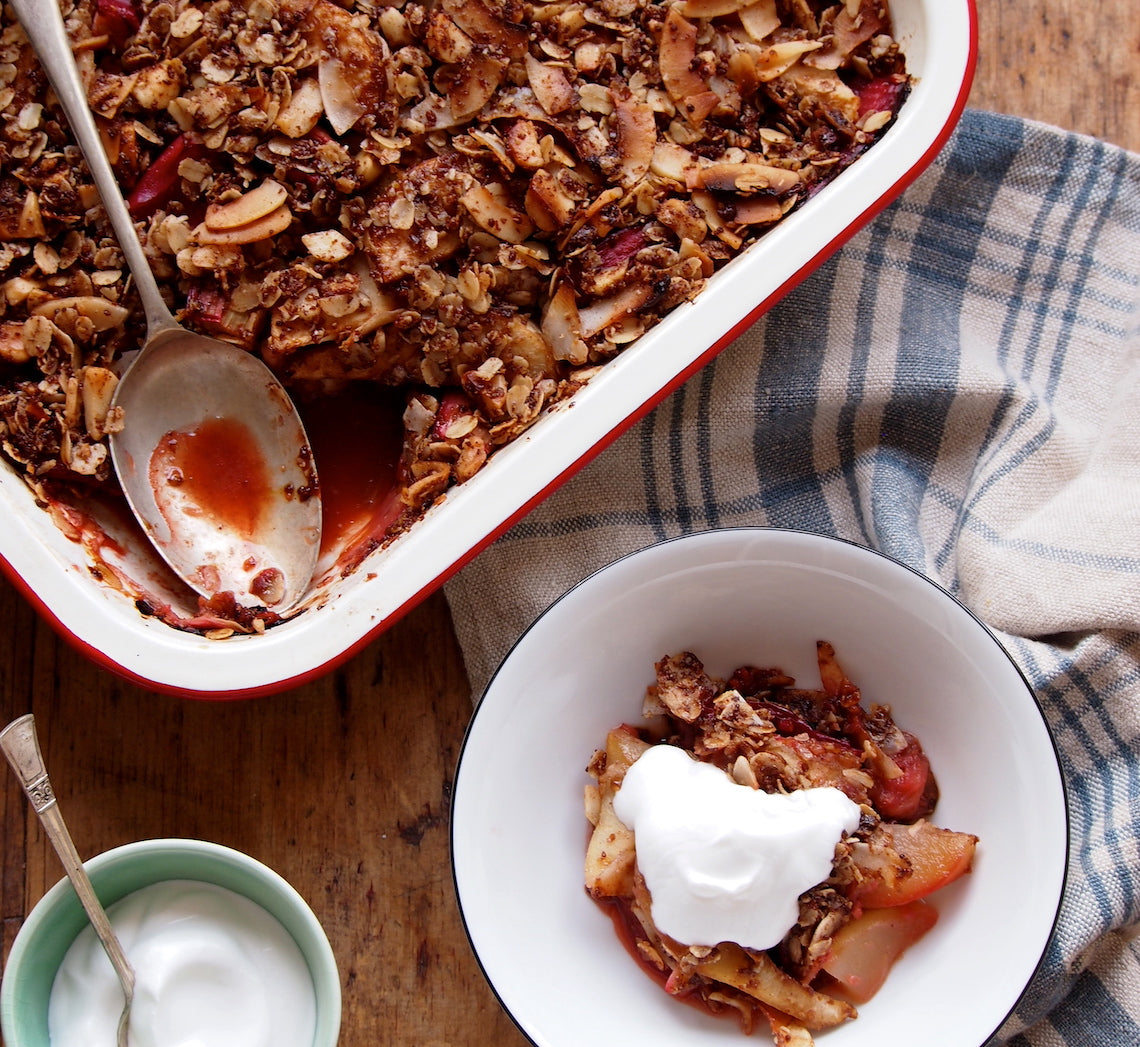
Prep 20minBake 35-40 minMakes 8 serves
Rhubarb and pear make wonderful partners and when teamed with a coconut and macadamia nut crumble topping in this dessert it brings sunshine to the table. The coconut sugar lends a lovely rich caramel flavour but can be replaced by brown sugar if you wish.
Ingredients
1 bunch rhubarb, trimmed and cut into 4cm lengths (you should have about 500g trimmed and chopped rhubarb)
750g (about 4) firm ripe pears (such as Josephine, Williams or Packhams)
2 tablespoons coconut or brown sugar
Coconut or Greek-style yoghurt, to serve
Crumble Topping
50g (½ cup) rolled oats
30g (½ cup) flaked coconut
55g (⅓ cup) macadamia nuts, coarsely chopped
50g coconut or brown sugar
2 tablespoons LSA (ground linseeds, sunflower seeds and almonds)
1½ teaspoons ground cinnamon
60ml (¼ cup ) sunflower or light olive oil
½ teaspoons natural vanilla essence or extract
Method
- Preheat the oven to 180ºC (160°C fan-forced).
- To make the Crumble Topping, place oats, flaked coconut, macadamias, sugar, LSA and cinnamon in a bowl, mix to combine. Combine the oil and vanilla, drizzle over the oat mixture and toss to combine evenly. Set aside.
- Peel, quarter and core the pears and then cut each quarter lengthwise into three slices. Place the pear slices, rhubarb and sugar in a large bowl and toss gently to combine. Transfer to a 1.5 litre (6 cup) ovenproof dish. Sprinkle with the Crumble Topping.
- Bake in preheated oven for 35-40 minutes until the crumble is crisp and golden and the fruit is tender when tested with a skewer.
- Serve warm or at room temperature with the coconut yoghurt.
Baker's Tips
- Store any leftover crumble in the ovenproof dish covered with plastic wrap or in an airtight container in the fridge for up to 3 days. Serve cold or reheat in an oven preheated to 180°C (160°C fan-forced) for 10-15 minutes or until heated through.
- This crumble can also be baked in eight 185ml (¾ cup) ramekins or ovenproof dishes at 180°C (160°C fan-forced) for 25-30 minutes.
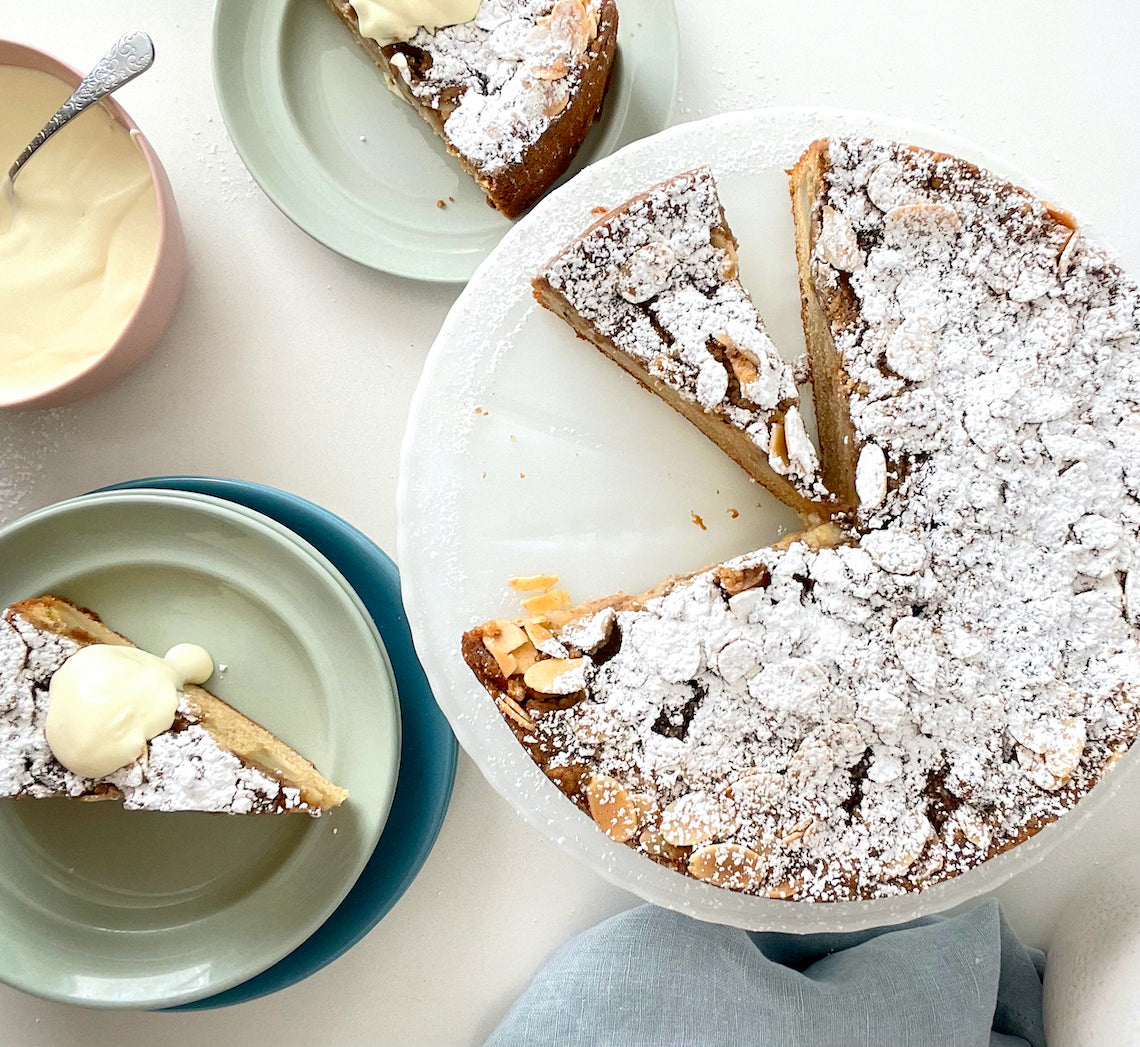
Prep 30min (+5min standing time)Bake 1hr 5min-1hr 15minMakes 10-12 serves
This is one of my favourite cakes – ever! Not only is it super easy to whip up and can be made with a whole variety of different fruits (you can replace the pears with the same quantity of plums, firm ripe nectarines or peaches for example), but it is also incredibly versatile when it comes to serving it. It not only makes for the perfect morning or afternoon tea cake but it is also wonderful served warm with lashings of cream or ice cream for dessert. I’ve also been known to eat the leftovers for breakfast (which I would also highly recommend!)
Ingredients
Melted butter, to grease
185g (1¼ cups/6½oz) self-raising flour
165g (⅔ cup, firmly packed/5¾oz) brown or raw caster sugar, plus 1 tablespoon extra
125g (4½oz) salted butter, at room temperature
85g (⅓ cup/3oz) sour cream
2 eggs, at room temperature
1½ teaspoons natural vanilla extract or essence
2 (about 200g/7oz each) firm but ripe Williams pears, cored and each cut into 12 wedges
Icing sugar, to dust
Cream or ice cream, to serve (optional)
Crumble Topping
50g (⅓ cup/1¾oz) plain flour
55g (¼ cup, firmly packed/2oz) brown or raw caster sugar
1 teaspoon ground cinnamon
60g (2oz) salted butter, chilled, diced
50g (½ cup/1¾oz) flaked almonds
Method
- Preheat oven to 170°C/340°F (150°C/300°F fan-forced). Grease a 21cm (81⁄4in), base measurement, springform tin with melted butter and line the base with non-stick baking paper.
- To make the Crumble Topping, combine the flour, sugar, and cinnamon in a medium bowl. Use your fingertips to quickly rub in the butter just until the mixture resembles coarse breadcrumbs (it will be quite moist). Stir in the almonds. Cover and put in the fridge while making the cake.
- To make the cake, place the flour, sugar, butter, sour cream, eggs and vanilla in a large mixing bowl. Use an electric mixer fitted with a paddle attachment to beat on low speed until combined. Increase the speed to high and beat for 3 minutes or until the mixture is well combined, very pale in colour and silky smooth in texture. Spoon the mixture into the prepared tin and smooth the surface with the back of a spoon.
- Toss the pear wedges with the extra 1 tablespoon sugar. Arrange the pears evenly over the top of the cake and then press gently into the batter. Sprinkle with the prepared Crumble Topping to cover.
- Bake in preheated oven for 65-75 minutes (the baking time will depend on how juicy the pears are) or until a skewer inserted into the centre comes out clean. Stand the cake in the tin for 5 minutes before transferring, still on the base of the tin, to a wire rack. Serve warm or at room temperature on its own or accompanied by cream or ice cream, if desired.
Variation
Brown Butter Pear Crumble Cake: Replace the butter in the cake with 125g (4½oz) brown butter, solidified but softened. Replace the butter in the crumble with 60g (2oz) browned butter, chilled and diced.
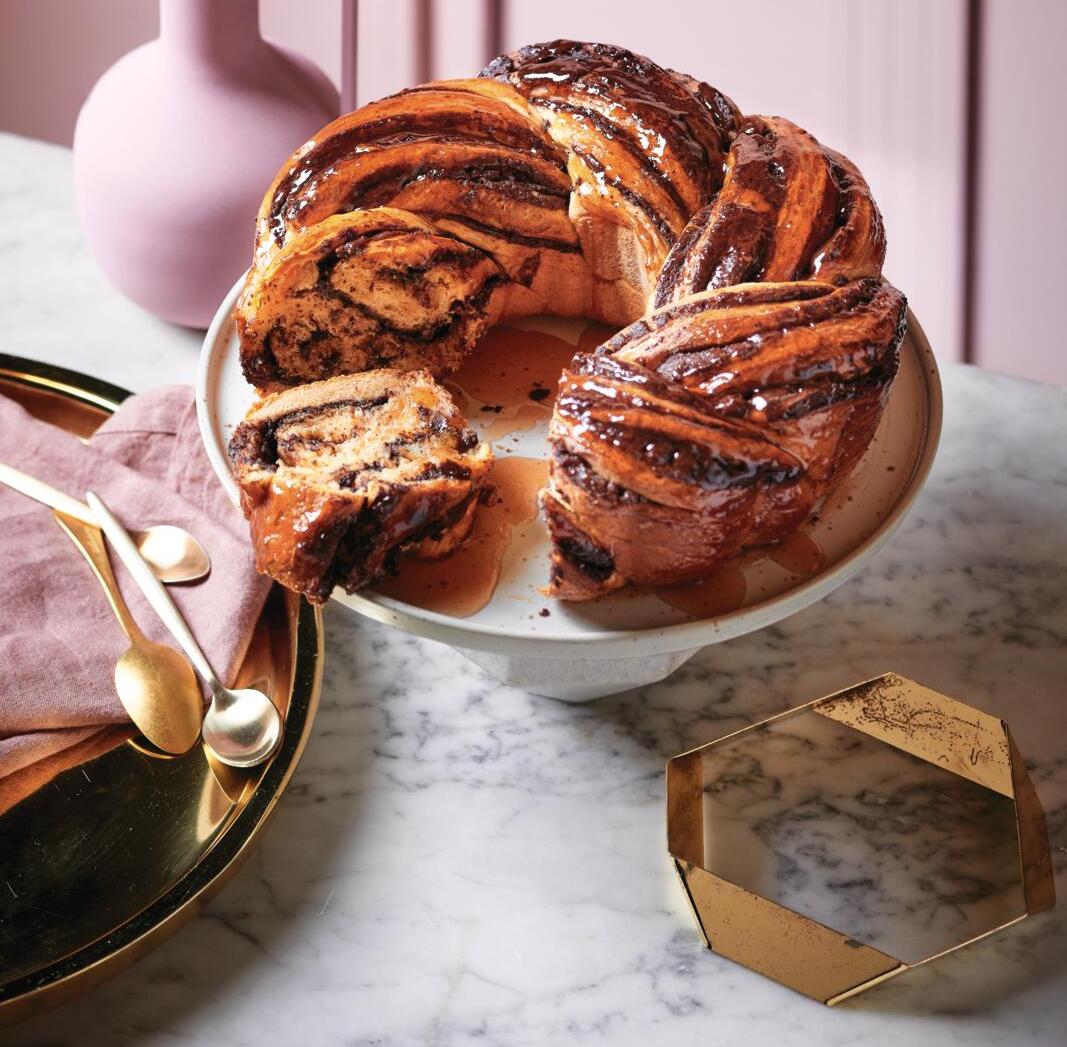
Prep 40min (+ 3hr proving, 20min standing and cooling time)Bake 45min12-14 serves
Laced with swirls of rich dark chocolate and drenched in a marmalade glaze, you’ll find this impressive loaf hard to resist – I dare you to stop at just one slice!
Ingredients
525g (3½ cups) strong (baker’s) flour
2 teaspoons instant dried yeast
75g (⅓ cup) caster sugar
½ teaspoon fine salt
Finely grated zest of 1 orange
180ml (⅔ cup) lukewarm milk
2 eggs, plus 1 extra
150g unsalted butter, softened, plus extra to grease
Chocolate Filling
150g dark (70%) chocolate, chopped
50g unsalted butter, chopped
110g (½ cup, firmly packed) brown sugar
Marmalade Glaze
300g jar blood orange marmalade (see Baker's Tips)
2 tablespoons boiling water
Method
- To make the dough, combine the flour, yeast, sugar, salt and orange zest in the bowl of a stand mixer fitted with the dough hook. Combine the milk and eggs in a jug. With the motor running, add milk mixture to the flour mixture and knead on low speed for 1-2 minutes or until mixture is evenly combined and a stiff dough forms.
- Switch to the paddle attachment and gradually add the butter, about 20g at a time, beating well after each addition on low speed until dough is smooth and very elastic (this will take about 5 minutes). Scrape down side of bowl, cover with plastic wrap and set aside in a warm, draught-free place for 1 hour 30 minutes or until dough has doubled in volume.
- For the Chocolate Filling, combine all ingredients in a large heatproof jug and microwave on high, in 30 second bursts, stirring after each burst, for 1 minute 30 seconds or until chocolate has melted. Stir vigorously until well combined, glossy and smooth. Set aside at room temperature to cool.
- Grease a 2.5L capacity (24cm top, 22cm base measurement) fluted ring pan with extra butter. Knock back the dough by punching it in the centre with your fist. Turn onto a lightly floured surface and knead for 1-2 minutes until smooth and elastic and dough has returned to its original size.
- Use a lightly floured rolling pin to roll dough into a 30cm x 35cm rectangle. Spread dough evenly with the chocolate filling. Starting from the longer end, roll up the dough into a tight roll. (At this point, if the dough is too soft and your kitchen too warm, you can place the log, slightly bent to fit, on a large baking tray lined with baking paper and chill for 20 minutes to firm slightly. This will make cutting and shaping the babka easier). Trim ends of roll. Starting about 2cm from the top end, cut in half, leaving the top end intact. Turn each half so that the cut edges are facing upwards. Twist the two halves together, keeping the cut edges facing upwards. Place in prepared tin, wrapping around the centre tube. Cover with plastic wrap and set aside in a warm, draught-free place for 1½ hours or until well risen.
- Preheat oven to 180°C (160°C fan-forced). Bake the babka for 45 minutes or until deep golden and babka sounds hollow when tapped on the top. Stand in the pan for 10 minutes before turning out onto a wire rack to cool.
- For the marmalade glaze, place marmalade in a large heatproof jug and microwave on high for 30 seconds. Stir well, then microwave for a further 15 seconds or until bubbling. Immediately stir through boiling water until well combined. Stand for 3 minutes, stir again, then drizzle over the cooled babka. Set aside for 10 minutes to cool slightly.
- Cut babka into wedges to serve.
Baker's Tips
- This loaf is best eaten the day it is made but it will keep in an airtight container at room temperature for up to 3 days and is perfect to slice, toast and served warm (especially for an indulgent breakfast!)
Photography: Nigel Lough
Styling: David Morgan
This recipe first appeared in delicious. Australia's April 2023 edition.


