SUBSCRIBE TO BAKECLUB!
  •  
0 CART/CHECKOUT

Learn, connect & share through a love of baking

  • Home
  • Classes
    • Live & Guided Online Classes
    • Self-paced Online Classes
    • How to choose an online class
    • Special Events
  • BakeClub & Co.
    • Join BakeClub & Co.
    • Log in to BakeClub & Co.
    • Gift BakeClub & Co.
  • Make Me a Baker Program
    • Make Me a Baker Online
    • Testimonials
    • Graduation gallery
  • Shop
    • Anneka's Books
    • BakeClub Aprons
    • Baking Gifts
    • Gift Certificates
  • Recipes
    • Browse All
    • Bakes that Travel Well
    • Bakes to Share with a Cuppa
    • Baking with Kids
    • Café Favourites
    • Flour-free Recipes
    • International Recipes
    • Recipes to Nurture, Comfort & Calm
    • Savoury Tummy Fillers
    • Winter Warmers
  • Resources
    • BakeClub Blog
    • BakeClub Tips
    • BakeClub Q&A
    • BakeClub Videos
    • BakeNews Archives
    • Subscribe to BakeClub
  • About
    • Who is Anneka Manning?
    • About BakeClub
    • What Our Students Say
    • BakeClub Partners
    • Media
    • Contact Us
  • home
  • Products
Prep 11/2hr (+ standing time) Bake 15min (per batch) Makes about 28

Pretty to look at, divine to eat, these macarons were created by Allen Au, one of our Make Me a Baker graduates, to use as part of his Graduation cake recipe.

Ingredients

125g almond meal
125g pure icing sugar
96g egg whites
125g caster sugar
30ml water
Gel colouring (see Baker's tip)

Filling

125g unsalted butter
125g pure icing sugar, sifted
1 tablespoon sieved cherry jam 

    Method

    1. Preheat oven to 165°C (145°C fan-forced). Line two large oven trays with non-stick baking paper or silicone baking mats.
    2. Sift together the almond meal and icing sugar into a large bowl. Add half the egg white and mix until a thick paste forms.
    3. Combine the caster sugar and water in a small saucepan and stir over medium heat until the sugar dissolves. Bring to a boil and simmer over medium heat, brushing down the sides of the saucepan with a wet pastry brush occasionally to prevent any sugar crystals forming. Do not stir. Once the sugar mixture has reached 115°C on a sugar thermometer, use an electric mixer with a whisk attachment to whisk the remaining egg white on medium-high speed until soft peaks form. Once the sugar mixture has reached 118°C, remove the saucepan from the heat and slowly whisk the hot sugar mixture into the egg whites. Continue to whisk on medium-high speed until the temperature cools to 30°C. The meringue should be thick and glossy. Add enough gel colour to the meringue to tint to the desired colour, whisking until evenly combined. 
    4. Fold 2 large tablespoons of the meringue into the almond paste mixture until well incorporated. Fold in the remaining meringue until evenly combined. The consistency of the batter should look like molten lava. If you can draw a figure eight and the trail stays on the surface, then the mixture is ready to be piped.
    5. Spoon the mixture into a piping bag fitted with a 10mm round nozzle. Pipe the macarons onto the lined trays into 3.5cm rounds. Tap the tray to remove any air bubbles from the macarons. Leave the macarons out in the open until a skin forms on the surface of the macaron. (This can take from 20 minutes to an hour depending on the humidity). The skin should be dry enough that it does not stick to your finger when touched lightly. 
    6. Bake one tray of macarons in the centre of the preheated oven for 15 minutes or until shells don't feel soft at the 'feet' when touched. Set aside to cool on the tray and repeat with the remaining tray of macarons.
    7. To make the Filling, use an electric mixer to beat the butter until it is pale and creamy. Beat in the icing sugar until well combined. Add the cherry jam and beat until well combined. Spoon the filling into a piping bag fitted with a 7mm star nozzle and pipe a small rosette onto the base of half the macarons. Sandwich with the remaining macarons.
    8. Store the macarons in the fridge overnight so the flavours from the filling are absorbed by the shells. Bring the macarons to room temperature before serving. 

    Baker's Tips

    • Allen used Chefmaster Liqua-Gel colours to colour his macarons – he used 8 drops of Super Red with 0.5 drop of Black Diamond
    • This recipe is based on a recipe from a course Allen did with Australian Patisserie Academy
        Cherry Macarons
        Prep 15minBake 16-18minMakes about 18

        This shortbread had been given a little update with the addition of chia seeds. Packed with omega 3 and omega 6 fatty acids as well as loads of fibre these tiny, slightly ‘flattened’ seeds add a little ‘nutty’ crunch to this traditional favourite.

        Ingredients

        • 125g butter, softened
        • 75g (⅓ cup) caster sugar
        • 1 teaspoon natural vanilla extract or essence
        • 150g (1 cup) plain flour, plus extra to dust
        • 1½ tablespoons black chia seeds

        Method

        1. Preheat oven to 160°C. Line two oven trays with non-stick baking paper.
        2. Put the butter, sugar and vanilla in a mixing bowl and use an electric mixer to beat until just creamy. Add the flour and chia seeds and use your hands to mix to a dough.
        3. Place the dough on a lightly floured surface and knead lightly until smooth. Shape into a disc and then use a lightly floured rolling pin to roll out the dough until 5mm thick. Use a 5cm round cutter to cut out biscuits and place them about 3cm apart on the trays. Re-roll any left over dough and repeat.
        4. Bake in preheated oven for 16-18 minutes, swapping the trays after 8 minutes, or until lightly golden and cooked through. Remove from the oven and cool on the tray

        Baker's Tips

        • Chia seeds are available from large supermarkets (in the health food section) and from specialty health food stores.
        • These biscuits will keep in an airtight container at room temperature for up to 1 week.
        Chia Shortbread
        Prep 25min (+ 1hr chilling, 2hr cooling and 30min standing time)Bake 1hrMakes 10 serves

        Choc-orange, or jaffa, is such a great flavour. This dead-easy cake is made completely in the food processor using a whole orange, rind and all (no that isn’t a mistake!). Orange flower water is optional in this recipe but will give the cake a slightly more ‘refined’ orange character.

        Ingredients

        1 orange, quartered, core and seeds removed
        220g (1 cup) caster sugar
        125g butter, melted and cooled
        2 eggs, at room temperature
        1 tabsepoon orange flower water, or to taste (optional)
        185g (1¼ cups) self-raising flour
        35g (¼ cup) plain flour
        100g good-quality dark chocolate (54% cocoa), chopped
        35g (¼ cup) coarsely chopped toasted pistachios, to sprinkle

        Chocolate glaze
        150g good-quality dark chocolate (54% cocoa), chopped
        125ml (½ cup) pouring cream

          Method

          1. Preheat oven to 170ºC (150ºC fan-forced). Grease 11cm x 21cm (base measurement) loaf tin with melted butter and line the base and two long sides with non-stick baking paper.
          2. Place the whole orange, sugar, butter, eggs and orange flower water in the bowl of a food processor. Process until the orange is finely chopped. Add the self-raising and plain flours and process until just combined. Transfer the mixture to a bowl and use a large metal spoon or spatula to fold in the chocolate.
          3. Pour the mixture into the prepared tin and use the back of a spoon to smooth the surface. Bake in preheated oven for 60 minutes or until a skewer inserted into the centre comes out clean. Remove from the oven and set aside for 5 minutes before transferring onto a wire rack to cool (this will take about 2 hours). Place the cake, still on the wire rack in the fridge for 1 hour to chill (this will help the glaze set).
          4. Meanwhile, to make the chocolate glaze, place the chocolate in a heatproof bowl. Heat the cream in a small saucepan over medium heat until almost simmering. Pour over the chocolate and stand for 1 minute. Stir until melted and smooth. Set aside to until cooled to room temperature. Pour the glaze over the cake on the wire rack, allowing it to drizzle down the sides. Sprinkle with the pistachios and set aside for 30 minutes or until the glaze sets. Serve in slices.

          Baker's Tips

          • This cake will keep in an airtight container at room temperature for up to 3 days.

          This recipe is from Anneka's SBS Food online column, Bakeproof: Easy Chocolate Cakes. CLICK HERE for more Bakeproof recipes.

          Photography by Alan Benson.

          Choc-Orange Loaf with Chocolate Glaze
          Prep 15minBake 25-30minMakes about 20

          Simple and super quick to make, these shortbread will satisfy even the most hard-core chocoholic! For extra crunch, try adding some chopped roasted hazelnuts to the mixture with the chopped chocolate.

          Ingredients

          150g (5¼oz) chilled unsalted butter, diced
          110g (½ cup, firmly packed/4oz) brown sugar
          110g (¾ cup/4oz) plain flour
          30g (⅓ cup/1oz) cornflour
          30g (¼ cup/1oz) cocoa powder, sifted
          75g (⅔ cup/2¾oz) hazelnut meal
          1 teaspoon natural vanilla extract or essence
          100g (3½oz) good-quality dark chocolate, chopped

            Method

            1. Preheat the oven to 160°C/315°F (140°C/285°F fan-forced). Line two large oven trays with non-stick baking paper.
            2. Place the butter, sugar, flour, cornflour, cocoa powder, hazelnut meal and vanilla in the bowl of a food processor (see Baker's Tips) and process for 1 minute or until the mixture just starts to form a dough (be careful not to over-mix).
            3. Transfer the mixture to a medium bowl, add the chopped chocolate and bring together with your hands to combine evenly.
            4. Roll tablespoonfuls of the mixture into balls and place on the lined trays about 5cm/2in apart. Flatten each with a fork, creating a criss-cross pattern, so that they are about 1cm/½in thick.
            5. Bake for 25-30 minutes, swapping the trays halfway through baking, or until cooked through. Remove from the oven and cool on the trays.

            Baker's Tips

            • If you don’t have a food processor, you can make these shortbread by hand. Leave the butter at room temperature for a little while for it to soften slightly. Put the sugar, flour, cornflour, cocoa powder and hazelnut meal in a medium bowl. Sprinkle with the vanilla and then use your fingertips to rub the butter through the dry ingredients until it starts to come together and forms a dough. Continue the recipe from Step 3.
            • These shortbread will keep in an airtight container at room temperature for up to 1 week.

            This recipe is from Anneka's SBS Food online column, Bakeproof: Cookies in a hurry. CLICK HERE for more Bakeproof recipes.

            Photography by Alan Benson.

            Chocolate & Hazelnut Shortbread
            Prep 40min (+ 3hr proving, 20min standing and cooling time)Bake 45min12-14 serves

            Laced with swirls of rich dark chocolate and drenched in a marmalade glaze, you’ll find this impressive loaf hard to resist – I dare you to stop at just one slice! 

            Ingredients

            525g (3½ cups) strong (baker’s) flour
            2 teaspoons instant dried yeast
            75g (⅓ cup) caster sugar
            ½ teaspoon fine salt 
            Finely grated zest of 1 orange
            180ml (⅔ cup) lukewarm milk
            2 eggs, plus 1 extra
            150g unsalted butter, softened, plus extra to grease

            Chocolate Filling

            150g dark (70%) chocolate, chopped
            50g unsalted butter, chopped
            110g (½ cup, firmly packed) brown sugar

            Marmalade Glaze

            300g jar blood orange marmalade (see Baker's Tips)
            2 tablespoons boiling water


            Method

            1. To make the dough, combine the flour, yeast, sugar, salt and orange zest in the bowl of a stand mixer fitted with the dough hook. Combine the milk and eggs in a jug. With the motor running, add milk mixture to the flour mixture and knead on low speed for 1-2 minutes or until mixture is evenly combined and a stiff dough forms.
            2. Switch to the paddle attachment and gradually add the butter, about 20g at a time, beating well after each addition on low speed until dough is smooth and very elastic (this will take about 5 minutes). Scrape down side of bowl, cover with plastic wrap and set aside in a warm, draught-free place for 1 hour 30 minutes or until dough has doubled in volume.
            3. For the Chocolate Filling, combine all ingredients in a large heatproof jug and microwave on high, in 30 second bursts, stirring after each burst, for 1 minute 30 seconds or until chocolate has melted. Stir vigorously until well combined, glossy and smooth. Set aside at room temperature to cool.
            4. Grease a 2.5L capacity (24cm top, 22cm base measurement) fluted ring pan with extra butter. Knock back the dough by punching it in the centre with your fist. Turn onto a lightly floured surface and knead for 1-2 minutes until smooth and elastic and dough has returned to its original size.
            5. Use a lightly floured rolling pin to roll dough into a 30cm x 35cm rectangle. Spread dough evenly with the chocolate filling. Starting from the longer end, roll up the dough into a tight roll. (At this point, if the dough is too soft and your kitchen too warm, you can place the log, slightly bent to fit, on a large baking tray lined with baking paper and chill for 20 minutes to firm slightly. This will make cutting and shaping the babka easier). Trim ends of roll. Starting about 2cm from the top end, cut in half, leaving the top end intact. Turn each half so that the cut edges are facing upwards. Twist the two halves together, keeping the cut edges facing upwards. Place in prepared tin, wrapping around the centre tube. Cover with plastic wrap and set aside in a warm, draught-free place for 1½ hours or until well risen.
            6. Preheat oven to 180°C (160°C fan-forced). Bake the babka for 45 minutes or until deep golden and babka sounds hollow when tapped on the top. Stand in the pan for 10 minutes before turning out onto a wire rack to cool.
            7. For the marmalade glaze, place marmalade in a large heatproof jug and microwave on high for 30 seconds. Stir well, then microwave for a further 15 seconds or until bubbling. Immediately stir through boiling water until well combined. Stand for 3 minutes, stir again, then drizzle over the cooled babka. Set aside for 10 minutes to cool slightly.
            8. Cut babka into wedges to serve.

            Baker's Tips

            • This loaf is best eaten the day it is made but it will keep in an airtight container at room temperature for up to 3 days and is perfect to slice, toast and served warm (especially for an indulgent breakfast!)

            Photography: Nigel Lough
            Styling: David Morgan

            This recipe first appeared in delicious. Australia's April 2023 edition.

              Chocolate & Marmalade Babka
              Prep 30min (+1hr cooling and 1hr chilling time)Bake 20minMakes 20 pieces

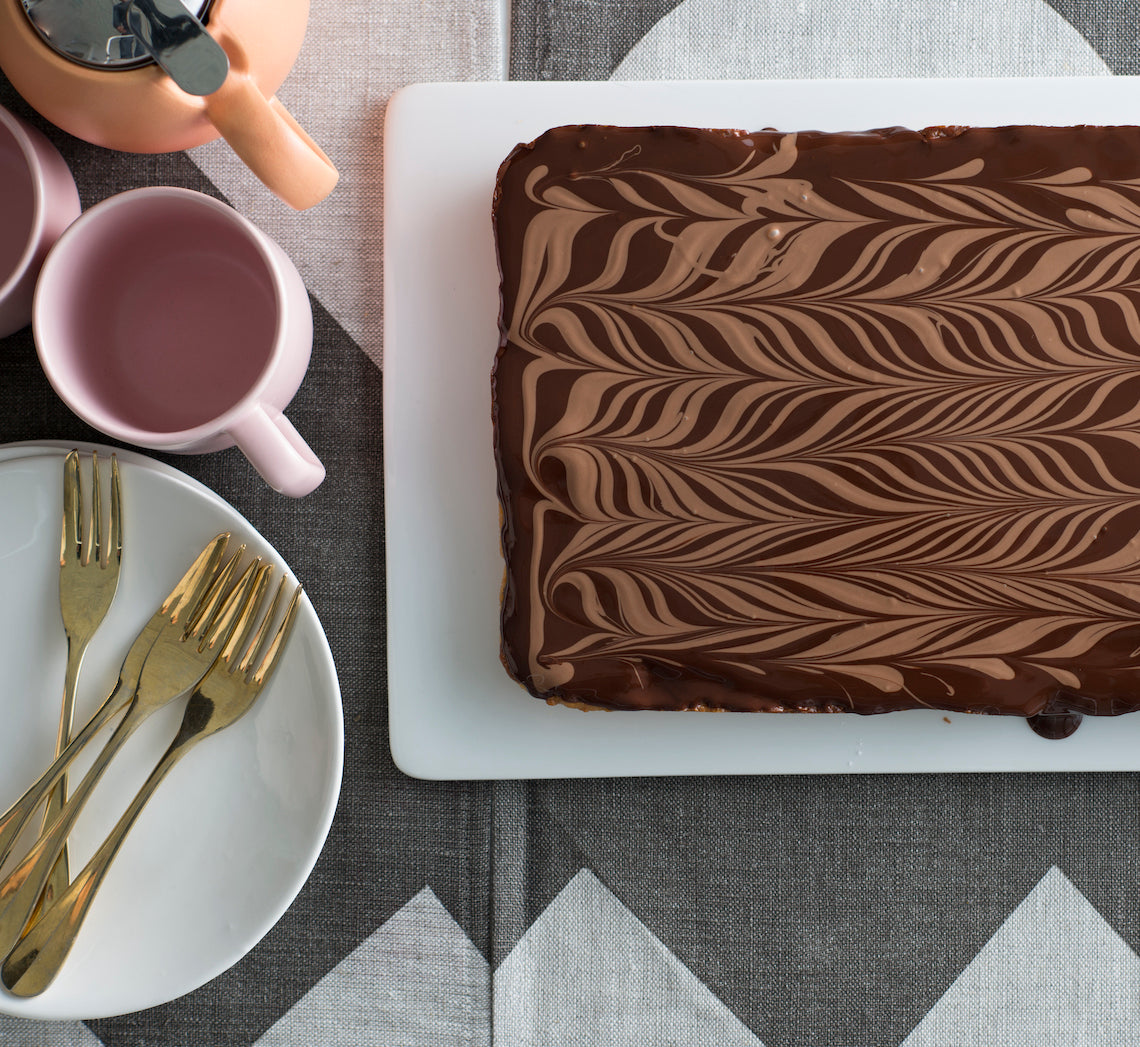
              This has to be the perennial favourite... biscuit base, gooey caramel centre and chocolate topping is a combination made in heaven. This chocolate caramel slice has been given a little makeover with a feather-patterned topping.

              Ingredients

              110g (¾ cup/4oz) plain flour
              ½ teaspoon baking powder
              30g (⅓ cup/1oz) desiccated coconut
              75g (⅓ cup, firmly packed/2¾oz) brown sugar
              80g (2¾oz) salted butter, melted
              1 teaspoon natural vanilla essence or extract

              Caramel filling

              395g (13¼oz) tin sweetened condensed milk
              110g (½ cup, firmly packed/4oz) brown sugar
              1 tablespoon golden syrup
              40g (1½oz) salted butter, cubed

              Chocolate topping

              200g (7oz) good-quality dark chocolate (70% cocoa), chopped
              30g (1oz) salted butter, cubed
              75g (2¾oz) good-quality milk chocolate

                Method

                1. Preheat oven to 180°C/350°F (160°C/315°F fan-forced). Grease a 16cm x 26cm (6 ¼in x 10½in), base measurement, shallow slice tin and line the base and sides with one piece of non-stick baking paper, cutting into the corners to fit.
                2. To make the base, combine the flour, baking powder, desiccated coconut and brown sugar in a medium bowl. Add the butter and vanilla and mix well. Crumble evenly over the base of the lined tin and use your hands to press down firmly and cover evenly. Bake in preheated oven for 12-15 minutes or until cooked through and lightly golden. Remove from the oven.
                3. Meanwhile, to make the Caramel Filling, combine the sweetened condensed milk, brown sugar, golden syrup and butter in a small saucepan and cook over a low heat, stirring constantly, for 10 minutes, or until the sugar dissolves and the mixture thickens slightly (do not boil).
                4. Pour the hot caramel immediately over the base and use the back of a metal spoon to smooth the surface. Return the slice to the oven and bake for 10 minutes or until the caramel has darkened slightly and starts to bubble around the edges. Remove from the oven and set aside for 1 hour or until cooled completely.
                5. To make the Chocolate Topping, combine the dark chocolate and butter in a medium heatproof bowl over a saucepan of simmering water (don’t let the water touch the base of the bowl). Stir frequently until the chocolate melts and the mixture is smooth. Pour over the cooled slice and use the back of a metal spoon to cover evenly. Tap the tin on the bench to even the topping and to remove any air bubbles. Melt the milk chocolate in the same way as the dark chocolate and butter in a separate small heatproof bowl. Place the slice with a short side of the tin closest to you. Use a teaspoon to generously drizzle the milk chocolate widthways across the dark chocolate to form horizontal lines. Then use a skewer to run through both the dark and milk chocolate lengthways 5-6 times in alternate directions to form a feather pattern. Place in the fridge for 1 hour or until the chocolate sets. 
                6. Use a warm large sharp knife to cut into pieces to serve.

                Baker's Tip

                • This slice will keep in an airtight container in the fridge for up to 1 week.

                This recipe is from Anneka's SBS Food online column, Bakeproof: Childhood Favourites.

                CLICK HERE for more Bakeproof recipes.

                Photography by Alan Benson.

                Chocolate Caramel Slice
                Prep 20min (+ 5min standing time)55-60minMakes 8 serves

                I have been baking this gluten-free pudding for years. Not only is it completely heavenly, it is also very clever and can be baked as a cake when you want.

                Ingredients

                Melted butter, to grease
                Cocoa powder, sifted, to dust
                200g (1⅓ cups/7oz) chopped good-quality gluten-free dark chocolate (70 percent cocoa is good)
                125g (4½oz) unsalted butter, cubed
                2 tablespoons marsala wine or freshly brewed strong coffee
                165g (¾ cup/5¾oz) caster sugar
                5 eggs, at room temperature, separated
                Gluten-free icing (confectioners’) sugar, to dust
                Cream or gluten-free vanilla ice cream, to serve

                Method

                1. Preheat the oven to 170°C/340°F (150°C/300°F fan-forced). Brush a 2 litre (8 cup/3½pt) capacity ovenproof dish (about 20cm/8in diameter) with melted butter to grease. Lightly dust with cocoa powder, tapping out any excess.
                2. Place the chocolate and butter in a medium heatproof bowl over a saucepan of simmering water, making sure the base of the bowl doesn't touch the water, and stir until melted and smooth. Transfer the mixture to a large bowl and stir in the marsala, 110g (½ cup/4oz) of the caster sugar and the egg yolks.
                3. Use an electric mixer with a whisk attachment to whisk the egg whites in a clean, dry large bowl on medium speed until soft peaks form. Add the remaining 55g (¼ cup/2oz) caster sugar and whisk until thick and glossy. Add one-third of the egg white mixture to the chocolate mixture and use a large metal spoon or spatula to fold together. Fold through the remaining egg white mixture until just combined.
                4. Pour the mixture into the prepared dish. Bake in the preheated oven for 55–60 minutes, or until crumbs cling to a skewer inserted in the centre.
                5. Remove the pudding from the oven and set aside for 5 minutes. Dust with icing sugar and serve in scoops with cream or ice cream.

                Variation

                Chocolate Soufflé Cake: Bake the mixture in a 22cm/8¾in (base measurement) springform cake tin that has been base-lined with baking paper, and then greased and dusted with cocoa powder. Bake at the same temperature for 55–60 minutes. Leave the cake to cool in the tin. Cut into wedges to serve.

                Baker's Tips

                • This pudding is also delicious served at room temperature. Leave to cool in the dish before serving.
                • Any leftover pudding will keep covered in the fridge for up to 3 days. Leave to stand at room temperature for at least 30 minutes before serving.

                Recipe and image from BakeClass by Anneka Manning (Murdoch Books).

                Chocolate Soufflé Pudding
                Prep 40min (+1hr cooling and 10min standing time)Bake 1hrMakes 40

                These mouthfuls of chocolate sweetness are simply too cute for words! The meringue mixture is made using the Swiss meringue method of heating the egg whites and sugar together over a bain marie until the sugar dissolves and the mixture is hot before whisking. Don’t be tempted to cut the whisking time with this method as the meringue structure won’t be fully formed until it is cooled completely and you will end up with little pools of shapeless meringue on your tray once piped instead of petite ‘kisses’.

                Ingredients

                Chocolate swirl meringues 
                4 egg whites, at room temperature
                220g (1 cup/7¾oz) caster sugar
                1 teaspoon natural vanilla essence or extract
                1½ tablespoons Dutch cocoa powder

                Caramel ganache 
                100g (3½oz) good-quality dark (70% cocoa) chocolate, finely chopped
                55g (¼ cup/2oz) caster sugar
                2 tablespoons water
                100ml (3½fl oz) pure (pouring/thin) cream
                20g (¾oz) salted butter, cubed

                Method

                1. Preheat oven to 110°C/230°F (90°C/195°F fan-forced). Line a large oven tray with non-stick baking paper.
                2. Combine the egg whites and sugar in the heatproof bowl and place over a saucepan of simmering water (make sure the bowl fits snugly in the saucepan and the base doesn’t touch the water). Stir with a whisk until the sugar is dissolved completely and the mixture reaches 55°C/130°F on a sugar thermometer.
                3. Transfer the mixture to the bowl of a stand mixer and whisk with the whisk attachment on medium-high speed for 10 minutes or until very thick and glossy and the mixture has cooled completely to room temperature. Whisk in the vanilla.
                4. Transfer the meringue mixture to a large wide bowl. Sift the cocoa powder over the top of the meringue mixture and use a spatula to fold the mixture 2-3 times to roughly swirl the cocoa powder through.
                5. Carefully spoon the meringue into a large piping bag fitted with a plain 11mm/½in (#11) nozzle. Holding the piping tip about 1cm/ ½in from the lined tray, pipe small ‘kisses’ about 3cm/1 ¼in in diameter and 2cm/ ¾in apart onto the tray.
                6. Bake in preheated oven for 1 hour-1 ¼ hours or until the meringue is crisp and hard to touch, but not coloured. Transfer the meringue kisses immediately (while still warm) to an airtight container lined with absorbent paper, dividing layers with more absorbent paper if necessary.
                7. Meanwhile, to make the Caramel Ganache, place the chocolate in a heatproof bowl. Combine the caster sugar and water in a small saucepan and use a wooden spoon to stir over low heat until the sugar dissolves. Increase the heat to medium and bring to the boil. Boil for about 10 minutes, brushing down the side of the pan with a pastry brush dipped in water to dissolve any sugar crystals, until the mixture turns a deep caramel. Remove immediately from the heat and carefully add the cream and butter. Stir with a wooden spoon until well combined and the caramel is smooth. Pour the warm caramel over the chocolate and set aside for 1 minute. Stir with a metal spoon until smooth. Set aside at room temperature for 1 hour, stirring occasionally, or until cooled and thickened to a spreadable consistency. (Makes about 200ml.)
                8. Spread the base of a cooled meringue with a little of the Caramel Ganache and then sandwich with another meringue. Repeat with the remaining meringues and ganache. Set aside for at least 10 minutes for the ganache to firm slightly before serving.

                Baker's Tip

                • The unsandwiched meringues will keep in an airtight container in a cool, dry place for up to 1 week. Once sandwiched with the ganache they are best eaten the same day, but keep them in an airtight container until serving time.


                This recipe is from Anneka's SBS Food online column Bakeproof: Meringue. Click here for more Bakeproof columns and recipes.


                Photography by Alan Benson.

                Chocolate Swirl Meringue Kisses with Caramel Ganache
                Prep 30min (+30min standing time)
                Bake 40min
                Makes about 24 

                Even though these rolls are based on a scone dough, they resemble more a cakey biscuit. Confused? Just go ahead and bake them, you won't be disappointed… And you'll probably find yourself sneaking an extra slice!

                Ingredients

                170g (1 cup) seedless raisins
                60ml (¼ cup) freshly brewed strong coffee
                225g (1½ cups) self–raising flour
                75g (½ cup) plain flour
                Pinch of salt
                80g butter, softened slightly, cubed
                2 tablespoons caster sugar
                125ml (½ cup) pure (pouring/thin) cream
                80ml (⅓ cup) milk, plus extra for glazing
                150g good-quality dark chocolate, chopped

                Coffee icing
                125g (1 cup) pure icing sugar
                1 tablespoon freshly brewed strong coffee

                Method
                1. Preheat the oven to 180°C (160°C fan-forced). Line a large baking tray with non–stick baking paper.
                2. Put the raisins and coffee in a small saucepan and bring to a simmer over medium heat. Remove from the heat and set aside for 15 minutes or until almost all the liquid has been absorbed. Drain the raisins and set aside.
                3. Sift both the flours and salt together into a medium bowl. Use your fingertips to rub in the butter until the mixture resembles fine breadcrumbs and the butter is evenly incorporated. Stir in the sugar and make a well in the centre. Combine the milk and cream, add to the flour mixture and use a flat-bladed knife to mix with a cutting action until the dough comes together in clumps.
                4. Use lightly floured hands to bring the dough together – it will be soft, but not sticky. Place on a lightly floured surface and knead lightly and briefly (only about 6 times) to bring it together in a smooth ball. Use a lightly floured rolling pin to roll the dough into a rectangle about 32 x 28cm. Sprinkle the dough with the chocolate and then the soaked raisins, leaving a 1cm border. Starting from a long side, roll up the dough to form a log. Cut in half and then place both logs on the lined oven tray, leaving enough room between each for spreading. Brush the surface of the logs with the extra milk to glaze.
                5. Bake in preheated oven for 40 minutes or until golden and cooked through and the logs sound hollow when tapped on the base. Remove from the oven and transfer the logs to a wire rack to cool.
                6. To make the Coffee Icing, put the icing sugar in a medium bowl and stir in the coffee to make a smooth pouring consistency. Drizzle over the cooled logs. Set aside for 15 minutes or until the icing sets before slicing.
                Baker's Tips
                • These rolls will keep in an airtight container at room temperature for up to 4 days.

                This recipe is from Anneka's SBS Food column, Bakeproof: Scones.

                CLICK HERE for more Bakeproof recipes.

                Photography by Alan Benson.

                Chocolate, Coffee & Raisin Rolls
                Prep 30min (+2hr cooling time)Bake 40-45minMakes about 20-24 pieces

                Hailing from Siena in the Tuscan region of Italy, panforte (‘strong bread’ when translated to English) is a delectable combination of dried fruits, nuts, spices, honey and, if you are lucky, chocolate. It is believed to date back to the 13th Century and was originally a form of tax paid to a local monastery. Like many traditional recipes, there are many variations with each often being a well-guarded family recipe – however I will share this one with you!

                Ingredients

                • Melted butter, to grease
                • 2 sheets confectioner's rice paper (see Baker's Tips)
                • 75g (½ cup/2¾oz) plain flour
                • 40g (⅓ cup/1½oz) cocoa powder
                • 1 teaspoon ground cinnamon
                • ½ teaspoon freshly ground black pepper
                • 70g (½ cup/2½oz) dried pitted dates, coarsely chopped
                • 80g (½ cup/2¾oz) prunes, coarsely chopped
                • 80g (2¾oz) glace apricots, chopped
                • 155g (1 cup/5½oz) unsalted roasted macadamias, coarsely chopped
                • 160g (1 cup/5¾oz) blanched almonds, coarsely chopped
                • 70g (½ cup/2½oz) unsalted pistachio kernels
                • 100g (3½oz) good-quality dark chocolate, chopped
                • 1½ tablespoon finely grated orange rind
                • 175g (½ cup/6¼oz) honey
                • 110g (½ cup/4oz) caster sugar
                • 2 tablespoon water
                • 1 teaspoon natural vanilla essence or extract
                • Icing sugar or extra cocoa powder, to dust

                Method

                1. Preheat oven to 170°C/340°F (150°C/300°F fan-forced).

                2. Brush a shallow round 20cm/8in (base measurement) tin with melted butter to grease and then line the base with a circle of rice paper, cutting the sheets to fit. Line the sides with a strip of non-stick baking paper.

                3. Sift the flour, cocoa and spices into a large bowl, then stir in the fruit, nuts, chocolate and orange rind. Set the bowl on a folded tea towel (see Baker's Tips). 
                4. Put the honey, sugar and water in a small saucepan. Stir over low heat, without boiling, until the sugar dissolves. Bring to the boil and simmer, uncovered and without stirring, for 5 minutes. Immediately pour the hot syrup and vanilla over the fruit and nut mixture and, working quickly, stir with a wooden spoon until well combined. Press mixture firmly and evenly into prepared tin.

                5. Bake for 40-45 minutes or until firm to touch in the centre. Cool in the pan sitting on a wire rack (this will take about 2 hours).

                6. Remove from pan and dust liberally with icing sugar or cocoa. Serve in thin slices or wedges.


                Baker's Tips

                • Confectioner's rice paper sheets are available from Asian grocers, delicatessens and specialty food stores. Don't confuse it with Asian rice paper, used to make rice paper rolls.
                • Before adding the hot syrup to the fruit and nut mixture, place a tea towel under the bowl to stop it from slipping when mixing.
                • To make individual panforte, grease eight 8cm (base diameter) loose-bottomed tart tins with oil spray or melted butter and line the bases with a circle of edible rice paper. Divide the mixture among the tins and press down firmly. Bake for 25-30 minutes.
                • This panforte will keep wrapped well in plastic wrap at room temperature in a cool spot for up to 1 month.

                This recipe is from Anneka's SBS Food online column, Bakeproof: Gifts from the Kitchen.

                CLICK HERE for more Bakeproof recipes.

                Photography by Alan Benson.

                Chocolate-orange Panforte
                Prep 20min (+pastry making and 30min cooling time)Bake 40minMakes 10

                Also called choux a la crème or cream puffs, profiteroles are basically choux pastry balls filled with crème patissiere, whipped cream or, as in these, ice-cream. These profiteroles, a heavenly combination of cinnamon, coffee and chocolate, are just a little bit addictive!

                Ingredients

                • 1 quantity basic choux pastry
                • 2 teaspoons caster sugar
                • 2 teaspoons ground cinnamon
                • 1 egg, lightly whisked, to glaze
                • 1 litre homemade or bought espresso or coffee ice-cream, to serve

                Fudge sauce

                • 200ggood quality dark chocolate (70% cocoa works well), chopped
                • 125ml (½ cup) pouring cream
                • 2 tablespoons golden syrup
                • 1 teaspoon natural vanilla essence or extract
                • ¼ teaspoon salt

                Method

                1. Preheat oven to 200°C. Line 2 large oven trays with non-stick baking paper.
                2. Use a wooden spoon to beat the sugar and cinnamon into the warm prepared choux pastry until well combined.
                3. Spoon 30 heaped teaspoonfuls of the choux pastry onto the lined trays about 2cm apart to allow for spreading. Use a damp fingertip to smooth any peaks. Sprinkle the trays with a little water.
                4. Bake in preheated oven for 20 minutes or until well puffed and golden. Reduce the oven to 180°C and bake for a further 20 minutes. Turn off the oven and leave the puffs to cool in the oven for at least 30 minutes to dry. Remove from the oven and set aside to cool completely.
                5. Meanwhile, to make the fudge sauce, combine all the ingredients in a small saucepan and stir over low heat until the chocolate melts and the sauce is smooth. Set aside and keep warm.
                6. To serve, cut each of the cinnamon choux puffs in half and fill each with small scoop of ice-cream. Place three on each serving plate and spoon over the warm chocolate fudge sauce. Serve immediately.

                Baker's Tips

                • The cinnamon choux puffs can be made up to 3 days ahead of serving. Store in an airtight container at room temperature. Refresh by placing on an oven tray and reheating in an oven preheated to 180°C for 10 minutes. Cool, assemble and serve.
                • The chocolate fudge sauce can be made up to 1 week ahead of serving. Keep in an airtight jar or container in the fridge. Reheat in a small saucepan over a low heat, stirring occasionally, until smooth and heated through.

                This recipe is from Anneka's SBS Food online column, Bakeproof: Choux Pastry.

                CLICK HERE for more Bakeproof recipes.

                 Photography by Alan Benson.

                Cinnamon & Espresso Profiteroles with Fudge Sauce
                Prep 30min (+pastry making time)Bake 1hr15minMakes 8-10 serves

                Everyone loves a classic apple pie – it is the ultimate comfort food... Especially when teamed with some good vanilla ice cream!

                Ingredients

                2 quantities Sweet Vanilla Shortcrust Pastry (combine ¼ of one pastry quantity with the other, and then shape each into a separate disc before wrapping and chilling for 30 minutes)
                1 egg yolk
                2 teaspoons milk
                1 tablespoon demerara sugar
                Vanilla ice-cream, to serve

                Apple Filling
                2½ tablespoons caster sugar
                1½ tablespoons plain flour
                1½ teaspoons ground cinnamon
                6 medium (about 140g each) pink lady or granny smith apples
                1 orange, rind finely grated and juiced
                1 teaspoon vanilla bean paste
                25g (¼ cup) almond meal
                20g salted butter, finely diced

                  Method

                  1. Preheat the oven to 200°C (180°C fan-forced).
                  2. Unwrap the larger portion of pastry and place on a lightly floured, cool benchtop. Use a lightly floured rolling pin to roll the pastry into a round, about 5mm thick and about 35cm in diameter.
                  3. Carefully drape the pastry loosely around the rolling pin, place it over an ungreased 20cm (top measurement) metal or ceramic pie dish (see Baker’s Tips) then unroll the pastry being careful not to stretch it. Gently lift the edges of the pastry and ease it into the pie dish to line the base and the sides and settle it into the corners without stretching it, allowing the excess pastry to overhang the edges. Place the lined pie dish on an oven tray and then place in the fridge to rest for while making the filling.
                  4. To make the apple filling, combine the sugar, flour and cinnamon in a small bowl. Peel, core and quarter each apple. Cut each apple quarter into 4 wedges and place in a separate large bowl with the orange rind, 1 tablespoon of the orange juice and the vanilla bean paste. Use your hands or spatula to toss gently to evenly coat the apple slices. Add the sugar mixture and toss gently to combine evenly.
                  5. Sprinkle the almond meal over the base of the chilled pastry case, spoon the apple mixture over the top and dot with the diced butter. Whisk together the egg yolk and milk. Brush the edge of the pastry with the egg wash. Roll out the remaining smaller disc of pastry into a round, about 5mm thick and about 25cm in diameter. Use a 2cm fluted or plain round cutter to cut out a circle from the centre of the pastry. Carefully drape the pastry loosely around the rolling pin and roll over the top of the pie. Use your fingertips to press the pie pastry top and bottom together around the edge of the pie to seal. Use a small sharp knife to trim the excess pastry from around the edge. Use your fingertips to pinch the edge of the pastry to decorate. Brush the top of the pie with some of the remaining egg wash and then sprinkle with demerara sugar.
                  6. Bake in preheated oven for 30 minutes. Reduce the oven temperature to 160°C (140°C fan-forced) and bake for a further 40 minutes or until the pastry is golden and cooked through and the apples are tender (see Baker’s Tips). Remove the pie from the oven and stand for 5 minutes before serving warm with ice cream. 

                  Baker's Tips

                  • For this recipe you will need a ceramic or metal pie dish measuring about 20cm across the top, 17cm across the base and 4.5cm deep.
                  • To check if the apples are tender, insert a skewer into the centre of the pie.
                  Classic Apple Pie
                  • 1
                  • 2
                  • 3
                  • 4
                  • 5
                  • 6
                  • …
                  • 17

                  Follow @bakeclub_australia on Instagram

                  Our partners

                  SUBSCRIBE!
                  contact us
                  • info@bakeclub.com.au

                  • FOLLOW US
                  CUSTOMER INFORMATION
                  • FAQ
                  • Terms of Use
                  • Privacy Policy
                  • Terms of Service
                  • Refund policy

                  © 2025 BakeClub. All Rights Reserved.

                  Site by Fruitful Creative.