SUBSCRIBE TO BAKECLUB!
  •  
0 CART/CHECKOUT

Learn, connect & share through a love of baking

  • Home
  • Classes
    • Live & Guided Online Classes
    • Self-paced Online Classes
    • How to choose an online class
    • Special Events
  • BakeClub & Co.
    • Join BakeClub & Co.
    • Log in to BakeClub & Co.
    • Gift BakeClub & Co.
  • Make Me a Baker Program
    • Make Me a Baker Online
    • Testimonials
    • Graduation gallery
  • Shop
    • Anneka's Books
    • BakeClub Aprons
    • Baking Gifts
    • Gift Certificates
  • Recipes
    • Browse All
    • Bakes that Travel Well
    • Bakes to Share with a Cuppa
    • Baking with Kids
    • Café Favourites
    • Flour-free Recipes
    • International Recipes
    • Recipes to Nurture, Comfort & Calm
    • Savoury Tummy Fillers
    • Winter Warmers
  • Resources
    • BakeClub Blog
    • BakeClub Tips
    • BakeClub Q&A
    • BakeClub Videos
    • BakeNews Archives
    • Subscribe to BakeClub
  • About
    • Who is Anneka Manning?
    • About BakeClub
    • What Our Students Say
    • BakeClub Partners
    • Media
    • Contact Us
  • home
  • Products
Prep 45min (+ 20min chilling + 1.5hr cooling time)Bake 55minMakes 8-10 serves

The combination of fig, honey and almonds is a well-loved one. I’ve added the gentle pungency of fresh sage to this and the result is sublime. This tart is something special to reserve for autumn lunches when figs are at their best.

Ingredients

1 x quantity sweet sage shortcrust pastry, shaped into a rectangle before wrapping and chilling as directed
8 medium firm ripe figs (about 50g each), quartered
2 tablespoons honey, warmed, to brush
20 small sage leaves (optional), to serve
Icing sugar (optional), to dust
Honey ice cream or whipped cream, to serve

Frangipane

80g unsalted butter, at room temperature
75g (⅓ cup) caster sugar
2 tablespoons honey
1 orange, rind finely grated
2 eggs, at room temperature
50g (⅓ cup) plain flour
120g ground almonds (meal)

Method
  1. Preheat oven to 200°C (180°C fan-forced).
  2. Unwrap the pastry and place on a lightly floured, cool work surface. Gently pat the pastry with the palm of your hand to flatten slightly. Use a lightly floured rolling pin to roll the pastry into a rectangle about 4mm thick. Line a 11.5cm x 35cm (base measurement) tart tin, with a removable base, with the pastry. Roll the rolling pin over the top of the tart tin to trim any overhanging pastry.
  3. Place tart case on a baking tray. Prick the pastry base with a fork (about 12 times). Line the pastry case with greaseproof paper or foil and fill with pastry weights, dried beans or raw rice, making sure to press into the corners. Bake for 15 minutes.
  4. Remove from oven and use the paper to lift the weights out of the case. Return the pastry case to the oven and cook for a further 5-10 minutes or until the pastry case is lightly golden and just cooked through. Remove the tart case from the oven and set aside to cool.
  5. Reduce the oven temperature to 170°C (150°C fan-forced).
  6. To make the Frangipane, use an electric mixer to beat the butter, sugar, honey and orange rind until pale and creamy. Add the eggs one at a time, beating well after each addition, until well combined. Combine the flour with the ground almonds and mix evenly. Add to the butter mixture and mix on low speed until just combined. Spoon the frangipane into the cooled tart case and spread evenly. Press the fig quarters, cut side up, randomly into the frangipane.
  7. Bake for 50-55 minutes or until the frangipane is just set and the pastry is golden and crisp. Remove the tart from the oven and place, still in the tin, on a wire rack.
  8. Brush the warm tart with the honey and set aside to cool (this will take about 1 hour). Sprinkle with the small sage leaves and icing sugar, and serve slices accompanied with ice cream or cream.
Baker's Tips
  • This tart is best eaten on the day it is baked; however, it will keep in the fridge in an airtight container for up to 2 days. Serve at room temperature.


This recipe is from Anneka's SBS Food online column, Bakeproof: Autumn Fruits. CLICK HERE for more Bakeproof recipes.

Photography by Alan Benson.

Fig, Honey & Sage Tart
Prep 40min (+1.5hr proving and 20min standing time)Bake 25minMakes about 12

Just milk bread studded with sultanas, topped with pink icing and finished with coconut – it's the simplicity that gives the finger bun its appeal!

Ingredients

375g (2½ cups) strong bread or pizza flour, plus extra, to dust

2 tablespoons caster (superfine) sugar

60g (⅓ cup) sultanas (golden raisins)

7g (1 sachet) dried yeast

½ teaspoon salt

200ml milk

40g butter, cubed

2 eggs, at room temperature

1 teaspoon natural vanilla extract or essence

Melted butter, to grease

Topping

185g (1½ cups) pure icing (confectioners') sugar

5 teaspoons water

Pink food colouring (about 3 drops)

2 tablespoons desiccated coconut, to sprinkle

Method
  1. To make the dough, combine the flour, sugar, sultanas, yeast and salt in a large bowl and make a well in the centre. Combine the milk and butter in a small saucepan and heat over low heat for 2–3 minutes, or until the butter has melted and the milk is lukewarm. Remove from the heat. Whisk one of the eggs with the vanilla and add to the butter and milk mixture. Whisk to combine. Add to the flour mixture. Use a wooden spoon and then your hands to mix to a soft dough.
  2. Turn the dough onto a lightly floured bench top and knead for 8–10 minutes or until it is smooth and elastic and springs back when you push your finger into it.
  3. Brush a large bowl with melted butter, to grease. Add the dough, turning it to coat lightly with the butter. Cover with plastic wrap and place in a warm, draught-free place for 1 hour or until doubled in size.
  4. Preheat the oven to 180°C (160°C fan-forced). Line two baking trays with baking paper.
  5. When the dough has doubled in size, knock it back by punching it in the centre with your fist. Turn onto a lightly floured bench top and knead for 2–3 minutes or until smooth and elastic. Divide the dough into 12 equal portions. Shape each portion into a long oval shape about 12cm long and 3cm wide in the centre, and place on the lined trays, leaving about 5cm between them. Cover with a slightly damp tea towel (dish towel) and set aside in a warm, draught-free place for 30 minutes or until well risen.
  6. Whisk the second egg and brush the rolls with it to glaze. Bake in the preheated oven for 25 minutes, swapping the trays halfway through baking, or until the buns are golden and sound hollow when tapped on the base. Transfer to a wire rack to cool.
  7. To make the Topping, sift the icing sugar into a medium bowl. Use a wooden spoon to stir in the water and mix to a very thick pouring consistency. Add 2–3 drops of pink food colouring to tint the icing. Spread the cooled finger buns with the icing, allowing it to drizzle down the sides. Sprinkle with the coconut and set aside for 20 minutes for the icing to set before serving. These finger buns are best eaten on the day they are made.

Recipe and image from BakeClass by Anneka Manning (Murdoch Books).
    Finger Buns
    Prep 30min (+ 1hr cooling and pastry making time)Bake 45minMakes 4 serves

    On a trip to Finland a few years ago it only took me a couple of meals to realise how much dill and salmon feature in the country’s wonderful cuisine. This pie is a little ode to the Fin’s favourite ingredients, all topped off with a deliciously buttery, flaky pastry.

    Ingredients

    40g (1½oz) salted butter
    2 celery stalks, trimmed and sliced
    35g (¼ cup/1¼oz) plain flour
    250ml (1½ cup/9fl oz) milk
    125ml (½ cup/4fl oz) pouring (thin) cream
    50g (½ cup/1¾oz) coarsely grated vintage cheddar
    3 spring onions, trimmed and sliced
    1½ tablespoons (6 teaspoons) baby capers, rinsed and drained
    2 tablespoons chopped dill
    1 teaspoon Dijon mustard
    Salt and freshly ground black pepper, to taste
    700g (1lb 8oz) skinless salmon fillets, pin-boned and cut into 3cm pieces
    1 quantity Cheat's Rough Puff Pastry
    1 egg yolk, lightly whisked with 2 teaspoons milk, to glaze

    Method

    1. Melt the butter in a medium saucepan over medium heat. Add the celery and cook, stirring occasionally, for 5 minutes or until starting to soften. Add the flour and stir with a balloon whisk for about 1 minute until the mixture is bubbling and leaves the sides of the pan.
    2. Remove the pan from the heat and gradually stir in half the milk, stirring constantly, until smooth. Gradually add the remaining milk and cream, stirring until smooth. Return the pan to medium heat and stir constantly until the sauce thickens and starts to simmer. Reduce the heat to low and simmer, stirring frequently, for 2 minutes.
    3. Transfer the sauce immediately to a large heatproof bowl and stir in the cheddar, spring onions, capers, dill and mustard. Taste and season well with salt and pepper.
    4. Place in the fridge for about 1 hour or until cooled to room temperature.
    5. Preheat the oven to 200˚C/400°F (180°C/350°F fan-forced). You will need a 1.5 litre (6 cup/2pt 10fl oz) capacity ovenproof dish to cook the pie.
    6. When the sauce has cooled, add the salmon and stir gently to combine evenly.
    7. Use a lightly floured rolling pin to roll out the pastry on a lightly floured surface to the shape of the dish until about 4mm/⅛in thick. Spoon the cooled salmon mixture into the dish, then brush the edge of the dish with a little of the egg wash. Place the pastry over the filling to cover, then use a small sharp knife to run around the edge of the pie dish on a slight angle to trim the excess pastry. Use a fork to press around the edge of the dish to seal. Cut a cross in the top of the pie and then brush the pastry with a little egg wash to glaze. Decorate the top with the off-cuts of pastry, if desired, and then glaze again with the little of the egg wash.
    8. Place the pie on a baking tray and bake for 45 minutes or until the pastry is dark golden, crisp and cooked through. Serve straight from the oven.
    This recipe is from Anneka's SBS Food online column, Bakeproof: Pies. CLICK HERE for more Bakeproof recipes.
      Photography by Alan Benson.
      Finnish Fish Pie
      Prep 20minBake 55minMakes 8-10 serves

      This cake is a favourite of mine – it is rich but light all at the same time. The chocolate, egg yolks and hazelnut meal provide the richness while the egg whites account for the light texture. It is indulgent without being overwhelmingly rich – my sort of chocolate cake. It makes a perfect dessert when served with thick cream or ice cream but don’t underestimate how blissfully suitable a slice with afternoon coffee can be.

      Ingredients

      Melted butter, to grease
      150g good-quality dark chocolate, chopped
      100g butter, cubed
      4 eggs, at room temperature, separated
      110g (½ cup) caster sugar
      110g (1 cup) hazelnut meal
      2 tablespoons sherry, brandy or Frangelico
      Cocoa powder or icing sugar, to dust

        Method

        1. Preheat the oven to 150°C (130°C fan-forced). Grease a 22cm (base measurement) springform tin with the melted butter, then line the base and side with baking paper.
        2. Combine the chocolate and butter in a medium heatproof bowl over a saucepan of simmering water (don’t allow the bowl to touch the water). Stir occasionally until the chocolate and butter melt and the mixture is smooth. Remove the bowl from the pan.
        3. Add the egg yolks, sugar, hazelnut meal and sherry to the chocolate mixture and use a balloon whisk to stir until well combined. Transfer the mixture to a large bowl.
        4. Place the egg whites in a clean, dry medium bowl and use electric beaters with a whisk attachment to whisk until firm peaks form. Add a spoonful of egg white to the chocolate mixture and use a large metal spoon or spatula to fold in – this will ‘loosen’ the mixture. Add the remaining egg white and fold in until just combined.
        5. Pour the mixture into the prepared tin and use the back of a spoon to smooth the surface. Bake in preheated oven for 55 minutes or until the top of the cake feels set and crumbs cling to a skewer inserted into the centre. Remove the cake from the oven, place on a wire rack and cool completely in the tin.
        6. Remove the cake from the ti and serve dusted with cocoa powder or icing sugar.

        Baker's Tips

        • This cake will keep in an airtight container in the fridge for up to 4 days. Bring it to room temperature before serving.

        Variations

        • Flourless Chocolate & Almond Cake: Replace the hazelnut meal with almond meal.
        • Flourless Chocolate & Orange Cake: Replace the hazelnut meal with almond meal. Replace the sherry with 2 tablespoons orange liqueur (such as Grand Marnier or Cointreau). Add 1 tablespoon finely grated orange zest with the egg yolks.
        • Flourless Chocolate Coffee Cake: Replace the sherry with 2 teaspoons instant coffee granules dissolved in 2 tablespoons water.
        Flourless Chocolate & Hazelnut Cake
        Prep 25minBake 30-35minMakes 12

        Drizzled with an oozing chocolate ganache, these cupcakes are wickedly rich (but light in texture) and have a surprise of intense raspberry tartness hidden right in the middle!
        Don't worry, you haven't done anything wrong – these cupcakes are meant to have a hole in the centre... Because the mixture is flourless, the raspberry jam sinks during baking creating a crater of sorts, giving them their name. 

        Ingredients

        180g good-quality dark chocolate (45% or 70% cocoa), chopped (see Baker's Tips)
        125g butter, cubed
        60ml (1/4 cup) water
        220g (1 cup) brown sugar, plus 2 tablespoons extra
        85g (3/4 cup) hazelnut meal
        25g (1/4 cup) desiccated coconut
        3 eggs, at room temperature, separated
        85g (1/4 cup) raspberry jam

        Chocolate ganache
        180g good-quality dark chocolate (45% cocoa), finely chopped
        60ml (1/4 cup) pure (pouring) cream

          Method

          1. Preheat the oven to 180°C (160°C fan-forced). Line a 12-hole 80ml (⅓ cup) muffin tin with paper cases.
          2. Combine the chocolate, butter and water in a medium saucepan and stir over a low heat until melted and smooth. Remove from heat, add the sugar, hazelnut meal, coconut and egg yolks and stir well with a wooden spoon until well combined and any lumps have broken up. Transfer the mixture to a large bowl.
          3. Place the egg whites in a clean, dry medium bowl and use electric beaters with a whisk attachment to whisk until soft peaks form. Add the extra 2 tablespoons of brown sugar and whisk until thick and glossy. Add a large spoonful of egg white mixture to the chocolate mixture and use a large metal spoon or spatula to fold in – this will ‘loosen’ the mixture. Add the remaining egg white mixture and fold in until just combined.
          4. Divide the mixture among the prepared muffin holes. Place a teaspoon of raspberry jam in the centre of each cupcake and press down gently until the jam is in line with the top the cupcake mixture. Bake in preheated oven for 30-35 minutes or until the top of the cupcakes feels set and crumbs cling to a skewer inserted into the side of a cupcake. Remove the cupcakes from the oven, and stand in the tray for at least 5 minutes before transferring to place a wire rack and cool completely.
          5. To make the Chocolate Ganache, place the chocolate in a heatproof bowl. Place the cream in a small saucepan and heat over medium heat, stirring occasionally, until the cream almost comes to a simmer. Pour the hot cream over the chocolate and set aside to stand for 3 minutes. Stir the chocolate and cream mixture until the chocolate melts and the mixture is smooth. Set aside, stirring occaiosnally until thickened to a thick pouring consistency (see Baker's Tips).
          6. Drizzle a generous spoonful of ganache on the tops of the cupcakes around the hole in the centre, allowing it to dribble over the sides and down into the hole. Set aside for about 30 minutes or until the ganache sets before serving. 

          Baker's Tips

          • Using 70% cocoa chocolate in the cupcakes will give them a more intense chocolate flavour.
          • The ganache will take between 15 minutes and about 11/2 hours to reach the right consistency for drizzling depending on the weather. If it is a really hot day you can put the ganache in the fridge to help it thicken - just make sure you stir it often so lumps don't form.
          • These cupcakes will keep in an airtight container in a cool spot (but not in the fridge) for up to 3 days. 

            Flourless Chocolate & Raspberry Volcano Cupcakes
            Prep 25min(+ pastry making and chilling time)Bake 50-55minMakes 8-10 serves

            This tart is simplicity at its best – a selection of gorgeous summer stone fruit encased in a sweet, easy-peasy pastry. There's no real structure, it's slightly rustic and lets seasonal stone fruits shine. Serve with toffee ice-cream if you can – the combination is sublime.

            Ingredients

            1 quantity of Sweet Shortcrust Pastry (see Variations)
            25g (¼ cup/¾oz) almond meal
            700g (1lb 8oz) firm but ripe stone fruit of your choice (such as peaches, nectarines, plums and apricots), halved and pitted
            2 tablespoons raw sugar
            Icing sugar, to dust (optional)
            Good-quality toffee or vanilla ice-cream, to serve

              Method

              1. Preheat oven to 200°C/400°F (180°C/350°F fan-forced).
              2. Use a lightly floured rolling pin to roll out the pastry on a piece of non-stick baking paper to a rough rectangle about 3mm/⅛in thick. Use the paper to transfer the pastry to a large baking tray. Sprinkle the pastry with the almond meal, leaving a 5cm/2in-wide border around the edge. Arrange the fruit over the almond meal and then fold the pastry border up over the fruit. Sprinkle the upturned border and fruit with the sugar. Bake in preheated oven for 50-55 minutes or until the pastry is golden and crisp.
              3. Serve warm or at room temperature, dusted with icing sugar, if desired, cut into wedges and accompanied by ice-cream.

              Baker's Tip

              • This tart is best served warm, but is also great served at room temperature. It will keep covered in the fridge for up to 2 days. Stand at room temperature for about 30 minutes before serving.
              Free-form Summer Fruit Tart
              Prep 50min (+20min chilling and 50min cooling time)Bake 35minMakes about 20

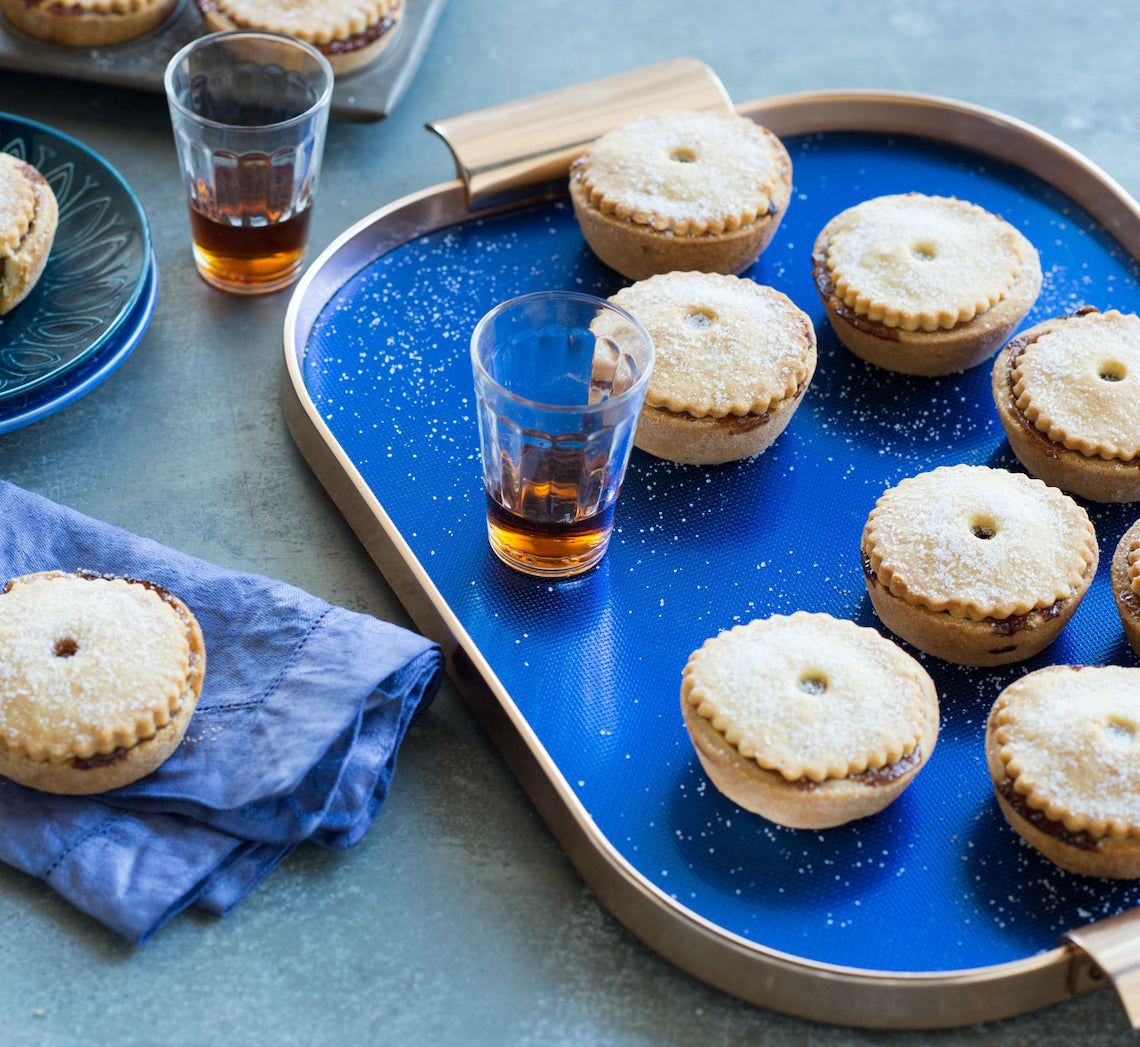
              According to a Middle Ages custom, if you eat a mince pie every day from Christmas day until Twelfth Night (6 January) you will have happiness for the whole year – what a wonderful excuse to indulge in these spiced, fruit-filled pies. Eat them at room temperature or straight from the oven with ice-cream, cream or brandy sauce.

              You will need two 12-hole 80 ml (⅓ cup) muffin tins for this recipe.

              Ingredients

              Granulated sugar, to sprinkle

              Fruit mince
              2 small (about 150g each) Granny Smith apples, peeled, cored and coarsely grated
              130 g (¾ cup) sultanas
              115g (¾ cup) currants
              130g (¾ cup) seedless raisins
              75g (½ cup) mixed peel or chopped glace apricots
              50g (⅓ cup) chopped blanched almonds
              125ml (½ cup) brandy or apple cider
              1 orange, zest finely grated and juiced
              1 lemon, zest finely grated and juiced
              2 teaspoons mixed spice
              ½ teaspoon ground ginger
              ¼ teaspoon ground cloves
              100g (½ cup, loosely packed) dark brown sugar
              60g unsalted butter, coarsely grated

              Sweet shortcrust pastry
              600g (4 cups) plain flour
              125g (1 cup) icing sugar, sifted
              1 teaspoon baking powder
              ½ teaspoon salt
              300g chilled unsalted butter, diced
              2 egg yolks
              80-100ml iced water

              Method

              1. To make the fruit mince, combine the grated apple, dried fruit, mixed peel, almonds, brandy or cider, orange and lemon zest and juice, and the spices in a medium saucepan. Cook over low heat, stirring occasionally for 20 minutes or until the excess liquid has evaporated. Remove from heat and set aside for 40 minutes or until cooled to room temperature.
              2. Meanwhile, to make the pastry, place the flour, icing sugar, baking powder and salt in a medium mixing bowl. Add the chilled butter. With your palms facing upwards, use your fingertips to rub in the butter until the mixture resembles coarse breadcrumbs. Use a fork to whisk together the egg yolks and 80 ml (⅓ cup) of the iced water and then sprinkle over the flour and butter mixture. Use a round-bladed knife in a cutting motion to mix until evenly combined and the mixture starts holding together. Press a little of the mixture between your fingers: if it holds together easily, there is no need to add more water. If it doesn’t, add the remaining 1 tbsp (20 ml) water and combine. The pastry should be soft but not sticky. Bring the pastry together with your hands and transfer to a lightly floured, cool bench top. Lightly knead the pastry with your fingertips for about 30 seconds or until smooth and soft. Divide pastry into three portions. Shape each into a disc, wrap separately in plastic wrap and place in the fridge for 20 minutes to rest.
              3. Preheat oven to 190°C (170°C fan-forced). Stir the sugar and butter through the cooled fruit mince.
              4. Use a lightly floured rolling pin to roll out one portion of the pastry to 3 mm thick. Use a 9 cm plain round cutter to cut out 10 rounds, re-rolling the offcuts if needed and line 10 x 80ml (⅓ cup) muffin tin holes, pressing into the sides and base with your fingertips (the pastry won’t reach to the top of the holes). Repeat with another portion of pastry to make another 10 pastry shells. Divide the fruit mince evenly among the pastry shells. Roll out the remaining pastry portion until 5 mm thick and use a 6.5 cm fluted round cutter to make the pie tops, re-rolling the off-cuts if needed. Use the end of a 7 mm piping nozzle to cut out a circle in the centre of each lid. Place a lid on top of each pie, and use your fingertips to gently ease the pastry out to meet the pastry case bases. Sprinkle each pie with a little granulated sugar.
              5. Bake in preheated oven for 35 minutes or until the pastry is deep golden and cooked through. Remove from the oven and stand in the tin for 10 minutes to cool slightly before transferring to a wire rack. Serve warm or at room temperature. Sprinkle with a little more granulated sugar, if desired.

              Baker's Tips

              • These pies will keep in an airtight container at room temperature for up to 1 week.
              • To reheat, place the pies back in the muffin holes and place in an oven preheated to 170°C (150°C fan-forced) for 10-15 minutes or until heated through.

              This recipe is from Anneka's SBS Food online column, Bakeproof: Traditional Christmas Baking. CLICK HERE for more Bakeproof recipes.

              Photography by Alan Benson.

              Fruit Mince Pies
              Prep 30min (+ 15min cooling and 30min chilling time)Bake 25-30minMakes about 15

              These jammy, Linzer-like, buttery mouthfuls are a popular inclusion in the German Weihnachtsplätzchen (collection of traditional festive cookies) but are often claimed by the Swiss. Feel free to switch up the type of jam you use – red currant is also very traditional.

              Ingredients

              185g (6½oz) salted butter, at room temperature
              110g (½ cup/4oz) caster sugar
              1 teaspoon natural vanilla essence or extract
              1 egg yolk
              300g (2 cups/11¾oz) plain flour
              ¼ teaspoon fine salt
              110g (⅓ cup/4oz) raspberry jam, warmed slightly
              Icing sugar, to dust

              Method

              1. Preheat oven to 160°C/315°F (140°C/285°F fan-forced). Line two large oven trays with non-stick baking paper.
              2. Use an electric mixer with a paddle attachment to beat the butter, sugar and vanilla until pale and creamy. Add the egg yolk and beat well. Sift together the flour and salt. Add to the butter mixture and beat on lowest possible speed until just combined and a soft dough forms.
              3. Divide the dough in half. Use a rolling pin to roll out one portion of dough between two sheets of non-stick baking paper to 5mm/¼in thick. Use a 6cm/2¼in fluted round cutter to cut out rounds of dough. Use a palette knife to transfer the rounds to the lined trays, leaving about 2cm/¾i between each to allow for spreading. Repeat with the remaining dough portion, re-rolling off-cuts, to make about 30 rounds in total. Place the trays in the fridge for 30 minutes to chill.
              4. Use a 2cm/¾in heart, fluted round or star-shaped cutter to cut the centre from half of the chilled cookie rounds.
              5. Bake for 25-30 minutes, swapping the trays halfway through baking, or until pale golden and cooked through. Cool on the trays.
              6. Spoon 1 teaspoon of the warm jam onto each of the cookie bases and spread to about 1cm/½in from the edge. Dust the cookie tops (with the cut-outs) generously with icing sugar. Carefully sandwich the cookies together, pressing gently to join.

              Baker's Tip

              • These cookies will keep in an airtight container, layered with baking paper, at room temperature for up to 1 week. Dust with icing sugar again if desired before serving.

                This recipe is part of Anneka's SBS Food Bakeproof: Festive Cookies online column. For more Bakeproof columns and recipes, click here.

                Photography by China Squirrel.

                German Jam Cookies (spitzbuben)
                Prep 40min(+30min standing and 1hr 45 min proving time)Bake 1hr-1hr10minMakes 12-15 serves

                Hot cross bun meets cinnamon scroll! With all the flavours of Easter plus cinnamon richness, this brings together two all-time favourites… Once you’ve tried it, it will be hard to go back to one without the other.

                Ingredients

                ¼ cup (60ml/2fl oz) maple syrup
                3 teaspoons pure icing sugar, sifted
                Salted butter, to serve

                Dough
                60g (⅓ cup/2oz) seedless raisins
                60g (⅓ cup/2oz) sultanas
                55g (⅓ cup/2oz) currants
                560g (3¾ cups/1lb 4oz) strong bread or pizza flour, plus extra for dusting
                55g (¼ cup/2oz) caster sugar
                1½ x 7g/¼oz sachets (3 teaspoons) instant dried yeast
                2½ teaspoons mixed spice
                1½ teaspoons ground cinnamon
                ¾ teaspoon fine salt
                45g (1½oz) unsalted butter, diced and softened, plus extra to grease
                1 egg, at room temperature, plus 1 extra, whisked, to glaze
                1½ teaspoons natural vanilla extract or essence
                310ml (1¼ cups/10½fl oz) lukewarm milk

                Filling
                60g (oz) unsalted butter, softened
                ⅓ cup (75g/2¾oz) brown sugar
                3 teaspoons ground cinnamon
                ¼ teaspoon fine salt

                Method

                1. Place the raisins, sultanas and currants in a heatproof bowl. Cover with boiling water and set aside to soak for 20 minutes until the fruit is plump. Drain well.
                2. Place the flour, sugar, yeast, mixed spice, cinnamon and salt in a large bowl and mix to combine. Add the butter. Whisk the egg and vanilla into the lukewarm milk. Add to the dry ingredients and use a wooden spoon and then your hands to mix to a soft dough.
                3. Turn the dough out onto a lightly floured bench top. Knead for 8-10 minutes or until smooth, elastic and springs back when you poke your finger into it (see notes).
                4. Lightly grease a clean large bowl with extra butter. Add the dough and well-drained fruit and use your hands to mix through (the fruit doesn’t need to me evenly distributed at this stage). Cover the bowl with plastic wrap and set aside in a warm, draught-free place for 1 hour or until doubled in volume.
                5. Grease a 24cm/9½in (base measurement) springform tin with extra butter. Remove the side from the base and then place a square of non-stick baking paper over the base of the pan, allowing it to overhang the edge of the base (do not reattach side of tin at this stage). Set aside.
                6. For the Filling, place the butter, sugar and cinnamon in a medium bowl and use a wooden spoon to beat until evenly combined and soft.
                7. Knock back the dough by punching it in the centre with your fist. Turn onto a lightly floured surface and knead for 1-2 minutes or until smooth and elastic, the dough has reduced to its original size and the fruit is evenly distributed. Use a lightly floured rolling pin to roll out the dough to a 30cmx40cm (12inx16in) rectangle, about 1.5cm (5/8in) thick.
                8. Spread the filling as evenly as possible over the dough. Use a large sharp knife or a pizza cutter to cut the dough lengthways into 6 even strips. Roll one of the strips into a scroll and place in centre of prepared tin. Wrap another strip around the centre scroll. Repeat with remaining strips to make one large scroll. Clamp side of tin around base to secure. Clamp the side of the pan around the base to secure (there will be about 2cm/¾in between the outside of the scroll and the side of the pan).
                9. Brush the top of the scroll with the whisked egg and cover with plastic wrap or a tea towel. Set aside in a warm, draught-free place for 45 minutes or until well risen, puffy and has increased in volume by about 50 percent.
                10. Meanwhile, preheat oven to 180°C/350°F (160°C/315°F).
                11. Bake the scroll in preheated oven for 1 hour to 1 hour 10 minutes or until deep golden and sounds hollow when tapped on the top.
                12. Meanwhile, place maple syrup and icing sugar in a small jug and whisk until combined and smooth. Remove the scroll from oven and immediately brush top with maple syrup mixture. Stand in tin for 10 minutes before removing. Cut scroll into wedges, and serve warm with salted butter.

                Baker's Tips

                • This scroll is best eaten the day it is made.
                • It is really important not to add too much extra flour when kneading the dough by hand as this excess will make your dough stiff and hard to knead, and your final scroll will be heavy and dense. Make sure you only lightly dust your bench top and hands and use as little additional flour as you can while kneading. A softer dough at the end of kneading will mean lighter, more palatable scroll.
                • To knead your dough using a stand mixer, place the flour, sugar, yeast, mixed spice, cinnamon, salt and butter in the mixer bowl and use the dough hook to mix to combine. With the motor on low speed, add the milk, egg and vanilla mixture and continue to knead for 5-8 minutes or until the dough is smooth and elastic.

                  Photography: Nigel Lough
                  Styling: David Morgan

                  This recipe first appeared in delicious. Australia's April 2023 edition.

                  Giant Hot Cross Scroll with Maple Glaze
                  Prep 30min (+2hr chilling and decorating time)Bake 20-25minMakes about 25 cookies

                  Use this recipe as the base for cookies decorated with either royal icing (like these gorgeous Iced Heart Cookies) or fondant. The sweetness of the icing complements the spicy gingerbread base perfectly and lays down a canvas for you to create something extra special for customers, friends and family.

                  Ingredients

                  125g salted butter, softened
                  90g (½ cup, lightly packed) brown sugar
                  235g (160ml/⅔ cup) golden syrup
                  1 teaspoon natural vanilla extract or essence
                  375g (2½ cups) plain flour
                  2 teaspoons ground ginger
                  1 teaspoon ground cinnamon
                  1 teaspoon bicarbonate of soda


                  Method

                  1. Use an electric mixer with a paddle beater attachment to beat the butter and sugar on medium speed for 2-3 minutes, or until pale and creamy. Add the golden syrup and vanilla and beat to combine evenly. Sift together the flour, ginger, cinnamon and bicarbonate of soda. Add to the butter mixture and beat on low speed until just combined evenly and a soft dough forms. Turn the dough onto a lightly floured surface and divide into 2 equal portions. Shape each portion into a disc about 2cm thick, wrap in plastic wrap and place in the fridge for 2 hours or until firm enough to roll easily.
                  2. Preheat the oven to 160°C (140°C fan-forced). Line two large oven trays with baking paper.
                  3. Use a lightly floured rolling pin to roll out one portion of the dough (leave the remaining portion in the fridge) on a lightly floured benchtop to 6mm thick. Use cutter/s of your choice, approximately 7.5cm across at the widest part, to cut out shapes and then use a palette knife to carefully transfer the shapes to the prepared oven trays, leaving a little room between each for
                    spreading. Reroll any dough scraps to make more shapes. Discard any offcuts from the second rolling. Repeat with the remaining gingerbread dough portion.
                  4. Bake in preheated oven for 20-25 minutes, swapping the trays halfway through baking, or until the cookies are just starting to colour and are cooked through. Stand the cookies on the trays for a few minutes before transferring to a wire rack to cool completely. Decorate as desired.

                  Baker's Tips

                  • Undecorated biscuits will keep in an airtight container at room temperature for up to 5 days.
                  Gingerbread Cookies
                  Prep 25min (+ 2hr chilling, cooling and standing time)Bake 12-15minMakes about 35

                  Based on a deliciously spiced gingerbread, these fun biscuits are given their personalities through simple decorations... Make them into cheeky gingerbread men or turn them upside down and decorate them as cute, Christmas-themed reindeer.

                  Ingredients

                  125g (4½oz) unsalted butter, softened
                  90g (½ cup, lightly packed/3oz) brown sugar
                  235g (⅔ cup/8¼oz) golden syrup
                  1 teaspoon natural vanilla extract or essence
                  375g (2½ cups/13¼oz) plain flour
                  2 teaspoons ground ginger
                  1 teaspoon ground cinnamon
                  1 teaspoon bicarbonate of soda

                  Icing

                  185g (1½ cups/6½oz) pure icing sugar
                  35ml (7 teaspoons) boiling water
                  Red food colouring  

                  Method

                  1. Use an electric mixer with a paddle attachment to beat the butter and sugar on medium speed for 2-3 minutes, or until pale and creamy. Add the golden syrup and vanilla and beat to combine. Sift together the flour, ginger, cinnamon and bicarbonate of soda. Add to the butter mixture and beat on low speed until just combined and a dough forms. Divide the dough into 2 portions. Shape each into a disc about 2cm/¾in thick, wrap in plastic wrap and place in the fridge for 2 hours to chill.
                  2. Preheat the oven to 160ºC/315°F(140°C/285°F fan-forced). Line two large oven trays with baking paper.
                  3. Use a lightly floured rolling pin to roll out one portion of dough (leave the remaining portion in the fridge) on a lightly floured bench top to 4mm/⅛in thick. Use an 8cm/3¼in tall gingerbread man cutter to cut out shapes and then carefully transfer the shapes to the prepared oven trays using a palette knife, leaving a little room between each for spreading. Reroll any scraps to make more shapes. Discard any off cuts from the second rolling. 
                  4. Bake in preheated oven for 12-15 minutes or until the biscuits are just starting to colour and are cooked through. Stand on the trays for a few minutes before transferring to a wire rack to cool. Repeat with the remaining gingerbread dough portion.
                  5. To make the Icing, sift the icing sugar into a medium bowl. Gradually add 30ml (6 teaspoons) of the boiling water and mix until smooth. The icing should be a piping consistency (see Baker’s Tips). If it is too thick stir in the remaining 1 teaspoon of boiling water and then test the consistency again. Spoon ¾ of the icing into a piping bag fitted with a 3mm/⅛in nozzle (see Baker’s Tips) and set aside. Stir a couple of drops of red food colouring into the remaining icing to reach the desired colour. Spoon into a separate piping bag fitted with a 3mm/⅛in nozzle.
                  6. Use the icing to decorate the cooled biscuits to make men and/or reindeer as desired (using the photograph as a guide). Set aside for about 20 minutes or until the icing sets completely. 

                  Baker's Tips

                  • To test if the icing is the correct consistency for piping, drizzle a little off the end of a teaspoon onto a plate and set aside for a few minutes. If it keeps its shape it is ready to use.
                  • If you don’t have piping bags and nozzles you can spoon the icing into a snap-lock bag, seal and then cut a small hole in one of the corners to pipe through.
                  • Store in an airtight container at room temperature for up to 1 week.


                  Photography by Georgie Esdaile.

                  Gingerbread Men and Reindeers

                  $100.00/pp

                  more info
                  Gluten-free Baking Essentials
                  - Products -

                  Gluten-free Baking Essentials is a self-paced online course that will introduce you to the tricky world of gluten-free baking.

                  CLICK HERE TO START NOW!


                  Discover this no-fuss 'real' guide to the world of gluten-free baking – in your own time!

                  Gluten-free Baking Essentials is a self-paced online course that will introduce you to the tricky world of gluten-free baking and will give you an understanding of gluten-free ingredients and how to use them successfully – all from your own home kitchen!

                  Completed in your own time, at your own pace, this course will give you a thorough understanding of what can be substituted for gluten-based ingredients in your baking and introduce you to the best gluten-free flour options. You will learn how to make your own gluten-free flour blends and for which type of recipe each blend is best suited, as well as how to adapt recipes to gluten-free (and how to get the best results!). You will also receive an invaluable collection of gluten-free recipes that you can build upon and use on a daily basis including gluten-free bread, pastry, pizza base, muffins, biscuits and a special celebration cake.

                  Guided by Anneka Manning, she will share her more than 30 years of baking experience, knowledge and research, as well as all of her practical and handy tips and tricks.

                  By the end of this course, you will walk away with all the knowledge, skill and confidence you need to get the best out of recipes without gluten and enjoy successful – and delicious – gluten-free baking!

                  Gluten-free Baking Essentials is accredited by Coeliac Australia.

                  How to enrol

                  Gluten-free Baking Essentials is a self-paced course and is now open for enrolment. 

                  CLICK HERE TO START NOW!

                  Cost

                  $100

                  Who is this course suitable for?

                  This course is, quite simply, suitable for bakers of all skill levels who want to expand their gluten-free knowledge and understand how gluten-free ingredients work and how to use them successfully in their baking. This course is not only for those who need to avoid gluten in their own diets, but also those who want to bake for family and friends who are gluten-intolerant.

                  As this course is completed online, it is suitable for students from all over the world.

                  What will I get?
                  • An understanding of gluten-free baking, substitutions and gluten-free flour options
                  • Downloadable and printable information resources including The Principles of Gluten-free Baking, A Guide to Gluten-free Flours, Starches and Other Ingredients, Making Your Own Gluten-free Flour Blends and Tips for Gluten-free Baking
                  • An invaluable collection of delicious gluten-free recipes (many of which are also dairy-free) that you can build upon and use on a daily basis (see full list below)
                  • Membership to BakeClub's exclusive The Kitchen Table online group which will provide ongoing support and inspiration
                  • Gluten-free baking confidence, knowledge and skill to use regularly at home
                  Which recipes are included?
                  • Artisan-style Gluten-free Bread
                  • Gluten & Dairy-free Banana & Coconut Berry Muffins
                  • Gluten-free Banana Bread
                  • Gluten-free Chocolate Chunk Cookies
                  • Gluten-free Orange Toffee & Chocolate Celebration Cake
                  • Gluten-free Ricotta, Basil & Tomato Pizza
                  • Gluten-free Shortcrust Pastry
                  • Gluten-free Vanilla Cupcakes with Chocolate Frosting
                  • Gluten-free Zucchini, Feta & Pesto Galette
                  • Seeded Gluten-free Crackers
                  How does a self-paced course work?

                  This online course is completely self-guided. Upon enrolment, you will gain access to the course content which you can work through at your own pace. You can log on whenever it is convenient for you and complete the modules one day at a time.

                  You can take as long as you need to complete the course – it's up to you how quickly you want to work through the content. You will have lifetime access to all the recipes and printable information sheets so you can dip in and out of it whenever it suits you.

                  There is the option to connect with other bakers via Facebook through BakeClub's exclusive The Kitchen Table membership group and via Instagram using #bakeschoolglutenfree. This way you can share your experience and support each other as your confidence and skills grow.


                  So, is Gluten-Free Baking Essentials for me?
                  • Do you need to avoid gluten in your diet but still want to bake delicious things you can eat?
                  • Do you want to bake successfully for family and friends who are gluten-intolerant?
                  • Would you like to gain a thorough understanding of what can be substituted for gluten-based ingredients in your baking and gain the confidence to do so?
                  • Would you like to be guided and inspired by Anneka's 30+ years of baking experience in your own kitchen?
                  • Do you have more time on your hands at the moment and keen to learn a new skill?

                  If any of these sound like you, then this course is the one for you!

                  CLICK HERE TO START NOW!


                  CLICK HERE TO BROWSE OUR OTHER ONLINE COURSES!


                  • 1
                  • …
                  • 5
                  • 6
                  • 7
                  • 8
                  • 9
                  • …
                  • 17

                  Follow @bakeclub_australia on Instagram

                  Our partners

                  SUBSCRIBE!
                  contact us
                  • info@bakeclub.com.au

                  • FOLLOW US
                  CUSTOMER INFORMATION
                  • FAQ
                  • Terms of Use
                  • Privacy Policy
                  • Terms of Service
                  • Refund policy

                  © 2025 BakeClub. All Rights Reserved.

                  Site by Fruitful Creative.