SUBSCRIBE TO BAKECLUB!
  •  
0 CART/CHECKOUT

Learn, connect & share through a love of baking

  • Home
  • Classes
    • Live & Guided Online Classes
    • Self-paced Online Classes
    • How to choose an online class
    • Special Events
  • BakeClub & Co.
    • Join BakeClub & Co.
    • Log in to BakeClub & Co.
    • Gift BakeClub & Co.
  • Make Me a Baker Program
    • Make Me a Baker Online
    • Testimonials
    • Graduation gallery
  • Shop
    • Anneka's Books
    • BakeClub Aprons
    • Baking Gifts
    • Gift Certificates
  • Recipes
    • Browse All
    • Bakes that Travel Well
    • Bakes to Share with a Cuppa
    • Baking with Kids
    • Café Favourites
    • Flour-free Recipes
    • International Recipes
    • Recipes to Nurture, Comfort & Calm
    • Savoury Tummy Fillers
    • Winter Warmers
  • Resources
    • BakeClub Blog
    • BakeClub Tips
    • BakeClub Q&A
    • BakeClub Videos
    • BakeNews Archives
    • Subscribe to BakeClub
  • About
    • Who is Anneka Manning?
    • About BakeClub
    • What Our Students Say
    • BakeClub Partners
    • Media
    • Contact Us
  • home
  • Products
Prep 40min (+30min cooling time)
Bake 25min
Makes about 10

Everyone needs a good classic yellow cake in their repertoire and this one, made as cute individual cakes with a rich, velvety fudge frosting, is the one to add. Have some fun with the decorations – there are so many edible sprinkles to choose from you may want to give each individual cake its own unique identity.

Ingredients

  • 20g butter, melted and combined with 1 teaspoon plain flour, to grease
  • 125g salted butter, softened
  • 165g (¾ cup) caster sugar
  • 2 teaspoon natural vanilla essence or extract
  • 1 egg, at room temperature
  • 2 egg yolks, at room temperature
  • 225g (1½ cups) plain flour
  • 2½ teaspoon baking powder
  • 125ml (½ cup) buttermilk or milk
  • Sprinkles of your choice, to decorate

Chocolate fudge frosting

  • 1 tablespoon cocoa powder, sifted
  • 1 tablespoon hot water
  • 185g salted butter, softened
  • 60g (½ cup) icing sugar mixture, sifted
  • 1 teaspoon natural vanilla essence or extract
  • 250g good-quality dark chocolate (54% cocoa), melted and cooled

Method

  1. Preheat the oven to 190°C (170°C fan-forced). Brush a 12-hole 80ml (⅓ cup) muffin pan with the melted butter mixture to grease.
  2. Use an electric mixer with a paddle attachment to beat the butter, sugar and vanilla until very pale and creamy. Add the egg and beat until well combined. Beat in the egg yolks, scraping down the sides of the bowl when necessary, until well combined and the mixture is pale and creamy.
  3. Sift together the flour and baking powder. With the motor running on lowest possible speed, add half the flour mixture and beat until just combined. Add the buttermilk or milk and beat on low until just combined. Add the remaining flour and beat until just combined.
  4. Divide the mixture evenly between the muffin holes and use the back of a spoon to smooth the tops. Bake for 25 minutes or until golden and cooked when tested with a skewer inserted in the centre. Stand in the tin for 5 minutes before transferring to a wire rack to cool.
  5. Meanwhile, to make the Chocolate Fudge Frosting, combine the cocoa powder and water in a small dish and stir until smooth and a paste forms. Set aside until cooled to room temperature. Use an electric mixer to beat the butter and icing sugar until very pale and creamy, scraping down the sides of the bowl when necessary. Gradually beat in the cooled chocolate and cocoa mixture until smooth and well combined.
  6. Cut each of the cooled cakes in half horizontally. Use a palette knife or the back of a teaspoon to spread a little of the chocolate fudge frosting over the bottom half of a cake and sandwich with the top half. Spread the top and sides of the cake generously with some of the remaining frosting, swirling on top and making an indent in the centre. Decorate with sprinkles. Repeat with the remaining cakes, frosting and sprinkles.

Baker's Tips

  • These cakes will keep in an airtight container at room temperature for up to 2 days.

This recipe is from Anneka's SBS Food online column, Bakeproof: Little Cakes. CLICK HERE for more Bakeproof recipes.

Photography by Alan Benson.
Yellow Cakes with Chocolate Fudge Frosting
Prep 25min (+ 1hr cooling and 1hr standing time)Bake 55minMakes 12-14 serves

This is such a fun cake – the weight of alternating spoonfuls of mixture dropped on top of one another cause it to spread in the tin and create a wonderful ‘zebra’ stripped pattern that will be revealed when cut. It’s useful to remember that the smaller your spoonfuls of mixture are, the more delicate and intricate your design will be.

Ingredients

15g butter, melted
1 teaspoon plain flour
300g (2 cups) self-raising flour
70g plain flour
330g (1½ cups) caster sugar
250g salted butter, softened
4 eggs, at room temperature
185ml (¾ cup) water
2 teaspoons natural vanilla essence or extract

Cocoa mixture
55g (½ cup) cocoa powder, sifted
90ml boiling water
110g (½ cup) caster sugar

Chocolate fudge glaze
125g good-quality dark chocolate, chopped
110ml pouring (thin) cream

Method

  1. Preheat the oven to 170°C (150°C fan-forced). Combine the 15g melted butter with the 1 teaspoon plain flour and use a pastry brush to grease a 2 litre (8 cup) Bundt or fluted ring tin (see Baker's Tips).
  2. To make the cocoa mixture, place the cocoa in a medium bowl and gradually stir in the boiling water. Stir in the caster sugar and set aside.
  3. Put the flour, sugar, butter, eggs, water and vanilla in a large mixing bowl and use an electric mixer to beat on low speed until combined. Increase the speed to high and beat for 3-4 minutes or until paler in colour and silky smooth in texture. Transfer 2 cups (about 500g) of the cake mixture to a separate bowl. Add the cocoa mixture and use a spatula to mix until evenly combined.
  4. Drop a large spoonful of the vanilla mixture into the prepared cake tin. Drop a large spoonful of the cocoa mixture into the centre of the vanilla mixture. Continue dropping alternating spoonfuls of the mixtures into the tin directly on top of each other until all the mixture is used. The mixture will spread and even out as you add more, creating the ‘zebra’ pattern.
  5. Tap the tin firmly on the benchtop 3 times. Bake in preheated oven for 50-55 minutes or until a skewer inserted into the cake comes out clean. Stand the cake in the tin for 10 minutes before turning onto a wire rack to cool completely (this will take about 1 hour).
  6. To make the chocolate fudge glaze, place the chocolate in a heatproof bowl. Heat the cream in a small saucepan until almost simmering. Pour the hot cream over the chocolate and then set aside for 2 minutes. Stir until the chocolate melts and the mixture is smooth. Set aside at room temperature for 30 minutes, stirring occasionally, until thickened to a thick pouring consistency.
  7. Place the cake on the wire rack over a tray and pour the chocolate fudge glaze over. Set aside for 30 minutes or until the glaze sets. 

Baker's Tips

  • I used Baker’s Secret Fluted Tube Pan for this recipe but if you don't have this particular one, or a similar tin, you can use a greased and base-lined 24cm round cake tin instead.
  • This cake will keep in an airtight container at room temperature for up to 2 days.
  • The uniced cake also freezes well for up to 3 months. For the whole cake (or a portion of it), seal in an airtight container appropriate for its size before freezing. For individual pieces, wrap in plastic wrap and seal in an airtight container or freezer bag. Thaw at room temperature.


Photography by Alan Benson.

Zebra Cake with Chocolate Fudge Glaze
Prep 15min (+ 5min standing time)Bake 25min-30minMakes about 12

Savoury muffins are a great alternative to the sweet ones, especially when served as a snack or instead of bread alongside soup or salad. The zucchini in these makes them lovely and moist while adding substance.

Ingredients

Light olive oil or sunflower oil, to grease (optional)
150g (1 cup) plain flour
150g (1 cup) wholemeal plain flour
1 tablespoon baking powder
½ teaspoon salt
70g (⅔ cup) finely grated parmesan cheese
65g (⅔ cup) coarsely grated vintage cheddar cheese
¼ cup chopped basil leaves
185ml (¾ cup) buttermilk
80ml (⅓ cup) light olive oil or sunflower oil
2 eggs, at room temperature
2 zucchini (about 100g each) ends trimmed, coarsely grated
40g (¼ cup) pine nuts, to scatter
Cayenne pepper, to sprinkle

    Method

    1. Preheat the oven to 190°C (170°C fan-forced). Line a 12-hole 80ml (⅓ cup) capacity muffin tin with paper cases or grease with a little vegetable oil.
    2. Sift together the flours, baking powder and salt into a large bowl, returning any husks left in the sieve to the bowl. Season well with pepper and then gently stir in the parmesan, cheddar and basil. Make a well in the centre.
    3. Use a fork to whisk together the buttermilk, olive oil and eggs in a bowl. Add the zucchini and mix to combine. Add to the flour mixture and use a spatula or large metal spoon to fold together until just combined. (Don’t overmix – the batter should still be a little lumpy.)
    4. Spoon the mixture into the prepared muffin holes, dividing evenly. Scatter over the pine nuts and sprinkle with a little cayenne pepper. Bake in the preheated oven for 25–30 minutes or until the muffins are golden and a skewer inserted in the centre comes out clean. Leave to cool in the tin for 5 minutes before transferring to a wire rack. Serve warm or at room temperature.

    Baker's Tips

    • These muffins are best eaten the day they are baked, however they freeze well – wrap individually in plastic wrap and then seal in an airtight container or freezer bag. Freeze for up to 3 months. Thaw at room temperature.

    Photography by Alan Benson.

    Zucchini, Parmesan & Basil Muffins

    Prep 1.5hr (+ Meringue Rosettes prep)Bake 18-20minMakes 8-10 serves

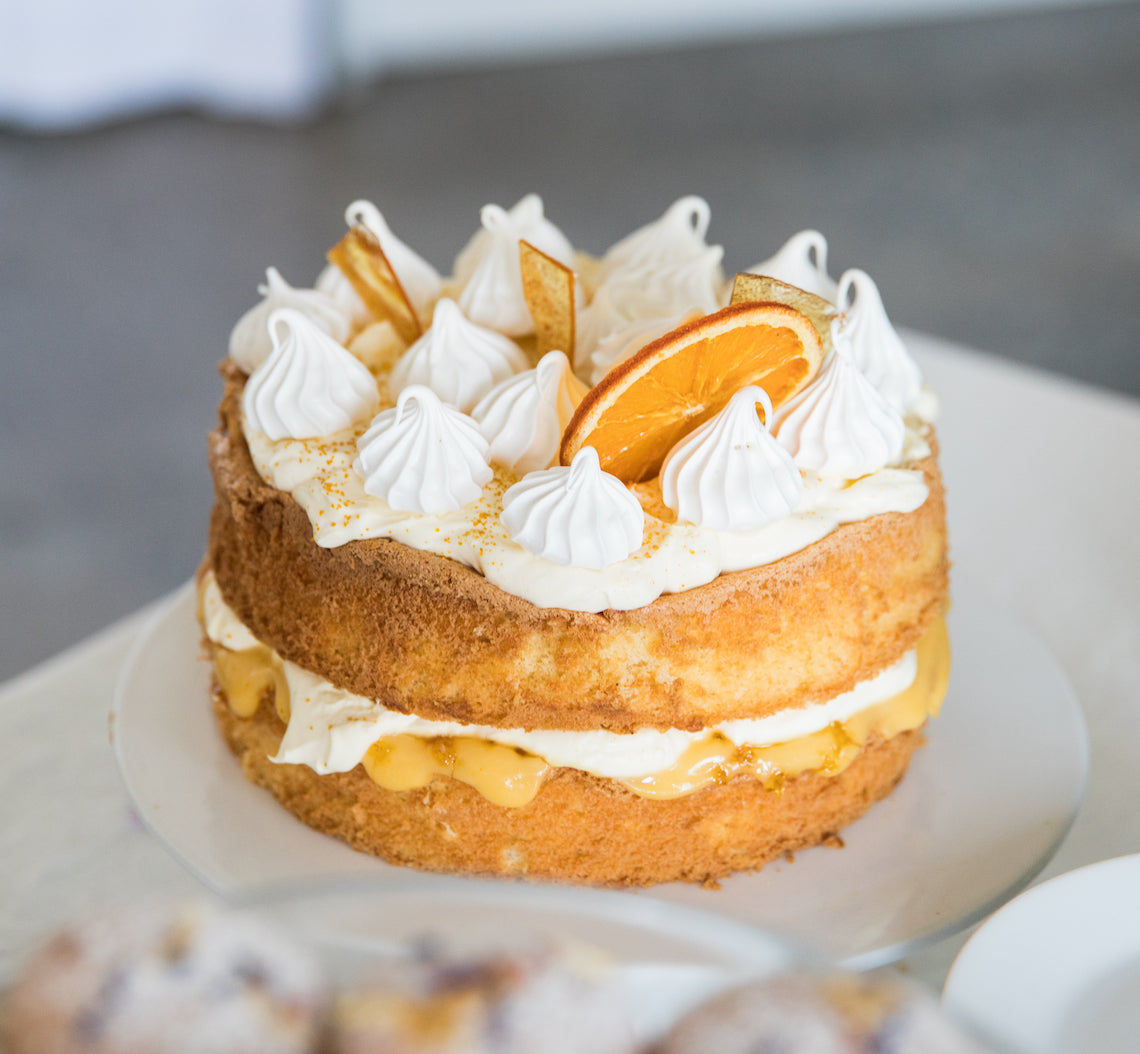
    An absolute must-try for any citrus fan, this light-as-air cake is the ultimate balance between light sponge, mouth-puckering lemon curd and beautiful hand-made adornments.
    Created by Make Me a Baker student, Cate Tibbertsma for her graduation, this cake is a nostalgic one "that will fill your belly with sweet memories" as Cate says.

    Ingredients

    125ml (½ cup) thickened cream
    125g (½ cup) sour cream
    1 tablespoon pure icing sugar, sifted
    1 teaspoon Citrus Dust (see recipe below), plus extra to sprinkle
    Meringue Rosettes (get Cate's meringue recipe HERE), to decorate
    Oven-dried orange slices (optional), to decorate

    Lemon Curd
    2 eggs, at room temperature
    2 egg yolks, at room temperature
    165g (3/4 cup) caster sugar
    80g unsalted butter, diced
    2 lemons, zest finely grated and juiced

    Sponge Layers
    Melted butter to grease
    4 fresh eggs, at room temperature
    1½ teaspoons natural vanilla essence or extract
    165g (3/4 cup) caster sugar
    60ml (1/4 cup) milk
    30g butter, diced
    110g (3/4 cup) self-raising flour
    30g (1/4 cup) cornflour

    Citrus Syrup
    110g (½ cup) caster sugar
    60ml (1/4 cup) strained fresh lemon juice
    60ml (1/4 cup) strained fresh orange juice

    Citrus Toffee Shards
    Oil spray
    100g caster sugar
    2½ tablespoons water
    1 tablespoon liquid glucose
    ½ teaspoon Citrus Dust (see recipe below), to sprinkle

      Lemon Curd

      1. Combine the whole eggs, yolks and sugar in a small saucepan and stir with a whisk until smooth. Add the butter and the lemon juice and zest.
      2. Place the saucepan over a low heat and stir constantly with the whisk until thickened and the mixture reaches 75°C on a sugar thermometer.
      3. Strain through a sieve into a sterilised jar or glass container with lid. Refrigerate until required (see Baker’s Tips).

      Citrus Toffee Shards

      1. Line a baking tray with non-stick baking paper and spray lightly with oil; set aside. Combine the caster sugar, water and the liquid glucose in a small saucepan.  Stir over a low heat until the sugar dissolves. Stop stirring when it starts to boil and brush down the inside of the saucepan with a wet pastry brush to dissolve any crystals that have formed on the surface. Boil until the syrup turns a dark caramel colour (see Baker's Tips).
      2. Immediately pour the caramel over the entire surface of the baking sheet to create a thin layer.  Sprinkle with the Citrus Dust.  Set aside to cool and set. When completely cool, transfer to a sealed airtight container together with the baking paper.

      Sponge Layers

      1. Position the oven rack in the middle of the oven and then preheat it to 180°C (160°C fan-forced). Brush two 18cm springform tins with melted butter to grease and line the base of each with a sheet of non-stick baking paper. Combine butter and milk in a small saucepan and set aside. Combine the Citrus Syrup ingredients in a separate small saucepan and set aside also.
      2. Use an electric mixer with a whisk attachment on medium-high speed to whisk the eggs and vanilla in a medium bowl until frothy. Add the sugar a spoonful at a time, whisking well between each addition, until the mixture is very thick and pale and the sugar has dissolved (this will take about 8 minutes).  Lift the whisk out of the mixture and slowly draw a figure eight, if the trail stays on the surface long enough for you to finish drawing then the mixture is ready. If not, continue to whisk for a further minute and then test again.
      3. Meanwhile, heat the milk and butter in a small saucepan over medium heat until the butter melts and the mixture is almost simmering. Remove from the heat.  Pour the hot milk mixture down the side of the bowl and then sift the flour and cornflour together over the egg mixture. Immediately whisk briefly again with the electric mixer on low speed, until the flour mixture is just incorporated (make sure there is no flour caught at the bottom of the bowl and be careful not to over mix).
      4. Divide the mixture evenly between the cake tins (see Baker's Tips) and gently tap the tins on the bench top three times to settle the mixture. Bake in preheated oven for 18-20 minutes or until the cakes are a pale golden colour, spring back when lightly touched in the centre and start pulling away from the sides of the tins.

      Citrus Syrup

      1. About 5 minutes before the Sponge Layers finish baking, place the saucepan with the Citrus Syrup ingredients over a medium heat and stir until the sugar dissolves. Bring to a boil then reduce to a very gentle simmer to keep warm. 
      2. Remove sponges from the oven and immediately use a small palette knife to loosen the top of the sponges from the tins and turn onto a wire rack lined with a tea towel. Remove the baking paper and carefully turn the hot sponges back on their base onto a rack over a tray. Immediately pour hot syrup over the hot sponge layers. Set aside to cool completely before layering.

        To Assemble

        1. Use an electric hand mixer with a whisk attachment or a balloon whisk to whisk the thickened cream, sour cream and icing sugar together in a medium bowl, until soft peaks form.
        2. Place one sponge layer on a serving plate or cake stand. Spread about 1/2 cup of curd over the sponge layer and use a small sieve to sprinkle the Citrus Dust over the curd. Spread about half the cream mixture over the curd layer, spreading gently to avoid over-working the cream.  Top with the remaining sponge layer. Spread another 1/2 cup of curd on top followed by the remaining cream mixture, again spreading gently so you don’t over work it.
        3. Decorate with the Meringue Rosettes and Citrus Toffee Shards and sprinkle with extra Citrus Dust. Embellish with oven-dried orange slices, if desired.  Serve immediately or refrigerate for up to 2 hours (see Baker's Tips).


        ORANGE CITRUS DUST: Preheat oven to 100°C (80°C fan-forced).  Use a vegetable peeler to peel the rind from 1 large orange.  Use a small knife to scrap any excess pith away.  Place on a lined oven tray and bake in oven for 1-2 hours.  Rind is ready when it has dried completely but still retains some of its original colour. Use a mortar and pestle or a small food processor to pound or process the rind to a fine powder that is aromatic and rich in colour.  Store in an airtight container in a cool dry place for up to one month.

          Baker's Tips

          • The Lemon Curd will keep in a sealed clean, sterilised jar for up to 2 weeks in the fridge.  My preference is to make and refrigerate the lemon curd 1-2 days in advance of using it so that the curd thickens and the flavour develops.
          • As the Citrus Toffee Shards syrup begins to darken, gently turn the pan to encourage the colour to spread but avoid swirling the mixture too vigorously to prevent the mixture from crystallising.
          • The Citrus Toffee Shards will store at room temperature in an airtight container for up to a month, depending on the humidity.
          • Having your butter and milk mixture for the Sponge Layers and the Citrus Syrup ingredients in separate saucepans, ready for heating, will make the preparation of this recipe more efficient and with help with the timing of when the different elements need to be ready.
          • To divide the mixture evenly between the tins, weigh the tins with the mixture in them to make sure they are the same weight. Placing a small upturned bowl on the scale and for the cake tin to sit on will mean that the measurement display window can be easily viewed.
          • Even though this cake is best eaten on the day it is baked, the unfilled syrup-infused sponge layers can be made the day before serving. Store in an airtight container at room temperature. To avoid the layers sticking to each other, separate the sponges with a layer of baking paper or store in two separate airtight containers. An upturned cake tin, larger than the diameter of the cake, also makes a useful barrier for separating sponges for storing.
          • To ensure this cake cuts easily, resist over-filling the middle layer of curd and cream and, if possible, chill the assembled cake for a few hours before serving. Decorate with the meringues, toffee shards and citrus dust just before serving.
            ‘Sweet Memories’ Citrus Syrup Sponge
            • 1
            • …
            • 16
            • 17
            • 18

            Follow @bakeclub_australia on Instagram

            Our partners

            SUBSCRIBE!
            contact us
            • info@bakeclub.com.au

            • FOLLOW US
            CUSTOMER INFORMATION
            • FAQ
            • Terms of Use
            • Privacy Policy
            • Terms of Service
            • Refund policy

            © 2025 BakeClub. All Rights Reserved.

            Site by Fruitful Creative.