
- home
- Recipes to Nurture, Comfort & Calm
Recipe Collections
- Recipes to Nurture, Comfort & Calm -
Calm, soothe and nurture your soul with this collection of heartwarming recipes
Prep 30min (+10min chilling time)
Bake 12min (per batch)Makes about 36
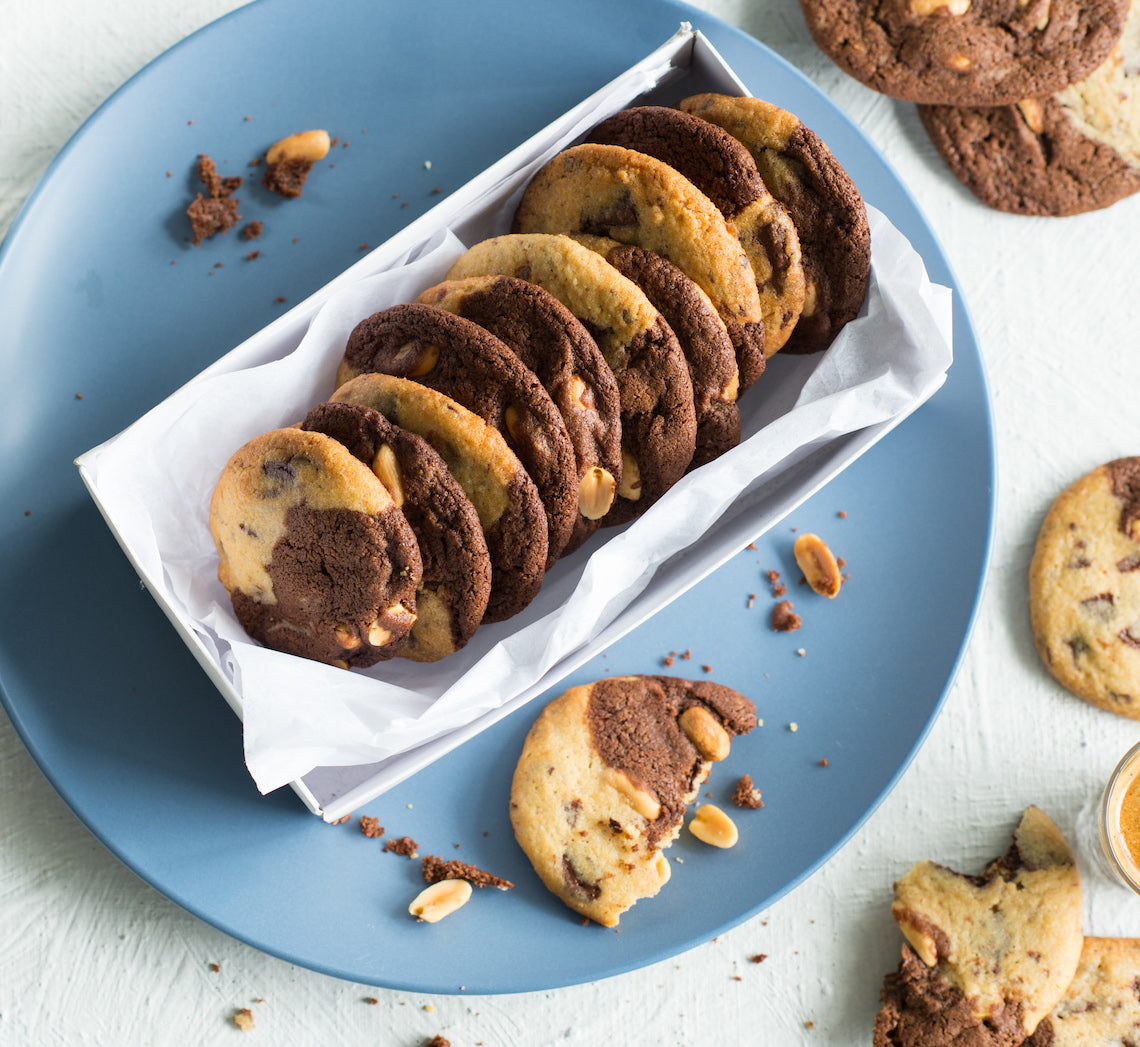
These clever cookies are the hybrid of a brownie and a chocolate chip cookie – dark, rich and chewy on one side and crisp, simple and familiar on the other. The perfect cookie really!
Ingredients
Chocolate chip cookie dough
125g butter, softened
110g (½ cup) granulated white sugar
55g (¼ cup, firmly packed) brown sugar
1 teaspoon natural vanilla essence or extract
1 egg, at room temperature
185g (1¼ cups) plain flour
½ teaspoon baking powder
125g good-quality dark chocolate chips or coarsely chopped chocolate (45-54% cocoa)
Salted peanut brownie dough
125g good-quality dark chocolate (45-54% cocoa), chopped
100g butter, cubed
165g (¾ cup, firmly packed) brown sugar
1 egg, at room temperature
1 teaspoon natural vanilla essence or extract
150g (1 cup) plain flour
½ teaspoon bicarbonate of soda
100g salted roasted peanuts
Method
- Preheat the oven to 180°C (160°C fan-forced). Line a large oven tray with non-stick baking paper.
- To make the Chocolate Chip Cookie Dough, use an electric mixer to beat the butter, sugar and vanilla until pale and creamy. Add the egg and beat well. Sift together the flour and baking powder, add to the butter mixture with the chopped chocolate and mix on the lowest possible speed until just evenly combined. Cover and place in the fridge while making the salted peanut brownie dough.
- To make the Salted Peanut Brownie Dough, put the dark chocolate and butter in a medium heatproof bowl over a saucepan of simmering water (make sure the base of the bowl doesn’t touch the water). Use a metal spoon to stir occasionally over low heat until just melted and smooth. Transfer to a large bowl and cool slightly. Use a balloon whisk to stir the sugar, egg and vanilla into the chocolate mixture until well combined. Sift together the flour and bicarbonate of soda, add to the chocolate mixture with the peanuts and use a wooden spoon to stir until evenly combined. Cover and place in the fridge to chill for 10 minutes or until the same consistency as the chocolate chip cookie dough.
- Take half a tablespoonful of both doughs and roll them together into a ball, keeping the different colours separate. Place on the lined tray, with the join between the two doughs running down the centre. Flatten to about 4cm in diameter and 1cm thick. Repeat to fill the tray, leaving about 5cm between the cookies.
- Bake in for 12 minutes or until the chocolate chip half is golden and cooked through and the brownie halves are still slightly soft to touch. Cool on the tray. Repeat with the remaining cookie doughs in two more batches.
Baker's Tips
- These cookies will keep in an airtight container at room temperature for up to 5 days – the longer they are kept the softer they will become.
Photography by Alan Benson.
This recipe is from Anneka's SBS Food online column, Bakeproof: Brownies.
CLICK HERE for more Bakeproof columns and recipes.
Prep 10minBake 15-18minMakes about 9
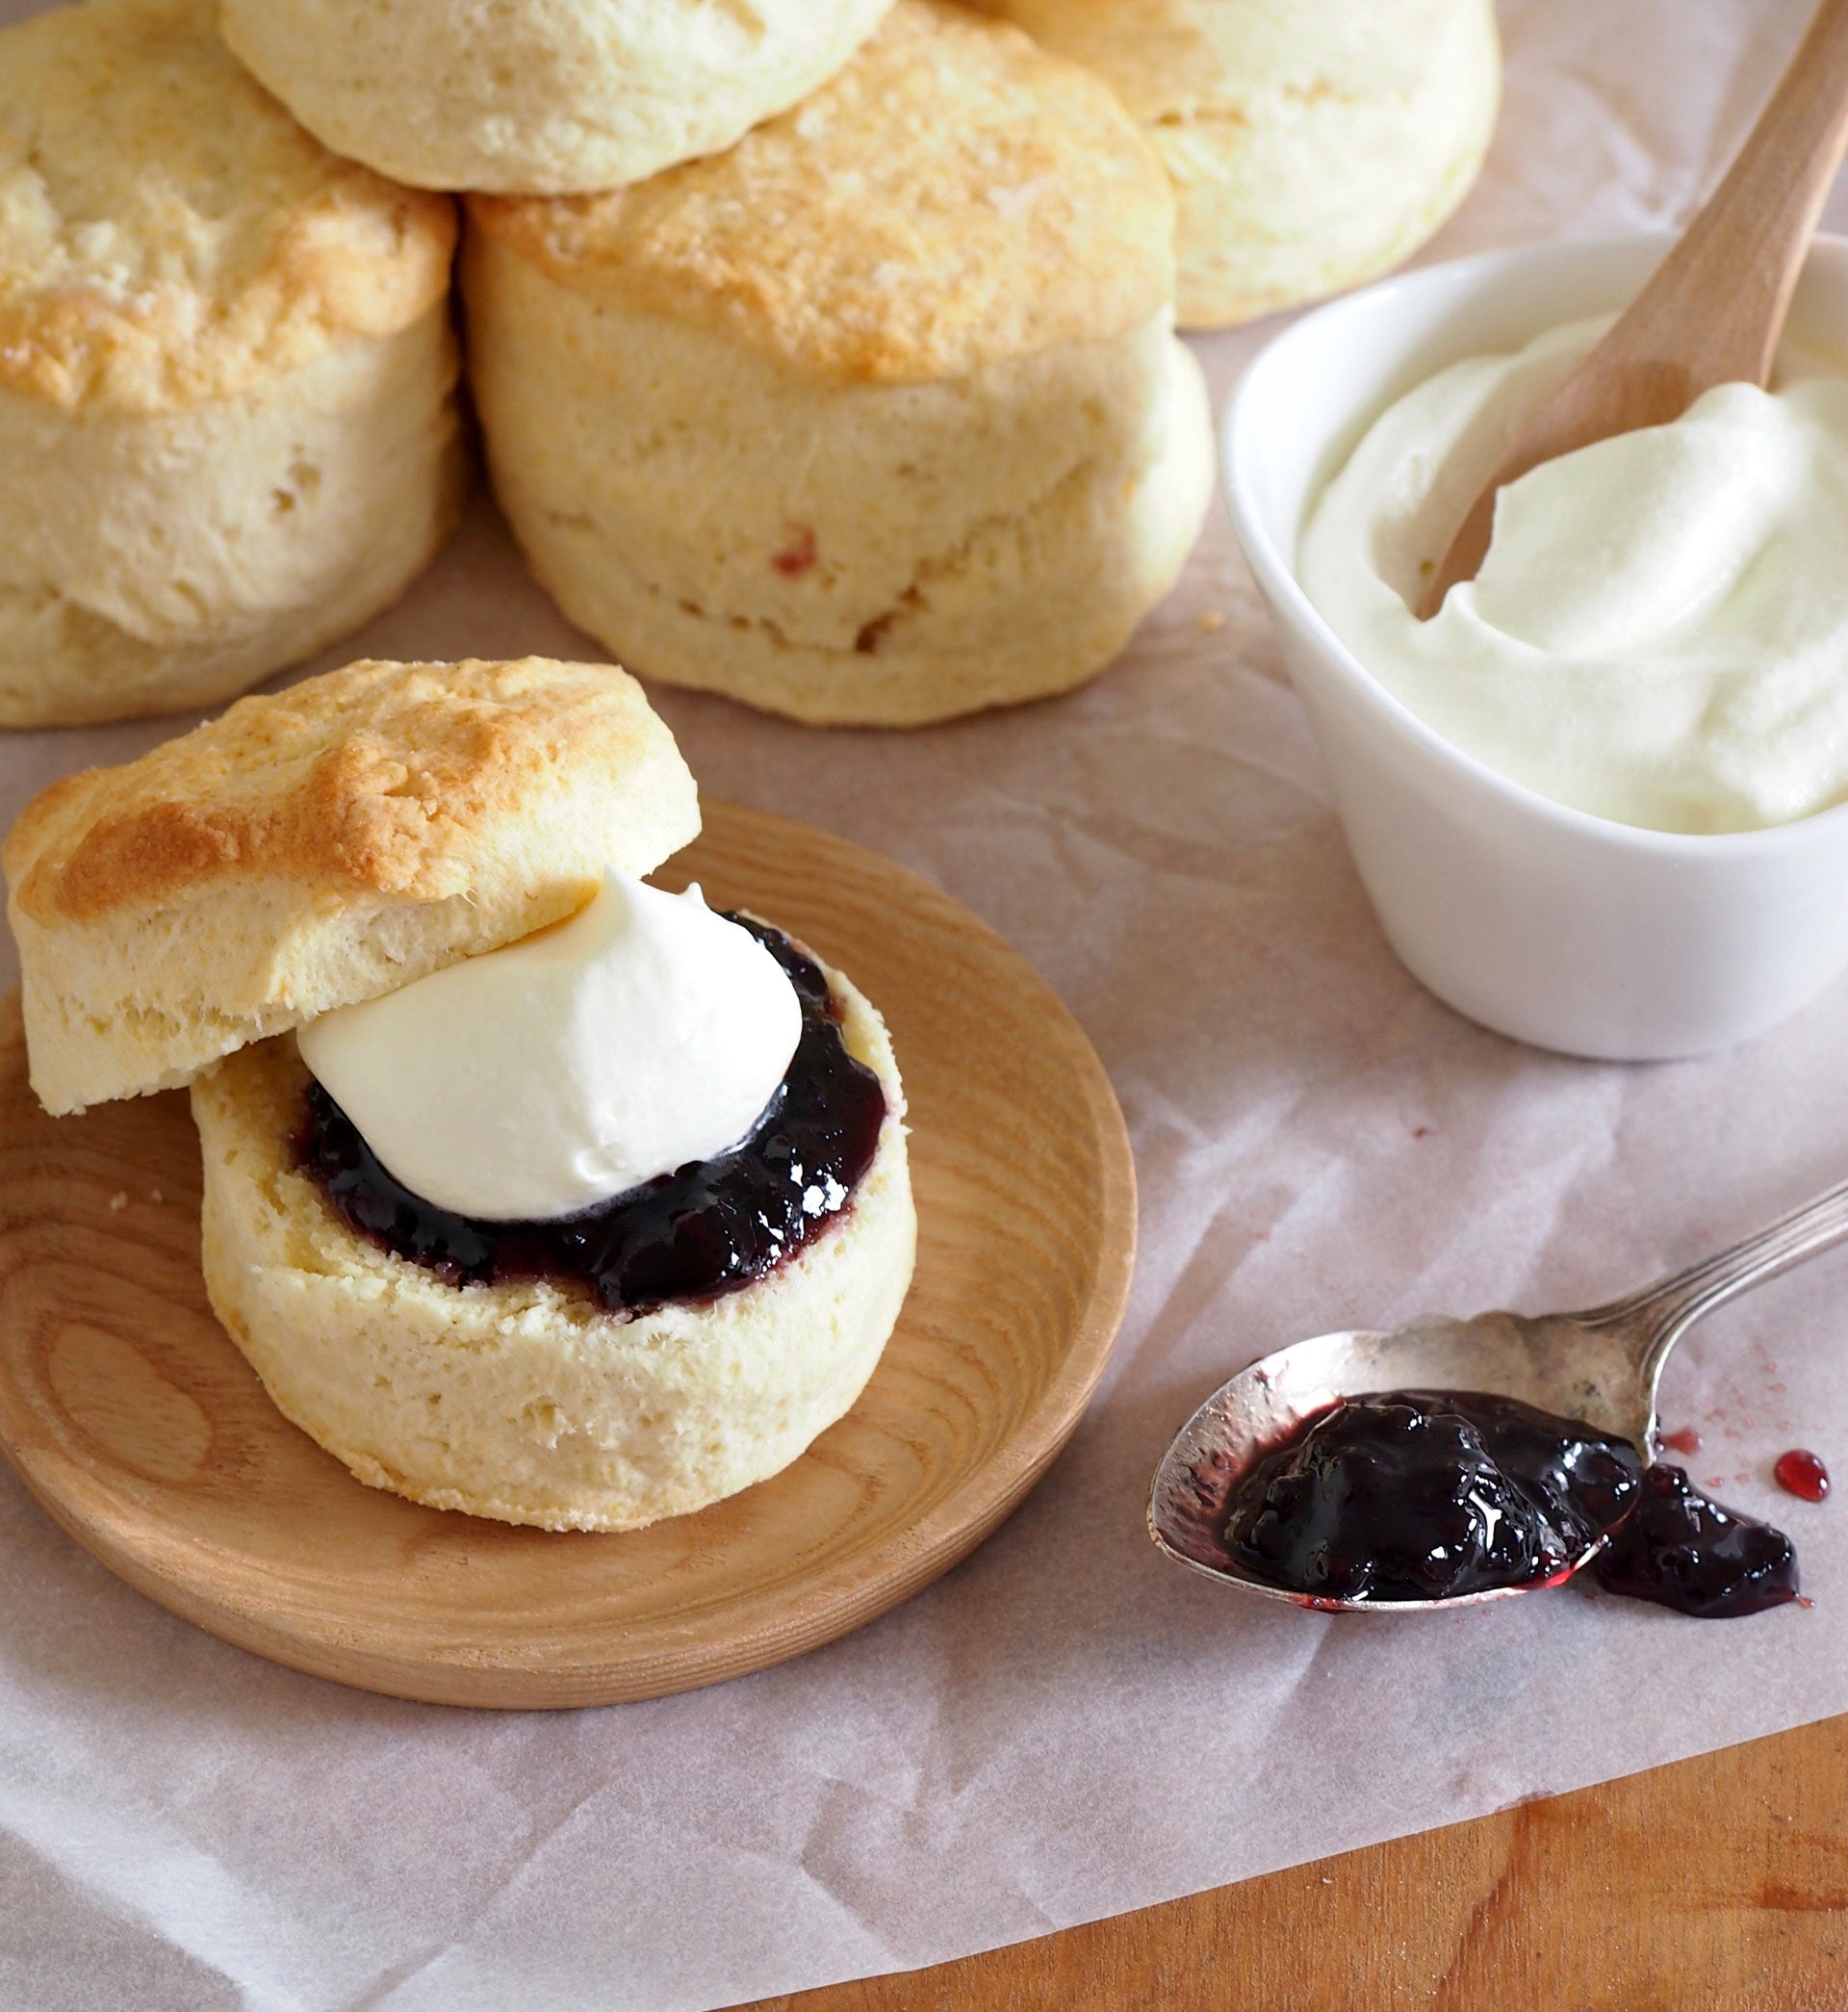
Scones are what I whip up if time is short – they are simple, fast and everyone loves them. The secret to the lightness of these scones is the surprising combination of lemonade and cream (instead of milk) – it may seem a little odd but, believe me, it works!
Ingredients
450g (3 cups) self-raising flour, plus extra, to dustPinch of Salt
80g butter, cubed, softened slightly
125ml (½ cup) lemonade, at room temperature
185ml (¾ cup) pouring cream, plus extra to glaze
Berry jam and whipped cream, to serve
Method
- Preheat the oven to 200°C. Lightly grease a baking tray with butter and then lightly dust with flour, shaking off any excess.
- Put the flour and salt in a medium bowl. Use your fingertips to rub in the butter until the mixture resembles fine breadcrumbs and the butter is evenly incorporated. Make a well in the centre.
- Combine the cream and lemonade, add to the flour mixture and use a flat-bladed knife to mix with a cutting action until the dough comes together in clumps.
- Use lightly floured hands to bring the dough together – it will be soft, but not sticky. Place on a lightly floured surface and knead lightly and briefly (only about 6 times) to bring it together in a smooth ball.
- Use the palm of your hand to flatten the dough out to about 2cm thick. Using a floured 6 cm round cutter, cut the dough into 9 rounds. Gathering the offcuts and, without over handling, pressing out as before, when necessary. Place on the prepared tray, 1-2cm apart. Use a pastry brush to lightly brush the top of each scone with a little extra cream, then dust with a little extra flour.
- Bake in the middle of the preheated oven for 15-18 minutes, until the scones are lightly golden and cooked through; they are ready if they sound hollow when you tap them on the base. Serve warm or at room temperature, split and topped with jam and cream.
Baker's Tips
- These scones are best eaten on the day they are made.

Prep 25min (+1hr 30min proving time)Bake 25minMakes 12
An updated version of the traditional favourite, these hot cross buns are studded with chunks of dark chocolate and tart, dried cherries. They're simply too hard to resist – especially when served warm with lashings of butter!
Ingredients
750g (5 cups/1lb 10½oz) strong bread or pizza (high protein) flour (see Baker's Tips)
55g (¼ cup/2oz) caster sugar
2 x 7g sachets (4 teaspoons) instant dried yeast
1½ teaspoons mixed spice
1½ teaspoons ground cinnamon
1 teaspoon salt
150g (1 cup/5¼oz) dried cherries (see Baker's Tips)
75g (½ cup/2¾oz) currants
435ml (1¾ cups/14¾fl oz) milk
60g (2fl oz) salted butter, cubed, plus extra, to grease and serve
2 eggs, at room temperature
1 teaspoon natural vanilla essence or extract
100g (3½oz) good-quality dark chocolate, chopped
Flour paste
75g (½ cup/2¾oz) plain flour
75ml (2½fl oz) water
Glaze
55g (¼ cup/ 2oz) caster sugar
2 tablespoons water
Method
- Put the bread flour, sugar, yeast, mixed spice, cinnamon and salt in a large bowl and mix to combine. Stir through the dried cherries and currants.
- Heat the milk and butter in a small saucepan over medium heat until the butter has just melted and the milk is lukewarm. Whisk one of the eggs with the vanilla and add to the milk mixture. Whisk to combine. Add to the dry ingredients and use a wooden spoon and then your hands to mix to a soft dough.
- Turn out onto a lightly floured bench top. Knead for 8-10 minutes or until smooth and elastic. Lightly grease a clean large bowl with a little butter, add the dough and turn to coat the dough. Cover with plastic wrap and set aside in a warm, draught-free place for 1 hour or until doubled in volumn.
- Line a large baking tray with baking paper. Punch the centre of the dough down with your fist. Turn onto a lightly floured bench top. Knead for 2-3 minutes or until smooth. Knead in the chocolate until evenly combined. Divide the dough into 12 equal portions. Roll each portion into a ball and place on the tray, allowing a little room for spreading. Cover with a damp tea towel and set aside in a warm, draught-free place for 30 minutes or until almost doubled in size.
- Preheat the oven to 180°C/350°F (160°C/315°F fan-forced). Meanwhile, make the Flour Paste. Combine the flour and water in a bowl and beat with a wooden spoon until smooth. Spoon into a small, good-quality snap-lock bag and seal.
- Whisk the remaining egg and brush the tops of the buns with it. Snip a small hole in the corner of the snap-lock bag containing the Flour Paste and pipe crosses on the buns.
- Bake in the preheated oven for 25 minutes or until the buns are cooked and sound hollow when tapped on the base.
- Meanwhile, make the Glaze. Combine the sugar and water in a small saucepan over medium heat and stir until the sugar dissolves. Bring to a simmer and simmer for 1 minute. Transfer the hot cross buns to a wire rack and brush the tops with the glaze. Serve warm, spread with butter.
Baker's Tips
- Bread and pizza flour (also known as 'strong' flour) has a higher gluten content than regular plain flour. This type of flour is more suited to use in yeast-based bread recipes like these buns and will give you a better final texture (the resulting bread will be more 'bread-like' with a slightly chewy texture rather than a fine, cake-like texture). Look for a protein content of around 11-13 percent for the best results with this recipe.
- Dried cherries are available at selected supermarkets, delicatessens, grocery shops and specialty food stores. You can replace them with good-quality dried cranberries.
- These hot cross buns are best eaten the day they are made although they will freeze well. To freeze, wrap in plastic wrap and then seal in an airtight container or freezer bag and freeze for up to 3 months. Thaw them at room temperature or split while still frozen and toast.
Recipe from BakeClass by Anneka Manning (Murdoch Books).
Photography by Alan Benson.
Prep 20min (+ 5min standing time)55-60minMakes 8 serves
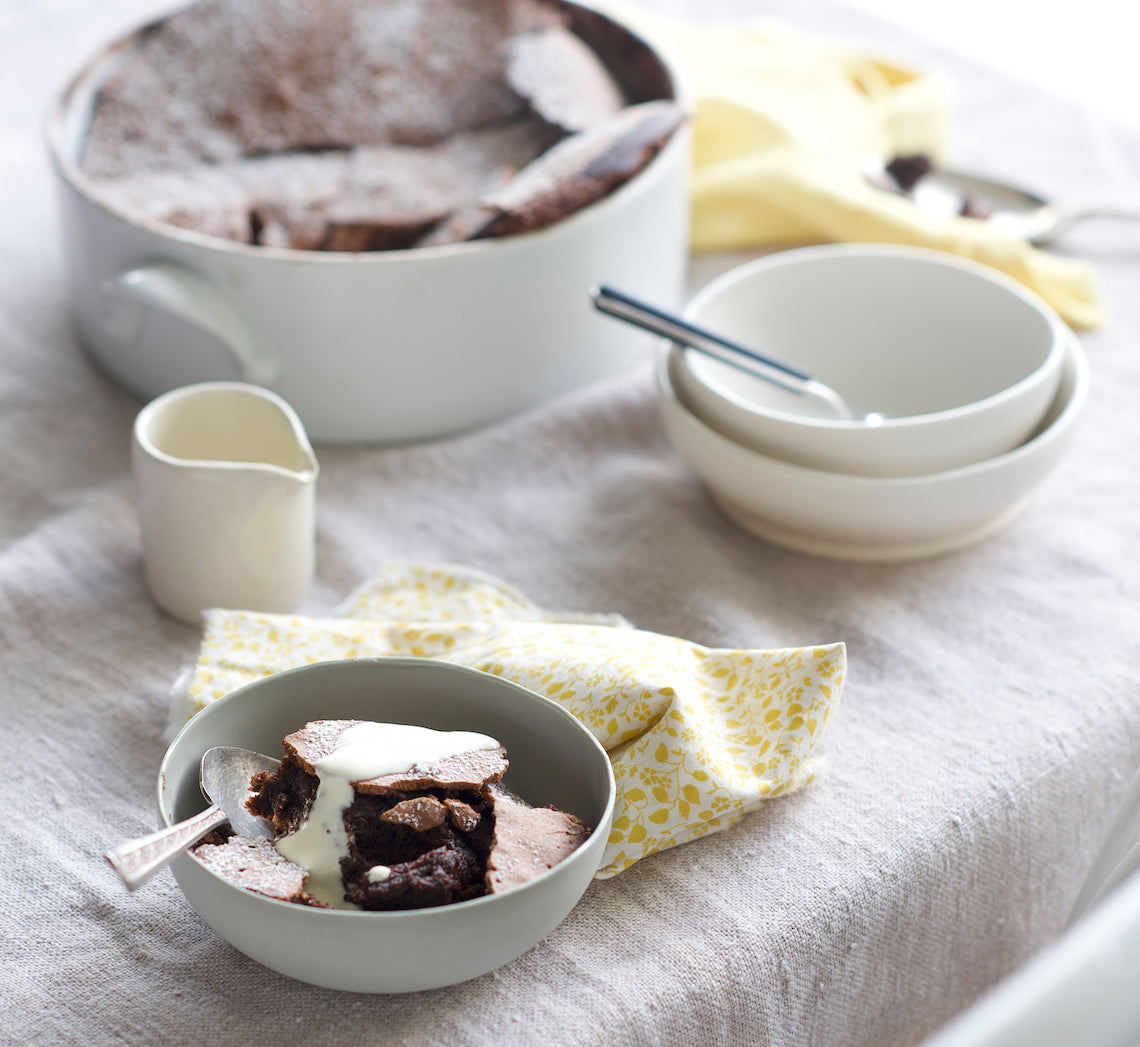
I have been baking this gluten-free pudding for years. Not only is it completely heavenly, it is also very clever and can be baked as a cake when you want.
Ingredients
Melted butter, to grease
Cocoa powder, sifted, to dust
200g (1⅓ cups/7oz) chopped good-quality gluten-free dark chocolate (70 percent cocoa is good)
125g (4½oz) unsalted butter, cubed
2 tablespoons marsala wine or freshly brewed strong coffee
165g (¾ cup/5¾oz) caster sugar
5 eggs, at room temperature, separated
Gluten-free icing (confectioners’) sugar, to dust
Cream or gluten-free vanilla ice cream, to serve
Method
- Preheat the oven to 170°C/340°F (150°C/300°F fan-forced). Brush a 2 litre (8 cup/3½pt) capacity ovenproof dish (about 20cm/8in diameter) with melted butter to grease. Lightly dust with cocoa powder, tapping out any excess.
- Place the chocolate and butter in a medium heatproof bowl over a saucepan of simmering water, making sure the base of the bowl doesn't touch the water, and stir until melted and smooth. Transfer the mixture to a large bowl and stir in the marsala, 110g (½ cup/4oz) of the caster sugar and the egg yolks.
- Use an electric mixer with a whisk attachment to whisk the egg whites in a clean, dry large bowl on medium speed until soft peaks form. Add the remaining 55g (¼ cup/2oz) caster sugar and whisk until thick and glossy. Add one-third of the egg white mixture to the chocolate mixture and use a large metal spoon or spatula to fold together. Fold through the remaining egg white mixture until just combined.
- Pour the mixture into the prepared dish. Bake in the preheated oven for 55–60 minutes, or until crumbs cling to a skewer inserted in the centre.
- Remove the pudding from the oven and set aside for 5 minutes. Dust with icing sugar and serve in scoops with cream or ice cream.
Variation
Chocolate Soufflé Cake: Bake the mixture in a 22cm/8¾in (base measurement) springform cake tin that has been base-lined with baking paper, and then greased and dusted with cocoa powder. Bake at the same temperature for 55–60 minutes. Leave the cake to cool in the tin. Cut into wedges to serve.
Baker's Tips
- This pudding is also delicious served at room temperature. Leave to cool in the dish before serving.
- Any leftover pudding will keep covered in the fridge for up to 3 days. Leave to stand at room temperature for at least 30 minutes before serving.
Recipe and image from BakeClass by Anneka Manning (Murdoch Books).
Prep 25min (+1hr cooling time)Bake 40minMakes 16 serves
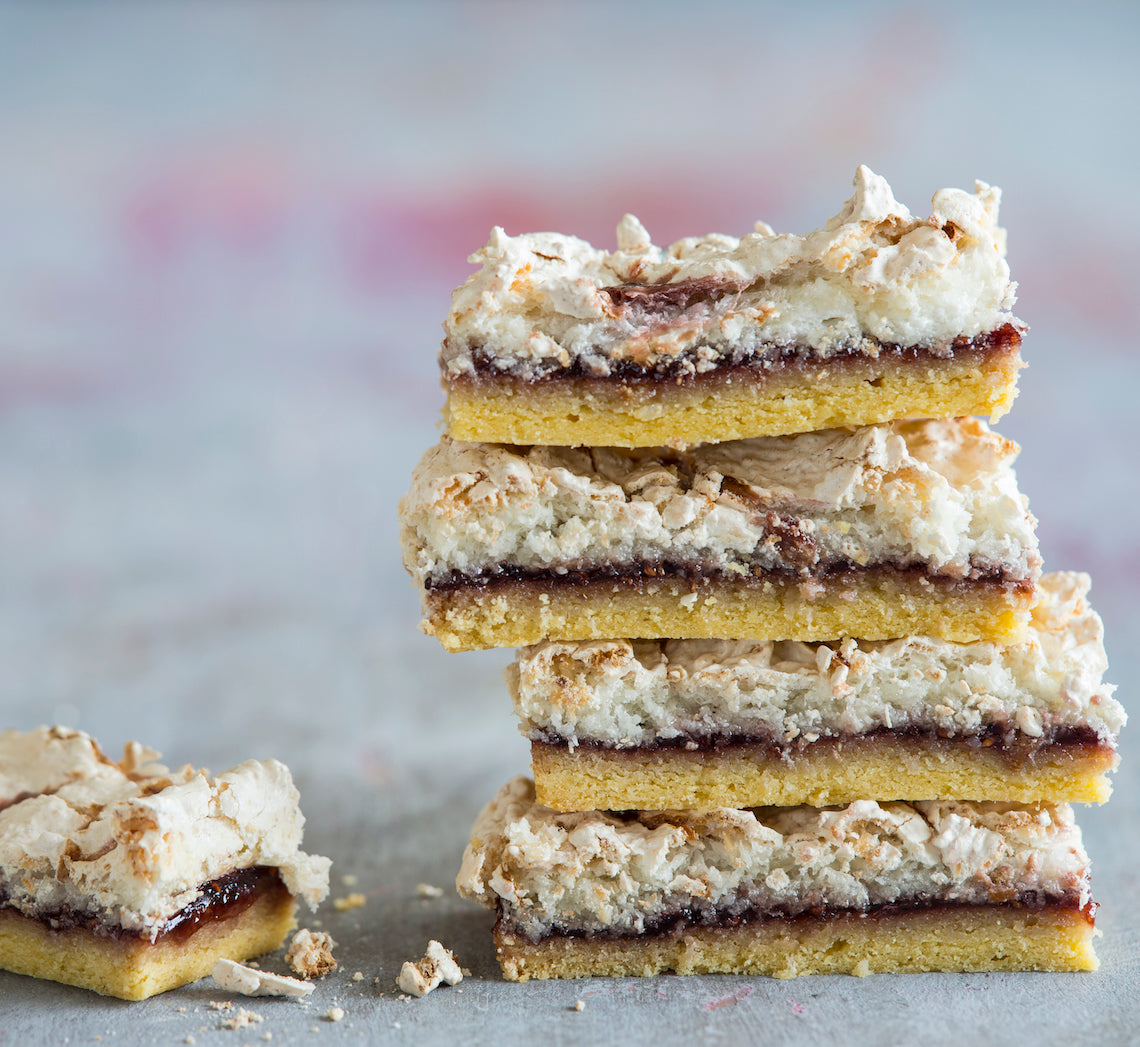
More a slice than a cake, I can’t believe I have only just discovered this gem from the land of the long white cloud. I can completely understand why it features fondly in the childhood memories for anyone who grew up in rural New Zealand!
Ingredients
Melted butter, to grease
Biscuit Base
100g (3½oz) salted butter, at room temperature
110g (½ cup/4oz) caster sugar
1 teaspoon natural vanilla essence or extract
3 egg yolks
225g (1½ cups/8oz) plain flour
1 teaspoon baking powder
320g (1 cup/11¼oz) good-quality raspberry jam
Coconut Meringue Topping
4 egg whites, at room temperature
220g (1 cup/7¾oz) caster sugar
1 teaspoon natural vanilla extract or essence
135g (1½ cups/4¾oz) desiccated coconut
1 tablespoon good-quality raspberry jam (see Baker's Tips)
Method
- Preheat oven to 180°C/350°F (160°C/215°F fan-forced). Grease a 20cm x 30cm (8inx12in) slice tin with melted butter to grease and line the base and sides with one piece of non-stick baking paper, cutting into the corners to fit and allowing the paper to overhang the sides.
- To make the Biscuit Base, use an electric mixer fitted with a paddle beater to beat the butter, sugar and vanilla until pale and creamy. Beat in the egg yolks until well combined. Sift together the flour and baking powder, add to the butter mixture and beat on low speed until just combined.
- Press the biscuit base mixture into the prepared tin to cover evenly. Bake for 10 minutes or until starting to colour (the base won’t be cooked through at this stage). Remove from the oven and spread evenly with the raspberry jam. Set aside to cool slightly.
- Meanwhile, use an electric mixer with a whisk attachment to whisk the egg whites in a large clean, dry mixing bowl on medium-high speed until soft peaks form. Add the sugar, a spoonful at a time, whisking well on medium-high speed after each addition. Continue to whisk until the mixture is thick and glossy, the sugar has dissolved and a trailing peak forms when the whisk is lifted. Whisk in the vanilla and then use a spatula or large metal spoon to fold in the coconut until evenly combined. Spread the meringue mixture over the raspberry jam to cover. Dot the 1 tablespoon of jam over the top of the meringue and then use a tooth pick or skewer to swirl it through the meringue mixture.
- Return the slice to the oven and bake for 30 minutes or until golden and crisp to touch on top. Place on a wire rack and allow the slice to cool in the tin (about 1 hour).
- Use the paper to transfer the slice from the tin to a cutting board. Cut into portions to serve.
Baker's Tips
- Although raspberry jam is traditionally used in this slice, any berry jam can be used - mixed berry, strawberry and blackberry all work well.
- This slice will keep in an airtight container at room temperature in a cool spot for up to 4 days.
This recipe is from Anneka's SBS Food online column Bakeproof: Meringue. Click here for more Bakeproof columns and recipes.
Photography by Alan Benson.
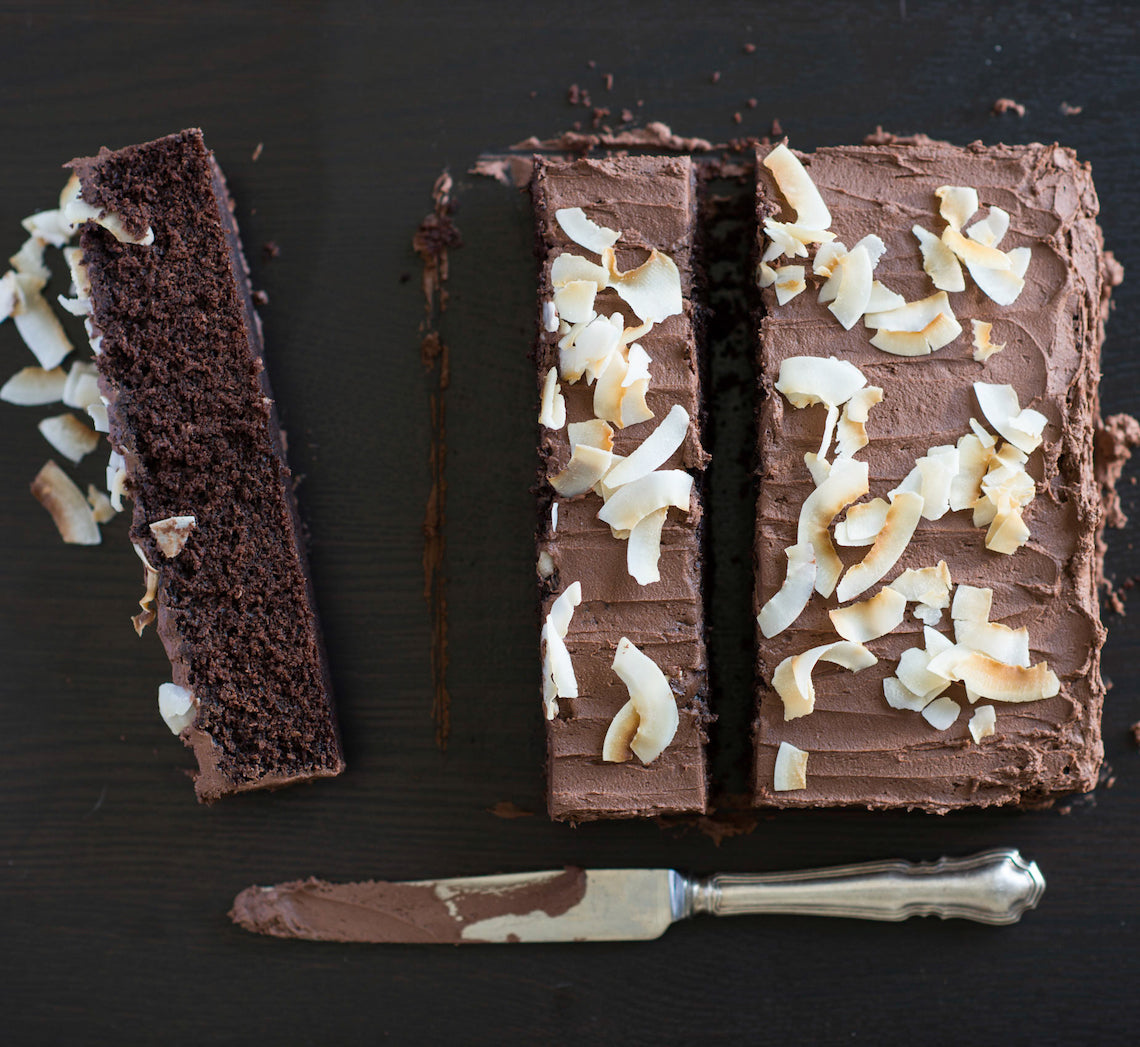
Prep 20min (+1hr 30min cooling time)Bake 30-35minMakes 10-12 serves
Everyone needs a good old-fashioned chocolate cake in their repertoire that is easy enough to whip up on a whim. Made with a simple melt-and-mix method this delicious cake is a real crowd-pleaser.
Ingredients
Melted butter, to grease
125g salted butter, diced, at room temperature
220g (1 cup) caster sugar
185ml (¾ cup) milk
2 eggs, at room temperature, lightly whisked
2 teaspoons natural vanilla essence or extract
150g (1 cup) self-raising flour
55g (½ cup) cocoa powder
1 teaspoon baking powder
45g (½ cup) desiccated coconut
Chocolate buttercream
125g salted butter, at room temperature
185g (1½ cups) icing sugar mixture, sifted
2 tablespoons cocoa powder, sifted
Method
- Preheat oven to 180°C (160°C fan-forced). Grease a square 20cm cake tin with melted butter and line the base with non-stick baking paper.
- Combine the butter, sugar and milk in a medium saucepan. Stir over medium heat until butter melts, sugar dissolves and mixture is combined (see Baker's Tips). Remove from heat and use a fork to whisk in the eggs and vanilla.
- Sift together the flour, cocoa powder and baking powder into a large bowl. Stir in the coconut. Add the butter mixture and use a balloon whisk to stir until just combined.
- Spoon the mixture into the prepared tin and use the back of a metal spoon to smooth the surface. Bake in preheated oven for 30-35 minutes or until a skewer inserted into the centre of the cake comes out clean. Stand in the tin for 5 minutes before turning onto a wire rack to cool (this will take about 1½ hours).
- To make the Chocolate buttercream, use an electric mixer to beat the butter, icing sugar and cocoa powder in a medium bowl until pale and creamy and it is a smooth spreadable consistency. Spread the cooled cake with the buttercream and cut into portions to serve.
Baker's Tips
- Don’t overheat the butter mixture – as soon as the butter melts and the sugar has dissolved, remove it from the heat.
- This cake will keep in an airtight container at room temperature in a cool spot for up to 3 days.
This recipe is from Anneka's SBS Food online column, Bakeproof: Easy Chocolate Cakes. CLICK HERE for more Bakeproof recipes.
Photography by Alan Benson.
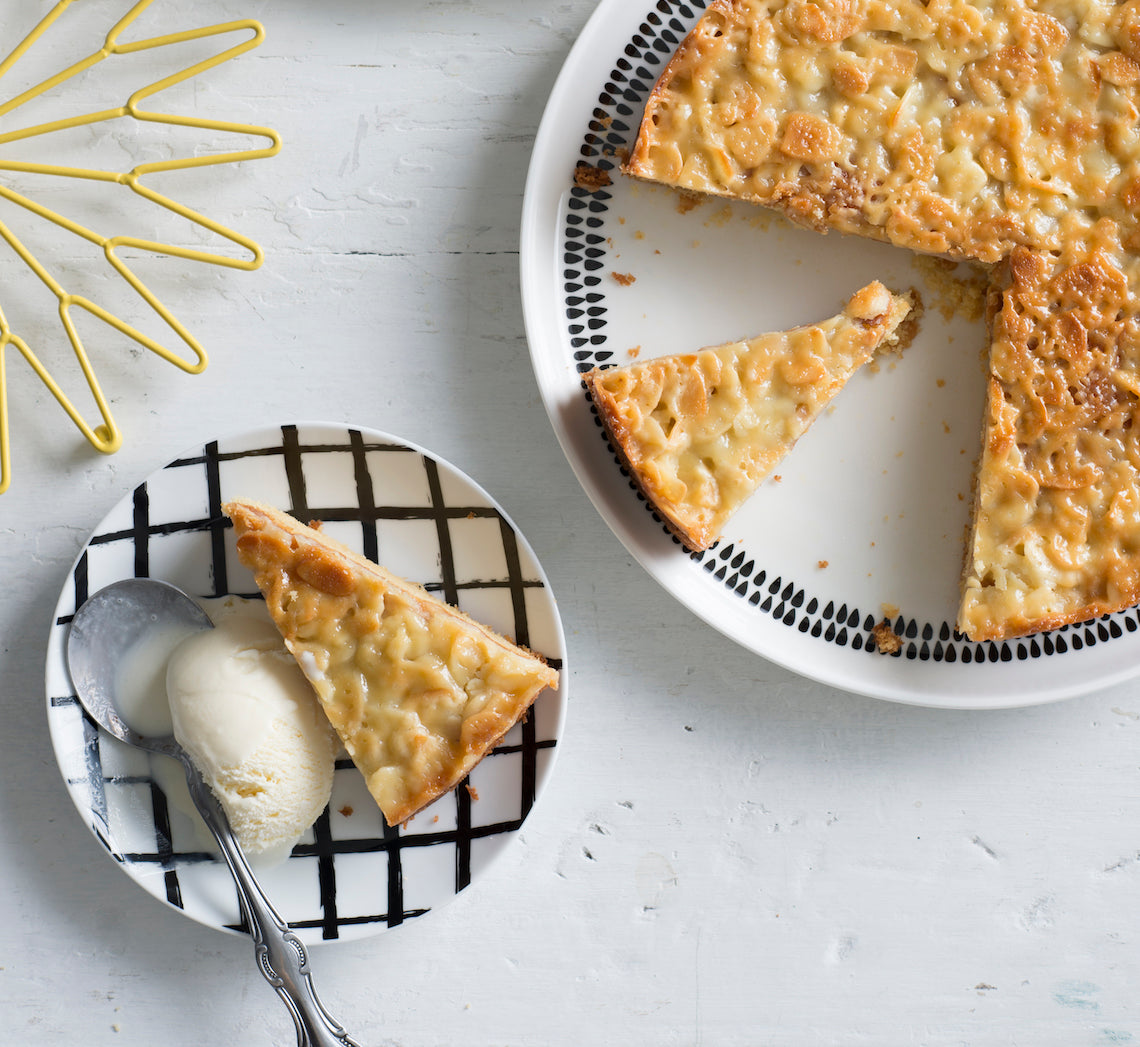
Prep 25min (+1hr 10min cooling time)Bake 40-45minMakes 8-10 serves
One of Scandinavia’s most loved cakes, both Sweden and Denmark have their own version of this wonderful cake (and, like all great cakes, the origins are unclear). A rich, buttery, moist cake topped with a crisp caramel-almond Florentine-like topping it is simply too good to care too much about its origins!
Ingredients
Melted butter, to grease
50g (5¼oz) butter, at room temperature
110g (½ cup/4oz) caster sugar
1 teaspoon natural vanilla extract or essence
2 eggs, at room temperature
150g (1 cup/5¼oz) plain flour
1 teaspoon baking powder
80ml (⅓ cup/2½fl oz) milk
Vanilla ice-cream or thick cream, to serve
Caramel almond topping
70g (2½oz) butter, cubed
75g (⅓ cup/2½oz) caster sugar
70g (⅔ cup/2½oz) flaked almonds
2½ tablespoons (50ml/1¾fl oz) pure cream
1½ tablespoons plain flour
Method
- Preheat the oven to 170°C/340°F (150°C/300°F fan-forced). Grease a 22cm/8¾in springform tin with melted butter and line the base with non-stick baking paper.
- Use an electric mixer to beat the butter, sugar and vanilla in a large bowl until pale and creamy. Add the eggs one at a time, beating well after each addition. Sift together the flour and baking powder. Add half the flour mixture to the butter mixture and beat on lowest possible speed until just combined. Add the milk and beat on lowest possible speed until just combined. Add the remaining flour mixture and beat on lowest possible speed until just combined.
- Spoon the cake mixture into the prepared tin and smooth with the back of a spoon. Place the tin on a baking tray and bake in preheated oven for 30 minutes or until almost cooked.
- Meanwhile, when the cake has been in the oven for about 20 minutes, make the topping. Combine the butter, sugar, almonds, cream and flour in a medium saucepan. Use a wooden spoon to stir over medium heat until well combined and the sugar has dissolved. Bring to a simmer and cook for 2–3 minutes or until thickened slightly.
- Remove the cake from the oven and increase the temperature to 200°C/400°F (180°C/350°F fan-forced). Quickly pour the caramel almond topping evenly over the top of the cake and then use the back of a metal spoon to spread evenly to cover the top. Return the cake immediately to the oven and bake for a further 10–15 minutes or until the cake is cooked through and the topping is golden brown.
- Remove the cake from the oven and place on a wire rack to cool for 10 minutes. Run a spatula around the outside of the cake to release the topping from the pan. Carefully remove the sides of the pan and set the cake aside for 1 hour or until cooled completely.
- Serve in wedges with ice-cream or cream.
Baker's Tip
- This cake will keep in an airtight container for up to 3 days.
This recipe is from Anneka's SBS Food online column, Bakeproof: Scandi Baking. CLICK HERE for more Bakeproof recipes.
Photography by Alan Benson.
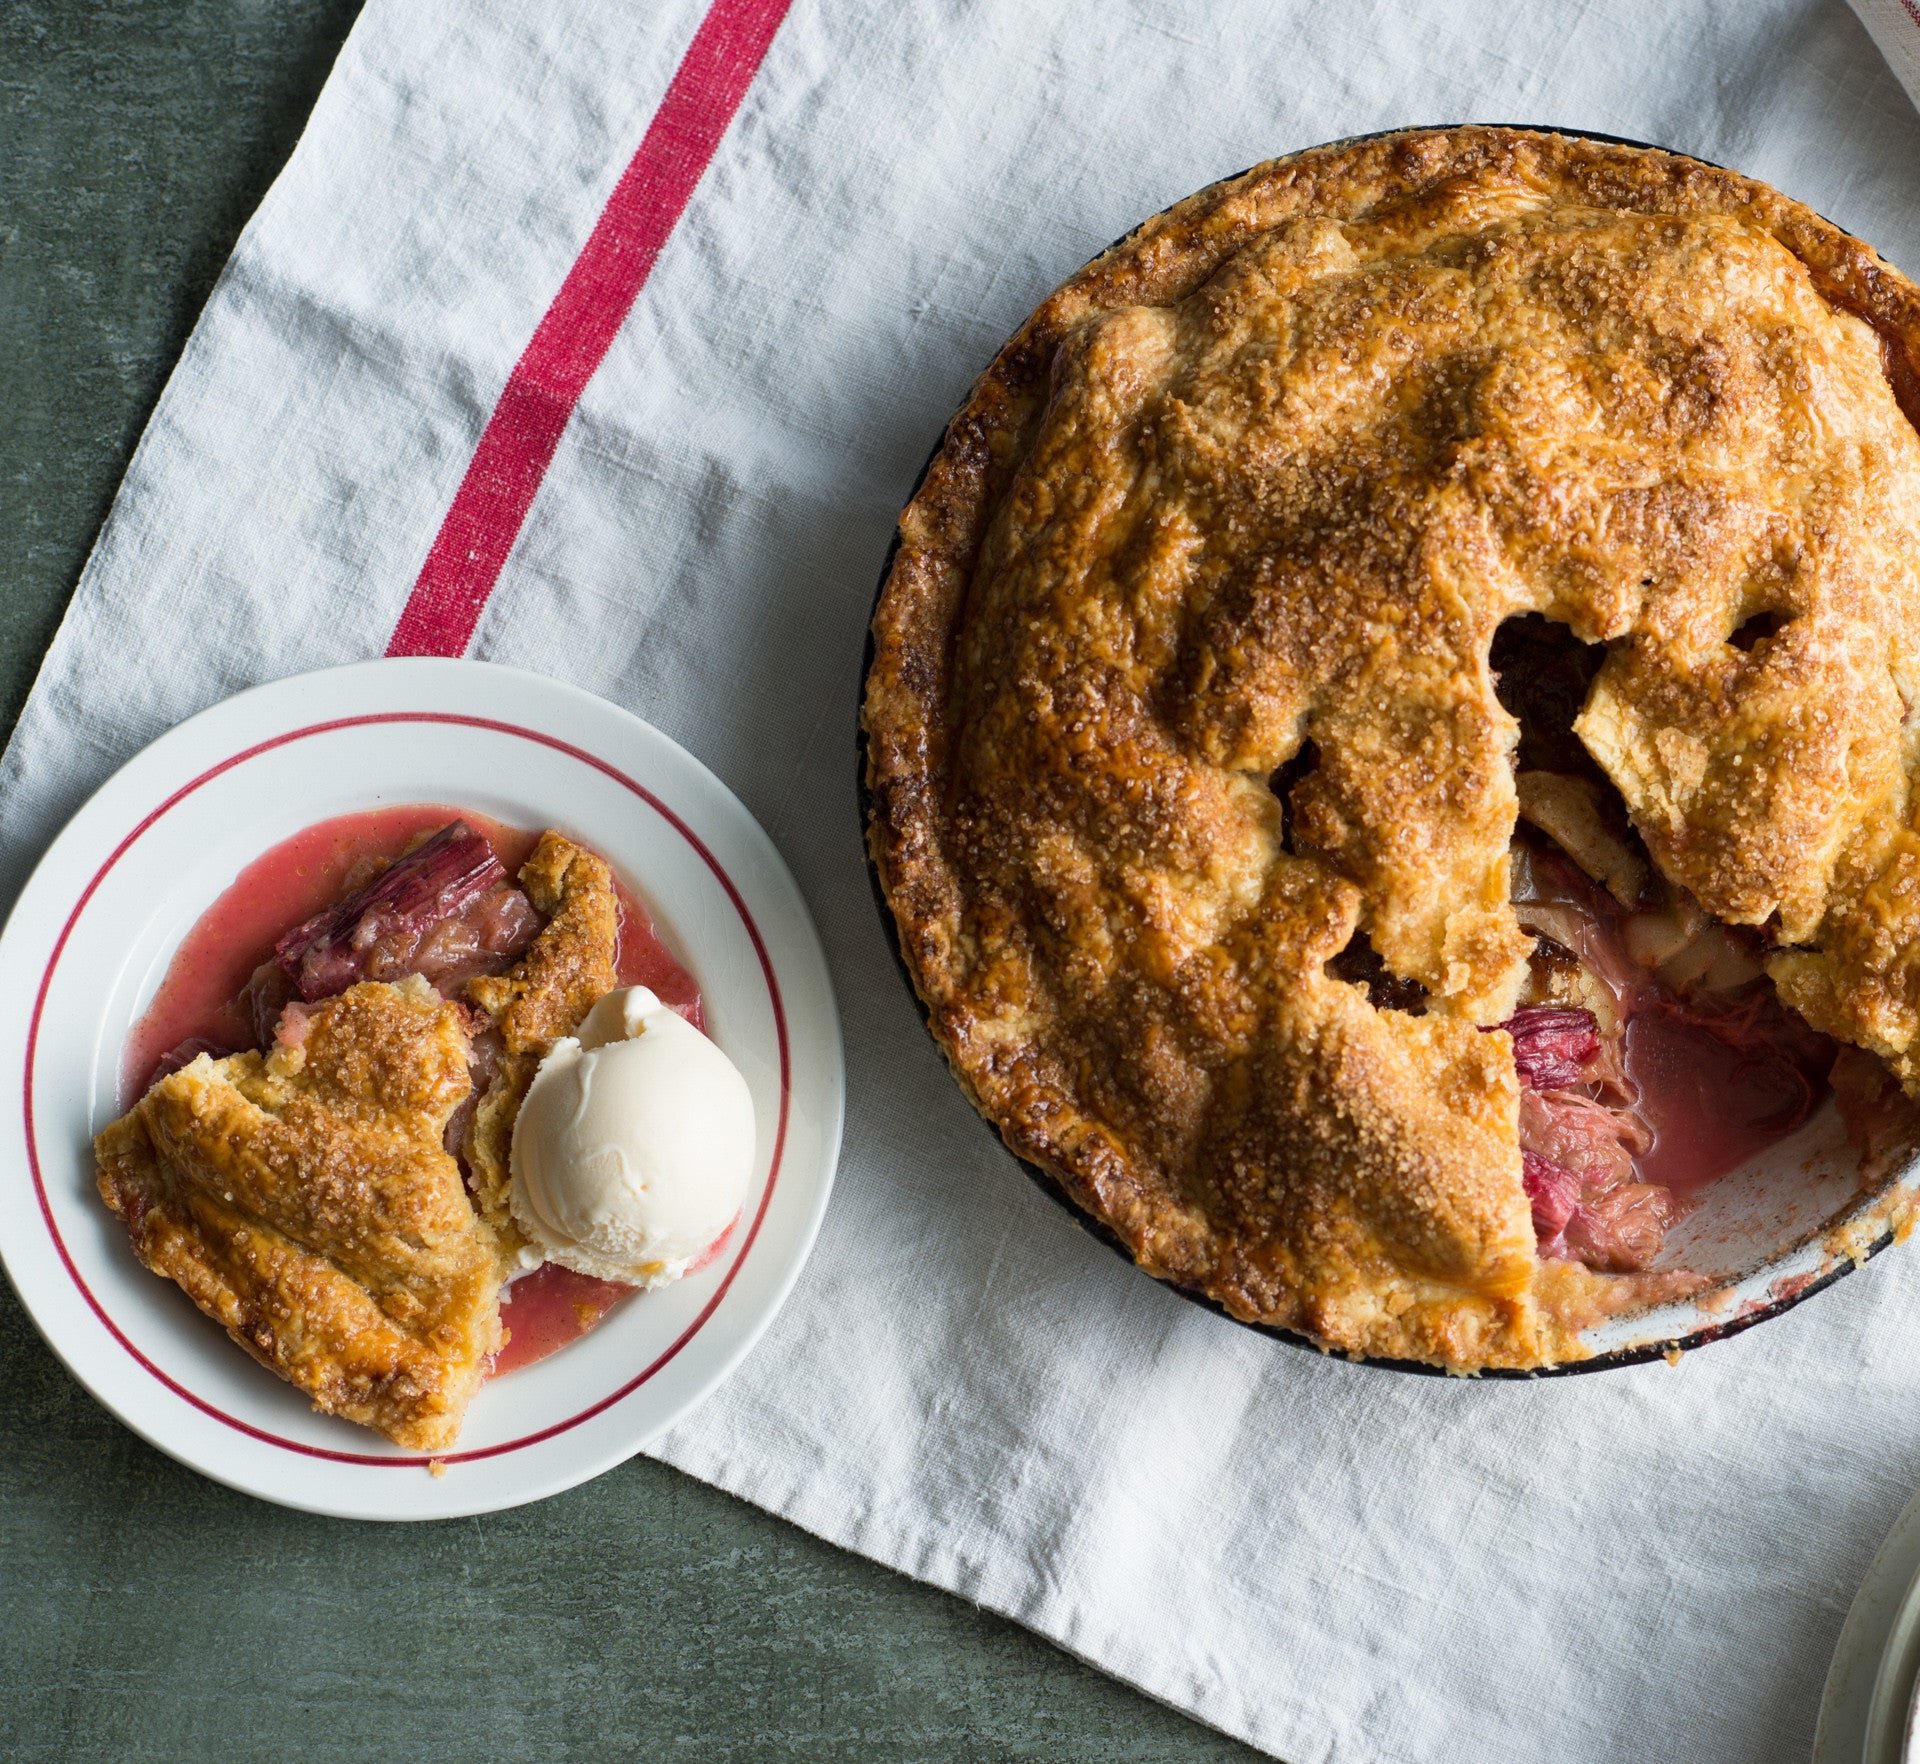
Prep 30min (+35min pastry making time)Bake 1hr 15minMakes 8-10 serves
Classic apple pie (served with a overly-generous scoop of vanilla ice-cream, of course) is one of the perennial delights of winter and can only be improved by the addition of rhubarb and a deliciously rich vanilla sour cream pastry. This pie just may be a little hard to beat.
Ingredients
1 egg, whisked, for brushing1 quantity vanilla sour cream pastry, shaped into a disc before wrapping and chilling as directed
2 teaspoons demerara sugar, to sprinkle
pouring cream, vanilla ice-cream or custard, to serve
Apple and rhubarb filling
1 teaspoon ground cinnamon1 teaspoon vanilla bean paste
1 orange, rind finely grated
110g (½ cup) demerara sugar
1½ tablespoons plain flour
1kg (about 6 medium) Granny Smith apples
750g trimmed rhubarb, cut into 4 cm lengths (see Baker’s Tips)
30g unsalted butter, finely diced
Method
- Preheat the oven to 200°C (180°C fan-forced).
- To make the apple and rhubarb filling, use your fingertips to rub the cinnamon, vanilla bean paste and orange rind through the sugar in a medium bowl. Stir in the flour. Peel, core and cut the apples into thin (about 3 mm) slices and place in a separate large bowl, along with the rhubarb and the sugar mixture. Use your hands to toss gently to combine evenly.
- Spoon the apple and rhubarb filling into an ungreased 23cm diameter (top measurement) ceramic or metal pie dish (see Baker’s Tips) and then dot with the diced butter. Brush the edge of the pie dish with the whisked egg.
- Roll out the vanilla sour cream pastry to make a pie lid about 5 mm thick. Use a 2cm round cutter to cut out a circle form the centre of the pastry. Carefully drape the pastry loosely around the rolling pin and place on top of the pie. Use your thumb and index finger to press the pie pastry top onto the rim of the pie dish to seal. Use a small sharp knife to trim the excess pastry from around the edge. Brush the top of the pie with some of the remaining whisked egg and then sprinkle with demerara sugar.
- Bake for 30 minutes. Reduce the oven temperature to 160°C (140°C fan-forced) and bake for a further 40-45 minutes or until the pastry is golden and cooked through and the apples are tender (see Baker’s Tips). Remove the pie from the oven and stand for 5 minutes before serving warm with cream, ice cream or custard.
Baker's Tips
- For this recipe you will need a ceramic pie dish measuring 23cm across the top, 17cm across the base and 7cm deep.
- You will need about 1kg untrimmed rhubarb for this recipe.
- To check if the apples are tender, insert a skewer into the centre of the pie.
This recipe is from Anneka's SBS Food online column, Bakeproof: Pies.
CLICK HERE for more Bakeproof recipes.
Photography by Alan Benson.
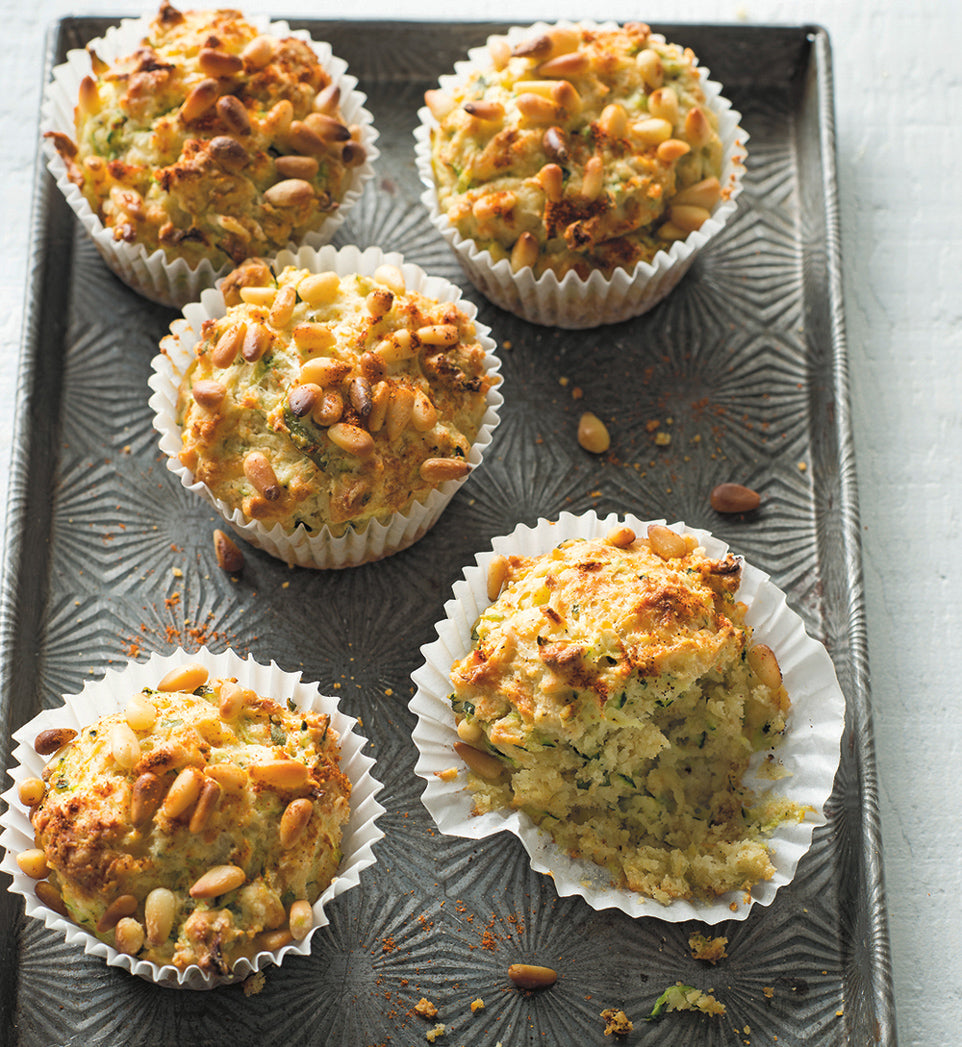
Prep 15min (+ 5min standing time)Bake 25min-30minMakes about 12
Savoury muffins are a great alternative to the sweet ones, especially when served as a snack or instead of bread alongside soup or salad. The zucchini in these makes them lovely and moist while adding substance.
Ingredients
Light olive oil or sunflower oil, to grease (optional)
150g (1 cup) plain flour
150g (1 cup) wholemeal plain flour
1 tablespoon baking powder
½ teaspoon salt
70g (⅔ cup) finely grated parmesan cheese
65g (⅔ cup) coarsely grated vintage cheddar cheese
¼ cup chopped basil leaves
185ml (¾ cup) buttermilk
80ml (⅓ cup) light olive oil or sunflower oil
2 eggs, at room temperature
2 zucchini (about 100g each) ends trimmed, coarsely grated
40g (¼ cup) pine nuts, to scatter
Cayenne pepper, to sprinkle
Method
- Preheat the oven to 190°C (170°C fan-forced). Line a 12-hole 80ml (⅓ cup) capacity muffin tin with paper cases or grease with a little vegetable oil.
- Sift together the flours, baking powder and salt into a large bowl, returning any husks left in the sieve to the bowl. Season well with pepper and then gently stir in the parmesan, cheddar and basil. Make a well in the centre.
- Use a fork to whisk together the buttermilk, olive oil and eggs in a bowl. Add the zucchini and mix to combine. Add to the flour mixture and use a spatula or large metal spoon to fold together until just combined. (Don’t overmix – the batter should still be a little lumpy.)
- Spoon the mixture into the prepared muffin holes, dividing evenly. Scatter over the pine nuts and sprinkle with a little cayenne pepper. Bake in the preheated oven for 25–30 minutes or until the muffins are golden and a skewer inserted in the centre comes out clean. Leave to cool in the tin for 5 minutes before transferring to a wire rack. Serve warm or at room temperature.
Baker's Tips
- These muffins are best eaten the day they are baked, however they freeze well – wrap individually in plastic wrap and then seal in an airtight container or freezer bag. Freeze for up to 3 months. Thaw at room temperature.
Photography by Alan Benson.

Prep 1hrBake 55minMakes 6 serves
Fun to make and scrumptious to eat, this homemade baked gnocchi combines pumpkin, tomatoes and spinach for a delicious, nutritious meal, made all the more fun by being served in individual dishes.
Ingredients
75g baby spinach
100g bocconcini, thinly sliced
Pumpkin gnocchi
350g unpeeled butternut pumpkin, deseeded and cut into 6 chunks
650g medium Desiree potatoes, unpeeled
salt and freshly ground black pepper, to taste
110g (½ cup) plain flour, plus extra to dust
Tomato sauce
100g bacon rashers, trimmed and chopped
1 garlic clove, crushed
1 x 400g can chopped tomatoes
1 teaspoon sugar
2 tablespoons pouring cream
salt and freshly ground black pepper, to taste
Method
- Preheat oven to 180°C (160°C fan-forced). Line a tray with a clean tea towel and dust lightly with flour.
- Place the pumpkin in an ovenproof dish, cover with foil and bake in preheated oven for 40 minutes or until tender when tested with a skewer. Set aside to cool slightly. Increase the oven temperature to 200°C (180°C fan-forced).
- Meanwhile, put the whole potatoes in a saucepan of water, cover with a lid and bring to the boil over medium heat. Boil for 30 minutes or until the potatoes are tender with tested with a skewer. Drain and set aside until cool enough to handle.
- Next, peel the warm potatoes, return the flesh to the dry saucepan and mash until smooth. Use a metal spoon to press a third of the potatoes through a coarse sieve or fine colander into a large bowl. Repeat with the remaining mashed potato in 2 more batches.
- Remove the pumpkin skin from the flesh and discard. Add the flesh to the potato and mash together. Season well with salt and pepper. Add the flour and use a wooden spoon and then your hands to mix to a firm but slightly sticky dough (adding a little more flour if necessary). Divide the dough into 4 equal portions and roll each out on a lightly floured bench top into a log about 2cm in diameter. Cut the logs into 2cm lengths and then roll each into a small ball. Gently roll each ball, one at a time, over the back of a lightly floured fork to form the gnocchi, placing on the tea towel-lined tray as they are finished.
- To make the tomato sauce, cook the bacon in a small saucepan over medium-high heat for 5 minutes, stirring occasionally, or until starting to colour. Add the garlic and cook for 1 minute or until aromatic. Add the tomatoes and sugar, bring to a simmer and simmer over medium-low heat for 10 minutes or until thickened slightly. Remove from the heat, stir through the cream and season with salt and pepper.
- Bring a large saucepan of salted water to the boil. Add a quarter of the gnocchi and boil for 2 minutes or until they just rise to the surface. Remove from the water immediately with a slotted spoon and place in a colander to drain well before transferring to a large bowl. Repeat with the remaining gnocchi in 3 more batches.
- Add the tomato sauce to the gnocchi with the spinach and gently stir through. Spoon the gnocchi and sauce into 6 x 250ml (1 cup) ovenproof dishes or ramekins, dividing evenly. Top with the bocconcini.
- Bake in preheated oven for 15 minutes or until bocconcini has melted and the sauce is bubbling. Remove from the oven and stand for 5 minutes before serving.
Baker's Tips
- You can also make this baked gnocchi by using 750g bought fresh gnocchi instead of making the pumpkin gnocchi.
- You can also bake this recipe in a 1.5 litre (6 cup) ovenproof dish. The baking time and temperature will be the same.
This recipe is from Anneka's SBS Food online column, Bakeproof: Kids in the Kitchen. CLICK HERE for more Bakeproof recipes.
Photography by Alan Benson.
Prep 30min (+ 1hr 30min proving time)Bake 25-30minMakes 16
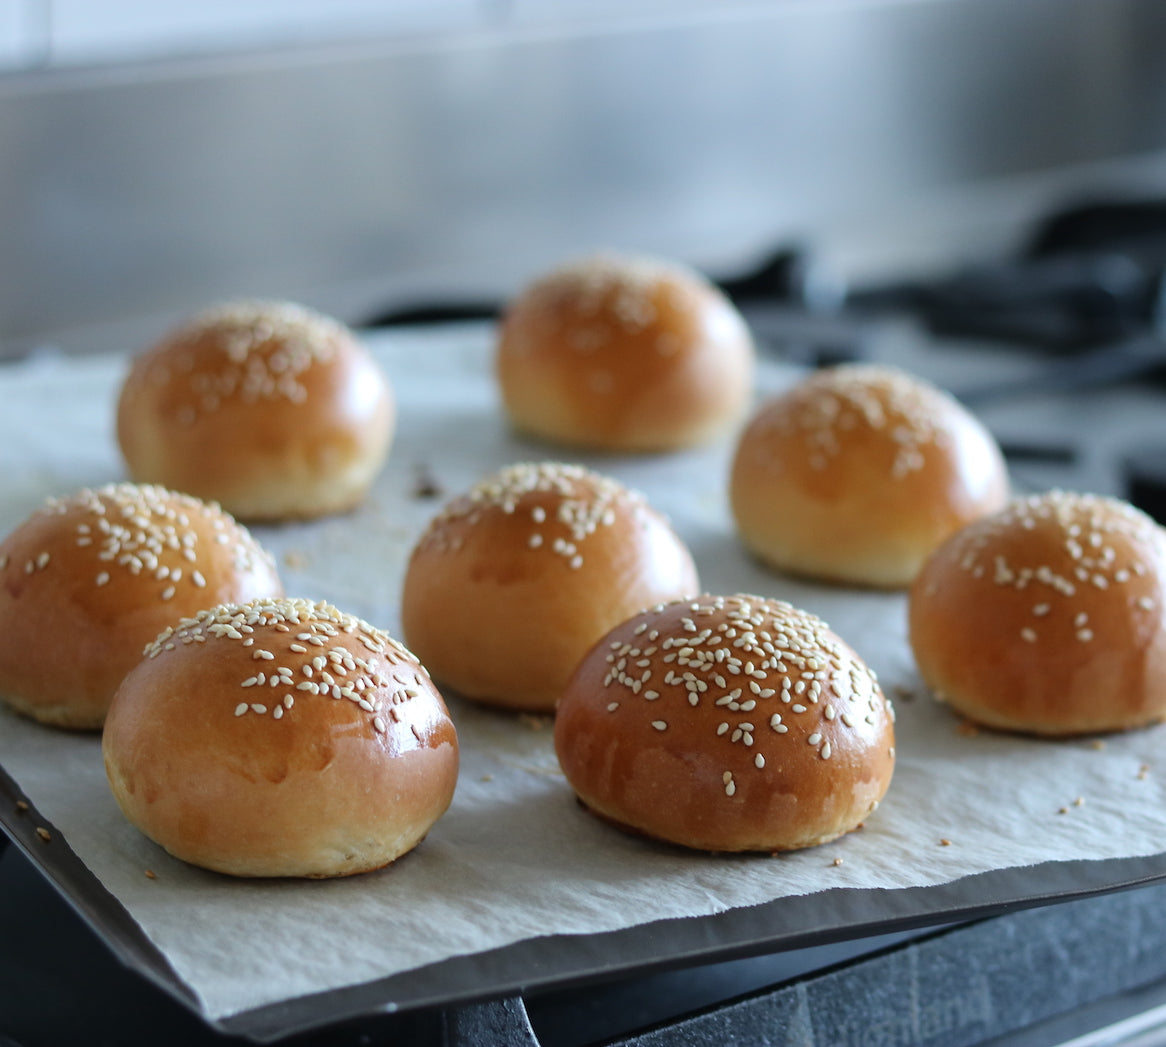
There is nothing quite like a really good, simple white bread roll. These ones have a lovely soft crumb and a thin crust, perfect (as their name suggests) for dinner or as the Italians do, for breakfast with lashings of butter and jam or cheese.
Ingredients
500g (3⅓ cups) strong bread or pizza flour, plus extra to dust
1 tablespoon caster sugar
1 x 7g sachet instant dried yeast
1 teaspoon salt
375ml (1½ cups) lukewarm water
40g butter, melted and cooled, plus extra to grease
1 egg yolk whisked with 1 tablespoon milk, to glaze
Sesame and/or poppy seeds, to sprinkle
Method
-
Combine the flour, sugar, yeast and salt in a large bowl and make a well in the centre. Combine the water and butter, then add to the flour mixture. Use a wooden spoon and then your hands to mix to a soft dough.
-
Turn the dough onto a lightly floured surface and knead for 8-10 minutes or until it is smooth and elastic and springs back when you push your finger into it.
-
Brush a large bowl with melted butter to grease. Add the dough turning it to coat lightly with the butter. Cover with plastic wrap and place in a warm, draught-free place for 1 hour or until doubled in size.
-
Preheat oven to 200°C (180°C fan-forced). Line two oven trays with non-stick baking paper.
-
Knock back the dough by punching it in the centre with your fist. Turn onto a lightly floured surface and knead for 2-3 minutes or until smooth and elastic. Divide the dough into 16 equal portions. Shape each portion into a ball by rolling it on the bench and place on the lined trays leaving about 5cm between each. Cover with a slightly damp tea towel and set aside in a warm draught-free place for 30 minutes or until well risen.
-
Brush the rolls with the egg wash to glaze, sprinkle with sesame or poppy seeds and then bake in preheated oven for 25-30 minutes, swapping the trays halfway through baking, or until golden and sound hollow when tapped on the base. Transfer to a wire rack to cool.
Variations
- Oval Rolls: In Step 5, roll each portion of dough into an oval shape about 7cm long. Use a small sharp knife to cut a slit, about 1cm deep, along the length of the roll, starting and finishing about 1cm from each end, then continue with the recipe.
- Knot rolls: In Step 5, roll each portion of dough into a sausage shape about 30cm long. Tie into a loose knot and continue with the recipe.
Baker's Tips
- These rolls are best eaten the day they are made however they do freeze well – seal in a freezer bag and freeze for up to 1 month. Thaw at room temperature.
Prep 25min (+ 1hr cooling and 1hr standing time)Bake 55minMakes 12-14 serves
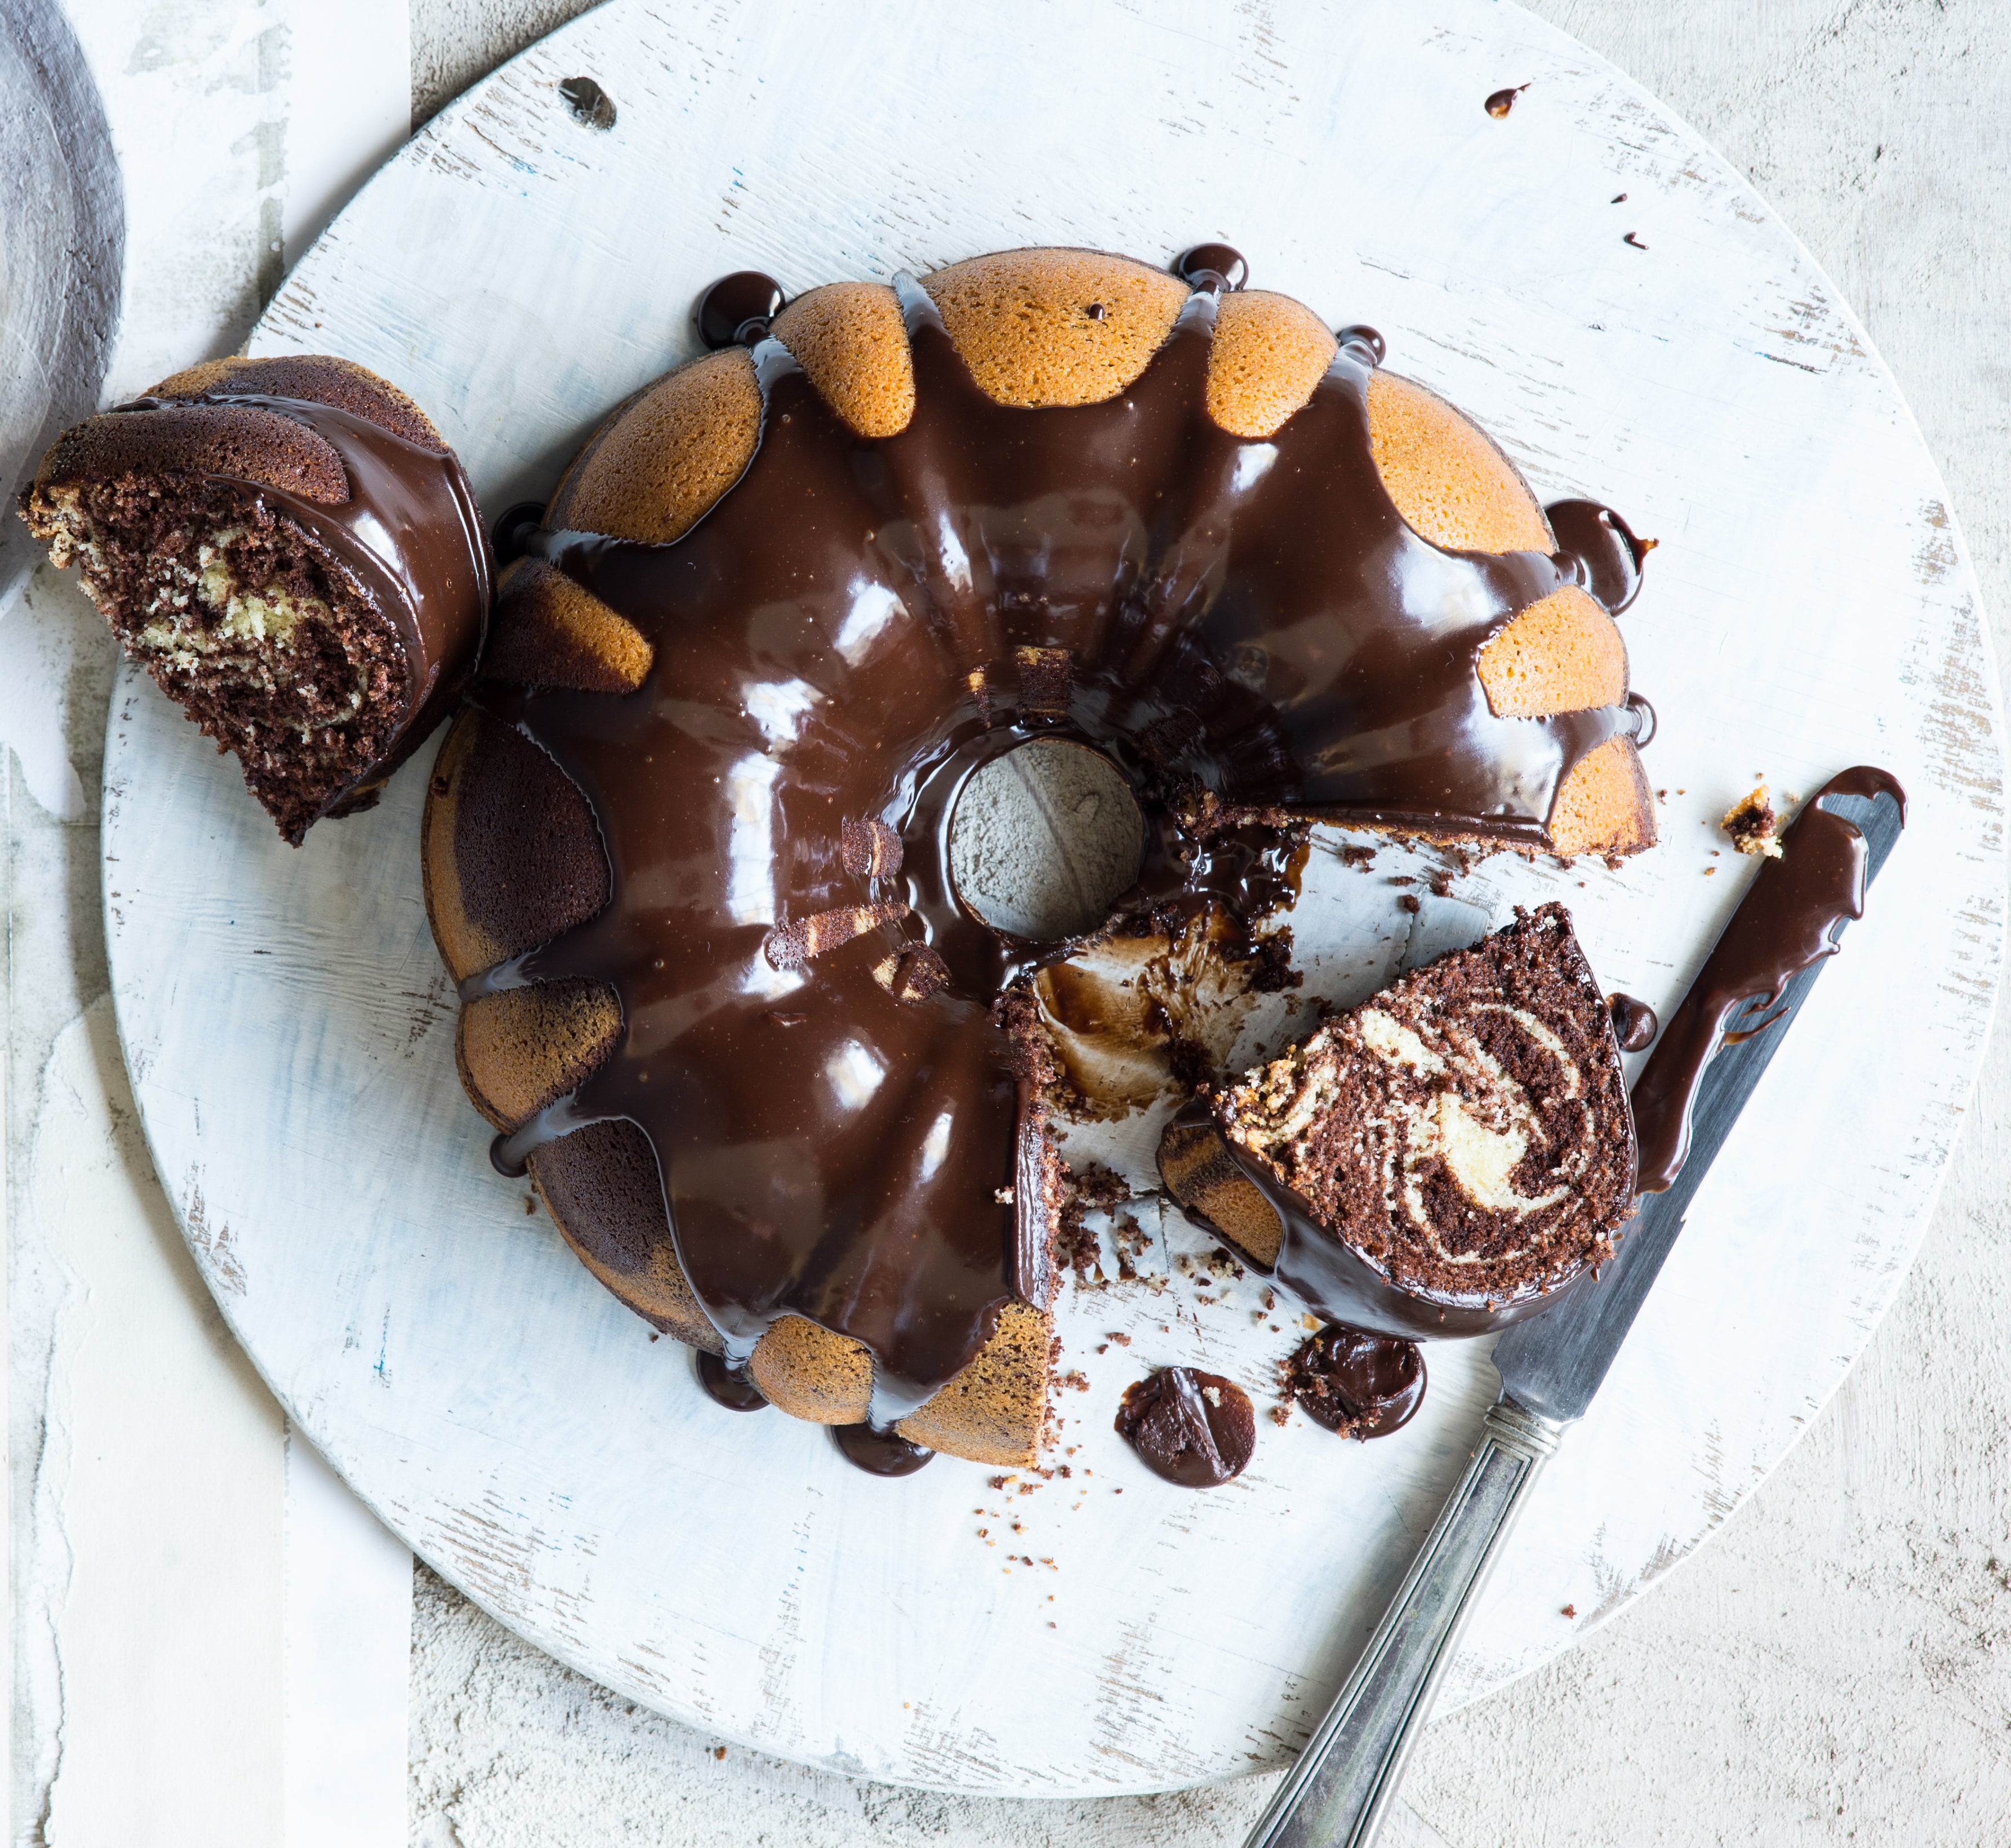
This is such a fun cake – the weight of alternating spoonfuls of mixture dropped on top of one another cause it to spread in the tin and create a wonderful ‘zebra’ stripped pattern that will be revealed when cut. It’s useful to remember that the smaller your spoonfuls of mixture are, the more delicate and intricate your design will be.
Ingredients
15g butter, melted
1 teaspoon plain flour
300g (2 cups) self-raising flour
70g plain flour
330g (1½ cups) caster sugar
250g salted butter, softened
4 eggs, at room temperature
185ml (¾ cup) water
2 teaspoons natural vanilla essence or extract
Cocoa mixture
55g (½ cup) cocoa powder, sifted
90ml boiling water
110g (½ cup) caster sugar
Chocolate fudge glaze
125g good-quality dark chocolate, chopped
110ml pouring (thin) cream
Method
- Preheat the oven to 170°C (150°C fan-forced). Combine the 15g melted butter with the 1 teaspoon plain flour and use a pastry brush to grease a 2 litre (8 cup) Bundt or fluted ring tin (see Baker's Tips).
- To make the cocoa mixture, place the cocoa in a medium bowl and gradually stir in the boiling water. Stir in the caster sugar and set aside.
- Put the flour, sugar, butter, eggs, water and vanilla in a large mixing bowl and use an electric mixer to beat on low speed until combined. Increase the speed to high and beat for 3-4 minutes or until paler in colour and silky smooth in texture. Transfer 2 cups (about 500g) of the cake mixture to a separate bowl. Add the cocoa mixture and use a spatula to mix until evenly combined.
- Drop a large spoonful of the vanilla mixture into the prepared cake tin. Drop a large spoonful of the cocoa mixture into the centre of the vanilla mixture. Continue dropping alternating spoonfuls of the mixtures into the tin directly on top of each other until all the mixture is used. The mixture will spread and even out as you add more, creating the ‘zebra’ pattern.
- Tap the tin firmly on the benchtop 3 times. Bake in preheated oven for 50-55 minutes or until a skewer inserted into the cake comes out clean. Stand the cake in the tin for 10 minutes before turning onto a wire rack to cool completely (this will take about 1 hour).
- To make the chocolate fudge glaze, place the chocolate in a heatproof bowl. Heat the cream in a small saucepan until almost simmering. Pour the hot cream over the chocolate and then set aside for 2 minutes. Stir until the chocolate melts and the mixture is smooth. Set aside at room temperature for 30 minutes, stirring occasionally, until thickened to a thick pouring consistency.
- Place the cake on the wire rack over a tray and pour the chocolate fudge glaze over. Set aside for 30 minutes or until the glaze sets.
Baker's Tips
- I used Baker’s Secret Fluted Tube Pan for this recipe but if you don't have this particular one, or a similar tin, you can use a greased and base-lined 24cm round cake tin instead.
- This cake will keep in an airtight container at room temperature for up to 2 days.
- The uniced cake also freezes well for up to 3 months. For the whole cake (or a portion of it), seal in an airtight container appropriate for its size before freezing. For individual pieces, wrap in plastic wrap and seal in an airtight container or freezer bag. Thaw at room temperature.
Photography by Alan Benson.


