
- home
- International Recipes
Recipe Collections
- International Recipes -
Travel the world with these recipes!
Prep 45min (+ 3hr 15min proving time)Bake 14minMakes about 8
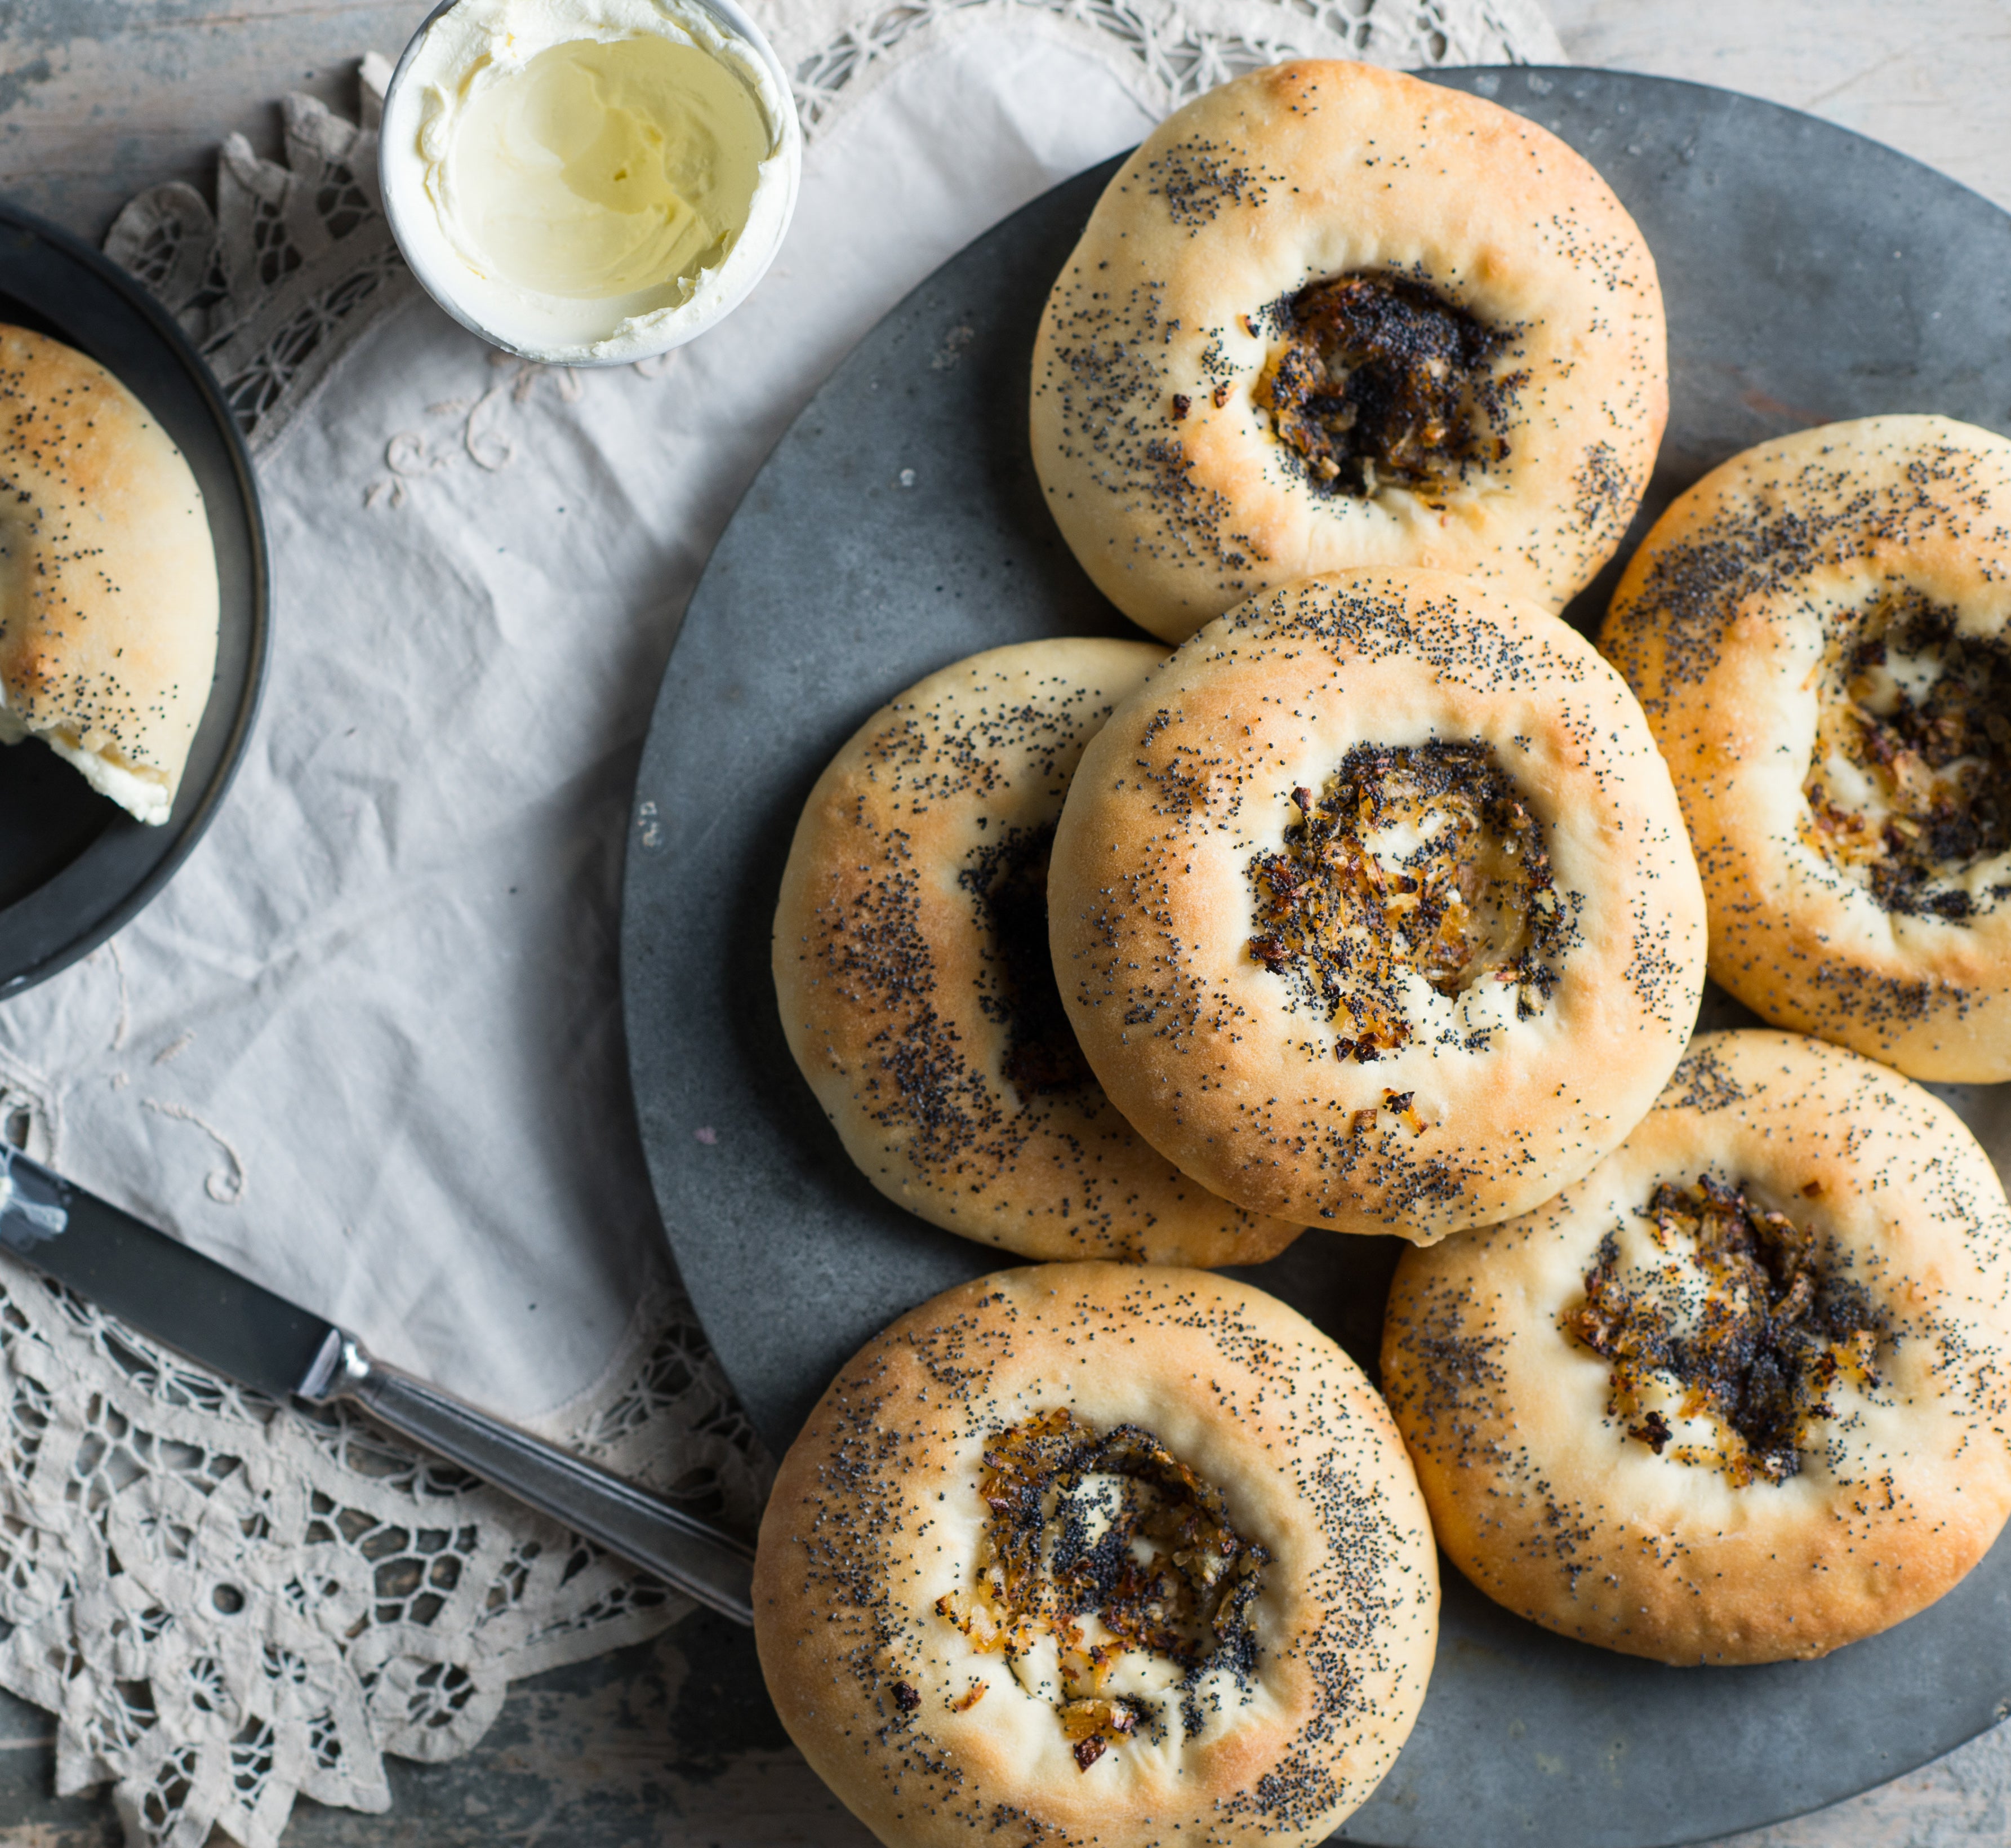
They get their name from where they originated in the city of Białystok in north-eastern Poland. They are best eaten the day they are baked (even better warm) and spread with cream cheese or butter.
Ingredients
500ml (2 cups) lukewarm water
7g (1 sachet) instant dried yeast
2 teaspoons caster sugar
450g (3 cups) strong bread or pizza flour, plus extra to dust
340g (2¼ cups) plain flour
3 teaspoons fine salt
olive oil, to grease
Onion and poppy seed topping
1 tablespoon olive oil
1 medium brown onion, finely diced
½ teaspoon fine salt
2 tablespoons poppy seeds
Method
- Combine 60ml (¼ cup) of the lukewarm water with the yeast, sugar and 2 tablespoons of the bread flour in a small bowl and use a fork to whisk to combine. Set aside in a warm, draught-free place for 5 minutes or until the mixture is frothy.
- Combine the remaining bread flour, plain flour and salt in a large bowl. Combine the yeast mixture with the remaining water, add to the flour mixture and use a wooden spoon and then your hands to mix to a soft dough.
- Turn the dough onto a lightly floured surface and knead for 10 minutes or until it is smooth and elastic and springs back when you push your finger into it (see Baker’s Tips).
- Brush a large bowl with olive oil to grease. Add the dough turning it to coat lightly with olive oil. Cover with plastic wrap and place in a warm, draught-free place for 1½ hours or until doubled in size.
- When the dough has doubled in size knock it back by punching it in the centre with your fist. Recover with plastic wrap and place in a warm, draught-free place for 60 minutes or until doubled in size again.
- Line 2 large oven trays with non-stick baking paper. Turn the dough onto a lightly floured surface and knead briefly to bring the dough together. Divide the dough evenly into 8 equal portions and shape each into a ball. Use your hands to press, pinch and stretch a ball of dough into a disc about 12cm in diameter and 1cm thick. Repeat with the remaining balls of dough, placing them on the lined oven trays about 4cm apart. Cover with plastic wrap and set aside in a warm, draft-free place for 30 minutes or until risen by about half their volume.
- Preheat the oven to 210°C (190°C fan-forced). Meanwhile, to make the onion and poppy seed topping, place the olive oil, onion and salt in a small frying pan over medium heat and cook for 8-10 minutes until the onion is soft and starts to become golden. Remove from the heat.
- Use lightly floured fingertips to make an indent in the centre of the dough discs, leaving a 2cm border around the outside. Spoon the onion mixture into the indents, dividing evenly, and then sprinkle with the poppy seeds. Cover with a slightly damp tea towel and set aside in a warm draught-free place for 15 minutes or until slightly puffed.
- Bake in preheated oven for 12-14 minutes or until lightly golden and cooked through (see Baker’s Tips). Serve warm or at room temperature, spread with cream cheese or butter.
Baker's Tips
- You can also knead the bread dough in step 2 in an electric stand mixer fitted with a dough hook. Knead on lowest possible speed for 5-6 minutes or until smooth, elastic and the dough has come away from the sides of the bowl and the bowl is clean.
- Over-baking the bialy will cause them to become dry, so make sure you remove them from the oven as soon as they are baked through.
- These Bialy are best eaten the day they are made however they do freeze well. Seal in a freezer-proof plastic bag and freeze for up to 3 months. Thaw at room temperature and reheat by wrapping individually in foil and placing in an oven preheated to 160°C (140°C fan-forced) for 10 minutes or until heated through. Serve warm.
This recipe is part of Anneka's SBS Food Bakeproof: Jewish Baking online column. For more Bakeproof columns and recipes, click here.
Photography by Alan Benson.
Prep 40min (+1hr cooling and 2hr standing time)Bake 30minMakes 10-12 serves
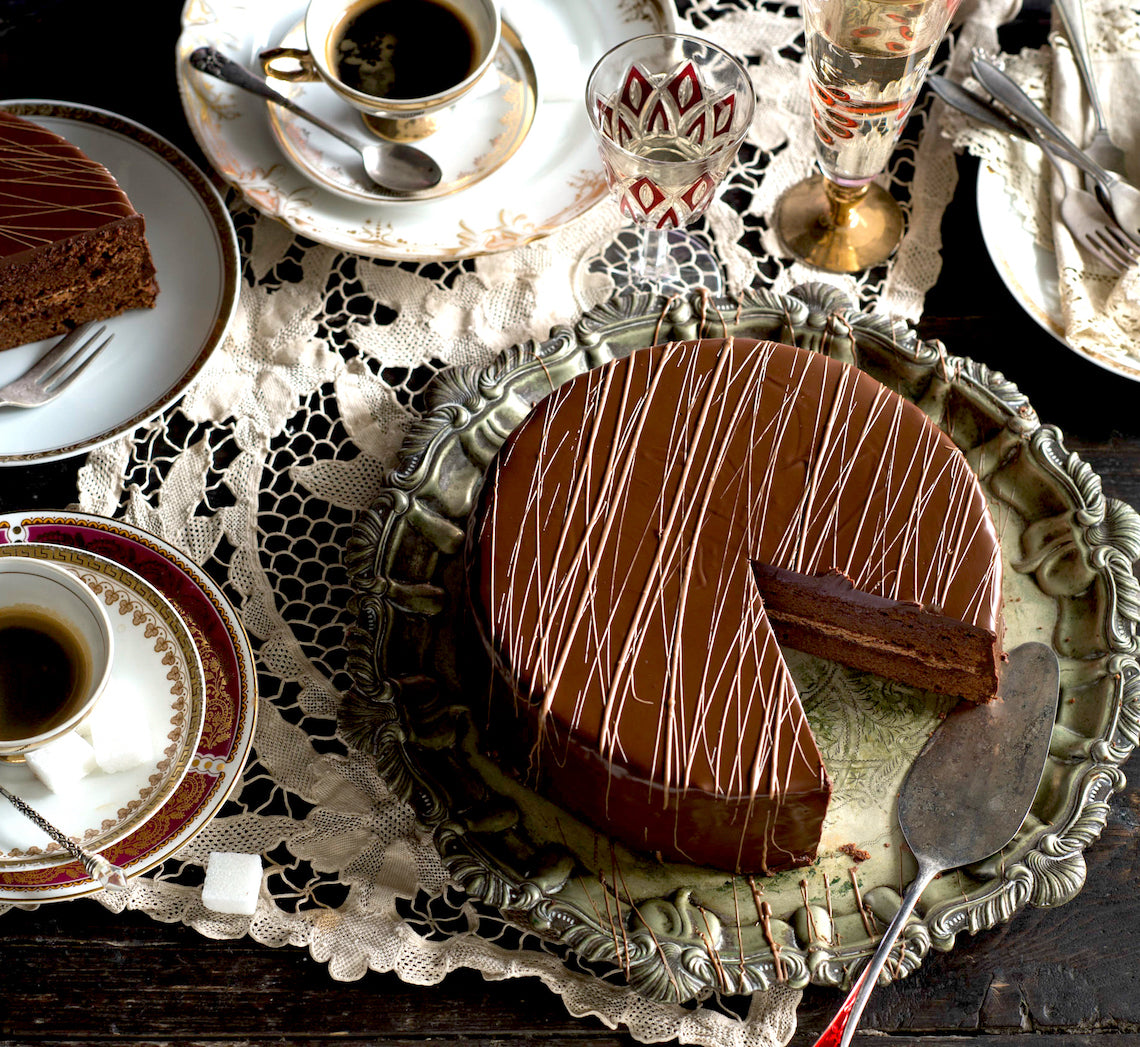
Possibly the most famous cake in the world, and certainly the pride of Austria, Sacher Torte was created by Franz Sacher, a 16-year-old apprentice stepping in for an ill head chef, to impress the guests of Prince Wenzel von Metternich. And as they say, the rest is now cuisine history. This elegant, rich and enticing cake is now loved the world over.
Ingredients
Melted butter, to grease
125g unsalted butter, softened
125g (1 cup) icing sugar, sifted
1½ teaspoons natural vanilla essence or extract
6 eggs, at room temperature, separated
175g good-quality dark chocolate (54% cocoa), chopped, melted and cooled to room temperature
110g (¾ cup) plain flour
110g (½ cup) caster sugar
85g (¼ cup) apricot jam, warmed and sieved
40g good-quality milk chocolate, melted, to decorate
Thick or whipped cream, to serve
Chocolate Glaze
300g good-quality dark chocolate (54% cocoa)
60g butter, cubed
Method
- Preheat oven to 180°C (160°C fan-forced). Brush 2 x shallow 20cm round cake tins with melted butter to grease and line the bases with rounds of non-stick baking paper.
- Use an electric mixer to beat the butter, icing sugar and vanilla until pale and creamy. Add the egg yolks and beat until well combined and creamy. Beat in the cooled melted chocolate until well combined. Use a large metal spoon or spatula to fold in the flour until just combined.
- Use an electric mixer with a whisk attachment to whisk the egg whites in a large clean, dry bowl until soft peaks form. Add the caster sugar and whisk on medium-high speed until thick and glossy and all the sugar has dissolved (see Baker’s tip). Add half the egg white mixture to the chocolate mixture and use a large metal spoon or spatula to fold in to ‘loosen’ the mixture. Add the remaining egg white mixture and fold until just evenly combined.
- Divide the mixture evenly between the tins and use the back of a spoon to smooth the surface. Bake in preheated oven for 30 minutes or until a skewer inserted into the centre of the cakes comes out clean. Stand in the tins for 10 minutes before turning onto a wire rack to cool (this will take about 1 hour).
- Once cool, spread one cake layer with the warmed sieved jam and then top with the second layer, bottom side up. Place the cake on a wire rack over a tray and set aside while making the chocolate glaze.
- To make the chocolate glaze, combine the chocolate and butter in a heatproof bowl and place over a saucepan of barely simmering water (make sure the base of the bowl doesn’t touch the water). Stir occasionally until just melted and combined. Use a plate knife to spread a little of the glaze over the outside of the cake to form a ‘crumb coat’ and to even the surface. Place in the fridge for 20 minutes or until set. Remove from the fridge and carefully pour over the rest of the glaze, allowing it to run down the sides of the cake to coat evenly. Tap the cake, still on the rack, gently on the tray to remove any air bubbles and to settle the glaze. Use a fork to drizzle the milk chocolate over the top of the cake to decorate. Set aside for 2 hours or until the glaze sets. Serve cut into small wedges with cream.
Baker’s Tips
- To test if all the sugar has dissolved, rub a little of the egg white and sugar between two fingers – you will be able to feel if there is still undissolved sugar. Whisk for another minute if not completely dissolved before testing again.
- This cake will keep in an airtight container at room temperature for up to 4 days.
This recipe is from Anneka's SBS Food online column, Bakeproof: Austrian Baking.
CLICK HERE for more Bakeproof columns and recipes.
Photography by Alan Benson.
Prep 25min (+1hr cooling time)Bake 40minMakes 16 serves
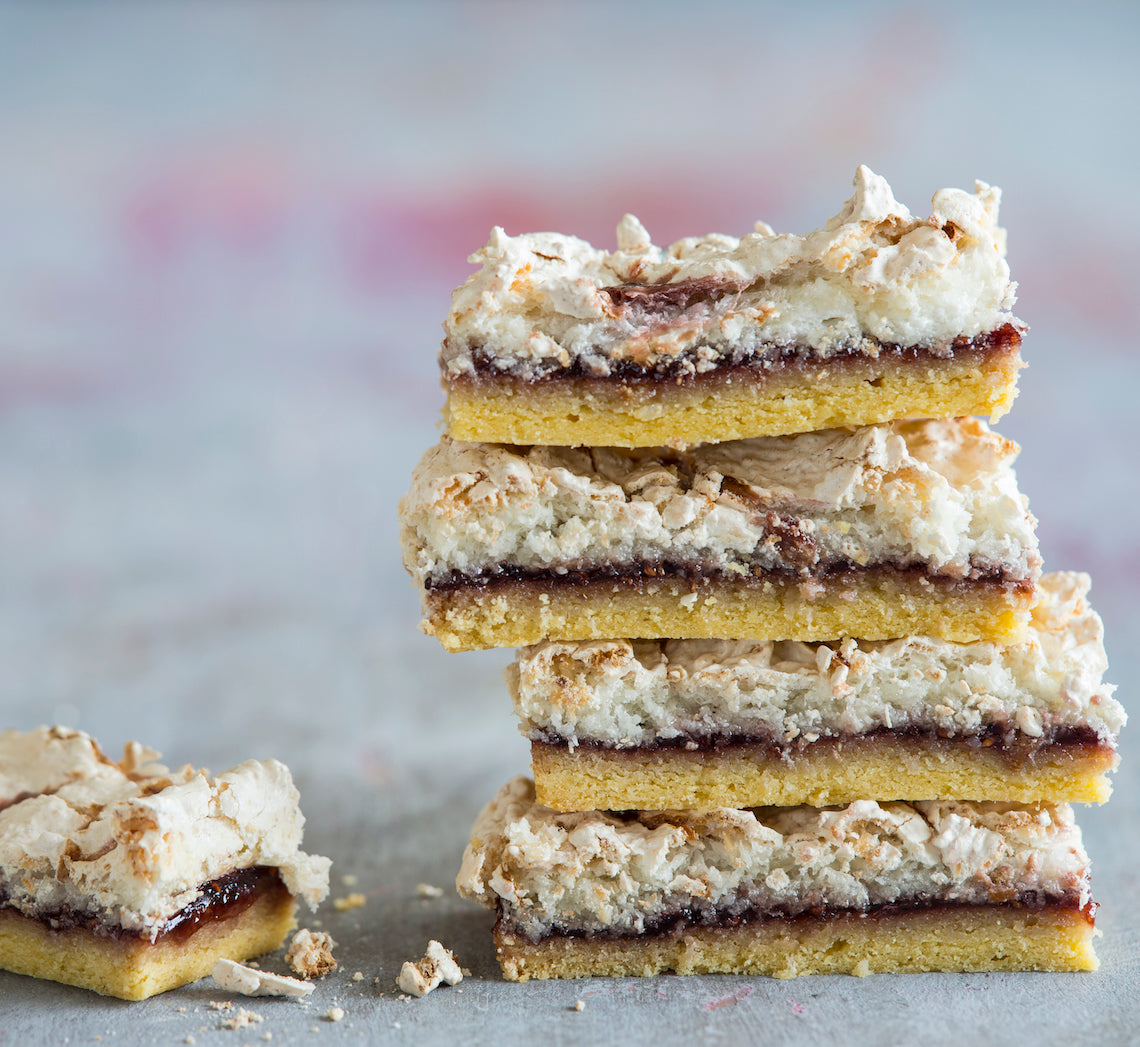
More a slice than a cake, I can’t believe I have only just discovered this gem from the land of the long white cloud. I can completely understand why it features fondly in the childhood memories for anyone who grew up in rural New Zealand!
Ingredients
Melted butter, to grease
Biscuit Base
100g (3½oz) salted butter, at room temperature
110g (½ cup/4oz) caster sugar
1 teaspoon natural vanilla essence or extract
3 egg yolks
225g (1½ cups/8oz) plain flour
1 teaspoon baking powder
320g (1 cup/11¼oz) good-quality raspberry jam
Coconut Meringue Topping
4 egg whites, at room temperature
220g (1 cup/7¾oz) caster sugar
1 teaspoon natural vanilla extract or essence
135g (1½ cups/4¾oz) desiccated coconut
1 tablespoon good-quality raspberry jam (see Baker's Tips)
Method
- Preheat oven to 180°C/350°F (160°C/215°F fan-forced). Grease a 20cm x 30cm (8inx12in) slice tin with melted butter to grease and line the base and sides with one piece of non-stick baking paper, cutting into the corners to fit and allowing the paper to overhang the sides.
- To make the Biscuit Base, use an electric mixer fitted with a paddle beater to beat the butter, sugar and vanilla until pale and creamy. Beat in the egg yolks until well combined. Sift together the flour and baking powder, add to the butter mixture and beat on low speed until just combined.
- Press the biscuit base mixture into the prepared tin to cover evenly. Bake for 10 minutes or until starting to colour (the base won’t be cooked through at this stage). Remove from the oven and spread evenly with the raspberry jam. Set aside to cool slightly.
- Meanwhile, use an electric mixer with a whisk attachment to whisk the egg whites in a large clean, dry mixing bowl on medium-high speed until soft peaks form. Add the sugar, a spoonful at a time, whisking well on medium-high speed after each addition. Continue to whisk until the mixture is thick and glossy, the sugar has dissolved and a trailing peak forms when the whisk is lifted. Whisk in the vanilla and then use a spatula or large metal spoon to fold in the coconut until evenly combined. Spread the meringue mixture over the raspberry jam to cover. Dot the 1 tablespoon of jam over the top of the meringue and then use a tooth pick or skewer to swirl it through the meringue mixture.
- Return the slice to the oven and bake for 30 minutes or until golden and crisp to touch on top. Place on a wire rack and allow the slice to cool in the tin (about 1 hour).
- Use the paper to transfer the slice from the tin to a cutting board. Cut into portions to serve.
Baker's Tips
- Although raspberry jam is traditionally used in this slice, any berry jam can be used - mixed berry, strawberry and blackberry all work well.
- This slice will keep in an airtight container at room temperature in a cool spot for up to 4 days.
This recipe is from Anneka's SBS Food online column Bakeproof: Meringue. Click here for more Bakeproof columns and recipes.
Photography by Alan Benson.
Prep 35min (+1hr 15min resting time)Bake 30minMakes 12
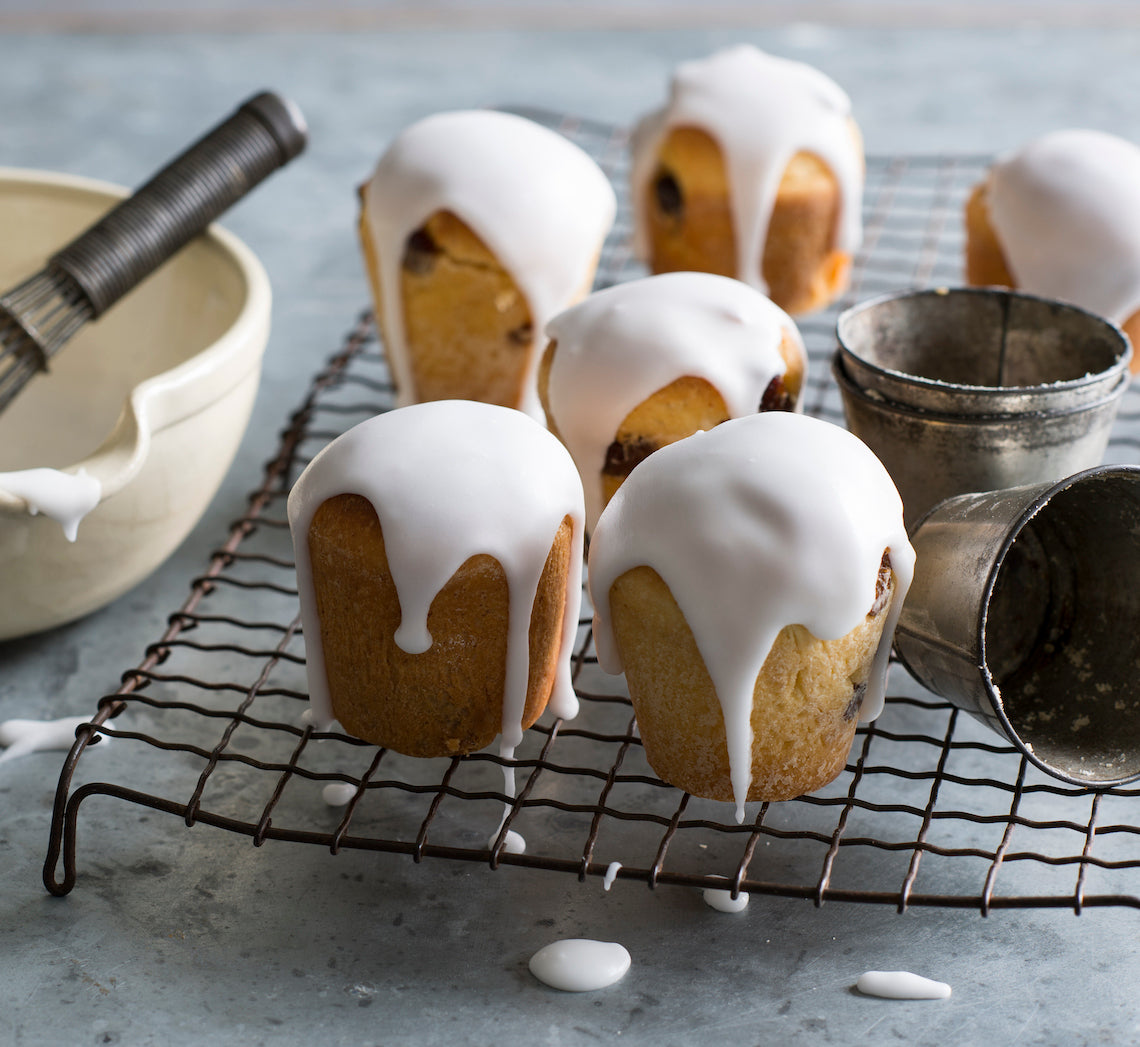
Many countries have their own version of this egg-rich, cake-like bread. This simple, slightly sweet, citrus-scented Ukrainian Easter one is typically baked in tall and cylindrical moulds just like Russian Kulich and Italian panettone.
Ingredients
5 egg yolks, at room temperature
1 whole egg, at room temperature
110g (½ cup) caster sugar
2 teaspoons natural vanilla essence or extract
½ teaspoon salt
185ml (¾ cup) lukewarm milk
10g (3 teaspoons) dried yeast
finely grated rind of 1 lemon
525g (3½ cups) plain flour, plus extra to dust
150g butter, cubed, at room temperature
170g (1 cup) seedless raisins
melted butter, to grease
Icing
370g (3 cups) pure icing sugar
3-4 tablespoons water
Method
- Put the egg yolks, egg, sugar, vanilla and salt in the bowl of a stand mixer and beat on high until pale and well combined. Add the milk, yeast and lemon rind and beat on low speed to combine. Gradually beat in 300g (2 cups) of the flour on low speed until combined. With the motor running gradually add the butter, a cube at a time, alternating with the remaining 225g (1½ cups) flour until a smooth, soft dough forms. Replace the beater with a dough hook and continue to knead on low speed for about 6 minutes or until very smooth and elastic. (Alternatively, turn onto a lightly floured bench and knead by hand for 10-15 minutes.) Knead in the raisins. Cover the dough in the bowl with plastic wrap and set aside in a warm draught-free place for 45 minutes or until doubled in size.
- Grease and lightly flour 12 x 125ml (½ cup) dariole moulds. Punch the centre of the dough down with your fist and turn onto a well-floured surface. Knead for 2-3 minutes or until smooth. Divide the dough into 12 equal portions, roll into balls and drop each into a prepared tin. Cover the moulds with a slightly damp tea towel and set aside in a warm draught-free place for 30 minutes or until the dough has risen to the top of the tins.
- Preheat the oven to 180°C.
- Bake the babkas in preheated oven for 28-30 minutes, covering the tops with foil if they start to brown too quickly, or until cooked when tested with a skewer and they sound hollow when tapped on the base. Stand in the moulds for 5 minutes before turning onto a wire rack to cool.
- To make the icing, put the icing sugar in a medium bowl and stir in the water to make a medium coating consistency. Spread over the tops of the babka, allowing it to drizzle down the sides. Set aside for the icing to set. Serve warm or at room temperature cut into slices.
Baker's Tips
- The babka dough can also be baked in two 9 x 19cm (base measurement) loaf tins. Grease and lightly flour as for the moulds. Divide the dough in half, roll each portion into a log about 15cm long and place in the prepared tins. Bake for 40 minutes or until cooked when tested with a skewer and they sound hollow when tapped on the base.
- This babka is best eaten the day it is made. To freeze, wrap well in plastic wrap and then seal in an airtight container or freezer bag and freeze for up to 3 months. Thaw at room temperature.
CLICK HERE for more Bakeproof recipes.
Photography by Alan Benson.
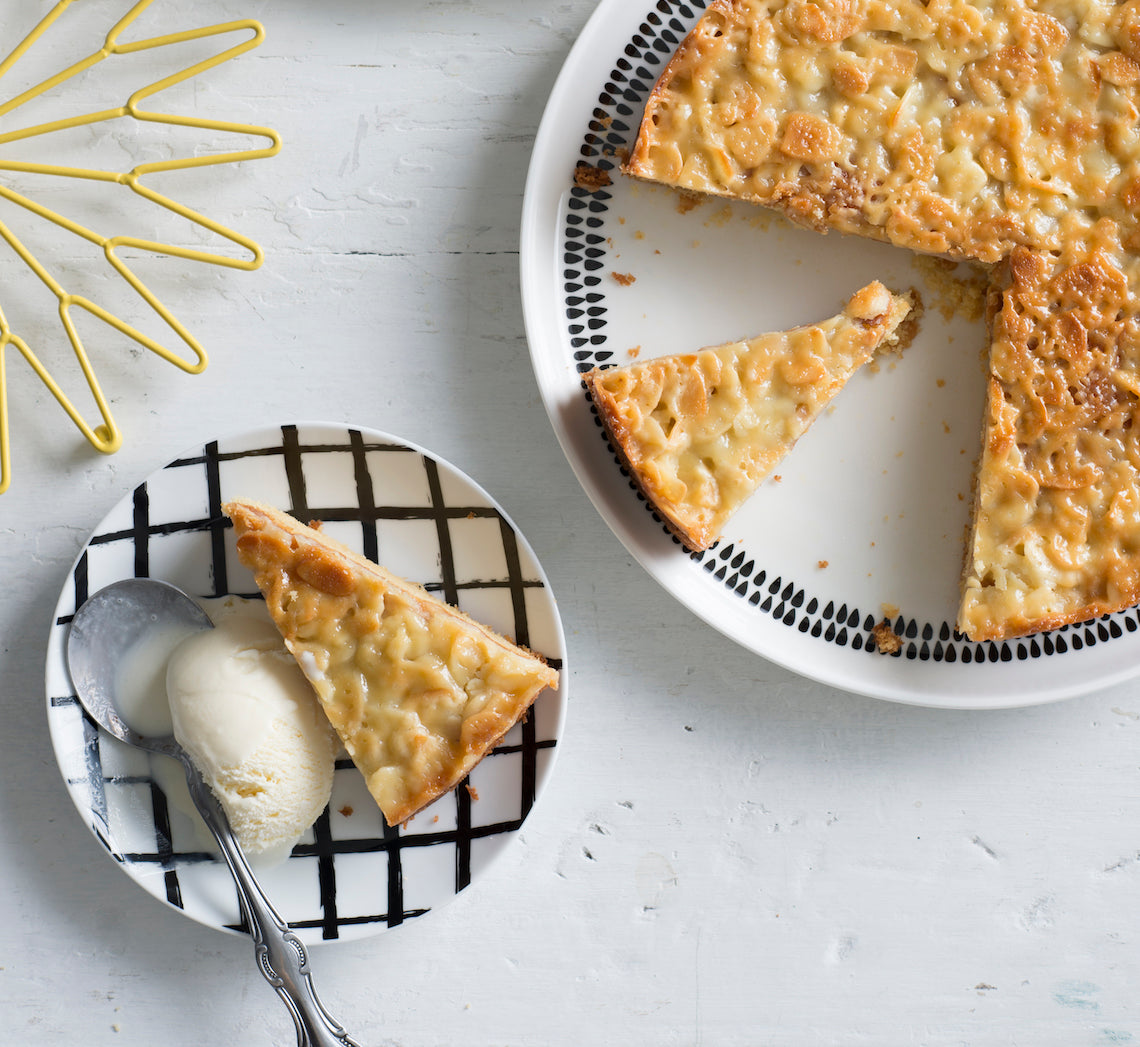
Prep 25min (+1hr 10min cooling time)Bake 40-45minMakes 8-10 serves
One of Scandinavia’s most loved cakes, both Sweden and Denmark have their own version of this wonderful cake (and, like all great cakes, the origins are unclear). A rich, buttery, moist cake topped with a crisp caramel-almond Florentine-like topping it is simply too good to care too much about its origins!
Ingredients
Melted butter, to grease
50g (5¼oz) butter, at room temperature
110g (½ cup/4oz) caster sugar
1 teaspoon natural vanilla extract or essence
2 eggs, at room temperature
150g (1 cup/5¼oz) plain flour
1 teaspoon baking powder
80ml (⅓ cup/2½fl oz) milk
Vanilla ice-cream or thick cream, to serve
Caramel almond topping
70g (2½oz) butter, cubed
75g (⅓ cup/2½oz) caster sugar
70g (⅔ cup/2½oz) flaked almonds
2½ tablespoons (50ml/1¾fl oz) pure cream
1½ tablespoons plain flour
Method
- Preheat the oven to 170°C/340°F (150°C/300°F fan-forced). Grease a 22cm/8¾in springform tin with melted butter and line the base with non-stick baking paper.
- Use an electric mixer to beat the butter, sugar and vanilla in a large bowl until pale and creamy. Add the eggs one at a time, beating well after each addition. Sift together the flour and baking powder. Add half the flour mixture to the butter mixture and beat on lowest possible speed until just combined. Add the milk and beat on lowest possible speed until just combined. Add the remaining flour mixture and beat on lowest possible speed until just combined.
- Spoon the cake mixture into the prepared tin and smooth with the back of a spoon. Place the tin on a baking tray and bake in preheated oven for 30 minutes or until almost cooked.
- Meanwhile, when the cake has been in the oven for about 20 minutes, make the topping. Combine the butter, sugar, almonds, cream and flour in a medium saucepan. Use a wooden spoon to stir over medium heat until well combined and the sugar has dissolved. Bring to a simmer and cook for 2–3 minutes or until thickened slightly.
- Remove the cake from the oven and increase the temperature to 200°C/400°F (180°C/350°F fan-forced). Quickly pour the caramel almond topping evenly over the top of the cake and then use the back of a metal spoon to spread evenly to cover the top. Return the cake immediately to the oven and bake for a further 10–15 minutes or until the cake is cooked through and the topping is golden brown.
- Remove the cake from the oven and place on a wire rack to cool for 10 minutes. Run a spatula around the outside of the cake to release the topping from the pan. Carefully remove the sides of the pan and set the cake aside for 1 hour or until cooled completely.
- Serve in wedges with ice-cream or cream.
Baker's Tip
- This cake will keep in an airtight container for up to 3 days.
This recipe is from Anneka's SBS Food online column, Bakeproof: Scandi Baking. CLICK HERE for more Bakeproof recipes.
Photography by Alan Benson.
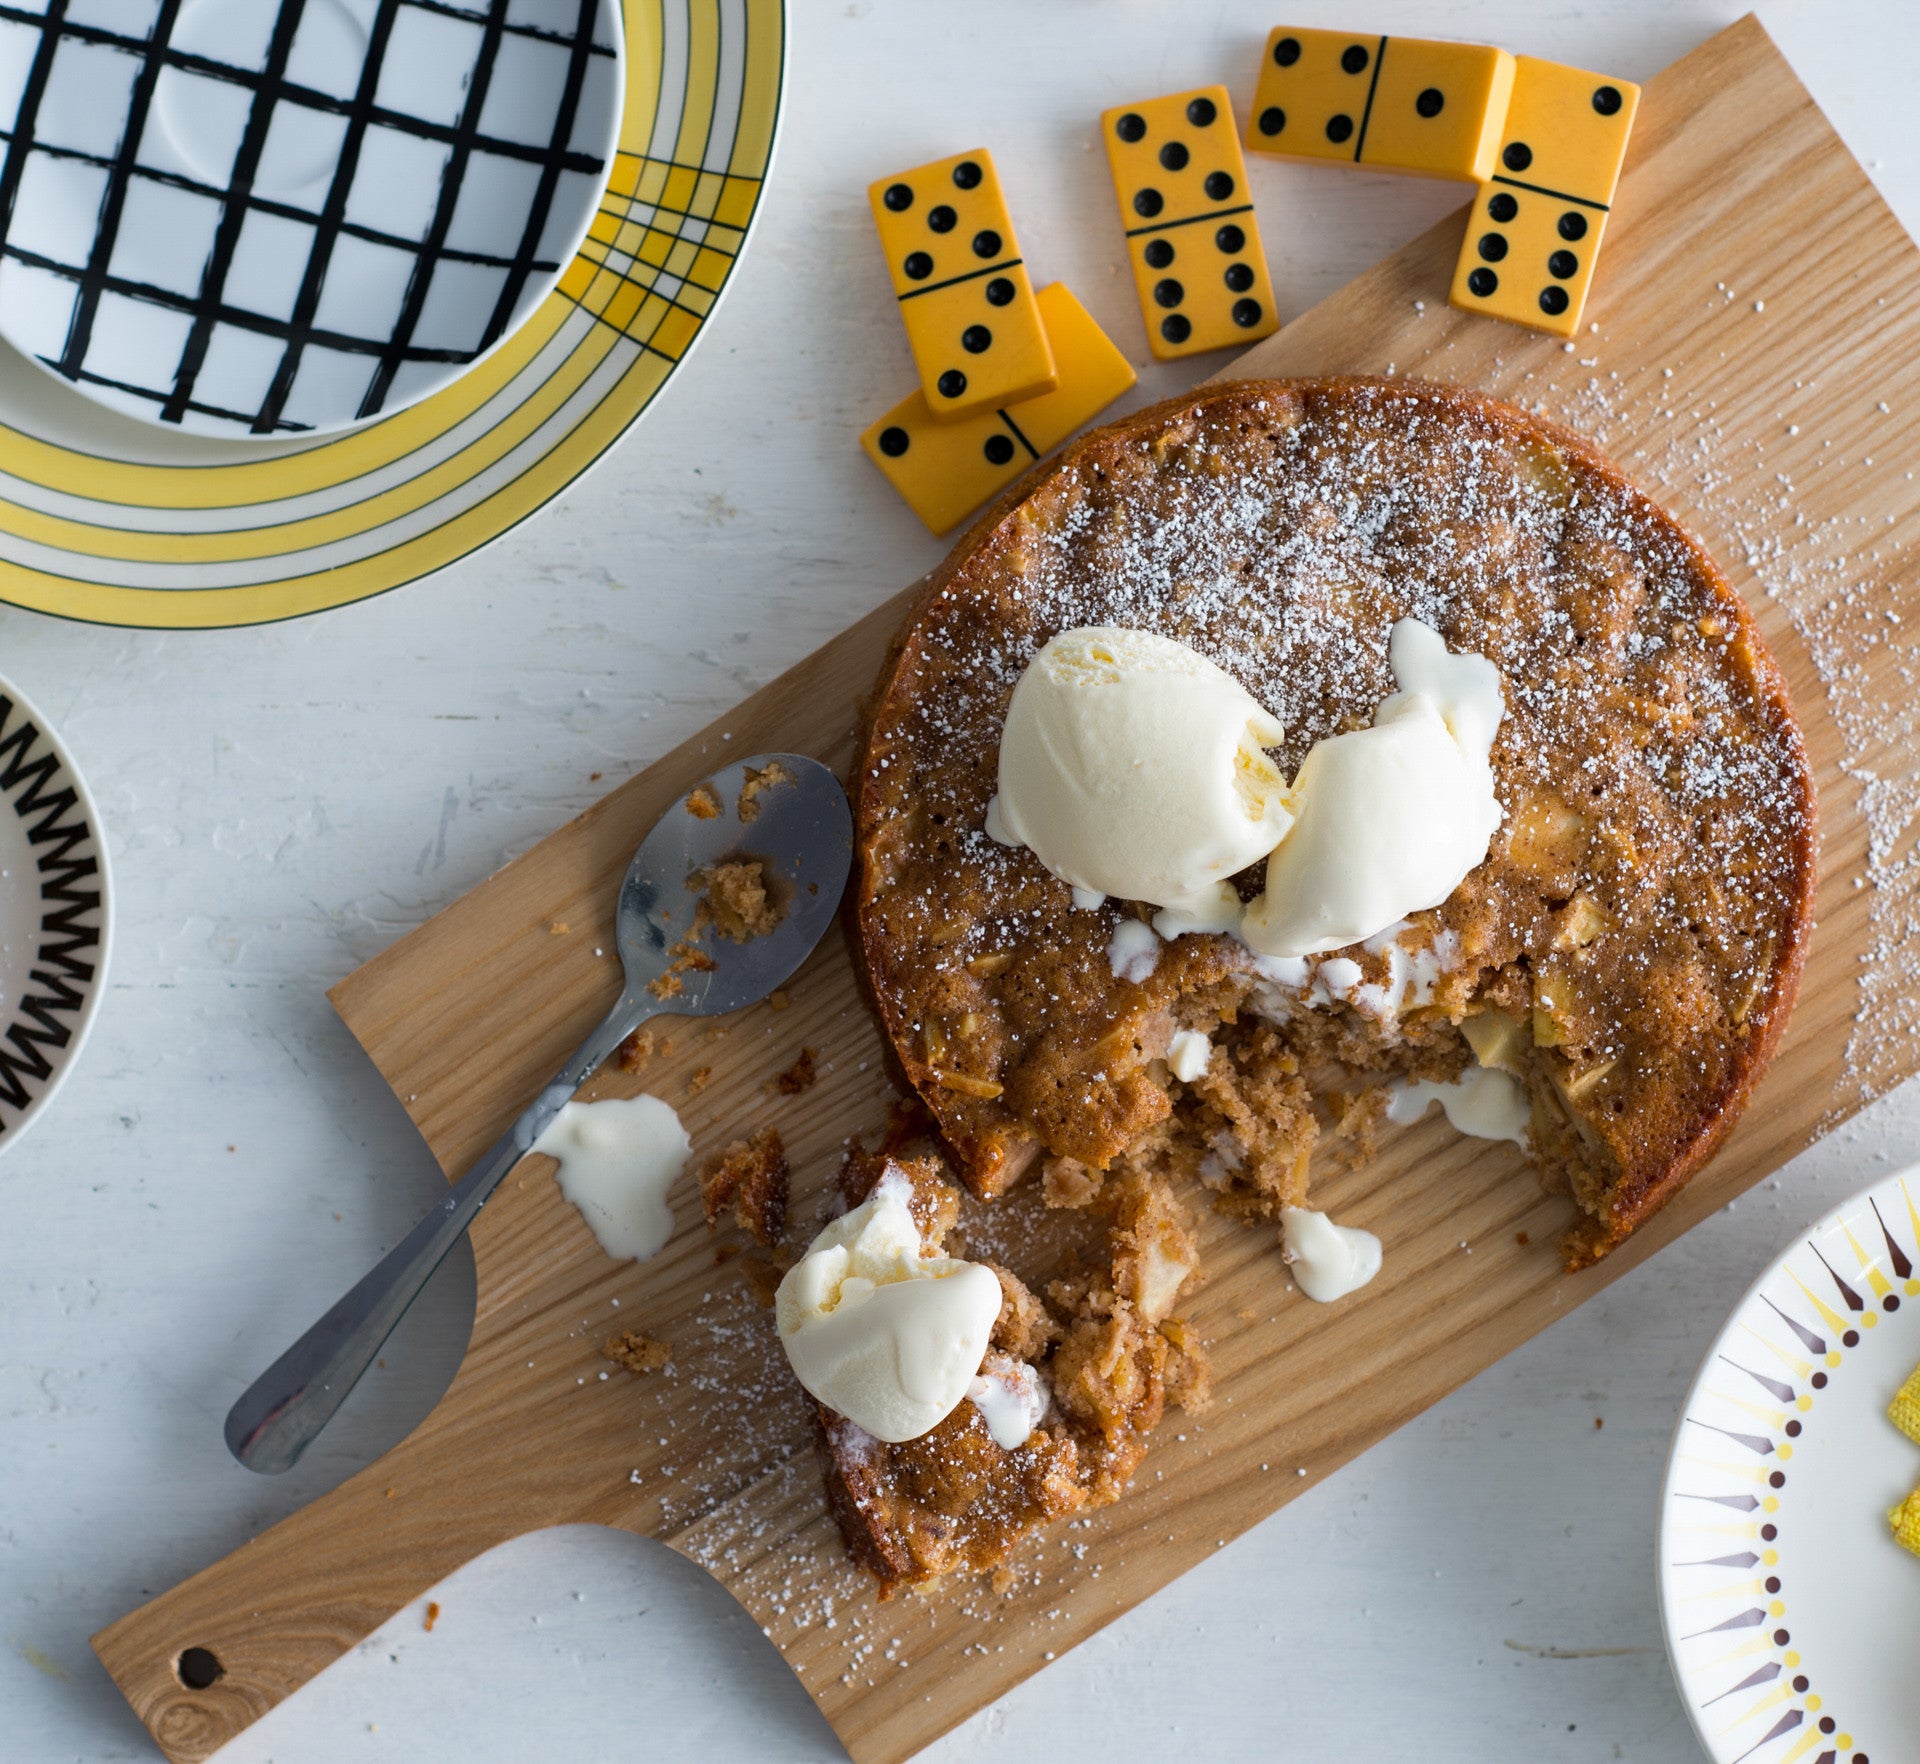
Prep 20minBake 35minMakes 8-10 serves
Much more like a cake than a pie, this apple-dense traditional Norwegian dessert is comforting, homely and can warm the soul with just one mouthful – especially when served straight from the oven in generous scoops and topped with ice-cream or a large dollop of thick cream. Don’t overlook the fact that it is also pretty good served like any other cake, cooled and in wedges. The trick to this recipe is not to over-mix – only mix until the wet and dry ingredients are evenly combined.
Ingredients
- Melted butter, to grease
- 110g (¾ cup) plain flour
- 1 teaspoon baking powder
- 1 teaspoon ground cinnamon
- ½ teaspoon ground cardamom
- 110g (½ cup) caster sugar
- 3 medium (about 150g each) apples (such as golden delicious, royal gala or pink lady), peeled, cored and cut into 2 cm pieces
- 80g slivered almonds, toasted
- 100g butter, melted and cooled
- 1 egg
- 2 tablespoons milk
- 1½ teaspoons natural vanilla essence or extract
- Vanilla ice-cream or thick cream, to serve
Method
- Preheat the oven to 180°C (160°C fan-forced). Grease a 20cm springform tin with melted butter and line the base with baking paper.
- Sift together the flour, baking powder, cinnamon and cardamom into a large bowl. Stir in the sugar, apple and almonds. Use a fork to whisk together the butter, egg, milk and vanilla. Add to the flour mixture and use a spatula to mix until just combined.
- Spoon the mixture into the prepared tin and spread evenly with the back of a spoon. Bake in the preheated oven for 35 minutes or until golden and a skewer inserted into the centre comes out clean.
- Stand the pie in the tin for 5–10 minutes before removing the sides of the tin. Serve warm in scoops or at room temperature in wedges with ice-cream or cream.
Baker's Tips
- This pudding/cake will keep in an airtight container at room temperaturein a cool spot for up to 3 days.
This recipe is from Anneka's SBS Food online column, Bakeproof: Scandi Baking. CLICK HERE for more Bakeproof recipes.
Photography by Alan Benson.
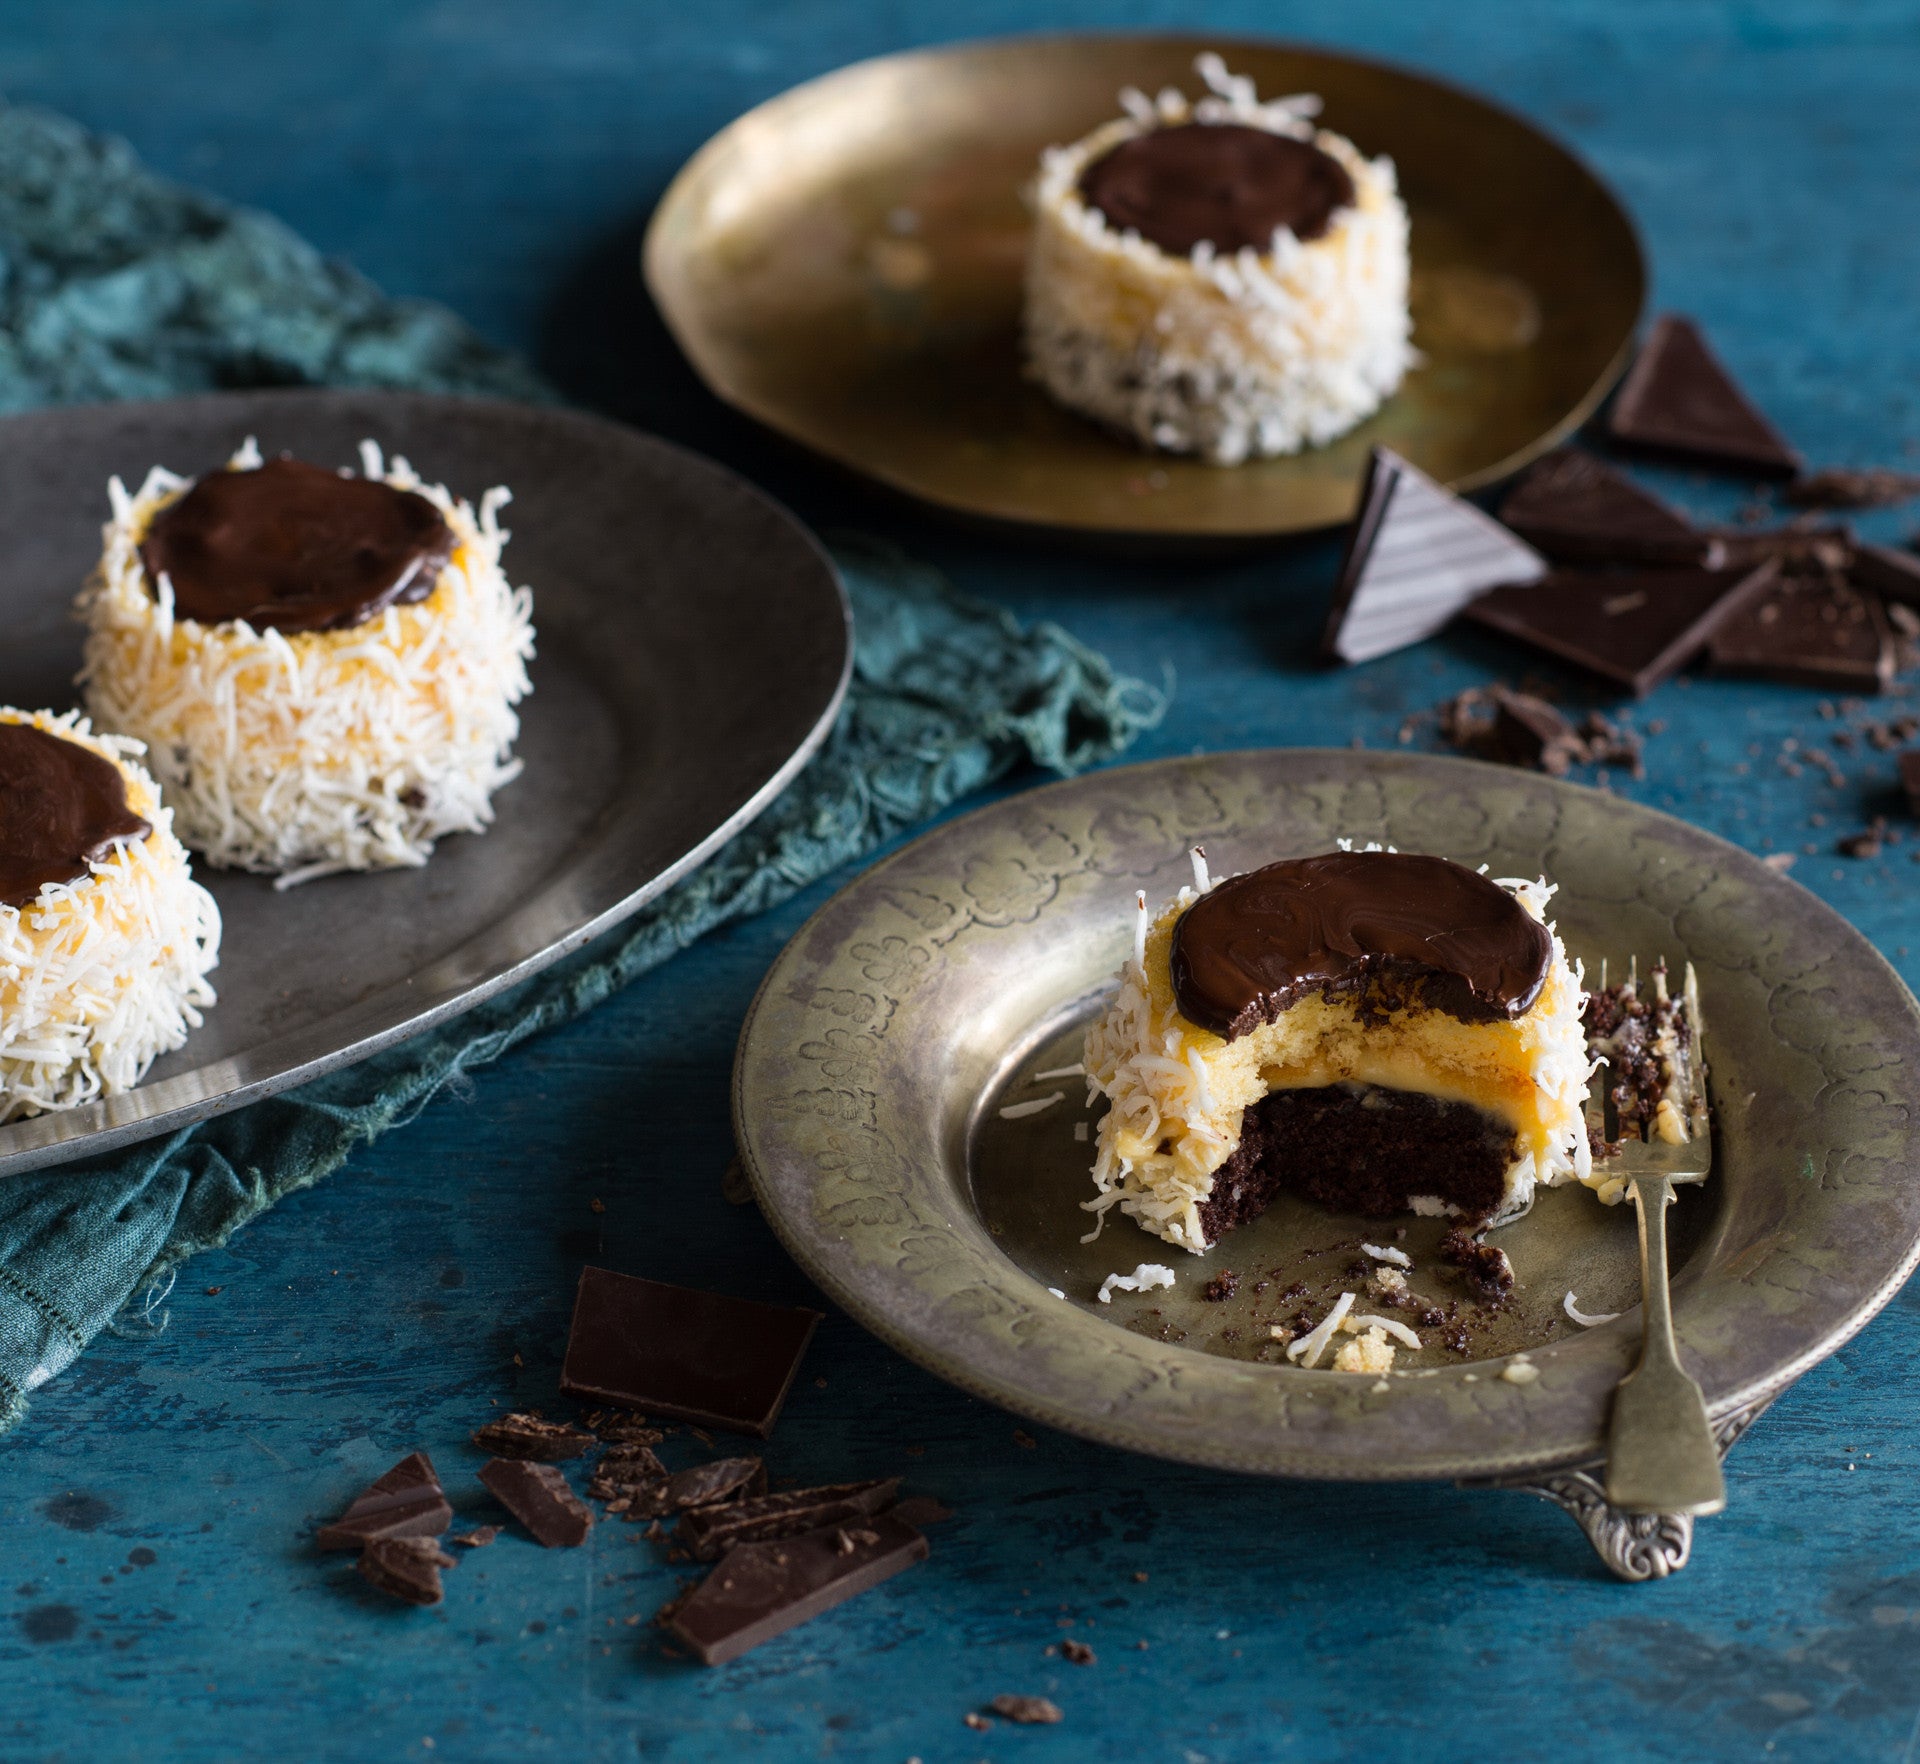
Prep 40min (+20min cooling and 2.5hr chilling)Bake 15minMakes 6 serves
These little layered cakes are the sweetest hats you'll find. Made up of custard cream and a chocolate topping they are covered in shredded coconut for a little texture but you can also use nuts as well, if you have them handy. They are best served chilled and if you aren't much for a dessert fork, then eating these with your hands like a cupcake is absolutely acceptable!
Ingredients
- 100g (1½ cups) shredded coconut, to coat
Sponge Layers
- melted butter, to grease
- 4 eggs, at room temperature
- 165g (¾ cup) caster sugar
- 2 tablespoons boiling water
- 2 tablespoons vegetable oil
- 100g (⅔ cup) self-raising flour, sifted
- 2 tablespoons cocoa powder mixed to a paste with 60 ml (¼ cup) boiling water and cooled
Custard cream
- 1 tablespoon cornflour
- 1 tablespoon custard powder
- 2 tablespoons caster sugar
- 200ml milk
- 20g butter, cubed
- 1 egg yolk
- 1½ teaspoons natural vanilla essence or extract
Chocolate glaze
- 50g dark chocolate, chopped
- 2 teaspoons vegetable oil
Method
- To make the custard cream, sift together the cornflour and custard powder into a small saucepan. Add the sugar and then use a balloon whisk to gradually stir in the milk. Place the saucepan over a medium heat and cook, stirring frequently, until the mixture boils and thickens. Remove from the heat and stir in the butter, egg yolk and vanilla until well combined. Pour into a medium bowl, cover the surface of the custard directly with a piece of plastic wrap and set aside to cool (this will take about 2 hours).
- To make the sponge layers, preheat oven to 180°C (160°C fan-forced). Brush two 16 x 26 cm shallow cake tins with a little melted butter to lightly grease and then line the base and two long sides of each with one piece of non-stick baking paper.
- Use an electric mixer with a whisk attachment on high speed to whisk the eggs and sugar in a large bowl until the mixture is very thick and pale (this will take 5-8 minutes). Lift the whisk out of the mixture and draw a figure eight, if the trail stays on the surface long enough for you to finish drawing then the mixture is ready. If not, continue to whisk for a further minutes and then test again.
- Combine the boiling water and oil. Sift the flour over the egg mixture. Immediately pour the warm water and oil mixture down the side of the bowl and use a spatula to fold until just evenly combined (be careful not to overmix).
- Pour half of the mixture into one of the prepared cake tins. Add the cocoa paste to the mixture still in the bowl and fold together until just combined. Pour into the second cake tin. Gently tap the tins on the bench top three times to settle the mixture. Bake in preheated oven for 12-15 minutes or until the cakes spring back when lightly touched in the centre and start pulling away from the sides of the tins. Stand the cakes in the tins for 2 minutes before turning onto a wire racks to cool completely.
- To assemble, use a 6 cm round cutter to cut each of the Sponge cakes into 6 rounds. Place the round cutter over a chocolate sponge. Top the chocolate sponge round with about 1 tbsp of the Custard cream and then cover with around of plain sponge. Remove the pastry cutter. Repeat with the remaining chocolate and plain sponge rounds and 1 tbsp of Custard cream for each cake to make 6 layered cakes in total. Spread the sides of the cakes with the remaining Custard cream. Roll the sides of the cakes in the coconut to coat and place on a serving plate. Place in the fridge while making the Chocolate glaze.
- Place the chocolate and oil in a heatproof bowl. Place over a saucepan of simmering water, stirring occasionally, until melted and smooth. Carefully spread about 1 tsp of the Chocolate glaze over the tops of each of the cakes to cover. Return the cakes to the fridge for 30 minutes or until the Chocolate glaze is set. Serve chilled.
Baker's Tips
These cakes will keep in an airtight container in the fridge for up to 2 days.This recipe is from Anneka's SBS Food online column, Bakeproof: Bosnian Baking.
CLICK HERE for more Bakeproof recipes.
Photography by Alan Benson.
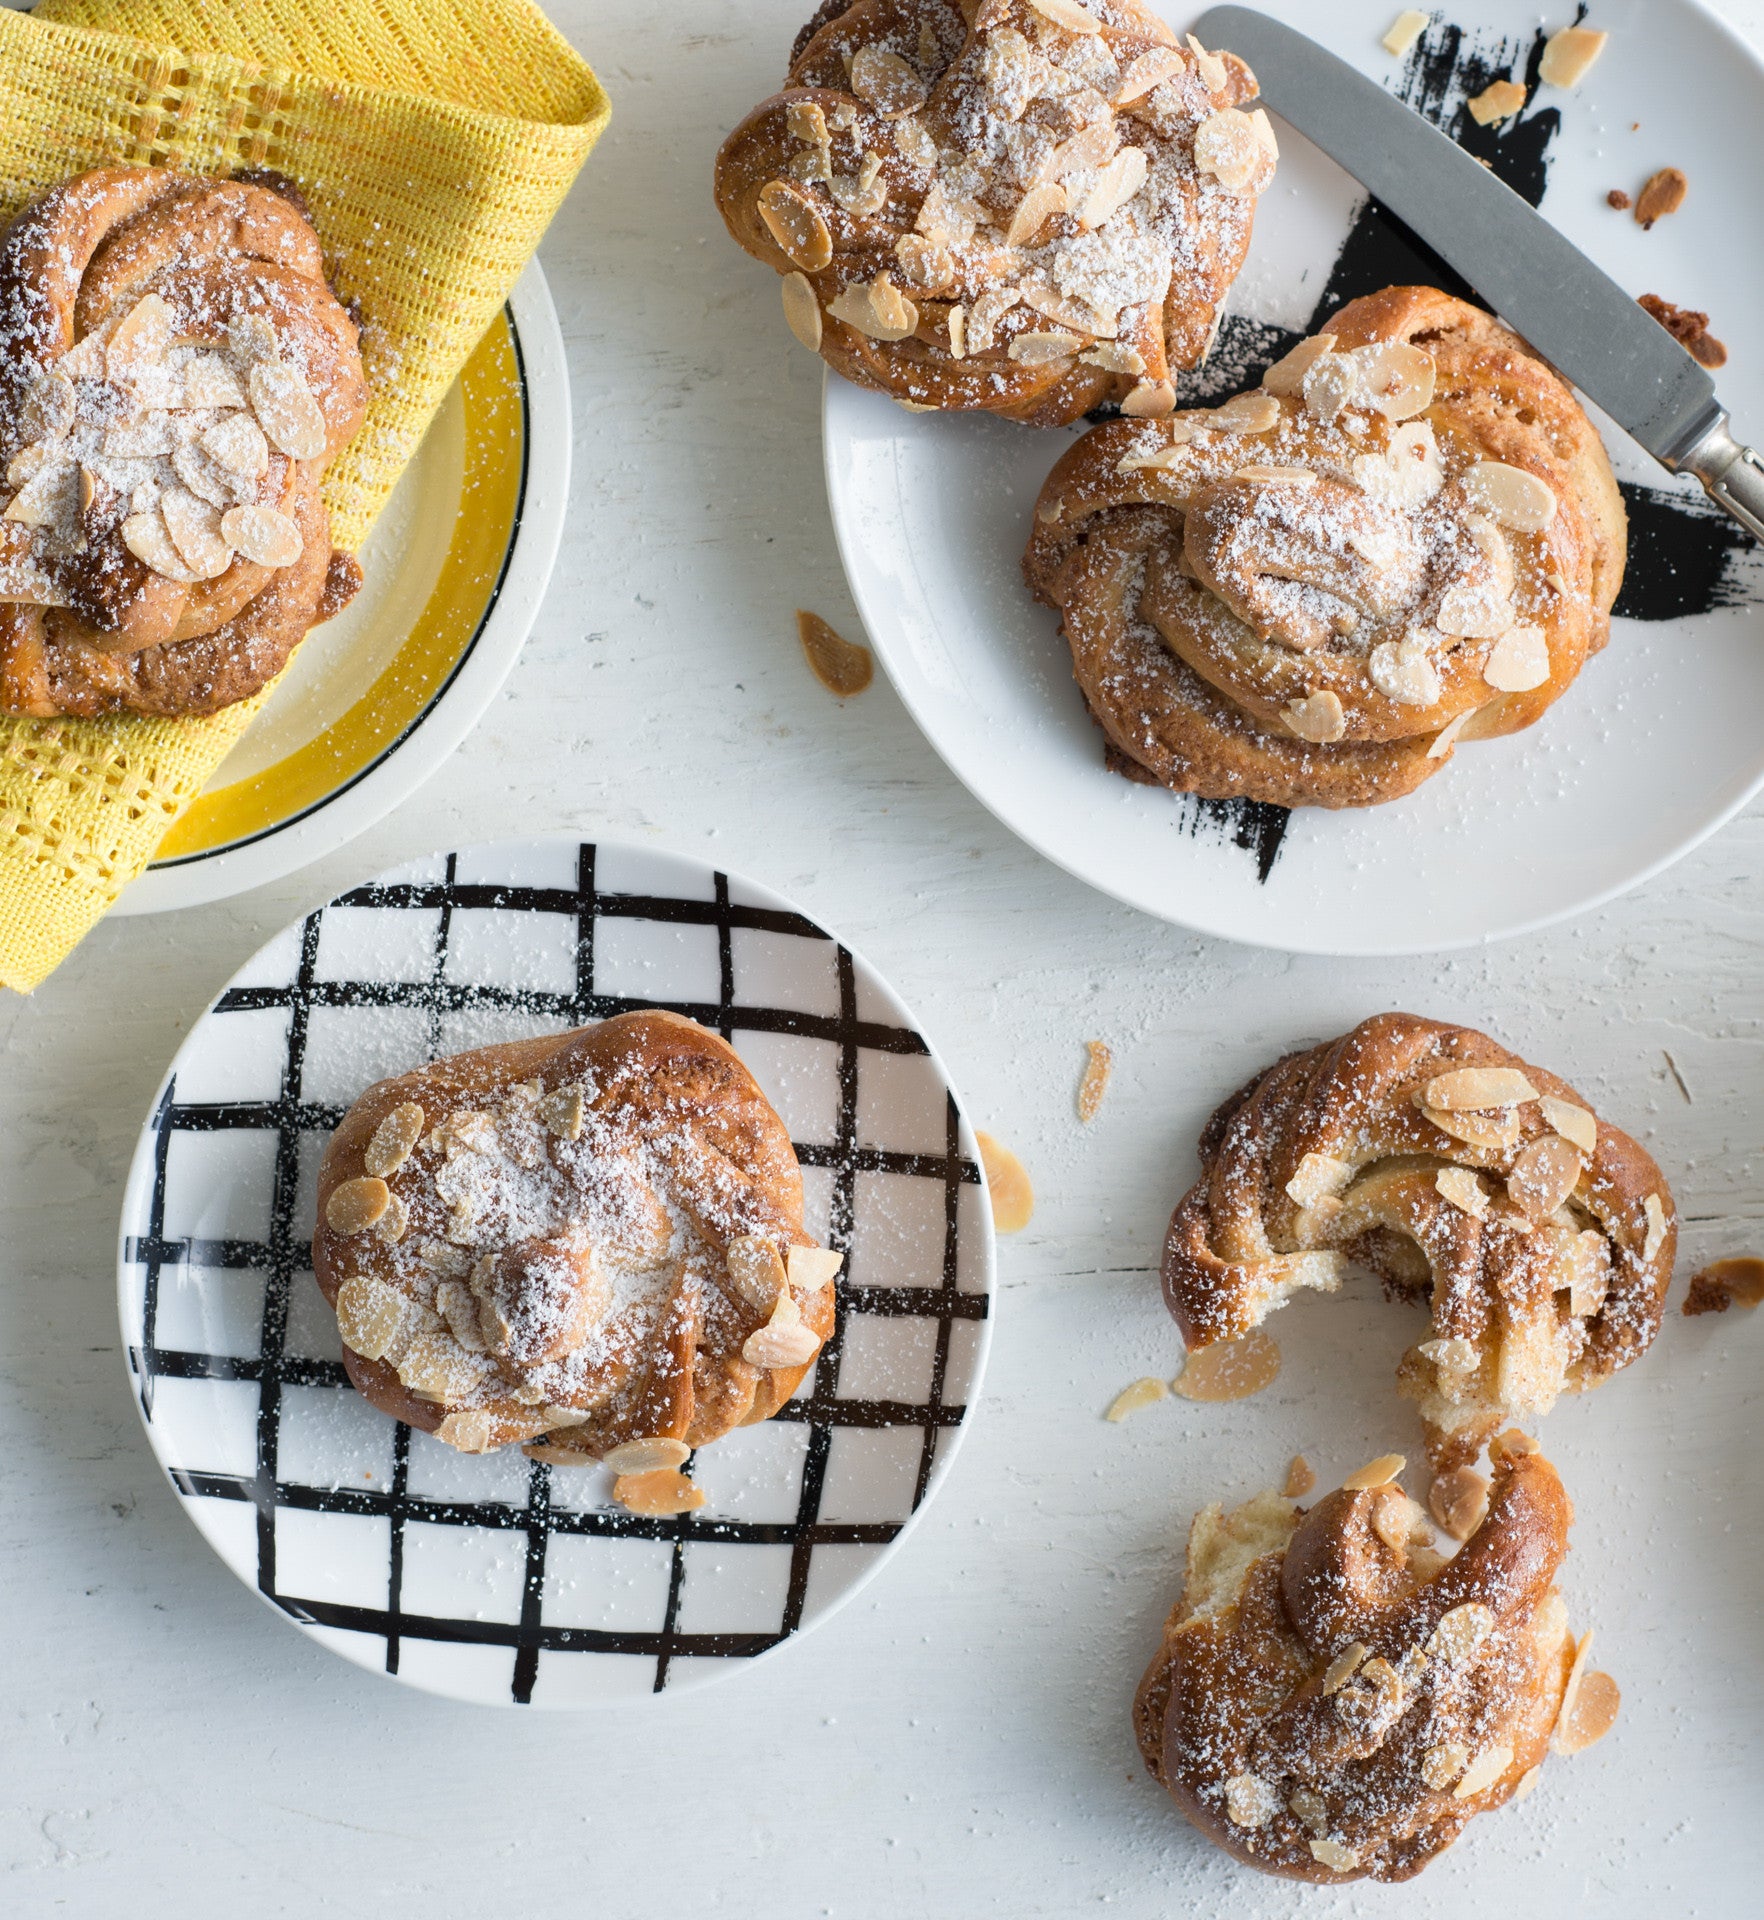
Prep 40min (+1hr 15min proving time)Bake 25minMakes about 16
The Swedes love their sweet buns so much they have even declared 4 October National Cinnamon Bun Day! These more-ish cinnamon-almond filled buns are the quintessential accompaniment to a fika (or coffee). The traditional twisting and shaping of them may seem a little tricky to start with but follow my instructions and watch this quick video and you’ll have it mastered in no time.
Ingredients
melted butter, to grease1 egg, lightly whisked, to glaze
flaked almonds or pearl sugar (see Baker's Tips), to sprinkle
Dough
450g (3 cups) strong bread or pizza flour, plus extra to dust55g (¼ cup) caster sugar
7g (1 sachet) dried yeast
1 teaspoon ground cardamom
½ teaspoon salt
300ml milk
100g butter, diced
1 teaspoon natural vanilla essence or extract
Almond filling
80g butter, at room temperature50g (½ cup) almond meal
50g marzipan
55g (¼ cup) caster sugar
1½ teaspoon ground cinnamon
Method
- To make the dough, combine the flour, sugar, yeast, cardamom and salt in a large bowl and make a well in the centre. Combine the milk and butter in a small saucepan and heat over low heat for 3–5 minutes or until the milk is lukewarm. Remove from heat, stir in the vanilla and set aside for 5 minutes, stirring occasionally with a fork, until the butter melts. Add to the flour mixture and use a wooden spoon and then your hands to mix to a soft dough.
- Turn the dough onto a lightly floured surface and knead for 8–10 minutes or until it is smooth and elastic and springs back when you push your finger into it (see Baker's Tips).
- Brush a large bowl with melted butter to grease. Add the dough turning it to coat lightly with the butter. Cover with plastic wrap and place in a warm, draught-free place for 1 hour or until doubled in size. (See Baker's Tips).
- To make the almond filling, place all the ingredients in a food processor and process until smooth and well combined, scraping down the side of the bowl when necessary. Set aside.
- Line two large baking trays with baking paper.
- When the dough has doubled in size knock it back by punching it in the centre with your fist. Turn onto a lightly floured surface and knead for 2–3 minutes or until smooth and elastic. Use a lightly floured rolling pin to roll out the dough into a 30 cm x 50 cm rectangle, about 0.5cm thick. Place the dough on the benchtop so that a long side is closest to you.
- Use a palette knife to spread the almond filling evenly over the lower half of the dough. Fold the top third down to cover the filling and then the bottom third up, pressing down firmly.
- Use a large, sharp knife to cut the dough into 16 strips, each about 3.5cm wide. Use the knife to cut each strip in half three-quarters of the way up towards the folded end to make two 'legs'. Hold a strip at opposite ends and pull gently to stretch slightly. Then twist the two 'legs' separately about three times. Tie the two 'legs' together in a simple knot and then tuck the opposite end under the knot.
- Repeat with the remaining dough strips, placing them about 5cm apart on the lined trays as they are shaped. Cover with a damp tea towel and set aside in a warm, draught-free place for 25–30 minutes or until risen and the dough no longer springs back when you poke it gently with a finger.
- Preheat the oven to 190°C (170°C fan-forced).
- Brush the rolls with the whisked egg to glaze and sprinkle with flaked almonds or pearl sugar. Bake the rolls in preheated oven for 25 minutes or until golden and sound hollow when tapped on the base. Serve warm or at room temperature.
Baker's Tips
- Pearl sugar (also known as hail or nib sugar) is a coarse white sugar used extensively in European baking. Because it retains its shape (it doesn’t melt during cooking) it adds a lovely textural sweet crunch to pastries, sweet breads and biscuits. Pearl sugar is available at specialty food stores and European-style delicatessens.
- The dough can be kneaded with an electric mixer, fitted with a dough hook, on low speed for 5–8 minutes or until smooth and elastic and comes away from the side of the bowl.
- The dough can be proved in the fridge overnight (in the greased, covered bowl). Stand in a warm, draught-free place for 1–2 hours, or until the dough reaches room temperature, before continuing with the recipe.
- These rolls are best eaten the day they are baked, however they do freeze well. To freeze, wrap individually in plastic wrap, seal them in an airtight container or freezer bag and freeze for up to 3 months. Thaw at room temperature. To reheat, place on a lined baking tray in an oven preheated to 160°C (140°C fan-forced) for 10 minutes or until heated through.
This recipe is from Anneka's SBS Food online column, Bakeproof: Scandi Baking.
CLICK HERE for more Bakeproof recipes.
Photography by Alan Benson.
Prep 30min (+40min proving)
Bake 15minMakes 4serves
Similar to Indian Naan, just lighter and flakier (and in my opinion yummier), taftan is a hearth-baked flatbread from Persia and Pakistan. It is often flavoured with saffron – as this one is – which gives it a striking golden hue and alluring flavour perfect to serve alongside curries and soups (although don’t discount just nibbling it on its own).
Ingredients
- 260g (1¾ cups) bread or pizza flour
- 2 teaspoons sugar
- 1 teaspoon salt
- ½ teaspoon instant dried yeast
- 70g (3½ tbsp) ghee, melted
- 2 tablespoon Greek-style natural yoghurt
- 80ml (⅓ cup) milk
- 1 tablespoon vegetable oil, plus extra to grease
- 2 teaspoons nigella seeds
- 1 good pinch saffron, soaked in 1 tbsp hot water
Method
- Combine the flour, sugar, salt and yeast in a large bowl and make a well in the centre. Combine the milk, yoghurt and 40g (2 tablespoons) of the melted ghee, add to the dry ingredients and use a wooden spoon and then your hands to mix to a soft dough. Turn onto a lightly floured bench top and knead for 8-10 minutes or until smooth and elastic and springs back when you push your finger into it.
- Brush a medium bowl with extra oil to grease, add the dough and turn to coat. Cover with plastic wrap and set aside in a warm, draught-free place for 40 minutes or until risen slightly.
- Preheat the oven to 200°C (180°C fan-forced). Line two large heavy baking trays with baking paper.
- Knock back the dough by punching it in the centre with your fist. Turn onto a lightly floured bench top and knead for 2-3 minutes or until smooth and elastic and the dough has returned to its original size. Divide the dough evenly into 2 portions and brush each with the oil to coat.
- Use a rolling pin to roll out a portion into a rough circle about 22cm in diameter and 5mm thick. Then use your hands to pull one end to shape into a teardrop, about 17cm x 24cm, pressing the centre to create a thicker edge. Transfer to a baking tray and then use your fingertips to make indents all over the surface of the flatbread. Repeat with the remaining dough portion. Brush the flatbreads with the saffron liquid and then sprinkle with the nigella.
- Bake for 10 minutes. Brush the surface of the flatbreads with the remaining melted ghee. Swap the trays around and then bake for a further 5-10 minutes or until the flatbreads are golden and cooked through.
- Serve warm or at room temperature along side a soup or curry.
Baker's Tips
This flatbread will keep in an airtight container at room temperature for up to 2 days but it is best eaten the day it is baked.This recipe is from Anneka's SBS Food online column, Bakeproof: Yeast-leavened Flatbreads.
CLICK HERE for more Bakeproof recipes.
Photography by Alan Benson.
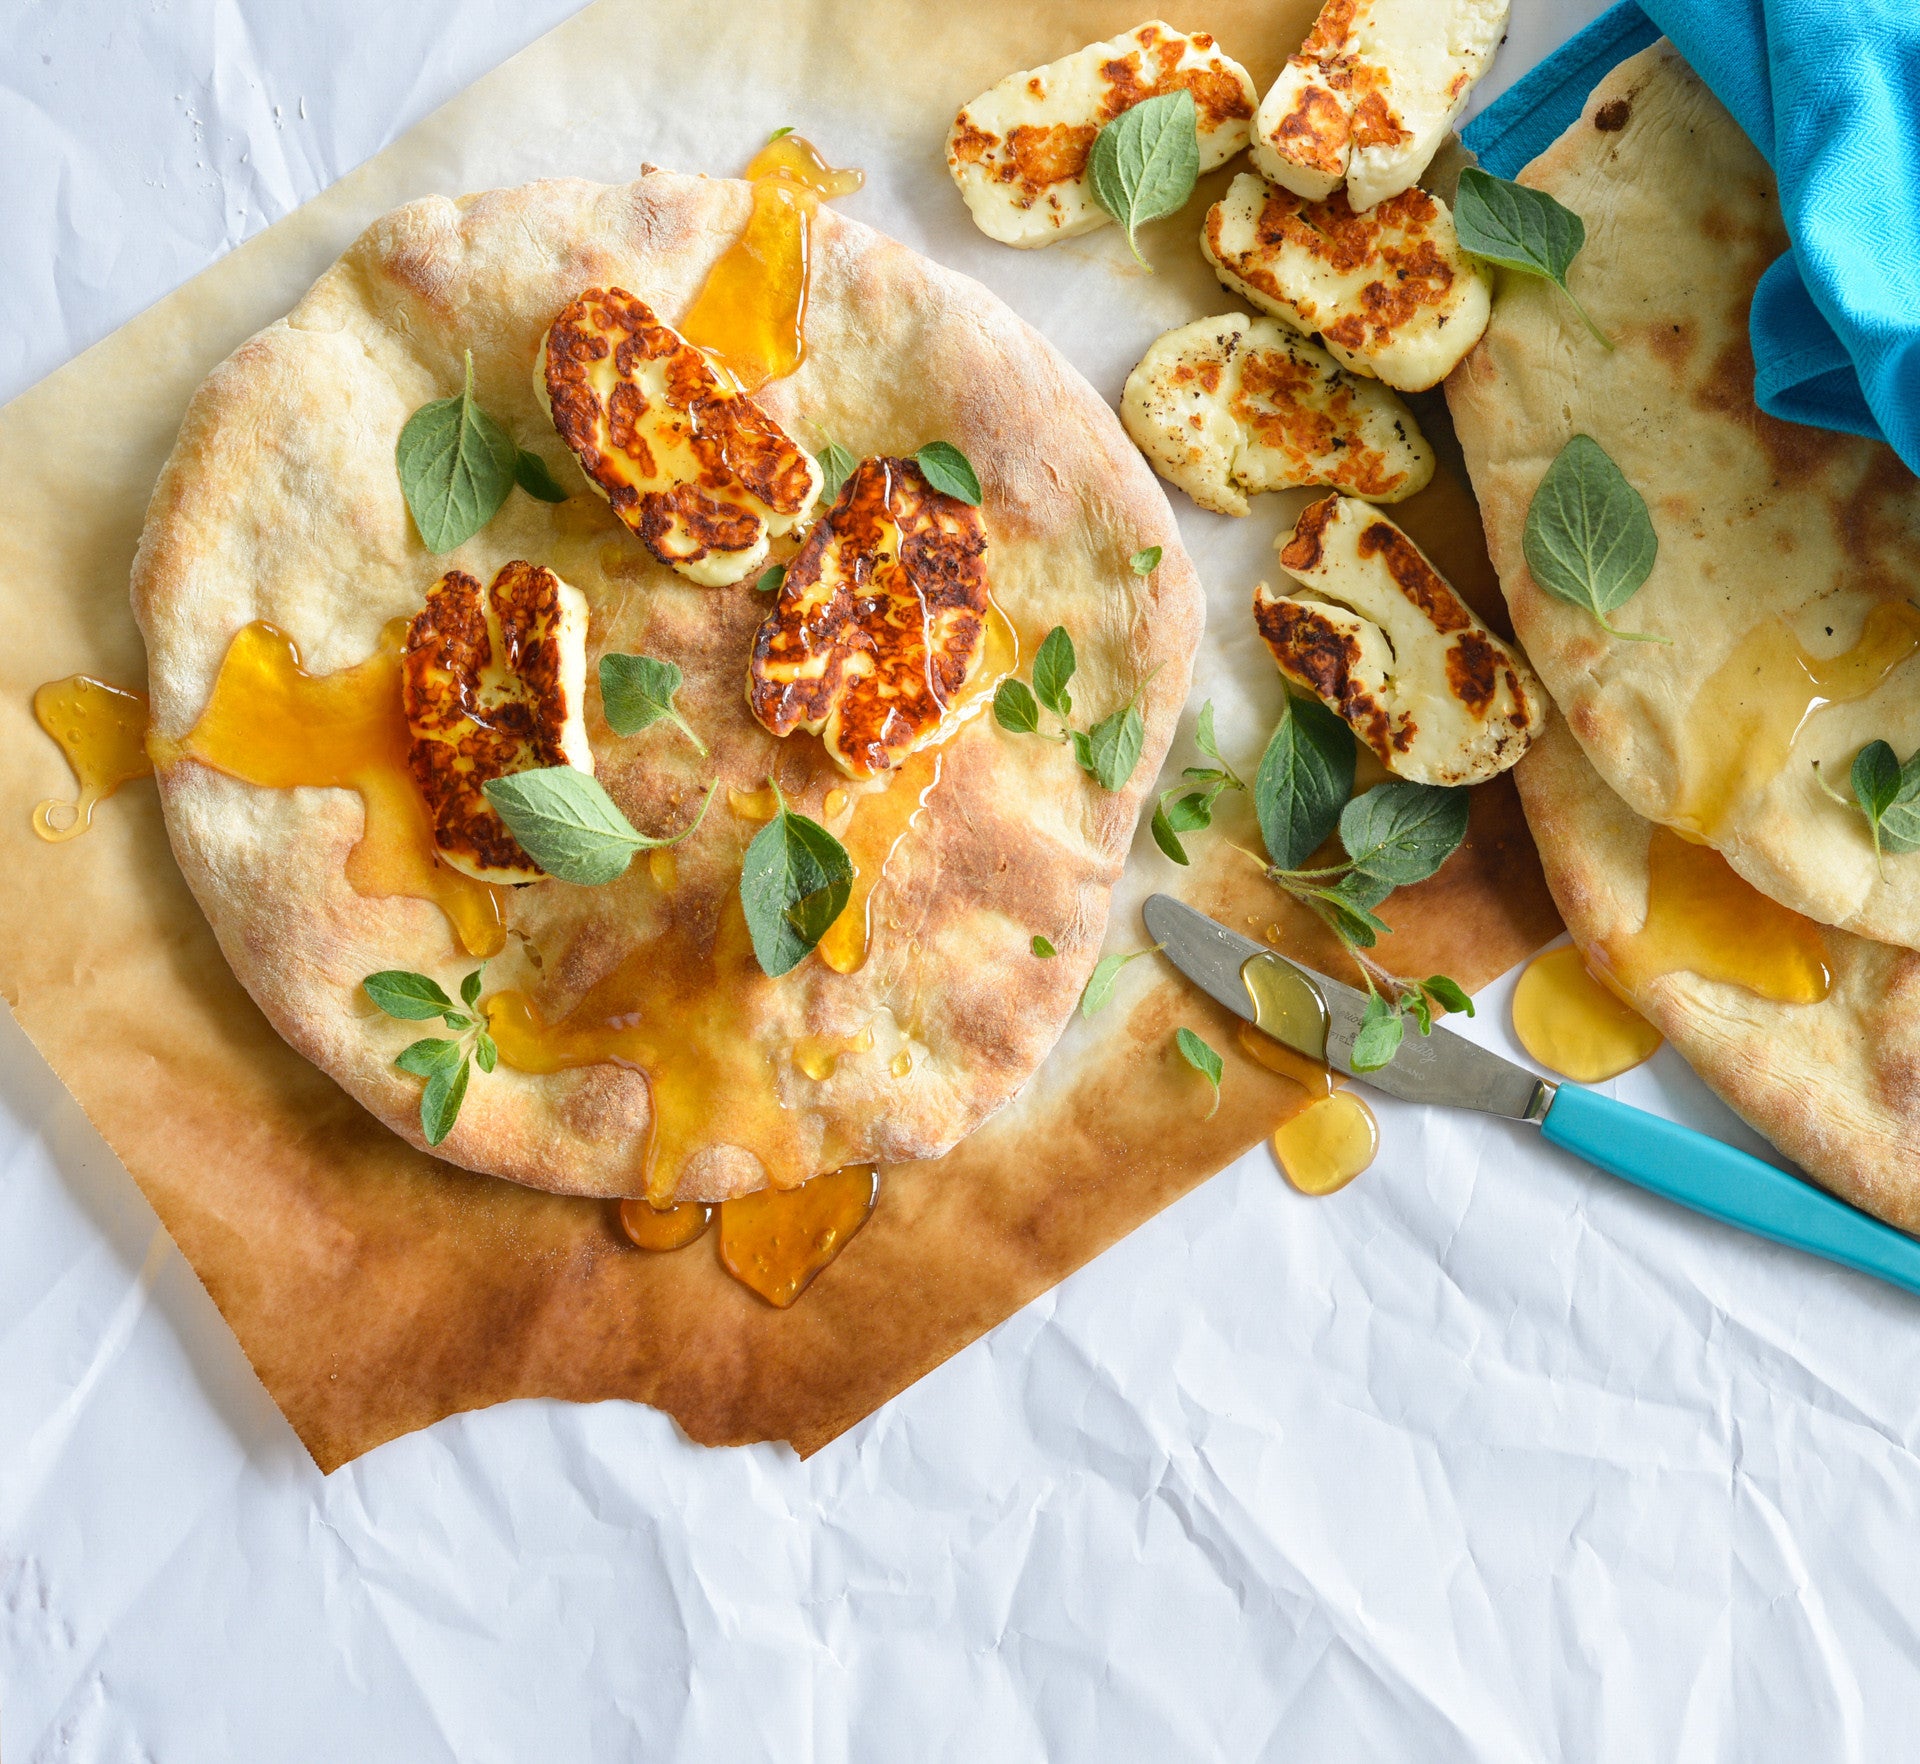
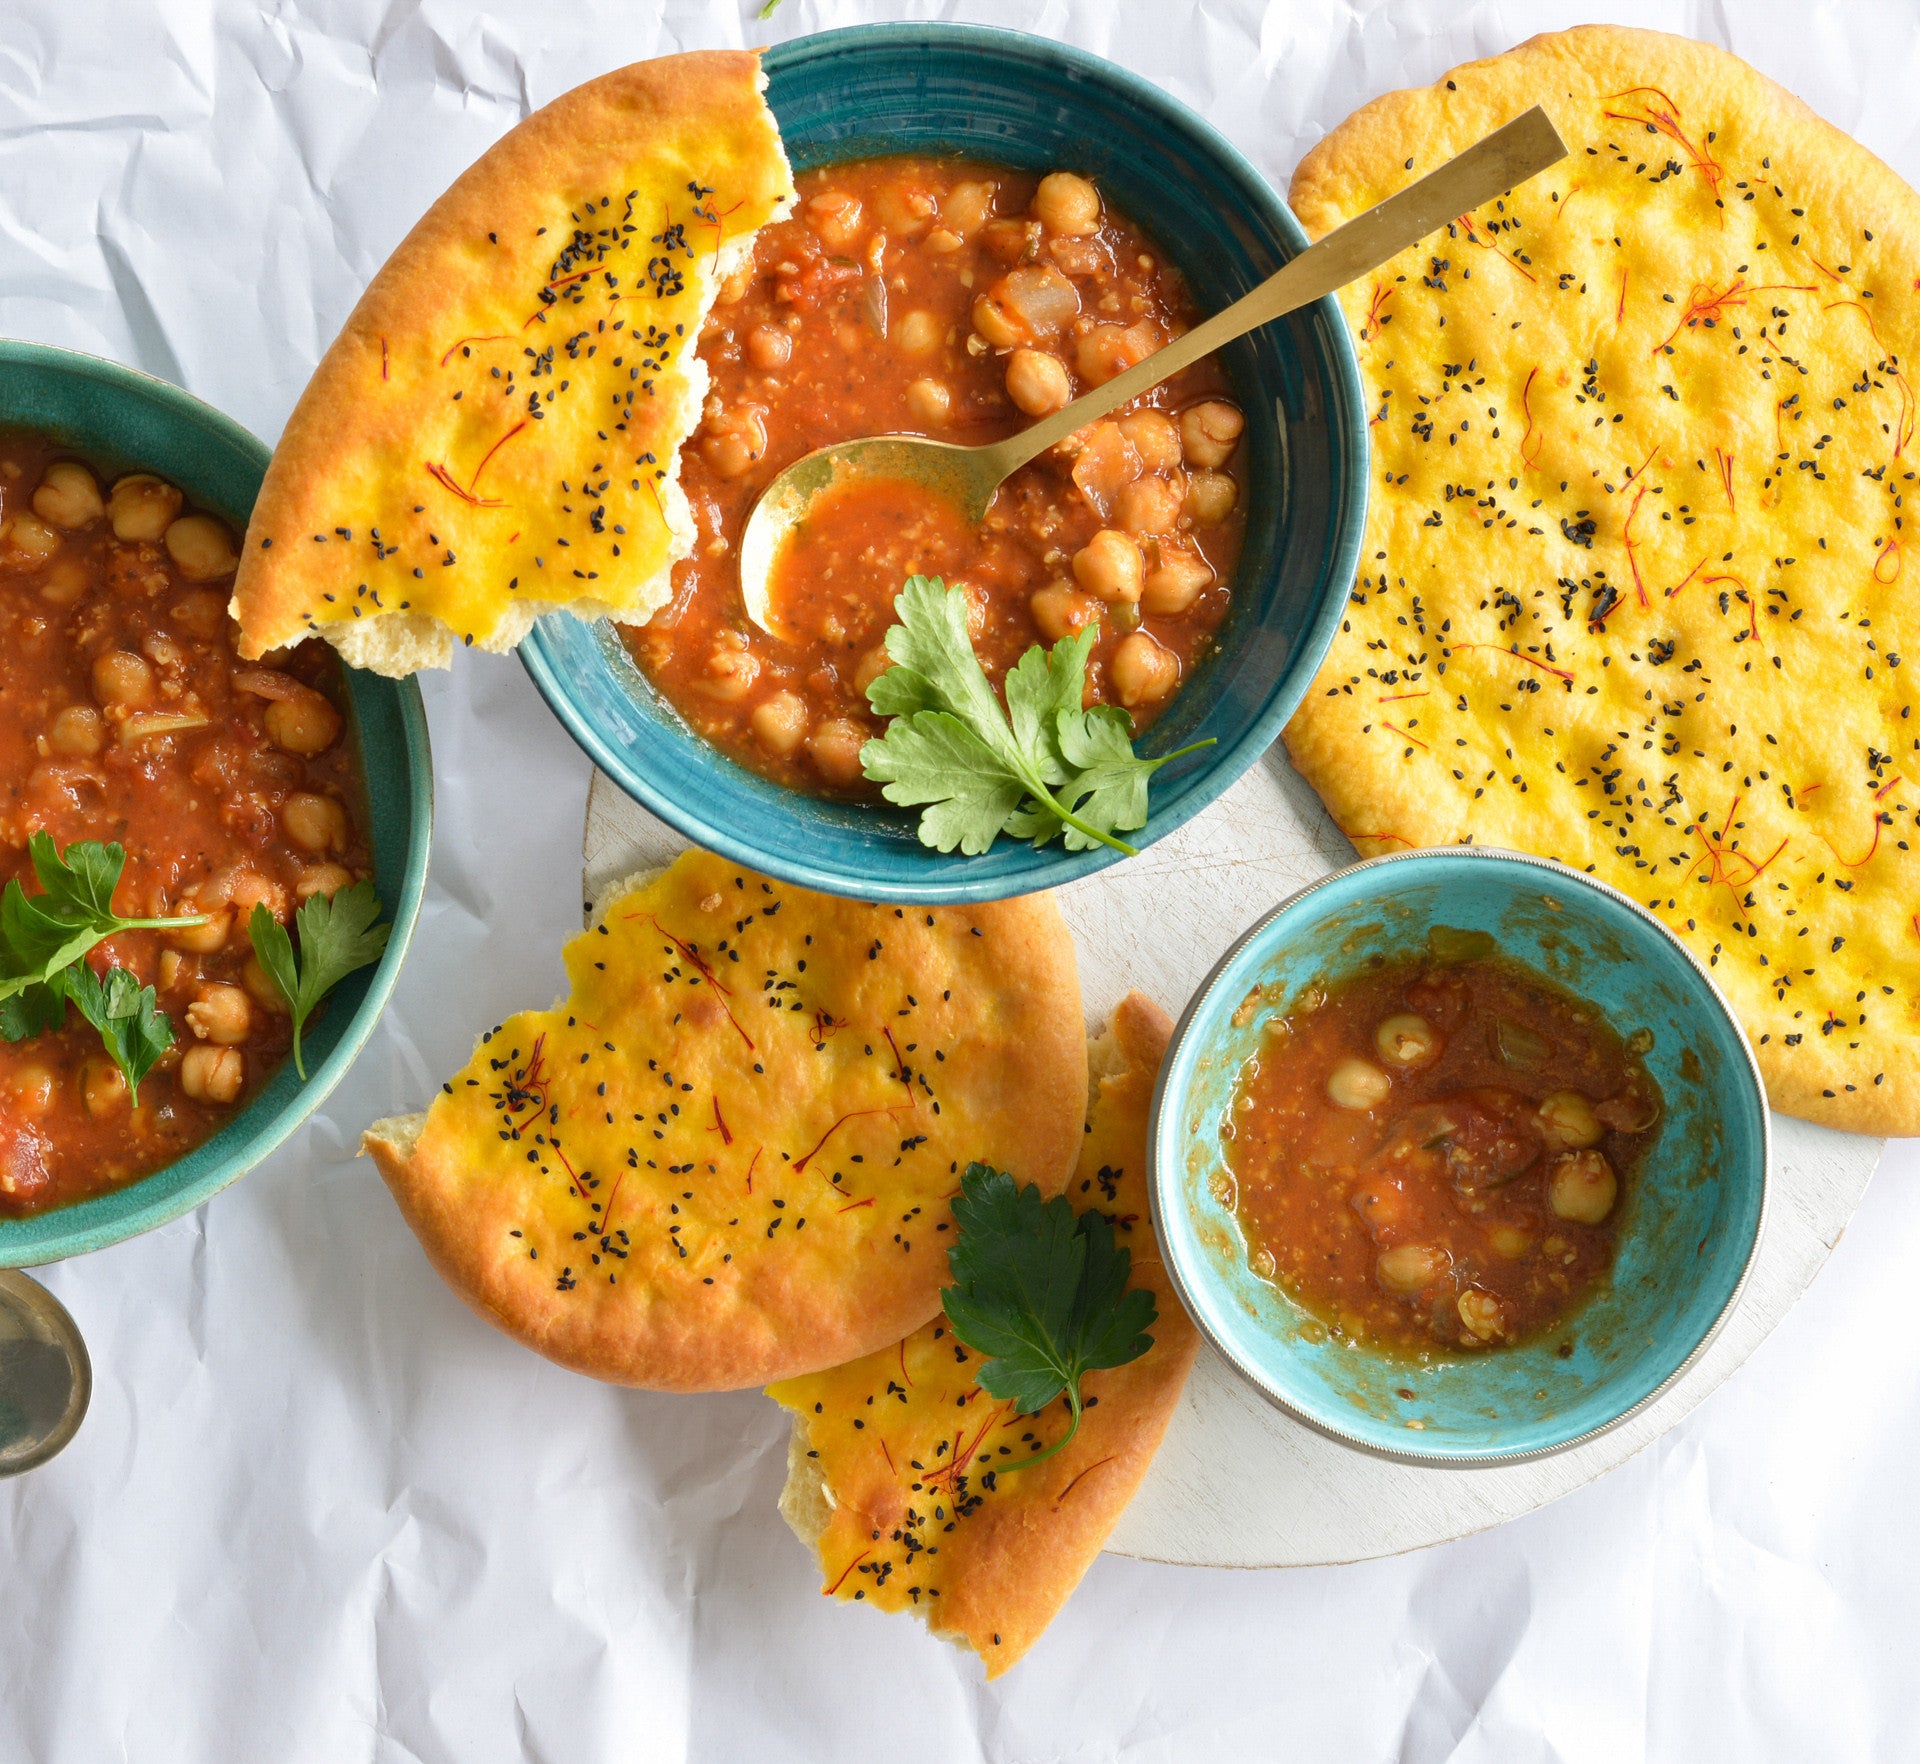
Prep 30min (+2hr proving)
Bake 40-50minMakes 4 serves
This mor-ish flatbread has a long fermentation time that gives its distinctive well-developed and slightly sour flavour. It’s perfect for dipping into and sopping up fragrant Middle Eastern stews and dips.
Ingredients
- 600 g (4 cups) plain flour
- 1 sachet (7 g) instant dried yeast
- 2 tsp sugar
- 1½ tsp salt
- 375 ml (1½ cups) warm water
- 130 g (½ cup) Greek-style natural yoghurt, at room temperature
- 1 tbsp olive oil
- Honey, good-quality pan-fried or grilled haloumi and fresh oregano leaves, to serve
Method
- Combine the flour, yeast, sugar and salt in a large bowl. Combine the water, yoghurt and oil, add to the flour mixture and use a wooden spoon and then your hands to mix to a soft dough (the dough will be quite sticky at this stage). Cover the bowl with a damp tea towel and set aside in a warm, draught-free place for 2-3 hours or until well risen.
- Place a pizza stone in the oven on the centre and preheat to 250°C (230°C fan-forced).
- Divide the dough into 4 portions. Use your hands to flatten each portion into a round on a floured bench top to about 26 cm in diameter and 6-7 mm thick. Place on a piece of baking paper on a tray and cover with a damp tea towel. Set aside in a warm, draft-free place for 15 minutes to rise slightly. Repeat with the remaining 3 dough portions.
- Use the baking paper to lift a bread round onto the pizza stone in the oven and bake for 10-13 minutes or until golden and baked though. Remove from the oven and wrap in a clean tea towel to keep warm while baking the remaining flatbreads in the same way (the flatbread will be crusty on the outside to start with and then will soften as it stands wrapped in the tea towel).
- Serve warm topped with honey, haloumi and oregano leaves.
Baker's Tips
You can also bake these flatbreads on baking paper-lined oven trays for 15 minutes.These flatbreads are best eaten the day they are baked.
This recipe is from Anneka's SBS Food online column, Bakeproof: Yeast-leavened Flatbreads.
CLICK HERE for more Bakeproof recipes.
Photography by Alan Benson.
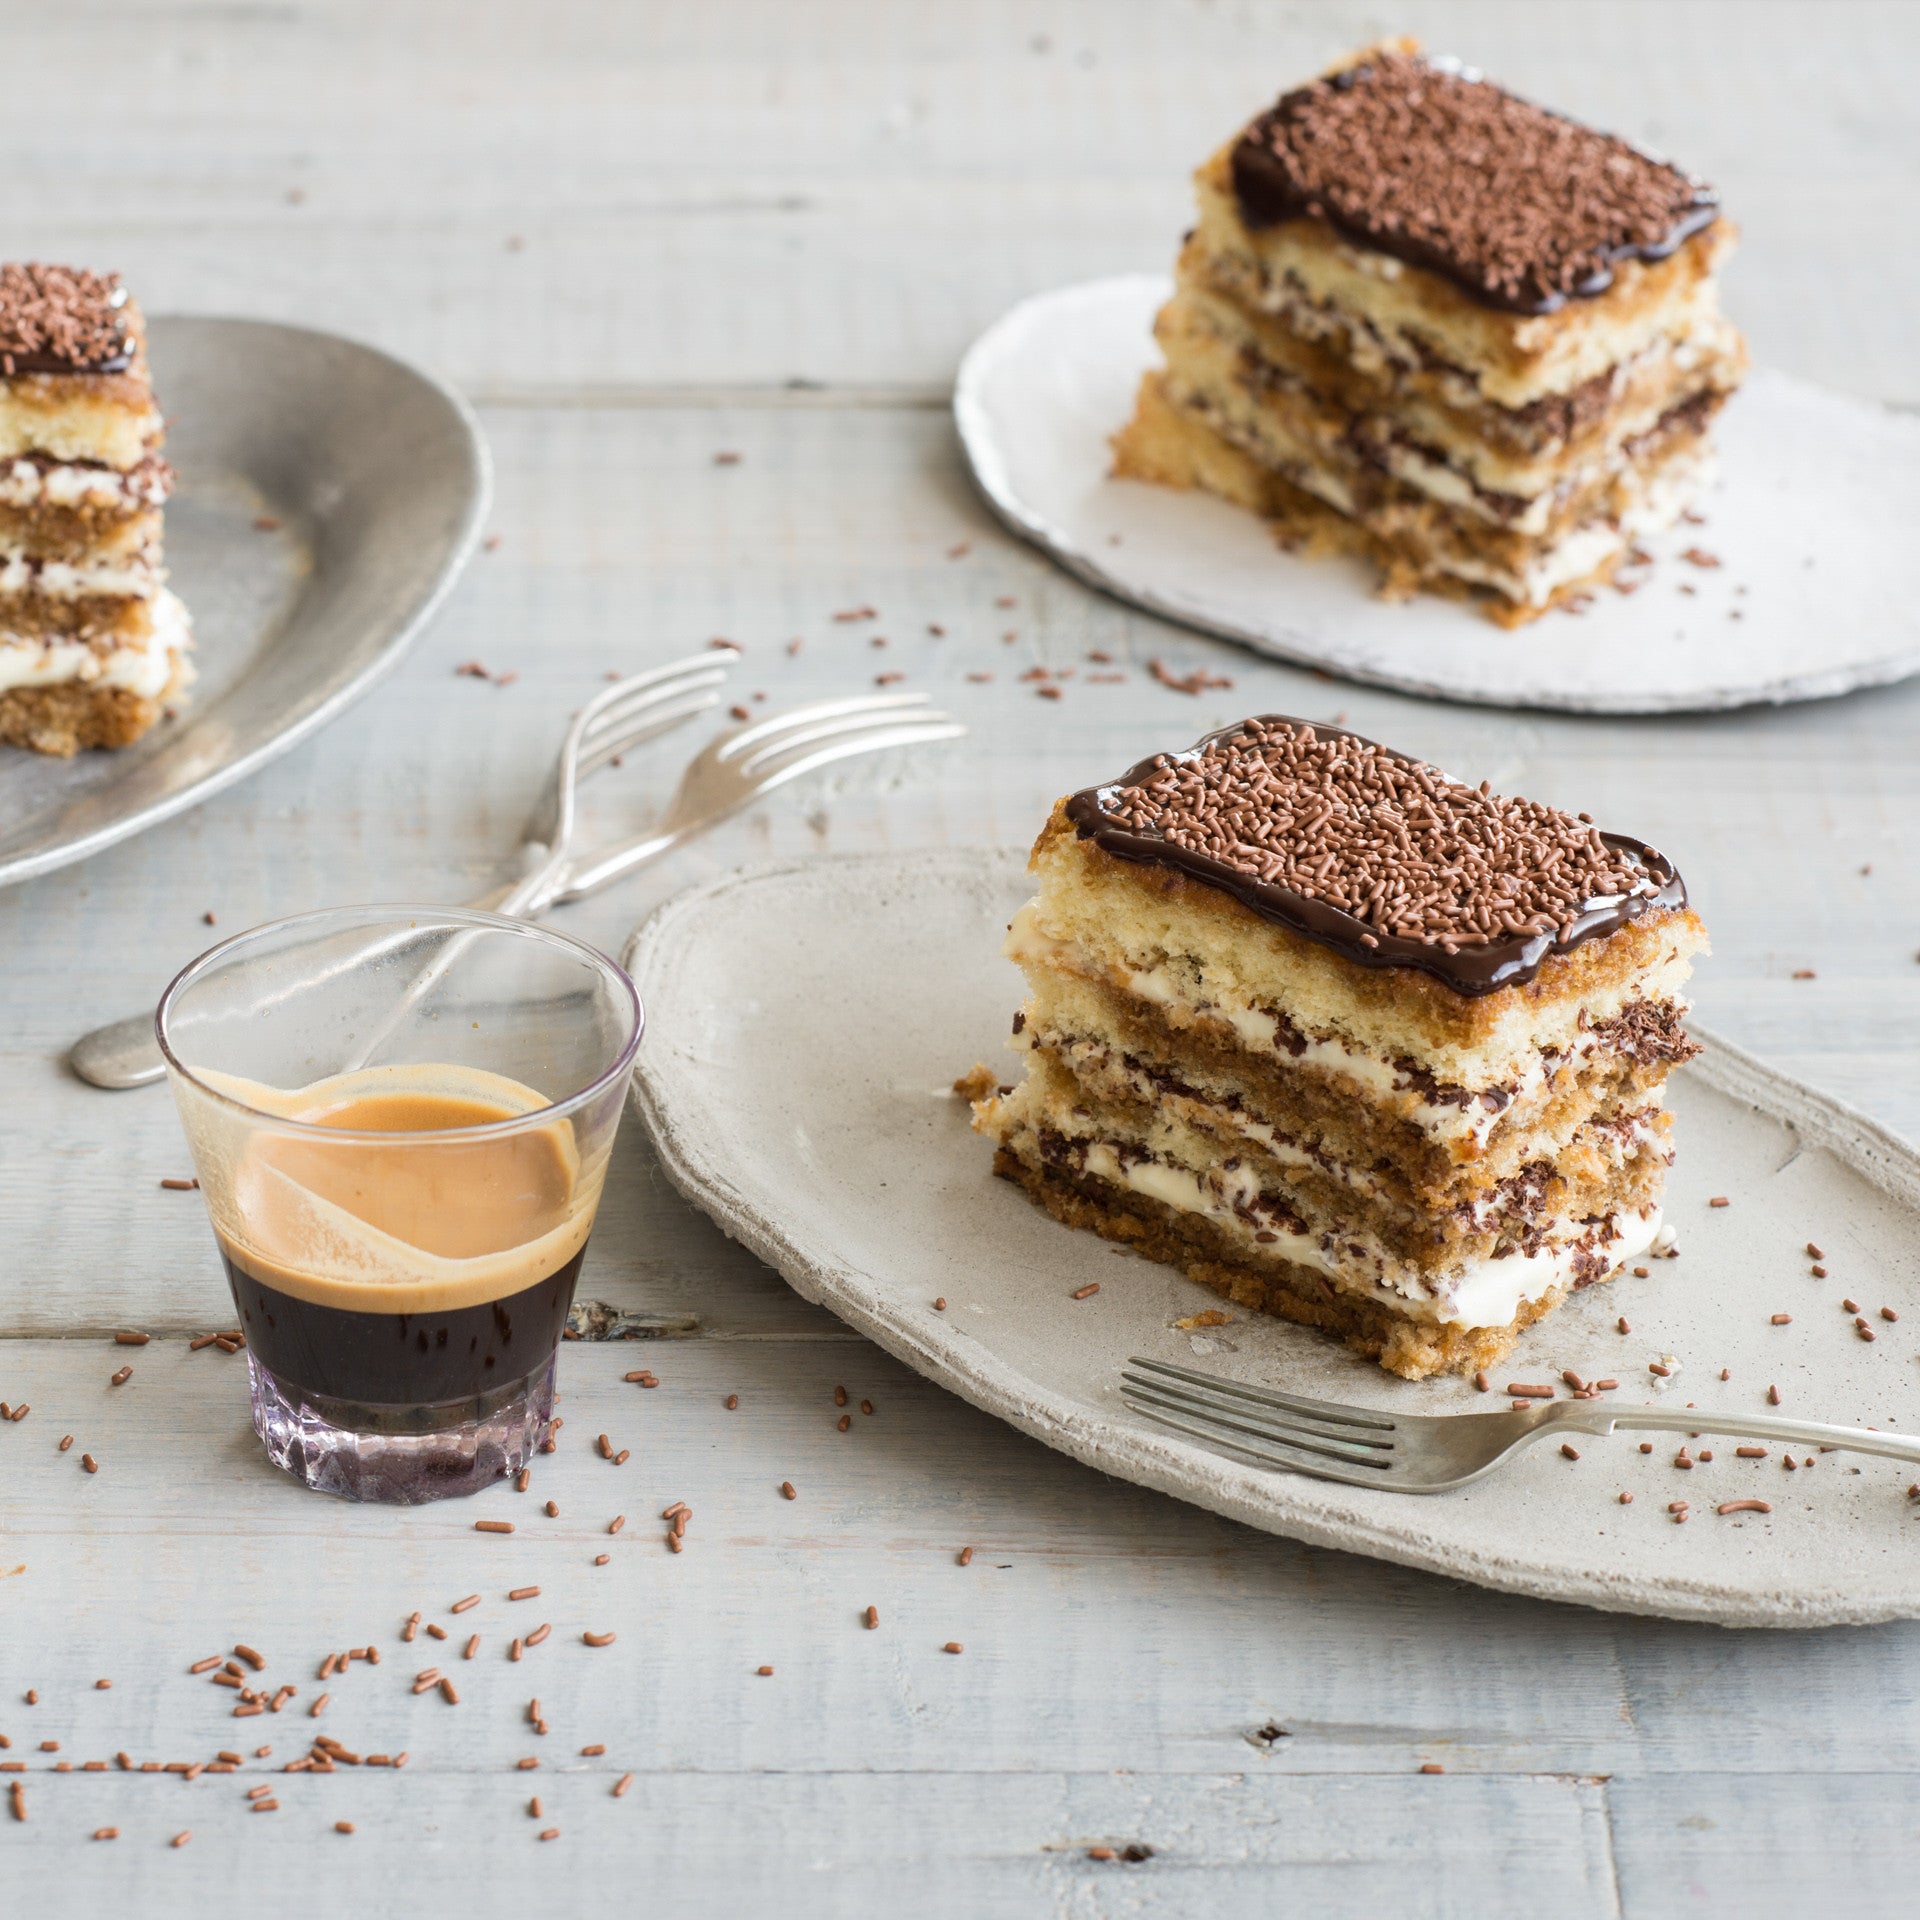
Prep 40min (+2hr 30min chilling and 20min cooling time)Bake 15minMakes 8 serves
This Italian classic is taken to a whole new level as elegant individual dessert cakes with a rich chocolate topping... Just serve with a fork!
Ingredients
185ml (¾ cup) strong freshly brewed coffee60ml (¼ cup) Marsala
75g good-quality dark chocolate (70% cocoa), grated
Chocolate dollar fives, to sprinkle (optional)
Sponge Layers
Melted butter, to grease4 eggs, at room temperature
165g (¾ cup) caster sugar
60ml (¼ cup) milk
20g butter
110g (¾ cup) self-raising flour, plus extra to dust
30g (¼ cup) cornflour
Mascarpone mixture
150ml thickened cream90g (⅔ cup) icing sugar, sifted
125g mascarpone
Chocolate ganache
250g good-quality dark chocolate (54% cocoa), chopped80ml (⅓ cup) pouring cream
Method
- To make the Sponge Layers, place the oven rack in the lower third of the oven and then preheat it to 180°C (160°C fan-forced). Brush two 30cm x 20cm shallow cake tin with a little melted butter to lightly grease and hen line the base and sides with one piece of baking paper, cutting into the corners to fit.
- Use an electric mixer with a whisk attachment on high speed to whisk the eggs and sugar in a large bowl until until the mixture is very thick and pale (this will take about 5 minutes). Lift the whisk out of the mixture and draw a figure eight, if the trail stays on the surface long enough for you to finish drawing then the mixture is ready. If not, continue to whisk for a further minutes and then test again.
- Heat the milk and butter in a small saucepan over medium heat just until the butter melts. Remove from the heat. Sift the flour and cornflour together over the egg mixture. Immediately pour the warm milk mixture down the side of the bowl and whisk again with the electric mixer briefly, until the flour mixture is just incorporated (be careful not to over mix).
- Divide the mixture evenly between the prepared tins, and use a spatula or the back of a spoon to spread evenly. Gently tap the tins on the bench top three times to settle the mixture. Bake in preheated oven for 12-14 minutes or until the cake is a pale golden colour, spring back when lightly touched in the centre and start pulling away from the sides of the tin. Remove from the oven and stand for 2 minutes before turning onto a wire rack to cool completely (this will take about 20 minutes).
- Line the base and sides of a 16cm x 26cm cake tin with two strips of non-stick baking paper allowing the paper to overhand the sides by about 10cm.
- To make the mascarpone mixture, use an electric mixer with a whisk attachment to whisk the cream and icing sugar on medium speed until soft peaks form. Add the mascarpone and whisk until firm peaks just form.
- Cut each of the sponge in half. Combine the coffee and Marsala. Place one sponge layer on the base of the prepared tin and sprinkle with a quarter of the coffee mixture. Spread with a third of the Mascarpone mixture (about ½ cup) and then sprinkle with a third of the grated chocolate. Continue to layer with the remaining sponge, coffee mixture, grated chocolate and mascarpone mixture, finishing with a sponge layer sprinkled with the remaining coffee and Marsala mixture. Cover with plastic wrap and place in the fridge for at least 2 hours or until firm enough to cut.
- Use the overhanging baking paper to remove the tiramisu from the tin and transfer to a cutting board. Use a sharp knife trim the edges and then cut into 8 portions about 4.5cm x 7cm each and place on a wire rack over a tray. Return to the fridge while making the Chocolate ganache
- To make the Chocolate ganache, combine the chocolate and cream in a heatproof bowl and place over a saucepan of barely simmering water (make sure the base of the bowl doesn’t touch the water). Stir occasionally until just melted and combined.
- Remove the cakes from the fridge and place on a wire rack. Pour a little of the Chocolate ganache over each cake, spreading it to cover the top. Sprinkle with the chocolate Dollar Fives if using and return to the fridge for 30 minutes or until the ganache is set before serving.
Baker's Tips
- These Tiramisu cakes will keep in an airtight container in the fridge for up to 3 days.
This recipe is from Anneka's SBS Food online column, Bakeproof: Little Cakes. CLICK HERE for more Bakeproof recipes.
Photography by Alan Benson.
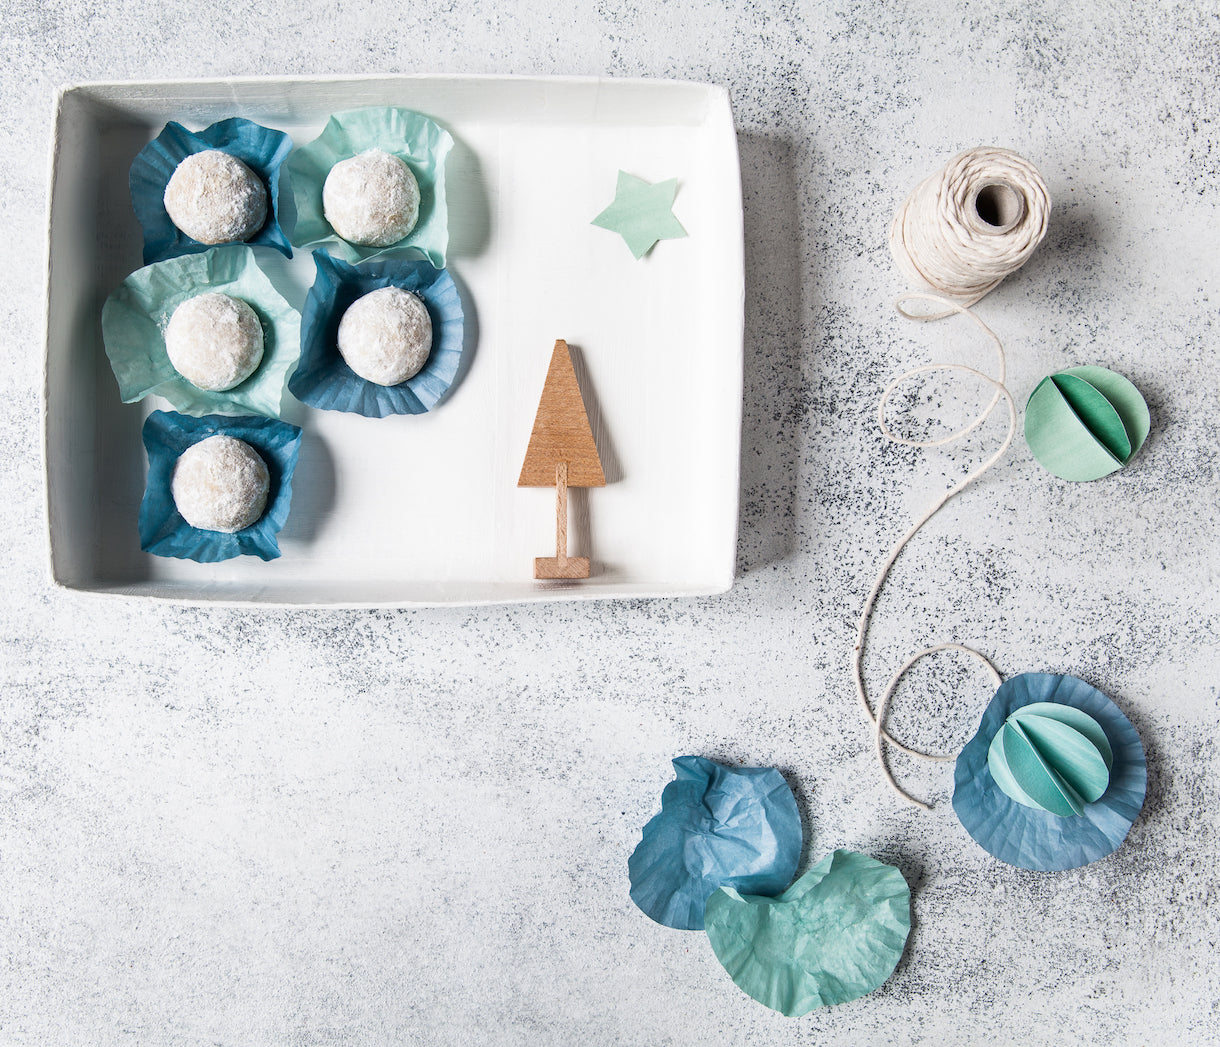
Prep 30min (+20min cooling time)Bake 15minMakes about 50
Often associated with Christmas in Germany, these bite-sized mouthfuls of gingerbread deliciousness actually originated in Scandinavia. The combination of a soft, highly spiced centre hidden beneath a crisp, sugar-powdered outer coat is pure, festive heaven.
Ingredients
125g (4½oz) unsalted butter, softened slightly
110g (½ cup, firmly packed/4oz) dark brown sugar
1 lemon, zest finely grated
1 orange, zest finely grated
90g (¼ cup/3oz) honey
1 egg, at room temperature
40g (¼ cup/1½oz) finely chopped candied citrus rind / mixed peel
350g (2⅓ cups/12¼oz) plain flour
½ teaspoon baking powder
½ teaspoon bicarbonate of soda
2 teaspoon ground cinnamon
½ teaspoon ground black pepper
½ teaspoon ground ginger
¼ teaspoon crushed aniseed
½ teaspoon ground nutmeg
¼ teaspoon ground cloves
¼ teaspoon ground allspice
125g (1 cup/4½oz) pure icing sugar, to dust
Method
- Preheat oven to 160°C/315°F (140°C/285°F fan-forced). Line two large oven trays with non-stick baking paper.
- Use an electric mixer with a paddle beater to beat the butter, sugar and citrus zest until just creamy. Add the honey and beat until just combined. Add the egg and beat until evenly combine. Mix in the candied citrus rind / mixed peel.
- Sift together the flour, baking powder, bicarbonate of soda and spices. Add the flour mixture to the butter mixture and beat on lowest possible speed until just combined and a soft dough forms.
- Roll heaped teaspoonfuls of the mixture into balls and place 5cm/2in apart on the lined trays. Bake in preheated oven for 10-12 minutes, swapping the trays halfway through baking, or until they start to crack and are just cooked through.
- Sift the icing sugar into a medium bowl. Add about 6 warm biscuits to the icing sugar and toss to coat generously. Place on a wire rack to cool and repeat with the remaining biscuits.
Baker's Tips
- The uncooked dough will keep covered in the fridge for up to 2 days. Roll and bake straight from the fridge.
- These biscuits will keep in an airtight container at room temperature for up to 1 month.
- Dust with icing sugar again just before serving if desired.


