SUBSCRIBE TO BAKECLUB!
  •  
0 CART/CHECKOUT

Learn, connect & share through a love of baking

  • Home
  • Classes
    • Live & Guided Online Classes
    • Self-paced Online Classes
    • How to choose an online class
    • Special Events
  • BakeClub & Co.
    • Join BakeClub & Co.
    • Log in to BakeClub & Co.
    • Gift BakeClub & Co.
  • Make Me a Baker Program
    • Make Me a Baker Online
    • Testimonials
    • Graduation gallery
  • Shop
    • Anneka's Books
    • BakeClub Aprons
    • Baking Gifts
    • Gift Certificates
  • Recipes
    • Browse All
    • Bakes that Travel Well
    • Bakes to Share with a Cuppa
    • Baking with Kids
    • Café Favourites
    • Flour-free Recipes
    • International Recipes
    • Recipes to Nurture, Comfort & Calm
    • Savoury Tummy Fillers
    • Winter Warmers
  • Resources
    • BakeClub Blog
    • BakeClub Tips
    • BakeClub Q&A
    • BakeClub Videos
    • BakeNews Archives
    • Subscribe to BakeClub
  • About
    • Who is Anneka Manning?
    • About BakeClub
    • What Our Students Say
    • BakeClub Partners
    • Media
    • Contact Us
  • home
  • Products
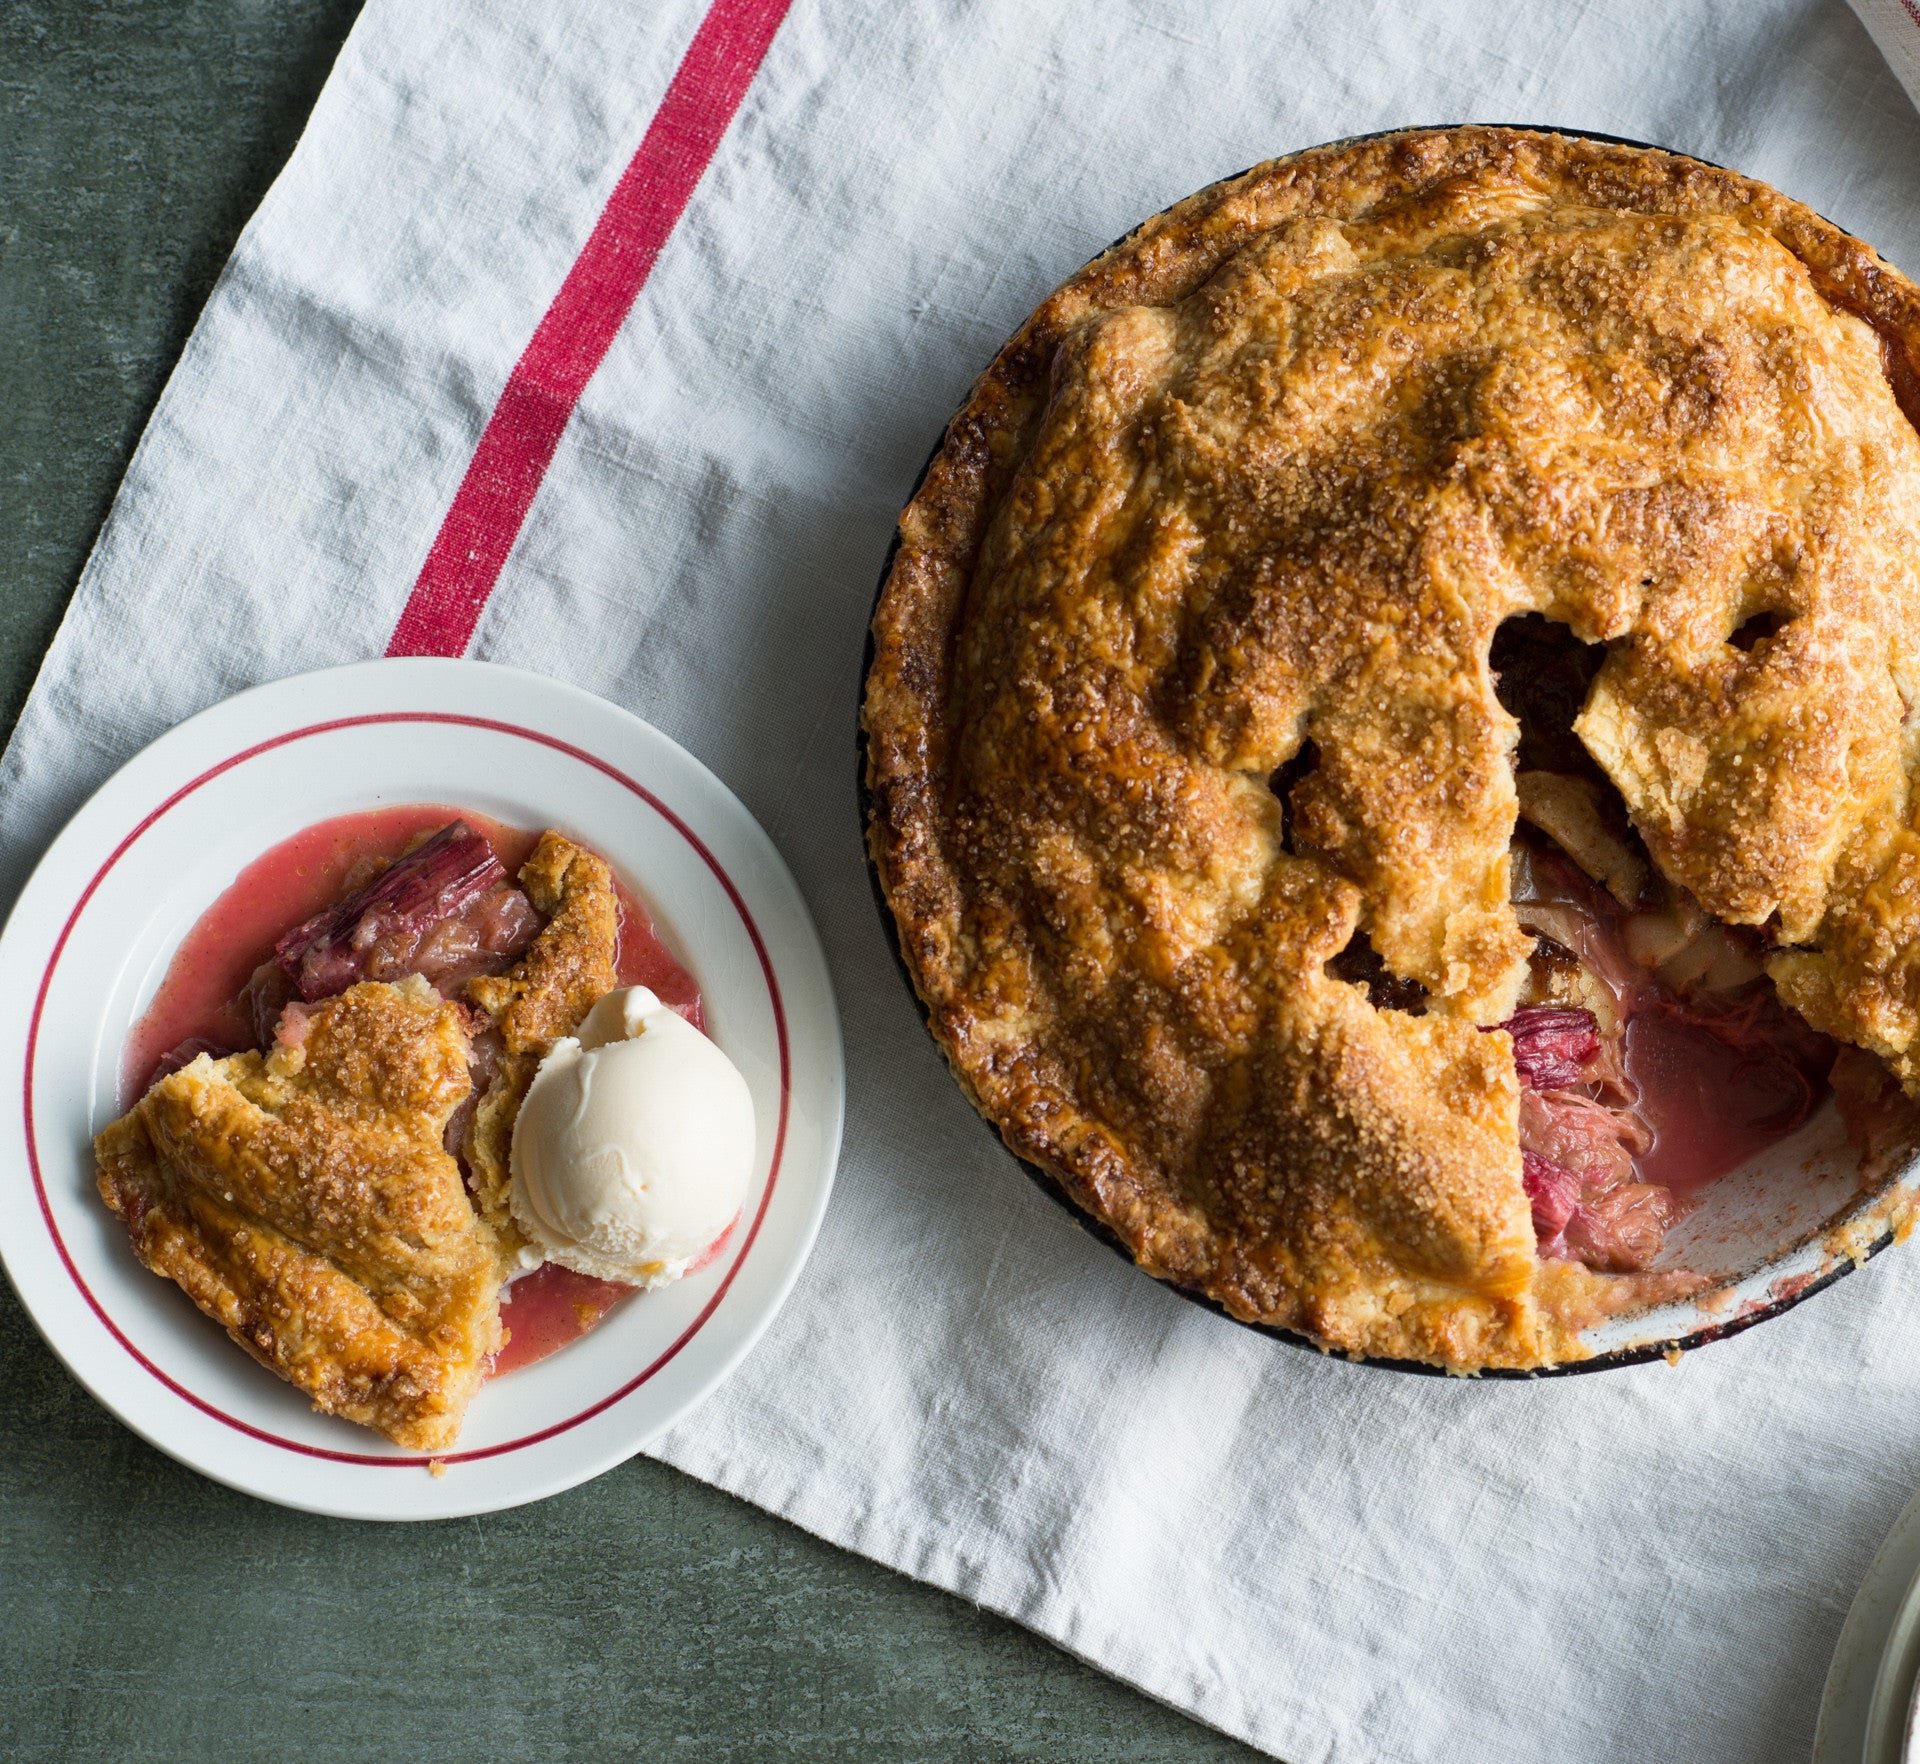
Prep 30min (+35min pastry making time)Bake 1hr 15minMakes 8-10 serves

Classic apple pie (served with a overly-generous scoop of vanilla ice-cream, of course) is one of the perennial delights of winter and can only be improved by the addition of rhubarb and a deliciously rich vanilla sour cream pastry. This pie just may be a little hard to beat.

Ingredients

1 egg, whisked, for brushing
1 quantity vanilla sour cream pastry, shaped into a disc before wrapping and chilling as directed
2 teaspoons demerara sugar, to sprinkle
pouring cream, vanilla ice-cream or custard, to serve

    Apple and rhubarb filling

    1 teaspoon ground cinnamon
    1 teaspoon vanilla bean paste
    1 orange, rind finely grated
    110g (½ cup) demerara sugar
    1½ tablespoons plain flour
    1kg (about 6 medium) Granny Smith apples
    750g trimmed rhubarb, cut into 4 cm lengths (see Baker’s Tips)
    30g unsalted butter, finely diced

      Method

      1. Preheat the oven to 200°C (180°C fan-forced).
      2. To make the apple and rhubarb filling, use your fingertips to rub the cinnamon, vanilla bean paste and orange rind through the sugar in a medium bowl. Stir in the flour. Peel, core and cut the apples into thin (about 3 mm) slices and place in a separate large bowl, along with the rhubarb and the sugar mixture. Use your hands to toss gently to combine evenly.
      3. Spoon the apple and rhubarb filling into an ungreased 23cm diameter (top measurement) ceramic or metal pie dish (see Baker’s Tips) and then dot with the diced butter. Brush the edge of the pie dish with the whisked egg.
      4. Roll out the vanilla sour cream pastry to make a pie lid about 5 mm thick. Use a 2cm round cutter to cut out a circle form the centre of the pastry. Carefully drape the pastry loosely around the rolling pin and place on top of the pie. Use your thumb and index finger to press the pie pastry top onto the rim of the pie dish to seal. Use a small sharp knife to trim the excess pastry from around the edge. Brush the top of the pie with some of the remaining whisked egg and then sprinkle with demerara sugar.
      5. Bake for 30 minutes. Reduce the oven temperature to 160°C (140°C fan-forced) and bake for a further 40-45 minutes or until the pastry is golden and cooked through and the apples are tender (see Baker’s Tips). Remove the pie from the oven and stand for 5 minutes before serving warm with cream, ice cream or custard.

      Baker's Tips

      • For this recipe you will need a ceramic pie dish measuring 23cm across the top, 17cm across the base and 7cm deep.
      • You will need about 1kg untrimmed rhubarb for this recipe.
      • To check if the apples are tender, insert a skewer into the centre of the pie.

      This recipe is from Anneka's SBS Food online column, Bakeproof: Pies.
      CLICK HERE for more Bakeproof recipes.

      Photography by Alan Benson.
      Rhubarb & Apple Pie
      Prep 20minBake 35-40 minMakes 8 serves

      Rhubarb and pear make wonderful partners and when teamed with a coconut and macadamia nut crumble topping in this dessert it brings sunshine to the table. The coconut sugar lends a lovely rich caramel flavour but can be replaced by brown sugar if you wish.

      Ingredients

      1 bunch rhubarb, trimmed and cut into 4cm lengths (you should have about 500g trimmed and chopped rhubarb)
      750g (about 4) firm ripe pears (such as Josephine, Williams or Packhams)
      2 tablespoons coconut or brown sugar
      Coconut or Greek-style yoghurt, to serve

      Crumble Topping
      50g (½ cup) rolled oats
      30g (½ cup) flaked coconut
      55g (â…“ cup) macadamia nuts, coarsely chopped
      50g coconut or brown sugar
      2 tablespoons LSA (ground linseeds, sunflower seeds and almonds)
      1½ teaspoons ground cinnamon
      60ml (¼ cup ) sunflower or light olive oil
      ½ teaspoons natural vanilla essence or extract

      Method

      1. Preheat the oven to 180ºC (160°C fan-forced).
      2. To make the Crumble Topping, place oats, flaked coconut, macadamias, sugar, LSA and cinnamon in a bowl, mix to combine. Combine the oil and vanilla, drizzle over the oat mixture and toss to combine evenly. Set aside.
      3. Peel, quarter and core the pears and then cut each quarter lengthwise into three slices. Place the pear slices, rhubarb and sugar in a large bowl and toss gently to combine. Transfer to a 1.5 litre (6 cup) ovenproof dish. Sprinkle with the Crumble Topping.
      4. Bake in preheated oven for 35-40 minutes until the crumble is crisp and golden and the fruit is tender when tested with a skewer.
      5. Serve warm or at room temperature with the coconut yoghurt.

      Baker's Tips

      • Store any leftover crumble in the ovenproof dish covered with plastic wrap or in an airtight container in the fridge for up to 3 days. Serve cold or reheat in an oven preheated to 180°C (160°C fan-forced) for 10-15 minutes or until heated through.
      • This crumble can also be baked in eight 185ml (¾ cup) ramekins or ovenproof dishes at 180°C (160°C fan-forced) for 25-30 minutes.
      Rhubarb & Pear Coconut Crumble
      Prep 25min (+2hr 30min cooling time)Bake 45-50minMakes 12-16 serves

      I love this cake. Rich, decadent and completely addictive, it is one of the easiest cakes I have ever made but also one of the most impressive. The toasted hazelnuts give a wonderful 'toasty' undertone, but you can use ground toasted pecans, almonds or pistachios (or a combination of nuts) instead – just take your pick! 

      Ingredients

      Melted butter, to grease
      200g (7oz) roasted and peeled hazelnuts
      250g (9oz) good-quality dark chocolate (45-54% cocoa), chopped
      185g (6½oz) unsalted butter, cubed
      40g (1â…“oz/â…“ cup) cocoa powder, sifted
      60ml (2fl oz/¼ cup) strong, freshly brewed coffee
      6 eggs, at room temperature
      275g (9¾oz/1¼ cups) caster sugar
      Cocoa powder or icing sugar, to dust
      Cream or ice cream, and fresh berries, to serve


      Method

      1. Preheat oven to 180°C/350°F (160°C/315°F fan-forced). Brush a 22cm (8¾in), base measurement, springform tin with the melted butter to grease and line the base with non-stick baking paper. Place the tin on a lined baking tray.
      2. Process the hazelnuts in a food processor using the pulse button until finely ground. Set aside.
      3. Combine the chocolate, butter and cocoa powder in a medium heatproof bowl over a saucepan of simmering water (don’t let the base of the bowl touch the water). Heat, stirring occasionally, until melted and smooth. Remove from heat and stir in the coffee. Set aside.
      4. Use a balloon whisk to mix the eggs and sugar until just combined. Stir in the chocolate mixture and then the ground hazelnuts until evenly combined.
      5. Pour into the prepared tin and bake in preheated oven for 45-50 minutes or until the centre 10cm (4in) still wobbles slightly when the tin is shaken gently. Remove from the oven and cool in the tin on a wire rack (this will take about 2½ hours).
      6. Serve dusted with cocoa powder or icing sugar and accompanied by cream or ice-cream, and berries.

      Baker's Tips

      • This cake will keep in an airtight container in the fridge for up to 5 days. Bring to room temperature to serve.

      Photography by Alan Benson.

      Rich Flourless Hazelnut Chocolate Cake
      Prep 15minBake 40minMakes 6 serves

      The simplicity of these roasted winter root vegetables allows their true flavours to shine – especially when finished with fresh herbs, lemon and ricotta salata.

      Ingredients

      • 1 bunch baby beetroot, scrubbed, trimmed and halved if large
      • 1 bunch baby (Dutch) carrots, scrubbed, trimmed and halved
      • 1 fennel bulb, trimmed and cut into 8 wedges
      • 3 small parsnips, scrubbed, trimmed and quartered
      • 2 tablespoons extra-virgin olive oil, plus extra to drizzle
      • 40g ricotta salata (see Baker's Tips) or sheep's milk feta, crumbled or coarsely grated
      • 1½ tablespoons oregano leaves
      • 1½ tablespoons chopped flat-leaf parsley
      • 1 lemon, zest finely grated
      • lemon wedges or cheeks, to serve

      Method

      1. Preheat the oven to 220°C (200°C fan-forced)
      2. Toss the beetroot, carrots, fennel and parsnip with the oil to coat. Spread over the base of a roasting dish and bake for 40 minutes, tossing once halfway through baking, or until the beetroot is tender when pierced with a skewer.
      3. Remove the vegetables from the oven and transfer to a serving platter. Drizzle with a little more oil. Combine the ricotta salata, oregano, parsley and lemon zest and scatter over the vegetables. Serve warm or at room temperature with lemon wedges.

      Baker's Tips

      • Ricotta salata is an Italian ricotta cheese that has been pressed, salted and aged for at least 90 days. It has a wonderfully salty flavour and firm texture which is perfect for crumbling, slicing or grating.

      This recipe is from Anneka's SBS Food online column, Bakeproof: Winter Root Vegetables. CLICK HERE for more Bakeproof recipes.

      Photography by Alan Benson.
      Roasted Root Vegetables with Herbs and Ricotta Salata
      Prep 2hrBake 40-45minMakes 12-15 serves

      This impressive cake was created by Débora Bueno Leite, one of our Make Me a Baker students, for her graduation. It marries two gems from the state of Minas Gerais in her native Brazil, guava paste and cheese – when served together they are known as ‘Romeo & Juliet'.

      Ingredients

      • 250ml (1 cup) milk combined with 2 tablespoons sweetened condensed milk
      • 11 guava macarons, to decorate

      Cake layers

      • Melted butter, to grease
      • 375g (2½ cups) plain flour
      • 2½ teaspoons baking powder
      • ½ teaspoon table salt
      • 250g butter, at room temperature
      • 440g (2 cups) caster sugar
      • 1 teaspoon natural vanilla extract or essence
      • 4 eggs, at room temperature
      • 250ml (1 cup) full-cream milk

      Guava Filling

      • 200g good-quality guava paste (available from good delicatessens and specialty food stores)
      • 125ml (½ cup) water

        Cream Cheese Filling

        • 300g cream cheese, at room temperature
        • 200ml cold thickened cream
        • 160ml (2/3 cup) sweetened condensed milk

        Cream Cheese Frosting 

        • 680g cream cheese, at room temperature
        • 115g unsalted butter, at room temperature
        • 240g icing sugar, sifted
        • 2 teaspoons natural vanilla extract or essence
        • Queen red food colour gel, to tint

        Method

        1. Preheat oven to 180°C (160°C fan-forced). Grease two deep 20cm round cake tins with melted butter and line the bases with non-stick baking paper.  
        2. Sift together the flour, baking powder and salt into a medium bowl. Set aside.
        3. Use an electric stand mixer fitted with a paddle attachment to beat the butter, sugar, and vanilla for about 8 minutes, scraping down the side of the bowl when necessary, or until pale and creamy.
        4. Add the eggs, one at a time, beating well after each addition and scraping down the side of the bowl when necessary, until well combined.
        5. Add the flour mixture in four equal portions, alternating with the milk in three portions, mixing on lowest possible speed until just incorporated before adding the next; do not overmix.
        6. Divide the batter into the prepared tins and use the back of a metal spoon to smooth the surface. Bake in preheated oven, swapping the tins around halfway through baking, for 40-45 minutes or until a skewer inserted into the centre of the cakes comes out clean.
        7. Transfer the cake tins to a wire rack and allow the cakes to cool completely in the tins. Once cool, cover each tin tightly with plastic wrap and refrigerate overnight.
        8. To make the Guava Filling, combine with guava paste and water in a small saucepan and stir over medium heat until the paste is creamy. Set aside to cool completely.
        9. To make the Cream Cheese Filling, use an electric mixer with a paddle attachment to beat the cream cheese for about 3 minutes or until soft and creamy; set aside. Whisk the cream with a balloon whisk or electric mixer with a whisk attachment in a clean bowl until soft peaks form. Add the cream cheese with the condensed milk and whisk until just combined and smooth. Set aside.
        10. To make the Cream Cheese Frosting, use an electric mixer fitted with a paddle attachment to beat the cream cheese for about 3 minutes or until smooth and creamy; transfer to another bowl and set aside. Beat the butter about 3 minutes or until pale and creamy. Add the cream cheese, icing sugar and vanilla and beat until well combined and frosting is creamy.
        11. Remove the cakes form the tins. Cut each cake layer in half horizontally and then brush with the milk and sweetened condensed milk mixture to moisten. Place one layer on a serving plate or cake stand and spread with some of the Cream Cheese Filling and then one third of the Guava Filling. Continue layering with the remaining cake layers, Cream Cheese Filling and Guava Filling, finishing with a cake layer, top side down.
        12. Spread the side and top with Cream Cheese Frosting to cover, using a spatula or cake scraper to smooth evenly.
        13. Add a little red gel colour to the remaining Cream Cheese Frosting and swirl so that it is marbled. Place in a piping bag fitted with a small star nozzle (Débora used a Wilton #18 star) and pipe small rosettes around the side and top of the cake (as shown in the image). Place the macarons between the rosette on the top to decorate.

        Baker's Tips

        • This cake will keep in an airtight container in the fridge for up to 3 days. Serve at room temperature. 

        This recipe was created by Débora for her Make Me a Baker graduation using inspiration from a number of different recipes including those from www.howtocakeit.com, Gretchen’s Bakery YouTube channel, Karen Munhoz  YouTube channel and a class she took with MakMak Macarons.

        Photography by Amy Piddington.

        Romeo & Juliet Cake
        Prep 40minBake 8-10min (per batch)Makes 40

        This recipe was created by Débora Bueno Leite, one of our Make Me a Baker students, as part of her graduation recipe – an impressive Romeo & Juliet Cake. The Macaron base is based on a recipe from a class she attended with MakMak Macarons, with the guava and cream cheese fillings her own creation to match the flavours of her cake which was inspired by a traditional pairing of guava and cheese known as ‘Romeo and Juliet’ in her native Brazil.

        Ingredients

        • 135g almond meal
        • 135g pure icing sugar
        • 2g red food colouring (water-based such as Queen Pillar Box Red)
        • 145g egg whites (divided into 2 parts of 50g and 95g)
        • 250g white sugar 60g water

          Guava Filling

          • 200g good-quality guava paste (available from good delicatessens and specialty food stores)
          • 125ml (½ cup) water

            Cream Cheese Filling

            • 300g cream cheese, at room temperature
            • 200ml cold thickened cream
            • 160ml (2/3 cup) sweetened condensed milk

              Method

              1. Preheat oven to 170°C (150°C fan-forced). Line 2-3 large baking trays with non-stick baking paper.
              2. Combine almond meal and pure icing sugar in a bowl and mix well. Pass this mix through a fine sieve.
              3. In a separate bowl, combine the red food colouring with 50g portion of egg whites. Add to the sifted almond meal and icing sugar and mix well until it becomes a homogenous paste (macaronage). Place the remaining 95g egg whites in the bowl of a stand mixer.
              4. In a small saucepan combine the white sugar and water. Stir over medium heat until the sugar dissolves completely and then bring to the boil. As soon as the mixture reaches 114°C on a sugar thermometer, start whisking the 95g portion of egg whites with a whisk attachment until soft peaks form.
              5. As soon as the sugar syrup reaches 118°C (soft ball stage), add to the egg whites in a steady steam, whisking constantly. Continue to whisk until the meringue cools so that the bowl is just warm to the touch.
              6. Weigh 190g of the finished meringue (use the remaining meringue can be used for another purpose). Add one-third of the 190g meringue portion into the red paste and mix well until it is evenly combined. Add the remaining two-thirds of the meringue to the coloured meringue mixture and fold gently together, making sure you scrape the bottom of the bowl, until just evenly combined (see Baker’s Tips).
              7. Transfer the batter into a piping bag fitted with a 1cm plain nozzle. Pipe rounds of batter ( about 4cm in diameter) onto the trays, leaving 2cm between each round. Tap the tray quite firmly on the bench to remove the air bubbles and settle the batter.
              8. Bake one tray of macarons at a time in the centre of the oven for 8-10 minutes. The macarons are ready when they no longer wobble when gently touched. Bake for another 1-2 minutes before testing again if necessary.
              9. Remove from oven and allow the macaron shells to cool completely on the trays.
              10. To make the Guava Filling, combine with guava paste and water in a small saucepan and stir over medium heat until the paste is creamy. Set aside to cool completely. Transfer the Guava Filling to a piping bag fitted with a 1cm plain nozzle. Set aside.
              11. To make the Cream Cheese Filling, use an electric mixer with a paddle attachment to beat the cream cheese for about 3 minutes or until soft and creamy; set aside. Whisk the cream with a balloon whisk or electric mixer with a whisk attachment in a clean bowl until soft peaks form. Add the cream cheese with the condensed milk and whisk until just combined and smooth. Transfer the Guava Filling to a piping bag fitted with a 1cm plain nozzle. Set aside.
              12. Carefully remove the shells from the trays and pair each with a like-sized shell. Pipe the guava paste onto the centre of a macaron shell and then pip the Cream Cheese Frosting around it. Sandwich with the paired macaron. Repeat with the remaining macarons and fillings.
              13. Place in an airtight container and refrigerate overnight before serving.

              Baker's Tips

              • When combining the meringue mixture with macaronage be careful not to over mix as it will ruin the rise of the shells. Once the batter looks evenly streaked by meringue and macaronage you will be about two-thirds of the way to competing the mixing and it is a good idea to slow down at this stage so you don’t overmix. Once evenly combined, the batter should not be shiny – if it is shiny, you have overmixed it.


              Photography by Amy Piddington.

              Romeo & Juliet Macarons
              Prep 30min (+ 1hr chilling time)Bake 15-20min (per batch)Makes about 80

              Along with lemon, these melt-in-the-mouth biscuits are scented with rosemary’s distinct, yet subtle, earthy and slightly sweet flavour. The clever imprinting of rosemary sprigs of the dough gives a gorgeous finish to these sweet, buttery mouthfuls.

              Ingredients

              250g (9oz) salted butter, cubed and softened slightly
              165g (¾ cup/5¾oz) granulated white sugar, plus 2 tablespoons extra to sprinkle
              1 egg yolk
              335g (2¼ cups/8¼oz) plain flour
              1½ tablespoons finely chopped fresh rosemary (see Baker’s Tips)
              1 lemon, rind finely grated
              Small rosemary sprigs, to imprint biscuits

              Method

              1. Line 3 large oven trays with baking paper.
              2. Use an electric mixer with a paddle attachment to beat the butter and sugar for about 1 minute or until starting to become pale and creamy but not too aerated (do not over beat). Beat in the egg yolk, rosemary and lemon until just combined.
              3. Add the flour to the butter mixture and beat on low speed until just combined and a soft dough forms.
              4. Divide the dough in half and shape each portion into a disc about 2cm/¾in thick. Wrap separately in plastic wrap and place in the fridge for 30 minutes to chill.
              5. Use a lightly floured rolling pin to roll a portion of dough out on a lightly floured bench top until 4mm/⅛in thick. Arrange the rosemary sprigs over the dough and lightly roll over with the rolling pin to imprint. Remove the rosemary sprigs and reserve. Use a 4.5cm/1¾in fluted round biscuit cutter to cut the dough into rounds and place on the lined trays, re-rolling, imprinting and cutting out any off cuts. Repeat with the remaining portion of dough. Sprinkle the biscuits liberally with the extra sugar.
              6. Place the trays in the fridge for 30 minutes to chill.
              7. Preheat oven to 170°C/340°F (150°C/300°F fan-forced)
              8. Bake 2 trays of the biscuits in preheated oven for 15-20 minutes, swapping the trays around half way through baking, or until pale golden and cooked through. Cool on the trays. Repeat with the remaining tray of biscuits, baking in the centre of the oven.

              Baker's Tips

              • Chopping the rosemary with a pinch of sugar will help bring out its aromatic flavours.
              • These biscuits will store in an airtight container at room temperature for up to week.


              This recipe is from Anneka's SBS Food online column Bakeproof: Christmas Baking with Fresh Herbs. Click here for more Bakeproof columns and recipes.


              Photography by Alan Benson.

              Rosemary & Lemon Sables
              Prep 10min (+30min cooling time)Bake 35-40minMakes 300g ( 10½oz)

              These aromatic and extremely more-ish nuts bring together rosemary, orange, cumin and salt in a wonderful combination. They are dead-easy to whip up and are a great accompaniment to an evening drink or make the perfect edible gift.

              Ingredients

              1 tablespoon (4 teaspoons) dark brown sugar
              1 tablespoon (4 teaspoons) finely shredded orange zest
              1½ teaspoons ground cumin
              1½ teaspoons sea salt flakes, lightly crushed
              ½ teaspoon freshly ground black pepper
              300g (10½oz) unsalted raw cashews
              ½ teaspoon olive oil
              1 tablespoon (4 teaspoons) finely chopped rosemary

              Method

              1. Preheat oven to 150°C/300°F (130°C/265°F fan-forced). Line a large oven tray with non-stick baking paper.
              2. Combine the sugar, orange zest, salt, cumin, salt and pepper in a medium bowl and toss to combine evenly. Rinse the cashews in a colander under running water and shake off any excess water. Add to the sugar mixture and toss to combine evenly.
              3. Heat the olive oil and rosemary in a small saucepan over low heat for 1 minute or until aromatic. Pour over the nut mixture and toss to combine evenly. Spread on the lined tray in a single layer.
              4. Bake in preheated oven for 35-40 minutes, tossing the nuts every 10 minutes, until aromatic and the nuts are a deep golden. Cool the nuts on the tray (this will take about 30 minutes) before serving or storing.

              Baker's Tip

              • These nuts will keep in an airtight jar or container in a cool dark spot for up to 3 weeks.
              Rosemary-spiced Cashews
              Prep 1hr (+2hr cooling time)
              Bake 1hr 35min
              Makes 8 serves

              Delicately flavoured with rosewater, these individual pavlovas make a divine create-your-own dessert. Those who prefer a slightly more casual approach to assembly can opt for an Eaton mess. Simply crush the pavlovas and layer the individual elements in a glass instead!

              Ingredients

              lime wedges, to serve

              Rosewater pavlovas

              3 egg whites, at room temperature

              165g (¾ cup) caster sugar

              2 teaspoons cornflour, sifted

              2 teaspoons rosewater

              Vanilla-roasted red fruits

              500g trimmed rhubarb (about 2 bunches), cut into 6 cm lengths

              2 x 250g punnets small strawberries, hulled

              2 vanilla beans, split lengthways

              150g (â…” cup) caster sugar

              Yoghurt cream

              125ml (½ cup) thickened cream, whipped to firm peaks

              130g (½ cup) thick Greek-style natural yoghurt

              Toffee pistachios

              110g (½ cup) caster sugar

              60ml (¼ cup) water

              75g unsalted pistachio kernels, toasted

              Method
              1. To make the rosewater pavlovas, place the oven rack in the lower third of the oven and preheat it to 110°C. Line an oven tray with non-stick baking paper. Use an electric mixer with a whisk attachment to whisk the egg whites in a large bowl on medium-high speed until soft peaks form. With the motor running, add the sugar a spoonful at a time, whisking well after each addition, until all the sugar has dissolved and the mixture is very thick and glossy (this will take 4-5 minutes). Add the cornflour and rosewater and whisk to combine. Use a spatula to stir the meringue mixture to ‘loosen’ it slightly (this will get rid of any excess air in the mixture and give it a smoother, less ‘foamy’ texture). Use two metal tablespoons to spoon 8 ovals of the meringue mixture on to the lined tray and use the back of a spoon to make in an indent in the centre of each. Bake in the lower third of the preheated oven for 1 hour 15 minutes, until the meringue is crisp and hard to touch, but not coloured. Turn off the oven, leave the door slightly ajar and cool it completely in the oven (this will take about 2 hours).
              2. To make the toffee pistachios, line an oven tray with non-stick baking paper. Combine the caster sugar and water in a small saucepan and use a wooden spoon to stir over low heat until the sugar dissolves. Increase the heat to medium and bring to the boil. Boil for 8-10 minutes, brushing down the side of the pan with a pastry brush dipped in water to dissolve any sugar crystals, until the mixture turns a deep caramel. Pour immediately onto the lined tray and then sprinkle with the pistachios. Lightly tap the tray 2-3 times on the bench top to settle the pistachios into the toffee and then set aside to cool completely (this will take about 30 minutes). When cool, use the end of a rolling pin to pound the toffee into coarse chunks.
              3. To make the vanilla-roasted red fruits, preheat the oven to 200°C (180°C fan-forced). Rinse the rhubarb and shake off any excess water. Place in a bowl with the strawberries and sugar. Use a small sharp knife to scrape the seeds from the vanilla bean. Add the bean and the seeds to the rhubarb mixture and toss to combine. Transfer to an ovenproof dish just large enough to hold the fruit in a single layer and cover with foil. Bake in preheated oven for 18-20 minutes or until the rhubarb is just tender and still holding its shape. Remove the foil and set aside to cool.
              4. To make the yoghurt cream, fold together the whipped cream and yoghurt.
              5. To serve, place the pavlovas, toffee pistachios, roasted fruit, yoghurt cream and lime wedges in the centre of the table for guests to assemble their own dessert.
              Baker's Tips
              • The rosewater pavlovas will keep in an airtight container at room temperature for up to 1 week.
              • The vanilla-roasted red fruit will keep in an airtight container in the fridge for up to 3 days. Serve at room temperature.
              • The toffee pistachios will keep in a sealed jar or airtight container at room temperature for up to 1 month. You may have to pound again to break up before serving.

              Photography by Alan Benson. Styling by Jane Hann. 
              Rosewater Pavlovas with Vanilla-Roasted Red Fruits & Toffee Pistachios
              Prep 40min (+20min cooling and 2.5hr chilling)Bake 15minMakes 6 serves

              These little layered cakes are the sweetest hats you'll find. Made up of custard cream and a chocolate topping they are covered in shredded coconut for a little texture but you can also use nuts as well, if you have them handy. They are best served chilled and if you aren't much for a dessert fork, then eating these with your hands like a cupcake is absolutely acceptable!

              Ingredients

              • 100g (1½ cups) shredded coconut, to coat

              Sponge Layers

              • melted butter, to grease
              • 4 eggs, at room temperature
              • 165g (¾ cup) caster sugar
              • 2 tablespoons boiling water
              • 2 tablespoons vegetable oil
              • 100g (â…” cup) self-raising flour, sifted
              • 2 tablespoons cocoa powder mixed to a paste with 60 ml (¼ cup) boiling water and cooled

              Custard cream

              • 1 tablespoon cornflour
              • 1 tablespoon custard powder
              • 2 tablespoons caster sugar
              • 200ml milk
              • 20g butter, cubed
              • 1 egg yolk
              • 1½ teaspoons natural vanilla essence or extract

              Chocolate glaze

              • 50g dark chocolate, chopped
              • 2 teaspoons vegetable oil

              Method

              1. To make the custard cream, sift together the cornflour and custard powder into a small saucepan. Add the sugar and then use a balloon whisk to gradually stir in the milk. Place the saucepan over a medium heat and cook, stirring frequently, until the mixture boils and thickens. Remove from the heat and stir in the butter, egg yolk and vanilla until well combined. Pour into a medium bowl, cover the surface of the custard directly with a piece of plastic wrap and set aside to cool (this will take about 2 hours).
              2. To make the sponge layers, preheat oven to 180°C (160°C fan-forced). Brush two 16 x 26 cm shallow cake tins with a little melted butter to lightly grease and then line the base and two long sides of each with one piece of non-stick baking paper.
              3. Use an electric mixer with a whisk attachment on high speed to whisk the eggs and sugar in a large bowl until the mixture is very thick and pale (this will take 5-8 minutes). Lift the whisk out of the mixture and draw a figure eight, if the trail stays on the surface long enough for you to finish drawing then the mixture is ready. If not, continue to whisk for a further minutes and then test again.
              4. Combine the boiling water and oil. Sift the flour over the egg mixture. Immediately pour the warm water and oil mixture down the side of the bowl and use a spatula to fold until just evenly combined (be careful not to overmix).
              5. Pour half of the mixture into one of the prepared cake tins. Add the cocoa paste to the mixture still in the bowl and fold together until just combined. Pour into the second cake tin. Gently tap the tins on the bench top three times to settle the mixture. Bake in preheated oven for 12-15 minutes or until the cakes spring back when lightly touched in the centre and start pulling away from the sides of the tins. Stand the cakes in the tins for 2 minutes before turning onto a wire racks to cool completely.
              6. To assemble, use a 6 cm round cutter to cut each of the Sponge cakes into 6 rounds. Place the round cutter over a chocolate sponge. Top the chocolate sponge round with about 1 tbsp of the Custard cream and then cover with around of plain sponge. Remove the pastry cutter. Repeat with the remaining chocolate and plain sponge rounds and 1 tbsp of Custard cream for each cake to make 6 layered cakes in total. Spread the sides of the cakes with the remaining Custard cream. Roll the sides of the cakes in the coconut to coat and place on a serving plate. Place in the fridge while making the Chocolate glaze.
              7. Place the chocolate and oil in a heatproof bowl. Place over a saucepan of simmering water, stirring occasionally, until melted and smooth. Carefully spread about 1 tsp of the Chocolate glaze over the tops of each of the cakes to cover. Return the cakes to the fridge for 30 minutes or until the Chocolate glaze is set. Serve chilled.

              Baker's Tips

              These cakes will keep in an airtight container in the fridge for up to 2 days.

              This recipe is from Anneka's SBS Food online column, Bakeproof: Bosnian Baking.
              CLICK HERE for more Bakeproof recipes.

              Photography by Alan Benson.
              Russians' Hats (Ruske Kape)
              Prep 40min (+1hr cooling and 2hr standing time)Bake 30minMakes 10-12 serves

              Possibly the most famous cake in the world, and certainly the pride of Austria, Sacher Torte was created by Franz Sacher, a 16-year-old apprentice stepping in for an ill head chef, to impress the guests of Prince Wenzel von Metternich. And as they say, the rest is now cuisine history. This elegant, rich and enticing cake is now loved the world over.

              Ingredients

              Melted butter, to grease
              125g unsalted butter, softened
              125g (1 cup) icing sugar, sifted
              1½ teaspoons natural vanilla essence or extract
              6 eggs, at room temperature, separated
              175g good-quality dark chocolate (54% cocoa), chopped, melted and cooled to room temperature
              110g (¾ cup) plain flour
              110g (½ cup) caster sugar
              85g (¼ cup) apricot jam, warmed and sieved
              40g good-quality milk chocolate, melted, to decorate
              Thick or whipped cream, to serve

              Chocolate Glaze
              300g good-quality dark chocolate (54% cocoa)
              60g butter, cubed

              Method
              1. Preheat oven to 180°C (160°C fan-forced). Brush 2 x shallow 20cm round cake tins with melted butter to grease and line the bases with rounds of non-stick baking paper.
              2. Use an electric mixer to beat the butter, icing sugar and vanilla until pale and creamy. Add the egg yolks and beat until well combined and creamy. Beat in the cooled melted chocolate until well combined. Use a large metal spoon or spatula to fold in the flour until just combined.
              3. Use an electric mixer with a whisk attachment to whisk the egg whites in a large clean, dry bowl until soft peaks form. Add the caster sugar and whisk on medium-high speed until thick and glossy and all the sugar has dissolved (see Baker’s tip). Add half the egg white mixture to the chocolate mixture and use a large metal spoon or spatula to fold in to ‘loosen’ the mixture. Add the remaining egg white mixture and fold until just evenly combined.
              4. Divide the mixture evenly between the tins and use the back of a spoon to smooth the surface. Bake in preheated oven for 30 minutes or until a skewer inserted into the centre of the cakes comes out clean. Stand in the tins for 10 minutes before turning onto a wire rack to cool (this will take about 1 hour).
              5. Once cool, spread one cake layer with the warmed sieved jam and then top with the second layer, bottom side up. Place the cake on a wire rack over a tray and set aside while making the chocolate glaze.
              6. To make the chocolate glaze, combine the chocolate and butter in a heatproof bowl and place over a saucepan of barely simmering water (make sure the base of the bowl doesn’t touch the water). Stir occasionally until just melted and combined. Use a plate knife to spread a little of the glaze over the outside of the cake to form a ‘crumb coat’ and to even the surface. Place in the fridge for 20 minutes or until set. Remove from the fridge and carefully pour over the rest of the glaze, allowing it to run down the sides of the cake to coat evenly. Tap the cake, still on the rack, gently on the tray to remove any air bubbles and to settle the glaze. Use a fork to drizzle the milk chocolate over the top of the cake to decorate. Set aside for 2 hours or until the glaze sets. Serve cut into small wedges with cream.
              Baker’s Tips
              • To test if all the sugar has dissolved, rub a little of the egg white and sugar between two fingers – you will be able to feel if there is still undissolved sugar. Whisk for another minute if not completely dissolved before testing again.
              • This cake will keep in an airtight container at room temperature for up to 4 days.

              This recipe is from Anneka's SBS Food online column, Bakeproof: Austrian Baking. 

              CLICK HERE for more Bakeproof columns and recipes. 

              Photography by Alan Benson.

              Sacher Torte
              Prep 30min (+10min chilling time)
              Bake 12min (per batch)
              Makes about 36

              These clever cookies are the hybrid of a brownie and a chocolate chip cookie – dark, rich and chewy on one side and crisp, simple and familiar on the other. The perfect cookie really!

              Ingredients

              Chocolate chip cookie dough

              125g butter, softened

              110g (½ cup) granulated white sugar

              55g (¼ cup, firmly packed) brown sugar

              1 teaspoon natural vanilla essence or extract

              1 egg, at room temperature

              185g (1¼ cups) plain flour

              ½ teaspoon baking powder

              125g good-quality dark chocolate chips or coarsely chopped chocolate (45-54% cocoa)

              Salted peanut brownie dough

              125g good-quality dark chocolate (45-54% cocoa), chopped

              100g butter, cubed

              165g (¾ cup, firmly packed) brown sugar

              1 egg, at room temperature

              1 teaspoon natural vanilla essence or extract

              150g (1 cup) plain flour

              ½ teaspoon bicarbonate of soda

              100g salted roasted peanuts

              Method
              1. Preheat the oven to 180°C (160°C fan-forced). Line a large oven tray with non-stick baking paper.
              2. To make the Chocolate Chip Cookie Dough, use an electric mixer to beat the butter, sugar and vanilla until pale and creamy. Add the egg and beat well. Sift together the flour and baking powder, add to the butter mixture with the chopped chocolate and mix on the lowest possible speed until just evenly combined. Cover and place in the fridge while making the salted peanut brownie dough.
              3. To make the Salted Peanut Brownie Dough, put the dark chocolate and butter in a medium heatproof bowl over a saucepan of simmering water (make sure the base of the bowl doesn’t touch the water). Use a metal spoon to stir occasionally over low heat until just melted and smooth. Transfer to a large bowl and cool slightly. Use a balloon whisk to stir the sugar, egg and vanilla into the chocolate mixture until well combined. Sift together the flour and bicarbonate of soda, add to the chocolate mixture with the peanuts and use a wooden spoon to stir until evenly combined. Cover and place in the fridge to chill for 10 minutes or until the same consistency as the chocolate chip cookie dough.
              4. Take half a tablespoonful of both doughs and roll them together into a ball, keeping the different colours separate. Place on the lined tray, with the join between the two doughs running down the centre. Flatten to about 4cm in diameter and 1cm thick. Repeat to fill the tray, leaving about 5cm between the cookies.
              5. Bake in for 12 minutes or until the chocolate chip half is golden and cooked through and the brownie halves are still slightly soft to touch. Cool on the tray. Repeat with the remaining cookie doughs in two more batches.
              Baker's Tips
              • These cookies will keep in an airtight container at room temperature for up to 5 days – the longer they are kept the softer they will become. 


              Photography by Alan Benson.

              This recipe is from Anneka's SBS Food online column, Bakeproof: Brownies.
              CLICK HERE for more Bakeproof columns and recipes.

              Salted Peanut Brookies
              • 1
              • …
              • 12
              • 13
              • 14
              • 15
              • 16
              • …
              • 18

              Follow @bakeclub_australia on Instagram

              Our partners

              SUBSCRIBE!
              contact us
              • info@bakeclub.com.au

              • FOLLOW US
              CUSTOMER INFORMATION
              • FAQ
              • Terms of Use
              • Privacy Policy
              • Terms of Service
              • Refund policy

              © 2025 BakeClub. All Rights Reserved.

              Site by Fruitful Creative.