
- home
- Products
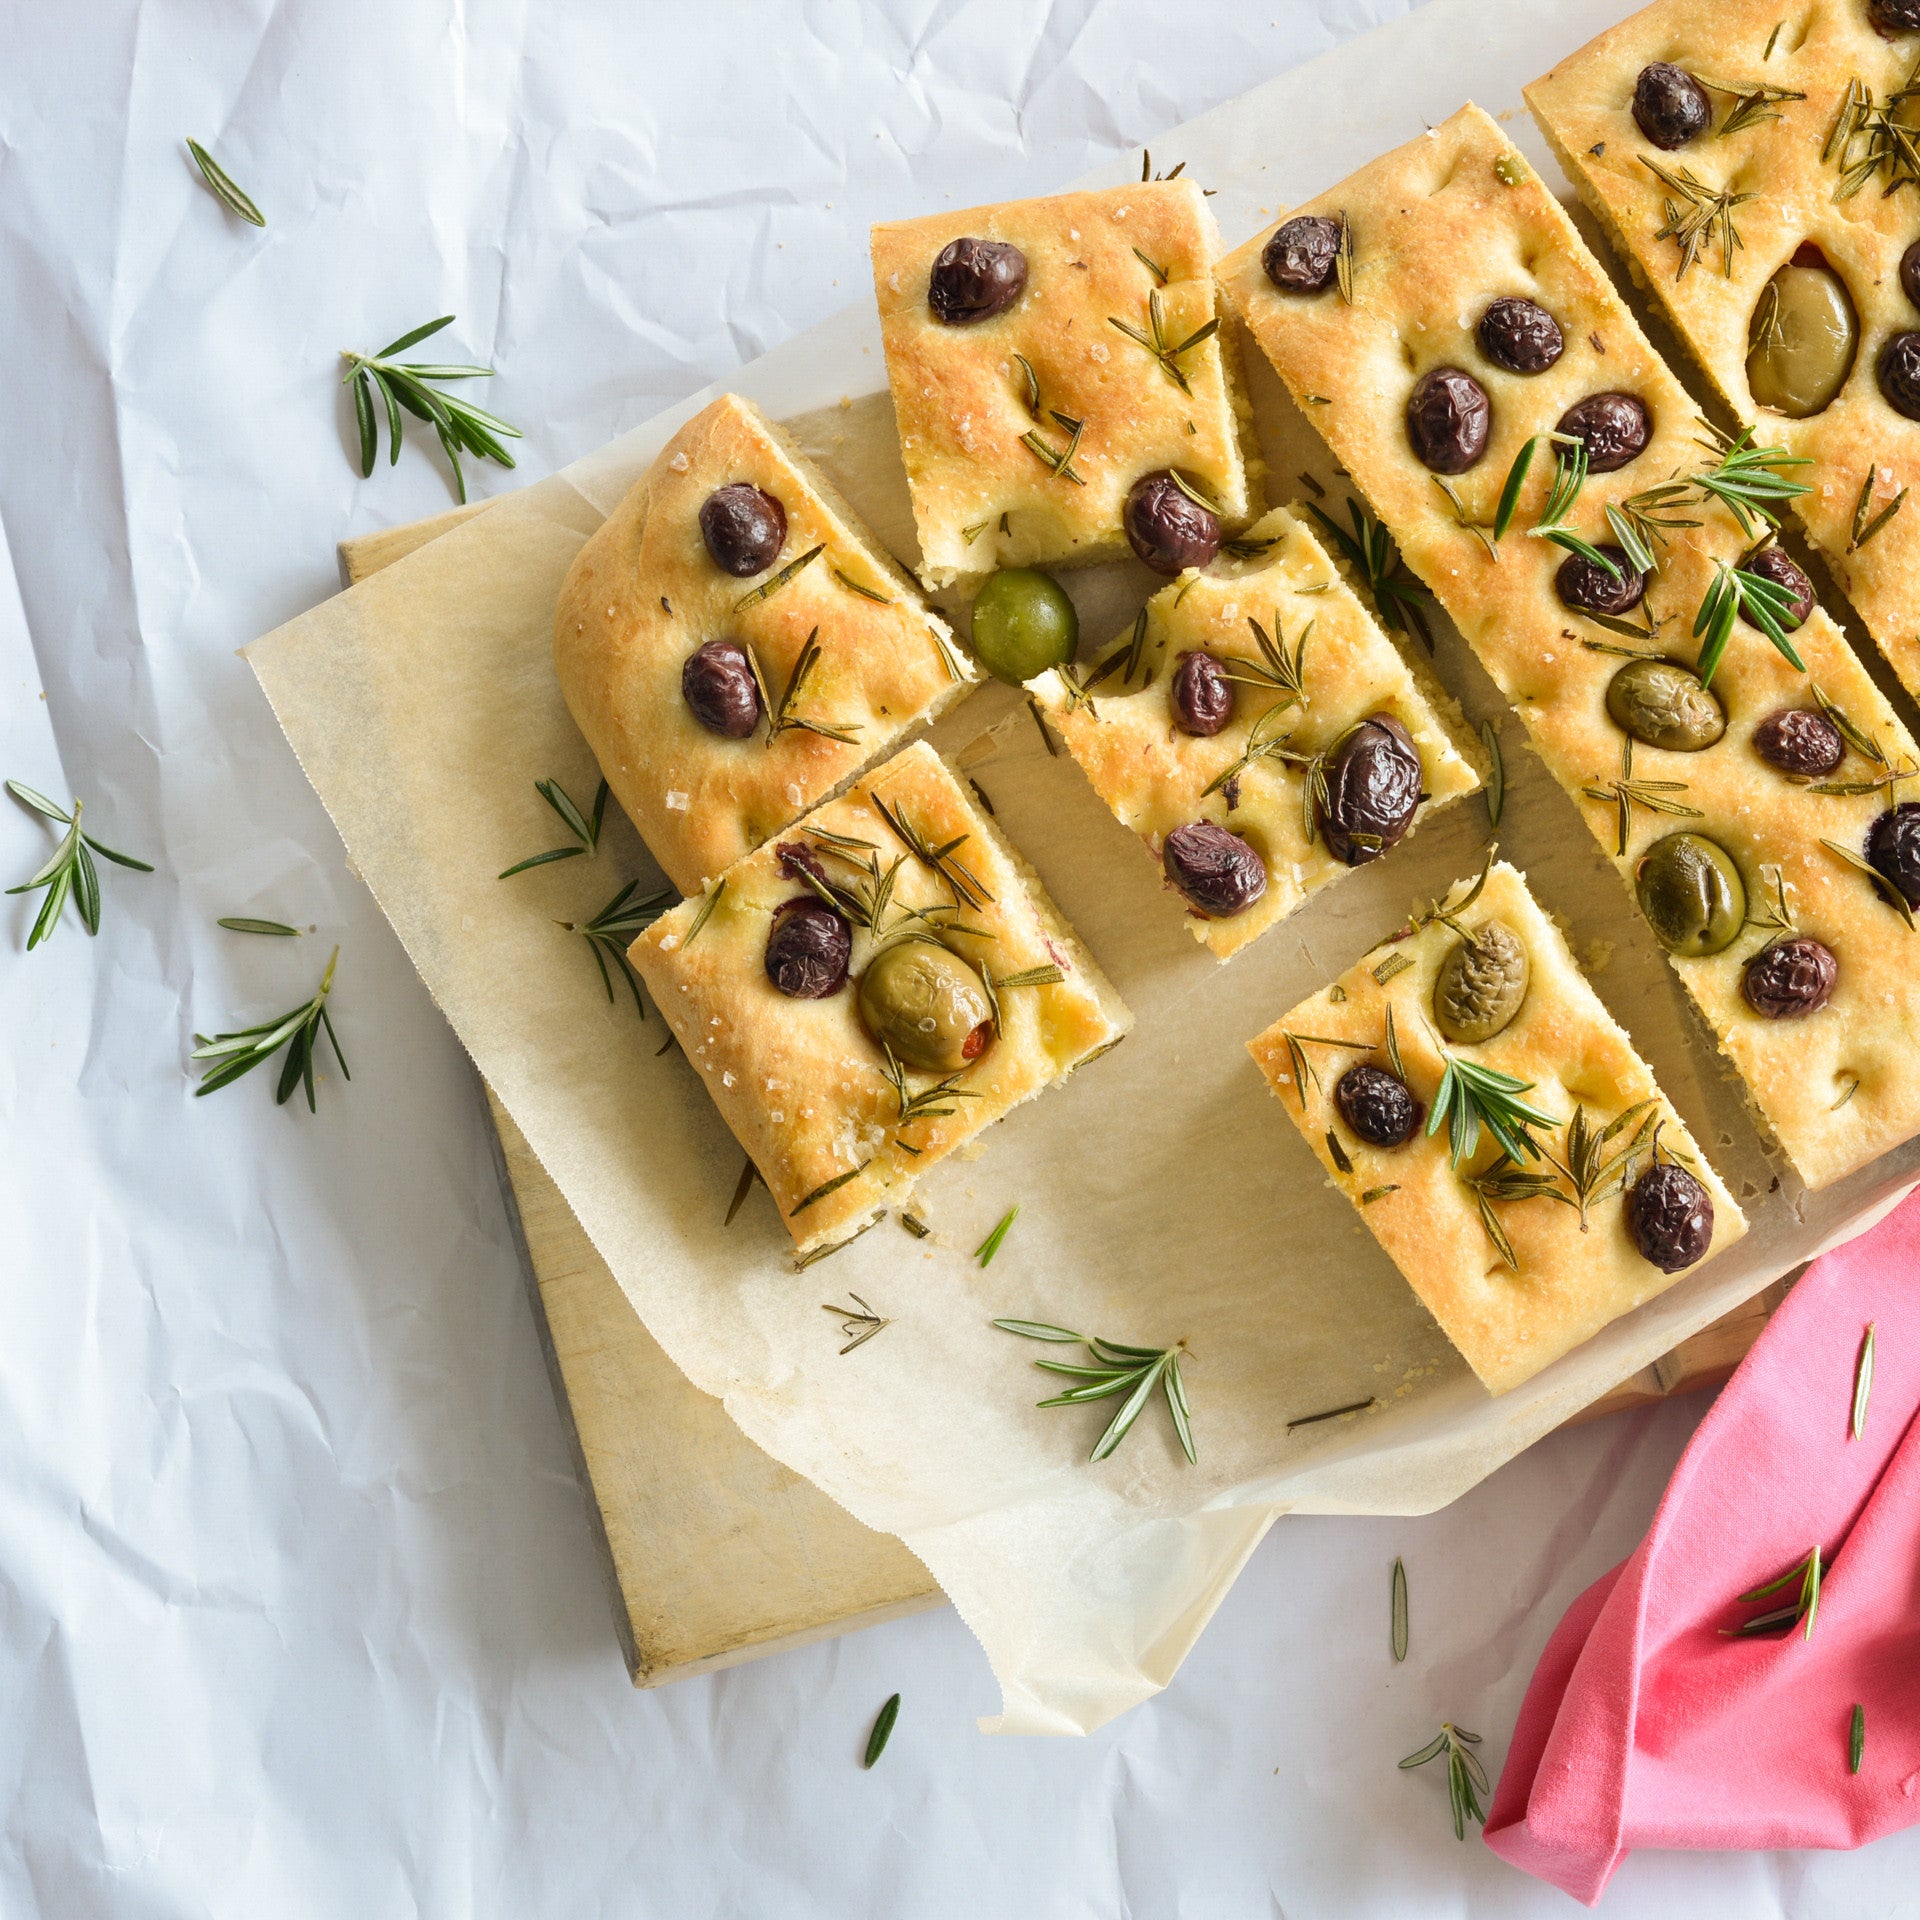
Prep 25min (+ 1hr 30min proving time)Bake 25minMakes 8-10 serves
Predecessor to the modern pizza, focaccia is a simple Italian flatbread that was associated with Christmas Eve and Epiphany for many centuries. This savoury version, studded with fragrant rosemary and mixed olives, makes a fabulous accompaniment to a cheese board, picnic spread or soup.
Ingredients
- 600g (4 cups) strong bread or pizza flour, plus extra to dust
- 3 teaspoons instant dried yeast
- 2 teaspoons salt
- 330ml (1⅓ cups) luke warm water
- 2 tablespoons olive oil, plus extra to grease and 2 tbsp to drizzle
- 150g mixed olives
- 2 tablespoons fresh rosemary leaves
- sea salt flakes, to sprinkle
Method
- To make the dough, combine the flour, yeast and salt in a large bowl and make a well in the centre. Combine the water and oil, add to the flour mixture and use a wooden spoon and then your hands to mix to a soft dough.
- Turn the dough onto a lightly floured surface and knead for 5-8 minutes or until it is smooth and elastic and springs back when you push your finger into it. Place the dough in an oiled bowl, turning it to coat lightly with the oil. Cover with plastic wrap and place in a warm, draught-free place for 1 hour or until doubled in size.
- Line a large baking tray with baking paper.
- Knock back the dough by punching it in the centre with your fist. Turn the dough onto the lined tray and use your hands to press down on it, and to pull and stretch it to form a rough rectangle about 20 cm x 30 cm and 1.5 cm thick. Use your fingertips to press into the surface of the dough to form dimples.
- Press the olives and rosemary into the surface flatbread. Drizzle with the extra olive oil and then sprinkle with the salt.
- Set aside in a warm draught-free place for 30 minutes or until risen slightly.
- Preheat the oven to 220°C (200°C fan-forced).
- Bake in the centre of the preheated oven for 25 minutes or until golden and cooked through. Serve warm or at room temperature.
Baker's Tips
- This focaccia is best eaten the day it is baked.
This recipe is from Anneka's SBS Food online column, Bakeproof: Yeast-leavened Flatbreads. CLICK HERE for more Bakeproof recipes.
Photography by Alan Benson.
Prep 30min (+20min resting time)Bake 16-18minMakes about 8
Just like the ones you buy, these thin, crisp wafers are the perfect addition to any cheese board. Serve them alongside a soft washed-rind cheese, soft feta, nutty cheddar or any number of dips, such as beetroot or baba ghanoush.
Ingredients
- 225g (1½ cups) plain bread or pizza flour
- 1 teaspoon sea salt, crushed plus extra to sprinkle
- 125ml (½ cup) water
- 60ml (¼ cup) olive oil, plus extra to roll
- 2 teaspoons sesame seeds, to sprinkle
Method
- Preheat oven to 180°C (160°C fan forced). Line 2 large oven trays with non-stick baking paper.
- Combine the flour and salt in a large mixing bowl and make a well in the centre. Combine the water and olive oil, add to the flour mixture and use a wooden spoon and then your hands to mix to a soft dough.
- Turn the dough onto a lightly floured surface and knead for 1 minute or until smooth, elastic and bounces back when you press your finger into it. Wrap the dough in plastic wrap and set aside for 20 minutes to rest.
- Divide the dough into 8 portions and roll each in a little extra olive oil to coat lightly. Use your hands to flatten a portion into a rough rectangle and then use a rolling pin to roll out thinly and evenly into a large rectangle about 2mm thick (see Baker’s tip). Place on the lined trays. Repeat with three of the remaining dough portions. Brush the wafers with a little extra olive oil and sprinkle with extra salt and sesame seeds.
- Bake the four wafers in preheated oven for 16-18 minutes, swapping the trays around halfway through baking, or until golden and crisp. Cool on the trays. Repeat with the remaining four dough portions to make eight large wafers in total. Break into smaller pieces to serve.
Baker's Tips
- The more evenly you can roll the dough, the more evenly it will bake.
- These wafers will keep in an airtight container or jar at room temperature for up to 1 week
This recipe is from Anneka's SBS Food online column, Bakeproof: Savoury Crackers.
CLICK HERE for more Bakeproof recipes.
Photography by Benito Martin.

Prep 1hr (+45min cooling and 1-1hr30min chilling time)Bake 20minMakes 12-14 serves
If you're a chocoholic this cake is heaven. And if you're not, it's still heaven! Wickedly rich and strikingly handsome, this layered centrepiece demands attention no matter what the celebration.
Ingredients
Cake layers
melted butter, to grease
250g butter, cubed, softened
330g (1½ cups) caster sugar
3 teaspoons natural vanilla essence or extract
4 eggs
225g (1½ cups) plain flour
225g (1½ cups) self-raising flour
250ml (1 cup) milk
1 tablespoon instant coffee granules dissolved in 1 tablespoon boiling water, cooled
Dark chocolate layer
30g (¼ cup) Dutch cocoa powder, sifted and combined with 60ml (¼ cup) hot tap water, cooled
Milk chocolate layer
1½ tablespoons Dutch cocoa powder, sifted and combined with 1½ tablespoons hot tap water, cooled
Light chocolate layer
2 teaspoons Dutch cocoa powder, sifted and combined with 2 teaspoons hot tap water, cooled
Whipped chocolate ganache
500g good-quality dark chocolate (45-54% cocoa), chopped
300ml pure (pouring / thin) cream
Chocolate drip icing
100g good-quality dark chocolate (45-54% cocoa), chopped
100ml pure (think / pouring) cream
2 tablespoons corn syrup
Method
- To make the Cake layers, preheat the oven to 190°C (170°C fan-forced). Grease four shallow 20cm round cake tins with melted butter and line the bases with non-stick baking paper.
- Prepare the Dark, Milk and Light chocolate layer mixtures and set aside.
- Use an electric mixer to beat the butter, sugar and vanilla in a large mixing bowl until pale and creamy. Add the eggs one at a time, beating well after each addition (the mixture will look curdled at this stage).
- Sift together both the flours. Combine the milk and coffee mixture. Add half the flour mixture to the butter mixture and beat on lowest possible speed until just combined. Add the milk and coffee mixture and beat on lowest possible speed until just combined and then beat in the remaining flour mixture until just combined.
- Divide the cake batter between four bowls (each will have about 360 g of mixture). Add the Dark chocolate layer mixture to one portion and stir gently to combine. Add the Milk chocolate layer mixture to one portion and stir gently to combine. Add the Light chocolate layer mixture to one portion and stir gently to combine. Leave the fourth portion as it is
- Spoon each of the batters into a prepared tin and smooth the surface with the back of a spoon. Bake in preheated oven for 15 minutes. Swap the cake tins around and bake for a further 5 minutes or until a skewer inserted into the centres comes out clean.
- Stand the cakes in the tins for 5 minutes before turning onto a wire rack to cool (this will take about 30 minutes).
- To make the Whipped chocolate ganache, put the chocolate and cream in a heatproof bowl over a saucepan of simmering water (make sure the bottom of the bowl doesn’t touch the water). Stir often with a metal spoon just until the chocolate melts and the mixture is smooth. Immediately remove the bowl from the saucepan, cover with plastic wrap and place the fridge for 1-1½ hours, stirring briefly about every 5 minutes, or until cooled and thickened to a spreadable consistency. Use an electric mixer fitted with a whisk attachment to whisk the chocolate mixture in a medium bowl on low speed for 1-2 minutes or until light and fluffy (be careful not to over whisk).
- To assemble the cake, set aside about a quarter of the Whipped chocolate ganache in a bowl for piping. Place the Dark chocolate cake layer, top side down on a cake stand or serving plate. Spread evenly with about ⅓ cup of the remaining Whipped chocolate ganache. Repeat with the remaining cake layers (from darkest to lightest) with about ⅓ cup of the ganache between each. Spread the remaining buttercream over the top and sides of the cake, using a large palette knife to smooth. Place the cake in the fridge for at least 30 minutes to chill.
- To make the Chocolate drip glaze, place the chocolate in a heatproof bowl and set aside. Combine the cream and corn syrup in a small saucepan and heat over a medium heat, stirring frequently, until almost simmering. Pour over the chocolate and set aside for 1 minutes. Stir until smooth and well combined. Place in the fridge for 15 minutes, stirring occasionally, until almost cooled to room temperature.
- Spoon the Chocolate drip glaze onto the center of the chilled cake and use the back of a metal tablespoon to spread to cover. Gently push some of the glaze over the edge all the way around to form a drip pattern. Set aside in a cool spot for about 15 minutes or until the glaze is set before cutting.
Baker's Tips
- This cake will keep in an airtight container at room temperature in a cool spot for up to 3 days.
How to decorate a cake with a drip glaze
There are a few things to keep in mind when creating a luscious glossy drip glaze on a cake.
Make sure the iced cake has been chilled for at least 30 minutes before decorating with the glaze as this will help the drips down the side of the cake set before reaching the base of the cake.
Gradually spoon the slightly warm (it should be slightly warmer than room temperature) glaze onto the centre of the cake, allowing it to flow naturally towards the edge.
Then use the back of a metal tablespoon to carefully ‘push’ the glaze towards the outside, smoothing the top and allowing small amounts of the glaze to flow over the edge and down the side of the cake to form a drip pattern.
The key is to take it slowly, not add too much glaze at one time and don’t push too firmly with the spoon as the drips will become large and cover more of the side of the cake than you want.
This recipe is from Anneka's SBS Food online column Bakeproof: Celebration Cakes. Click here for more Bakeproof columns and recipes.
Photography by Alan Benson.
Prep 2hr (+ cooling time)Bake 8-10minMakes 18 serves
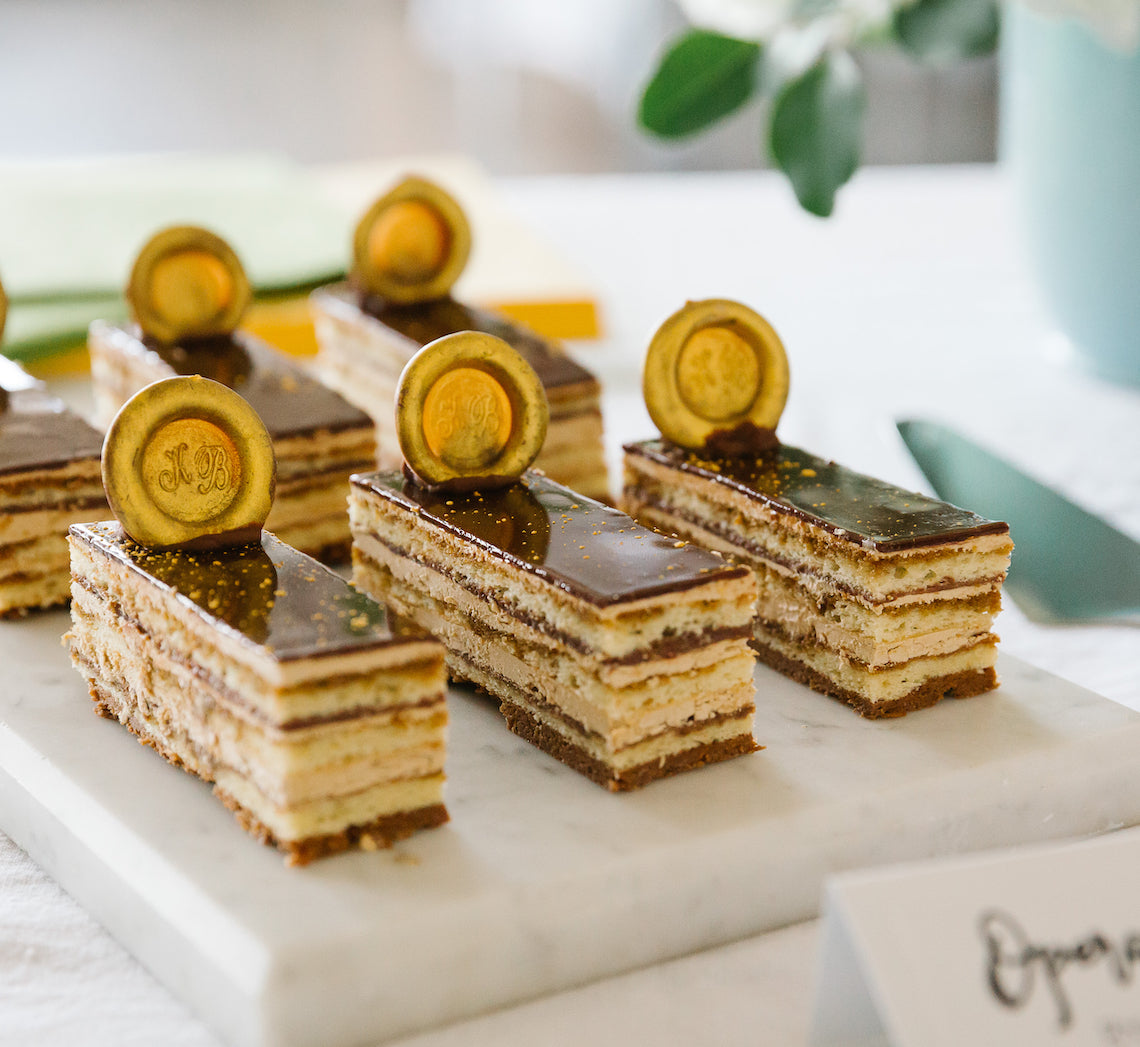
Created by Make Me a Baker student, Karthika Biju for her graduation, this stunning cake brings together numerous techniques learnt throughout the 6-month course. A real challenge, this dessert is an exquisite combination of chocolate and coffee-infused layers of almond sponge, ganache, chocolate croustillant, hazelnut praline and Swiss meringue buttercream. Karthika finished each portion of cake with gold dust and leaf and also personalised them with a chocolate disc monogramed with her initials. Not for the faint-hearted baker, this recipe is nothing short of a challenge but the results will definitely reflect the effort.
Ingredients
Edible gold leaf and dust, to decorateJoconde (Almond Sponge)
Melted butter, to grease5 eggs, at room temperature
140g almond meal
140g soft icing sugar mixture
30g plain flour
5 egg whites
30g caster sugar
¼ teaspoon salt
30g unsalted butter, melted
Coffee Syrup
160ml (2/3 cup) water100g caster sugar
3 teaspoons instant coffee powder
Hazelnut Praline Paste
125g whole raw hazelnuts75g caster white sugar
2 teaspoons water
¼ teaspoon salt
Chocolate Croustillant
40g good-quality dark chocolate (45% cocoa), chopped or callets30g Hazelnut Praline Paste
70g Paillette Feuilletine (see Baker’s Tips)
Chocolate Ganache
160g good-quality dark chocolate (45% cocoa), chopped or callets160ml (2/3 cup) thickened cream
Swiss Meringue Coffee Buttercream
4 egg whites, at room temperature200g caster sugar
1/2 teaspoon salt
250g unsalted butter, at room temperature
Coffee extract, to taste
Chocolate Glaze
6.6g gelatine leaves250ml (1 cup) chilled water
125ml (1/2 cup) room temperature water
225g caster sugar
150g good-quality dark chocolate (70% cocoa), callets or chopped
30g cocoa powder, sifted
65ml pure cream (35% butterfat)
Monogramed Chocolate Discs
70g good-quality dark chocolate (45% cocoa), callets or choppedEdible gold lustre paint (See Baker’s Tips)
Wax seal (kept in freezer for at least 45 minutes)
Joconde (Almond Sponge Cake)
- To make the Joconde, preheat the oven to 200°C (180°C fan-forced). Brush two 23cm x 33cm shallow baking trays with melted butter and line the base and sides of each with one piece of non-stick baking paper, cutting into the corners to fit.
- Sift the almond meal and icing sugar into a large bowl. Add the whole 5 eggs and use an electric hand mixer to mix until the mixture is creamy. Stir in the flour until just combined.
- Use an electric mixer with a whisk attachment on medium speed to whisk the egg whites and salt in a large clean bowl until soft peaks form. Gradually whisk in the sugar and continue to whisk until stiff peaks form. Use a spatula or large metal spoon to fold the egg whites through the almond mixture. Add the melted butter and fold gently together.
- Divide the batter evenly between the prepared tins. Bake in preheated oven for 8-10 minutes until lightly golden and cooked through. Cool in the tins.
- Carefully turn the cooled cakes onto a cutting board and cut each into one 20cm square and one 10cm x 20cm rectangle.
Coffee Syrup
- To make the Coffee Syrup, place the water, sugar and coffee into a small saucepan and stir over medium heat until the sugar dissolves. Bring to the boil then remove from heat and set aside to cool completely.
Caramel
- Place the sugar and water in a saucepan over low heat. Leave it to heat until the sugar has melted. Do not stir. Continue cooking until it has turned a golden caramel.
- Meanwhile, fill your sink with cold water. Once the caramel is ready, dip the base of the saucepan in the cold water for a few seconds to stop the cooking process. Set the pan on a towel on the bench.
Hazelnut Praline Paste
- To Make the Hazelnut Praline Paste, reduce the oven temperature to 180°C (160°C fan-forced) and roast the hazelnuts for 10-15 minutes, stirring them every 5 minutes, or until aromatic and the skins start to crackle.
- Wrap the warm hazelnuts in a tea towel and set aside to steam for 10 minutes. Use the tea towel to rub to hazelnuts against it and each other to remove the skins.
- Line an oven tray with non-stick baking paper or a silicone mat. Place the sugar and water in a small heavy-based saucepan and stir over medium heat until the sugar dissolves. Bring to a simmer and simmer over medium heat, brushing down the sides of the saucepan with a pastry brush dipped in water to remove any sugar crystals from the sides of the pan, until a deep golden toffee forms. Remove from the heat add the toasted skinned hazelnuts but don’t stir. Pour immediately onto the lined tray and set aside to cool completely.
- When the toffee is cool, break into small pieces. Add about a quarter of the toffee shards to a food processor bowl and process until ground. With the motor running, add the remining toffee shards and process until ground. Add the salt and continue to process until a smooth paste with a peanut butter consistency forms (see Baker’s Tips).
Chocolate Hazelnut Croustillant
- To make the Chocolate Croustillant, place the chocolate in a heatproof bowl and place over a saucepan of barely simmering water (don’t let the base of the bowl touch the water). Stir occasionally until melted and smooth.
- Add Pailleté Feuilletine and Hazelnut Praline Paste to the melted chocolate and stir to combine. Spread the croustillant over the 20cm square layer of sponge cake on the board. Place in the fridge to set
Chocolate Ganache
- To make the Chocolate Ganache, place the chocolate in a heatproof bowl. Heat cream in a small saucepan over medium heat and bring just to the boil.
- Pour the cream over the chocolate and set aside for 1 minute. Stir until smooth. Set aside to cool at room temperature, stirring occasionally, until it thickens to a peanut butter consistency (see Baker’s Tips).
Coffee Buttercream
- To make the Coffee Buttercream, combine the egg whites, sugar and salt in a medium heatproof bowl. Place the bowl over a pan of simmering water (don’t let the base of the bowl touch the water). Use a balloon whisk to stir until the sugar dissolves. Continue to stir until the mixture reaches 70°C on a thermometer.
- Transfer the mixture to the bowl of a stand mixer and whisk on high speed with the whisk attachment until the mixture is very thick and glossy and has cooled completely to room temperature.
- Replace the whisk with the paddle attachment and gradually add the room temperature butter a tablespoon at a time, beating well on medium-high speed after each addition, before adding the next lot. Once all the butter has been incorporated, beat in the coffee extract.
Cake Assembly
- Remove the croustillant-coated sponge cake layer from the fridge and carefully flip it onto a on a another cutting board with chocolate croustillant facing down. Brush the sponge with about a third of the coffee syrup and then spread with half of the coffee buttercream. Place the two 10cm x 20cm sponge layers side by side on top to cover and brush with half of the remaining coffee syrup.
- Reserve about 1/4 cup of the ganache and spread the sponge evenly with the remaining chocolate ganache. Top with the remaining layer of sponge cake and brush well with the remining coffee syrup. Spread with the remaining buttercream to cover and even the surface using an offset spatula or cake scraper. Cover and refrigerate the cake for at least 2 hours or overnight.
Monogramed Chocolate Discs
- Line a tray with non-stick baking paper. Remove the wax seal from the freezer and place in a bowl of ice.
- Melt the chocolate in the microwave for 10 seconds bursts on high, stirring well after each burst until the chocolate is completely melted. Spoon the chocolate into a zip-lock bag and cut a small hole in one corner. Working quickly, pipe the chocolate onto the lined try to form three discs, each about the size of a dollar coin. Immediately use the chilled wax seal to imprint the chocolate discs, holding on each for 5 seconds. Place the seal back in the ice (see Baker’s Tips) and repeat with the remaining chocolate making and imprinting three discs at a time. Set aside at room temperature to set and firm.
- Once set use a small paintbrush to paint each disc with edible lustre gold paint to coat.
Chocolate Glaze
- When ready to glaze the cake, carefully transfer the cake to a rack over a tray lined with baking paper. Return to the fridge.
- To make the Chocolate Glaze. Place the gelatine sheets in a bowl and add 250ml (1 cup) of the chilled water to cover. Set aside.
- Place the chocolate in a medium heatproof bowl. Combine the remaining 125ml (1/2 cup) water in a small saucepan with the sugar. Stir over medium heat until the sugar dissolves. Bring to the boil and boil gently, brushing down the sides of the pan with a pastry brush dipped in water to dissolve any sugar crystals, until the syrup reaches 104°C on a thermometer.
- Remove the syrup from the heat and pour over the chocolate. Stir until the chocolate melts and the mixture is smooth. Sift the cocoa powder over the chocolate mixture and use a balloon whisk to stir until combined and smooth. Add the cream and stir until the mixture cools to 60°C on a thermometer.
- Use your hands to squeeze as much water as possible from the gelatine sheets and add to the warm chocolate mixture. Stir until dissolved.
- Transfer the mixture to a jug anduse a stick blender to blend until the mixture is emulsified and smooth. Strain the glaze through a fine mesh sieve.
- Once the glaze cools to 32°C on a thermometer pour it immediately over the chilled cake to create a smooth surface, allowing any excess to drip down the sides. Refrigerate for about 1 hour or until the glaze is set.
To Serve
- Use a hot, dry knife trim the edges of the cake and then cut into 18 pieces (each about 7cm x 3cm). Transfer to a serving plate. Soften the reserved Chocolate Ganache by heating in 10 second bursts on high and stirring between each burst until smooth. Cool until almost a piping consistency. Spoon into a piping bag fitted with a small star nozzle. Pipe a rosette of ganache at the end of each cake portion and rest a Monogramed Chocolate Disc against the rosette to hold it. Decorate with gold leave and dust as desired.
Baker's Tips
- Paillette Feuilletine is fine broken shards of Crêpes Dentelle (a crisp biscuit made from rolled crêpes)and is used to add texture to confections and desserts. It is available from specialty food stores and French delicatessens.
- Edible lustre gold paint is available from specialty cake decorating shops and suppliers and some craft stores.
- The Hazelnut Praline Paste will be coarse crumbs in the beginning, but it will eventually get smooth with processing. Don’t add water to thin the mixture but a little vegetable oil can be added to reach the right consistency is needed.
- The longer the Chocolate ganache stands at room temperature the thicker it will become. It is ready to use when it becomes a peanut butter-like consistency. If left for too long, it will become too thick to spread.
- The wax seal must be left in the ice between imprinting the discs for it to work effectively and not stick to the chocolate.
Karthika based this recipe on one from https://www.homecookingadventure.com.
Prep 25min (+ 1hr cooling time)Bake 45minMakes 12 serves
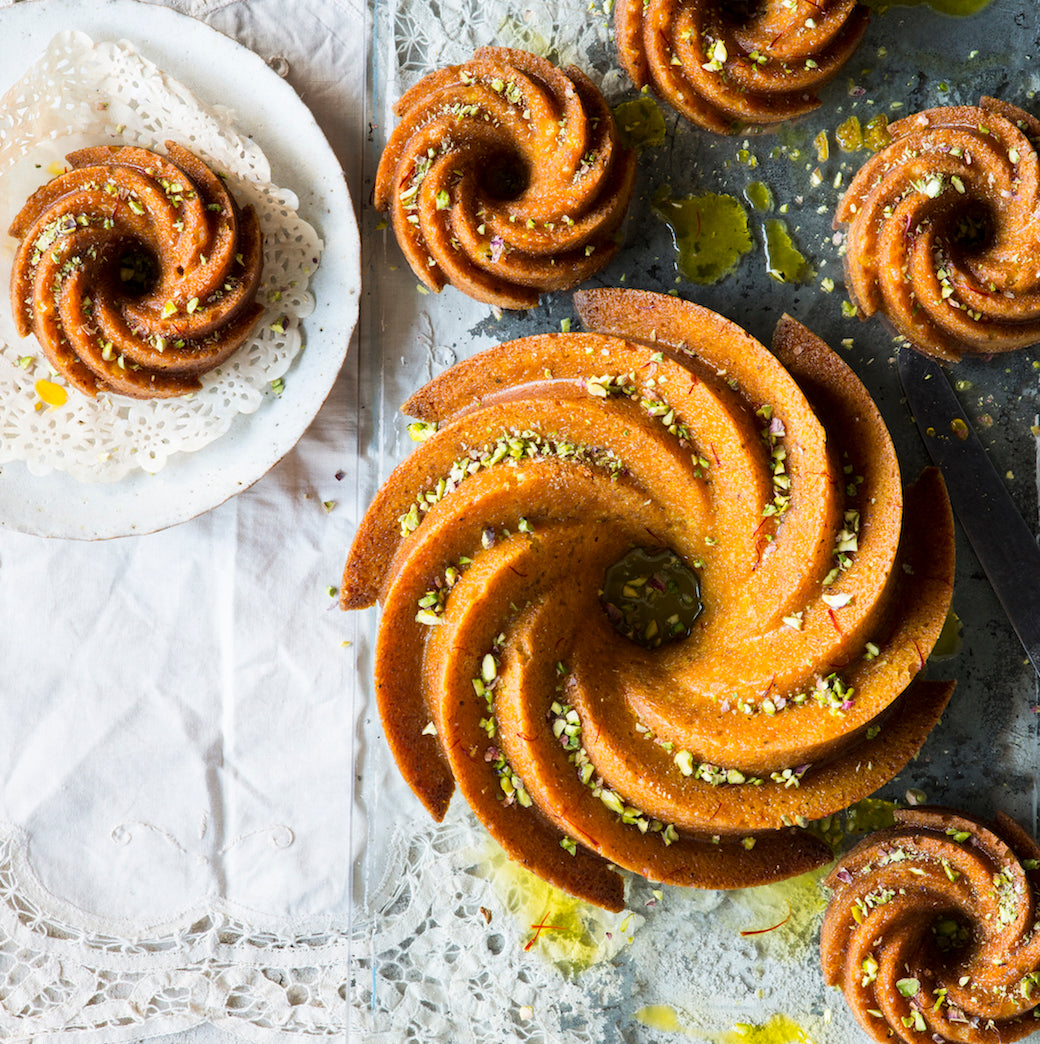
This cake falls into that category of "less is more". The cake itself is a simple one-bowl mix whipped up in the food processor, but when baked in a decorative Bundt cake tin and infused with a flavoursome, and almost fluorescent, saffron syrup, it is one that will definitely impress.
Ingredients
15g (½oz) butter, melted
1 teaspoon plain flour
2 tablespoons unsalted pistachio kernels, toasted and chopped, to sprinkle
Orange and pistachio cake
100g (3½oz) unsalted pistachio kernels, toasted
1 orange (about 240g/8½oz), quartered, cored and seeds removed
220g (1 cup/7oz) caster sugar
125g (4½oz) salted butter, melted and cooled
2 eggs, at room temperature
185g (1¼ cups/6½oz) self-raising flour
Saffron syrup
1 large pinch saffron threads
125ml (½ cup/4fl oz) boiling water
125ml (½ cup/4fl oz) strained freshly squeezed orange juice
110g (½ cup/4oz) caster sugar
Method
- Preheat the oven to 170°C/340°F (150°C/300°F fan-forced). Combine the 15g/½oz melted butter with the 1 teaspoon plain flour and use a pastry brush to grease a 2 litre (8 cup/3.5pt) Bundt tin (see Baker's Tips).
- Place the pistachios in a food processor and process until very finely ground. Add the whole orange, sugar, butter and eggs to the food processor and process until the orange rind is finely chopped and the mixture is almost smooth. Add the self-raising flour and process briefly until just combined.
- Pour the mixture into the prepared tin. Tap the tin firmly on the benchtop 3 times to settle the mixture. Bake in preheated oven for 40-45 minutes or until a skewer inserted into the cake comes out clean. Stand the cake in the tin for 10 minutes.
- Meanwhile, place the saffron in a small dish and add about 1 tablespoon of the boiling water. Set aside to infuse. Combine the remaining boiling water, orange juice and sugar in a small saucepan and stir over low heat until the sugar dissolves. Add the saffron mixture, bring to a simmer over high heat. Reduce the heat to low and simmer for 5 minutes or until reduced slightly.
- Turn the cake onto a serving plate or cake stand with a lip. Gradually pour the hot saffron syrup over the hot cake, allowing it to soak in. Set aside and allow to cool (this will take about 1 hour). Serve sprinkled with the chopped pistachios.
Baker's Tips
- This cake will keep in an airtight container at room temperature for up to 3 days.
- I baked this cake in a Nordic Ware Heritage Bundt pan.
- You can also bake this cake as eight individual Bundts. Combine 30g (1oz) butter, melted, with 2 teaspoons plain flour and grease eight individual 250ml (1 cup/9fl oz) Bundt tins. Divide the mixture evenly among the tins and then tap them firmly on the benchtop 3 times to settle the mixture. Bake at 190°C/375°F (170°C/340°F) for 18-20 minutes or until a skewer inserted comes out clean. Stand in the tins for 5 minutes before turning onto a serving plate and pouring the syrup over. I used the Nordic Ware Heritage Bundtlette pans for these smaller Bundt cakes – each tray has 6 holes so you will have to bake the remaining two cakes separately.
This recipe is part of Anneka's SBS Food Bakeproof: Bundt Cakes online column. For more Bakeproof columns and recipes, click here.
Photography by Alan Benson.
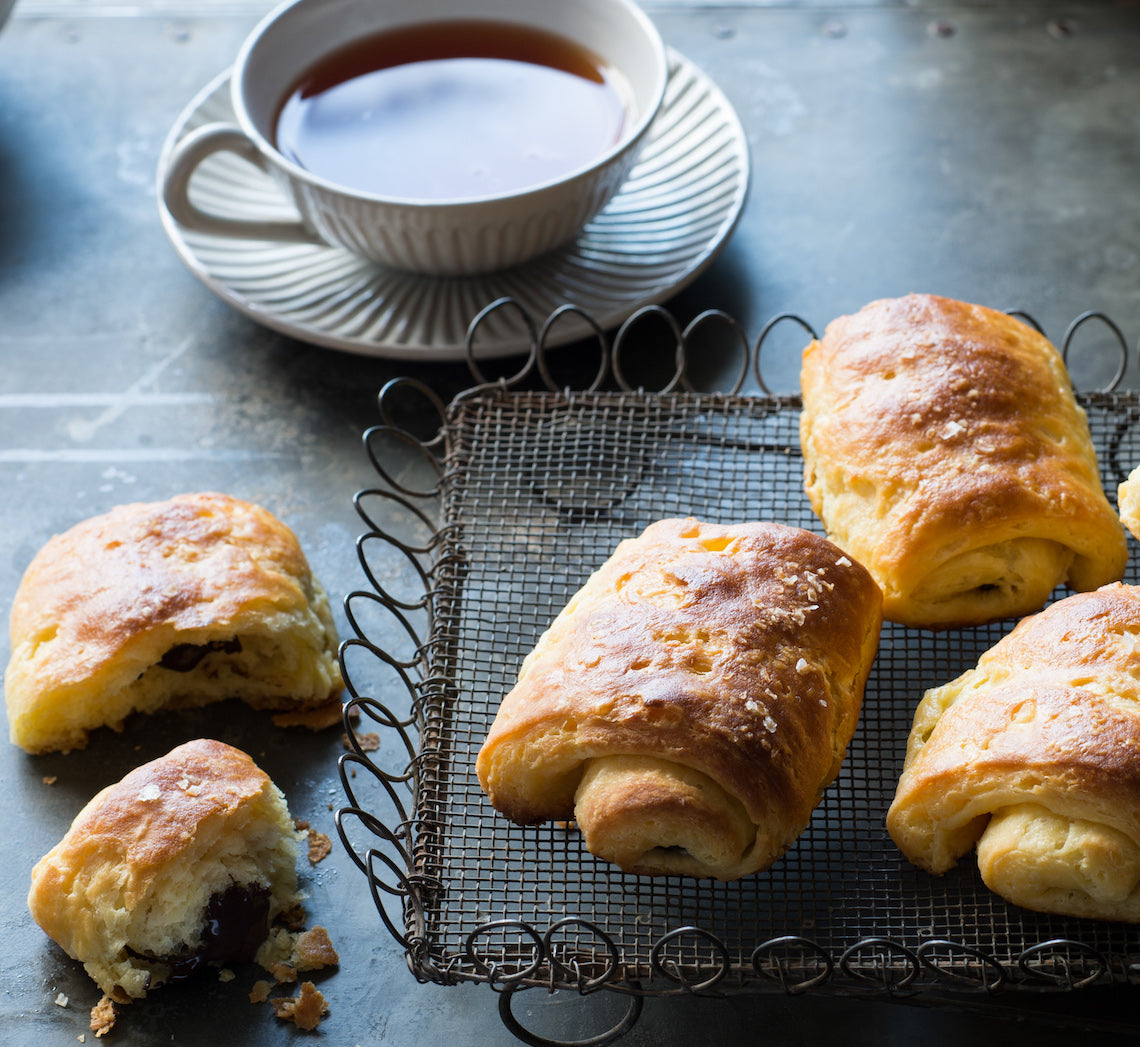
Prep 40min (+ overnight proving and 30min chilling time)Bake 25minMakes 8
At their best warm from the oven, these classic French pastries are based on the same pastry as a croissant, known as a leavened puff pastry (basically a puff pastry with yeast). These pain au chocolat uses a cheat’s pastry of sorts and gives a similar, less refined, result as the traditionally-made pastry, without the hassle of having to interleave the butter with the pastry dough as you fold it. The light sprinkling of sea salt flakes adds a surprising yet pleasant contrast to the sweetness of the chocolate centre.
Ingredients
125ml (½ cup/4fl oz) lukewarm milk
2 teaspoons (7g/¼oz 1 sachet) instant dried yeast
250g (1⅔ cups/9oz) bread flour (see Baker's Tips), plus extra to dust
185g (6½oz) chilled butter, cut into 2cm cubes
1 egg, at room temperature, lightly whisked,
2 tablespoons caster sugar
125g 4½oz) good-quality dark chocolate, chopped
1 extra egg, lightly whisked with 2 teaspoons milk, to glaze
Sea salt flakes (optional), to sprinkle
Icing sugar (optional), to dust
Method
- Put the milk in a medium bowl, sprinkle the yeast over the top and stir with a fork. Set aside for 5 minutes.
- Put the flour and butter into the bowl of a food processor and use the pulse button to process until the butter is cut into rough 1cm/½in pieces (make sure you don’t process any further). Transfer to a large bowl.
- Add the egg and sugar to the milk mixture and stir to combine. Add to the flour and butter mixture and use a wooden spoon and then your hands to mix until it is just combined and a soft dough forms. Cover the bowl with plastic wrap and place in the fridge overnight.
- Turn the dough onto a lightly floured surface and bring together with your hands. Knead briefly or until just smooth but the butter pieces are still visible. Shape into a rectangle and then use a lightly floured rolling pin to roll out until about 25cmx40cm/10inx16in, keeping the edges as straight as possible. With a long side nearest to you, fold the right third of the dough in to cover the centre third and then fold the left side in also. Turn the dough clockwise a quarter turn. Fold the dough into thirds as before to make a small rectangle.
- Flip the dough over on the bench so that the open edge is now underneath and repeat the rolling and folding process again as in step 4. You will finish with a small rectangle. Wrap well in plastic wrap and chill for 30 minutes.
- Preheat the oven to 190°C/375°F (170°C/340°F fan forced). Line a large baking tray with non-stick baking paper.
- Roll out the pastry with a lightly floured rolling pin on a lightly floured surface to a 30cm/12in square, about 5mm/¼in thick. Cut in half to make two 15cmx30cm/6inx12in rectangles, and then cut each into quarters so you end up with eight 7.5cmx15cm/3inx6in rectangles. Divide the chocolate evenly between the rectangles, placing it across the shorter end of each. Starting from the short end with the chocolate, roll the dough around the chocolate to form a roll. Place on the lined tray, seam-side down, and flatten slightly with the palm of your hand. Cover loosely with a slightly damp tea towel and set aside in a warm, draught-free place for 15 minutes or until the pastry has risen slightly and is ‘puffy’.
- Brush the pastries lightly with the egg and milk glaze and sprinkle with a little sea salt flakes, if desired. Bake in preheated oven for 25 minutes or until the pastry is golden, crisp and cooked through. Serve warm or at room temperature sprinkled with icing sugar, if desired.
CLICK HERE for more Bakeproof recipes.
Photography by Alan Benson.
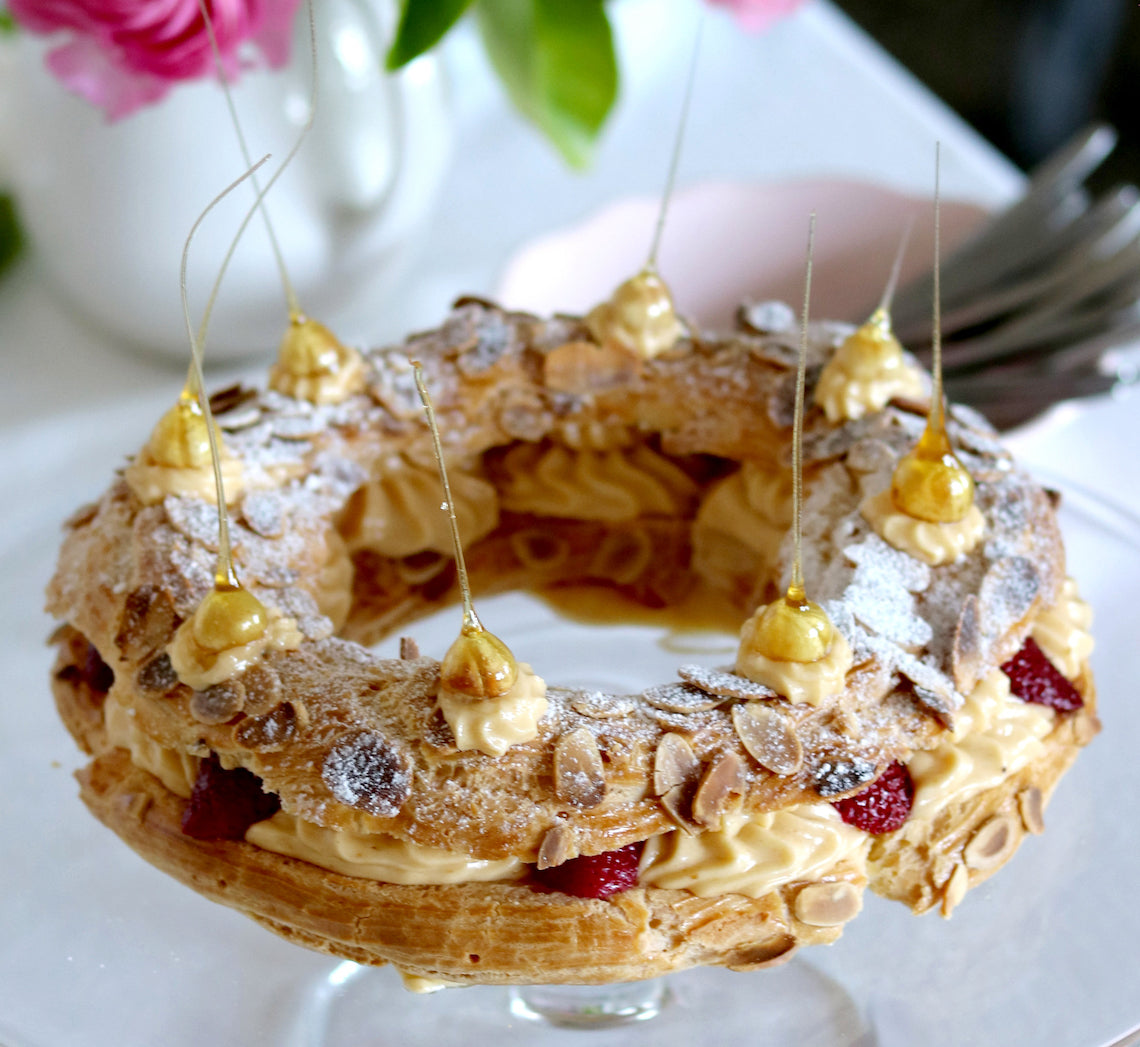
Prep 2hrBake 40-45minMakes 12-15 serves
Created by Make Me a Baker student Janine Cowen for her Graduation, this classic dessert has been elevated by the addition of a divine hazelnut praline crème mousseline filling and roasted rosewater strawberries.
"I picked the recipe because it is something I have always wanted to taste and try to bake, but I've never had the confidence to tackle such a complex recipe or even the know-how to make choux pastry. Reading all of the elements was overwhelming at first, but being able to calmly break it down and methodically follow the steps to produce the final dessert was so satisfying. It has opened up a whole world of challenging multi-element recipes for me to try," says Janine
Janine also suggests, when in season, roasting quartered fresh figs with a little brown sugar to replace the strawberries.
Ingredients
1 quantity Basic Choux Pastry
1 egg yolk, whisked with a dash of water, to brush
30g flaked almonds
Icing sugar, to dust
Crème Pâtissière (original recipe from Mastering the Art of Baking by Anneka Manning, Murdoch Books)
1 vanilla bean, split lengthways and seeds scraped
250ml (1 cup) full-cream milk
250g (1 cup) pure (thin/pouring) cream
4 egg yolks
150g caster sugar
2 tablespoons plain flour
1 tablespoon cornflour
Crème Mousseline
225g unsalted butter, softened
Praline Paste (Janine used a recipe from Serious Eats by Kristina Razon)
Toffeed Hazelnuts (based on a recipe from The Pastry School cookbook by Julie Jones)
20 whole hazelnuts
220g (1 cup) caster sugar
100ml water
Roasted Strawberries
400g ripe but firm larger strawberries, hulled and halved
2 teaspoons caster sugar
4 drops rosewater essence
Small pinch fine salt
Method
-
To make the Crème Pâtissière, combine the vanilla seeds, milk and cream in a medium saucepan and bring just to a simmer over a medium heat. Remove from heat. Use a balloon whisk or electric mixer with a whisk attachment to whisk the egg yolks and sugar together in a heatproof bowl until thick and pale. Sift together the flour and cornflour, then whisk into the yolk mixture until smooth and well combined. Gradually whisk in the milk mixture until smooth and well combined. Return to the saucepan. Stir constantly with a balloon whisk over a medium heat until the mixture comes to a simmer. Simmer, stirring constantly with the whisk, for 2 minutes. Remove from heat and pass the crème pâtissière through a sieve into a heatproof bowl. Cover the surface of the crème pâtissière with plastic wrap or a round of baking paper and refrigerate for 2 hours or until well chilled before using.
-
To make the Toffeed Hazelnuts, gently insert a toothpick into the base of each hazelnut (being careful not to split them). Cover a benchtop under a cupboard or shelf with foil to catch the dripping caramel. Place a strip of double-sided sticky tape or Blu Tack on the bottom edge of a cupboard or shelf (this will hold the hazelnuts by the toothpicks). Fill your kitchen sink or a large bowl with about 3cm of water. Combine the caster sugar and water in a small saucepan and use a wooden spoon to stir over low heat until the sugar dissolves. Increase the heat to medium and bring to the boil. Boil, occasionally brushing down the side of the pan with a pastry brush dipped in water to dissolve any sugar crystals, until the mixture turns a deep caramel. Remove immediately from the heat and place the saucepan base in the water until the bubble subside to stop it from cooking. Remove the saucepan from the water and set aside for 1-2 minutes near the lined bench or until the caramel thickens enough to coat the hazelnuts. One at a time and holding the toothpick, carefully dip the hazelnuts into the caramel and then stick the toothpick to the cupboard or shelf using the sticky tape or Blue Tack so that the caramel drips onto the foil and a tail forms. It may take a few hazelnuts before the caramel has thickened enough for a good tail to form. Let the caramel set (it will take about 10-15 minutes) before gently removing the toothpicks from the hazelnuts. Place in an airtight container separated by baking paper.
-
To make the Roasted Strawberries, preheat the oven to 200°C (180°C fan-forced) and line an oven tray with non-stick baking paper. Place the strawberries in a large bowl and sprinkle with the caster sugar, rosewater essence and salt. Toss gently to coat evenly and then spread the strawberries, cut side down, evenly on the lined tray. Roast in preheated oven for 10 minutes or until starting to soften but still holding their shape. Place in an airtight container in the fridge until required (see Baker’s Tips).
-
To make the choux pastry ring, draw a 12cm diameter circle on a piece of non-stick baking paper. Turn the paper upside down, line a baking tray with it, and use a little of the choux pastry to stick the baking paper to the tray. Preheat the oven to 200°C (180°C fan-forced).
-
Spoon the choux pastry into a large piping bag fitted with a 13mm (6B) French star piping nozzle. Using the marked paper as a guide, pipe a ring of choux pastry onto the lined tray. Pipe another ring of pastry around the outside of the first one, so that they just touch. Finally pipe a third circle of pastry over the gap between the two bottom pastry rings. Bruch the rings gently with the egg wash and then sprinkle with the flaked almonds. Bake in preheated oven for 35 minutes. Reduce the oven temperature and bake for a further 25 minutes or until the pastry is puffed, golden and dry.
-
Immediately transfer the pastry ring to a wire rack and use a skewer to piece the ring on top about 8 times (this will allow the excess steam trapped inside to escape while it cools). See Baker’s Tips.
-
Meanwhile, to make the Crème Mousseline, use an electric mixer with a paddle beater to beat the butter until very pale and creamy, scraping down the side of the bowl when necessary. Add the Praline Paste and beat on medium speed until well combined. Gradually add the Crème Pâtissière, about ¼ cup at a time, and beat on medium speed after each addition until well combined, scraping the bowl when necessary. Replace the paddle beater with the whisk attachment and whisk on medium speed for about 3 minutes or until the mousseline is light and airy. Transfer about three quarters of the Crème Mousseline to a piping bag fitted with a 15mm French star piping nozzle (see Baker’s Tips).
-
Use a large sharp serrated knife to carefully cut the pastry ring in half horizontally. Remove any uncooked dough with your fingertips. Set the top aside. Pipe rosettes of the Crème Mousseline into the base of the pastry ring about 2cm apart. Then pipe another, slightly smaller, rosette on top of each Place a strawberry half, cut side down, between each of the Crème Mousseline rosettes, placing them so they overlap the edge of the pastry ring base and peek out once the lid is placed on top. Gently place the pastry ring lid on top and then dust with icing sugar.
-
Place the remaining Crème Mousseline in a piping bag fitted with a 5mm French star piping nozzle and pipe eight small rosette at even intervals on the top of the pastry ring. Choose the best eight Toffeed Hazelnuts and carefully place one on top of each of the piped rosettes to decorate. Serve immediately.
Baker's Tips
- The Crème Pâtissière can be made up to 3 days before using. Place in an airtight container or a bowl and cover the surface with plastic wrap and keep in the fridge.
- The Roasted Strawberries can be made up to 3 days before using. Place in an airtight container in the fridge.
- The pastry ring can be made up to a day ahead. Keep in an airtight container at room temperature. To refresh before filling, place on a lined oven tray in an oven preheated to 180°C (160°C fan-forced) for 10 minutes. Allow to cool before using.
- In warmer weather, the Crème Mousseline may become a little soft. If so, before piping place it into the fridge until it firms enough to be a good piping consistency before continuing with the recipe.
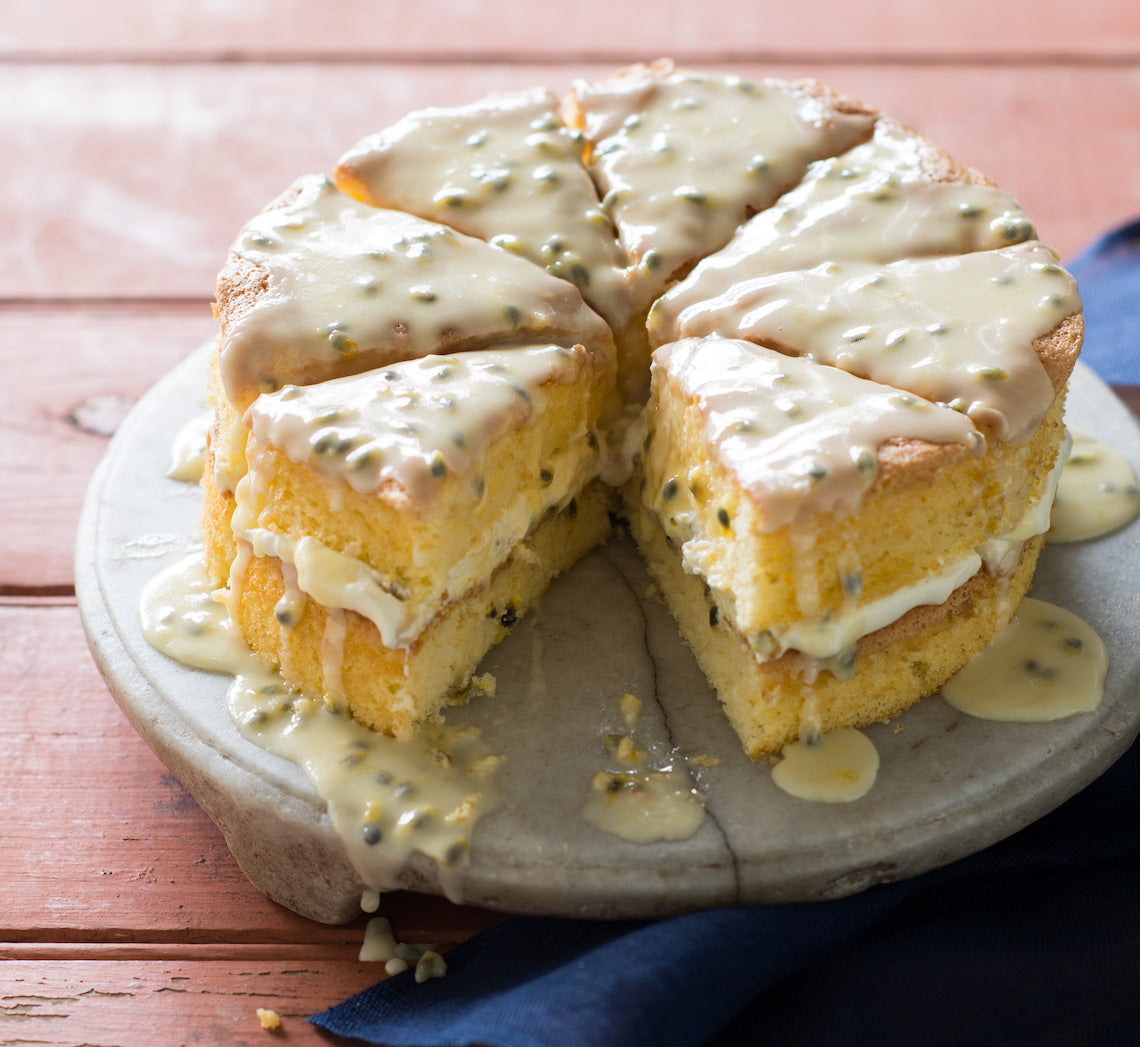
Prep 25min (+cooling time)Bake 18-20minMakes 8-10 serves
This sponge will have you wanting an excuse to make afternoon tea every day. There are two main tricks when making a sponge: don’t over-whisk the mixture once you have added the flour – only whisk it until the mixture is just combined. Also, sponges don’t take long to bake and, if overcooked, will easily become dry, so keep a close eye on them when baking.
Ingredients
160ml (⅔ cup/5¼fl oz) thickened cream
80ml (⅓ cup/2½fl oz) fresh passionfruit pulp
Sponge Layers
Melted butter, to grease
4 x 60g (2oz) fresh eggs, at room temperature
165g (¾ cup/5¾oz) caster sugar
60ml (¼ cup/2fl oz) milk
30g (1oz) salted butter, diced
110g (¾ cup/4oz) self-raising flour, plus extra to dust
30g (¼ cup/1oz) cornflour
Passionfruit Icing
180g (1½ cups/6½oz) pure icing sugar
1½ tablespoons fresh passionfruit pulp
Approx. 3 teaspoons boiling water
Method
- To make the Sponge Layers, place the oven rack in the lower third of the oven and then preheat it to 180°C/350°F (160°C/315°F fan-forced). Brush two 20cm/8in shallow (sandwich) cake tins with a little melted butter to lightly grease. Line the bases with circles of baking paper. Lightly brush the paper with a little more melted butter and then dust the bases and sides of the tins with a little flour to lightly coat, tapping out any excess.
- Use an electric mixer with a whisk attachment on medium-high speed to whisk the eggs in a medium bowl until frothy. Add the sugar a spoonful at a time, whisking well between each addition, until the mixture is very thick and pale and the sugar has dissolved (this will take about 8 minutes). Lift the whisk out of the mixture and draw a figure eight, if the trail stays on the surface long enough for you to finish drawing then the mixture is ready. If not, continue to whisk for a further minutes and then test again.
- Meanwhile, heat the milk and butter in a small saucepan over medium heat until the butter melts and the mixture is almost simmering. Remove from the heat. Pour the hot milk mixture down the side of the bowl with the egg mixture. Quickly sift the flour and cornflour together over the egg mixture and then immediately whisk again with the electric mixer briefly, until the flour mixture is just incorporated (make sure there is no flour caught at the bottom of the bowl and be careful not to overmix).
- Divide the mixture evenly between the cake tins (see Baker’s Tips) and gently tap the tins on the bench top three times to settle the mixture. Bake in preheated oven for 18-20 minutes or until the cakes are a pale golden colour, spring back when lightly touched in the centre and start pulling away from the sides of the tins. Remove from the oven and stand for 1 minute before turning onto a wire rack, top side up (see Baker’s Tips), to cool completely.
- When ready to fill, to make the Passionfruit Icing, sift the icing sugar into a medium bowl. Add the passionfruit pulp and enough boiling water to mix to a thin, spreadable icing. Cover tightly with plastic wrap and set aside. Use an electric mixer with a whisk attachment or a balloon whisk to whisk the cream in a medium mixing bowl until soft peaks form. Use a large metal spoon or spatula to gently fold the passionfruit pulp through the whipped cream until just swirled through. Place one layer of the sponge on a serving plate or cake stand and spread with the passionfruit cream. Top with the remaining sponge layer. Spread the Passionfruit Icing evenly over the top layer of the sponge, allowing it to drip down the sides slightly. Set aside or 20 minutes or until the icing sets before serving in slices.
Baker's Tips
- You will need about 5 large passionfruit for this recipe.
- To divide the mixture evenly between the tins, weigh the tins with the mixture in them to make sure they are the same weight.
- When removing the cakes from the tins, turn them onto a wire rack covered with a tea towel before inverting onto another rack. The tea towel will prevent the rack marking the tops of the cakes.
- The unfilled sponge cakes will keep in an airtight container at room temperature for up to 1 day. Once filled, the cake will keep in an airtight container in the fridge for up to 2 days. Stand at room temperature for at least 30 minutes before serving.
This recipe is from Anneka's SBS Food online column, Bakeproof: Sponge Cake.
CLICK HERE for more Bakeproof recipes.
Photography by Alan Benson.
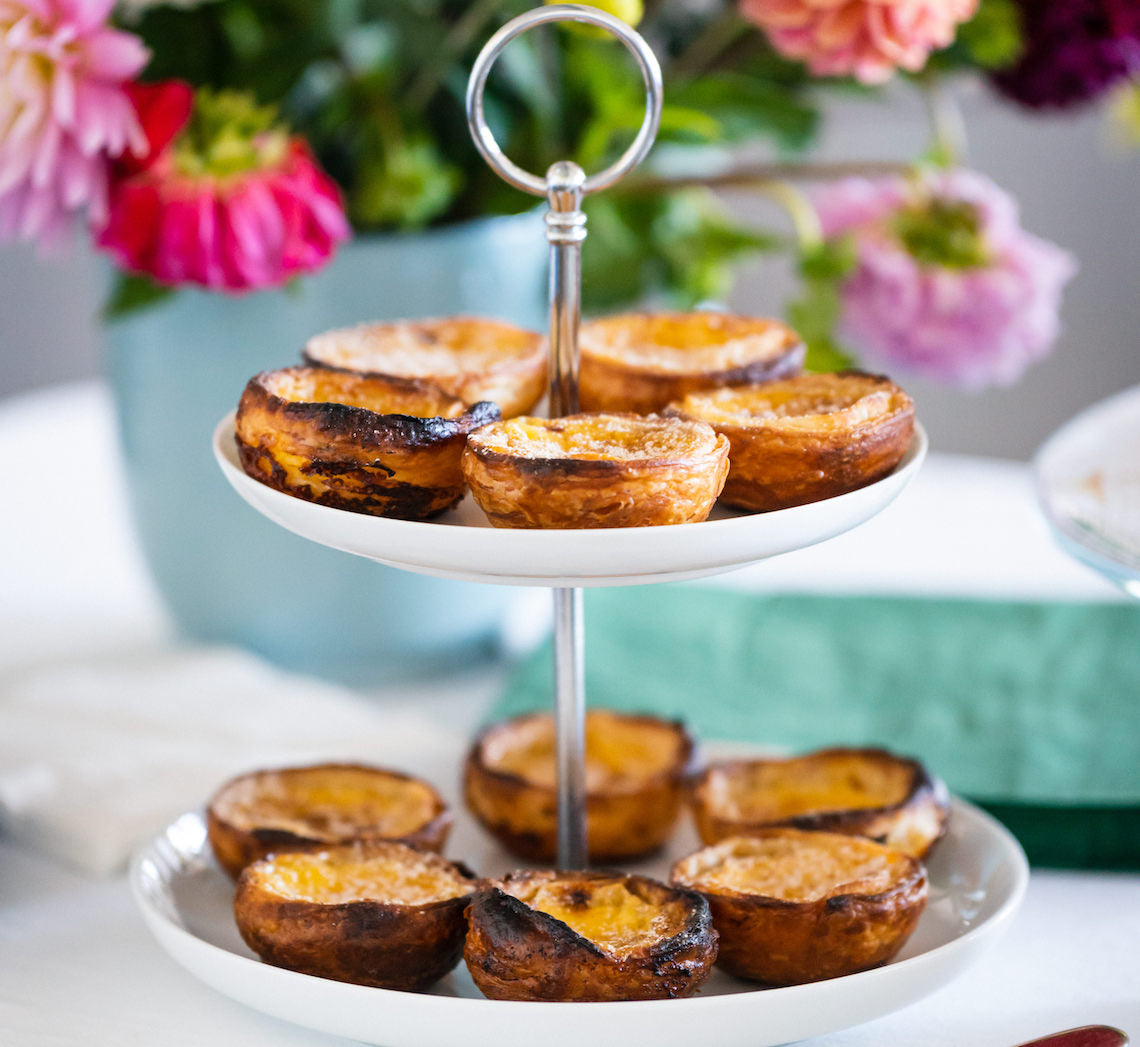
Prep 1hr (+20min resting, 2hr chilling and 30min cooling time)Bake 12-15min (per batch)Makes 24
Made by Make Me a Baker student Theresa Ling these Portuguese Custard Tarts will be some of the best you will try. The main trick with these tarts is to bake them at a very high heat (often as hot as your oven will go) for a short period of time to make sure the pastry is lovely and crisp while not over cooking the luscious creamy custard filling, creating a wonderful contrast between the two.
If you've never made portuguese custard tarts before or haven't got the results you wanted from a previous attempt CLICK HERE for my top tips when making them
at home before you start.
Ingredients
Icing sugar and ground cinnamon (optional), to sprinkle
Rough Puff Pastry
225g (1½ cups) plain flour
½ teaspoon salt
140g water
225g unsalted butter, softened
Custard
2 tablespoons plain flour300ml milk
220g (1 cup) caster sugar
160ml (⅔ cup) water
2 cinnamon sticks
½ teaspoon natural vanilla essence or extract
6 egg yolks, lightly whisked
Method
-
To make the Rough Puff Pastry, place the flour and salt in the bowl of a stand mixer. Add the water and mix with a paddle beater on low speed until well combined and a dough forms. Transfer the dough to a clean bench top and knead until smooth. Shape into a square about 1cm thick, wrap in plastic wrap and set aside to rest for 20 minutes.
- Use a lightly floured rolling pin to roll the pastry out on a well floured surface to a 35cm square, keeping the edges as neat as possible. Use your fingers to dot small pieces of 75g of the softened butter over the left two-thirds of the pastry, leaving about a 1cm border, and then spread it with your fingers so it covers the pastry roughly. Fold over the unbuttered right hand third of pastry, brush away any excess flour, then fold over the left hand third to cover. Starting from the top, use the rolling pin to tap the pastry widthways to release any air pockets and then press the open edges with your fingertips to seal and enclose the butter. Turn the pastry a quarter turn anticlockwise and then fold in the right hand third of pastry then fold over the left hand third to cover. Again, tap it gently widthways with the rolling pin.
- Reroll the pastry to a 35cm square and, with the folded edge closest to you repeat step 2 one more time, dotting and spreading the left hand two thirds with 75g of the remaining softened butter, folding, turning anti-clockwise and folding again.
- Reroll the pastry to a 35cm x 40cm rectangle. With a short edge closest to you, dot and spread the 75g of remaining softened butter over the whole surface, leaving a 1cm border. Starting from the short edge, roll into a tight log. Use a sharp knife to trim the ends and then cut the log in half. Wrap the logs separately in plastic wrap and place in the fridge to chill for at least 2 hours before using (see Baker’s Tips).
- Place two pizza stones in the oven, one in the top third and one in the bottom third. Place an oven rack in between them. Preheat oven to 300°C (280°C fan-forced) for at least 1 hour.
- To make the Custard, place the flour in a medium bowl and use a balloon whisk to gradually stir in 60ml (¼ cup) of the milk until smooth and well combined. Place the remaining milk in a small saucepan and bring just to a simmer over a medium heat. Use the balloon whisk to gradually stir the hot milk into the flour mixture and stir until smooth and well combined. Combine the sugar, water and cinnamon sticks in a medium saucepan and stir over medium heat until the sugar dissolves. Bring to the boil and simmer until it reaches 100°C on a thermometer. Remove the cinnamon sticks from the sugar syrup and gradually stir into the milk mixture. Add the vanilla and stir until cooled slightly. Stir in the egg yolks until evenly combined. Cover the surface of the custard with plastic wrap and place in the fridge to cool, stirring occasionally, this will take about 30 minutes (see Baker’s Tips).
- Cut one of the pastry logs into twelve 1.5cm lengths (each portion will be about 25g) and place each portion, with a cut side facing up, into an ungreased 50ml capacity (3cm base measurement and 6.5cm top measurement) round-based tartlet tin (see Baker’s Tips). Using your thumb, gently press into the centre of a pastry portion towards the base until about 5mm thick, and then, using your thumbs and working around the tart case, gently ease the pastry up the sides thinning it to about 5mm thick and so it extends about 2mm above the tart tin and forms a thicker lip at the top. Repeat with the remaining pastry portions.
- Place the tart tins on a heavy oven tray. Divide half the cooled custard among the pastry cases, filling each to no more than 5mm from the top edge of the pastry. Bake the tarts between the pizza stones in the preheated oven for 12-15 minutes or until the pastry is crisp and baked through, and the custard is just set and partially charred on the top.
- Remove the tarts from the oven and set aside to cool slightly for 2-3 minutes before removing from the tins. Repeat with the remaining pastry log and custard mixture to make 12 more tarts.
- Sprinkle the tarts with icing sugar and/or cinnamon if desired and serve warm or at room temperature (see Baker’s Tips).
Baker's Tips
- The pastry can be made up to 3 days ahead of using. Keep wrapped in the fridge.
- The custard can be made up to 3 days ahead of baking. Store in an airtight container or jar in the fridge. Stir well before pouring into the tart cases.
- Once cut into portions and before pressing into the tins, you may have to let the pastry stand at room temperature until it softens slightly and becomes pliable enough to be able to be pressed into the tins easily and without force.
- These tarts are best eaten warm or at room temperature the day they are made. However, they will keep in an airtight container in the fridge for up to 2 days. To refresh, place the chilled tarts back in the tart tins on an oven tray and place in an oven preheated to 180°C (160°C fan-forced) for 10 minutes or until the pastry is crisp and the custard is just warmed through (there is no need to use the pizza stones when reheating). Stand the tarts in the tins for at least 5 minutes before removing and serving warm or at room temperature.

Prep 20min (+2hr cooling time)Bake 1hr15minMakes 8-10 serves
I remember my mum making pavlova for my dad’s surprise 40th birthday party – lots of them. They were hidden all over the house, even under my bed. Pavlova is definitely a crowd pleaser and Mum chose the right dessert for a party. This pavlova is finished with a slightly tart topping of poached apricots infused with lemon – the perfect partner for the sweet meringue base.
Ingredients
Melted butter, to grease4 egg whites, at room temperature
Pinch of salt
2 teaspoons cornflour
1 teaspoon white vinegar
220g (1 cup) caster sugar
1½ teaspoons natural vanilla extract
300ml thickened cream
Poached Apricot & Lemon Topping
2 lemons, washed220g (1 cup) caster sugar
185ml (¾ cup) water
250g dried apricot halves
Method
- Place the oven rack in the lower third of the oven and then preheat it to 110°C. Draw a circle on a piece of baking paper using a 20cm cake tin as a guide. Place the baking paper, marked side down, on a baking tray.
- Place the egg whites in a large mixing bowl and use an electric mixer with a whisk attachment to whisk on medium speed until foamy. Add the salt, vinegar and cornflour and whisk on medium speed until soft peaks form (this will take about 1 minute).
- With the motor running, add the sugar a spoonful at a time, whisking well after each addition, until all the sugar has dissolved and the mixture is very thick and glossy (this will take 4-5 minutes). Add the vanilla and whisk to combine. Use a spatula to stir the meringue mixture to ‘loosen’ it slightly (this will get rid of any excess air in the mixture and give it a smoother, less ‘foamy’ texture).
- Spoon the meringue mixture onto the lined tray and use the back of the spoon to spread it to fill the marked circle. Make a well in the centre and build up the sides, creating swirls or smoothing the surface as desired.
- Bake in preheated oven for 1 hour 15 minutes, until the meringue is crisp and hard to touch, but not coloured. When the pavlova is cooked, turn off the oven, leave the door slightly ajar (see Baker’s Tips) and cool it completely in the oven (this will take about 2 hours).
- To make the Poached Apricot & Lemon Topping, use a vegetable peeler to remove the rind from the lemons in wide strips. Remove any white pith on the rind with a small sharp knife. Juice the lemons and measure out 80ml (⅓ cup) lemon juice. Put the lemon rind strips and juice, sugar and water in a small saucepan. Stir with a wooden spoon over medium heat until the sugar dissolves. Add the apricots and bring to the boil. Reduce the heat to medium and simmer for 8–10 minutes or until the apricots are plump and tender and the syrup has reduced slightly. Remove from the heat and set aside to cool.
- To serve, use an electric mixer with a whisk attachment or a balloon whisk to whisk the cream until soft peaks form. Spoon the whipped cream into the centre of the pavlova and spread evenly. Spoon the apricots and lemon rind over the cream and then spoon a little of the poaching syrup over the top. Serve immediately with any remaining syrup served separately.
Baker's Tips
- Use a wooden spoon to keep the oven door ajar if it won’t stay slightly open on its own when cooling the pavlova.
- The unfilled pavlova shell will keep in an airtight container in a cool place (not the fridge), for up to 1 day.
Photography by Julie Renouf.

Prep 20minBake 30-35minMakes 12
Dense with fruit, studded with macadamias and finished with a thin lemon glaze, these muffins are wholesome yet slightly naughty. Enjoy them at morning or afternoon tea or even for brunch.
Ingredients
150g (1 cup/5¼oz) plain flour
150g (1 cup/5¼oz) wholemeal plain flour
1 tablespoon baking powder
1 teaspoon ground cinnamon
55g (¾ cup/2oz) shredded coconut
75g (½ cup/2¾oz) raw, unsalted macadamia nuts, toasted and coarsely chopped
200g (¾ cup/7¾oz) Greek-style natural yoghurt
80ml (⅓ cup/2½fl oz) light olive oil or sunflower oil
2 eggs, at room temperature
1½ teaspoons natural vanilla extract or essence
Lemon glaze
125g (1 cup/4½oz) pure icing sugar, sifted
1½ tablespoons (30ml/1fl oz) fresh lemon juice
Method
- Preheat the oven to 190°C/375°F (170°C/340°F fan-forced). Line a 12-hole 80ml (⅓ cup/2½fl oz) muffin tray with muffin paper cases.
- Sift together both the flours, the baking powder and cinnamon into a large mixing bowl, returning any husks to the bowl. Stir in the sugar, coconut and macadamias.
- Halve the peaches and remove the stones. Cut each half into 8 wedges. Add to the flour mixture and gently toss to combine evenly.
- Use a fork to whisk together the yoghurt, oil, eggs and vanilla in a bowl or jug. Add to the flour mixture and use a spatula or large metal spoon to fold together until just combined. (Don’t overmix – the batter should still be a little lumpy.)
- Spoon the mixture into the paper cases, dividing evenly. Bake in preheated oven for 30-35 minutes or until the muffins are golden and cooked when tested with a skewer.
- Meanwhile, to make the Lemon glaze, combine the icing sugar and lemon juice in a medium bowl and mix until smooth. Cover and set aside while the muffins finish baking.
- Remove the muffins from the oven and stand for a few minutes in the tin before transferring to a wire rack. Drizzle a little of the lemon glaze over each warm muffin. Serve warm or at room temperature.
Baker's Tips
- The peaches can be replaced with 400g (14oz) of nectarines, plums, apricots, pitted and cut into 8 wedges, or cherries, pitted and halved.
- The wholemeal plain flour can be replaced by 150g (1 cup/5¼oz) wholemeal spelt flour.
- These muffins are best eaten the day they are baked, though they freeze well. Wrap individually in plastic wrap and then seal in a plastic bag or airtight container. Freeze for up to 3 months. Thaw at room temperature.

Prep 1hr15min (+2hr chilling and 1hr cooling time)Bake 1hr20minMakes 10 serves
This blissful combination of sponge cake, cream, meringue, dulce de leche and peaches takes its name from a native Uruguayan bird – apparently the meringues resemble the features of a chaja bird. I must admit I find it hard to see the resemblance and feel this wonderful cake has been dealt a slight disservice in its naming!
Ingredients
400g (14oz) tin sliced peaches in juice
55g (¼ cup/2oz) caster sugar
2 tablespoons peach-flavoured liqueur or schnapps
300ml (10¼fl oz) thickened cream
1 teaspoon natural vanilla essence or extract
2 x 20cm/8in sponge cakes
225g (¾ cup/8oz) dulce de leche, warmed gently to a spreadable consistency
Meringues
2 egg whites (from 60g/2oz eggs)
110g (½ cup/4oz) caster sugar
1 teaspoon vanilla essence
Method
- To make the Meringues, combine the egg whites and sugar in a medium heatproof bowl (preferably metal) and place over a saucepan of simmering water, ensuring the bowl doesn’t touch the water. Stir with a spatula or small whisk until the sugar dissolves and the mixture is hot to touch (about 55-60°C on a sugar thermometer). Be careful not to allow the egg whites to cook.
- Transfer the egg white mixture to the bowl of an electric mixer (see Baker’s Tips). Whisk the egg white mixture with a whisk attachment on medium-high speed until very thick and glossy and the mixture has cooled to room temperature. Whisk in the vanilla and cornflour.
- Fill a large piping bag fitted with a 4B star (or #11/11mm/½in round) piping nozzle with the meringue mixture. Holding the piping nozzle about 1cm/½in above the tray, pipe small rosettes (or 'kisses') about 2.5cm/1in in diameter and 2cm apart on the lined tray.
- Bake in a preheated oven for 60-70 minutes or until the meringues are crisp, hard to touch and peel away from the tray easily, but are not coloured. Remove the meringues from the oven and place immediately in an airtight container lined with absorbent paper.
- Drain the peach slices, reserving 100ml (3½fl oz) of the juice. Set the peach slices aside. Combine the reserved juice in a small saucepan with the sugar and stir over low heat until the sugar dissolves. Bring to a simmer and simmer gently for 2 minutes to reduce slightly. Remove from the heat and stir in the peach-flavoured liqueur or schnapps.
- Use an electric mixer with a whisk attachment on medium-low speed or a balloon whisk to whisk the cream and vanilla until soft peaks form.
- To assemble the cake, turn the sponge layers upside down and brush with half the peach syrup. Turn the sponges right side up and brush with the remaining syrup. Place one layer on a serving plate and spread with half the dulce de leche. Spread with half of the whipped cream. Crumble over about 12 of the meringues and then top with the reserved peach slices. Cover with the remaining sponge layer. Spread the top with the remaining dulce de leche and then the remaining cream. Decorate the top with the remaining meringues. Serve immediately.
Baker's Tips
- The assembled cake, without the meringues on top, will keep in the fridge for up to 3 hours before serving. Stand at room temperature for 30 minutes before serving.
- The fan-forced setting is often too intense for baking meringues and will cause them to crack. If this is the case with your oven, opt for the conventional setting. However, if the meringues do crack when using the convention setting, your oven may be running a little hot and next time reduce the temperature by 5-10°C (41-50°F) as this will often help prevent them from cracking.
- If you don't have a small bowl for your mixer, first whisk the egg white mixture with a balloon whisk until it is foamy and doubled in volume before whisking with the stand mixer. This will make the whisking of the egg white mixture more efficient in a standard size bowl.
- Allowing the egg white mixture to come to room temperature before whisking will reduce the time it will take to whisk it to a meringue.
- The meringues will keep in an airtight container at room temperature for up to 1 week.
This recipe is from Anneka's SBS Food online column, Bakeproof: Latin American Cakes.
CLICK HERE for more Bakeproof recipes.
Photography by Alan Benson.


