
- home
- Products
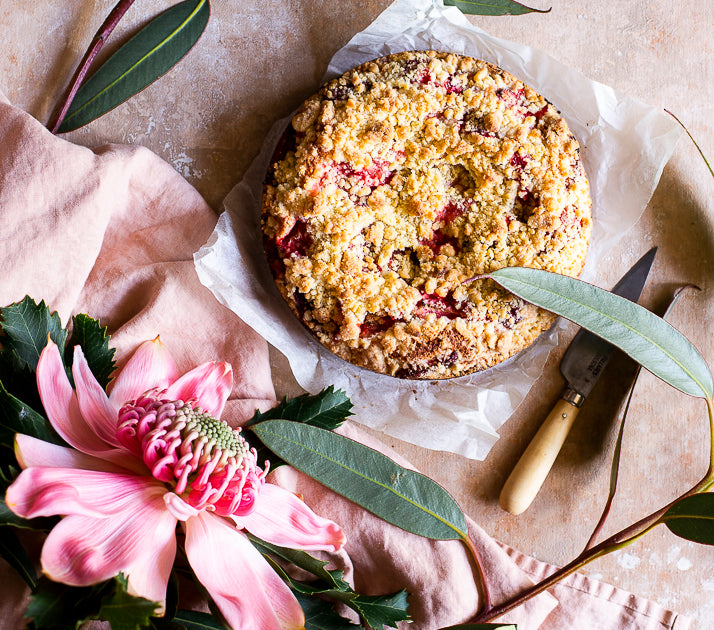
Makes one 22cm cake
I don’t know about you, but lately I have taken great comfort in the known; in tried and tested cakes, and all things familiar. This cake is a real favourite of mine – simple, delicious and easily adaptable (surely good qualities for navigating life in general, really). I make it often with strawberries as pictured, or plums, but raspberries or ripe apricots would be equally lovely. It’s inspired by the streusel cakes I ate in Germany when I was an exchange student, and in the absence of seeing old friends there, I’ll eat this cake.
Ingredients
Streusel topping
60g butter, cubed
½ teaspoon vanilla bean paste
55g caster sugar
75g plain flour
Pinch of salt
Cake
125g unsalted butter, melted and cooled
3 eggs
1 teaspoon vanilla bean paste
100g plain flour
1 teaspoon baking powder
Pinch of salt
150g almond meal
185g caster sugar
375g strawberries, hulled and quartered
Method
- Preheat oven to 170°C (fan-forced) and grease a 22cm round springform tin well with butter and line the base with baking paper.
- Place streusel ingredients into a small mixing bowl and use your fingertips to work butter and vanilla through the sugar, flour and salt until mixture resembles large breadcrumbs. Set aside.
- Place melted butter, eggs and vanilla in a medium mixing bowl and whisk to combine. In a separate large bowl, sift together flour and baking powder, before stirring in salt, almond meal, and caster sugar. Make a well in the centre of the dry ingredients and pour in the melted butter and egg mixture, stirring gently to combine.
- Spoon batter into lined baking tin and smooth the top with a spatula before scattering with strawberry quarters. Sprinkle with streusel topping and bake for 55-60 minutes or until cake is cooked through and streusel is starting to colour.
- Allow cake to cool in the tin for 10 minutes or so before carefully releasing from the tin and placing on a wire rack to cool further.
- Slice into large wedges and serve cake warm with ice-cream or cream. Whilst best eaten the day it is made, any leftover cake will keep happily in an air-tight container in the fridge for a day or two, just warm slightly before serving.
This recipe is from Tilly Pamment's The Plain Cake Appreciation Society (Murdoch Books, RRP $39.99).
You can read more about what Tilly is baking this winter here.
Prep 1hr (+ 2hr cooling time)Bake 30minMakes 10-12 serves
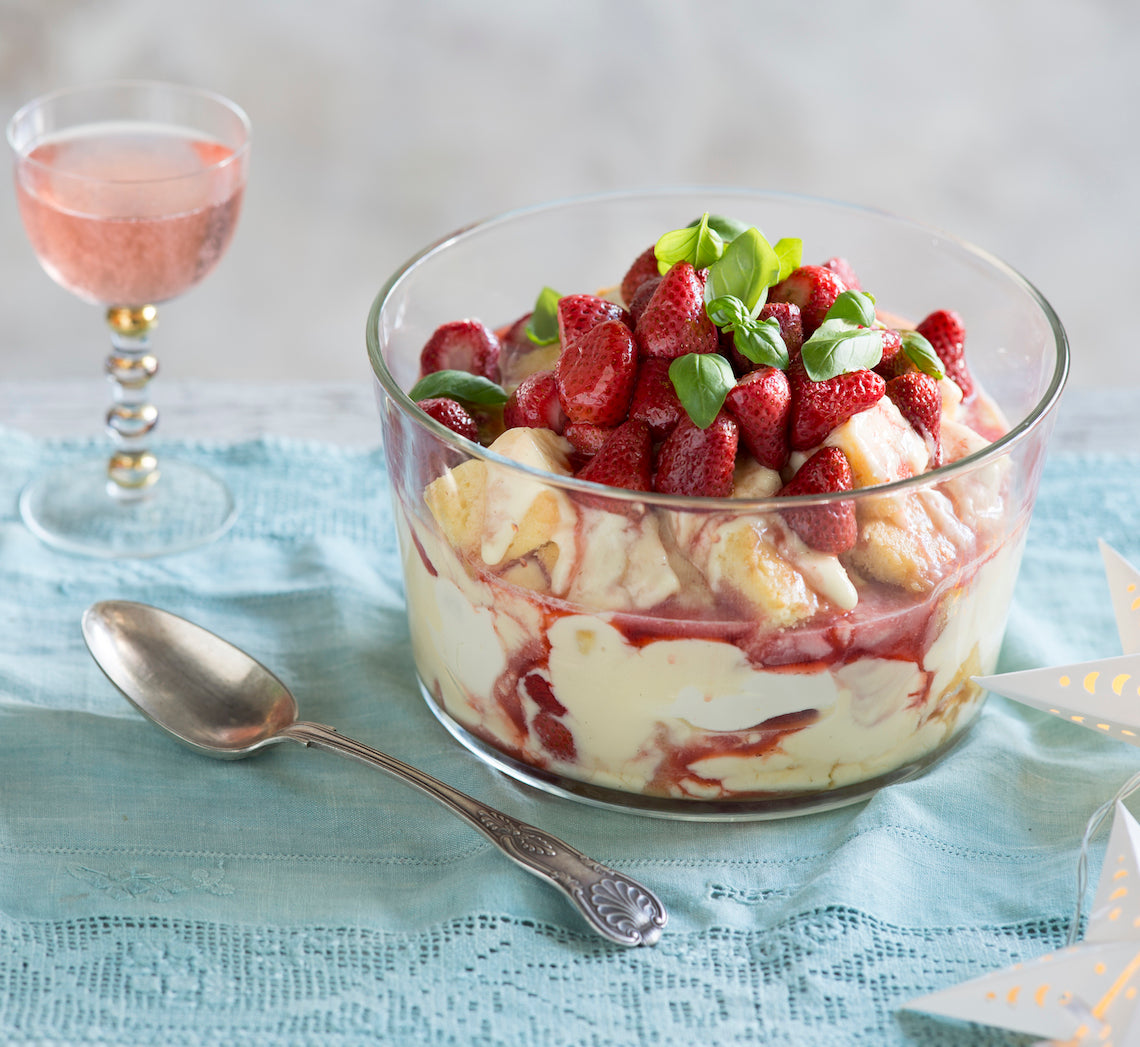
Fragrant, sweet and fresh, basil brings something truly special to this festive trifle. Layers of vanilla buttercake soaked with a basil and lemon syrup, creamy basil-infused custard and roasted strawberries make for a wonderful combination in this impressive dessert… I promise one serve won’t be enough!
Ingredients
125 ml (½ cup) pure (pouring / thin) cream
Small fresh basil leaves, to decorate
Buttercake
110g (¾ cup) self-raising flour
75g (½ cup) plain flour
165g (¾ cup) caster sugar
125g butter, softened
80ml (⅓ cup) milk
2 eggs, at room temperature
1 teaspoon natural vanilla extract or essence
Basil-infused custard
500ml (2 cups) milk
125ml (½ cup) pure (pouring / thin) cream
20 medium fresh basil leaves
75g (⅓ cup) caster sugar
2 tablespoons cornflour, sifted
3 egg yolks, lightly whisked
1 teaspoon natural vanilla essence or extract
Roasted strawberries
1kg strawberries, hulled and halved if large
75g (⅓ cup) caster sugar
Basil and lemon syrup
165g (¾ cup) caster sugar
125ml (½ cup) water
10 medium fresh basil leaves
60ml (¼ cup) strained fresh lemon juice
Method
- To make the Basil-infused custard, put the milk, cream and basil leaves into a medium saucepan. Bring just to a simmer over a medium heat. Remove from heat and stand for 30 minutes to infuse. Remove the basil leaves. Use a balloon whisk to whisk the sugar and cornflour together in a heatproof bowl. Gradually whisk in the milk mixture until smooth and well combined. Whisk in the egg yolks. Return to the heat and stir constantly with the whisk over medium heat until the mixture thickens and just comes to a simmer. Remove from the heat and stir in the vanilla. Pass the custard through a sieve into a heatproof bowl. Cover the surface with plastic wrap and refrigerate for 2 hours or until chilled.
- To make the Buttercake, preheat the oven to 180°C (160°C fan-forced). Grease a 20 x 30 cm (base measurement) shallow cake tin and line the base and two longs sides with one piece of baking paper.
- Place both the flours, sugar, butter, milk, eggs and vanilla in a large mixing bowl. Use an electric mixer to beat on low speed until combined. Increase the speed to medium and beat for 3 minutes or until the mixture is smooth, creamy and very pale in colour. Spoon the mixture into the lined tin and spread evenly using the back of a spoon. Bake in preheated oven for 18-20 minutes or until cooked when tested with a skewer. Cool for 5 minutes in the tin, then turn onto a wire rack to cool.
- To make the Roasted strawberries, preheat oven to 200°C (180°C fan-forced). Toss the strawberries with the sugar in a bowl. Spread over an oven tray in a single layer. Roast in preheated oven for 10 minutes, stirring gently after 5 minutes, or until the strawberries are soft but still holding their shape. Set aside to cool.
- To make the Basil and lemon syrup, combine the sugar and water in a small saucepan and site over medium heat until the sugar dissolves. Add the basil, bring to a simmer and simmer for 5 minutes or until reduced slightly. Stir in the lemon juice. Set aside to cool.
- To assemble the trifle, use a balloon whisk or a hand held electric whisk on medium speed to whisk the cream in a medium bowl until soft peaks form. Cut the buttercake into 3cm cubes and place half of the cake over the base of a 2-3 liter (8-12 cup) serving dish. Drizzle the cake with half the Basil and lemon syrup. Spread half the Basil-infused custard over the top. Spoon half the Roasted strawberries over the custard and then top with all of the whipped cream. Repeat the layering with the remaining ingredients finishing with the roasted strawberries. Decorate with the basil leaves and serve in large scoops.
Baker's Tips
- The butter cake can be made up to 3 days ahead of using. Keep in an airtight container at room temperature.
- The Basil-infused custard, Roasted strawberries and Basil and lemon syrup can all be made up to 3 days ahead of serving. Keep separately in airtight containers in the fridge.
- This trifle can be assembled up to 8 hours ahead of serving. Top with fresh strawberries, dust with icing sugar and decorate with basil just before serving.
This recipe is from Anneka's SBS Food online column Bakeproof: Christmas Baking with Herbs. Click here for more Bakeproof columns and recipes.
Photography by Alan Benson.
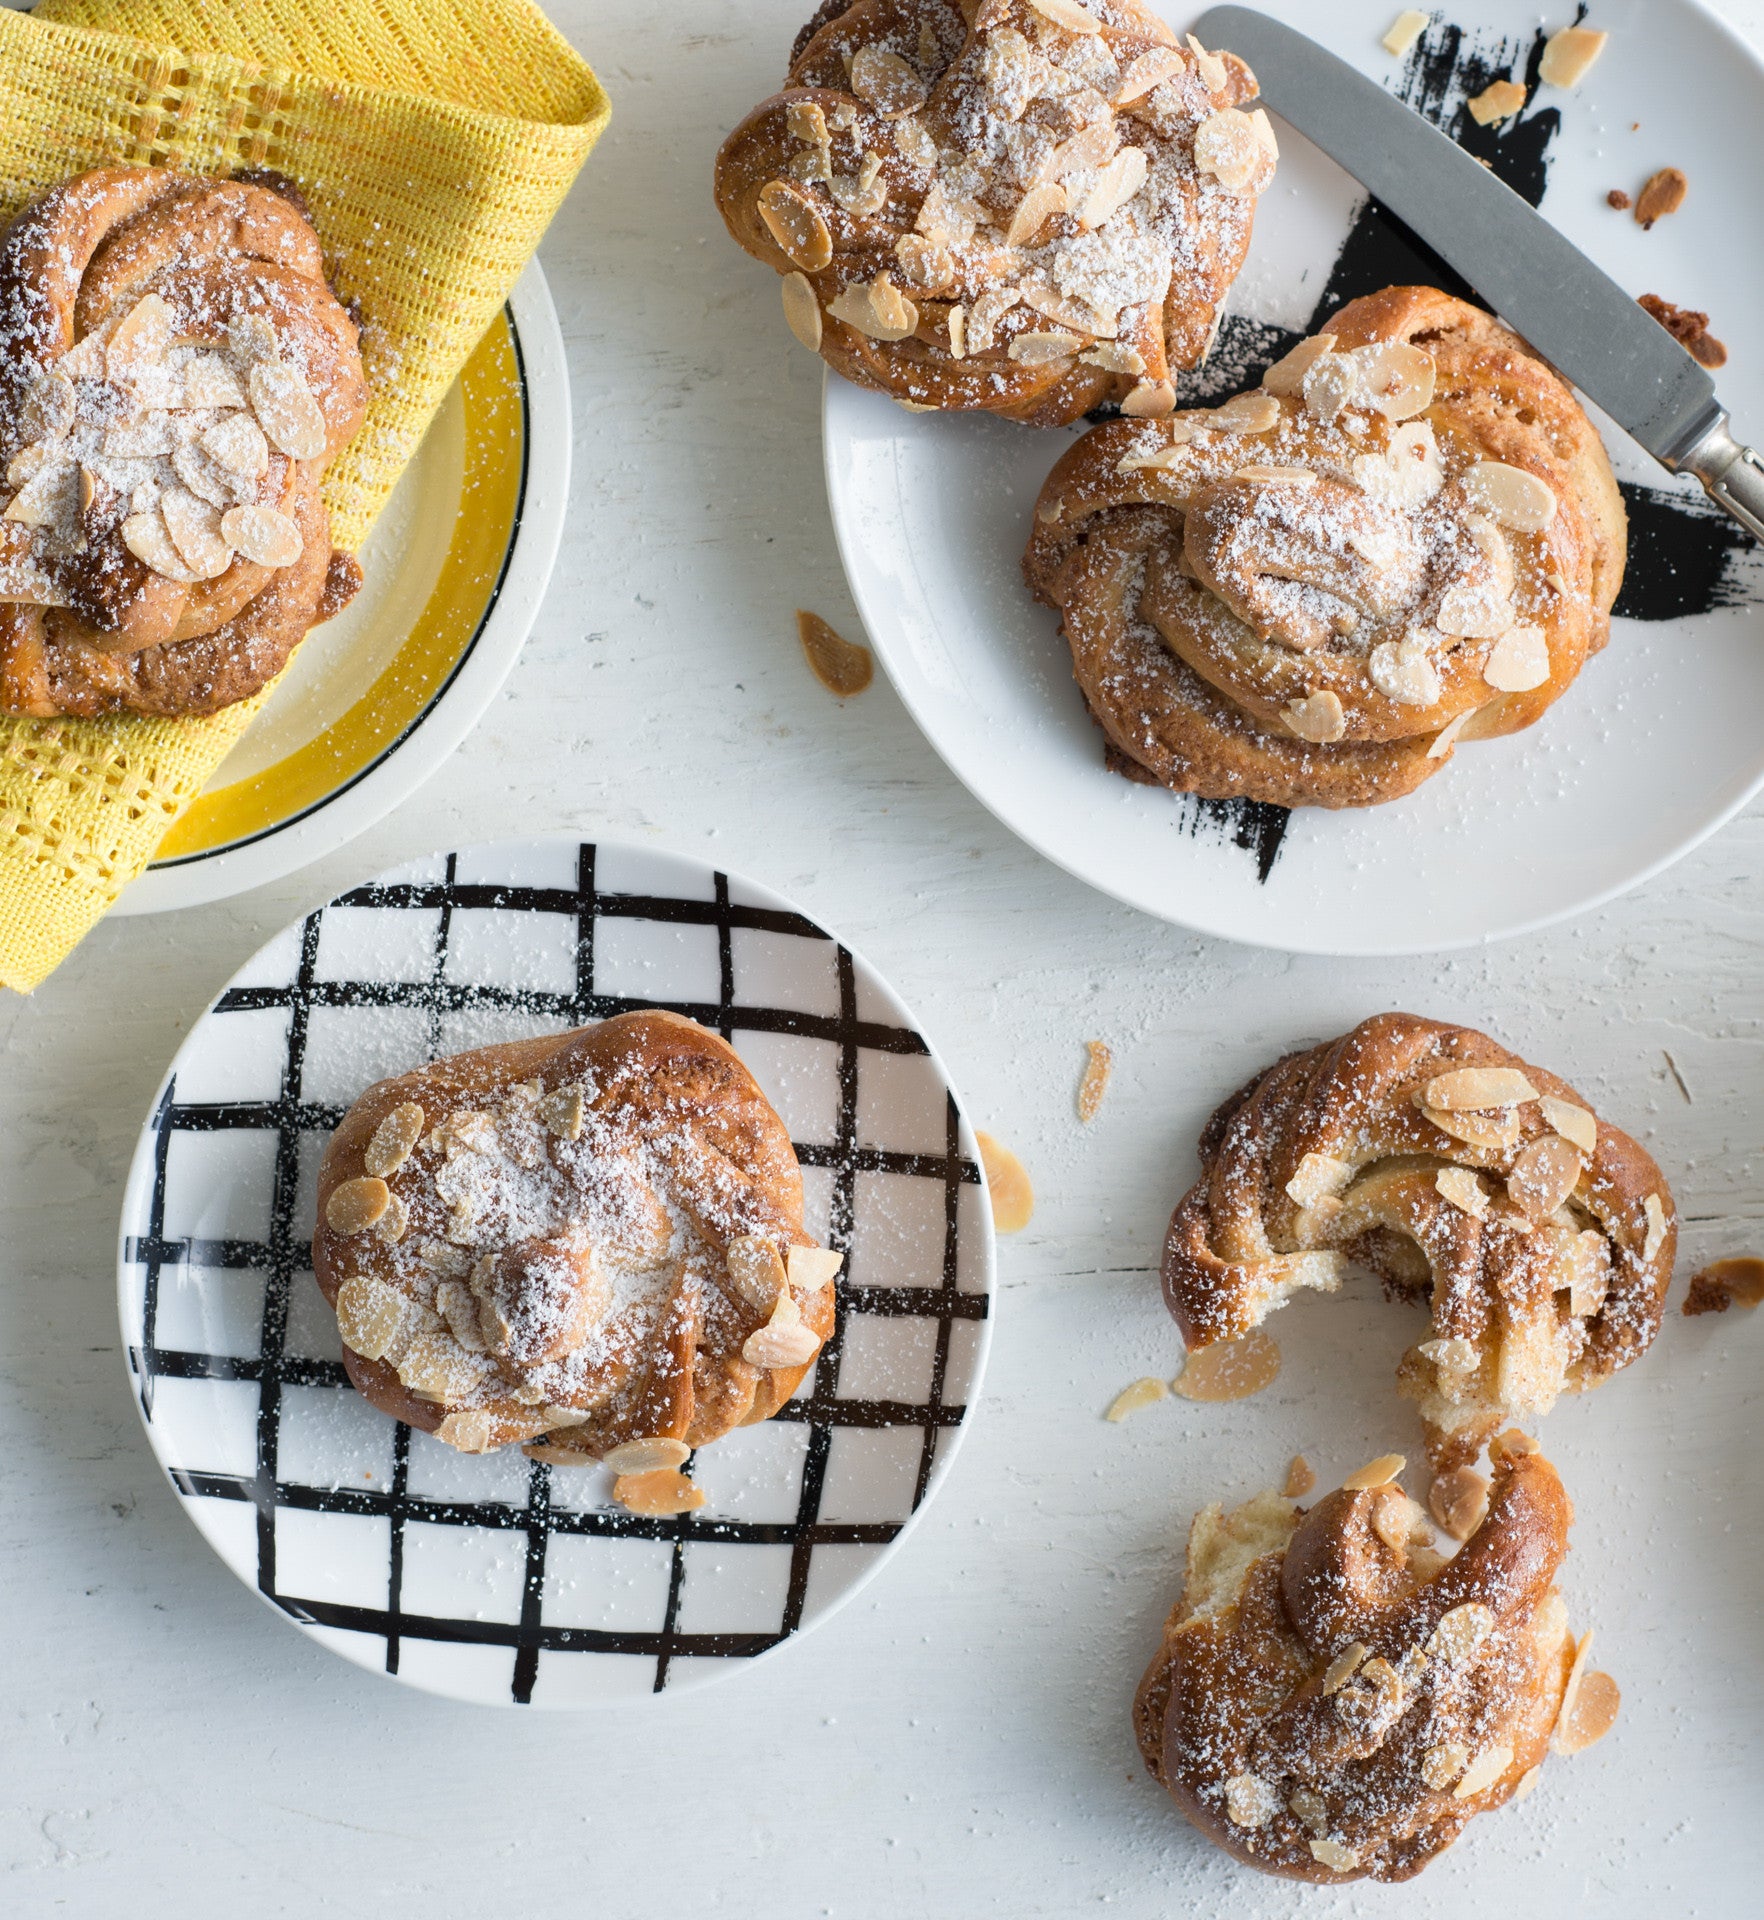
Prep 40min (+1hr 15min proving time)Bake 25minMakes about 16
The Swedes love their sweet buns so much they have even declared 4 October National Cinnamon Bun Day! These more-ish cinnamon-almond filled buns are the quintessential accompaniment to a fika (or coffee). The traditional twisting and shaping of them may seem a little tricky to start with but follow my instructions and watch this quick video and you’ll have it mastered in no time.
Ingredients
melted butter, to grease1 egg, lightly whisked, to glaze
flaked almonds or pearl sugar (see Baker's Tips), to sprinkle
Dough
450g (3 cups) strong bread or pizza flour, plus extra to dust55g (¼ cup) caster sugar
7g (1 sachet) dried yeast
1 teaspoon ground cardamom
½ teaspoon salt
300ml milk
100g butter, diced
1 teaspoon natural vanilla essence or extract
Almond filling
80g butter, at room temperature50g (½ cup) almond meal
50g marzipan
55g (¼ cup) caster sugar
1½ teaspoon ground cinnamon
Method
- To make the dough, combine the flour, sugar, yeast, cardamom and salt in a large bowl and make a well in the centre. Combine the milk and butter in a small saucepan and heat over low heat for 3–5 minutes or until the milk is lukewarm. Remove from heat, stir in the vanilla and set aside for 5 minutes, stirring occasionally with a fork, until the butter melts. Add to the flour mixture and use a wooden spoon and then your hands to mix to a soft dough.
- Turn the dough onto a lightly floured surface and knead for 8–10 minutes or until it is smooth and elastic and springs back when you push your finger into it (see Baker's Tips).
- Brush a large bowl with melted butter to grease. Add the dough turning it to coat lightly with the butter. Cover with plastic wrap and place in a warm, draught-free place for 1 hour or until doubled in size. (See Baker's Tips).
- To make the almond filling, place all the ingredients in a food processor and process until smooth and well combined, scraping down the side of the bowl when necessary. Set aside.
- Line two large baking trays with baking paper.
- When the dough has doubled in size knock it back by punching it in the centre with your fist. Turn onto a lightly floured surface and knead for 2–3 minutes or until smooth and elastic. Use a lightly floured rolling pin to roll out the dough into a 30 cm x 50 cm rectangle, about 0.5cm thick. Place the dough on the benchtop so that a long side is closest to you.
- Use a palette knife to spread the almond filling evenly over the lower half of the dough. Fold the top third down to cover the filling and then the bottom third up, pressing down firmly.
- Use a large, sharp knife to cut the dough into 16 strips, each about 3.5cm wide. Use the knife to cut each strip in half three-quarters of the way up towards the folded end to make two 'legs'. Hold a strip at opposite ends and pull gently to stretch slightly. Then twist the two 'legs' separately about three times. Tie the two 'legs' together in a simple knot and then tuck the opposite end under the knot.
- Repeat with the remaining dough strips, placing them about 5cm apart on the lined trays as they are shaped. Cover with a damp tea towel and set aside in a warm, draught-free place for 25–30 minutes or until risen and the dough no longer springs back when you poke it gently with a finger.
- Preheat the oven to 190°C (170°C fan-forced).
- Brush the rolls with the whisked egg to glaze and sprinkle with flaked almonds or pearl sugar. Bake the rolls in preheated oven for 25 minutes or until golden and sound hollow when tapped on the base. Serve warm or at room temperature.
Baker's Tips
- Pearl sugar (also known as hail or nib sugar) is a coarse white sugar used extensively in European baking. Because it retains its shape (it doesn’t melt during cooking) it adds a lovely textural sweet crunch to pastries, sweet breads and biscuits. Pearl sugar is available at specialty food stores and European-style delicatessens.
- The dough can be kneaded with an electric mixer, fitted with a dough hook, on low speed for 5–8 minutes or until smooth and elastic and comes away from the side of the bowl.
- The dough can be proved in the fridge overnight (in the greased, covered bowl). Stand in a warm, draught-free place for 1–2 hours, or until the dough reaches room temperature, before continuing with the recipe.
- These rolls are best eaten the day they are baked, however they do freeze well. To freeze, wrap individually in plastic wrap, seal them in an airtight container or freezer bag and freeze for up to 3 months. Thaw at room temperature. To reheat, place on a lined baking tray in an oven preheated to 160°C (140°C fan-forced) for 10 minutes or until heated through.
This recipe is from Anneka's SBS Food online column, Bakeproof: Scandi Baking.
CLICK HERE for more Bakeproof recipes.
Photography by Alan Benson.
Prep 15min (+chilling time)
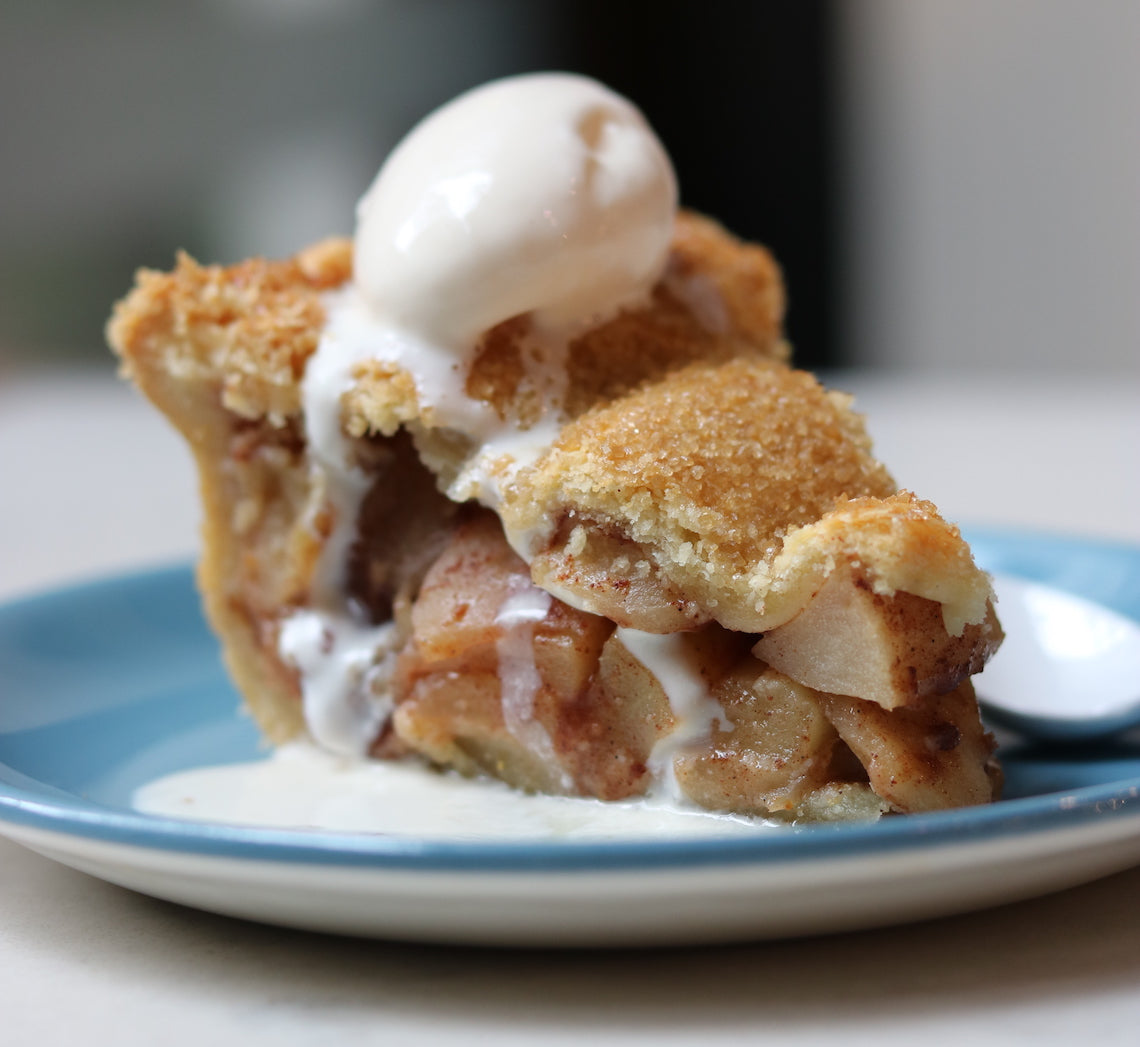
Shortcrust pastry, when you have a good recipe, is one of the simplest and quickest pastries to make. This sweet vanilla variety is great with a Classic Apple Pie.
Ingredients
200g (1⅓ cups) plain flour
2 tablespoons almond meal
2 tablespoons caster sugar
150g chilled salted butter, cubed
3 tablespoons iced water
1 teaspoon vanilla bean paste
Method
- Combine the flour, almond meal and caster sugar in the bowl of a food processor. Add the butter and use the pulse button to pulse until the mixture resembles fine breadcrumbs.
- Remove the lid of the food processor and sprinkle the water over the flour mixture and then add the vanilla bean paste. Continue to process using the pulse button until the mixture is evenly combined and just starts to come together (but hasn’t as yet formed a ball). The pastry should be soft but not sticky.
- Turn the pastry out onto a lightly floured, cool bench top. Knead lightly with your fingertips for about 10 seconds or until it comes together but isn’t completely smooth. Shape the pastry into a disc, wrap well in plastic wrap, and chill and use as directed.
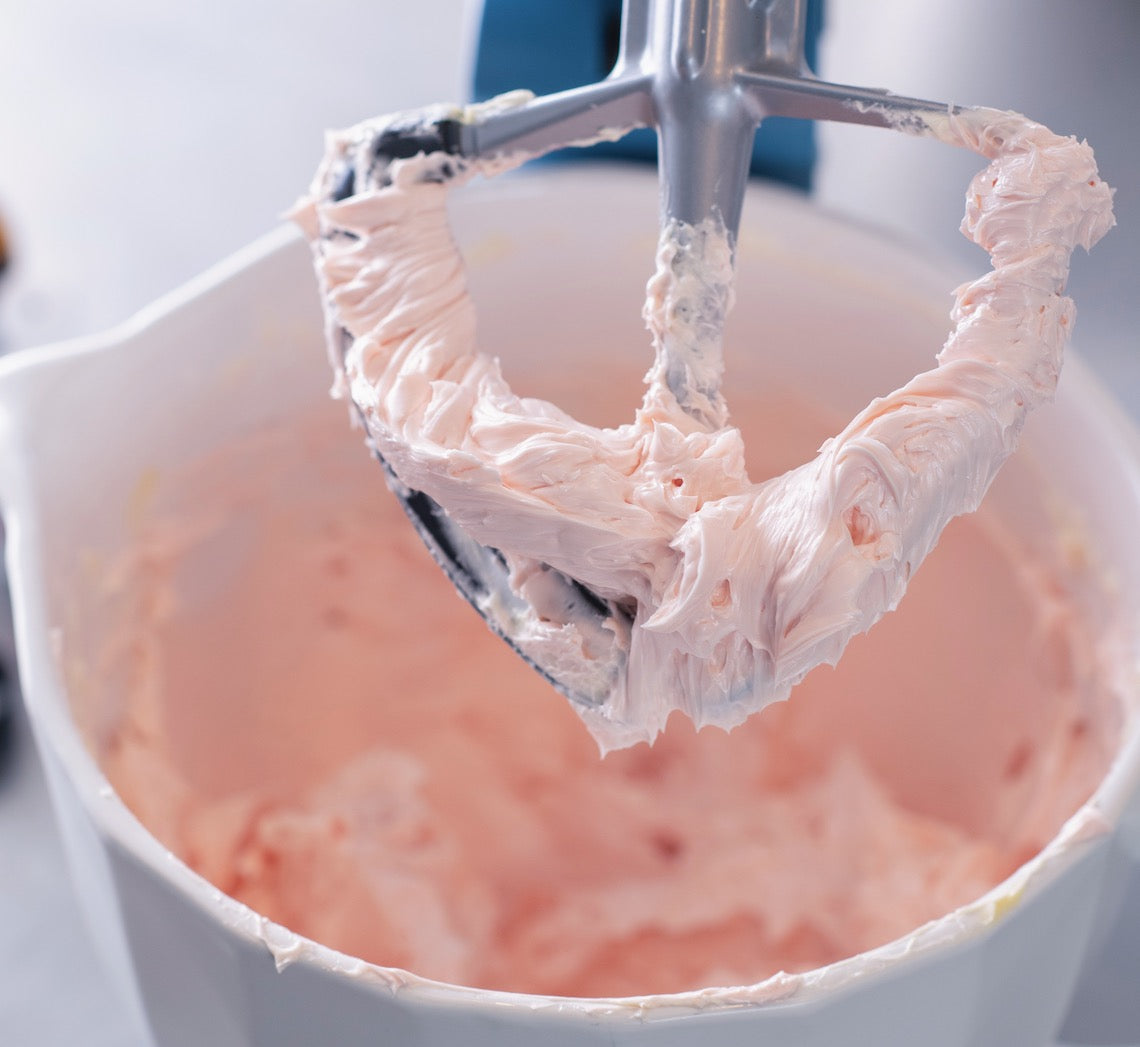
Prep 35-40minMakes about 3 cups
Ingredients
4 egg whites (from 59g/2oz eggs), at room temperature
220g (1 cup/7¾oz) caster sugar
250g (9oz) unsalted butter, cut into 8 equal portions, at room temperature
Good pinch of salt, or to taste
1 teaspoon natural vanilla essence or extract, or to taste
Food colouring gel of your choice (optional)
Method
- Combine the egg whites and sugar in a large heatproof bowl and place over a saucepan of barely simmering water (make sure the bowl does not touch the water). Stir with a whisk until the sugar is dissolved and the mixture reaches 65°C/150°F on a sugar thermometer.
- Transfer the mixture to the bowl of a stand mixer and whisk on medium-high speed with the whisk attachment for 10-15 minutes or until very thick and glossy and the mixture has cooled completely to room temperature.
- Replace the whisk attachment with the paddle beater. Beat on medium-high speed using the paddle beater for about 10 minutes adding a portion of butter one at a time and beating well after each addition until completely incorporated and smooth before adding the next portion of butter. If the mixture becomes lumpy or looks slightly curdled at any stage increase the speed to high and beat until smooth before adding the next portion of butter.
- Reduce speed to medium-low and beat for 3-4 minutes and the mixture is smooth and creamy. Beat in the salt and vanilla. Tint with gel colour to desired colour if using. Use imediately.
Baker's Tips
- This buttercream will keep in an airtight container in the fridge for up to 3 days or freezer for up to 3 months. Before using bring to room temperature/thaw and then beat with the paddle attachment on low speed for 4-5 minutes or until silky smooth again. Use immediately after beating.
Prep 30min (+40min proving)
Bake 15minMakes 4serves
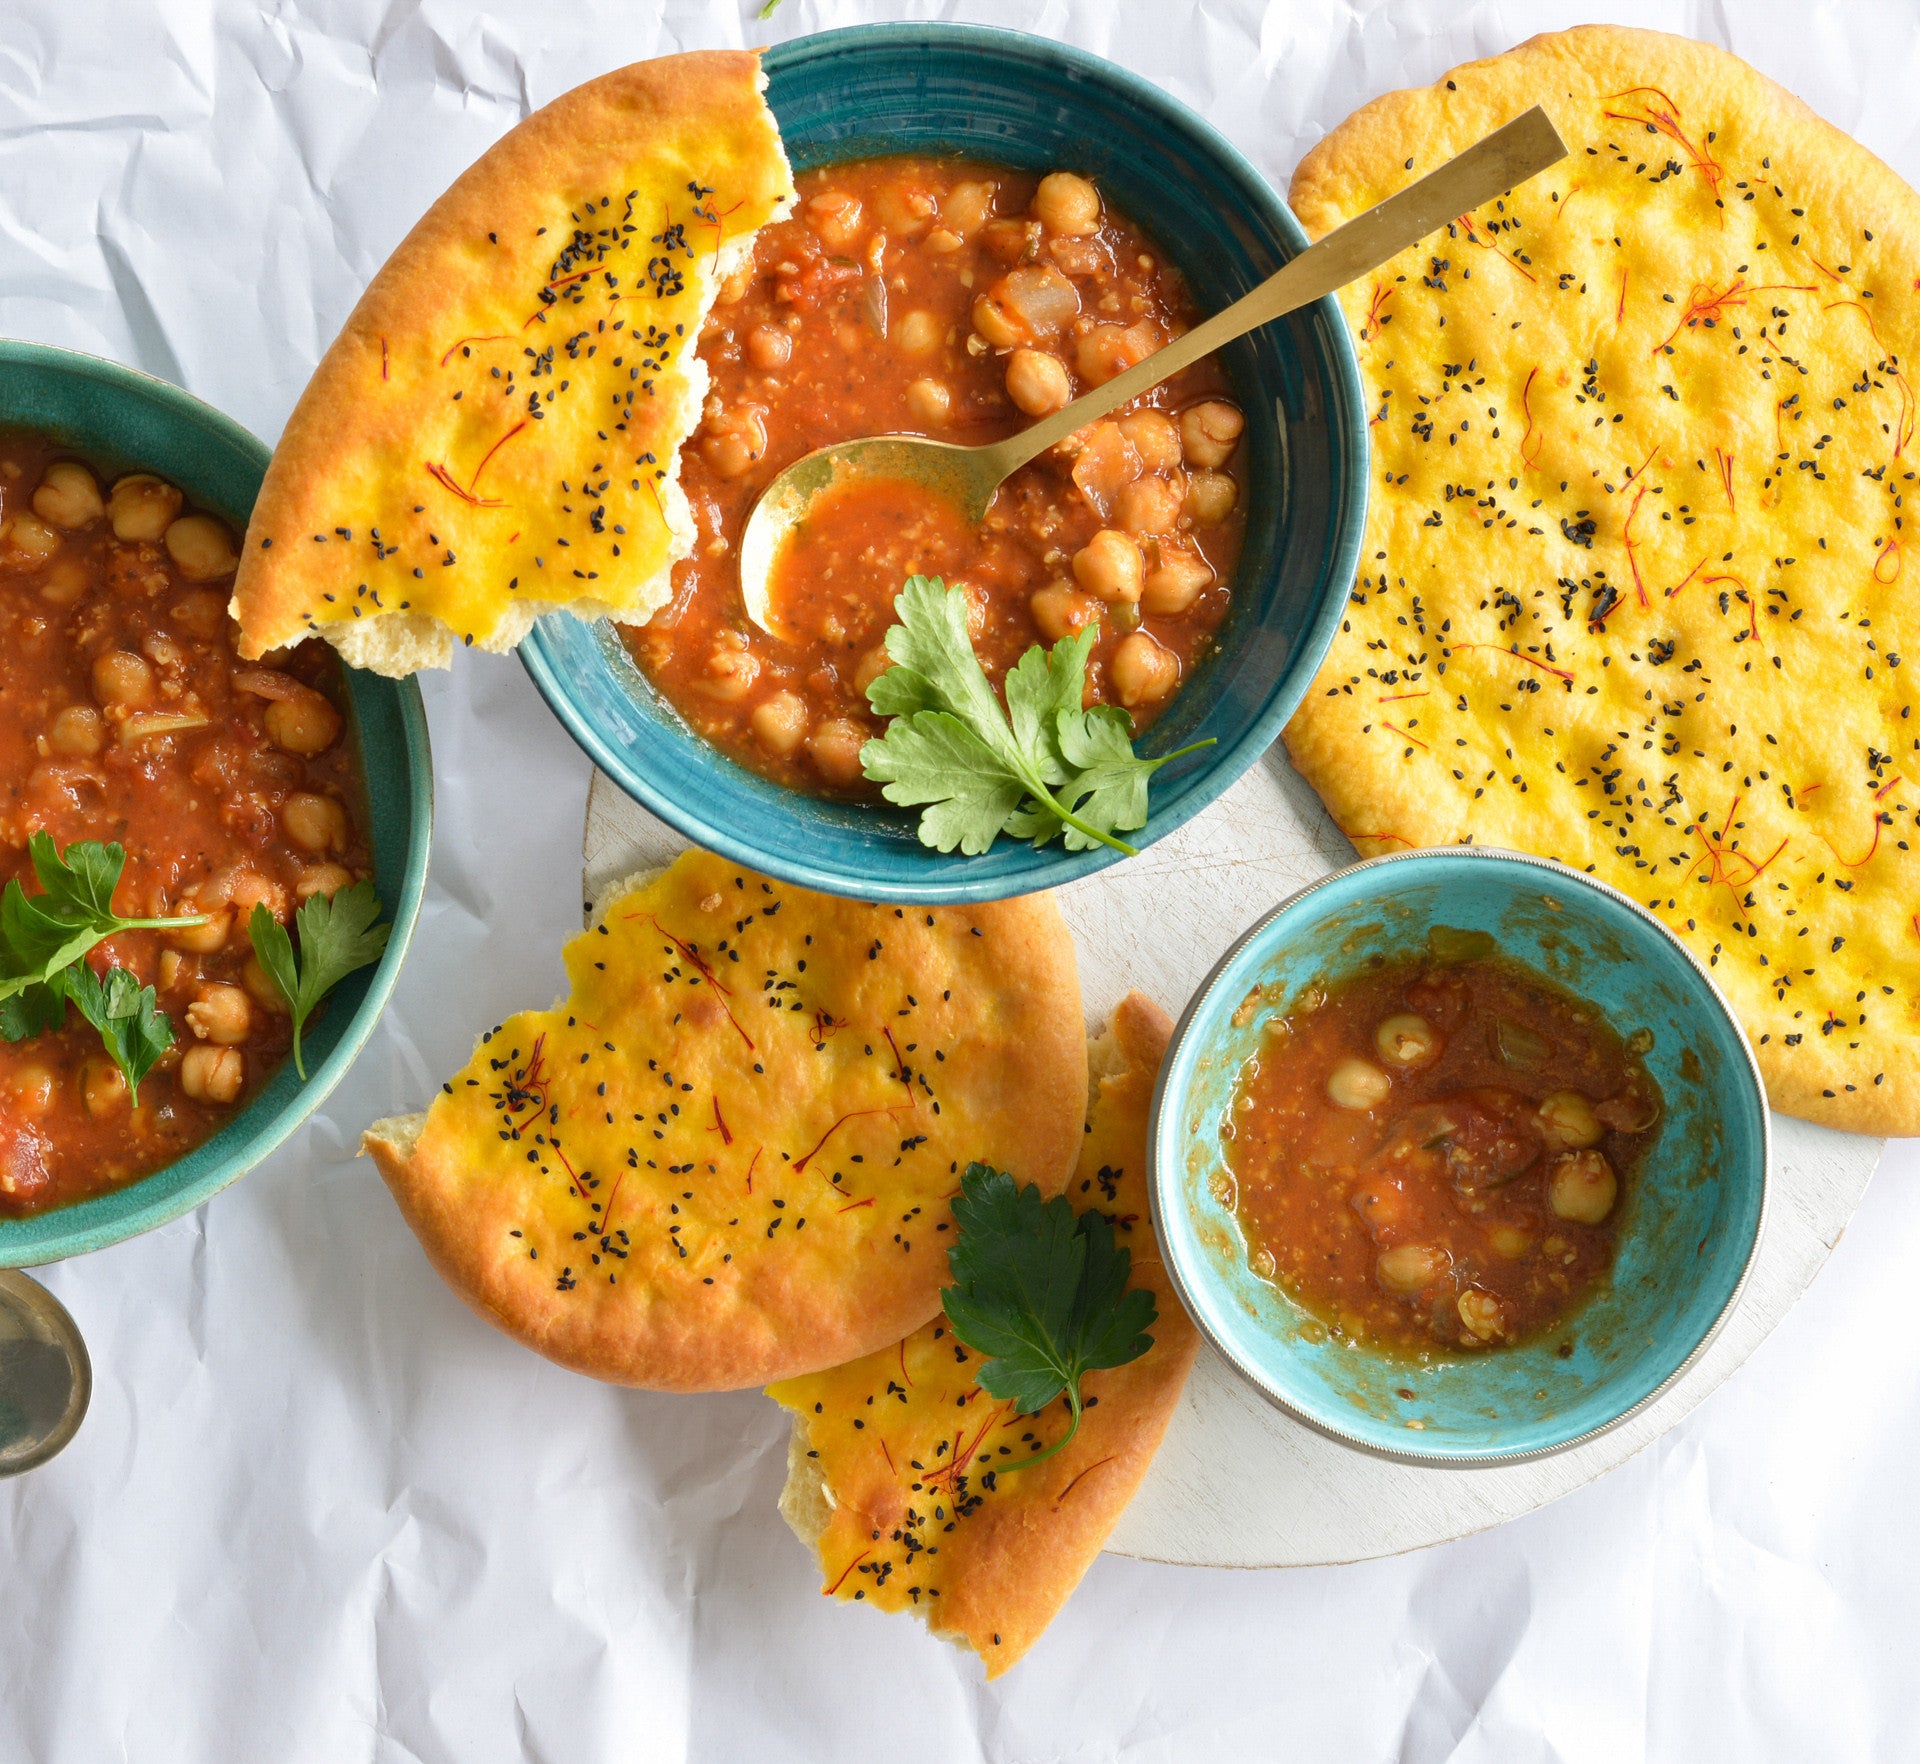
Similar to Indian Naan, just lighter and flakier (and in my opinion yummier), taftan is a hearth-baked flatbread from Persia and Pakistan. It is often flavoured with saffron – as this one is – which gives it a striking golden hue and alluring flavour perfect to serve alongside curries and soups (although don’t discount just nibbling it on its own).
Ingredients
- 260g (1¾ cups) bread or pizza flour
- 2 teaspoons sugar
- 1 teaspoon salt
- ½ teaspoon instant dried yeast
- 70g (3½ tbsp) ghee, melted
- 2 tablespoon Greek-style natural yoghurt
- 80ml (⅓ cup) milk
- 1 tablespoon vegetable oil, plus extra to grease
- 2 teaspoons nigella seeds
- 1 good pinch saffron, soaked in 1 tbsp hot water
Method
- Combine the flour, sugar, salt and yeast in a large bowl and make a well in the centre. Combine the milk, yoghurt and 40g (2 tablespoons) of the melted ghee, add to the dry ingredients and use a wooden spoon and then your hands to mix to a soft dough. Turn onto a lightly floured bench top and knead for 8-10 minutes or until smooth and elastic and springs back when you push your finger into it.
- Brush a medium bowl with extra oil to grease, add the dough and turn to coat. Cover with plastic wrap and set aside in a warm, draught-free place for 40 minutes or until risen slightly.
- Preheat the oven to 200°C (180°C fan-forced). Line two large heavy baking trays with baking paper.
- Knock back the dough by punching it in the centre with your fist. Turn onto a lightly floured bench top and knead for 2-3 minutes or until smooth and elastic and the dough has returned to its original size. Divide the dough evenly into 2 portions and brush each with the oil to coat.
- Use a rolling pin to roll out a portion into a rough circle about 22cm in diameter and 5mm thick. Then use your hands to pull one end to shape into a teardrop, about 17cm x 24cm, pressing the centre to create a thicker edge. Transfer to a baking tray and then use your fingertips to make indents all over the surface of the flatbread. Repeat with the remaining dough portion. Brush the flatbreads with the saffron liquid and then sprinkle with the nigella.
- Bake for 10 minutes. Brush the surface of the flatbreads with the remaining melted ghee. Swap the trays around and then bake for a further 5-10 minutes or until the flatbreads are golden and cooked through.
- Serve warm or at room temperature along side a soup or curry.
Baker's Tips
This flatbread will keep in an airtight container at room temperature for up to 2 days but it is best eaten the day it is baked.This recipe is from Anneka's SBS Food online column, Bakeproof: Yeast-leavened Flatbreads.
CLICK HERE for more Bakeproof recipes.
Photography by Alan Benson.
Prep 50min (+1hr 30min proving time)Bake 1hr 5minMakes about 36
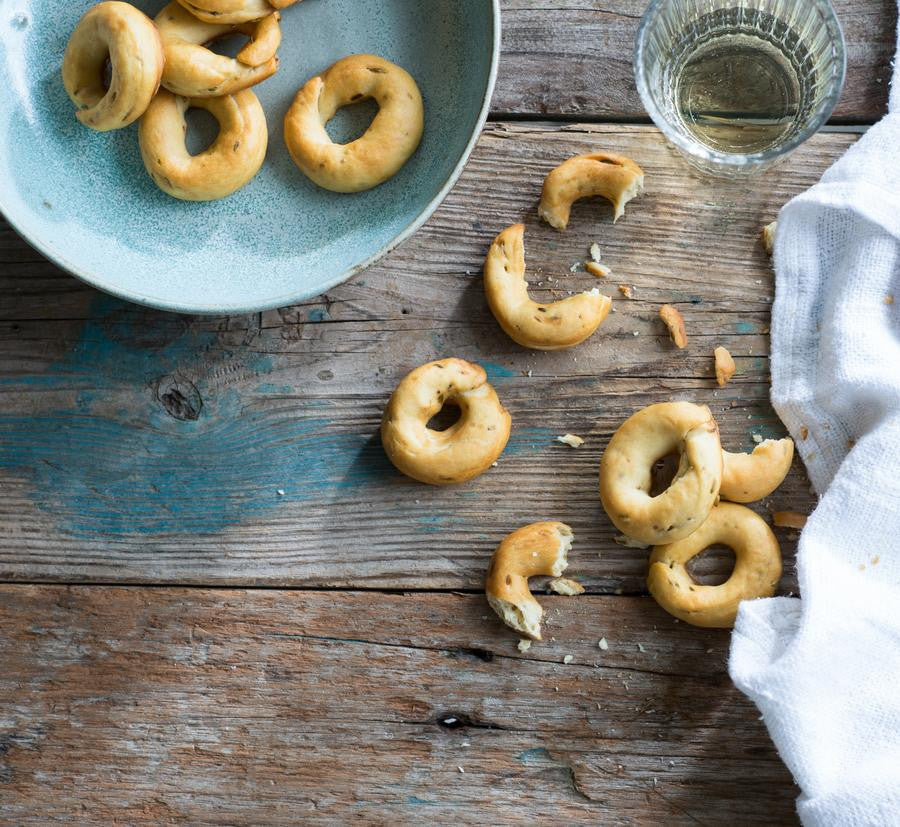
Traditionally served as a stuzzichini (an appetiser snack), these cute, crisp, fennel-scented biscuits hail from the Puglia region in the heel of Italy’s boot. Traditionally associated with Easter you will also often find them served throughout the year alongside an aperitif for dunking.
Ingredients
80ml (⅓ cup) lukewarm water
1 teaspoon dried yeast
60ml (¼ cup) extra virgin olive oil
60ml (¼ cup) dry white wine
300g (2 cups) bread or pizza flour, plus extra to dust (see Baker's Tips)
1 tablespoon fennel seeds, coarsely crushed
1 teaspoon freshly ground black pepper
1 teaspoon salt
1 tablespoon bicarbonate of soda
Method
- Combine the water and yeast in a jug, stir to combine and set aside in a warm draught-free place for 5 minutes or until frothy.
- Add the olive oil and wine to the yeast mixture. Combine the flour, fennel seeds, pepper and salt in a large bowl, make a well in the centre and add the yeast mixture. Use a wooden spoon and then your hands to mix to a soft dough. Turn the dough onto a lightly floured surface and knead for 5-8 minutes or until it is smooth and elastic and springs back when you push your finger into it.
- Place the dough in an oiled bowl, turning it to coat lightly with the oil. Cover with plastic wrap and place in a warm, draught-free place for 1 hour or until almost doubled in size.
- Line two large oven trays with non-stick baking paper.
- Knock back the dough by punching it in the centre with your fist. Turn onto a lightly floured surface and knead for 1-2 minutes or until it returns to its original volume.
- Divide the dough into 12 even portions. Roll each portion into a rope about 30cm long and then cut each into three shorter lengths, each about 10 cm long. Roll each length until 15cm long. Join the ends of each length, pinching to seal, to form rings. Place on the lined oven trays, leaving a little room for rising between each, cover with plastic wrap or a slightly damp tea towel and set aside in a warm, draught-free place for about 30 minutes or until well puffed.
- Preheat oven to 180°C (160°C fan-forced). Fill a large saucepan or large deep frying pan with water until about 8cm deep. Add the bicarbonate of soda and bring to the boil.
- Reduce the heat so that the water is simmering. Working quickly, carefully add 6 of the rings to the boiling water. Once they rise to the surface (this will only take a few seconds) use a slotted spoon to transfer the rings, one at a time, back to the lined oven trays, allowing any excess water to drain away. Repeat with the remaining rings in 5 more batches.
- Bake in preheated oven for 25 minutes or until dark golden, swapping the trays after 12 minutes. Reduce the oven temperature to 110°C (90°C fan-forced) and continue to bake for a further 40 minutes, swapping the trays after 20 minutes, or until crisp all the way through. Cool on the trays.
Baker's Tips
- Bread and pizza flour (also known as ‘strong’ flour) has a higher gluten-content than regular plain flour. This type of flour is more suited to use in yeast-based bread recipes like these biscuits and will give you a better texture that will have more ‘bite’ rather than a fine cake-like crumbly texture.
- These biscuits will keep in an airtight container at room temperature for up to 2 weeks.
- The butter for this recipe needs to be soft enough to spread but not so soft that is starts melting when you spread it.
- This bread is best eaten on the day it is made but will keep in an airtight container for up to 2 days.
Prep 30minBake 30minMakes 4-6 serves
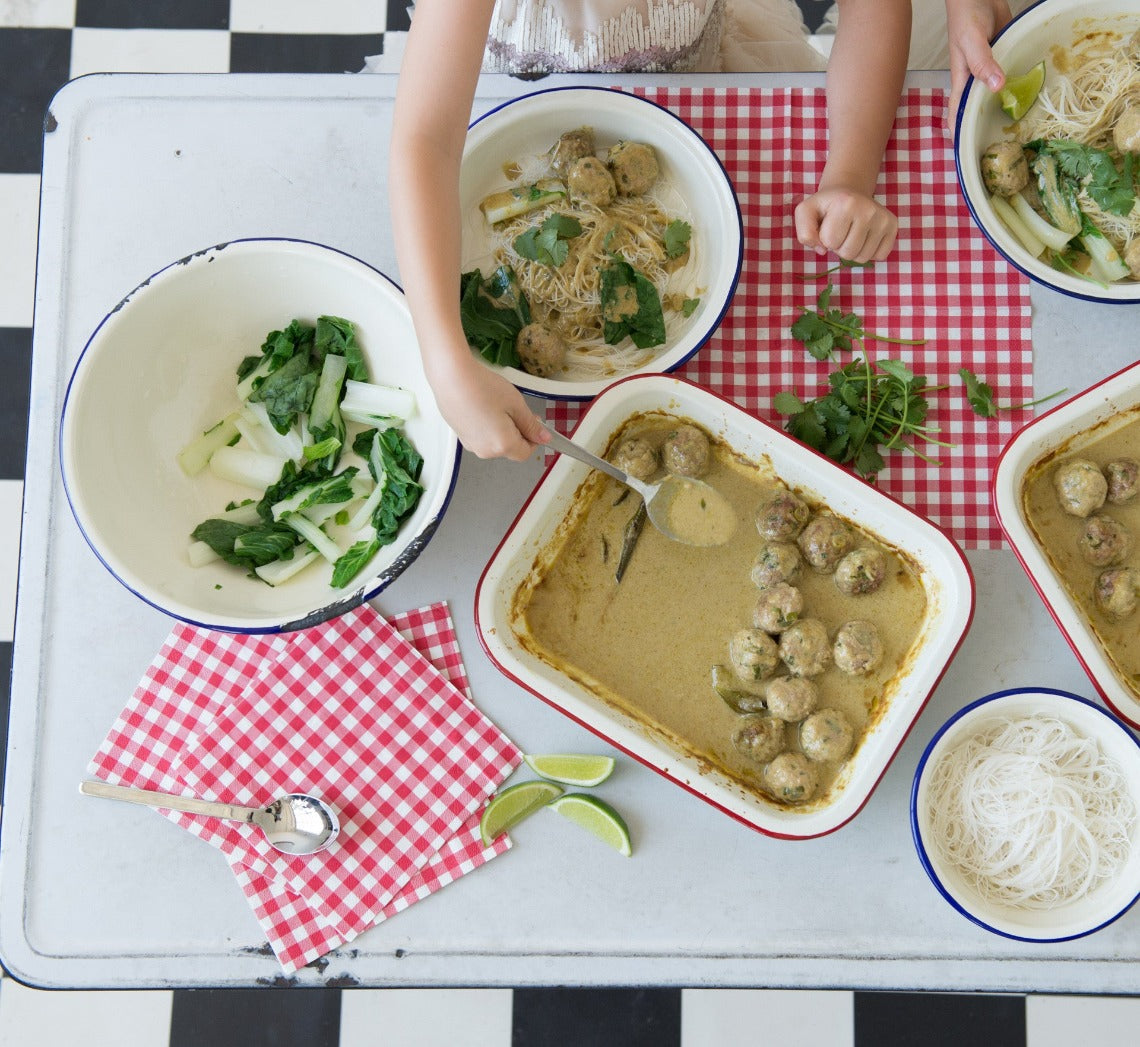
Any recipe that gets kids rolling balls of mixture will help develop their fine motor skills no matter what their age. Fun to make, these meatballs also encourage independence — put all the components in the middle of the table for everyone to help themselves.
Ingredients
200g dried rice vermicelli, cooked according to packet directions
fresh coriander leaves, lime wedges and steamed asian greens, to serve
Meatballs
500g pork and veal mince (see Baker's Tips)
18g (⅓ cup) panko rice crumbs
2 tablespoons milk
3 teaspoons finely grated fresh ginger
1½ tablespoons finely chopped drained canned water chestnuts
5 green shallots, thinly sliced
⅓ cup finely chopped coriander
Sauce
2 teaspoon peanut oil
3 tablespoons good-quality green curry paste, or to taste (see Baker's Tips)
125ml (½ cup) good-quality chicken stock
500ml (1 cup) water
440ml can coconut milk
4 kaffir lime leaves
2 teaspoons fish sauce, or to taste
1 tablespoon lime juice, or to taste
2 teaspoon grated palm or brown sugar, or to taste
Method
- Preheat oven to 180°C (160°C fan-forced).
- Combine the mince, crumbs, milk, ginger, water chestnuts, green shallots and coriander in a large bowl and mix well with your hands until thoroughly combined. Use damp hands to roll 2 teaspoonfuls of the mixture into balls and place in one layer in a shallow 20cm x 30cm/2.5 litre (10 cup) capacity ovenproof dish. Cover and place in the fridge while making the sauce.
- To make the sauce, combine the peanut oil and curry paste in a medium saucepan and cook over medium-high heat for 2-3 minutes, stirring occasionally, or until aromatic. Add the stock, coconut milk, kaffir lime leaves, fish sauce, lime juice and sugar and bring just to a simmer over medium heat.
- Pour the sauce over the meatballs. Bake in the preheated oven for 30 minutes or until the meatballs are just cooked through. Taste the sauce and adjust seasoning with extra fish sauce, lime just and sugar if desired.
- Divide the noodles among four bowls and spoon over the meatballs and some of the sauce. Top with coriander leaves and serve with lime wedges and steamed Asian greens.
Baker's Tips
- You can also use just pork mince for this recipe.
- You may find you need to use a little less or add a little more green curry paste depending on the brand you use as they can vary greatly in flavour and heat intensity. Keep also in mind your childrens' flavour preferences as you don’t want to make it too hot for their sensitive tastebuds.
Prep 10min (+soaking and cooling time)Bake 1hrMakes 8 serves
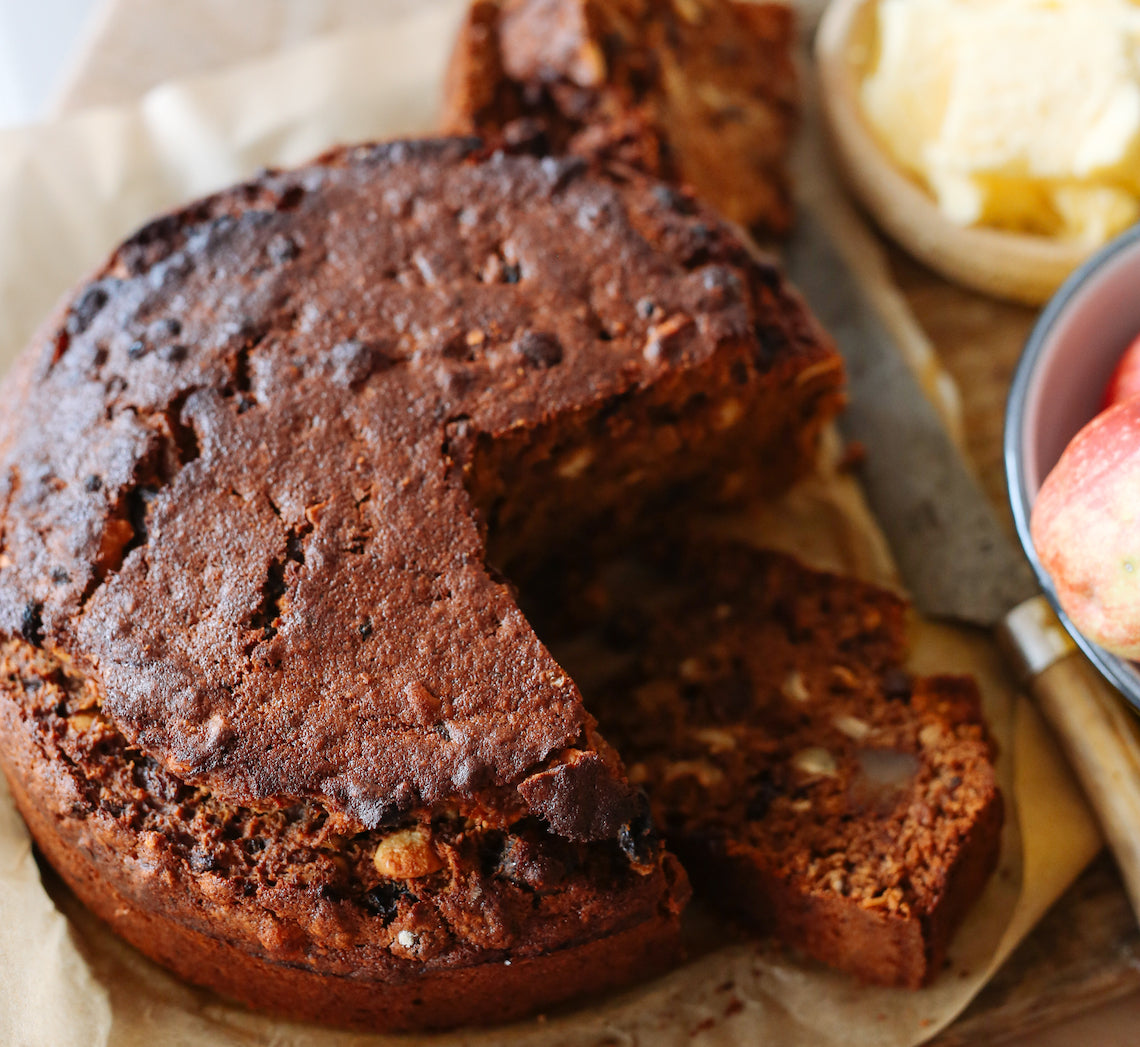
I found this in my late grandmother Helen’s recipe box, written out in her beautiful cursive. And with that heading, of course I had to try it. She was right. It is easy – almost entirely made in one saucepan, with just one wooden spoon. But it’s also wonderfully delicious, lasts for ages and, thanks to the soaked fruit and spices, could also pass as a Christmas cake.
I’ve made a few adjustments over the years, adding the nuts and soaking the fruit in brandy, which makes it feel a bit more special, but you could leave both those steps out, and it will still be great.
Ingredients
½ cup (125ml) brandy
2 cups (370g) mixed dried fruit (see Baker's Tip)
½ cup (125g) butter, cubed
¾ cup (165g) brown sugar
2 tablespoons treacle, or honey
1 teaspoon mixed spice
1 teaspoon ground ginger
1 teaspoon ground cinnamon
1 teaspoon bicarbonate of soda
2 eggs, lightly beaten
½ cup (70g) walnuts (ideally dry-toasted in the oven and roughly chopped)
1 cup (150g) plain flour
1 cup (150g) self-raising flour
Method
- Heat the brandy in a saucepan until just simmering. Remove from the heat and add the dried fruit. Leave to plump up for at least 30 minutes.
- To your soaked dried fruit, add the butter, sugar, treacle, spices, bicarbonate of soda and 1/2 cup (125 ml) water. Place over medium–high heat and bring to the boil, stirring as you go. Set aside to cool for 10 minutes.
- Grease and line a 22–24 cm cake tin with paper. Preheat the oven to 180°C.
- Add the eggs and mix to combine. Fold in the flours and a pinch of salt. Pour into the cake tin and bake for 1 hour, or until a skewer inserted in the centre comes out clean.
- Remove from the oven and cool for 10 minutes before gently removing from the tin.
Baker's Tip
- Gran didn’t specify which fruit to use, but I like a mixture of dried chopped apricots, figs, currants and cranberries. Just sultanas would also be great.
This recipe is from What Can I Bring by Sophie Hansen (Murdoch Books, RRP $49.99).
You can read more about what Sophie is baking this winter here.

$350.00/pp
more info- Products -
The Science of Baking – a 6-week online course that uncovers the "why" behind the "how" of baking, will run from 24th July – 4th September 2026.
This is a fun and fascinating course where you will learn how baking works and how to apply that knowledge to improve your baking. Anneka's knowledge and guidance was key to me learning as much as I did. What a great teacher! The videos were simple, clear and easy to understand. Excellent learning materials that I loved reading. Great recipes – some have become favourites already!
Lesley Schoer, Coffs Harbour
What is The Science of Baking? Watch the video below to find out!
You are invited to Anneka's online kitchen!
The Science of Baking is a 6-week online course that will uncover the “why” behind the “how” of baking. It will run from 24th July – 4th September 2026.
We will explore the most common ingredients and how they affect our baking when used in different ways. Once you understand the science of baking, you will be able to turn old baking failures into successes and troubleshoot as you bake from now on.
With Anneka Manning helping and encouraging you along the way, you’ll work through common baking mishaps – like why a cake hasn’t risen – and be guided through the science behind it, so you can apply this knowledge every single time you bake and ensure the best results.
The course will be delivered in 6 modules which are released weekly. Made up of videos, recipes, experiments, infographics and information sheets, you can download and print them off to study and enjoy at your own pace. The information will be presented in a fun and interesting way and will be backed up with practical projects, virtual live sessions with Anneka, online discussions and lots of support.
In just 6 weeks you will understand why you’re using particular ingredients and the science behind what happens when you use them to guarantee success whenever you bake. You’ll gain the confidence to try past failed recipes again as well as the skill to adjust recipes with success.
Understanding the science of baking will open your eyes to the bigger baking picture and truly transform the way that you bake from now on.
Dates
24th July – 4th September 2026
If you are interested in taking part in a future course, please fill out your details at the bottom of this page.
Cost
$350 (50% off for all BakeClub & Co. Members).
Student numbers
We will only be accepting a limited number of bakers for this course so that Anneka can provide personal feedback and timely answers to your baking questions.
My favourite part of the course was the structure for learning it offered. The course was presented in such a way that over the 6 weeks your knowledge grows and the process of baking starts to make more sense. I learnt such a lot from Anneka and the other participants. Anneka is so generous with sharing her knowledge. Questions posted on the online chat forum were answered in great detail ... I gained so much more than I expected and really enjoyed the 6 weeks. It was perfect.
Leanne Mahoney, Geelong
Live Session schedule
During the course, you will have access to weekly online Live Sessions with Anneka. During these Live Sessions Anneka will go over specific concepts covered in that week’s Module and you will also have the opportunity to ask her any related questions that have arisen for you as you work your way through the content. The Live Session dates and times will be confirmed closer to the start date of the course.
Who is this course suitable for?
Whether you’re an occasional cook or a diehard daily baker, there’s a huge amount to learn from The Science of Baking. If you are a beginner baker, we highly recommend that you complete our Baking Foundations online course (either as a guided or as a self-paced course) first.
As this course is completed online, it is suitable for students from all over the world.
What will I receive?
- Six downloadable course modules packed with invaluable information sheets, in-depth videos, carefully designed recipes, practical experiments, infographics and more – all created to deepen your understanding and enrich your learning.
- Personal, timely baking advice, guidance and encouragement from Anneka Manning throughout the course.
- Access to a private online forum where you can connect with Anneka and fellow students – asking questions, sharing discoveries and supporting one another as you explore the science behind baking.
- Weekly online Live Sessions with Anneka (see schedule above), where she expands on key concepts from each week’s module and answers your questions as they arise while you work through the content.
- The opportunity to explore the science of baking within a welcoming (virtual) community of like-minded bakers.
- Free membership to BakeClub & Co. for the duration of the course
- A thorough understanding of the “why” behind baking – and the ability to apply that knowledge to achieve consistent, reliable results.
- Membership to BakeClub’s exclusive The Kitchen Table online group upon completion of the course.
- Lasting baking confidence, knowledge and skills you can draw on every time you step into your kitchen.
What will I learn?
Each module will include a combination of baking theory and practical exercises including experiments and recipes. The experiments will bring the theory to life and really show you what is happening when we bake.
Module 1: Becoming an Observant Baker
The first module will introduce you to the concept of the “why” of baking and how becoming an observant – and mindful – baker can change the way you look at baking and, ultimately, the success you will have. You will also be taken through the 7 stages of baking helping you to fully understand what happens to your bake while in the oven.
Module 2: How Leavening Works
During the second module, we will explore what makes your baking rise and gives it lightness – we will look at what leavening is and how it works, the different types of leavening you can use in your baking and which ones are best used for particular recipes.
Module 3: Flour Proteins & Gluten
Gluten (flour protein) is one of the three main structure-builders in baking and is the most complex in the way it works. This module will explore the many factors that control how and to what extent gluten is developed in your bakes, as well as touch on gluten-free flours and what to be aware of when using them in your baking.
Module 4: Sugars
The fourth module will explore sugar including the nine important things that sugar does in your baking and how adjusting the amount or type of sugar in a recipe can really affect the results you get.
Module 5: Fats & Oils
When it comes to fats in your baking, it is not only the type used but also its consistency and how it is combined with the other ingredients, which will help determine the final texture, volume and flavour of your bake. The fifth module will explain the role that fats play in your baking.
Module 6: Eggs
The final module is all about eggs and its many roles. We will look at egg foams, how the freshness of eggs affect your baking as well as the science behind what happens when egg whites are whisked with sugar.
I could not recommend Anneka and her BakeClub team highly enough! The course was so informative, and the online resources were all of high quality and extremely useful. Anneka’s recipes are all delicious and well developed. Whether you bake a little or a lot, you will expand and improve your skills with BakeClub.
Abbey Gordon, Melbourne
How will I get the most out of this course?
To gain the greatest benefit from this course, we recommend setting aside 3–4 hours each week to read the content, watch the videos, attend the weekly Live Session, carry out the experiments and bake the recipes. This regular commitment will allow you to truly absorb the concepts and see them come to life in your kitchen.
We understand that life can occasionally interrupt the best intentions – which is why you’ll have 6 months’ access to the course materials. By giving the course your time and attention, you’ll experience meaningful improvement in your baking and enjoy the full range of benefits it’s designed to deliver.
So, is The Science of Baking for me?
- Would you love to understand the why behind baking – and know exactly what’s happening as your ingredients transform in the oven
- Are you curious about why some bakes don’t turn out as expected – and how to troubleshoot and fix them with confidence?
- Would you like to deepen, strengthen and refine your baking skills?
- Do you want to move beyond simply following recipes and instead understand how ingredients interact and influence your results?
- Would you feel more confident tackling tricky recipes – or retrying past “failures” – knowing you truly understand what went wrong?
- Do you enjoy practical, hands-on experiments that bring baking theory to life in your own kitchen?
- Do you enjoy connecting with like-minded people and sharing your love of baking?
If any of these questions resonate with you, then The Science of Baking is the course for you!
My favourite part was being able to ask questions throughout the course based on the baking you were doing, or what you saw others doing. I absolutely respect Anneka's ability to be able to offer information in a very clear and concise manner and I got more than expected from the course. If you are interested in understanding what is happening when you bake, so that you can get better outcomes, then you must do this course!
Gina Hughes, Perth
If you're interested in enrolling in a future course, please fill out your details below and you'll be one of the first to know when bookings open.
Prep 30min (+3hr chilling and 2hr cooling time)Bake 35minMakes 12 serves
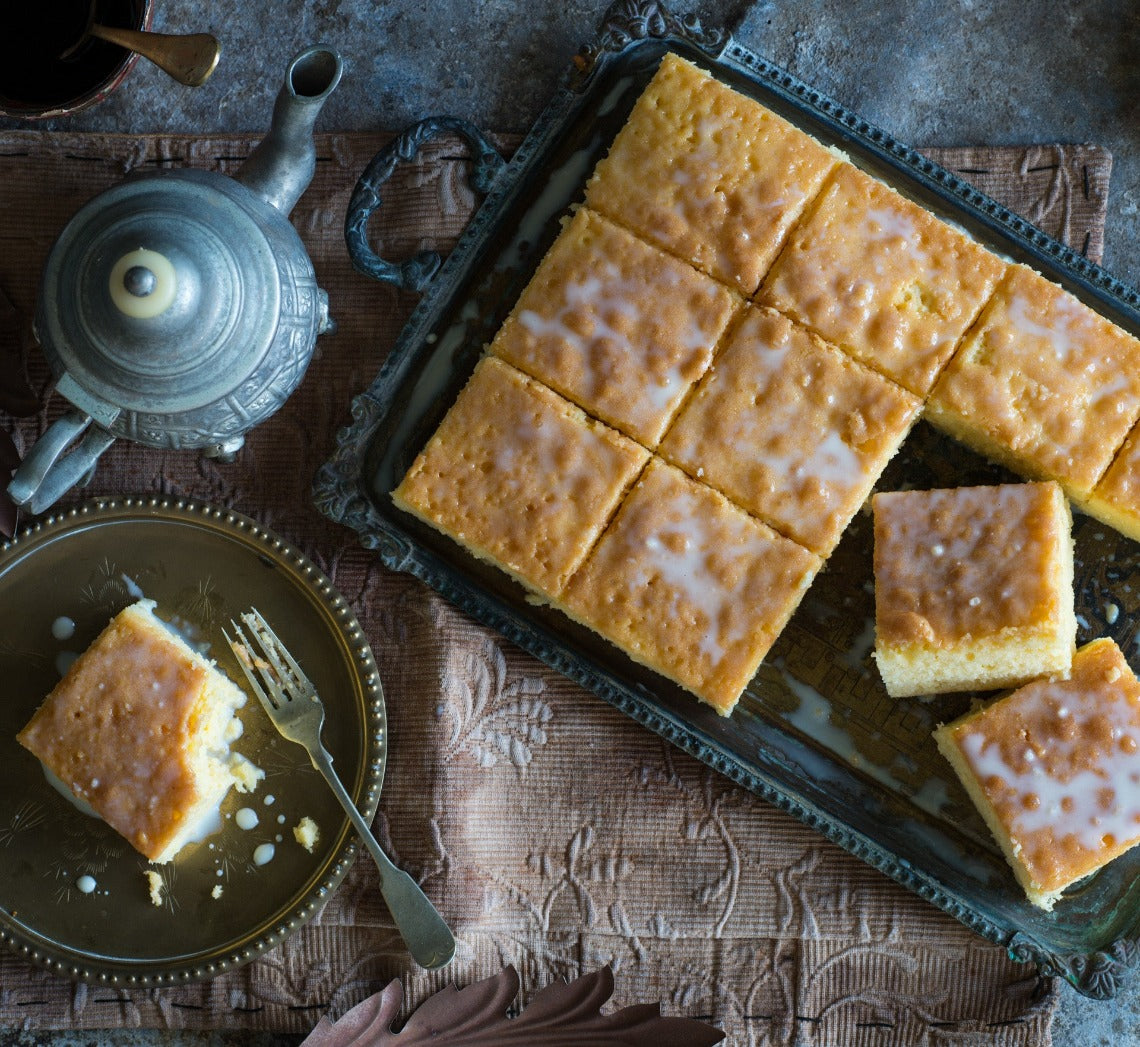
Immensely well-loved in Latin America, a recipe for this wonderfully milky cake appeared on the label of Nestle’s sweetened condensed milk cans in the 1940s, possible explaining why its popularity has spread so widely in this part of the world.
Ingredients
Sponge Cake
5 eggs, at room temperature
220g (1 cup/7¾oz) caster sugar
125g (4½oz) butter, melted
150g (1 cup/5¼oz) plain flour
75g (½ cup/2¾oz) self-raising flour
1 teaspoon natural vanilla essence or extract
Milk Syrup
395g tin sweetened condensed milk
150ml evaporated milk
250ml (1 cup) full-cream milk
Method
- Preheat the oven to 180°C/350°F (160°C/315°F fan-forced). Grease a 20cm x 30cm (8in x 12in), base measurement, shallow cake tin or lamington pan and line the base and two longs sides with one piece of non-stick baking paper.
- Use an electric mixer with a whisk attachment to whisk the eggs on high speed until combined. Gradually add the sugar, about 55g (¼ cup/2oz) at a time, whisking well after each addition. Once all the sugar has been added, whisk on high for a further 4 minutes or until the mixture is very thick and a ribbon trail forms when the whisk is lifted. Reduce the mixer speed to low and gradually add the melted butter, whisking until just incorporated. Sift together the plain and self-raising flours. Add to the egg mixture in three separate batches, whisking on low speed between each addition until just combined and scraping the bottom of the bowl when necessary to make sure all the flour is incorporated.
- Pour batter into the prepared tin and gently tap it on the bench three times to remove any excess air bubbles. Bake in preheated oven for 30-35 minutes or until the cake is firm when touched in the centre and a skewer inserted in the centre comes out clean.
- Just before the sponge is ready, make the Milk Syrup by combining the sweetened condensed milk, evaporated milk and milk in and bowl and stirring with a balloon whisk until well combined. Transfer to a jug.
- Remove the sponge from the oven and stand in the tin for 3 minutes before inverting onto a tray with a lip. Use a skewer to prick holes all over the surface of the cake and all the way through. Pour the milk mixture evenly and slowly over the warm cake, allowing it to soak it up. Stand at room temperature until cool (this will take about 2 hours) and then refrigerate, uncovered, for 3 hours or overnight. Cut into pieces to serve (see Baker's Tips).
Baker's Tips
- For an extra rich cake you can top it with 375 ml (1½ cups) thickened cream that has been whisked to soft peaks with 2 tablespoons of sifted icing sugar and 1 teaspoon of natural vanilla essence or extract before serving.
- This cake will keep covered in the fridge for up to 3 days. Serve at room temperature.
This recipe is from Anneka's SBS Food online column, Bakeproof: Latin American Cakes.
CLICK HERE for more Bakeproof recipes.
Photography by Alan Benson.
Prep 40min (+2hr 30min chilling and 20min cooling time)Bake 15minMakes 8 serves
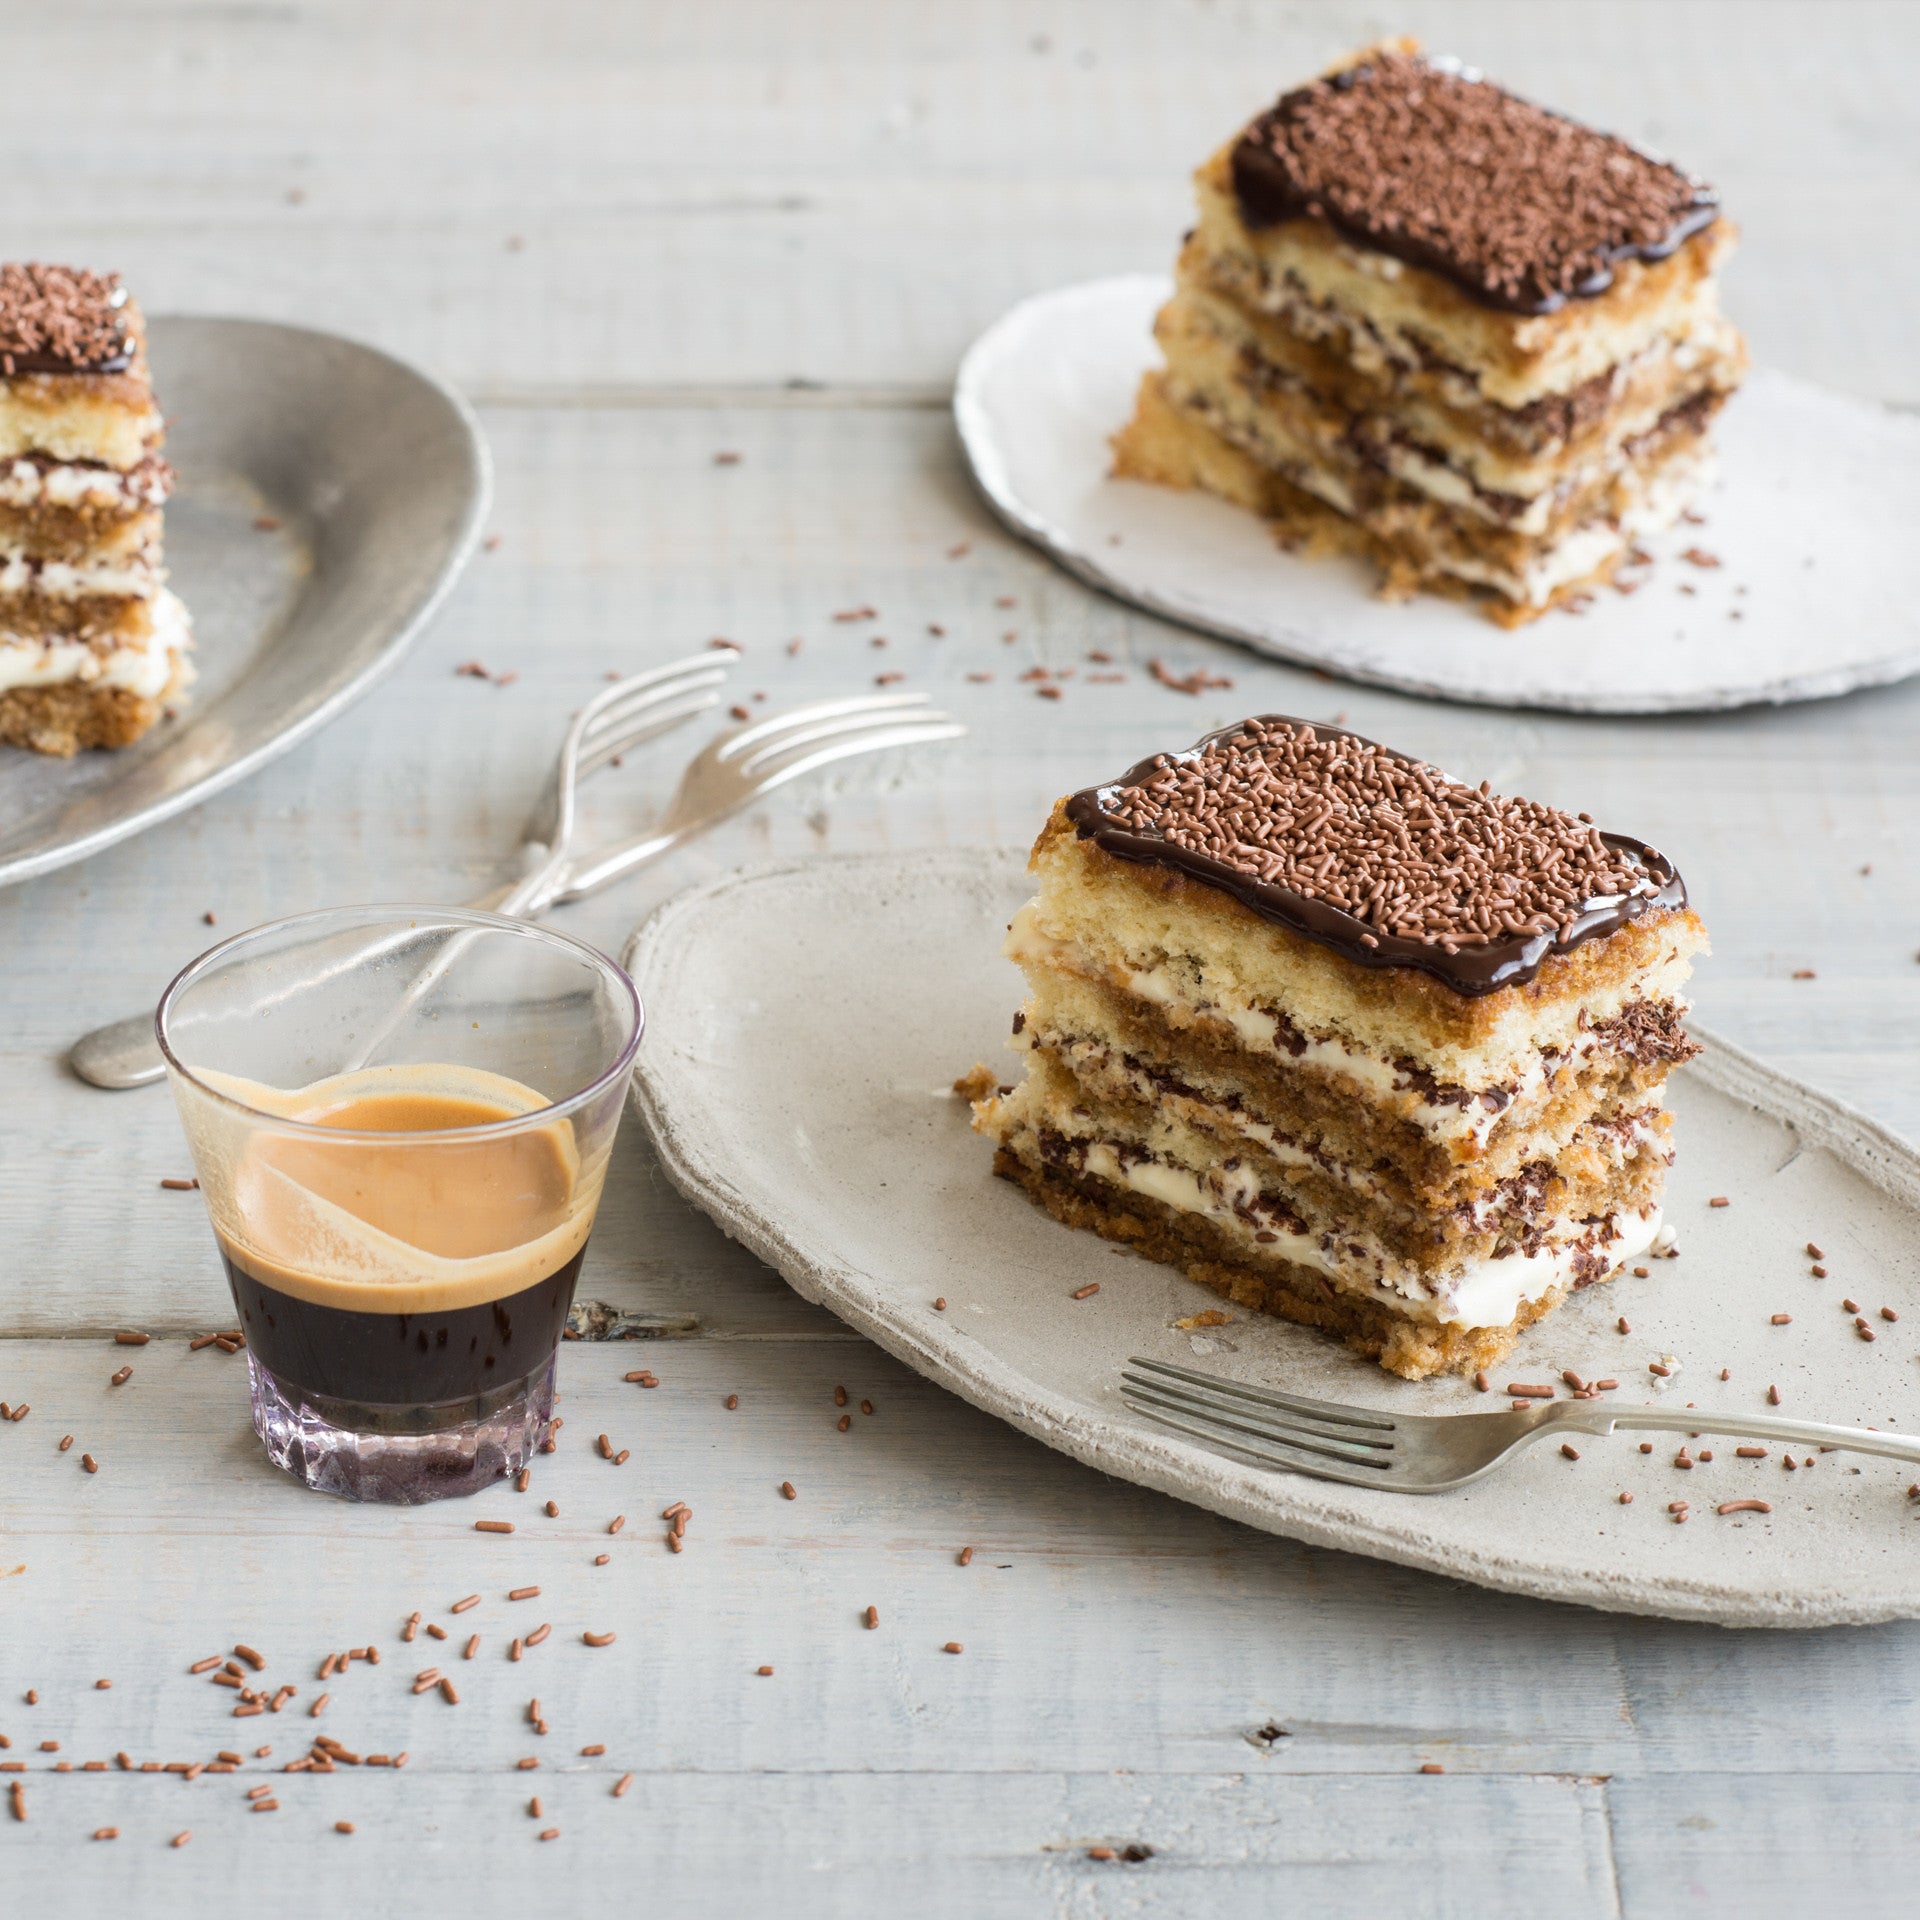
This Italian classic is taken to a whole new level as elegant individual dessert cakes with a rich chocolate topping... Just serve with a fork!
Ingredients
185ml (¾ cup) strong freshly brewed coffee60ml (¼ cup) Marsala
75g good-quality dark chocolate (70% cocoa), grated
Chocolate dollar fives, to sprinkle (optional)
Sponge Layers
Melted butter, to grease4 eggs, at room temperature
165g (¾ cup) caster sugar
60ml (¼ cup) milk
20g butter
110g (¾ cup) self-raising flour, plus extra to dust
30g (¼ cup) cornflour
Mascarpone mixture
150ml thickened cream90g (⅔ cup) icing sugar, sifted
125g mascarpone
Chocolate ganache
250g good-quality dark chocolate (54% cocoa), chopped80ml (⅓ cup) pouring cream
Method
- To make the Sponge Layers, place the oven rack in the lower third of the oven and then preheat it to 180°C (160°C fan-forced). Brush two 30cm x 20cm shallow cake tin with a little melted butter to lightly grease and hen line the base and sides with one piece of baking paper, cutting into the corners to fit.
- Use an electric mixer with a whisk attachment on high speed to whisk the eggs and sugar in a large bowl until until the mixture is very thick and pale (this will take about 5 minutes). Lift the whisk out of the mixture and draw a figure eight, if the trail stays on the surface long enough for you to finish drawing then the mixture is ready. If not, continue to whisk for a further minutes and then test again.
- Heat the milk and butter in a small saucepan over medium heat just until the butter melts. Remove from the heat. Sift the flour and cornflour together over the egg mixture. Immediately pour the warm milk mixture down the side of the bowl and whisk again with the electric mixer briefly, until the flour mixture is just incorporated (be careful not to over mix).
- Divide the mixture evenly between the prepared tins, and use a spatula or the back of a spoon to spread evenly. Gently tap the tins on the bench top three times to settle the mixture. Bake in preheated oven for 12-14 minutes or until the cake is a pale golden colour, spring back when lightly touched in the centre and start pulling away from the sides of the tin. Remove from the oven and stand for 2 minutes before turning onto a wire rack to cool completely (this will take about 20 minutes).
- Line the base and sides of a 16cm x 26cm cake tin with two strips of non-stick baking paper allowing the paper to overhand the sides by about 10cm.
- To make the mascarpone mixture, use an electric mixer with a whisk attachment to whisk the cream and icing sugar on medium speed until soft peaks form. Add the mascarpone and whisk until firm peaks just form.
- Cut each of the sponge in half. Combine the coffee and Marsala. Place one sponge layer on the base of the prepared tin and sprinkle with a quarter of the coffee mixture. Spread with a third of the Mascarpone mixture (about ½ cup) and then sprinkle with a third of the grated chocolate. Continue to layer with the remaining sponge, coffee mixture, grated chocolate and mascarpone mixture, finishing with a sponge layer sprinkled with the remaining coffee and Marsala mixture. Cover with plastic wrap and place in the fridge for at least 2 hours or until firm enough to cut.
- Use the overhanging baking paper to remove the tiramisu from the tin and transfer to a cutting board. Use a sharp knife trim the edges and then cut into 8 portions about 4.5cm x 7cm each and place on a wire rack over a tray. Return to the fridge while making the Chocolate ganache
- To make the Chocolate ganache, combine the chocolate and cream in a heatproof bowl and place over a saucepan of barely simmering water (make sure the base of the bowl doesn’t touch the water). Stir occasionally until just melted and combined.
- Remove the cakes from the fridge and place on a wire rack. Pour a little of the Chocolate ganache over each cake, spreading it to cover the top. Sprinkle with the chocolate Dollar Fives if using and return to the fridge for 30 minutes or until the ganache is set before serving.
Baker's Tips
- These Tiramisu cakes will keep in an airtight container in the fridge for up to 3 days.
This recipe is from Anneka's SBS Food online column, Bakeproof: Little Cakes. CLICK HERE for more Bakeproof recipes.
Photography by Alan Benson.


