BakeRecipes
Basic sourdough bread
Prep 1hr (+12-14hrs / overnight + 30min standing, 8.5-10hrs proving and 1hr cooling time)Bake 45-50minMakes 2 standard loaves
This is a well-tested recipe to begin your sourdough baking. It's made with white flour but you can use spelt instead.
This recipe is one I have made many times with great results. Before you get started, read over my tips and tricks for making and baking sourdough bread.
It does take at least 24 hours from start to finish but time is what helps create a great loaf of sourdough. I have included some time variations throughout to allow the making of this sourdough fit more easily into your day. This dough is folded six times (not kneaded) with rests in between. Below is a timeline to help you map out your day of baking:
Feed your sourdough starter to get it active, 4–8 hours
↓ ↓
Make levain, stand 12 hours (overnight)
↓ ↓
Mix levain + dough, stand 1 hour
↓ ↓
1st folding, prove 30 minutes
↓ ↓
2nd folding, prove 30 minutes
↓ ↓
3rd folding, prove 30 minutes
↓ ↓
4th folding, prove 30 minutes
↓ ↓
5th folding, prove 30 minutes
↓ ↓
6th folding, prove 1 hour (or up to 4 hours)
↓ ↓
Cut into loaves, prove 1—2 hours
↓ ↓
Shape loaves, prove 2—3 hours
(OR prove 1 hour, then transfer to fridge for 12-14 hours)
↓ ↓
Bake at 240ºC for 20 minutes, then 220ºC for 20-25 minutes
↓ ↓
Cool (1 hour), slice, eat!
Ingredients
Strong bread or pizza flour (12-15% protein content), for dusting
Rice flour, for preparing proving baskets (optional)
Levain
50g active sourdough starter80g (80ml/⅓ cup) lukewarm water
75g (½ cup) strong bread or pizza flour (12-15% protein content)
Dough
500g (500ml/2 cups) lukewarm water700g (4⅔ cups) strong bread or pizza flour (12-15% protein content), plus extra for dusting
2½ teaspoons fine sea salt
Method
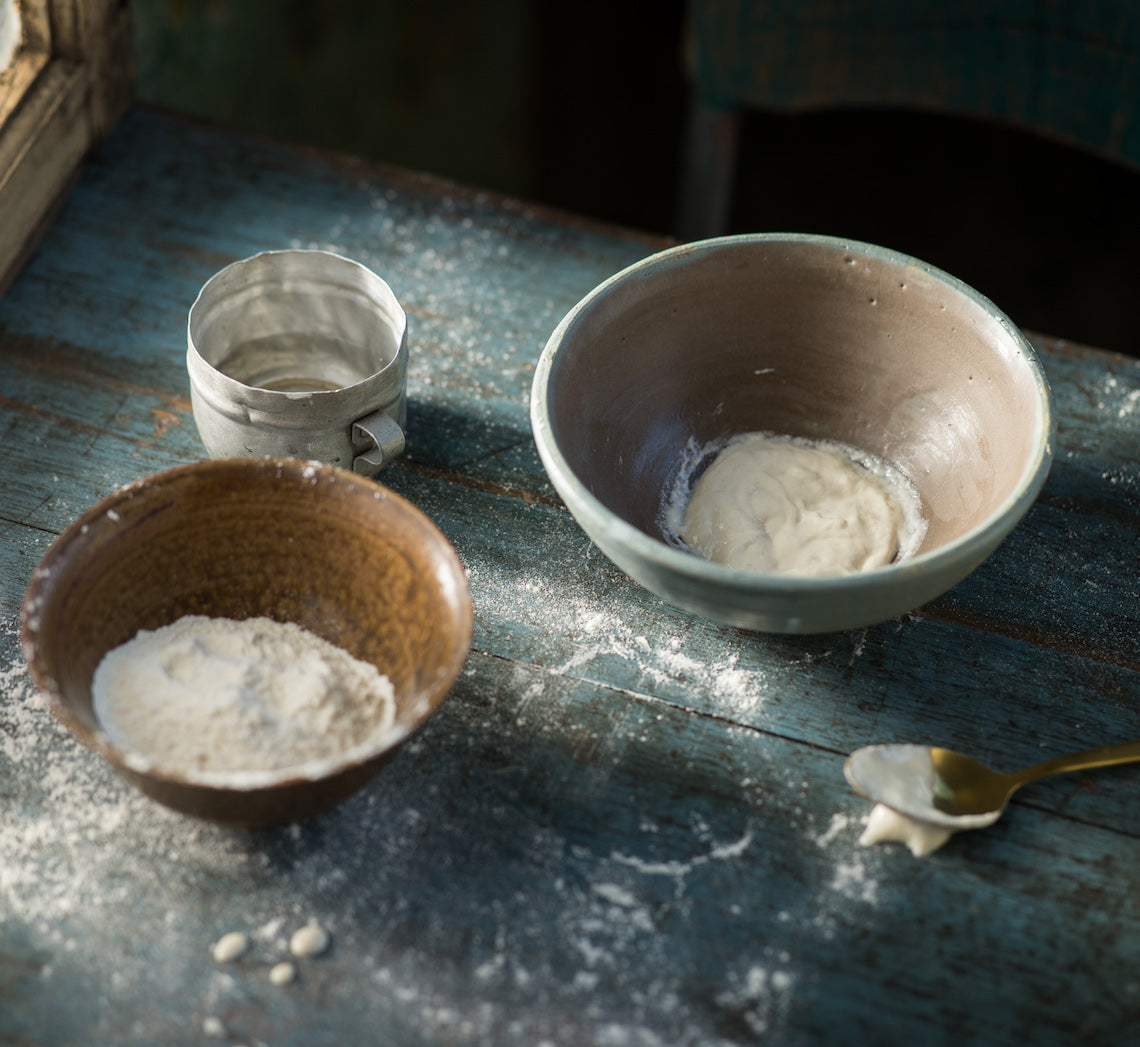
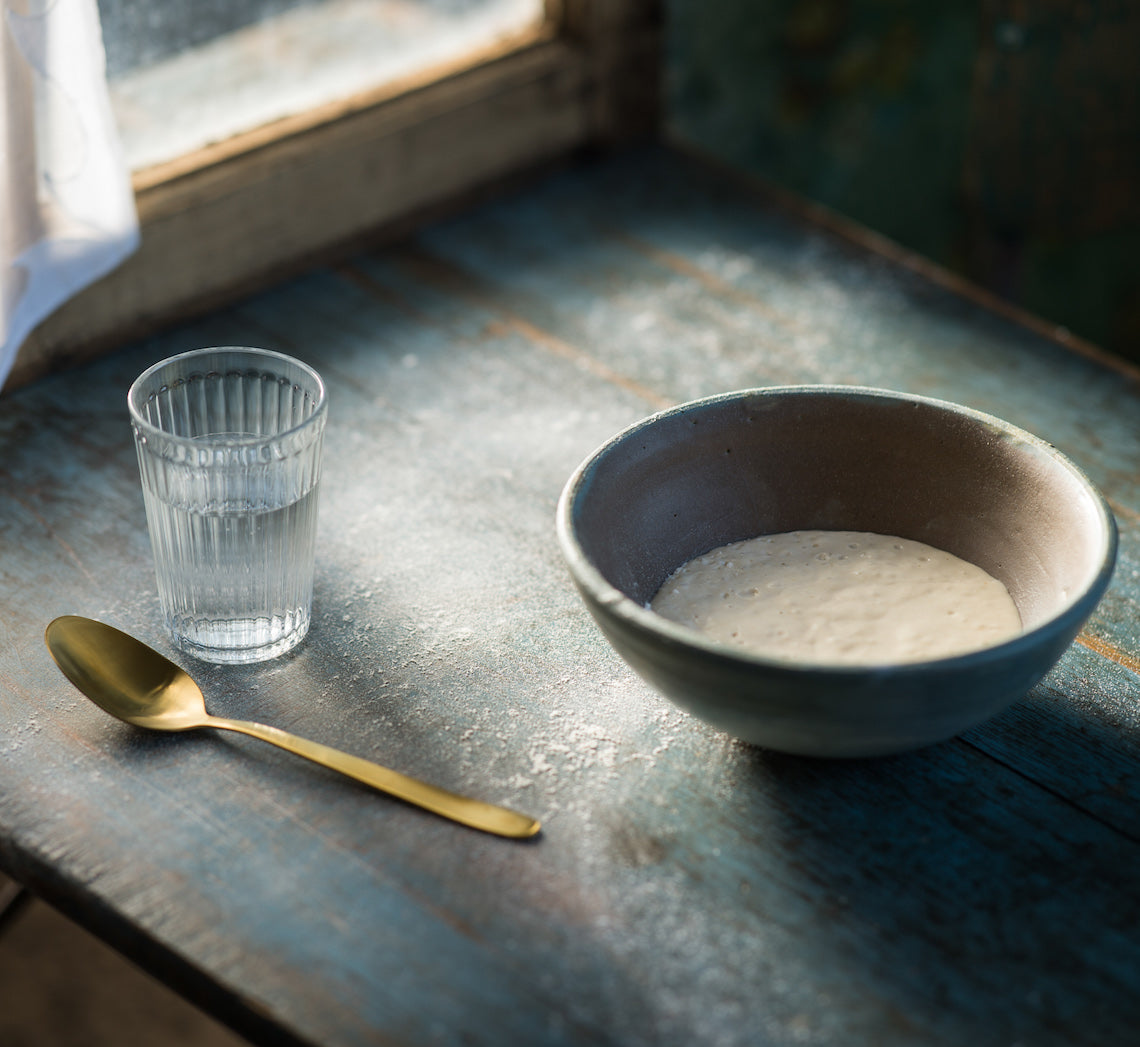
- To make the levain, combine the sourdough starter, water and flour (see image 2) in a medium bowl and mix until well combined. Cover with plastic wrap and stand in a warm, draught-free place (approx. 24.5- 28°C) overnight (12-14 hours). The levain should have expanded and be very bubbly and may even double (see image 3) when it is ready to use (see Baker’s Tips #1).
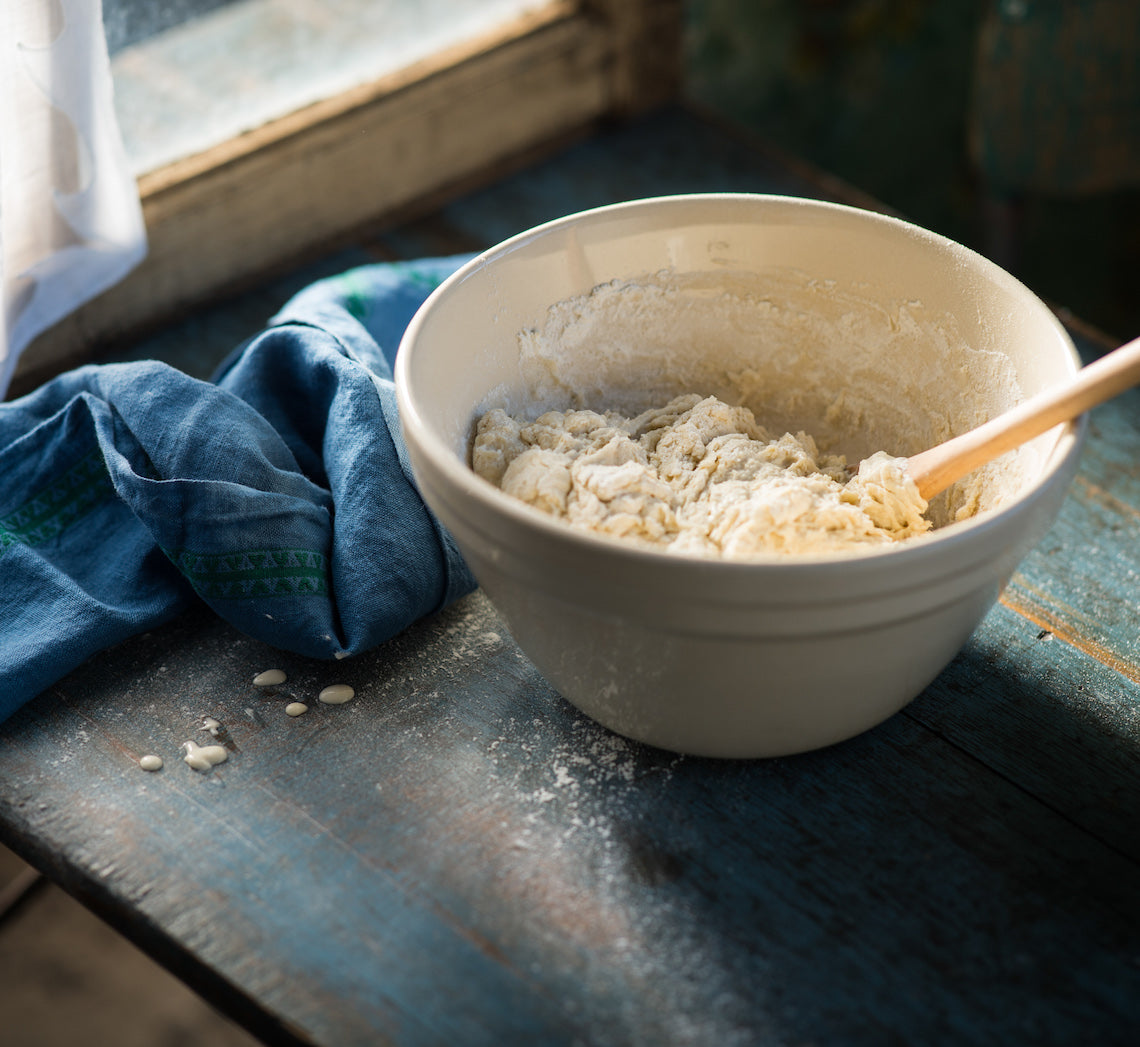
- To make the dough, transfer the levain to a large bowl. Add half the water and use a balloon whisk or spatula to break up the levain until almost smooth. Stir in the remaining water. Add the flour to the levain mixture, sprinkle over the salt, and stir with a wooden spoon until combined and a very shaggy dough forms (see image 4). Cover the bowl with plastic wrap and set aside in a warm, draught-free place (approx. 24.5-28°C) for 1 hour.
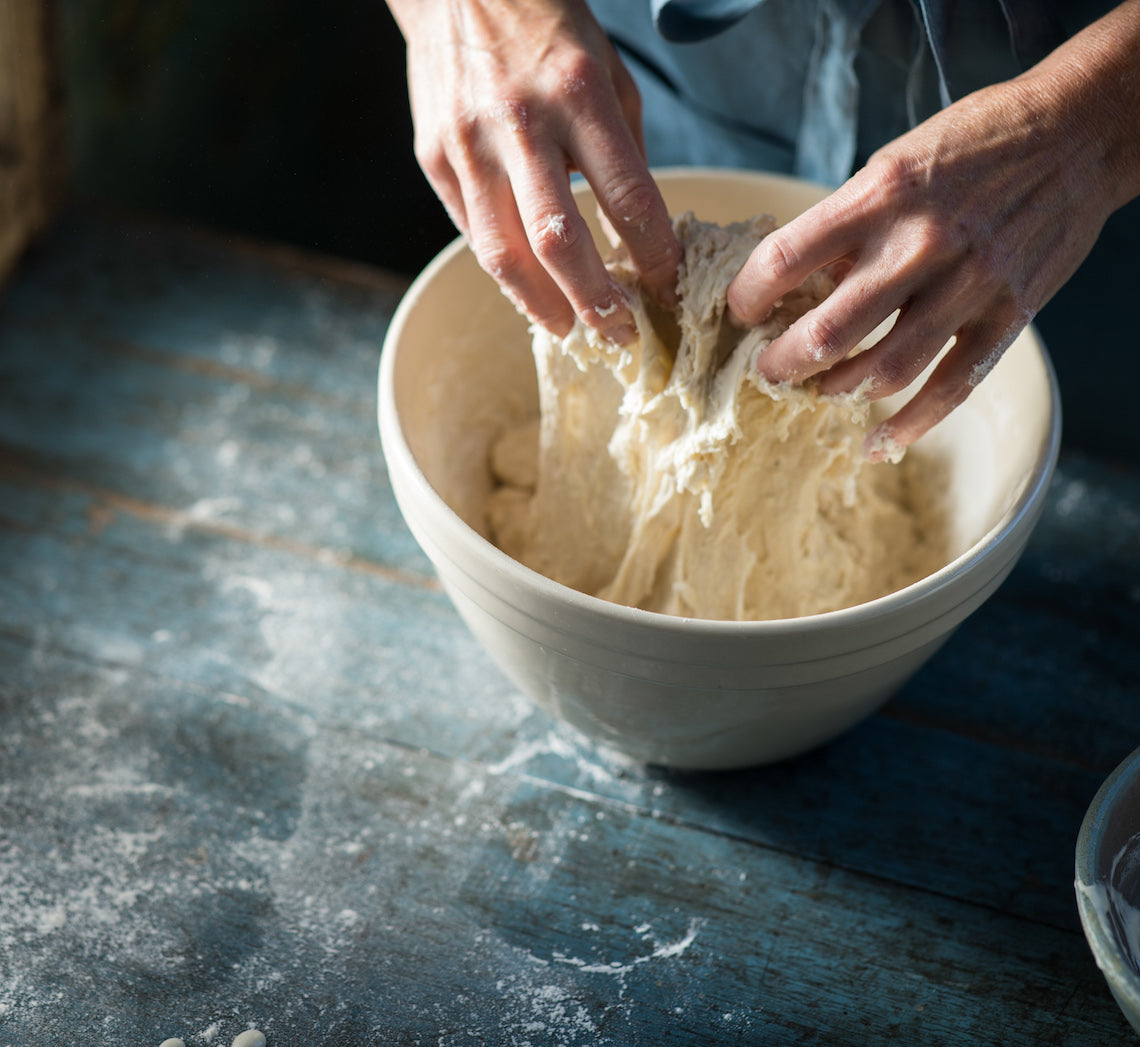
- Instead of kneading, you are going to stretch and fold the dough (see Baker’s Tip #2). Leave the dough in the bowl and use your fingertips to pick up the top side of the dough (furthest away from you), lift it up as you stretch it, and then fold it back on itself (see image 5). Turn the bowl a quarter turn and repeat this stretching and folding process three more times, turning the bowl after each fold. Cover with plastic wrap and set aside in a warm, draught-free place (approx. 24.5-28°C) for 30 minutes. Repeat this folding process five more times (which will be 6 foldings in total), resting the dough for 30 minutes between each time you fold (see Baker’s Tip #3). When you begin this process the dough will be unevenly textured and shaggy in appearance but will become less so as you continue to stretch, fold and rest/prove. Once all six folding, stretching and resting processes have been completed, the dough will be very smooth, spongy and elastic (see image 6).
- Once you have stretched and folded the dough a total of 6 times, cover and place in a warm draught-free place (approx. 24.5-28°C) for 1 hour or until well puffed (see Baker’s Tips #4).
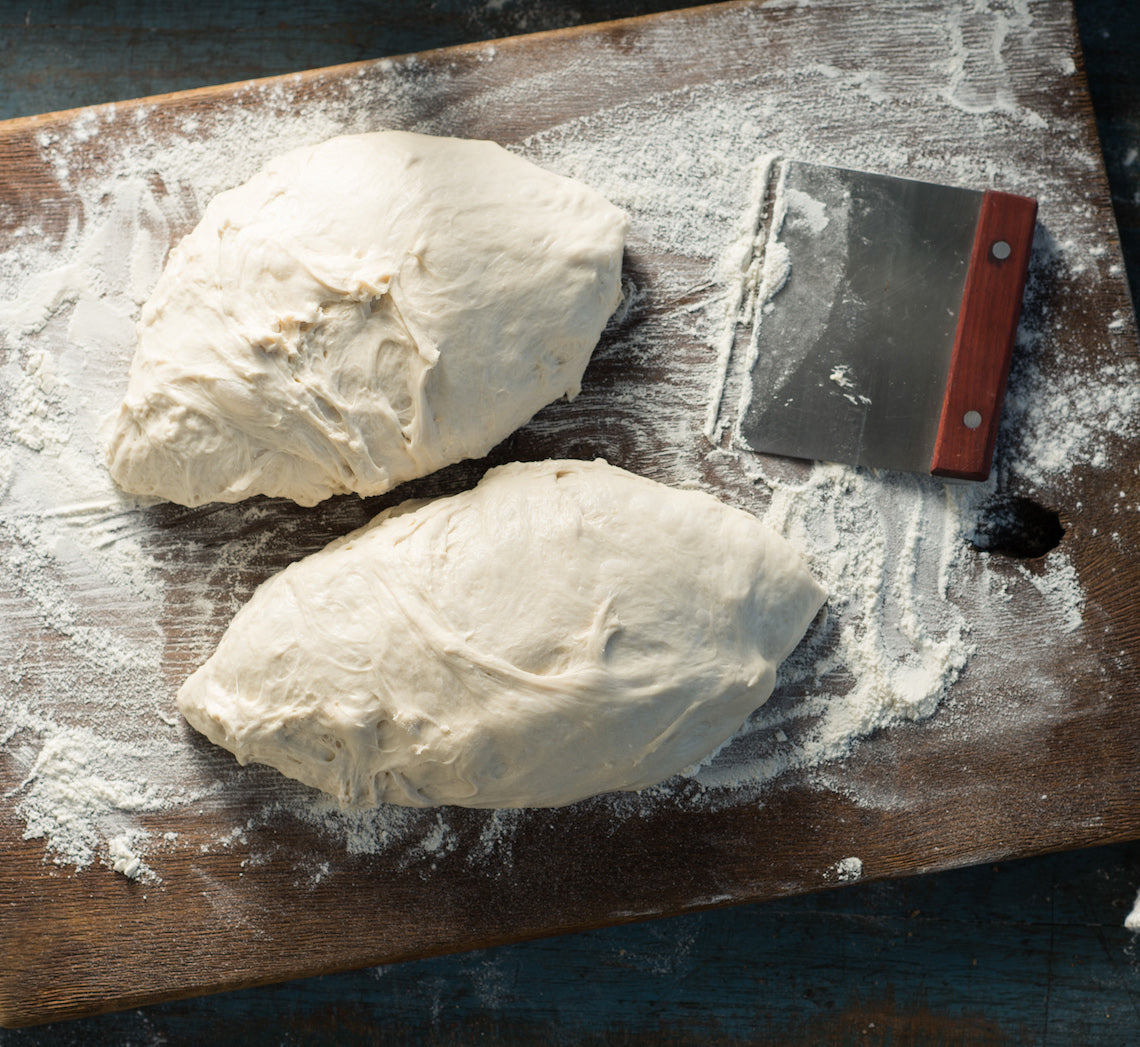
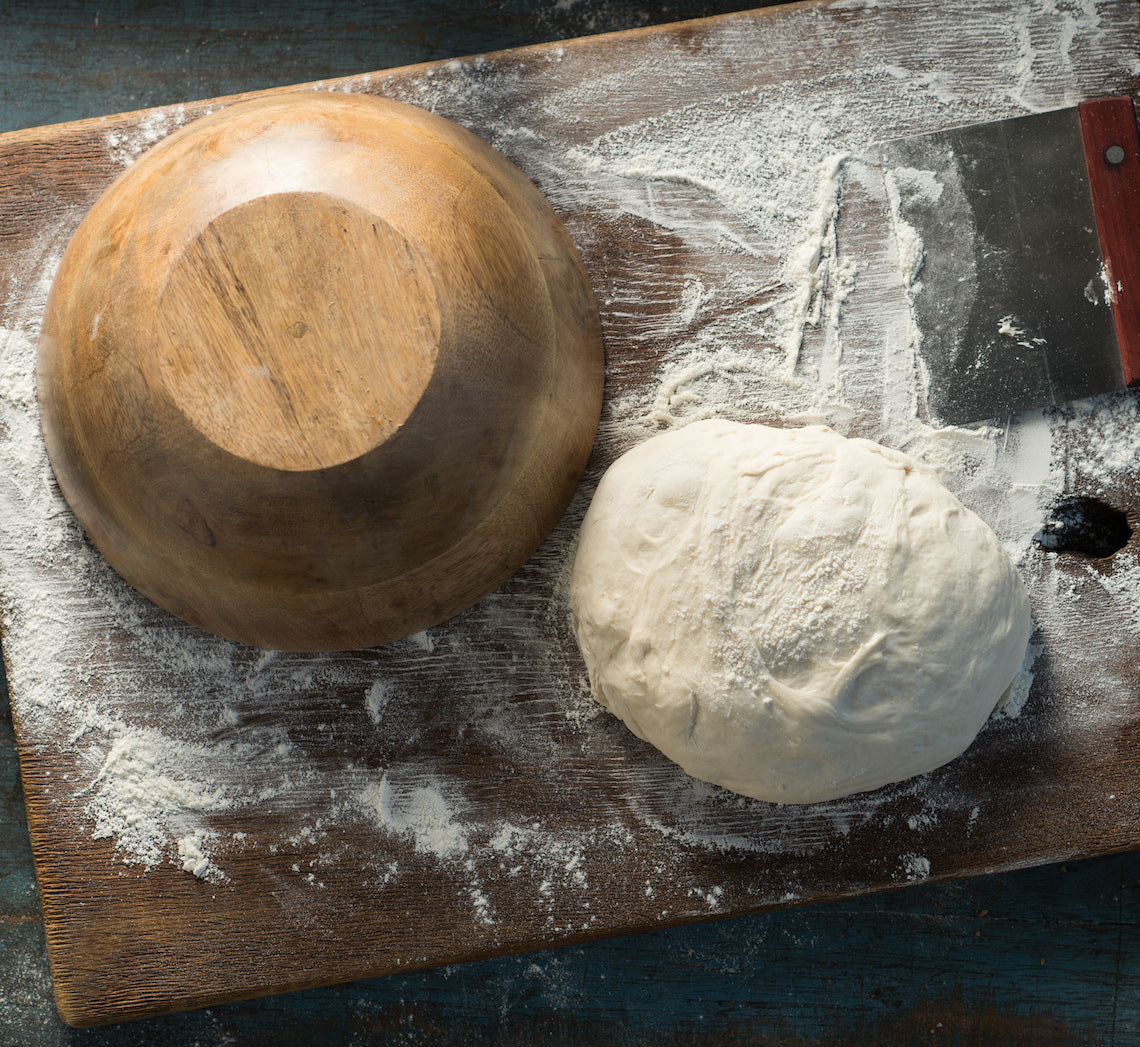
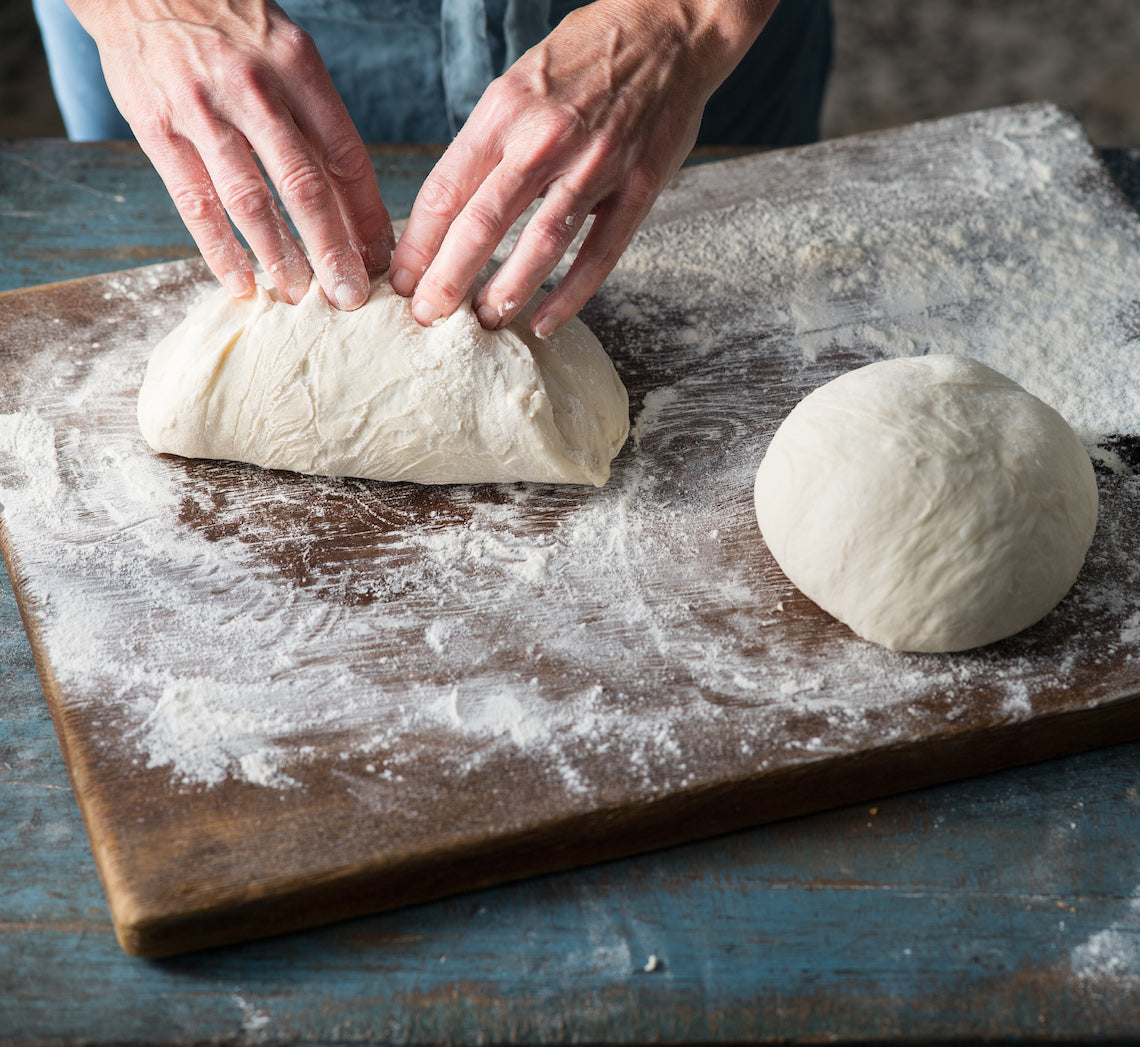
- Gently turn the dough out of the bowl onto a well- floured surface, being careful not to deflate it. Use a sharp knife or a pastry scraper to cut the dough in half (see image 7). Use well-floured hands or a pastry scraper to shape each dough portion into a loose round. Cover each dough round with an upturned bowl (large enough so the dough has room to rise) (see image 8) and leave to rest for 1 1⁄2-2 hours or until well puffed.
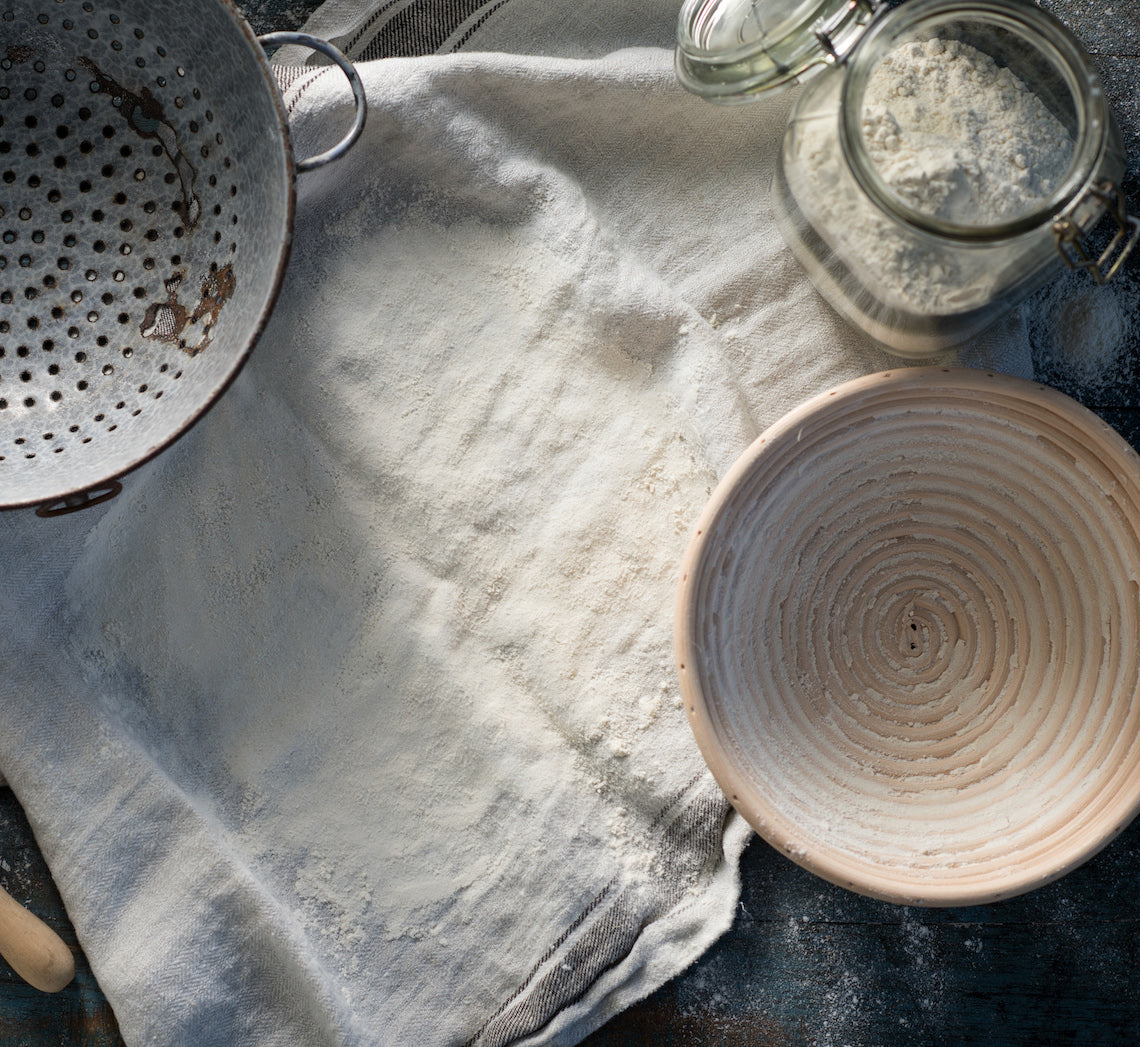
- Dust 2 clean, loosely woven cloths or tea towels generously with flour and then use your fingers to rub the flour into the cloth (see images 9). Line two 19-22cm (top measurement) round dough proving baskets or colanders with the cloths. If using traditional proving baskets, you don’t need to line them with a cloth (particularly if you want the bread to take on the lovely pattern of the basket), just dust and rub the insides of the baskets generously with rice flour and/or bread flour.
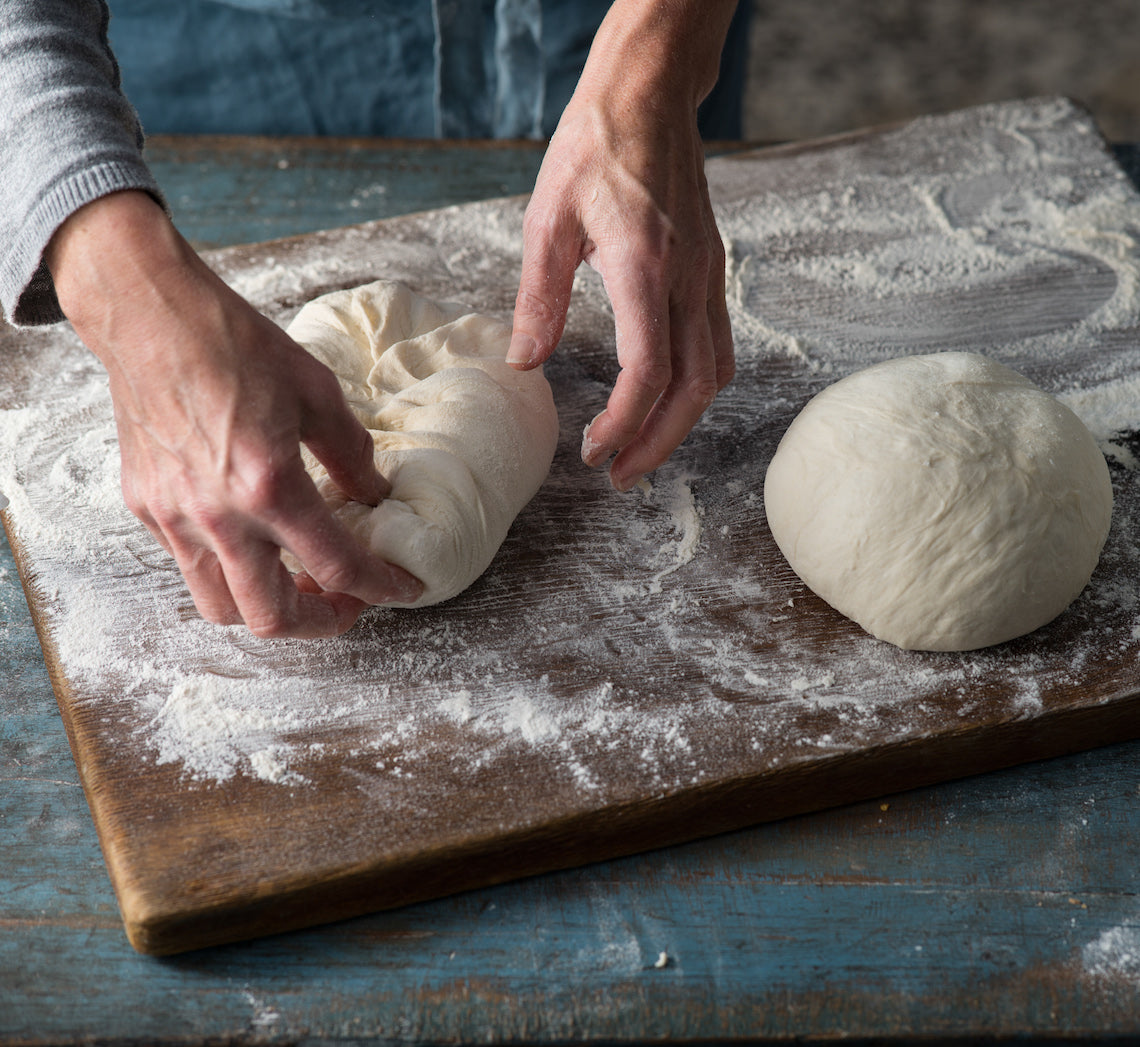
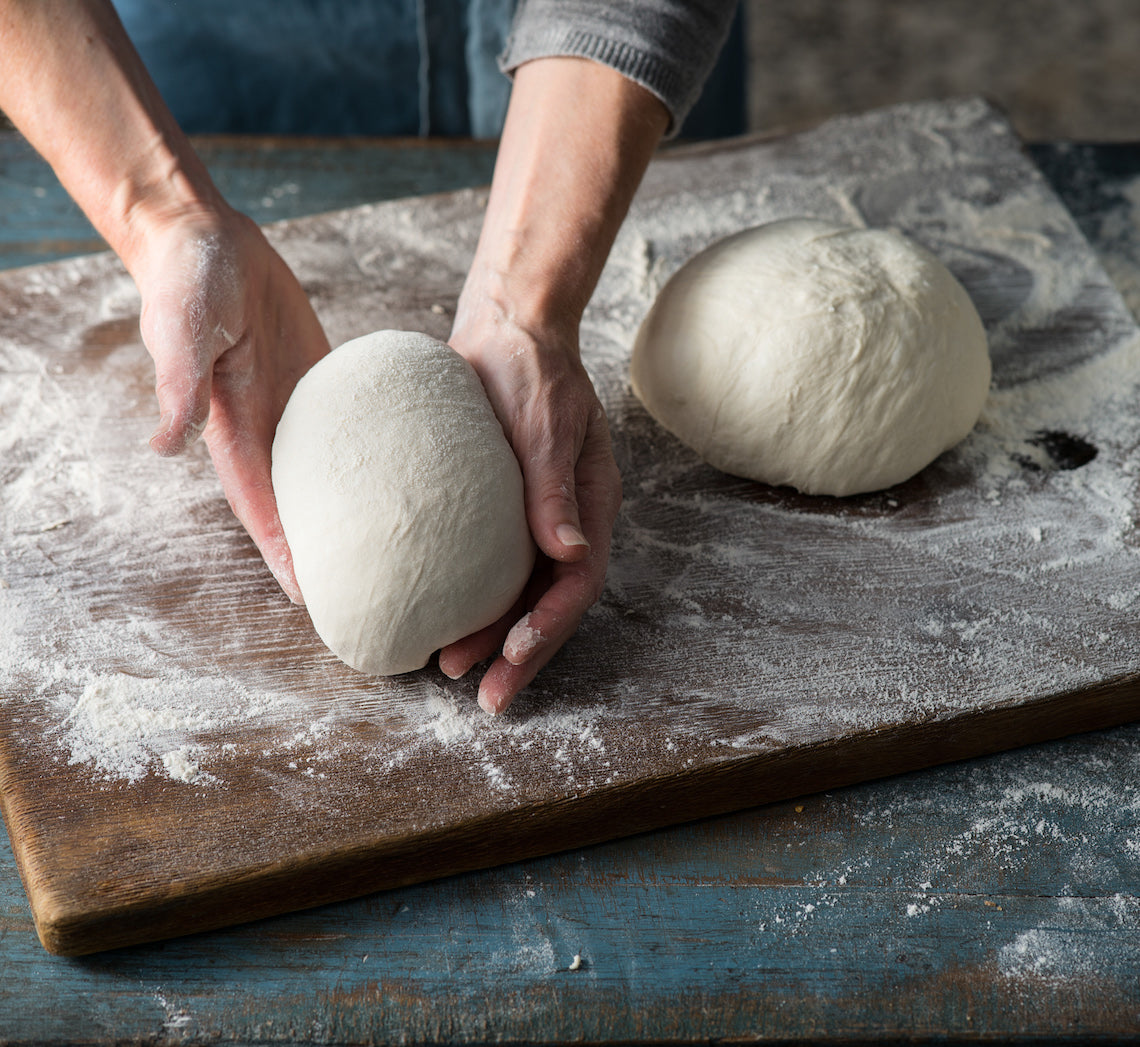
- Dust the top of one of the dough portions with flour. Turn it over and then use a similar folding action in Step 3 to shape into a round loaf, pulling the edges of the dough into the centre so that the dough surface underneath is tight to help shape it, only folding 6 times to help retain as much air as possible (see images 10-11). Gently turn the loaf over again (so that the smooth surface is on top) and use the palms of your hands to shape and even the round, stretching the top surface of the dough towards its base (see image 12). Be firm yet gentle when shaping the dough – you want to form the dough so it holds its shape but not be too forceful that you lose the valuable air bubbles (your technique will improve with practise). Repeat with the remaining dough portion. Dust the top of the loaves with a little more flour and use the palm of your hand to gently spread it over the top and sides to coat. Carefully turn each loaf over and lift into a proving basket or colander, top side down (see Baker’s Tip #5). If using cloths, loosely fold the overhanging edges over the dough.
- Place each of the loaves in their baskets or colanders in sealed plastic bags (see Baker’s Tip #6). Set aside in a warm draught-free place for 2-3 hours to prove or until well risen (see Baker’s Tip #7) (see image 13).
- Preheat the oven to 240ºC (220ºC fan-forced) (read tips here). Line two heavy baking trays with non-stick baking paper (see Baker’s Tips #8).
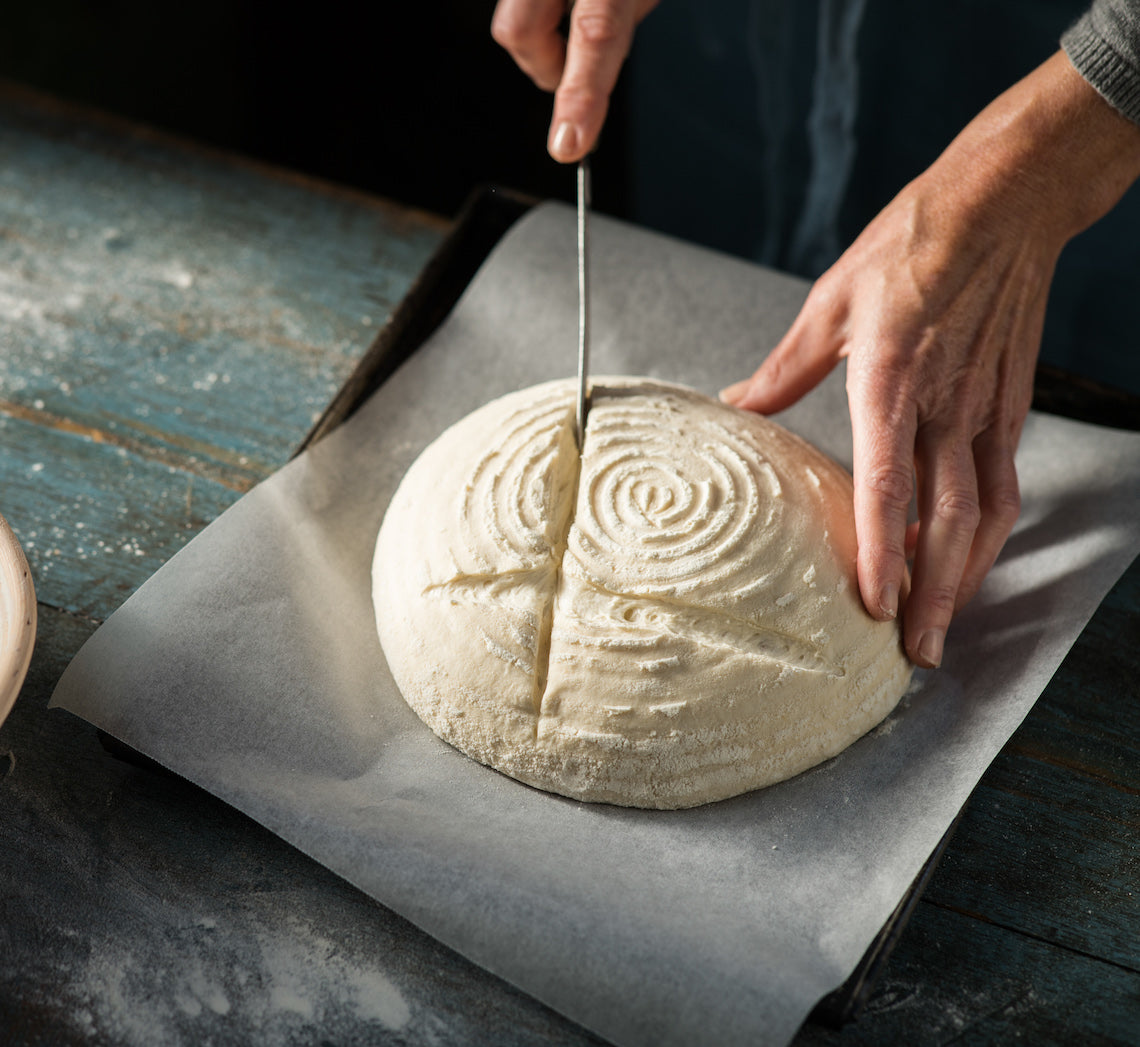
- Very gently turn a loaf onto a lined tray so that you retain as much air as possible, leaving the second loaf in the proving basket (see Baker’s Tip #9). Use a bread lame or very sharp knife to score the surface of the loaf, about 1.5cm deep, in a pattern of your choice (see image 14). Dip your hand in water and flick it onto the top of the loaf to sprinkle three times. Place the loaf in the oven, thrown a small bowlful of ice cubes into the bottom of the oven and immediately close the door (see Baker’s Tip #10). Bake for 25 minutes.
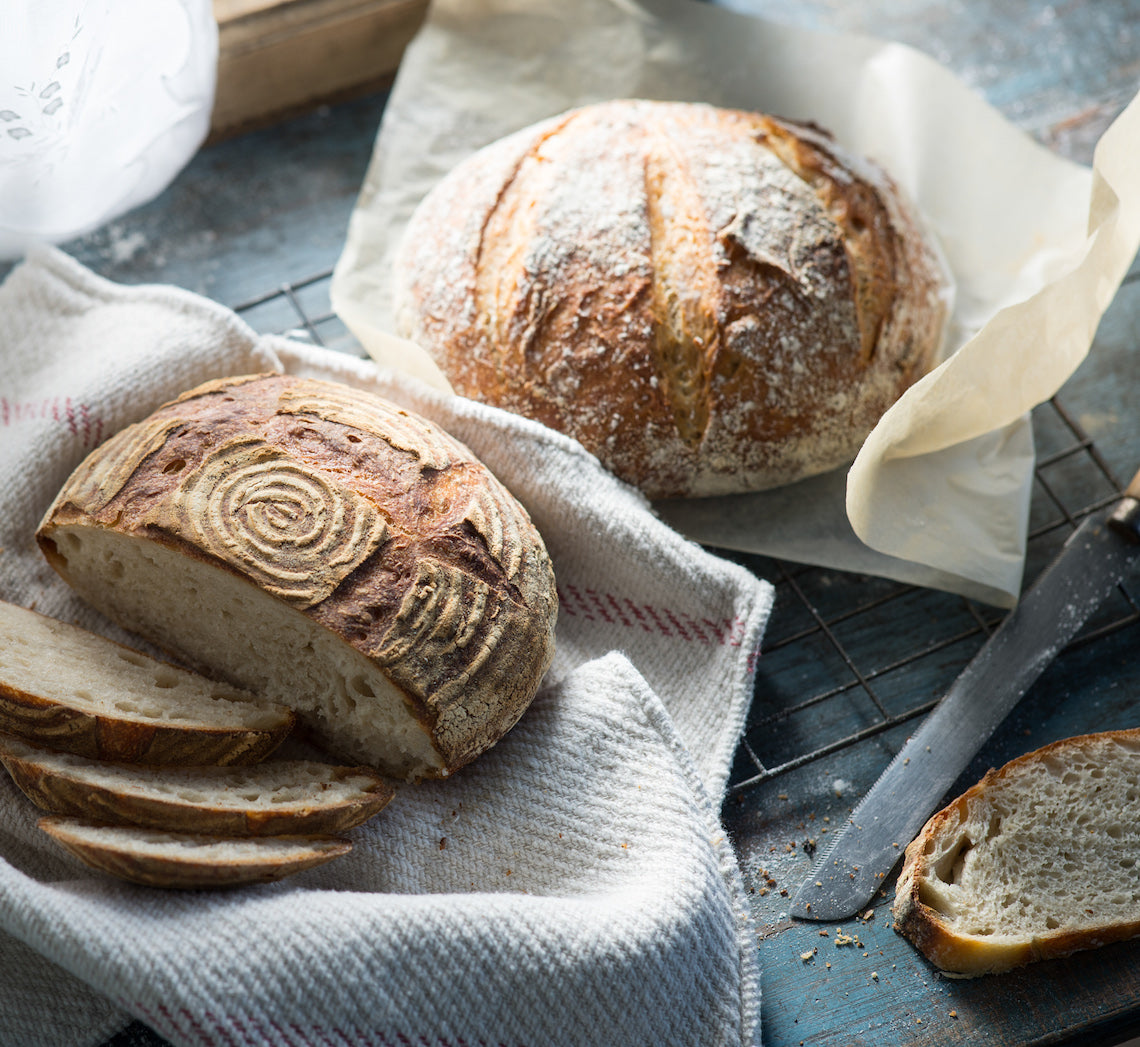
- Reduce the oven temperature to 220°C (200°C fan-forced) and bake for another 20-25 minutes or until the crust is deeply coloured and the loaves sound hollow when tapped on the base. Transfer the loaves to a wire rack and set aside to cool completely before slicing.
Baking in a Covered Pot
If baking your dough in a covered pot preheat it with the oven. Turn the dough out of the proving basket onto a piece of non-stick baking paper large enough to line the base and sides of the pot. Sprinkle the dough with water as in Step 10. Carefully lift the bread dough into the heated pot and score the top as desired. Cover with the lid and bake in the preheated oven for 25 minutes. Remove the lid and bake, without reducing the oven temperature, for a further 25 minutes or until a deep golden and the loaf sounds hollow when tapped on the base.
If wanting to brown the base crust further, remove the bread from the pot and place directly on the oven rack, without the baking paper, and bake for a further 5-10 minutes.
Spelt sourdough variation
Replace the strong bread or pizza flour with wholemeal spelt flour. Note, because of the lower gluten content of spelt wholemeal flour the resulting bread will be heavier and less ‘holey’ than the basic sourdough loaf. However, it will have a wonderful pleasant earthy flavour.
Baker's Tips
#1. When the levain is ready to use, a small teaspoon of it dropped into a glass of water should rise to the surface. This indicates that the levain is active and strong enough to produce enough carbon dioxide for it to be light enough to float.
#2. Stretching and folding the dough, along with the multiple resting/proving times in this recipe, replaces the kneading process to strengthen the gluten network in the dough, and produces a bread with quite large, uneven
air pockets and a great texture. The dough will be quite sticky and rubbing your fingers with a little water before stretching the dough will help stop it from sticking to them.
#3. It is particularly easy to lose track of how many times you have folded your dough. To make sure you don’t lose track, use a permanent pen to put a mark on the plastic wrap covering your dough, or write on a sticky note attached to the bowl, each time you finish a folding. Always remember to reset your timer too.
#4. In Step 4, you may need to stand/prove the dough for up to 4 hours depending on the proving temperature.
#5. Before adding the dough to the proving baskets or colanders make sure the surface of the dough is well floured – if it isn’t, it is likely to stick and the dough can lose valuable volume when you go to remove it which can result in a densely textured bread.
#6. Recycled plastic shopping bags or large snaplock bags work well to seal the dough in the basket or colander for the last proving stage. Sealing them in the bags means that the surface of the dough won’t dry out during proving. It will also help retain some of the heat generated by the yeast fermenting, helping to create a warm environment for your dough to prove in.
#7. When ready to bake, the dough will have risen by at least 50% and when poked with a finger a small indent will be left which will spring back slightly.
In Step 8, you can prove the loaves for 1-2 hours, or until risen slightly, in a warm draught-free place and then place them in the fridge overnight for 12-14 hours, if you wish. Stand the dough at room temperature in the baskets for 2-4 hours before turning out and baking.
#8. You can also bake the bread in a covered pot. See 'Baking in a Covered Pot' above.
#9. If you don’t have a large oven, it’s a good idea to bake the loaves separately. Leave the second loaf in the proving basket in the fridge while the first one bakes.
#10. If not baking your bread in a covered pot you can create steamy heat either by adding a tray with 1cm of water in the bottom of the oven before preheating it (as mentioned in Step 9) or by quickly throwing a bowlful of ice cubes into the bottom of your oven after adding your loaf and then immediately shutting the door. This will help give your bread the best possible ‘oven spring’ or rise when baking as well as contributing to a thick, crunchy crust (read tips here under 'Baking your Bread' to discover why).
This recipe is part of Anneka's SBS Food Bakeproof: Sourdough online column. For more Bakeproof columns and recipes, click here.
Photography by Alan Benson.