
- home
- Products
Prep 15minBake 30-40minMakes 1kg
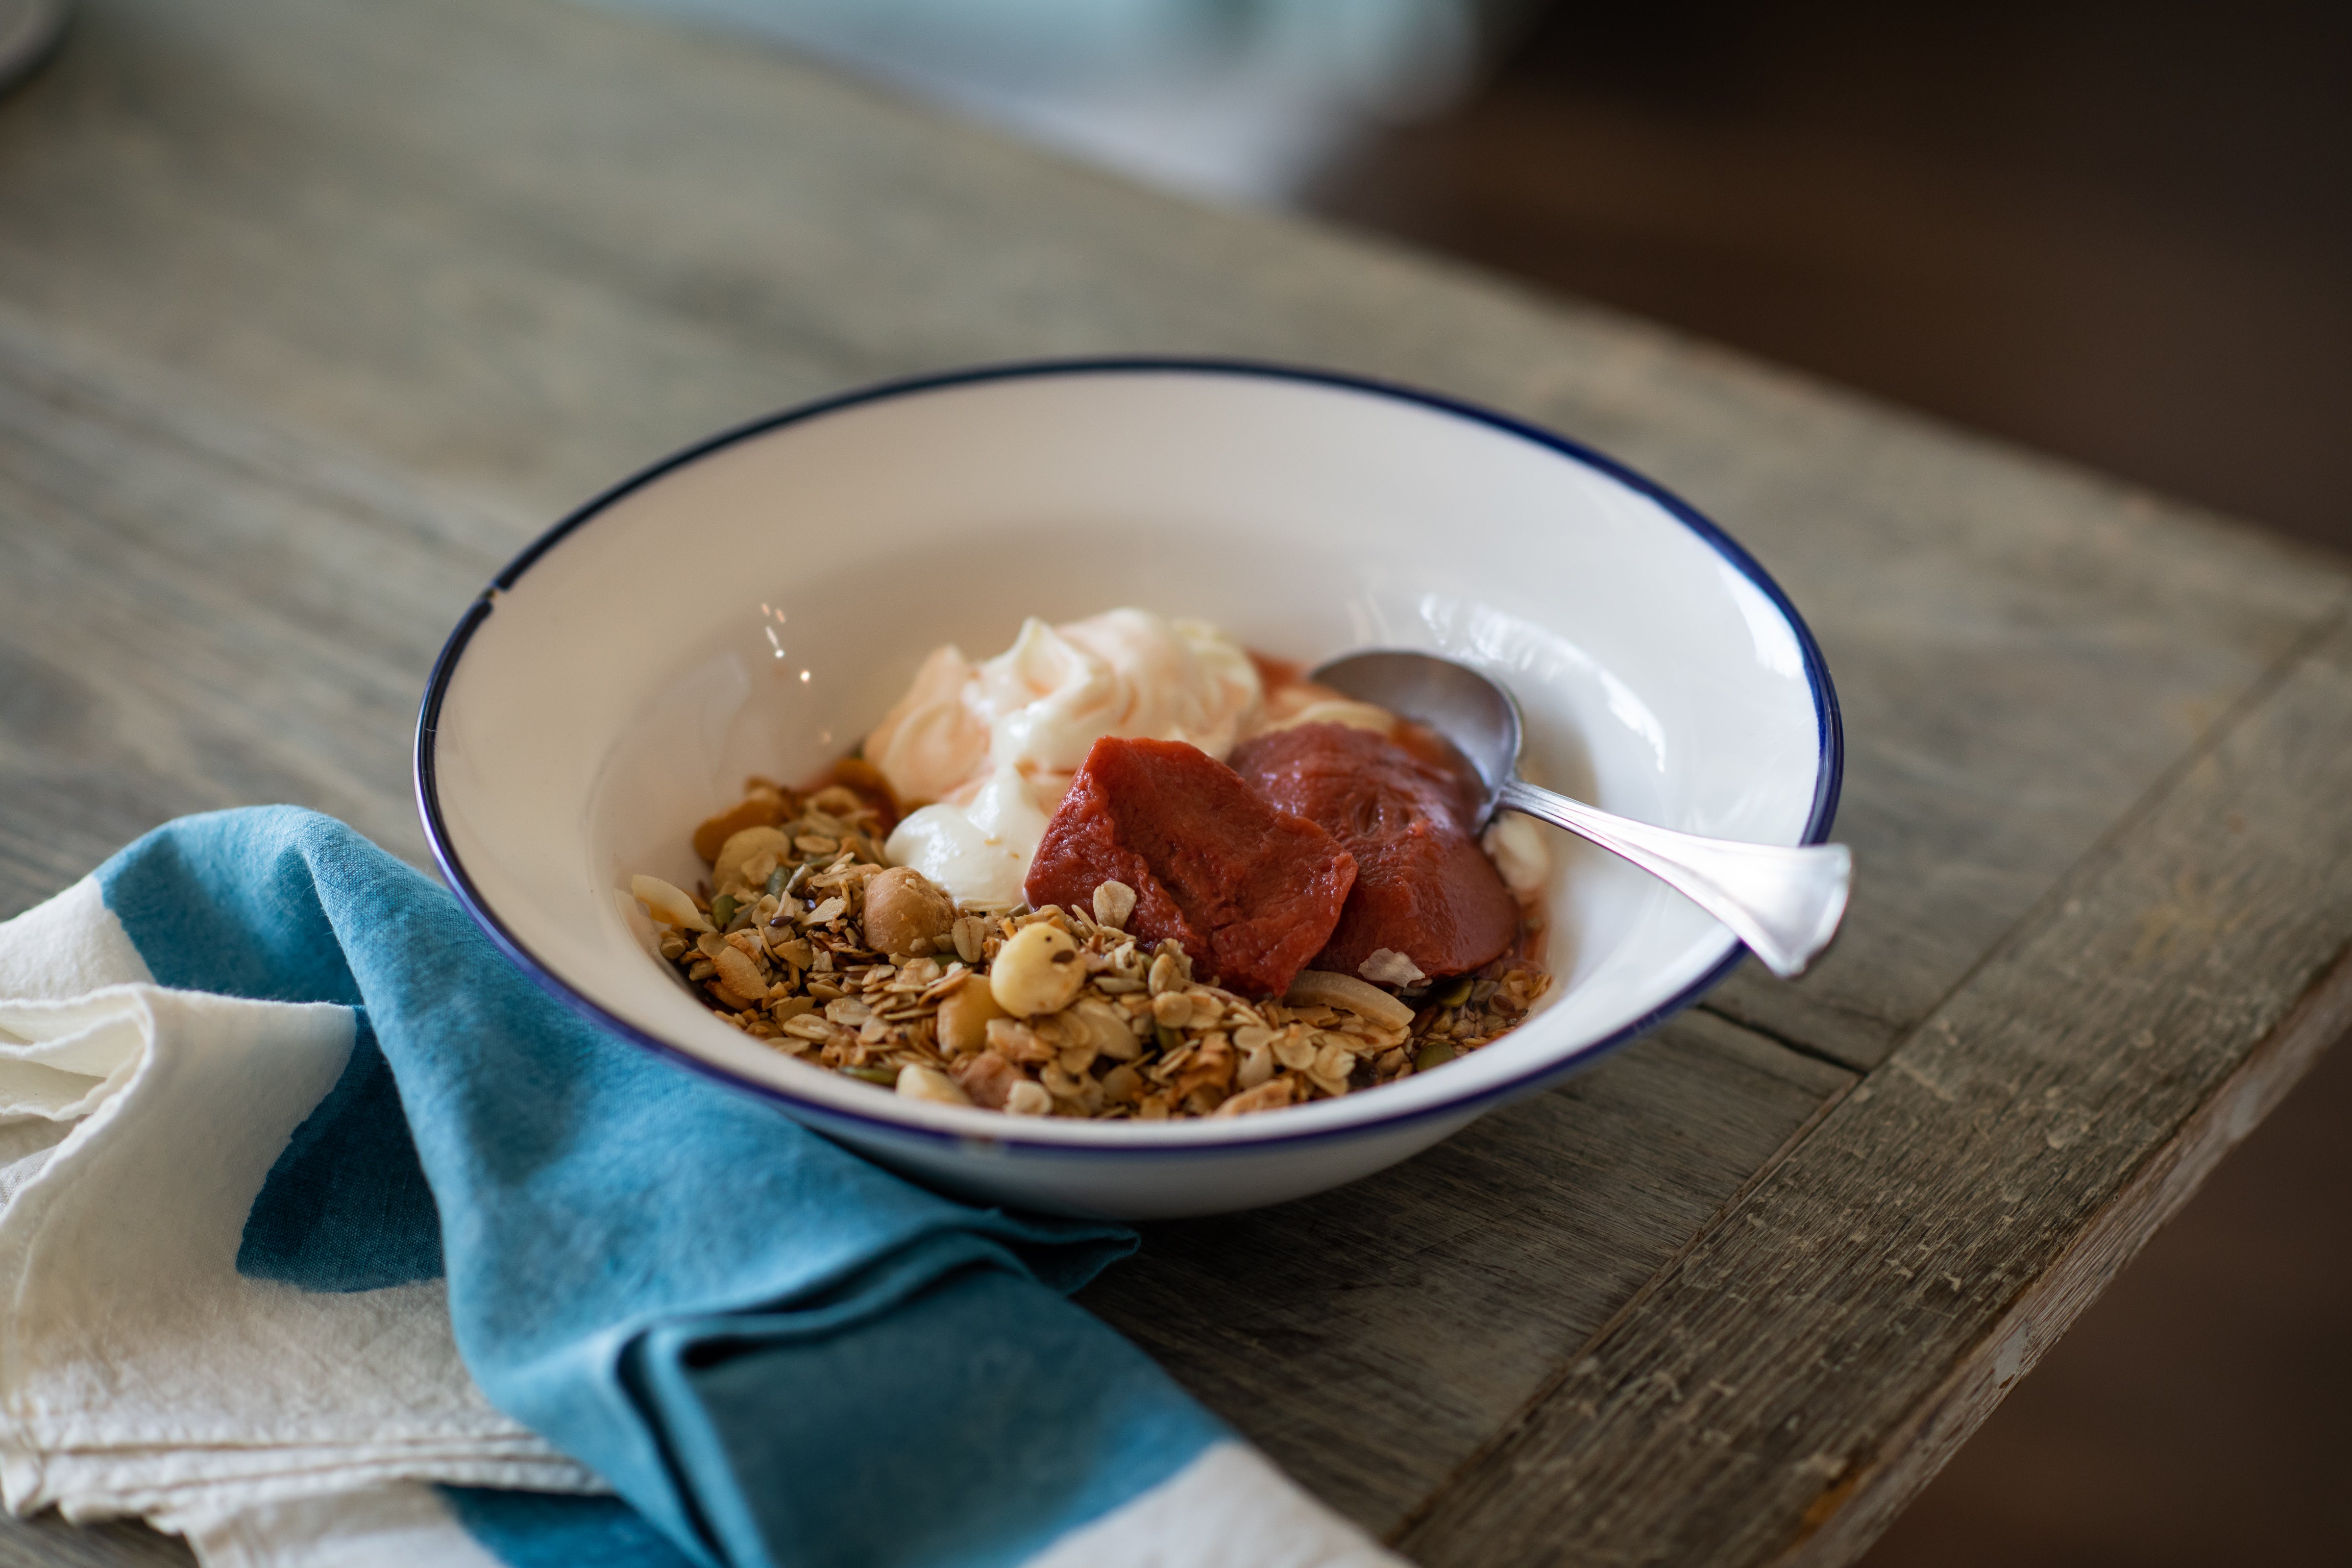
Scrumptious and satisfying, this granola recipe is one that Make Me a Baker graduate, Sarah Taylor, serves at her cafe Six Smith in Cronulla on Sydney's southern beaches. If you would like to serve it just as Sarah does, greek-style yoghurt and seasonal fruit, such as oven-baked rhubarb, pears or apples, will make the perfect accompaniment.
Ingredients
275g rolled oats
75g sunflower seeds
75g coconut chips / flakes
75g shredded coconut
75g pepitas
25g white chia seeds
25g black chia seeds
25g poppy seeds
200g unsalted macadamias
60g maple syrup
60g almond oil
Method
- Preheat the oven to 170°C (150°C fan-forced).
- Combine all ingredients except the maple syrup and almond oil in a large bowl. Set aside.
- Heat the maple syrup and almond oil in a small saucepan over a low heat until warmed through and and combined. Pour over the rolled oats mixture and mix thoroughly until combined and evenly coated.
- Spread the oat mixture evenly over 2 medium shallow baking trays and bake in preheated oven for 30-40 minutes, stirring every 10 minutes, until golden and aromatic.
Baker's tip
- This granola will keep well in an airtight container or jar for up to 4 weeks.
$50.00/pp
more info- Products -
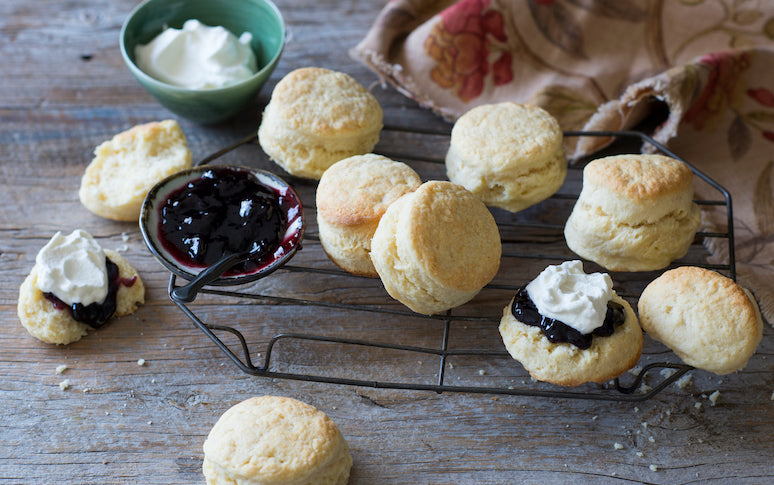
Learn to bake the BEST scones you have ever eaten – light, flaky and irresistible – in this fun and casual online baking class!
Scones LIVE is not currently scheduled. If you would like to take part in a future course, please fill out your details below and we will be in touch when new dates are released.
I've eaten a fair few scones and even made several batches in my day, none of which compared to the calibre of the scone taught in Anneka's online Scones class. It was revelatory. In addition to Anneka's friendly and approachable style, there are comprehensive explanations, expertise and skills. I recommend this class as a way to relax and switch off from your everyday, if only to experience the very best of scones, made by your own hands.
Lee, NSW
Learn to bake the BEST scones you have ever eaten – right in your very own kitchen!
Scones is a fun and casual 1.5-hour LIVE virtual baking class where you will learn to make your own traditional scones – light, flaky and irresistible!
Anneka Manning will take you through the process step by step, sharing all of her practical tips and tricks along the way to guarantee success. You will have the ability to bake along with her as well as ask any questions that arise as you rub, mix, shape and bake your own ‘cream scones’. You will also learn how to adapt the basic recipe to create a range of different scones for any occasion.
The virtual Live Session will be supported by printable recipes and resources which will become your go-to scone baking kit. Anneka will also share a number of recipe variations, including gluten-free scones, so that you can use the techniques and tips learnt to create both savoury scrolls and a divine dessert.
At the end of this class, you will come away not only with new-found skills and confidence but a batch of fresh-from-the-oven warm scones ready for Sunday afternoon tea!
Dates
Scones LIVE is not currently scheduled. If you are interested in joining a future class and would like to be notified when new dates are released, please fill in your details at the top of this page.
Please note: The Live Session will be recorded and available for you to watch afterwards if you are unable to attend, or rewatch it at a later date if you would like to.
Cost
$50 (50% off for all BakeClub & Co. Members).
Student numbers
We will only be accepting a limited number of bakers for this class so that Anneka can answer your baking questions during the Live Session and provide personal feedback.
The Scones LIVE class was such a joy to be part of. I'm no stranger to baking or scones but I felt like I achieved my best scones to date, even though I thought I did well prior. I really loved being part of such a wonderful group where I did not feel pressure or judgement, I was just at ease! Come as you are, you are definitely welcome at a BakeClub class.
Alicia, NSW
Who is this class suitable for?
This class is, quite simply, suitable for everyone – from absolute beginners to more experienced bakers who want to brush up on their scone-making skills. As this class is completed online, it is suitable for students from all over the world.
What will I get?
- A 1.5-hour virtual live baking demonstration (which will take place on Zoom and will be recorded) where you will learn and bake along with Anneka Manning through the process of making traditional scones.
- Access to Anneka's baking experience, knowledge, tips and tricks, and the ability to ask her any questions that come up during the class.
- A chance to learn surrounded (virtually) by like-minded people.
- A thorough understanding of how to make traditional scones and how to apply what you’ve learnt to be able to troubleshoot in the future and ensure baking success.
- Invaluable printable information sheets and recipes.
- Lifetime access to the live video and course material.
- Membership to BakeClub's exclusive The Kitchen Table online group to continue asking questions and share your baking.
- Baking confidence, knowledge and skill to use regularly at home.
Seeing Anneka make scones and explain what she is doing and being able to ask questions is so valuable – you are in the kitchen with her and learning from her years of experience. It is also great to learn and share your experience and ideas with the other participants. A fun afternoon with a delicious batch of scones to enjoy at the end!
Vanessa, South Australia
How will I get the most out of this online class?
To get the most out of this class, you need to set aside the time to attend the Live Session with Anneka and read the support material supplied beforehand. The Live Session will be recorded so it will be available to watch at any time if you are unable to attend. However, we do recommend baking along to get the most out of the class.
What if the dates don't suit me? Can I still enrol in the class?
If the date of this class doesn't work for you, you can still enrol and take part in your own time. While you may miss out on the Live Session, it will be recorded and will be available to watch when it suits you. You will have lifetime access to the video, as well as all the course material (including all of the resources and recipes).
Prep 15min (+20-30min chilling time)Makes: Enough for a 23cm/9in round tart case
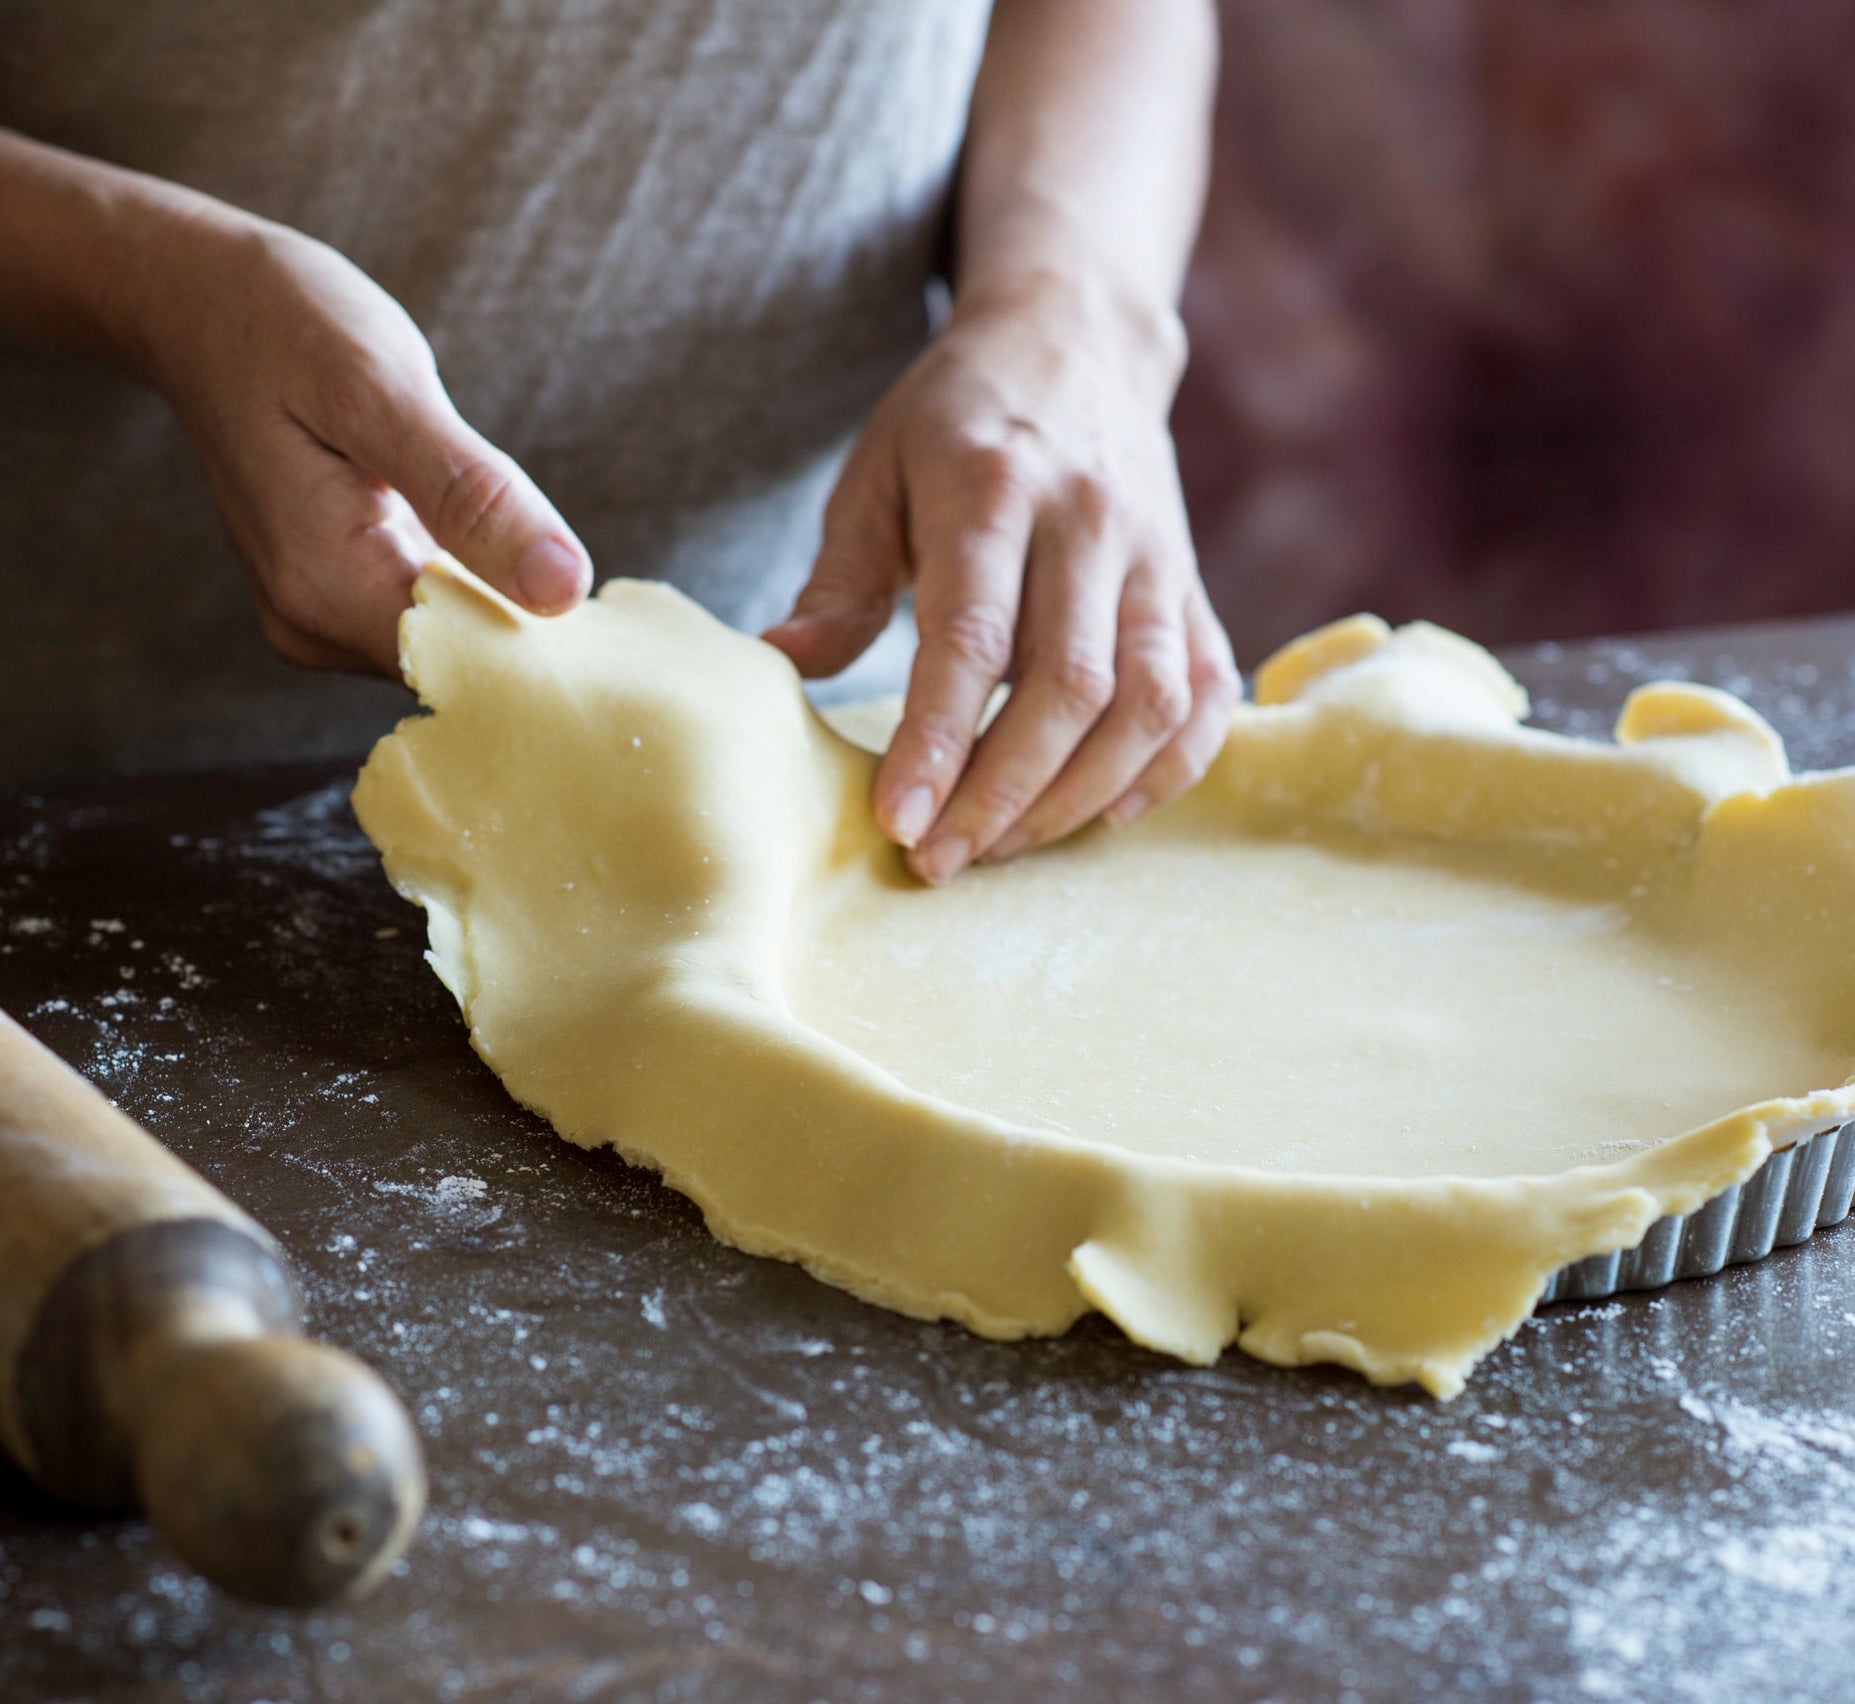
A really good, well-made, homemade pastry is always the secret to a fabulous pie or tart and shortcrust pastry, when you have a good recipe, is one of the simplest and quickest pastries to make. Here I have given lots of making ahead and freezing tips as well as some great variations to use in a selection of both sweet and savoury tarts and pies.
Ingredients
225g (1½ cups/8oz) plain flour
Good pinch salt
150g (5¼oz) chilled unsalted butter, diced
3-3½ tablespoons (60-70ml/2½fl oz) iced water
Method
- Combine the flour and salt in a large, wide mixing bowl. Add the chilled butter. With your palms facing upwards, use your fingertips to rub in the butter until the mixture resembles breadcrumbs with some larger pieces of butter still visible.
- Sprinkle 3 tablespoons (60ml/2fl oz) of the iced water over the flour and butter mixture. Use a butter or round-ended knife in a cutting motion to mix, turning the bowl frequently, until evenly combined and the mixture starts holding together. Press a little of the mixture between your fingers – if it holds together easily, there is no need to add more water; if it doesn’t add the remaining 1⁄2 tablespoon (10ml/⅓fl oz), a teaspoon at a time, combining with the knife until it reaches the right consistency. The pastry should be soft but not sticky.
- Bring the pastry together with your hands in the bowl or turn out onto a cool bench top and then bring together. Lightly knead the pastry with your fingertips for about 5-10 seconds or until it comes together but isn’t completely smooth. Shape the pastry into a disc about 2cm/¾in thick, wrap well in plastic wrap, baking paper or beeswax wrap and place in the fridge for 20-30 minutes to rest. Use as directed.
Baker's Tips
This pastry is also enough for a 24cm/9½in square tart case; ten 6cm/2¼in or eight 8cm/3¼in) individual round tart cases; a 12cmx34.5cm/4¾inx13½in) rectangular tart case; or 24 tartlet cases (1 Tbsp/20ml/¾fl oz capacity)
Making Ahead
Keeping in the fridgeShape uncooked pastry into a disc. Wrap well in plastic wrap and keep in the fridge for up to 3 days. Stand at room temperature for about 1 hour (depending on the temperature in your kitchen) until softened slightly and pliable enough to roll easily.
Freezing uncooked pastry
Shape uncooked pastry into a disc. Wrap well in plastic wrap, then seal in a freezer bag or airtight container and freeze for up to 6 months. Transfer to the fridge to thaw completely (this will take about 1 day). Stand at room temperature for about 1 hour (depending on the weather) until softened slightly and pliable enough to roll easily.
Freezing uncooked pastry case/s
Place the pastry case, still in the tin or dish, in the freezer until frozen. Once frozen, leave the pastry in the tin or dish or remove and seal in freezer bag or an airtight container. Freeze for up to 6 months. Bake in the tin or dish directly from the freezer or transfer to the fridge to thaw completely in the tin or dish (this will take about 1 day) and then bake as directed.
Variations
- Rich Shortcrust Pastry: Increase the butter to 170g (6oz). Replace the water with 1 lightly whisked egg yolk.
- Parmesan Shortcrust Pastry: Combine 40g (½ cup/1½oz) finely grated parmesan to the flour and butter mixture just before adding the water.
- Mustard Shortcrust Pastry: Add 1½ teaspoons dry mustard powder to the flour and salt before rubbing in the butter.
- Sweet Shortcrust Pastry: Stir 2 tablespoons sifted icing sugar or caster sugar to the flour and butter mixture just before adding the water.
- Chocolate Shortcrust Pastry: Reduce the flour to 200g (1⅓cups/7oz). Sift the flour with 2 tablespoons cocoa powder and 2 tablespoons icing sugar and the salt before rubbing in the butter.
- Sweet Orange & Vanilla Shortcrust Pastry: Reduce the flour to 200g (1⅓cups/7oz). Add 2 tablespoons almond meal, 2 tablespoons caster or icing sugar and 1 teaspoon finely grated orange zest to the flour and salt before rubbing in the butter. Add 1 teaspoon natural vanilla essence or extract with the water.
-
Brown Butter Shortcrust Pastry: Replace the unsalted butter with 150g (5¼oz) chilled and diced unsalted brown butter. Make the pastry in the food processor by putting the flour, salt and chilled brown butter in the bowl of your food processor. Use the pulse button to process until the mixture resembles coarse breadcrumbs. Sprinkle over the water (you’ll generally find that you may need 1-2 teaspoons more than the basic recipe due to the brown butter containing little or no water). Use the pulse button to process briefly until the mixture just starts to cling together. Turn the pastry out onto a lightly floured, cool bench top and bring it together with your hands.
This recipe is from Anneka's SBS Food online column, Bakeproof: Never-fail Shortcrust Pastry. CLICK HERE for more Bakeproof recipes.
Photography by Alan Benson.
$100.00/pp
more info- Products -
Uncover the secrets to perfect shortcrust pastry in this comprehensive and accessible self-paced online baking course!
If you are interested in this class as well as learning how to make Puff Pastry and Leavened Puff Pastry, you can book our 3 pastry classes together and save 15% with our special bundle deal!
I have avoided making shortcrust pastry because it hasn’t always worked and seemed too hit and miss. I hoped the class would give me what I need to know to get it right each time and give me confidence, and both these expectations were met! Having the [video] where we could watch Anneka ... was so valuable ... It really was like having Anneka in my kitchen – it was very comfortable and relaxed and it gave me so much confidence.
Vanessa, South Australia
Uncover the secrets to perfect shortcrust pastry – right in your very own kitchen!
Shortcrust Pastry is a fun and accessible online baking course where you will learn the art of making your own melt-in-the-mouth pastry – all from your very own kitchen.
Anneka Manning will take you through the process and share her more than 35 years of baking experience, knowledge and research, as well as all of her practical and handy tips and tricks.
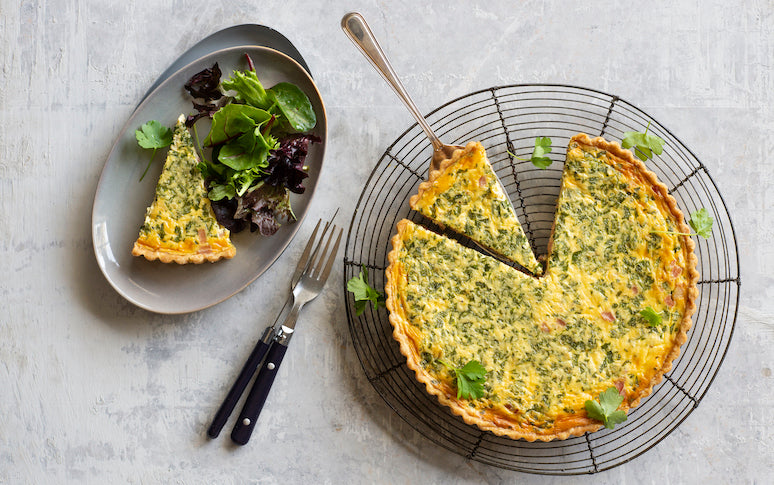
The course includes a 3-hour masterclass pre-recorded video (which was previously recorded as a Live Session), which enables you to take part in this course entirely at your own pace. Not only does the video include full step-by-step instructions for making shortcrust pastry from scratch and a Quiche Lorraine, but you will have the ability to bake along in your own time and have access to all the questions that were answered during the session.
This virtual masterclass is supported by printable recipes and resources which will become your go-to shortcrust pastry kit. Along with the Quiche Lorraine recipe, Anneka also shares a number of tried-and-tested recipes including a seasonal Fruit Galette and a Roasted Pumpkin, Tomato and Oregano Tart.
At the end of this course, you will walk away with all the knowledge, skill and confidence you need to be able to bake your own delicious shortcrust pastry at home and never rely on store-bought pastry again.
Dates
Shortcrust Pastry is a self-paced course and is now open for enrolment.
Please note: The video included in this course is a pre-recorded 3-hour video of a previous Live Session.
If you're interested in joining in a future LIVE class and would like to be notified when new dates are released, please fill out your details at the bottom of this page.
This course was great! So informative and easy to follow along. I can now make shortcrust pastry and bake some amazing pies and tarts – all delicious!
Caroline, USA
Cost
$100
Who is this class suitable for?
This class is, quite simply, suitable for everyone – from absolute beginners to more experienced bakers who want to brush up on their pastry-making skills. As this class is completed online, it is suitable for students from all over the world.
What will I get?
- A 3-hour pre-recorded masterclass video where you can bake along with Anneka Manning and learn how to make your own shortcrust pastry and a Quiche Lorraine
- Membership to BakeClub's exclusive The Kitchen Table online group
- Access to Anneka's 35+ years of baking experience and knowledge through The Kitchen Table and the ability to ask any baking-related questions
- A thorough understanding of the shortcrust pastry process and how to apply what you’ve learnt to be able to troubleshoot in the future and ensure baking success
- Invaluable printable information sheets and recipes
- Lifetime access to the live video and course material
- A chance to (virtually) meet like-minded people and share your baking with The Kitchen Table online group
- Baking confidence, knowledge and skill to use regularly at home
How does a self-paced course work?
This online course is completely self-guided. Upon enrolment, you will gain access to the course content which you can work through at your own pace. You can log on whenever it is convenient for you and watch the video and bake the recipes entirely in your own time. You will have lifetime access to all the recipes, videos and printable information sheets.
There is the option to connect with Anneka and other bakers via Facebook through BakeClub's exclusive The Kitchen Table membership groups. This way you can share your experience and support each other as your confidence and skills grow.
Once you learn the basics and understand that you can fix problems along the way, it takes the fear out of making shortcrust. I understand what I am doing now and feel more confident. I loved every minute of the course... And I can make pastry now!
Gail, Sydney
Watch the video below for a sneak peek into one of our Live Sessions...
If you are interested in joining a future LIVE class, please fill out your details below and we'll be in touch when new dates are released.
$100.00/pp
more info- Products -
Simple Cakes is a self-paced course and is now open for enrolment.
Learn all there is to know about making the cake you want to bake, eat and share in this fun and informative online baking course.
Anneka has a wealth of baking knowledge that she so kindly shares. I felt her support and genuine interest in teaching people shone through. It didn’t feel like just another online class. The little tips that came up were invaluable. This course was a great way to join a small community of like-minded bakers and tweak my baking to guarantee better results.
Fiona Parker, Melbourne
Learn the secrets to delicious (and impressive!) cakes – right in your very own kitchen!
Simple Cakes is a fun and casual online baking course where you will learn a range of techniques and countless practical tips giving you everything you need to bake, ice and decorate delicious – and impressive – cakes at home.
Anneka Manning will guide you through the process and share her more than 35 years of baking experience, knowledge and research. The course includes a 2.5-hour masterclass pre-recorded video (which was previously recorded as a Live Session), which enables you to take part in the course entirely at your own pace. Not only will you learn the secrets to the 'creaming' method (and get the answer to one of baking's most-asked questions, "How long do I need to cream for?") but you will gain the building blocks you need for all your future cake baking.
You can also bake along with Anneka in your own time and make a quintessential Vanilla Buttercake complete with Raspberry Buttercream, troubleshooting and gaining invaluable tips and tricks as you go.
The virtual masterclass is supported by printable recipes and resources including step-by-step instructions on the two other main mixing methods when it comes to cake baking as well as recipes to practice each method. Each recipe includes multiple variations (giving you a repertoire of over 36 different cakes!) as well as how to adapt for different tin shapes, from standard round and square tins through to cupcakes and sheet cakes. Included are also a number of recipes and instructions for different types of icings (glace, buttercream, frosting and ganache) and clever decoration ideas for your cakes.
At the end of this course, you will walk away with a repertoire of reliable recipes that will become your go-to bakes be it for a special afternoon tea, a casual weekend picnic or the school cake stall.
So, join us and say goodbye to store-bought and packet cakes forever!
Dates
Simple Cakes is a self-paced course and is now open for enrolment.
Please note: The video included in this course is a pre-recorded 3-hour video of a previous Live Session.
If you're interested in joining in a future LIVE class and would like to be notified when new dates are released, please fill in your details at the bottom of this page.
Cost
$100 (FREE for all BakeClub & Co. Members in January 2026).
This course encouraged me to bake out of my comfort zone and be more experimental and creative with cakes. I gained so many extra little tips that make my cakes even more refined ... [It included] so many good recipes that I will do over and over as I know they work every time ... This course is definitely worth it.
Pippa Bell, Nundle NSW
Who is this class suitable for?
This class is, quite simply, suitable for everyone – from absolute beginners to more experienced bakers who want to brush up on their cake-baking skills. As this class is completed online, it is suitable for students from all over the world.
What will I get?
- A 2.5-hour pre-recorded masterclass video where you can bake along with Anneka Manning and learn how to make a Vanilla Buttercake with Raspberry Buttercream.
- Membership to BakeClub's exclusive The Kitchen Table online group
- Access to Anneka's 35+ years of baking experience and knowledge through The Kitchen Table and the ability to ask any baking-related questions.
- A thorough understanding of the cake-baking process and how to apply what you've learnt to be able to troubleshoot in the future and ensure baking success.
- Invaluable printable information sheets and recipes.
- Lifetime access to the video and course material.
- A chance to (virtually) meet like-minded people and share your baking with The Kitchen Table online group.
- Baking confidence, knowledge and skill to use regularly at home.
What will I learn?
This course covers the three main mixing methods used when baking cakes: the Measure & Mix method, the Measure & Beat method, and the Creaming method.
Each recipe includes multiple variations as well as how to adapt for different tin shapes, from standard round and square tins through to cupcakes and sheet cakes (giving you a repertoire of over 36 different cakes!).
Included are also a number of recipes and instructions for different types of icings (glace, buttercream, frosting and ganache) and clever decoration ideas for your cakes, as well as loads of helpful information, tips and tricks around cake baking.
I have always loved baking but wanted to deep dive into making perfect cakes and the science behind it ... I loved the virtual class!
Suzie Naidu, Sydney
If you are interested in taking part in a future class, please fill out your details below and we'll be in touch when new dates are released.
$350.00/pp
more info- Products -
Sourdough will run from 18th September – 16th October 2026.
Build the skills, knowledge and confidence to bake exceptional sourdough at home in just 4 weeks!
From start to finish this course is all you need to know about sourdough bread making and you can do it in your own time! I particularly like the way you explain the science behind cooking as it helps me understand each step of the process better and where I might need to make adjustments ... All of it was wonderful!
Maria Hickey, Victoria
Discover everything you need to know about making your own sourdough – right from your very own kitchen!
Sourdough is an intensive 4-week online course where you will learn everything there is to know about how to make and bake your own artisan sourdough bread – all from your very own kitchen.
This online course combines live virtual demonstrations (all recorded so you can rewatch them anytime) with printable recipes and detailed information sheets to guide your learning at your own pace. You’ll be taken step-by-step through the entire sourdough process – from creating and maintaining your starter to kneading, proving, shaping, baking and storing your bread – as well as how to incorporate your starter into your everyday baking.
Anneka Manning will guide you every step of the way, sharing her more than 35 years of baking experience, knowledge and research, as well as all of her practical and handy tips and tricks. Throughout the course, you will have access to a closed online forum where you will be able to ask Anneka any questions that arise and be able to troubleshoot your sourdough baking as you move through the process.
At the end of this course, you will walk away with all the knowledge, skill and confidence you need to be able to bake your own delicious sourdough bread at home.
Dates
18th September – 16th October 2026
Cost
$350 (50% discount for all BakeClub & Co. Members)
I really enjoyed the journey of making sourdough from the starter, to the different feedings and the proving process. It has given me a different appreciation of this delicious bread! Anneka has a wealth of baking knowledge. As always, so professional and fun! I got all I expected from this course.
Corina Benjamin, Sydney
How will the course work?
This course is made up of 3 key components:
1. Live demonstrations:
The live component of this course will take place over four virtual sessions where Anneka will take you through the entire sourdough process including:
-
Friday 18th September 2026 at 7.30-9pm (AEST): How to make your own sourdough starter
-
Friday 9th October 2026 at 8-9pm (AEDT): How to make a levain
-
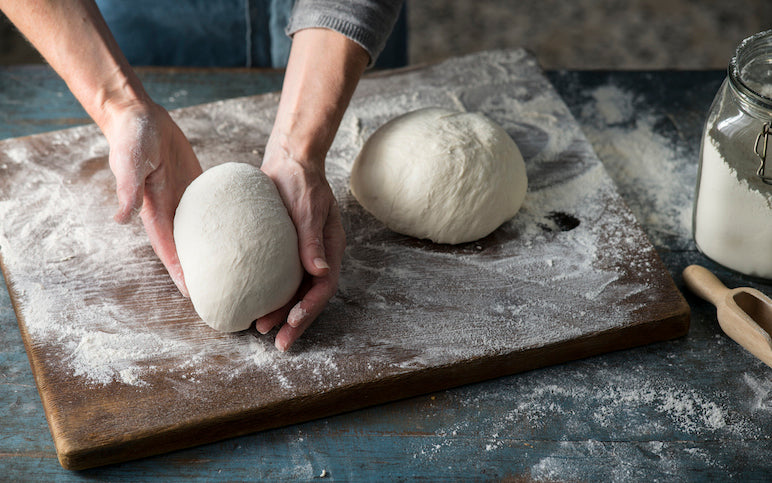
Saturday 10th October at 9-10.30am (AEDT): Making, stretching, folding, proving and shaping your dough
-
Saturday 10th October at 4-5pm (AEDT): Baking your bread
Please note: the first Live Session takes place at Australian Eastern Standard Time (UTC+10) while the following three take place at Australian Eastern Daylight Time (UTC+11). All of the Live Sessions will all be recorded so you can look back at them as many times as you like or watch them in your own time if you happen to miss the live session.
During the course, you will also have access to two extra online Live Sessions with Anneka. These Live Sessions will go over specific concepts covered and you will also have the opportunity to ask Anneka any related questions that have arisen for you as you work your way through the content. The Live Sessions will take place on Wednesday 30th September from 8-8.30pm (AEST) and Wednesday 14th October from 8-9pm (AEDT).
2. Written recipes and resources:
The live sessions will supported by printable recipes and resources which will take you through the process step by step so you can study and work through them at your own pace.
3. Closed Online Forum
An integral part of the course will be the closed online forum. This will be the place where you can ask Anneka any questions that come up as well as troubleshoot any issues that arise during the course. It is also a place where you can share your experience with fellow students.
Student numbers
We will only be accepting a limited number of bakers for this course so that Anneka can answer your baking questions during the live sessions and provide personal feedback via the closed online forum throughout the course.
Who is this course suitable for?
This course is, quite simply, suitable for everyone, but it is aimed at intermediate to experienced bakers. As this course is completed online, it is suitable for students from all over the world.
What will I receive?
- Four virtual live baking demonstrations (which will be recorded) where you will learn and bake along with Anneka Manning through the complete process of making your own sourdough.
- Personal, timely baking advice, guidance and encouragement from Anneka throughout the course.
- Access to a private online forum where you can connect with Anneka and fellow students – asking questions, sharing discoveries and supporting one another as you explore the art of making sourdough.
- Two online Live Sessions with Anneka (see schedule above), where she expands on key concepts and answers your questions as they arise while you work through the content.
- The opportunity to explore the science of baking within a welcoming (virtual) community of like-minded bakers.
- Free membership to BakeClub & Co. for the duration of the course
- A thorough understanding of the “why” behind baking – and the ability to apply that knowledge to achieve consistent, reliable results.
- Membership to BakeClub’s exclusive The Kitchen Table online group upon completion of the course.
- Lasting baking confidence, knowledge and skills you can draw on every time you step into your kitchen.
What will I learn?
- What a sourdough starter is
- How to make your own sourdough starter
- How to feed, maintain, store and get the most from your sourdough starter
- What a levain or pre-frement is
- Key ingredients and equipment needed to make great sourdough bread
- What is the most ideal way to knead and prove your sourdough
- Using proving baskets and how to shape your sourdough without them
- The secret to a crunchy crust and chewy texture (like the artisan ones you buy!)
I would recommend this course as an excellent introduction to baking sourdough bread with experience that could not be gleaned from just reading a recipe.
Sheila Zanyk, Canada
How will I get the most out of this course?
To truly benefit from this course, we recommend setting aside 3–4 hours each week to read the content, watch the videos, join the online Live Sessions and bake the recipes. This dedicated time will allow you to build skills steadily and gain the full, far-reaching benefits the course is designed to deliver.
We understand that life can sometimes interrupt the best of plans – which is why you’ll have 6 months’ access to the course content – but consistent time and effort will make all the difference to your progress, confidence and enjoyment in the kitchen.
So, is Sourdough for me?
- Would you like to master the technique of making your own sourdough bread from scratch?
- Would you love to be able to bake artisan-style bread at home?
- Would you like to be guided and inspired by Anneka's 35+ years of baking experience in your own kitchen?
- Do you have more time on your hands at the moment and keen to learn a new skill?
If any of these sound like you, then this course is the one for you!
I have tried making sourdough in the past, but never had consistent results. This course is a great way to start your sourdough baking journey and gives you a solid foundation to work from.
Su Shearer, Victoria
$150.00/pp
more info- Products -
Sourdough is an in-depth, self-paced online course where you will learn everything there is to know about making and baking your own artisan sourdough bread.
From start to finish this course is all you need to know about sourdough bread making and you can do it in your own time! I particularly like the way you explain the science behind cooking as it helps me understand each step of the process better and where I might need to make adjustments ... All of it was wonderful!
Maria Hickey, Victoria
Discover everything you need to know about making your own sourdough – in your own time!
Sourdough is an in-depth, self-paced online course where you will learn everything there is to know about making and baking your own artisan sourdough bread – in your own time, at your own pace – all from your own home kitchen!
Made up of a combination of demonstration videos, printable recipes and invaluable information sheets that you can study at your own pace, this online course will take you through the entire process from making and maintaining your own sourdough starter through to proving, kneading, shaping, baking and even storing your bread.
Throughout the course, Anneka Manning shares her more than 30 years of baking experience, knowledge and research, as well as all of her practical and handy tips and tricks.
At the end of this course, you will walk away with all the knowledge, skill and confidence you need to be able to bake your own delicious sourdough bread at home.
How to enrol
Sourdough is now open for enrolment.
I really enjoyed the journey of making sourdough from the starter, to the different feedings and the proving process. It has given me a different appreciation of this delicious bread! Anneka has a wealth of baking knowledge. As always, so professional and fun! I got all I expected from this course.
Corina Benjamin, Sydney
Cost
$150
Who is this course suitable for?
This course is, quite simply, suitable for everyone, but it is aimed at intermediate to experienced bakers. As this course is completed online, it is suitable for students from all over the world.
What will I get?
- Four downloadable modules which will take you through the complete process of making your own sourdough
- A thorough understanding of the sourdough process and how to apply what you’ve learnt to be able to troubleshoot in the future and ensure baking success
- Membership to BakeClub's exclusive The Kitchen Table online group
- Invaluable printable information sheets and recipes
- Baking confidence, knowledge and skill to use regularly at home – and the inspiration to get into the kitchen and get baking!
What will I learn?
- What a sourdough starter is
- How to make your own sourdough starter
- How to feed, maintain, store and get the most from your sourdough starter
- What a levain or pre-frement is
- Key ingredients and equipment needed to make great sourdough bread
- What is the most ideal way to knead and prove your sourdough
- Using proving baskets and how to shape your sourdough without them
- The secret to a crunchy crust and chewy texture (like the artisan ones you buy!)
I would recommend this course as an excellent introduction to baking sourdough bread with experience that could not be gleaned from just reading a recipe.
Sheila Zanyk, Canada
How does a self-paced course work?
This online course is completely self-guided. Upon enrolment, you will gain access to the course content which you can work through at your own pace. You can log on whenever it is convenient for you and complete the modules one day at a time.
You can take as long as you need to complete the course – it's up to you how quickly you want to work through the content. You will have lifetime access to all the videos, recipes and printable information sheets so you can dip in and out of it whenever it suits you.
There is the option to connect with other bakers via Facebook through BakeClub's exclusive The Kitchen Table membership group and via Instagram using #bakeschoolsourdough. This way you can share your experience and support each other as your confidence and skills grow.
Can I use my own sourdough starter if I already have one?
You are more than welcome to use your own starter if you already have one but we do recommend that you use a sourdough starter that is 100% hydration. A 100% hydration starter is made from, and fed with, equal quantities (by weight) of both flour and water, or 1 part flour and 1 part water (for example, 125g of starter is fed with 125g water and 125g flour).
So, is Sourdough for me?
- Would you like to master the technique of making your own sourdough bread from scratch?
- Would you love to be able to bake artisan-style bread at home?
- Would you like to be guided and inspired by Anneka's 30+ years of baking experience in your own kitchen?
- Do you have more time on your hands at the moment and keen to learn a new skill?
If any of these sound like you, then this course is the one for you!
I have tried making sourdough in the past, but never had consistent results. This course is a great way to start your sourdough baking journey and gives you a solid foundation to work from.
Su Shearer, Victoria
Prep 5 days
A practical, step-by-step guide with tips, tricks and timelines to making your own sourdough starter and baking with it.
This method is logical and simplified for beginner bakers to follow (and expert bakers to hone). While the process of making this starter is a little lengthy (at least 5 days) it isn’t difficult, if you follow the steps and take note of my tips.
The detailed steps are below, but here is a nifty quick reference to keep you on track:
Day 0
125g flour + 125g water, stand for 48 hours
↓ ↓
Day 2
1st feeding: 125g starter + 125g flour + 125g water, stand for 24 hours
↓ ↓
Day 3
2nd feeding: 125g starter + 125g flour + 125g water, stand for 24 hours
↓ ↓
Day 4
3rd feeding: 125g starter + 125g flour + 125g water, stand until doubled in size (8—24 hours)
↓ ↓
Day 5
If not doubled in size, feed every 12 hours until doubled in 8 hours or less
↓ ↓
Use 'active' starter OR store at room temperature or in fridge.
Sourdough starter method - Day 0
A young starter is quite sensitive so when establishing your sourdough starter it is important to follow the process (measuring the flour and water accurately, feeding at the suggested times, etc.) But once mature and strong, it will have more flexibility and will be more resilient to changes so don’t worry too much if you occasionally miss a feeding by a day or so or if your quantities are slightly out - just get back on track as soon as you can and your starter will bounce back.
Ingredients
Starter
125g organic wholemeal flour (see Baker’s Tips #1 and Variations)
125g bottled water, at room temperature (see Baker’s Tips #2 and #3)
To feed the starter
unbleached organic plain flour (see Baker’s Tips #1)
bottled water, at room temperature
Method
Day 0
- Place the wholemeal flour and water in a medium bowl and stir until well combined.
- Weigh a clean, dry jar with a lid that you are going to store your sourdough starter in and note the weight down (see Baker’s Tips #4).
- Transfer the flour mixture to the jar, seal and set aside in a warm draught-free place (see Baker’s Tips #5) for 48 hours (see Baker’s Tips #6).
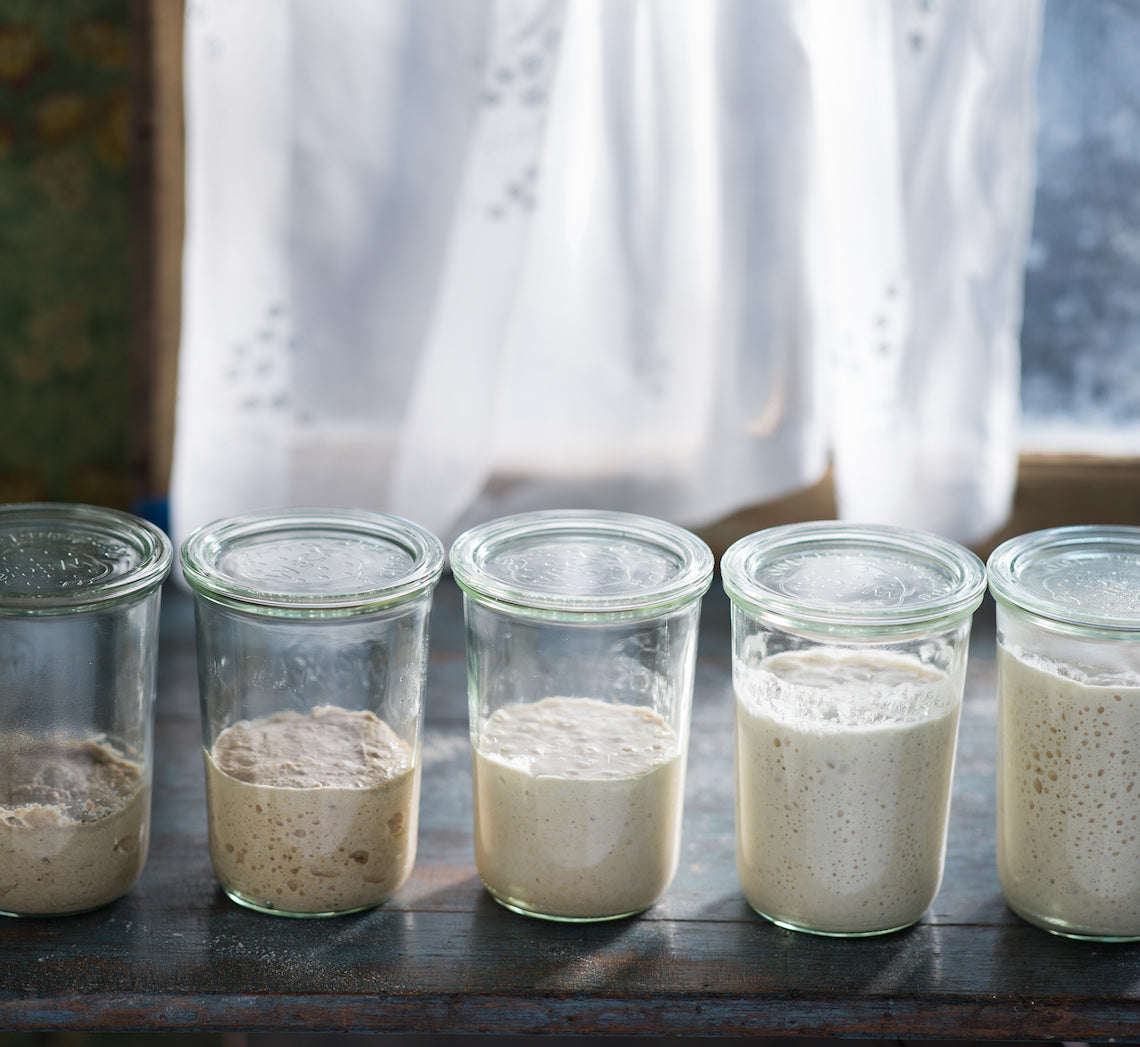
After 12 hours (see images, jar 1, from left), there won’t be much change in your mixture although a few bubbles may start to appear through the side of the jar.
After 48 hours (see images, jar 2, from left), the starter may have risen just a little and a dark skin would have formed. There may be a few bubbles on the surface and also noticeable through the side of the jar – but not always. Proceed to the first feeding.
If you don't see these signs, set aside for another 24 hours – if there are no signs of activity by then, just continue with the first feeding. The aroma will be quite unpleasant.
Variations
Rye sourdough starter: replace the wholemeal flour with 100g rye flour (and feed with unbleached organic plain flour).White sourdough starter: replace the wholemeal flour with 125g unbleached plain flour (and feed with unbleached organic plain flour).
Baker's Tips
#1. In my experience, I’ve had the best results with starting a sourdough starter with organic wholemeal flour and then switching to unbleached organic plain flour for feeding until it is established. Once mature, you can then just switch to regular plain flour or bread flour for feeding, or even occasionally feed it with wholemeal flour again to add a little ‘nuttiness’ to its flavour.
#2. Use bottled water (or water that is filtered and has been allowed to stand uncovered for at least 4 hours for the chlorine to dissipate) to give your sourdough starter the best possible chance of success.
#3. It’s a good idea to embrace measuring both your flour and water in grams when making and maintaining your sourdough starter. It is the most accurate way of measuring and will give you the best possible chance of success.
#4. A sourdough starter can be mixed and kept in a non-reactive container such as a glass jar. Look for one that has straight sides and a reasonable sized mouth to make mixing easy. This starter recipe will need a jar that has a capacity of at least 1 litre (4 cups) and, before making your starter, ensure that it is very clean and dry. It’s a good idea to note the weight of your jar so that it is easy to calculate how much sourdough starter you need to remove and discard every time you feed it.
#5. The ideal temperature for proving sourdough starter is between 21°C-23.5°C (70ºF-74ºF). Don’t be tempted to keep the starter at higher temperatures to accelerate the process as it won’t necessarily mean you will get a better result. Higher temperatures can encourage more ‘bad’ bacteria to grow than the ‘good’ ones, which will ultimately ruin the starter. If your kitchen is cold, I find placing it under the stove rangehood with the light on or on top of the fridge gives a warm (but not too warm), consistent temperature.
#6. After each feeding, it’s a good idea to mark the side of the jar with tape (or an elastic band) so you can see how much it grows in the specified time.
Sourdough starter method - Day 2
First feeding after 48 hours
- Remove and discard all but 125g of the sourdough starter from the jar.
- Add 125g plain flour and 125g water to the jar and stir well to combine.
- Use a clean spatula to scrape the sides of the jar down to clean (see Baker’s Tips #7).
- Seal the jar and set aside in a warm, draught-free place for 24 hours.
After the first feeding and rise, the starter would have risen slightly (up to 50%) (see images, jar 3, from left) and random bubbles will be visible on the surface as well as through the side of the jar indicating the wild yeast is active and starting the multiply.
Baker's Tips
#7. Make sure you scrape down the side of the jar after every feed – this will make it easier to see how much the starter has risen each time.
Sourdough starter method - Day 3
Second feeding after 24 hours
- Remove and discard all but 125g of the sourdough starter from the jar.
- Add 125g plain flour and 125g water to the jar and stir well to combine.
- Use a clean spatula to scrape the sides of the jar down to clean.
- Seal the jar and set aside in a warm, draught-free place for 24 hours.
After the second feeding and rise there will be more visible bubbles but they will be smaller and more uniform (see images, jar 4, from left). The aroma will be less pungent and a little sweeter.
Sourdough starter method - Day 4
Third feeding after 24 hours
- Remove and discard all but 125g of the sourdough starter from the jar.
- Add 125 g plain flour and 125g water to the jar and stir well to combine.
- Use a clean spatula to scrape the sides of the jar down to clean.
- Seal the jar and set aside in a warm, draught-free place until doubled in size (8-24 hours, depending on the strength of your sourdough).
Sourdough starter method - Day 5
Depending on the strength of your sourdough and how quickly it ferments it may double in size in less than 24 hours. You may also notice that once it doubles it starts to lose volume and falls back on itself indicating that it needs regular feeding from this point.
If your starter has not doubled in 24 hours or less, continue the discarding and feeding process every 12 hours until it has the ability to double in size in 8 hours or less. When it does, it is now "active" and ready to use, or store in the fridge to be used at a later date (see Baker’s Tips #8).
Baker's Tips
#8. A young starter is quite sensitive so when establishing your sourdough starter it is important to follow the process (measuring the flour and water accurately, feeding at the suggested times, etc.) But once mature and strong, it will have more flexibility and will be more resilient to changes so don’t worry too much if you occasionally miss a feeding by a day or so or if your quantities are slightly out - just get back on track as soon as you can and your starter will bounce back.
What's that smell? Aroma changes in sourdough starter
When making and establishing a sourdough starter you will notice that the aromas it gives off change quite considerably from one day to the next. This is because the bacteria present is changing and ‘settling’.
To start, in the first day or so, it can smell quite foul but will mellow with subsequent feedings and over time the smell will become slightly tangy and sweet and then more sour. You will also notice once the sourdough starter has matured and is more stable, the aroma will become more consistent too.
The aroma will also change depending on where it is in the feeding cycle once established, mature and healthy; it will have a slightly sweet scent when first fed, and will become more sour as it stands and ripens ready for use.
Sourdough starters can be unpredictable
Remember all sourdough starters are different. There are so many things that can vary while making a sourdough starter (including the type of wild yeast and bacteria present, the temperature the starter is held at, etc.) and ultimately this will affect how long it takes for your starter to become mature.
Sometimes, a starter may seem to be on the right track and then, for whatever reason, it doesn’t progress at all. If yours doesn’t reflect the exact description above, don’t lose heart, be patient and keep repeating the feeding process every 12 hours until your starter reflects the Day 5 description before you move onto maintaining, storing and using it.
How to use your sourdough starter in your baking
To make sure your sourdough starter is strong and 'active' enough to use in baking, you will need to feed, maintain and store it. Click here to find out how.
Once your starter is ready to use, this Basic sourdough bread recipe is a well-tested recipe to begin your sourdough baking.
This recipe is part of Anneka's SBS Food Bakeproof: Sourdough online column. For more Bakeproof columns and recipes, click here.
Photography by Alan Benson.
$100.00/pp
more info- Products -
Sponges LIVE will take place on Sunday 25th October 2026 from 10am-1pm.
Learn to whip up your own light and fluffy sponge cakes in in this fun and casual online baking class!
This class absolutely exceeded my expectations. Anneka has a very warm and engaging style. The instructions were clear and being able to watch along made all of the difference. Give it a go! Anneka will have you making a sponge in no time.
Alison, Melbourne
Discover the secrets to super light sponges – right in your very own kitchen!
Sponges LIVE is a fun and informative online baking class that will have you whipping up your own light and fluffy sponge cakes – all from your very own kitchen! It will take place on Sunday 25th October, 10am-1pm (AEDT).
Guiding you through the process will be Anneka Manning, ready to share her more than 35 years of baking experience, knowledge and research, as well as her practical and handy tips and tricks. You will have the ability to bake along with Anneka and learn how to make a Classic Hot Milk Sponge from scratch.
The virtual Live Session will be supported by printable recipes and resources which will teach you everything you need to know to conquer your fear of these gorgeous, classic cakes at home and become your go-to sponge baking kit. Anneka will also share a number of additional recipes using the various mixing methods and techniques used when making sponge cakes.
At the end of this class, you will walk away with fail-safe recipes, techniques and confidence you need to bake a gorgeous sponge whenever the mood takes you!
Dates
Sunday 25th October 2026 at 10.00am-1.00pm, Australian Eastern Daylight Time (UTC+11) via Zoom.
If you are interested in joining a future class and would like to be notified when new dates are released, please fill in your details at the bottom of this page.
Please note: The Live Session will be recorded and available for you to watch afterwards if you are unable to attend, or rewatch it at a later date if you would like to.
Cost
$100 (50% off for all BakeClub & Co. Members).
Student numbers
Sponges have always terrified me. I knew there was a method that I was not doing, so was great to get this info. This is a great online course ... Loved it!
Cath, Perth
Who is this class suitable for?
This class is, quite simply, suitable for everyone – from absolute beginners to more experienced bakers who want to brush up on their scone-making skills. As this class is completed online, it is suitable for students from all over the world.
What will I receive?
- A 3-hour virtual live baking demonstration on Zoom (recorded for you to rewatch at your convenience) where Anneka Manning will guide you step-by-step through the process of making a Classic Hot Milk Sponge – including the opportunity to bake alongside her.
- Access to Anneka’s 35+ years of baking experience and expertise, with the ability to ask any questions that arise during the class.
- The chance to connect (virtually) with like-minded bakers and share your creations within The Kitchen Table online group.
- A thorough understanding of how to make macarons, plus the knowledge to troubleshoot and apply these skills in the future for consistent baking success.
- Invaluable printable information sheets and recipes to support your learning and reference in your own kitchen.
- Lifetime access to the live video and all course materials, so you can revisit the class whenever you like.
- Membership to BakeClub’s exclusive The Kitchen Table online group, providing a space to ask questions and share your baking journey.
- Lasting baking confidence, knowledge and skills you can use regularly at home.
What will I learn?
This course covers the various mixing methods and techniques used when making sponge cakes and includes the following recipes:
- Classic Hot Milk Sponge
- Raspberry Swiss Roll
- Powder Puffs
- Lemon Chiffon Cake
Included are also Anneka's top tips for beautiful sponges, how to remove sponges from cake tins, how to roll a Swiss Roll, and loads of clever ideas on how to embellish your sponge cakes.
How will I get the most out of this online class?
To get the most from this class, we recommend setting aside time to attend the Live Session with Anneka and review the supporting materials beforehand. If you’re unable to join live, the session will be recorded so you can watch it at a time that suits you.
For the best experience and results, we encourage you to bake along during the class – it’s the perfect way to put the techniques into practice and gain the full benefit of Anneka’s guidance.
What if the dates don't suit me? Can I still enrol in the class?
If the date of this class doesn't work for you, you can still enrol and take part in your own time. While you may miss out on the Live Session, it will be recorded and will be available to watch when it suits you. You will have lifetime access to the video, as well as all the course material (including all of the resources and recipes).
If you are interested in joining a future LIVE class, please fill out your details below and we will be in touch when new dates are released.
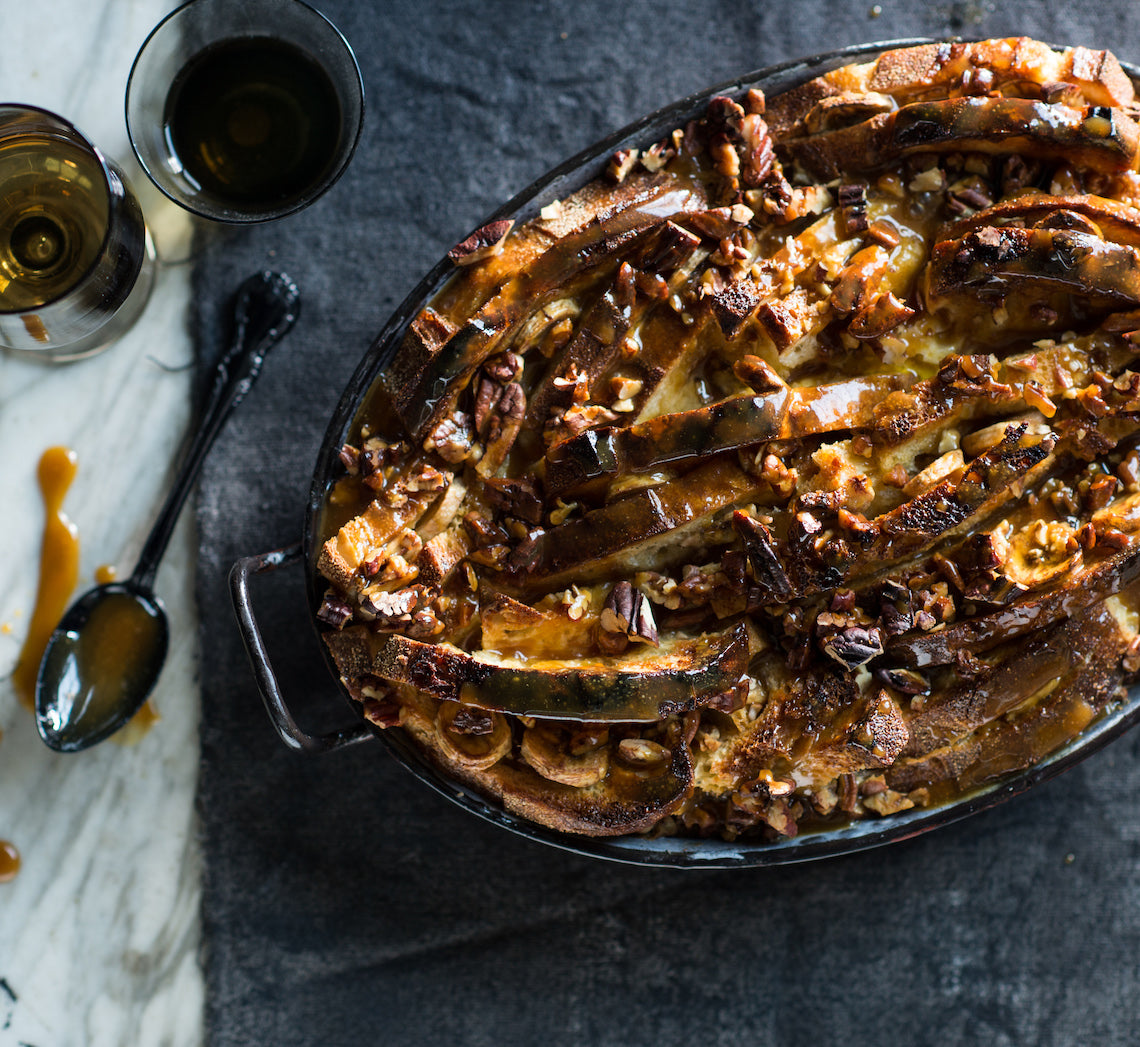
Prep 30min (+30-60min standing time)Bake 1hr 10minMakes 10-12 serves
Indulgent is the one word (and possibly the only) that comes to mind when describing this dessert. Custardy bread, pecans, bananas and a rich caramel sauce combine to make this one very decent over-the-top offering.
Ingredients
Melted butter, to grease
600g (1lb 5oz) day-old sourdough or crusty loaf, cut into 1cm-thick slices, crusts partially removed
60g (2oz) salted butter, softened
3 ripe medium bananas (about 200g/7oz each), thinly sliced
100g (3 ½oz) pecans, toasted and coarsely chopped
4 eggs, at room temperature
110g (½ cup/4oz) caster sugar
500ml (2 cups/17fl oz) milk
375ml (1½ cups/13fl oz) pouring cream
2 teaspoons natural vanilla essence or extract
Vanilla ice-cream, to serve
Caramel sauce
100g (½ cup, lightly packed/3 ½oz) brown sugar
115g (⅓ cup/4oz) golden syrup
40g (1 ½oz) salted butter
125ml (½ cup/4fl oz) pouring cream
Method
- Preheat oven to 170°C/340°F (150°C/300°F fan-forced). Brush a deep 2-litre (8-cup/3.5pt) ovenproof dish with melted butter to grease.
- Spread the bread slices with the butter. Top half of the slices with the banana and then cover with the remaining bread slices. Cut each ‘sandwich’ diagonally into half. Arrange the layered bread in the ovenproof dish, allowing it the stick up a little, and then sprinkle with the pecans.
- Use a balloon whisk to whisk together the eggs, sugar, milk, cream and vanilla until well combined. Pour evenly over the bread in the dish and set aside for 30-60 minutes or until the bread has absorbed all the custard.
- Meanwhile, to make the Caramel Sauce, combine the sugar, golden syrup and butter in a small saucepan. Stir over low heat until the sugar dissolves. Bring to a simmer and simmer for 2-3 minutes or until thickened slightly.
- Sprinkle the pudding with the remaining pecans, pour over half the caramel sauce (reserve the remaining sauce) and bake in preheated oven for 1 hour and 10 minutes or until the top is golden and the custard is set.
- Meanwhile, add the cream to the remaining Caramel Sauce and stir over medium heat until well combined and heated through.
- Remove the pudding from the oven and stand for 5 minutes before serving with the warm Caramel Sauce and ice cream.
Baker's Tip
- This bread and butter pudding will keep covered in the fridge for up to 2 days. Serve at room temperature or cover with foil and warm gently in an oven preheated to 150°C/300°F (130°C/265°F fan-forced) for 10-20 minutes (depending on the portion size).
This recipe is from Anneka's SBS Food online column, Bakeproof: Comforting Custard.
CLICK HERE for more Bakeproof recipes.
Photography by Alan Benson.
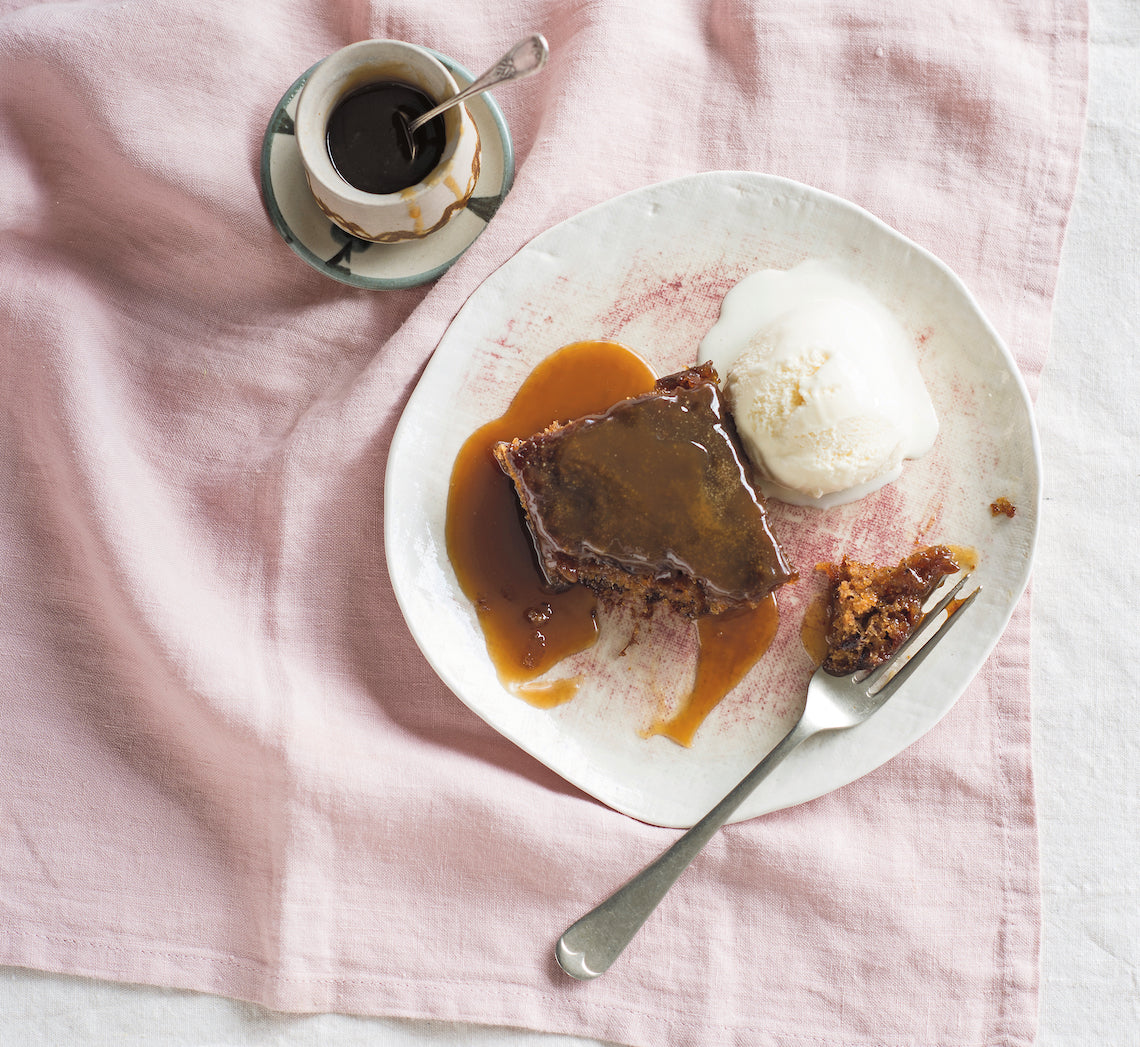
Prep 20min (+25min cooling time)Bake 30minMakes 8 serves
Hailing from the 70s and reaching peak popularity in the 90s, sticky toffee pudding now sits alongside the likes of lemon delicious, rice pudding and chocolate fondants as a classic. Sweet, sticky and completely addictive, it is always a crowd pleaser.
Ingredients
200g fresh dates, pitted and chopped250ml (1 cup) water
1 teaspoon bicarbonate of soda
100g unsalted butter, at room temperature
150g (¾ cup, firmly packed) brown sugar
2 eggs
150g (1 cup) self-raising flour
Cream or vanilla ice cream, to serve
100g unsalted butter, cubed
200g (1 cup, firmly packed) brown sugar
250ml (1 cup) pouring cream
Method
- Preheat oven to 180°C. Grease a 18 x 28cm shallow cake tin with melted butter and line the base and two long sides with one piece of baking paper, allowing the paper to overhang the sides.
- Place the dates and water in a small saucepan, bring to the boil over medium heat and simmer for 3-5 minutes or until pulpy. Stir in the bicarbonate of soda and then set aside for 20 minutes or until cooled to room temperature.
- Use an electric mixer to beat the butter and sugar in a medium bowl until pale and creamy. Add the eggs, one at a time, beating well after each addition. Use a large metal spoon or spatula to fold in the cooled date mixture and then the flour until just combined.
- Spoon the mixture into the prepared tin and smooth the surface with the back of a spoon. Bake in preheated oven for 30 minutes or until cooked when tested with a skewer.
- Meanwhile, to make the toffee sauce, put the butter, sugar and cream in a medium saucepan and stir over medium heat until the butter melts and the sugar dissolves. Bring to a simmer for 3 minutes.
- Remove the pudding from the oven and pour a quarter of the hot toffee sauce over. Set aside for 5 minutes. Remove the warm pudding from the tin, cut into portions and serve drizzled with the remaining warm toffee sauce and accompanied by cream or ice-cream.
Baker's Tips
- Any leftover pudding and sauce will keep in an airtight container in the fridge for up to 4 days. Reheat both separately in the microwave on medium in 1-minute bursts until warmed through.
This recipe is from Anneka's SBS Food online column, Bakeproof: Comfort Puddings. CLICK HERE for more Bakeproof recipes.
Photography by Alan Benson.

Prep 30min (+2hr cooling time and overnight freezing)Bake 1hrMakes 12-15 serves
There is something wonderful about ice-cream cakes. This one is a layer of cheat's strawberry ice-cream sandwiched with orange-scented pistachio meringue. It makes a wonderful dessert for any summer celebration.
Ingredients
1 litre (3½pt) good-quality vanilla ice cream
Strawberries, hulled and halved, to serve
Coarsely chopped pistachio kernels, to serve
Edible flowers (optional), to serve
Strawberry sauce
500g (1lb 2oz) strawberries, hulled and sliced
2 tablespoons (40g/1½oz) caster sugar
1 tablespoon (4 teaspoons) fresh lemon juice
2 teaspoons rosewater, to taste (optional)
Pistachio meringue discs
4 egg whites, at room temperature
220g (1 cup/7¾oz) caster sugar
45g (⅓ cup/1½oz) ground pistachios
1 orange, rind finely grated
Method
- Preheat oven to 150°C/300°F (130°C/265°F fan-forced). Mark two 20cm/8in circles on 2 pieces of non-stick baking paper. Turn the paper over and line two oven trays.
- To make the Pistachio meringue discs, use an electric mixer with a whisk attachment to whisk the egg whites until soft peaks form. With the motor running, gradually add the sugar, whisking well after each addition, until very thick and glossy and the sugar has dissolved. Whisk in the orange rind. Use a large metal spoon or spatula to fold in the ground pistachios until evenly combined. Divide the mixture between the two trays and use a palette knife or the back of a metal spoon to spread to fill the two marked circles.
- Reduce the oven temperature to 100°C/200°F (80°C/175°F fan-forced) and bake for 1-1¼ hours, swapping the trays halfway through baking, or until crisp on top. Turn off the oven and allow the discs to cool in the oven (this will take about 2 hours).
- Meanwhile, to make the Strawberry sauce, combine the strawberries, sugar and lemon juice in a medium saucepan and cook over low heat, stirring occasionally until the sugar dissolves. Bring to to a simmer and simmer for 5 minutes or until syrupy but the strawberries still hold some of their shape. Strain the sauce through a sieve set over a heatproof bowl. Transfer to strawberry pieces in a bowl and stir the rose water through the sauce. Cover both with plastic wrap and place in the fridge to cool.
- When ready to assemble the cake, line the base and sides of a 22cm/8¾in springform tin with non-stick baking paper. Place a pistachio disc in the base of the lined tin, trimming to fit if necessary.
- Scoop the ice cream into a large bowl and set aside for 5 minutes at room temperature to soften slightly. Add the cooled strawberry pieces to the ice cream and use a large metal spoon or spatula to briefly fold together to form a rough swirl pattern. Working quickly, spoon the ice cream immediately into the prepared tin over the meringue disc and use the back of a metal spoon to press down to remove any air pockets and smooth the surface. Cover the ice cream with the remaining meringue disc, trimming to fit if necessary. Cover with plastic wrap and freeze overnight.
- To serve, remove the cake from the springform tin and place on a serving plate. Top with strawberries and sprinkle with chopped pistachios and edible flowers, if using. Spoon over some of the strawberry sauce. Serve in wedges with the remaining strawberry sauce passed separately.
Baker's Tips
- This cake will keep covered in the freezer for up to 2 weeks.
- The strawberry sauce will keep in an airtight container in the fridge for up to 3 days. Alternatively freeze it for up to 1 month and thaw in the fridge.
This recipe is from Anneka's SBS Food online column, Bakeproof: Cakes for Crowds.
CLICK HERE for more Bakeproof recipes.
Photography by Alan Benson.


