
- home
- Products
$100.00/pp
more info- Products -
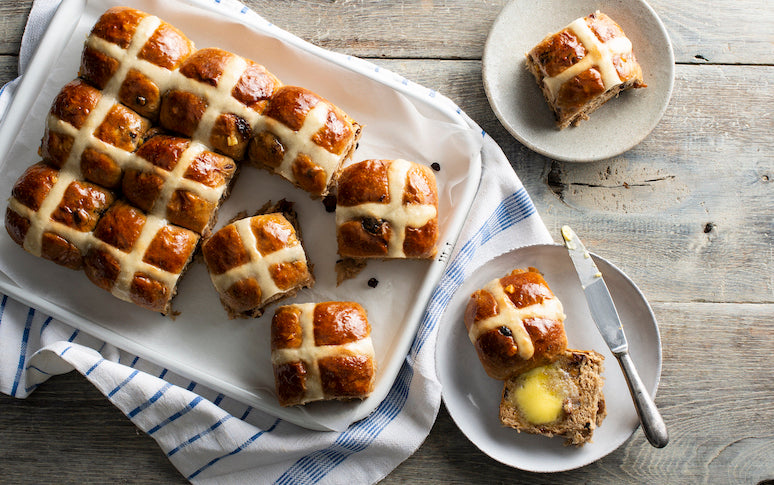
Hot Cross Buns LIVE will run again in 2027.
If you are interested in taking part, please contact us to express your interest.
I had never made Hot Cross Buns as they always seemed too difficult. I always enjoy Anneka's way of teaching – I find I learn so much and I love the way she supports her teachings with the science behind it. I find the live sessions work really well, and I learn so much from them ... being able to ask questions live is such a bonus. This course is a great way to learn something which you think is difficult but Anneka makes it all so simple. Absolutely do it!
Christine, NSW
Learn to bake the most traditional of Easter breads – right in your very own kitchen!
Hot Cross Buns is a fun and casual 2.5-hour LIVE virtual baking class where you will learn to make your own traditional Hot Cross Buns – just in time for the Easter weekend!
Anneka Manning will take you through the process step by step, sharing all of her practical tips and tricks along the way. You will have the ability to bake along with her as well as ask any questions that arise as you mix, knead, prove and shape your dough together throughout the evening. You can either bake your buns immediately or Anneka will share how to prove the dough overnight so it's ready to bake first thing the next morning (and have freshly baked buns for Good Friday).
The virtual Live Session will be supported by printable recipes and resources which will become your go-to Hot Cross Bun baking kit every Easter. Anneka will also share a number of recipe variations and some ideas of what to do with leftovers (if there are any!)
At the end of this class, you will come away not only with new-found skills and confidence but a dozen just-baked warm buns ready to smother in butter!
Date
If you are interested in taking part in 2027, please contact us to express your interest.
Please note: The Live Session will be recorded and available for you to watch afterwards if you are unable to attend, or rewatch it at a later date if you would like to.
Cost
$100 (50% off for all BakeClub & Co. Members).
Student numbers
We will only be accepting a limited number of bakers for this class so that Anneka can answer your baking questions during the Live Session and provide personal feedback.
I definitely got more than I expected from the class. Easy step-by-step instructions provided by Anneka and the opportunity to ask questions, no matter how 'silly', while making the buns meant I got the best experience possible. It was just perfect. Definitely recommend.
Glynis, Melbourne
Who is this class suitable for?
This class is, quite simply, suitable for everyone – from absolute beginners to more experienced bakers. As this class is completed online, it is suitable for students from all over the world.
What will I receive?
- A 2.5-hour virtual live baking demonstration on Zoom (recorded for you to rewatch at your convenience) where Anneka Manning will guide you step-by-step through the process of making traditional Hot Cross Buns.
- Access to Anneka’s 35+ years of baking experience and expertise, with the ability to ask any questions that arise during the class.
- The chance to connect (virtually) with like-minded bakers and share your creations within The Kitchen Table online group.
- A thorough understanding of how to make macarons, plus the knowledge to troubleshoot and apply these skills in the future for consistent baking success.
- Invaluable printable information sheets and recipes to support your learning and reference in your own kitchen.
- Lifetime access to the live video and all course materials, so you can revisit the class whenever you like.
- Membership to BakeClub’s exclusive The Kitchen Table online group, providing a space to ask questions and share your baking journey.
- Lasting baking confidence, knowledge and skills you can use regularly at home.
How will I get the most out of this online lass?
To get the most from this class, we recommend setting aside time to attend the Live Session with Anneka and review the supporting materials beforehand. If you’re unable to join live, the session will be recorded so you can watch it at a time that suits you.
For the best experience and results, we encourage you to bake along during the class – it’s the perfect way to put the techniques into practice and gain the full benefit of Anneka’s guidance.
What if the dates don't suit me? Can I still enrol in the class?
If the date of this class doesn't work for you, you can still enrol and take part in your own time. While you may miss out on the Live Session, it will be recorded and will be available to watch when it suits you. You will have lifetime access to the video, as well as all the course material (including all of the resources and recipes).
I enjoy Anneka's classes and always learn a lot ... It makes a difference to watch and learn, and be able to ask questions, rather than just read a recipe. It was fun and enjoyable to bake along and have Anneka give feedback. A highlight for me are all the tips and tricks from Anneka ... she is a great teacher ... and her recipe is really good!
Helen, Hong Kong
Prep 30minBake 30-35minMakes 12-15 serves
Originating (and excessively popular) in America, Hummingbird cake is a tropical mix of banana and pineapple, and when layered with an orange cream cheese frosting makes a great celebration cake. Sweet and indulgent, a small slice is all that is needed to satisfy.
Ingredients
150g (1 cup) plain flour
75g (½ cup) self-raising flour
½ teaspoon bicarbonate of soda
2 teaspoons ground cinnamon
220g (1 cup, firmly packed) brown sugar
45g (½ cup) desiccated coconut
2 very ripe large bananas (about 250g each)
440g crushed pineapple in natural juice, drained and juice reserved
2 eggs, lightly whisked
185ml (¾ cup) sunflower oil, plus extra to grease
Orange cream cheese frosting
100g unsalted butter, at room temperature
250g cream cheese, at room temperature
1 orange, zest finely grated
375g (3 cups) icing sugar mixture, sifted
Method
- Preheat oven to 180°C (160°C fan-forced). Brush three 20cm round cake tins with extra sunflower oil to lightly grease and line the bases with non-stick baking paper.
- Sift together the plain and self-raising flours, bicarbonate of soda and cinnamon. Add the brown sugar and coconut and stir to combine, breaking up any lumps.
- Mash the banana and combine with the drained pineapple, 80 ml (⅓ cup) of the reserved pineapple syrup, eggs and oil. Add to the flour mixture and use a wooden spoon or spatula to mix until just combined.
- Divide the mixture evenly among the prepared tins and spread with the back of a metal spoon to smooth the surface. Bake in preheated oven for 30-35 minutes or until cooked when tested with a skewer.
- Stand the cakes in the tins for 5 minutes before turning onto wire racks to cool (this will take about 1 hour).
- Meanwhile, to make the Orange cream cheese frosting, use an electric mixer to beat the cream cheese, butter and orange zest until very smooth. Gradually add the icing sugar, beating well after each addition and beat until well combined and really creamy. Divide the Orange cream cheese frosting evenly among 3 bowls.
- Take one portion of the Orange cream cheese frosting and use a palette knife to spread half over one cake layer. Top with a second cake layer and spread with the remaining frosting of the first portion. Top with the remaining cake layer. Spread another portion of frosting over the sides and the remaining portion over the top of the cake. Sprinkle with the pecans to decorate
Baker's Tips
- This cake will keep in an airtight container in the fridge for up to 4 days. Stand at room temperature for about 30 minutes before serving.
This recipe is from Anneka's SBS Food online column, Bakeproof: Cakes for Crowds. CLICK HERE for more Bakeproof recipes.
Photography by Alan Benson.

Prep 1-2hr (+drying time)Makes about 25 biscuits
If you're keen to show your loved one/s just how much they mean to you by baking them something irresistibly sweet, then you really can't go past a batch of these gorgeous cookies! The style of decorating used to create them is called 'flood on flood' icing and is a really effective way to decorate gingerbread or sugar biscuits. The key is to be patient, try not to rush and remember your designs will improve with practice. You will need at least three small piping bags and three Wilton or Loyal #4 round piping nozzles for this style. This Royal Icing recipe makes about 3 cups of icing and is enough to decorate about 25 average-sized cookies.
Ingredients
Gel food colours of your choice (we have used shades of 'rose pink' and 'raspberry'), to tint
About 25 gingerbread cookies
Edible sprinkles, to decorate
Royal Icing
3 egg whites (from 59g eggs) or 90g pasteurized egg whites (see Baker’s Tips)
675g (1½ cups) pure icing sugar, sifted through a fine sifter
½-3 teaspoons strained fresh lemon juice
Room temperature water, to thin icing
Method
- To make the Royal Icing, place the egg whites then the icing sugar in the bowl of an electric mixer. Use the paddle beater to beat on low speed until combined. Increase speed to medium and beat for 5 minutes. The icing will be smooth and thick at this stage. Add the lemon juice, ¼ teaspoon at a time, beating well between each addition, until the icing reaches a good piping consistency. The icing should be the consistency of toothpaste - soft but will hold its shape and form a soft peak when the beater is lifted.
- Immediately cover the bowl with plastic wrap and then a damp tea towel or cloth to prevent it from drying out (see Baker’s Tips).
- Divide the icing evenly between 3-5 small bowls (depending on how many different coloured icings you would like to use - we used 4 for these cookies including the white) and cover each bowl well. Transfer one white icing portion to a small piping bag fitted with a Wilton or Loyal #4 round piping tip (this will be used to pipe the outlines). Working with one portion of the remaining icing at a time, tint to desired colours, then add a little water, a drop at a time, and use a small palette knife or metal spoon to stir until it reaches the right consistency for ‘flooding’ (see Baker’s Tips). As soon as each portion reaches the right consistency, spoon into a small piping bag fitted with a Wilton or Loyal #4 round piping tip. Twist the end of the piping bag and seal with a clip or elastic band (this will help prevent it from drying out). Cover the tip with plastic wrap and then a damp cloth or tea towel and set aside while tinting and thinning the remaining icing portions.
- Use the white icing to pipe an outline around the inside edge of a cookie to create a border so that the icing in the centre won’t flow over the edge. Set aside for 3-5 minutes or until firm but not set.
- Pipe a tinted icing into the centre of a cookie to 'flood' it (making sure there will be enough to cover it comfortably but not too much so that the icing flows over the piped border). Use a toothpick to carefully spread the icing to cover fully, if needed, and then let the icing settle and become smooth. To achieve a ‘flood on flood’ effect (so that the pattern sinks into the base icing), while the icing is still wet, use contrasting tinted icing/s to pipe the stripes, dots or patterns onto the flooded icing (see Baker’s Tips). We created the heart pattern by piping dots and then dragging a toothpick through the dot from top to bottom and a little beyond. Sprinkle with edible sprinkles to decorate, if desired.
- Set iced cookies aside to dry completely overnight before storing (see Baker’s Tips).
Baker's Tips
- If you are concerned that these cookies will be served to pregnant women or people with compromised immune systems, use pasteurised egg whites. They are available in a carton from the refrigerated section of the supermarket.
- Royal Icing will dry out and start to set very quickly if not covered well. Cover bowls and the tips of filled icing bags with plastic wrap and then a damp tea towel while you are not using them to prevent the icing from drying out.
- To test if the icing is at the right consistency for ‘flooding’, drop a teaspoonful of the icing back into the bowl. If it melts back into the icing and the surface becomes flat in 5-6 seconds it is ready. If not, add a little more water to thin or a little more icing sugar to thicken it.
- If using the ‘flood on flood’ technique, to prevent the icing from spilling over the piped border, it is important not to over-flood the centre of the cookie with icing.
- It is best to have all the tinted icing consistencies the same for the best results for the 'flood on flood' technique. However, if two icing portions are slightly different consistencies, use the thinner one first to cover the cookie first and then use the slightly thicker one on top to create the decoration.
- If your royal icing becomes too thick during decorating, remove it from the piping bag and stir in a drop or two of water or enough to reach the desired consistency. A dropper is ideal for adding this small amount of water.
- The time it will take for the icing to dry/set will depend greatly on the weather (temperature and humidity). If humid, to assist in the drying, place the cookies on a lined tray in an oven preheated to 50°C for 30-60 minutes. Also if it is really humid, it is best to put the cookies straight into an airtight container lined with absorbent paper as soon as they cool from drying in the oven.
- These decorated cookies will keep in a single layer in a sealed airtight container lined with paper towel for up to 5 days.
- The Royal Icing will keep in a well-sealed container in the fridge for up to 3 days. Bring to room temperature to use. You may need to add a little more water to bring it to the correct consistency.
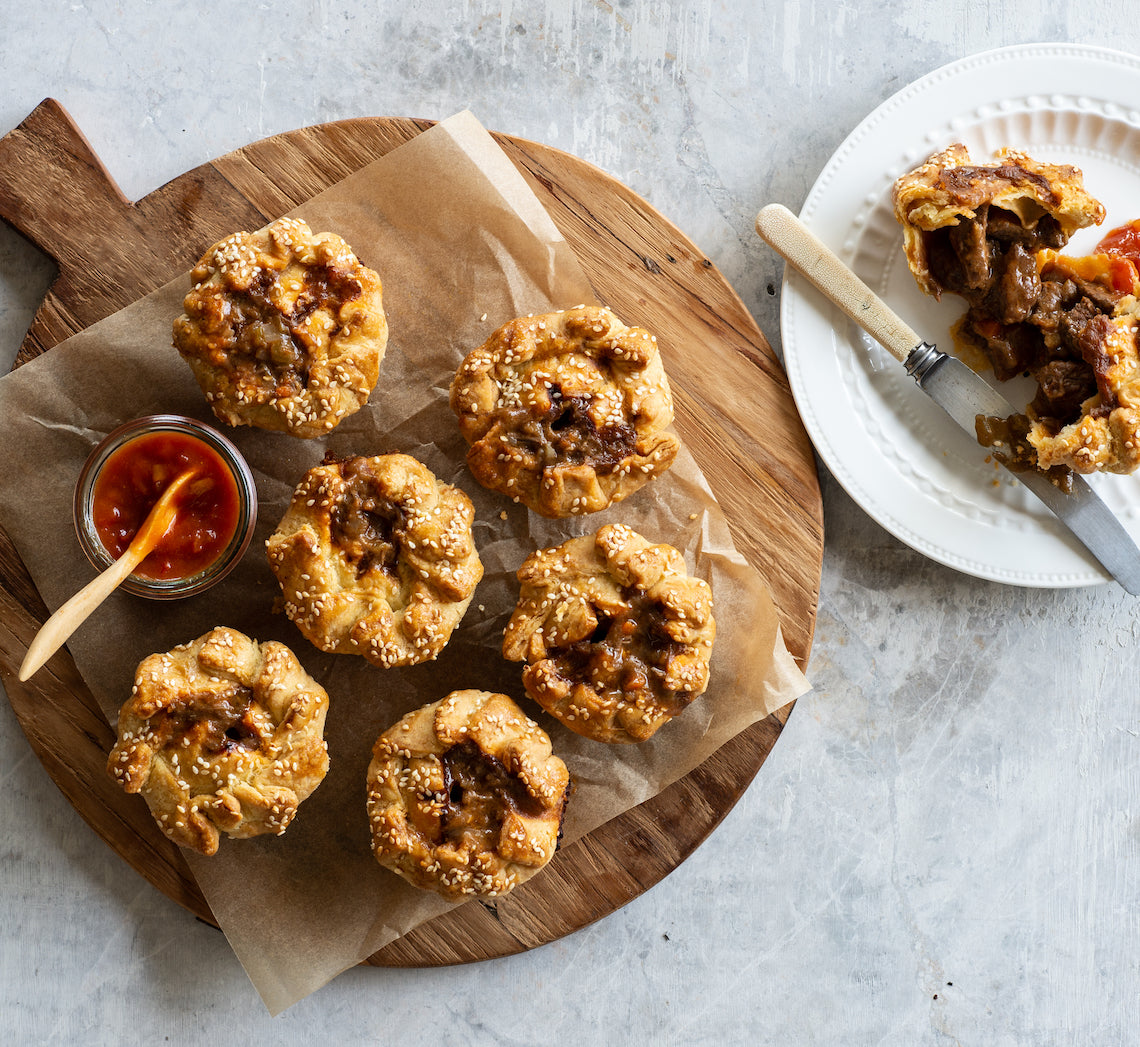
Prep 1hr (+ 2hr cooling and pastry making time)Bake 45-50minMakes 12 small pies
The quintessential Aussie bakery favourite, these classic meat pies are all about honest, slow-cooked flavour. Chuck steak is gently simmered with onion, carrot, celery and a splash of Worcestershire until tender and rich, creating a deeply savoury filling. Wrapped in crisp shortcrust pastry and baked in individual portions, they’re simple, satisfying and made for proper cold-weather comfort.
Ingredients
3 quantities Shortcrust Pastry, each quantity shaped into a disc before wrapping and chilling as directed
1 egg, lightly whisked
Sesame seeds, to sprinkle (optional)
Filling
35g (1¼ oz/¼ cup) plain flour
Salt and freshly ground black pepper, to taste
1kg (2lb 3oz) trimmed chuck steak, cut into 2cm (¾in) pieces (see Baker's Tips)
60ml (2fl oz/¼ cup) olive oil
1 large brown onion, chopped
1 celery stalk, trimmed and diced
1 carrot, peeled and diced
2 garlic cloves, finely grated or chopped
1 tablespoon tomato paste
250ml (9fl oz/1 cup) good-quality beef stock
500ml (17fl oz/2 cups) water
1 tablespoon Worcestershire sauce
Method
- Season the flour with salt and pepper. Place in a large bowl with the diced steak and toss to coat.
- Heat 1 tablespoon of the oil in a large heavy-based saucepan over a high heat and cook half the diced steak, stirring occasionally, for about 5 minutes or until sealed. Remove from the pan, scraping any cooked-on bits from the base, and set aside. Repeat with another tablespoon oil and the remaining steak.
- Clean the pan. Add the remaining 1 tablespoon oil, onion, celery and carrot and cook over a medium heat, stirring occasionally, for 10 minutes or until the onion starts to soften. Add the garlic and cook for a further 1 minute, stirring occasionally, or until aromatic. Add the tomato paste and cook, stirring for 1 minute. Return the steak to the pan with the stock, water and Worcestershire sauce and bring to a simmer.
- Reduce heat to low, cover with a piece of baking paper and simmer, covered, for 1 hour, stirring occasionally. Uncover and then simmer for a further 1 hour, stirring frequently or until the meat is tender and the liquid has reduced to a thick sauce consistency. Transfer the mixture to a heatproof bowl, cover loosely and place in the fridge, stirring occasionally, until cooled to room temperature (this will take about 2 hours).
- When ready to assemble the pies, preheat oven to 200°C/400°F (180°C/350°C fan-forced). Unwrap one of the pastry discs and place on a lightly floured, cool bench top. Use a lightly floured rolling pin to roll the pastry disc until about 3mm (1⁄8 in) thick. Use a 14cm (5½in) pastry cutter, saucer or upturned bowl as a guide to cut out 6 rounds, re-rolling any leftover pastry if necessary. Gently ease the pastry discs into the holes of an ungreased 12-hole 80ml (2¾fl oz/1⁄3 cup) muffin tray to line six holes. Use your fingertips to press it gently into the corners without stretching it – the pastry will reach above the top of the muffin pans and buckle slighlty. Repeat with another pastry disc to make 12 pastry cases in total. Divide the steak mixture between the pastry cases to fill (you may have a little mixture left over).
- Roll out the remaining pastry to about 3mm (1⁄8in) thick and use a 7cm (2¾in) round pastry cutter to cut out 12 lids. Use a small sharp knife to cut a small steam hole in the centre of each round (see Baker’s Tips). Place a lid over the mixture to cover each pie, brush each lid with the whisked egg and then fold the excess pastry from the bases over the top of the lids, crimping and pressing together to seal. Brush the top of each pie with some more of the remaining egg wash and sprinkle with sesame seeds, if using.
- Bake the pies in preheated oven for 45-50 minutes or until the pastry is cooked through and golden. Stand the pies in the tin for 5 minutes before turning out and serving.
Baker's Tips
- You will need about 1.5kg (3lb 5oz) untrimmed chuck steak for this recipe.
- You can also make the steam holes in the pastry lids by using a 1cm piping nozzle to cut a hole in the centre of each lid before placing it on top of the pies.
- These pies will keep in an airtight container in the fridge for up to 2 days. Reheat in an oven preheated to 160°C/315°F (140°C/285°F fan-forced) for 10-15 minutes or until heated through.
- To freeze, wrap individually in plastic wrap and then seal in an airtight container or freezer bag and freeze for up to 3 months. Thaw in the fridge before reheating (see above tip).
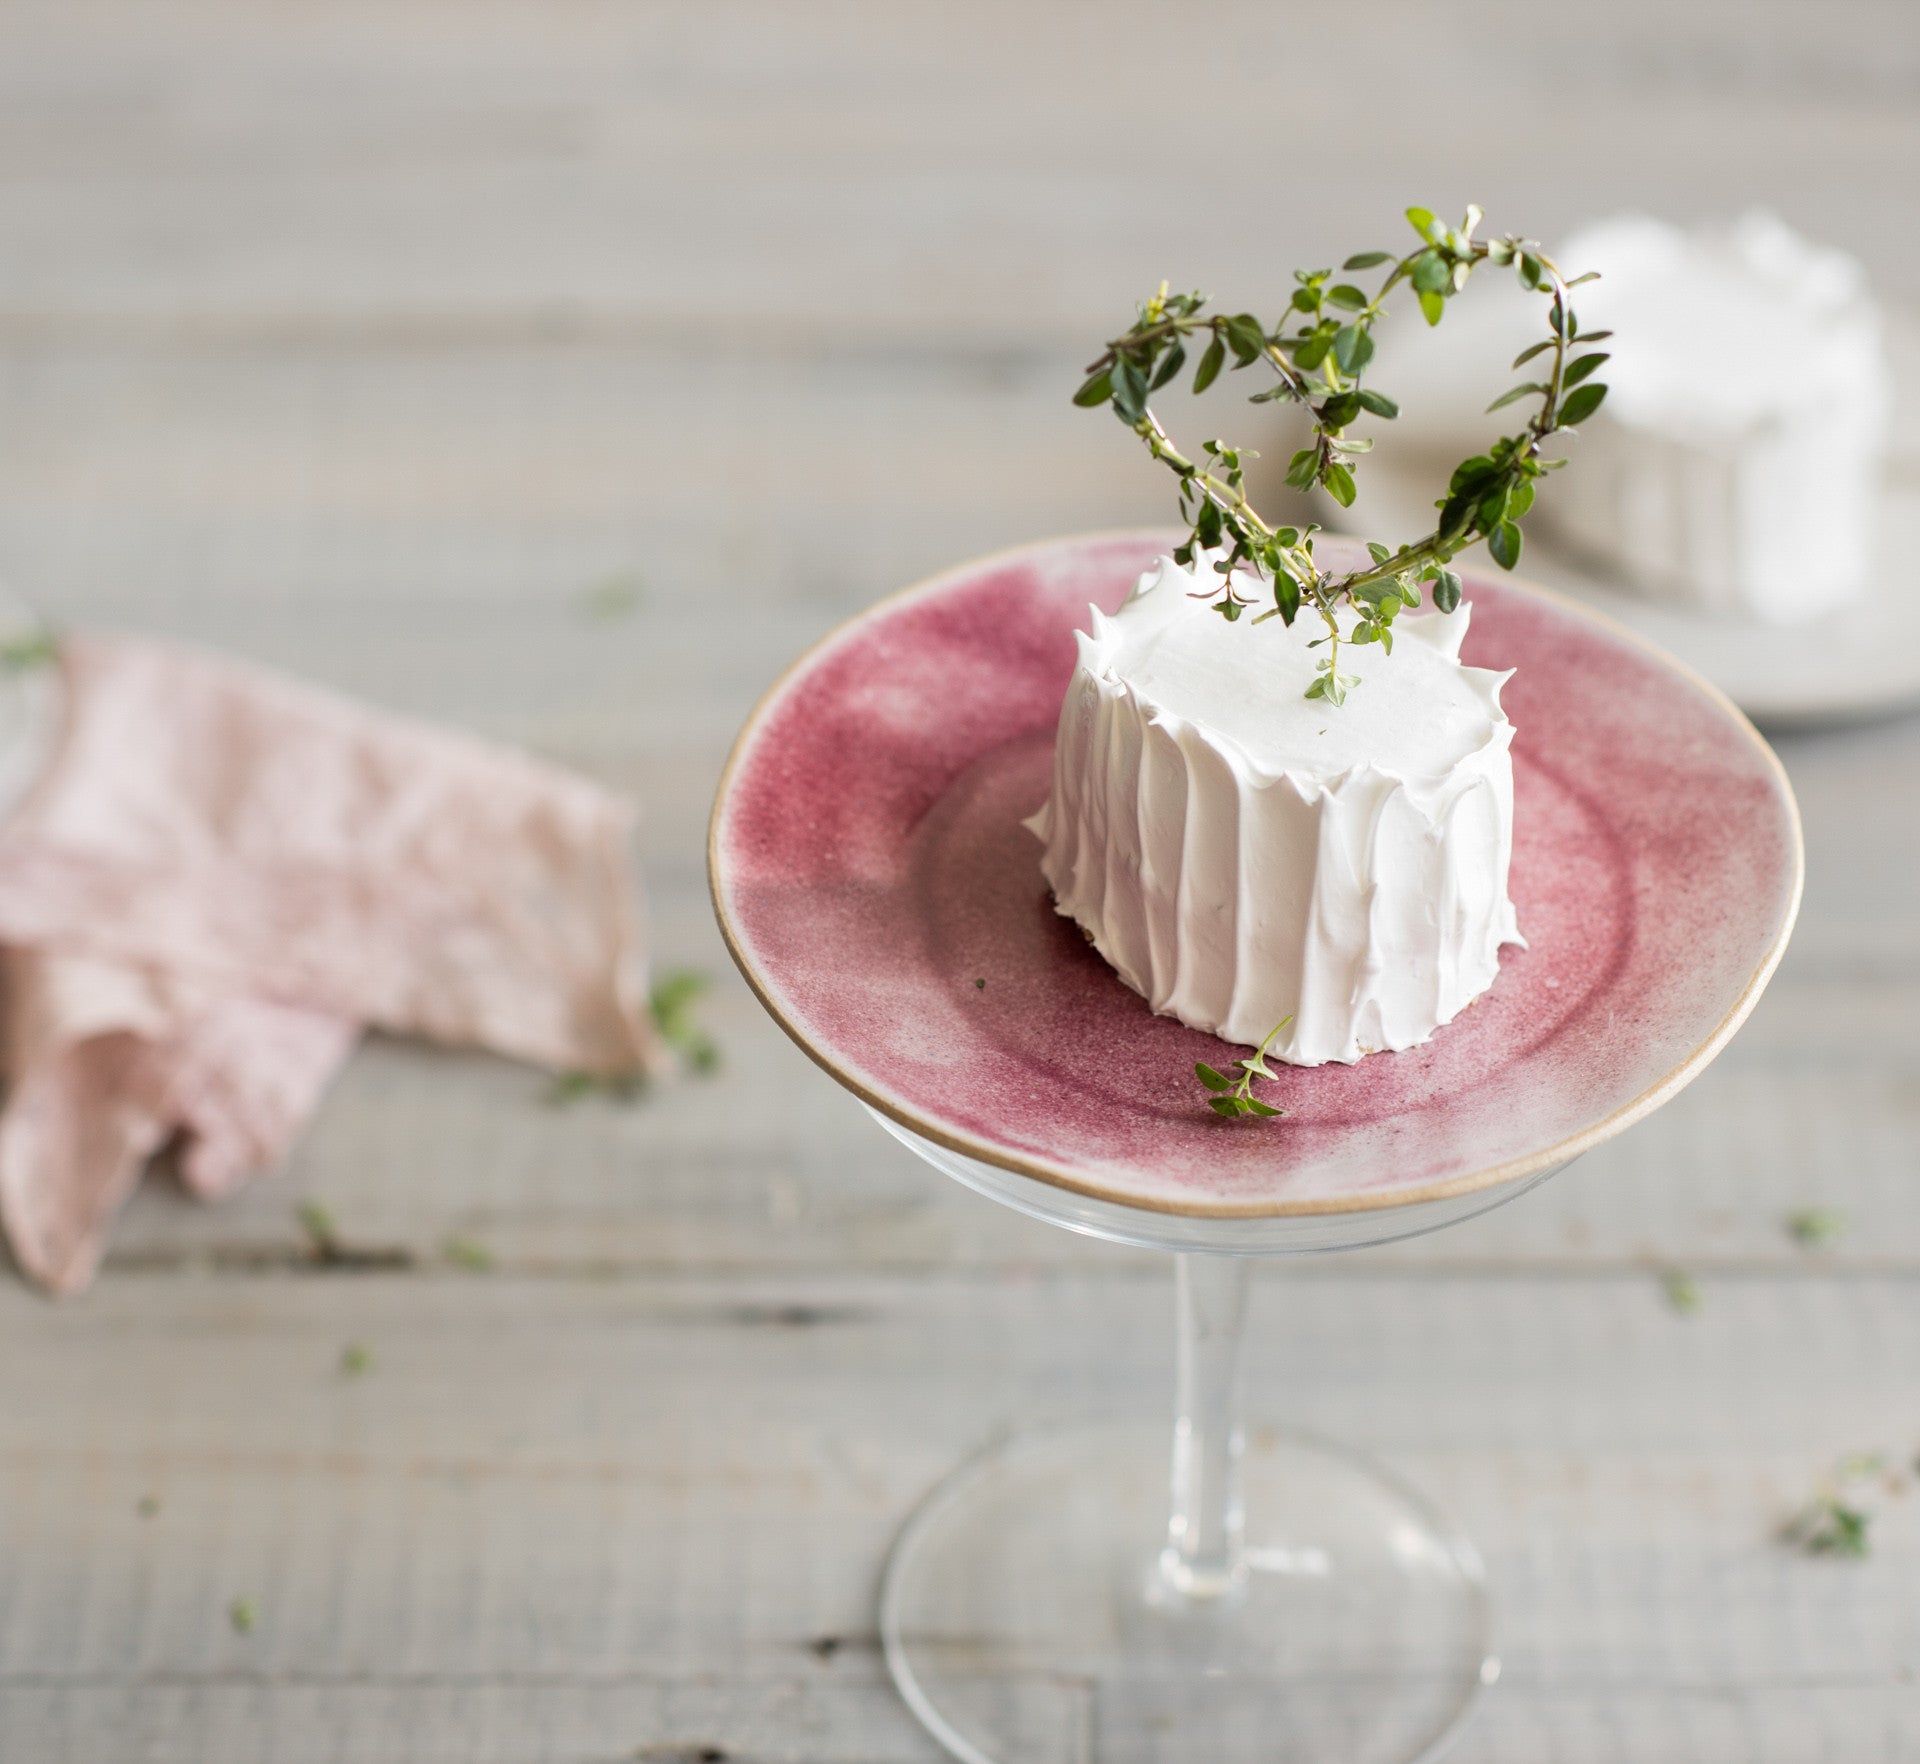
Prep 1hr (+30min cooling and 30min standing time)Bake 20minMakes 12
Hailing from the deep south of North America, Lady Baltimore cake is a classic wedding cake choice. With its simple buttercake layers, fruit and nut filling and dreamy meringue frosting, the resulting flavour combination is delightfully complex. These individual cakes are made just for one.
Ingredients
Melted butter, to grease185g butter, softened
145g (⅔ cup) caster sugar, plus 75g (⅓ cup) extra
1 teaspoon natural vanilla essence or extract
1 orange, zest finely grated
225g (1½ cups) plain flour
2 teaspoons baking powder
165ml (⅔ cup) milk
3 egg whites
Filling
45g (¼ cup) raisins, chopped45g (¼ cup) chopped dried figs
2 tablespoons brandy
40g (⅓ cup) chopped toasted walnuts
Meringue Frosting
- 3 egg whites
- 150g (⅔ cup) caster sugar
- 1 teaspoons natural vanilla essence or extract
Method
- Preheat the oven to 180°C (160°C fan-forced). Brush a 12-hole 125ml (½ cup) friand pan with melted butter to grease.
- To make the filling, combine the raisins, figs and brandy in a small saucepan and heat over low heat for 3-5 minutes or until heated through. Remove from the heat and set aside to cool.
- Use an electric mixer to beat the butter, 145g (⅔ cup) caster sugar, vanilla and orange zest, scraping down the sides of the bowl when necessary, until pale and creamy.
- Sift together the flour and baking powder. With the motor running on the lowest possible speed, beat in the flour alternately with the milk, in 2 separate batches each, until just combined.
- In a separate clean dry medium mixing bowl, use a whisk attachment to whisk the egg whites until soft peaks form. Gradually add the extra caster sugar, a spoonful at a time, and whisk on medium-high speed until thick and glossy. Use a large metal spoon or spatula to fold a large spoonful of the egg white mixture through the butter mixture until well combined. Add the remaining egg white mixture and fold until just combined. Divide the mixture evenly among the friand holes and smooth the surfaces. Bake for 20 minutes or until a skewer inserted in the the centre of the cakes comes out clean. Stand the cakes in the tin for 5 minutes before turning out onto a wire rack to cool completely.
- Meanwhile, make the meringue frosting. Choose a medium heatproof mixing bowl that sits snugly on top of a medium saucepan. Quarter-fill the saucepan with water and bring to the boil. Reduce the heat to the lowest possible setting. Put the eggwhites and sugar in the heatproof bowl and place over the simmering water. Use a spatula to stir until the sugar dissolves. (You can tell if the mixture is ready by rubbing a little between your fingers – if it still feels grainy, then continue to stir for another minute or until it no longer feels grainy.) Transfer the mixture to the bowl of an electric mixer and use a whisk attachment to whisk on high speed for 5-8 minutes or until the meringue has cooled to room temperature and is very thick and glossy. Whisk in the vanilla. Transfer two-thirds of the frosting to a bowl, cover with plastic wrap and set aside.
- To finish the filling, transfer the remaining third of the frosting to a medium bowl and fold in the chopped walnuts and the fruit mixture.
- Use a small sharp serrated knife to cut the cakes in half horizontally and trim the tops to level, if necessary. Spread a little of the filling over the bottom halves of the cakes and sandwich with the top halves, pressing down.
- Spread the reserved meringue frosting over the sides and tops of the cakes to cover, swirling as desired. Set aside for 30 minutes for the frosting to firm slightly before serving.
Baker's Tips
- These cakes will keep in an airtight container at room temperature for up to 2 days.
Photography by Alan Benson.
Prep 40min (+ 20min cooling time)
Bake 20minMakes about 15
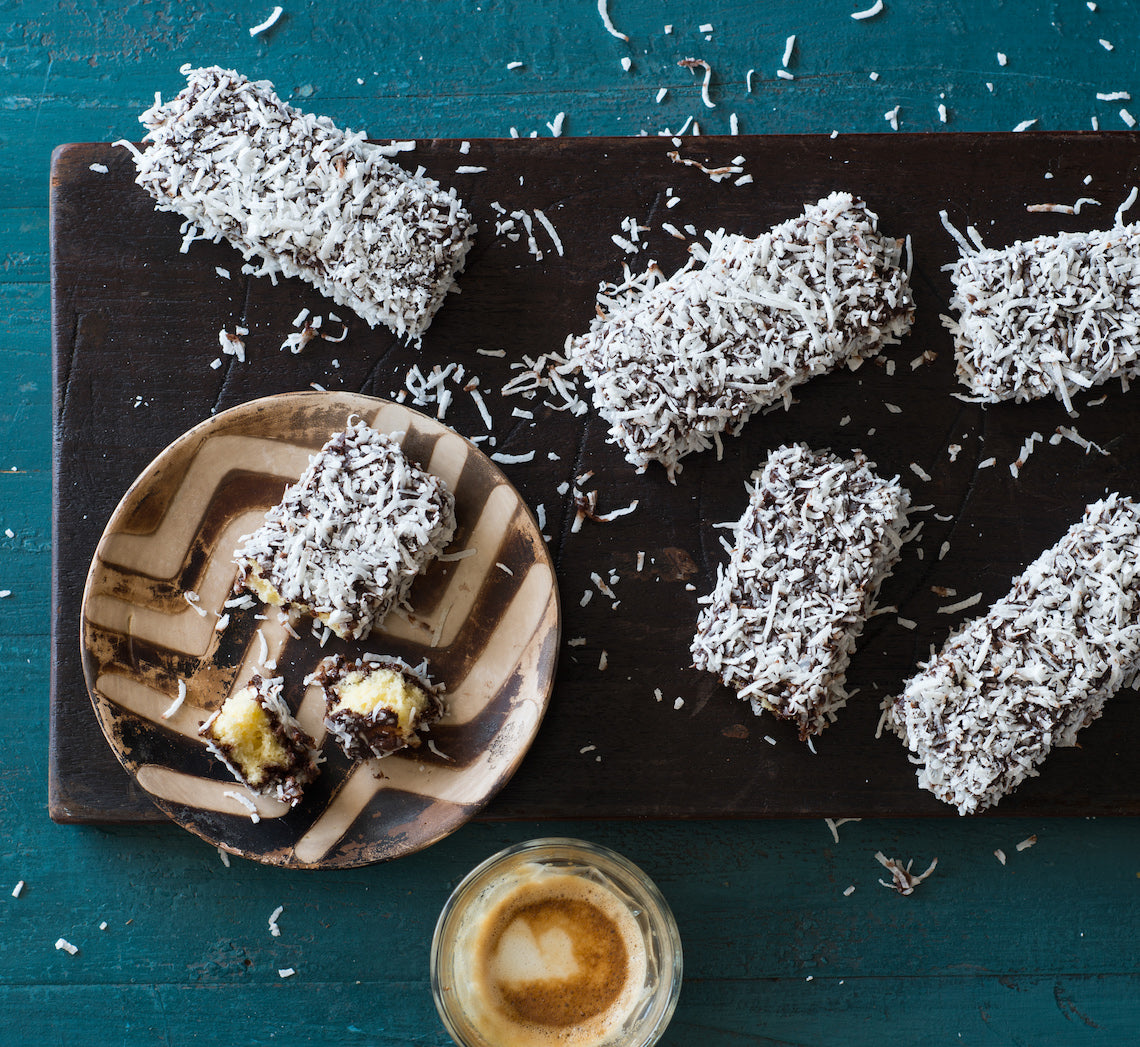
Who doesn't love a lamington? Believe it or not, this iconic Australian cake dates back over 100 years. These lamingtons of mine are based on a super simple, super quick, one-bowl recipe that requires no fussing at all. It is baked in a thin layer and then cut into fingers – the resulting lamingtons don't have the height of the traditionally sized ones, but it does mean you get more chocolate icing and coconut with each piece of butter cake – a little cheeky, but definitely a good thing! Feel free to use desiccated or flaked coconut instead of the shredded, depending on what 'look' you want for your lamingtons.
Ingredients
195g (3 cups) shredded coconut, to coatButtercake
110g (¾ cup) self-raising flour75g (½ cup) plain flour
165g (¾ cup) caster sugar
125g salted butter, at room temperature
80ml (⅓ cup) milk
2 eggs, at room temperature
1 teaspoon natural vanilla extract or essence
Chocolate icing
465g (3¾ cups) pure icing sugar55g (¼ cup) cocoa powder
150ml boiling water
1½ teaspoons vanilla essence
Method
- To make the buttercake, preheat the oven to 180°C (160°C fan-forced). Grease a 20 x 30cm (base measurement) shallow cake tin and line the base and two longs sides with one piece of baking paper.
- Place both the flours, sugar, butter, milk, eggs and vanilla in a large mixing bowl. Use an electric mixer to beat on low speed until combined. Increase the speed to medium and beat for 3 minutes or until the mixture is well combined and very pale in colour. Spoon the mixture into the lined tin and spread evenly using the back of a spoon.
- Bake for 20 minutes or until cooked when tested with a skewer. Cool for 5 minutes in the tin, then turn onto a wire rack to cool.
- Cut the cooled cake into 15 equal ‘fingers’ (each will be about 4 x 10cm).
- To make the chocolate icing, sift the icing sugar and cocoa powder into a medium bowl. Add the boiling water and vanilla and stir until smooth (it should be the consistency of pouring cream).
- Spread the coconut on a tray or plate. Rest a cake ‘finger’ on a fork and dip it into the icing to coat (see Baker’s tips). Lift it out and allow any extra icing to drip off. Roll the cake ‘finger’ in the coconut to coat evenly. Place on a wire rack to set. Repeat with the remaining cake ‘fingers’, icing and coconut.
Baker's Tips
- You can also spoon the icing over the cake to help coat it.
- If the icing becomes too thick while you are coating the cake pieces, stir in enough extra boiling water, adding it a teaspoon at a time, to thin to the right consistency.
- These lamingtons will keep in an airtight container in a cool spot, but not in the fridge, for up to 2 days.
This recipe is from Anneka's SBS Food online column Bakeproof: Lamingtons. CLICK HERE for more Bakeproof recipes.
Photography by Alan Benson.
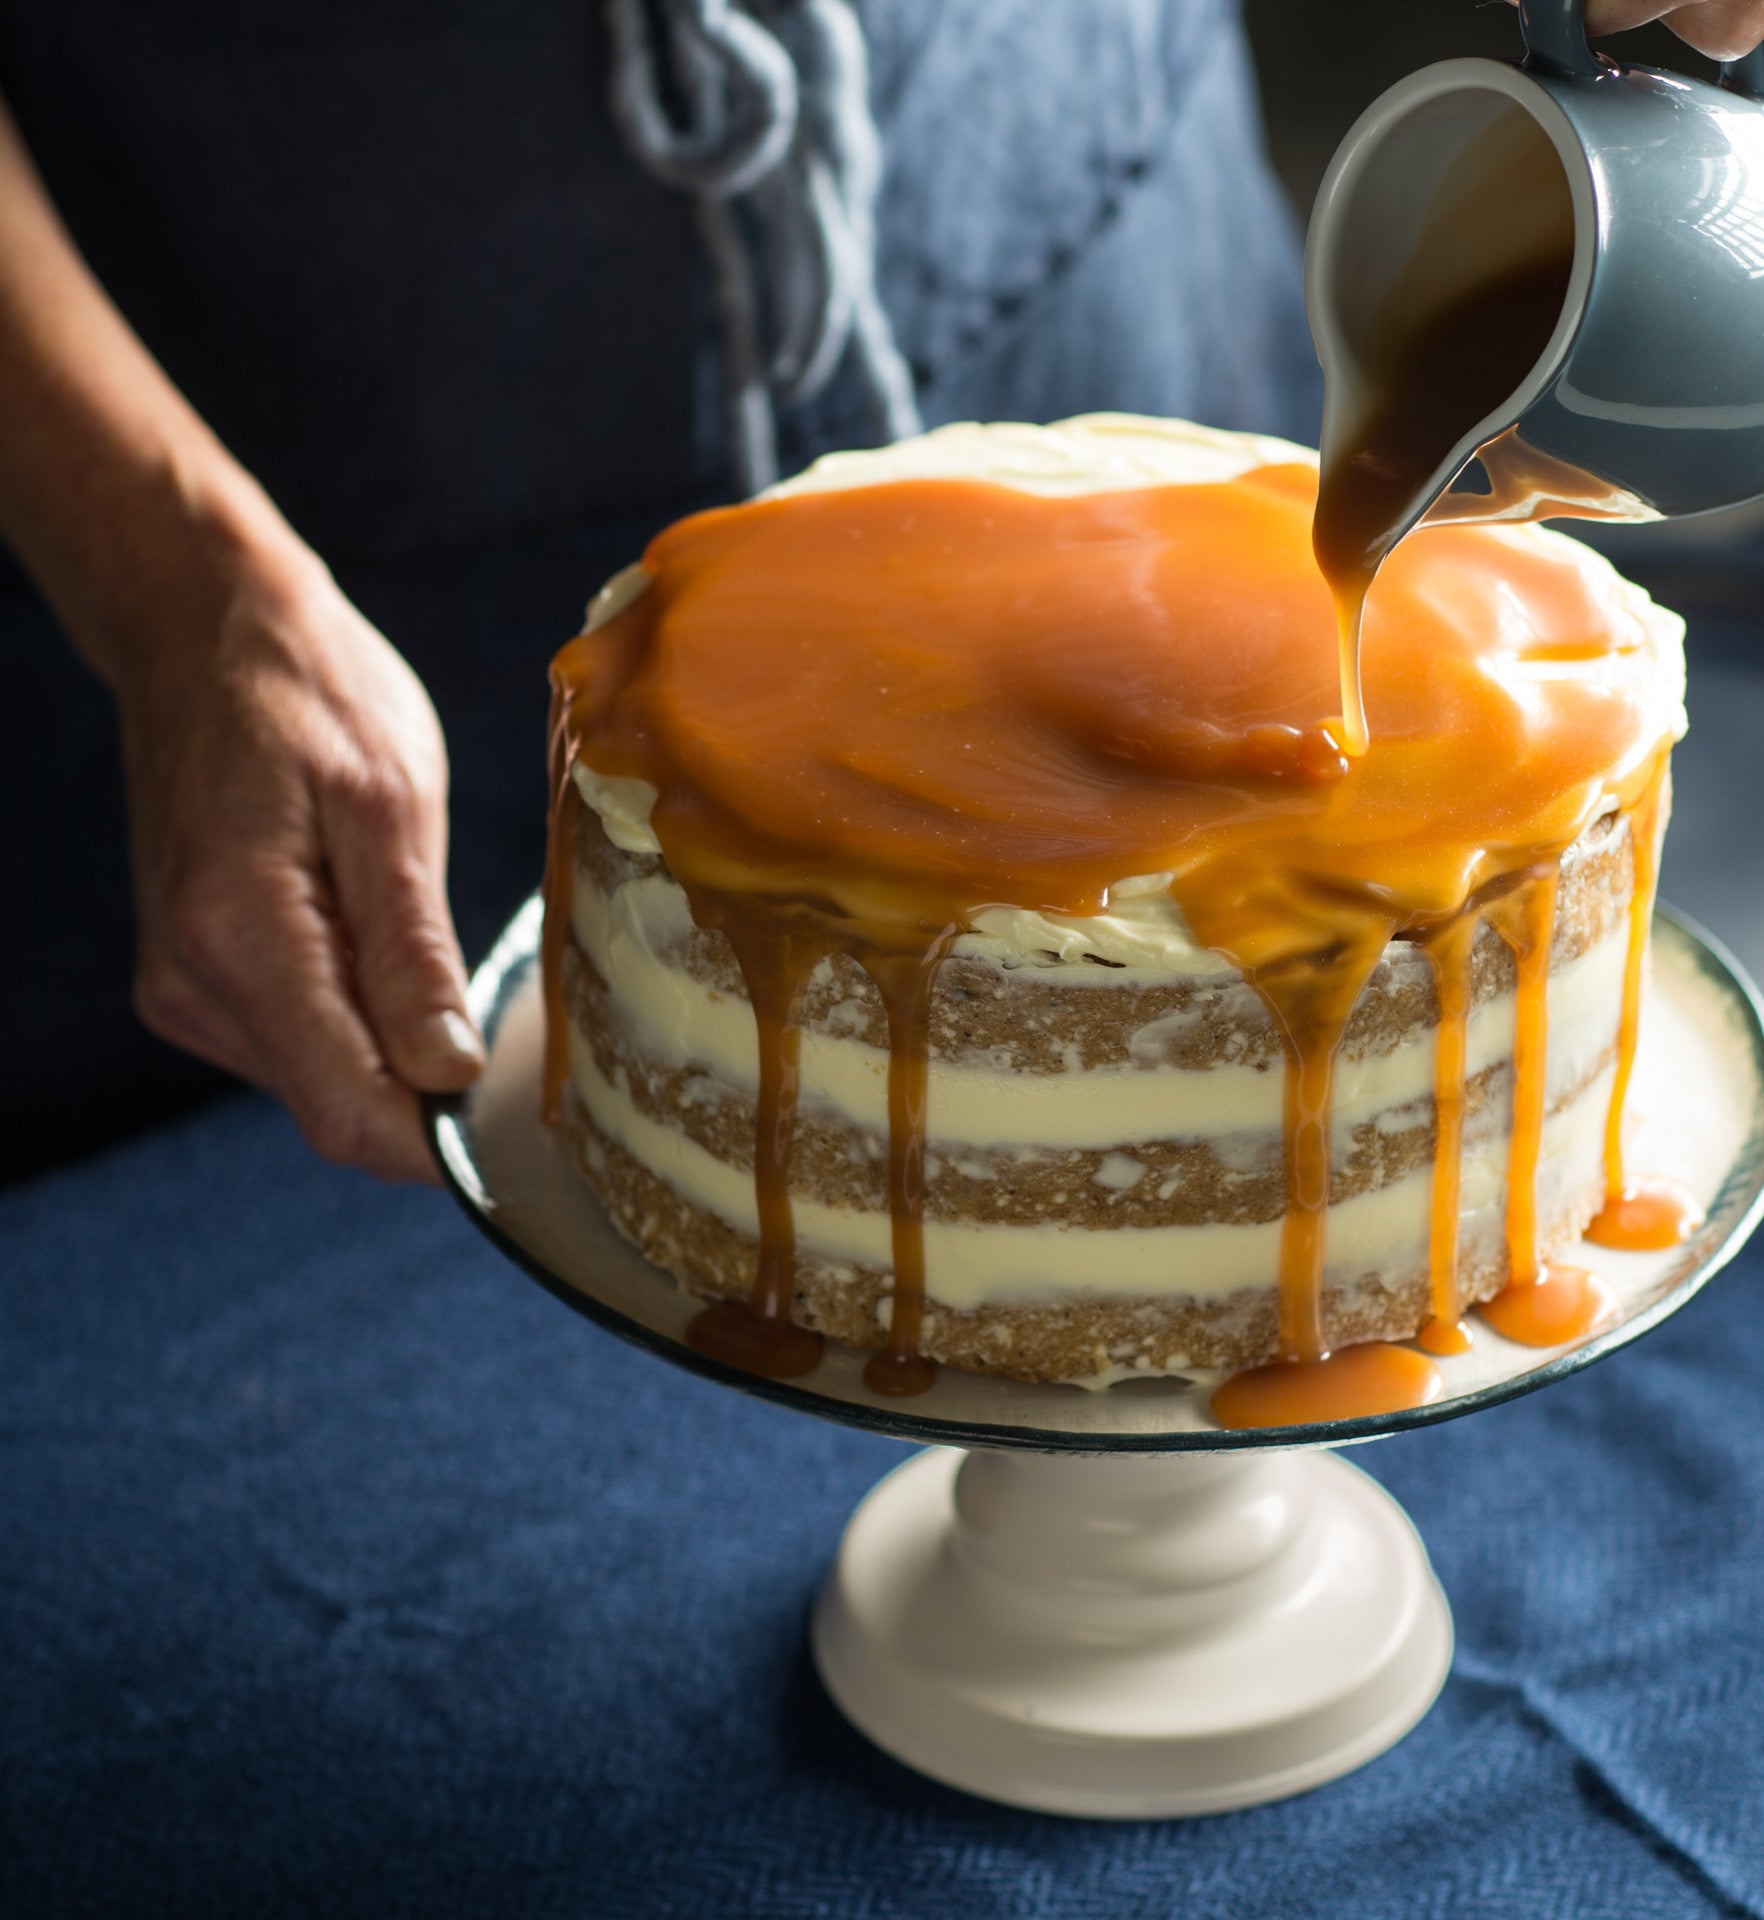
Prep 35min (+1hr cooling time)Bake 25minMakes 12 serves
Layer upon layer, this impressive cake is deceptively simple to make. What’s more, you could call it a hazelnut hummingbird cake with the added bonus of lashings of caramel. Now what’s not to love about that!
Ingredients
Banana and hazelnut cake layers
Melted butter, to grease
300g (2 cups/10½oz) plain flour
3½ teaspoons baking powder
2 teaspoons ground cinnamon
½ teaspoon ground cardamom
220g (1 cup, firmly packed/7¾oz) brown sugar
100g (3½oz) hazelnut meal
60g (⅔ cup/2oz) desiccated coconut
150g (5¼oz) salted butter, melted and cooled
3 eggs, at room temperature, lightly whisked
4 ripe medium bananas (about 200g/7oz each), mashed
2 teaspoons natural vanilla extract or essence
Caramel
165g (¾ cup/5¾oz) caster sugar
60ml (¼ cup/2fl oz) water
150ml (5fl oz) pouring cream
30g (1oz) salted butter, cubed
Cream cheese frosting
250g (9oz) cream cheese, cubed, at room temperature
80g (2¾oz) salted butter, cubed, at room temperature
1 teaspoon natural vanilla essence or extract
185g (1½ cups/6½oz) icing sugar
Method
- To make the cake layers, preheat the oven to 180°C/350°F (160°C/315°F fan-forced). Brush three shallow 20cm/8in round cake tins with the melted butter to grease and line the bases with non-stick baking paper.
- Sift together the flour, baking powder, cinnamon and cardamom into a large bowl. Stir in the brown sugar, hazelnut meal and coconut and stir with a wooden spoon to combine, breaking up any lumps. Make a well in the centre. Use a fork to whisk together the butter, eggs, banana and vanilla until well combined. Add to the dry ingredients and use a spatula or large metal spoon to fold together until just combined.
- Divide the cake mixture evenly among the prepared cake tins, smoothing the surface with the back of a spoon. Bake in preheated oven for 25 minutes, swapping the tins around halfway through baking, until pale golden and a skewer inserted into the centre of the cakes comes out clean. Stand the cakes in the tins for 5 minutes before transferring to wire racks to cool.
- Meanwhile, to make the Caramel, combine the caster sugar and water in a small saucepan and use a wooden spoon to stir over low heat until the sugar dissolves. Increase the heat to medium and bring to the boil. Boil without stirring for about 10 minutes, brushing down the side of the pan with a pastry brush dipped in water to dissolve any sugar crystals, until the mixture turns a deep caramel. Remove immediately from the heat and carefully add the cream and butter. Stir with a wooden spoon until well combined and the caramel is smooth. Return the saucepan to a medium heat if any lumps remain to dissolve them, stirring constantly. Brush a little of the hot caramel over the warm cakes.
- Pour the Caramel into a heatproof bowl or jug and set aside to cool, stirring occasionally this will take about 1 hour).
- Meanwhile to make the Cream Cheese Frosting, use an electric mixer to beat the cream cheese, butter and vanilla until well combined and creamy. With the mixer running, gradually beat in the icing sugar until well combined and smooth. Cover and set aside in a cool spot (but not in the fridge).
- To assemble the cake, spread about ½ cup of the cream cheese frosting over the top of one of the cake layers. Top with another cake layer, another ½ cup frosting and the remaining cake layer. Spread a thin layer of frosting around the outside of the cake so that the cake layers show through. Spread the remaining frosting on top. Pour a generous amount of the caramel over the top of the cake, allowing it to drizzle down the sides. Serve in wedges with the remaining caramel passed separately, if desired.
Baker's Tip
- This cake will keep in an airtight container in the fridge for up to 3 days. Stand at room temperature for 30 minutes before serving.
Photography by Alan Benson.
$100.00/pp
more info- Products -
Leavened Puff Pastry LIVE will take place on Sunday 21st June 2026 from 10am-1pm.
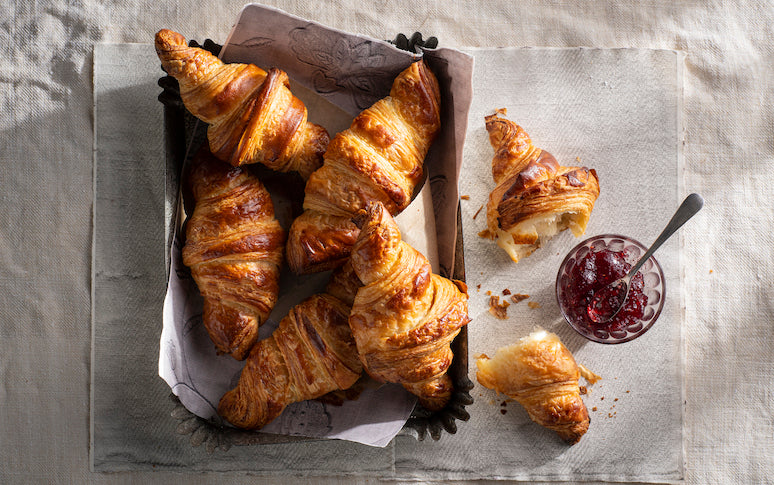
Master leavened puff pastry – one of the most difficult baking techniques – in this informative and comprehensive online baking class.
We highly recommend that you complete our self-paced Shortcrust Pastry and Puff Pastry online classes before taking part in this course. If you book our 3 pastry classes together (Leavened Puff Pastry, Shortcrust Pastry and Puff Pastry), you can save 15% with our special bundle offer.
If you have already completed Shortcrust Pastry, you can book our advanced pastry bundle (Leavened Puff Pastry and Puff Pastry) and save 15%!
Thank you so much Anneka! Once again I have learnt an incredible amount and feel like I’ve stepped up to another level of baking - I never thought I’d make croissants or my all time favourite pain aux raisins. Your generosity of time and advice, patience and going the extra mile is greatly appreciated. Thank you for creating this fantastic course!
Vanessa, South Australia
Master one of the most difficult baking techniques – right in your very own kitchen!
Leavened Puff Pastry is an informative and accessible live online baking sessions where you will learn everything you need to know to make your own leavened puff pastry (also known as pâte feuilletée) – all from your very own kitchen. This class will take place on Sunday 21st June 2026 at 10am-1pm (AEST).
Leavened puff is possibly one of the hardest of all baking techniques to master and is often referred to as the 'Holy Grail' in the world of pastry. With Anneka Manning as your guide, learning how to make this crisp, buttery, flaky pastry – alongside a bunch of other enthusiastic bakers – will be a joy and something to value for the rest of your baking life. From Croissants and Danish Pastries to Pain au Chocolat, these divine pastries will become part of your baking repertoire!
Anneka will share her more than 35 years of baking experience, knowledge and research, as well as all of her practical and insightful tips and tricks. The virtual Live Session will be supported by printable recipes and resources that you can study at your own pace ensuring that you gain the confidence and skill to bake your own delicious puff at home. This will include additional recipes which you are encouraged to practise in your own time.
At the end of this class, you will have not only the knowledge and skill but the confidence to be able to make your own leavened puff pastry and a collection of wonderful bakes to create with it!
Dates
Sunday 21st June 2026 at 10am-1pm, Australian Eastern Standard Time (UTC+10) via Zoom.
If you are interested in joining a future class and would like to be notified when new dates are released, please fill in your details at the bottom of this page.
Please note: The Live Session will be recorded and available for you to watch afterwards if you are unable to attend, or rewatch it at a later date if you would like to.
Cost
$100 (50% off for all BakeClub & Co. Members).
I enjoyed the course very much and appreciated Anneka's personal interactions with us individually and a group. I particularly enjoyed the interaction in the Facebook group. It was really invaluable to see what others were baking and their strengths and weaknesses, and their mistakes as well. I learnt a lot from that aspect. My other favourite part of the course was Anneka's in-depth feedback and guidance to each participant's activity; and her generosity with imparting her knowledge and technical expertise; and her encouragement.
Trisha, online class student
Student numbers
We will only be accepting a limited number of bakers for this class so that Anneka can answer your baking questions during the Live Session and provide personal feedback.
Who is this course suitable for?
This course is aimed at intermediate to experienced bakers. We highly recommend that you complete our Shortcrust Pastry LIVE and Puff Pastry LIVE online classes before taking part in this course. If you book our 3 pastry classes together, you can save 15% with our special bundle deal.
We also suggest completing our self-paced Bread 101 online class, which will build your confidence in baking with yeast, prior to this course.
As this course is completed online, it is suitable for students from all over the world.
Anneka, you have given me a level of confidence that I didn't know I had! Never in a million years could I have thought croissants were something I could achieve. Thank you for all you do to make this all possible.
Catherine, New South Wales
What will I receive?
- A 3-hour virtual live baking demonstration on Zoom (recorded for you to rewatch at your convenience) where Anneka Manning will guide you step-by-step through the process of making your own leavened puff pastry – including the opportunity to bake Croissants alongside her.
- Access to Anneka’s 35+ years of baking experience and expertise, with the ability to ask any questions that arise during the class.
- The chance to connect (virtually) with like-minded bakers and share your creations within
The Kitchen Table online group.
- A thorough understanding of how to make shortcrust pastry, plus the knowledge to troubleshoot and apply these skills in the future for consistent baking success.
- Invaluable printable information sheets and recipes to support your learning and reference in your own kitchen.
- Lifetime access to the live video and all course materials, so you can revisit the class whenever you like.
- Membership to BakeClub’s exclusive The Kitchen Table online group, providing a space to ask questions and share your baking journey.
- Lasting baking confidence, knowledge and skills you can use regularly at home.
How will I get the most out of this online class?
To get the most from this class, we recommend setting aside time to attend the Live Session with Anneka and review the supporting materials beforehand. If you’re unable to join live, the session will be recorded so you can watch it at a time that suits you.
For the best experience and results, we encourage you to bake along during the class – it’s the perfect way to put the techniques into practice and gain the full benefit of Anneka’s guidance.
What if the dates don't suit me? Can I still enrol in the class?
If the date of this class doesn't work for you, you can still enrol and take part in your own time. While you may miss out on the Live Session, it will be recorded and will be available to watch when it suits you. You will have lifetime access to the video, as well as all the course material (including all of the resources and recipes).
If you are interested in joining a future LIVE class, please fill out your details below and we'll be in touch when new dates are released.
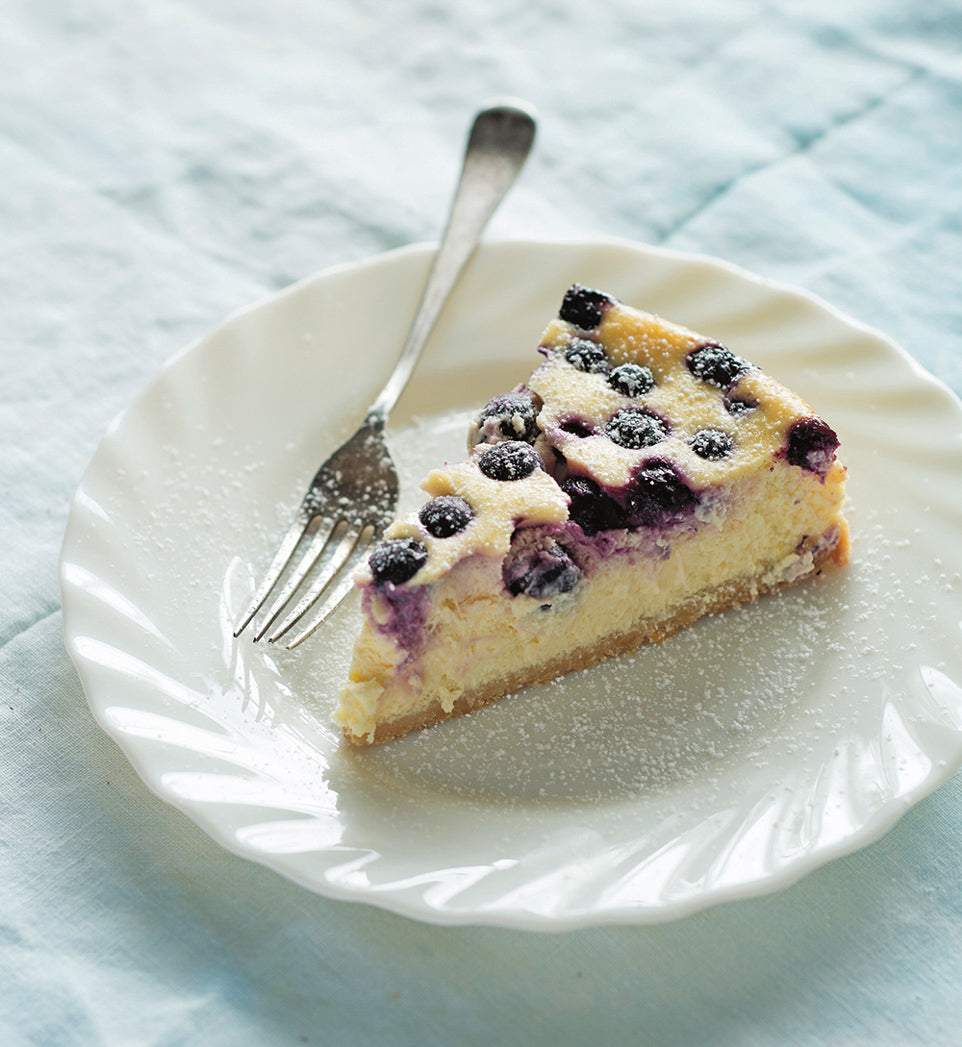
Prep 25min (+ 3-4hr cooling and 3hr or overnight chilling time)Bake 1hr 10minMakes 10 serves
Baked low and slow, then cooled gradually, this Lemon & Blueberry Cheesecake has a beautifully smooth, luscious texture throughout. The creamy, gently tangy filling is lifted with fresh lemon and studded with bursts of juicy blueberries, all set on a simple buttery biscuit base. It’s an easy make-ahead dessert that feels quietly special — fresh, vibrant and perfect for sharing.
Ingredients
Melted butter, extra, to grease
375g (13 oz) cream cheese, at room temperature, cubed (see Baker's Tips)
3 eggs, at room temperature
185g (¾ cup/6½oz) sour cream
125ml (½ cup/4fl oz) thin (pouring) cream
165g (¾ cup/5¾oz) caster (superfine) sugar
1 tablespoon finely grated lemon zest
2 tablespoons freshly squeezed lemon juice
200g (7oz) fresh or frozen blueberries (see Baker's Tips)
Icing sugar, to dust
Biscuit Base
100g (3½ oz) plain sweet biscuits
60g (2¼oz) salted butter, melted
Method
- Preheat the oven to 150°C/300°F (130°C/265°F fan-forced). Line the base of a 20cm (8in) springform tin with a square of non-stick baking paper, allowing it to overhang. Brush the side of the tin with a little melted butter to grease.
- To make the Biscuit Base, process the biscuits in a food processor until finely crushed. Add the butter and process until well combined. Sprinkle the mixture over the base of the tin and use the back of a metal spoon or the base of a glass to press down to cover evenly. Put the tin on a baking tray and place in the fridge.
- Clean the food processor bowl and process the cream cheese until smooth. Add the eggs and process until smooth, scraping down the side and base of the bowl when necessary. Add the sour cream, thin cream, sugar, lemon zest and juice and process until well combined and smooth, scraping down the side and base of the bowl when necessary. Pour into the tin over the base. Scatter the blueberries over the top.
- Bake for 1 hour 10 minutes or until the cheesecake is just set but the centre trembles slightly when the tin is shaken gently. Turn off the oven, use a wooden spoon to keep the oven door ajar and leave the cheesecake in the oven for 1 hour (this will help stop the cheesecake from cracking). Stand at room temperature until cool (this will take 2-3 hours). Transfer the cheesecake, still in the tin, to the fridge and chill for at least 3 hours or overnight or until well chilled. Serve dusted with icing sugar.
Baker's Tips
- Having the cream cheese at room temperature means it will easily become smooth and creamy in the food processor. If you use it straight from the fridge it will take longer and you’ll need to scrape the side and base of the food processor frequently so that no lumps are left after processing.
- If using frozen blueberries, use them straight from the freezer – do not thaw.
- This cheesecake will keep in an airtight container in the fridge for up to 4 days.
Variations
Orange & Raspberry Cheesecake – Replace the lemon zest and juice with orange zest and juice. Replace the blueberries with fresh or frozen raspberries.
Blueberry & White Chocolate Cheesecake – Replace the lemon zest and juice with 1½ teaspoons natural vanilla extract or essence. Melt 180g (6½oz) good-quality white chocolate and cool to room temperature. Add to the bowl of the food processor just before transferring the mixture to the tin and process until just combined.
Individual Lemon & Blueberry Cheesecakes – Line a 12-hole 80ml (⅓ cup) capacity muffin tin with paper cases. Divide the biscuit base, cream cheese mixture and blueberries evenly among the cases. Bake at 160°C/315°F (140°C/285°F fan-forced) for 30 minutes. Cool as per the recipe, then chill in the fridge for at least 1 hour before removing the paper cases and serving.
Recipe and image from BakeClass by Anneka Manning (Murdoch Books).

Prep 20min (+1hr cooling time)Bake 1hrMakes about 16
Lemon bars are one of those ‘clever’ slices that combines a simple shortbread-like base and an intensely-tart/sweet lemon topping to create a memorable mouth puckering moment – old-fashioned yet slightly sophisticated, all at the same time.
Ingredients
Base
150g (1 cup) plain flour
50g (¼ cup) caster sugar
150g chilled butter, diced
1 teaspoon natural vanilla essence or extract
Topping
3 eggs, at room temperature
165g (¾ cup) caster sugar
1 tablespoon finely grated lemon rind
125ml (½ cup) strained freshly squeezed lemon juice
2 tablespoons flour
Method
- Preheat oven to 180°C. Grease a 16cm x 26cm (base measurement) slice tin with butter and line the base and sides with one piece of non-stick baking paper, cutting into the corners to fit.
- To make the base, combine the flour, sugar, butter and vanilla in the bowl of a food processor and process until mixture is evenly combined and just starts to come together. Tip mixture into the prepared tin and use your hands to press it evenly over the base. Bake in preheated oven for 20 minutes or until it is golden around the edges.
- To make the topping, use a balloon whisk to whisk together the eggs, sugar and lemon rind and juice until well combined. Add the flour and stir until just combined. Pour the topping over the warm base and return to the oven for 15-20 minutes or until the topping is just set in the center.
- Cool the slice in the tin on a wire rack (this will take about 1 hour). Use the baking paper to lift the slice from the tin. Cut into bars and dust with icing sugar to serve.
Baker's Tips
- These bars will keep in an airtight container in a cool spot (but not in the fridge) for up to 3 days.
This recipe is from Anneka's SBS Food online column, Bakeproof: Citrus.
CLICK HERE for more Bakeproof recipes.
Photography by Alan Benson.
Prep 50min (+30min cooling time)
Bake 50minMakes 8-10 serves
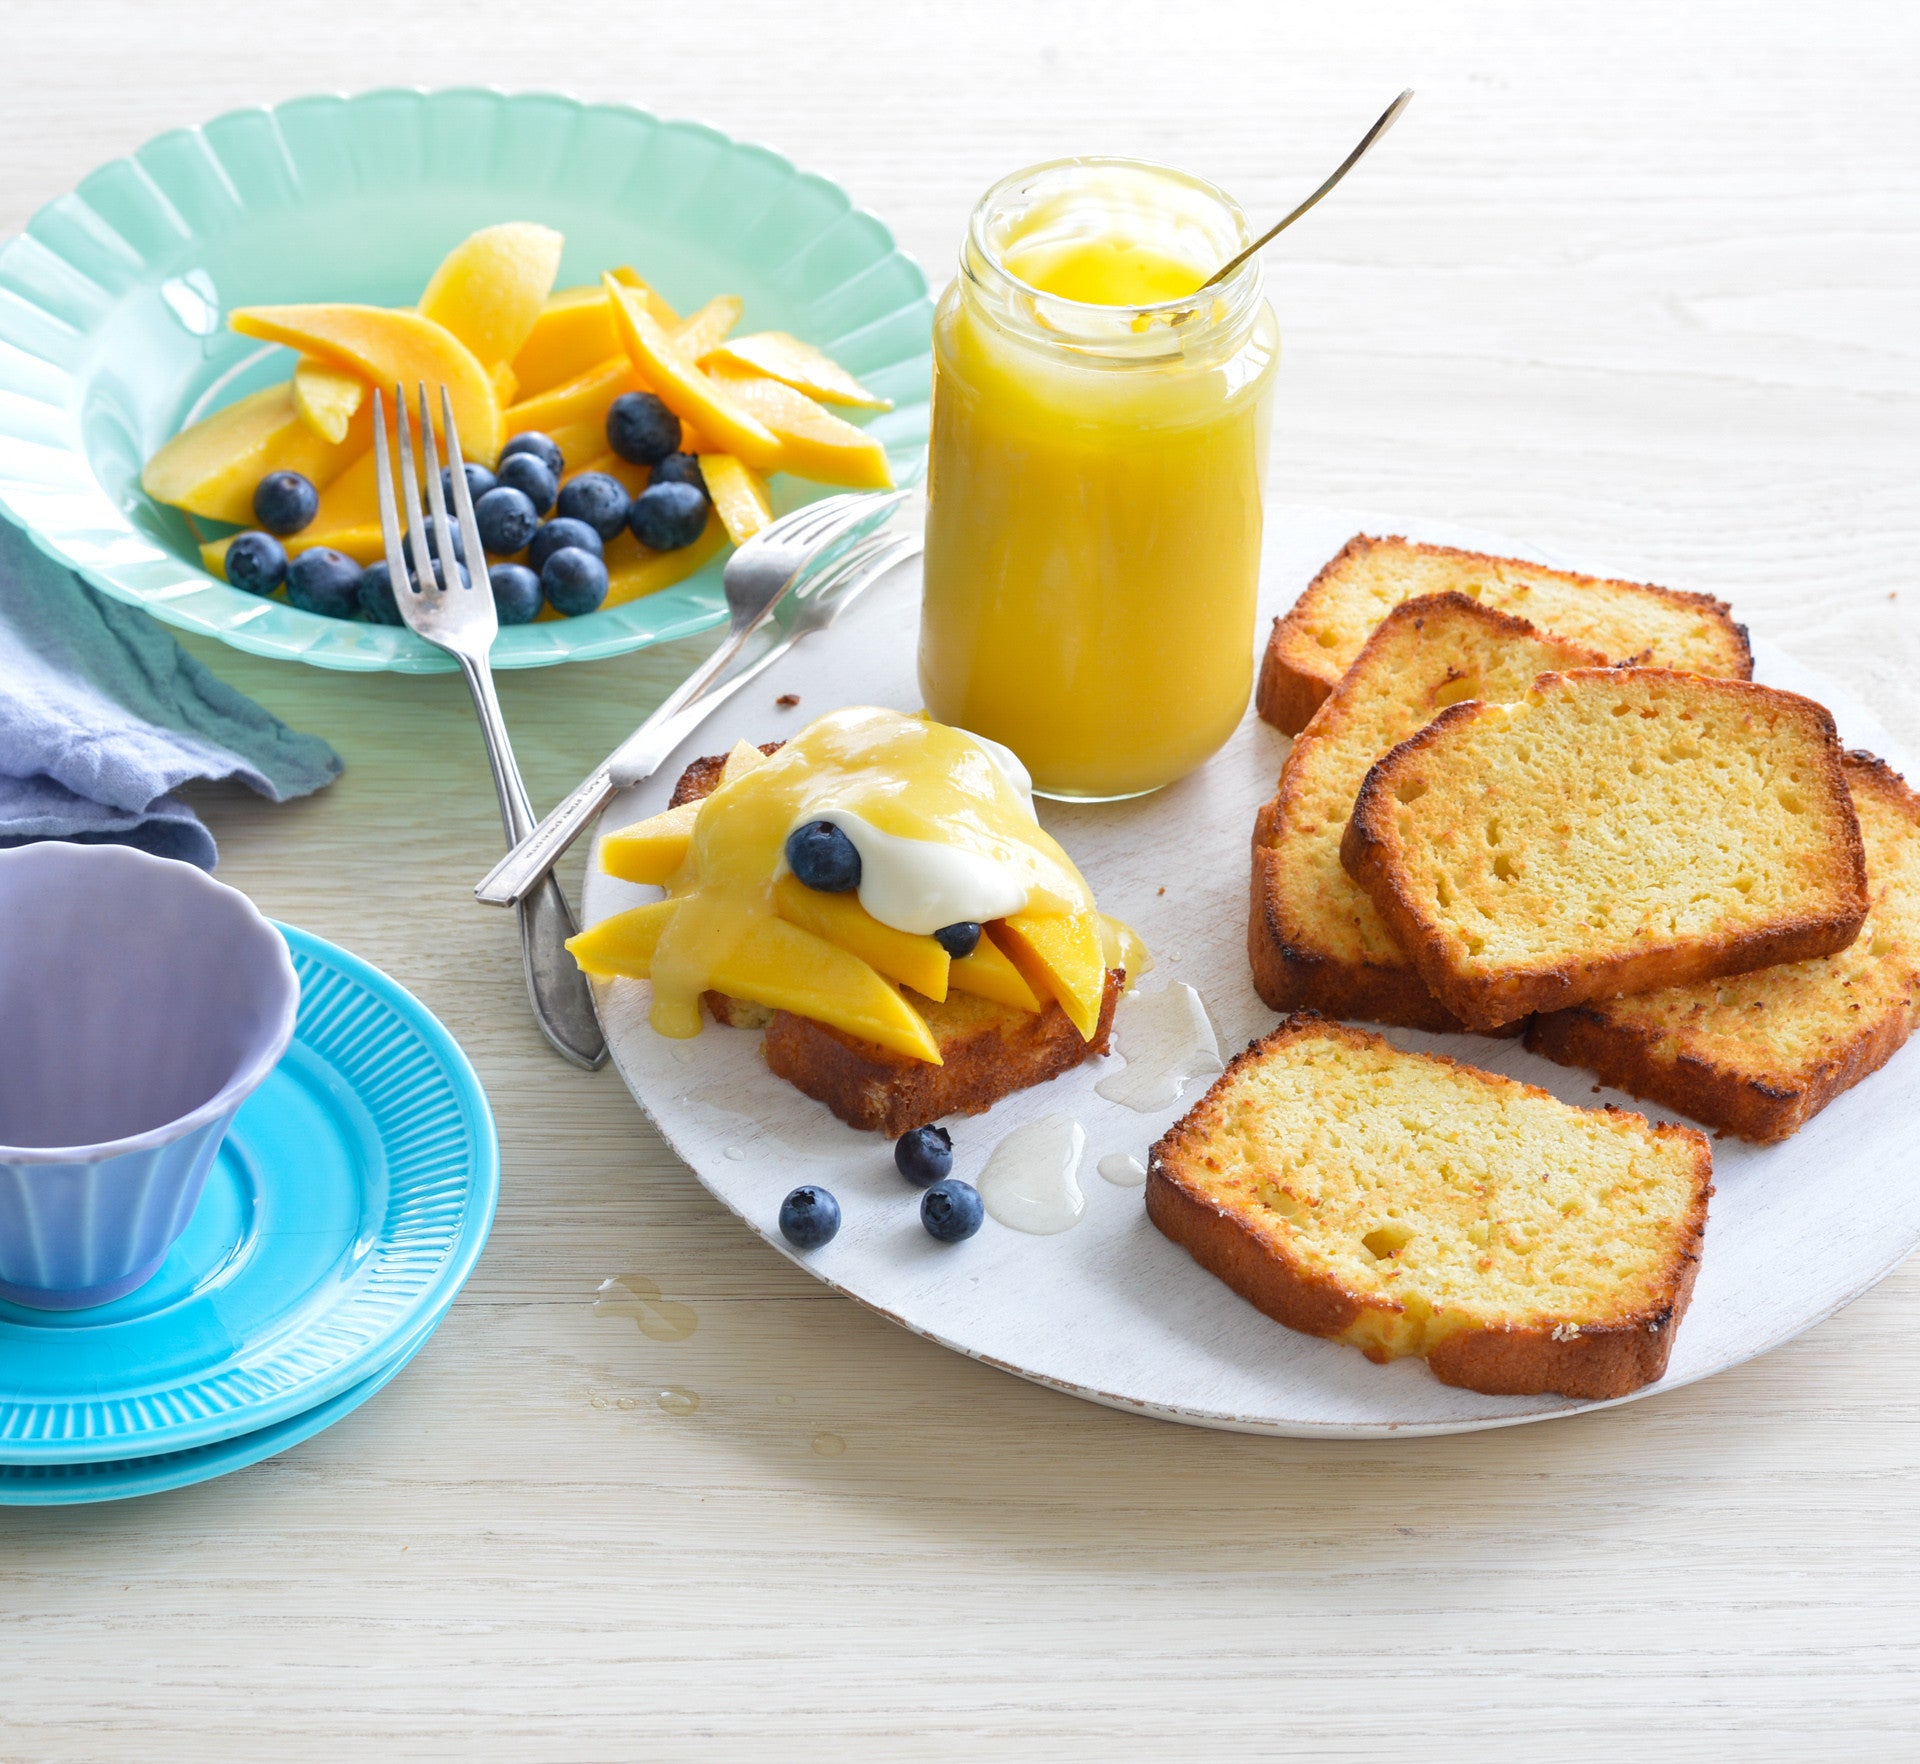
A heavenly layering of mouth-puckering lemon pound cake, curd and syrup, teamed with summer fruits and ‘soured’ cream, this dessert is one for lemon-lovers. The cake is just as delicious served either plain, toasted or chargrilled – just take your pick!
Ingredients
- melted butter, to grease
- 125ml (½ cup) sour cream
- 125ml (½ cup) thickened cream
- 2 x 125g punnets blueberries, to serve
- 2 ripe medium mangoes, sliced, to serve
Lemon buttermilk pound cake
- 125g butter, at room temperature
- 220g (1 cup) caster sugar
- 2 eggs
- 1 tablespoon finely grated lemon zest
- 225g (1½ cups) plain flour
- ½ teaspoon bicarbonate of soda
- 125ml (½ cup) buttermilk
- 1 tablespoon strained fresh lemon juice
Lemon curd
- 125ml (½ cup) strained fresh lemon juice
- 165g (¾ cup) caster sugar
- 3 eggs, whisked and strained
- 100g unsalted butter, cubed, at room temperature
Lemon syrup
- 110g (½ cup) caster sugar
- 160ml (⅔ cup) strained fresh lemon juice
- 2 tablespoons water
Method
- To make the lemon buttermilk pound cake, preheat oven to 180°C (160°C fan-forced). Grease a 9cm x 19cm (base measurement) loaf tin and line the base and long sides with one piece of non-stick baking paper. Use an electric mixer to beat the butter and sugar until pale and creamy. Add the eggs one at a time, beating well after each. Beat in the lemon zest. Sift together the flour and bicarbonate of flour. Combine the buttermilk and lemon juice. On lowest possible speed beat in half the flour mixture and then half the buttermilk mixture until just combined. Repeat with the remaining flour and buttermilk mixtures in two more batches until just combined. Pour the mixture into the prepared tin and smooth the surface with the back of a spoon. Bake in preheated oven for 50 minutes or until a skewer inserted into the centre comes out clean. Leave to stand in the tin for 5 minutes before transferring to a wire rack to cool (this will take about 30 minutes).
- To make the lemon curd, combine the lemon juice, sugar and eggs in a medium heatproof bowl and place over a saucepan of simmering water (make sure the bowl doesn’t touch the water). Stir with a wooden spoon for 10-12 minutes or until the mixture thickens to a consistency similar to pouring cream (do not boil). Remove the bowl from the saucepan and gradually stir in the butter until the butter is evenly incorporated and the curd is smooth. Cover with plastic wrap (see Baker’s tips) and place in the fridge to chill.
- To make the lemon syrup, combine the sugar, water and lemon juice in a small saucepan and stir over medium heat until the sugar dissolves. Bring to the boil and boil for 3 minutes or until reduced slightly.
- To serve, combine the cream and sour cream in a medium bowl and use a balloon whisk to whisk until soft peaks form. Transfer to a serving bowl. Preheat a chargrill pan on high (see Baker’s tips). Cut the cake into 1.5 cm-thick slices and toast in a toaster until lightly golden and warmed through. Transfer to a plate and place in the centre of the table with the curd, syrup, fruit and cream for guests to assemble their own dessert.
Baker's Tips
- The Lemon buttermilk pound cake will keep in an airtight container at room temperature for up to 2 days.
- If making the curd ahead of time, you can transfer it straight into a clean airtight jar, cover with an airtight lid and place in the fridge. It will keep in an airtight jar or container in the fridge for up to 1 week.
- The lemon syrup will keep in an airtight jar or container in the fridge for up to 2 weeks.
- The cake can be also toasted in a sandwich press or in a toaster until golden.
- The combined whipped cream and sour cream can be replaced by scoops of good-quality vanilla ice-cream if desired.
Photography by Alan Benson.

Prep 30minBake 40-45minMakes 10-12 serves
Lemon buttercake is something from heaven – rich, tart and mor-ish all at the same time… And when teamed with coconut it becomes sublime! This cake is particularly good for afternoon tea or dessert when teamed with vanilla ice-cream.
Ingredients
150g salted butter, softened
220g (1 cup) caster sugar
Finely grated zest of 2 lemons
3 eggs
300g (2 cups) self-raising flour
45g (½ cup) desiccated coconut
125ml (½ cup) milk
Candied Lemon Strips
220g (1 cup) caster sugar
250ml (1 cup) water
Lemon Drizzle Icing
125g (1 cup) pure icing sugar4-5 teaspoons strained fresh lemon juice
Method
- Preheat the oven to 170°C (150°C fan-forced). Grease a 24cm (top measurement) or 2.5 litre (10 cup) capacity fluted ring tin with the melted butter and dust with flour to lightly coat, tapping out any excess.
- Use an electric mixer to beat the butter, sugar and lemon rind in a large mixing bowl, scraping down the sides when necessary, until very pale and creamy. Add the eggs one at a time, beating well after each addition until well combined.
- Combine the flour and coconut. Add half of the flour mix to the butter mixture and mix on lowest speed possible until just combined. Add the milk and mix on lowest possible speed until just combined. Add the remaining flour mix and beat on lowest possible speed until just combined.
- Spoon the mixture into the prepared tin and use the back of a spoon to smooth the surface. Bake for 40-45 minutes or until a skewer inserted into the centre comes out clean. Stand the cake in the tin for 5 minutes to cool slightly before turning onto a wire rack sitting over a tray or plate.
- While the cake is cooling make the Candied Lemon Strips. Use a vegetable peeler to remove the rind in wide strips from the lemon. Use a small sharp knife to remove any white pith from the rind and then cut the rind into thin strips. Combine the sugar, water and lemon rind strips in small saucepan. Stir over medium heat until the sugar dissolves. Bring to a simmer and simmer for 10 minutes or until translucent. Use a fork to transfer the rind from the syrup to a plate, separating the strands. Set aside.
- When the cake is cool, make the Lemon Drizzle Icing. Sift the icing sugar into a medium bowl. Add 4 teaspoons of the lemon juice and stir until smooth and is a heavy coating consistency, adding a little more lemon juice, ¼ teaspoon at a time, until the desired consistency is reached. Use a spoon to drizzle the icing over the cake allowing it to run down the sides. Set aside for 10 minutes or until the icing sets.
- Transfer the cake to a serving plate, decorate with the Candied Lemon Strips and serve in wedges.
Baker's Tip
- This cake will keep in an airtight container for up to 2 days.


