SUBSCRIBE TO BAKECLUB!
  •  
0 CART/CHECKOUT

Learn, connect & share through a love of baking

  • Home
  • Classes
    • Live & Guided Online Classes
    • Self-paced Online Classes
    • How to choose an online class
    • Special Events
  • BakeClub & Co.
    • Join BakeClub & Co.
    • Log in to BakeClub & Co.
    • Gift BakeClub & Co.
  • Make Me a Baker Program
    • Make Me a Baker Online
    • Testimonials
    • Graduation gallery
  • Shop
    • Anneka's Books
    • BakeClub Aprons
    • Baking Gifts
    • Gift Certificates
  • Recipes
    • Browse All
    • Bakes that Travel Well
    • Bakes to Share with a Cuppa
    • Baking with Kids
    • Café Favourites
    • Flour-free Recipes
    • International Recipes
    • Recipes to Nurture, Comfort & Calm
    • Savoury Tummy Fillers
    • Winter Warmers
  • Resources
    • BakeClub Blog
    • BakeClub Tips
    • BakeClub Q&A
    • BakeClub Videos
    • BakeNews Archives
    • Subscribe to BakeClub
  • About
    • Who is Anneka Manning?
    • About BakeClub
    • What Our Students Say
    • BakeClub Partners
    • Media
    • Contact Us
  • home
  • Products
Prep 15 mins (+1 hour cooling)Bake 40minMakes 10 serves

This cake was shared by Hannah Scott as part of her Make Me a Baker program homework for Module 5.
"This sturdy but moist cake is a real crowd pleaser and a favourite in my family. To be honest, I’m not exactly sure why it’s called a Mexican Wedding Cake as I don’t think it’s traditionally served at weddings, but since my family usually make it for family gatherings and celebrations, the name has stuck. It’s super easy to make using the measure and beat method."

Ingredients

  • 15g melted butter mixed with 1 teaspoon plain flour
  • 310g plain wholemeal flour (unsifted)
  • 2 teaspoons bicarbonate of soda
  • 165g brown sugar
  • 2 eggs, at room temperature, lightly whisked
  • 85g slivered almonds
  • 100g coarsely chopped glace ginger
  • 450g tin crushed pineapple in natural juice, (with its juice)

Icing

  • 75g butter, at room temperature
  • 250g cream cheese, at room temperature
  • 125g icing sugar, sifted
  • 2 teaspoons natural vanilla extract or essence

Method

  1. Preheat oven to 180°C (160°C fan-forced). Brush a 2 litre (8 cup) fluted ring or bundt tin with the melted butter and flour mixture to grease.
  2. Place the flour, bicarbonate of soda, brown sugar, eggs, almonds, glace ginger and crushed pineapple into a mixing bowl and use an electric mixer to beat on low speed until well combined.
  3. Pour the cake batter into the prepared tin. Bake in preheated oven for 40 minutes or until a skewer inserted into the cake comes out clean.
  4. Stand the cake in the tin for 5 minutes before turning onto a wire rack to cool (this will take about an hour).
  5. Meanwhile, to make the Icing, use an electric mixer to beat the butter, cream cheese, icing sugar and vanilla until pale and creamy.
  6. Once cake has cooled completely, use the back of a metal spoon to gently spread the icing all over the cake. Serve in slices.

Baker's Tips

  • This cake will keep in an airtight container in the fridge for up to 3 days. Serve at room temperature.


Hannah Scott (aka @thefoodstoryteller) won a scholarship to BakeClub's Make Me a Baker program thanks to SBS Food. Her rustic approach to baking is partly to thank for winning her the top spot in the competition. Stay tuned to Instagram and the blog to follow her Make Me a Baker journey over the next 6 months! In the meantime, click here to get to know a little more about her. 

To find out more about how you can be part of a future Make Me a Baker program, click here.

Photography by Hannah Scott.

Mexican Wedding Cake
Prep 40min (+2hr cooling, 30min standing and 2hr chilling time)
Bake 45min
Makes 10 serves

These trifles are a complete contradiction in terms when it comes to eating them – they are rich yet refreshing, sweet yet tart, indulgent yet light – and that’s what makes them so good.

Ingredients

Brownie cake
200g good-quality dark chocolate (45-54% cocoa solids), chopped
185g butter, cubed
220g (1 cup) caster sugar
3 eggs, at room temperature, lightly whisked
1 teaspoon natural vanilla extract or essence
185g (1¼ cups) plain flour
30g (¼ cup) Dutch cocoa powder
¾ teaspoon baking powder

Minted custard cream
375ml (1½ cups) milk
8 sprigs fresh mint
3 egg yolks
2 tablespoons caster sugar
1 teaspoon natural vanilla essence or extract
500ml (2 cups) thickened cream, whipped to soft peaks

Sweetened raspberries
600g frozen raspberries
55g (¼ cup) caster sugar
1½ tablespoons lemon juice

Method
  1. To make the Minted Custard Cream, put the milk and mint sprigs into a medium saucepan. Bring just to a simmer over a medium heat. Remove from heat and stand for 30 minutes to infuse. Remove the mint sprigs. Use a balloon whisk to whisk the egg yolks and sugar together in a heatproof bowl. Gradually whisk in the milk mixture until smooth and well combined. Return to the heat and stir constantly with the whisk over medium heat until the mixture thickens enough to coat the back of a spoon (do not simmer). Remove from the heat and stir in the vanilla. Pass the custard through a sieve into a heatproof bowl. Cover the surface with plastic wrap and refrigerate for 2 hours or until chilled.
  2. To make the Brownie Cake, preheat oven to 160°C (140°C fan-forced). Grease a 20cm springform tin with melted butter and line the base with piece of non-stick baking paper. Place the chocolate and butter in a medium heatproof bowl over a saucepan of simmering water (don’t let the base of the bowl touch the water). Stir occasionally until chocolate and butter melt and the mixture is smooth. Remove bowl from saucepan and set aside to cool slightly. Use an electric mixer with a whisk attachment to whisk the sugar, eggs and vanilla until thick and pale and a ribbon trail forms when the whisk is lifted. Whisk in the melted chocolate mixture. Sift together the flour, cocoa and baking powder, add to the egg mixture and use a large metal spoon or spatula to fold in until just combined.
  3. Pour mixture into the prepared tin and spread evenly. Bake for 40-45 minutes or until moist crumbs cling to a skewer inserted in the centre. Remove from the oven and cool in tin on a wire rack (this will take about 2 hours). Use a large serrated knife to cut the cake in half horizontally and then break it into chunks.
  4. To make the Sweetened Raspberries, combine the frozen raspberries, sugar and lemon juice in a medium saucepan. Cover and cook over medium heat, stirring occasionally until the raspberries have just thawed. Remove from heat and set aside to cool.
  5. To finish the Minted Custard Cream, fold the whipped cream through the chilled custard.
  6. To assemble, layer the Custard Cream, Brownie Cake chunks, and Sweetened Raspberries and their juice in individual glasses.
Baker's Tips
  • The Brownie Cake will keep in an airtight continer at room temperature for up to 4 days. The Minted Custard Cream and Sweetned Raspberries will keep in separate airtight containers in the fridge for up to 2 days.
  • You can also layer this trifle on one large serving dish and serve in scoops.


Photography by Alan Benson.

This recipe is from Anneka's SBS Food online column, Bakeproof: Brownies.
CLICK HERE for more Bakeproof columns and recipes.

Minted Raspberry Brownie Trifles
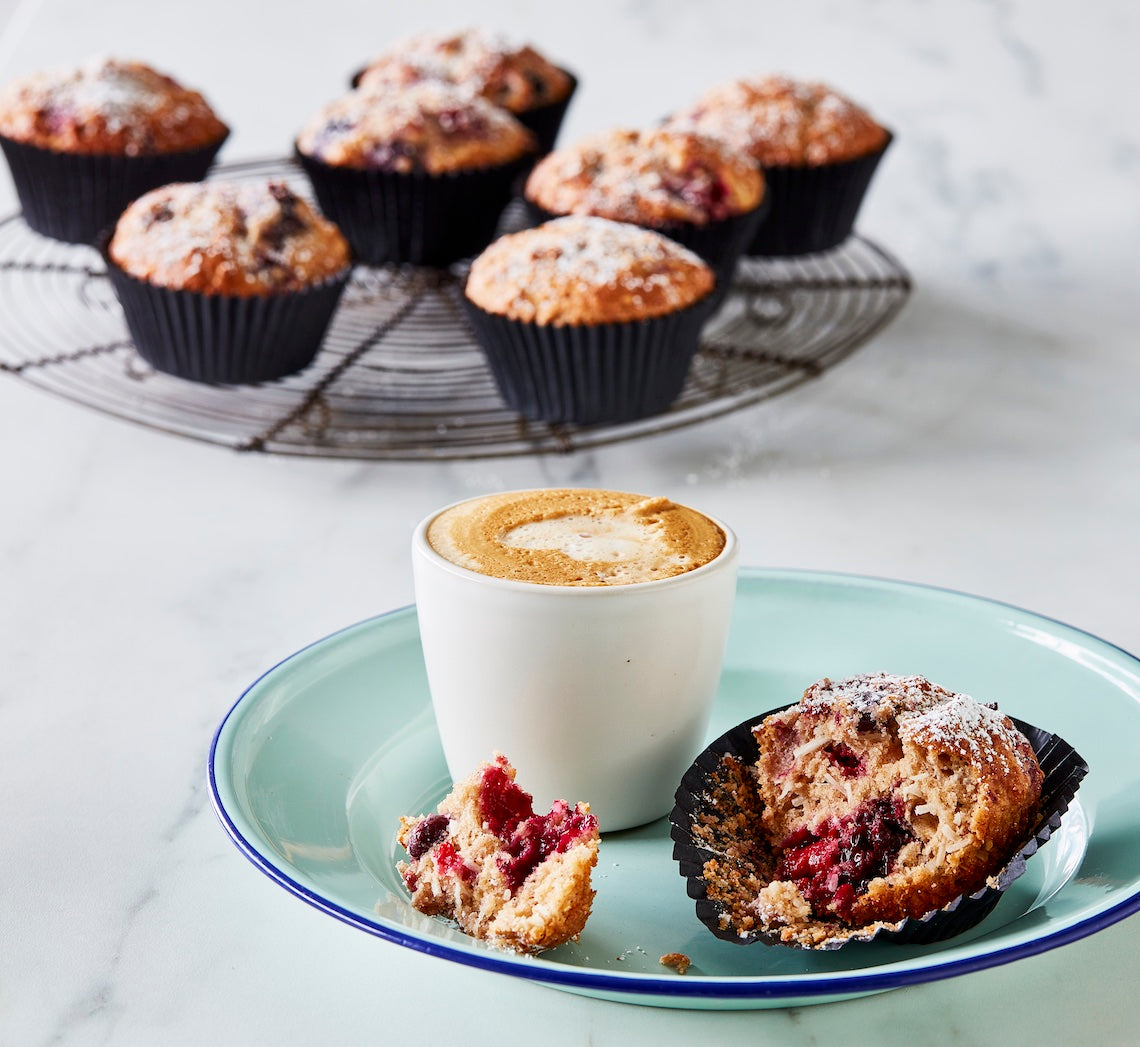
Prep 20minBake 25-28minMakes 12

Good muffins should have substance. They shouldn't be too light and airy, or overly sweet – they are muffins, after all, not a cake. My favourites are dense with fruit (like this one), include wholemeal flour to add texture (and a little wholesomeness) and are subtly spiced (cinnamon is always good). This recipe is particularly easy to whip up.

Ingredients

150g (1 cup/5¼oz) plain flour
150g (1 cup/5¼oz) wholemeal plain flour
1 tablespoon baking powder
2 teaspoons ground cinnamon
185g (1 cup/6½oz) raw caster sugar
50g (⅔ cup/1¾oz) shredded coconut
300g frozen mixed berries (see Baker's Tips)
185ml (¾ cup/6½fl oz) buttermilk
80ml (⅓ cup/2½fl oz) light olive oil, safflower or sunflower oil
2 eggs, at room temperature
1½ teaspoons natural vanilla extract or essence

    Method

    1. Preheat the oven to 190°C/375°F (170°C/340°F fan-forced). Line 12 x 80ml (⅓ cup/2½fl oz) muffin tray holes with muffin paper cases.
    2. Sift together both the flours, the baking powder and cinnamon into a large mixing bowl, returning any husks to the bowl. Stir in the sugar and coconut. Gently stir in the frozen berries. Make a well in the centre.
    3. Use a fork to whisk together the buttermilk, oil, eggs and vanilla in a bowl. Add to the flour mixture and use a spatula or large metal spoon to fold together until just combined. (Don’t overmix – the batter should still be a little lumpy.)
    4. Spoon the mixture into the paper cases, dividing evenly. Bake in preheated oven for 25-28 minutes or until the muffins are golden and cooked when tested with a skewer. Cool for 3 minutes in the tin, then turn out onto a wire rack. Serve warm or at room temperature.

    Baker's Tips

    • You can replace the raw caster sugar with 220g (1 cup, firmly packed) brown sugar if you like.
    • You can replace the wholemeal plain flour with 150g (1 cup/5¼oz) wholemeal spelt plain flour.
    • There’s no need to thaw the frozen berries before using them in this recipe.
    • These muffins are best eaten the day they are baked, however they freeze well. Wrap individually in plastic wrap and then seal in a plastic bag or airtight container. Freeze for up to 3 months. Thaw at room temperature. 

    Photography by Steve Brown

    Mixed Berry & Coconut Muffins
    Prep 45min (+30min cooling time per batch)Bake 45minMakes 12-14 serves

    This pretty cake, with its heavenly orange blossom-scented frosting, is currently one of my favourite 'special occasion' cakes – particularly for birthday celebrations. The cake layers are baked in two batches but if you are lucky enough to have four cake pans that can fit in your oven all at once, feel free to make the mixture in one lot and bake them all together.

    Ingredients

    Melted butter, to grease

    Orange poppy seed cake layers
    3 oranges
    3 tablespoons poppy seeds
    125g (½ cup) sour cream
    250g butter, cubed, at room temperature
    300g (1⅓ cups) caster sugar
    4 eggs
    350g (2⅓ cups) plain flour
    3 teaspoons baking powder

    Candied orange rind
    3 oranges
    220g (1 cup) caster sugar
    250ml (1 cup) water

    Orange blossom water buttercream
    250g butter, at room temperature
    375g (3 cups) icing sugar, sifted
    3-4 teaspoons orange blossom water (or to taste)

      Method

      1. To make the cake layers, preheat the oven to 180°C. Grease two shallow 20cm (base measurement) round cake tins with melted butter and line the bases with rounds of non-stick baking paper.
      2. Finely grate the rind from the oranges and set aside. Juice the fruit and measure 125ml (½ cup), reserving the rest for another use. Divide the juice evenly between two medium bowls. Add half the poppy seeds and half the sour cream to each. Set aside.
      3. Use an electric mixer to beat 125g of the butter, 150g of the sugar and half the orange rind until pale and creamy. Add 2 of the eggs, one at a time and beating well after each addition. Sift together 175g of the flour and 1½ teaspoon of the baking powder. Fold half the flour mixture through the butter mixture until just combined. Fold through one quantity of the poppy seed mixture and then the remaining flour mixture until just combined.
      4. Divide the cake mixture evenly between the prepared cake tins and use the back of a metal spoon to smooth the surfaces. Bake in the preheated oven for 20-25 minutes or until a skewer inserted into the centre of the cakes come out clean. Stand in the tins for 5 minutes before turning onto wire racks, topside down, to cool (this will take about 30 minutes).
      5. Repeat with the remaining poppy seed mixture and ingredients to make two more cake layers.
      6. Meanwhile, to make the candied orange rind, use a vegetable peeler to remove the rind from the oranges in wide strips. Use a small sharp knife to remove any white pith from the rind. Combine the sugar and water in a small saucepan and stir over low heat until the sugar dissolves. Add the orange rind strips and bring to a simmer. Simmer, without stirring, for 10-15 minutes or until the rind is translucent. Use a fork to transfer the rind from the syrup to a wire rack. Set aside. Reserve the syrup.
      7. To make the orange blossom water buttercream, use an electric mixer to beat the butter, icing sugar and orange blossom water in a medium bowl until very pale and creamy. Cover and set aside at room temperature.
      8. To assemble the cake, place a cake layer, topside down, on a serving plate or cake stand. Spread with a little of the buttercream and then top with another layer of cake. Continue to layer with some of the remaining buttercream and cake layers, finishing with a cake layer. Spread a thin layer of buttercream around the outside of the cake so that the cake layers show through. Spread the remaining buttercream on top, swirling as desired. Decorate with the candied orange rind and drizzle with some of the remaining syrup just before serving.

      Baker's Tips

      • This cake will keep in an airtight container at room temperature for up to 3 days.

      This recipe is from Anneka's SBS Food online column, Bakeproof: Citrus.

      CLICK HERE for more Bakeproof recipes.

      Photography by Alan Benson.

      Naked Orange Poppy Seed Cake with Orange Blossom Frosting
      Prep 25minBake 40minMakes 6 serves

      We often think of crisps and crumbles as winter desserts, but please don’t pigeon-hole them! This combination of sweet nectarines and tart raspberries, subtly flavoured with rosewater, topped with a pistachio 'crisp' topping and served with honey-flavoured yoghurt is a sublime summer dessert. Any leftovers are good for breakfast!

      Ingredients

      750g white or yellow nectarines
      300g fresh or frozen raspberries or blueberries
      55g (¼ cup) caster sugar
      3 teaspoons rosewater, or to taste
      1½ tablespoons plain flour

      Pistachio topping
      75g (½ cup) plain flour
      55g (¼ cup) caster sugar
      1 teaspoon ground cinnamon
      80g chilled butter, diced
      50g pistachio kernels, chopped, toasted

      Honey yoghurt
      200g tub Greek-style yoghurt
      1 tablespoon pure honey, or to taste

        Method
        1. Preheat oven to 190°C (170°C fan-forced).
        2. To make the Pistachio topping, combine the flour, sugar and cinnamon in a medium bowl. Use your fingertips to rub in the butter until the mixture begins to resemble coarse breadcrumbs. Stir in the pistachios.
        3. Halve the nectarines and remove the stones. Cut each half into 4 wedges. Combine with the sugar, rosewater and flour and toss to combine. Add the raspberries and toss gently to combine evenly. Divide the fruit mixture evenly among 6 x 250 ml (1 cup) ramekins or ovenproof dishes. Sprinkle the pistachio crisp topping over the fruit to cover.
        4. Bake in preheated oven for 35-40 minutes or until the fruit is tender when pierced with a skewer and the topping is crisp and golden.
        5. Meanwhile, to make the Honey yoghurt, stir the yoghurt and honey in a medium bowl until combined. Cover and refrigerate until required.
        6. Serve the crisp warm or at room temperature with the honey yoghurt.
        Baker's Tips
        • You can also bake this crisp in a 1.5 litre (6 cup) ovenproof dish. Bake for 50 minutes.

        This recipe is from Anneka's SBS Food online column, Bakeproof: Stone Fruit.

        CLICK HERE for more Bakeproof recipes.

        Photography by Alan Benson.

        Nectarine & Berry Crisp with Honey Yoghurt
        Prep 40min (+30min chilling and 30min cooling time)Bake 20minMakes 12

        Dating back almost a century, this Australian creation of a pastry case filled with mock cream (and sometimes a raspberry jam layer) and topped with sickly sweet icing seems to hit a nostalgic chord – we all remember eating them as a child! For a more contemporary twist, we've added an extra colour punch to the pink icing. Remember that chocolate and white, or pink and white are also popular colour combinations.

        Ingredients

        1 quantity Sweet shortcrust pastry, divided in half before wrapping and chilling as directed

        Mock Cream Filling
        1 tablespoon boiling water
        ½ teaspoon gelatine powder
        65g (⅓ cup) caster sugar
        2 tablespoons milk
        125g unsalted butter, softened
        1 teaspoon natural vanilla essence or extract

        Icing
        185g (1½ cups) pure icing sugar
        1 tablespoon water, plus 1 teaspoon extra (optional)
        2 teaspoons sifted cocoa powder
        Pink food colouring

          Method
          1. Unwrap one pastry portion and place on a lightly floured, cool work surface. Gently pat the pastry with the palm of your hand to flatten slightly. Use a lightly floured rolling pin to roll out on a lightly floured surface until 3mm thick. Use an 8cm diameter plain round cutter to cut out 6 circles, re-rolling the pastry if necessary. Line six holes of a 12-hole 80ml ( ⅓ cup) muffin tin (the pastry circles won’t fill the muffin holes completely. Repeat with the remaining pastry portion to line the six remaining muffin holes.
          2. Prick each pastry case base 3 times with a fork and place in the fridge for 30 minutes. Preheat the oven to 200°C (180°C fan-forced).
          3. Line each tartlet case with a piece of foil and then fill with dried rice. Blind bake the tart cases for 15 minutes or until the pastry is sealed. Use the foil to lift the rice out of the tartlet cases and bake for a further 5 minutes or until lightly golden and cooked through. Cool the cases in the tin.
          4. To make the Mock cream filling, put the boiling water in a small ramekin and sprinkle the gelatine over the top. Use a fork to whisk the gelatine into the water and then set aside for about 3 minutes or until the mixture is clear (see Bakers Tips). Meanwhile, combine the sugar and milk in a small saucepan and stir over medium heat until the sugar dissolves. Stir in the gelatine mixture until well combined. Remove from heat and set aside, stirring occasionally so the gelatine doesn't set, for 30 minutes or until cooled to room temperature.
          5. Use an electric beater to beat the butter and vanilla in a medium bowl until pale and creamy. With the motor running, gradually add the cooled gelatin mixture in a slow steady stream until well combined and fluffy. Divide the Mock cream filling evenly among the pastry cases and smooth the surfaces. Set aside in a cool spot but not in the fridge.
          6. To make the Icing, sift the icing sugar into a bowl and then stir in the water until smooth (the icing should be a spreadable consistency). Put half the icing into a separate bowl and stir in the cocoa powder and extra teaspoon of water. Colour the remaining portion with 2-4 drops of pink food colouring. Use a palette knife or the back of a teaspoon to spread about a teaspoon of the pink icing over the top of half of each tart. Set aside for 5-10 minutes for the icing to set. Spread about a teaspoon of the chocolate icing over the remaining half of each tart to cover the tops and then set aside for 5-10 minutes for the icing to set. Serve at room temperature.
          Baker's Tips
          • If the gelatine doesn't dissolve in the boiling water and become clear, add boiling water to a larger heatproof bowl, jug or dish and then sit the ramekin with the gelatine mixture in the water. Stir occasionally until the mixture is clear.
          • These tarts will keep in an airtight container in the fridge for up to 4 days. Serve at room temperature. 

          This recipe is from Anneka's SBS Food online column, Bakeproof: Childhood Favourites. CLICK HERE for more Bakeproof recipes.

          Photography by Alan Benson.

          Neenish Tarts
          Prep 20minBake 35minMakes 8-10 serves

          Much more like a cake than a pie, this apple-dense traditional Norwegian dessert is comforting, homely and can warm the soul with just one mouthful – especially when served straight from the oven in generous scoops and topped with ice-cream or a large dollop of thick cream. Don’t overlook the fact that it is also pretty good served like any other cake, cooled and in wedges. The trick to this recipe is not to over-mix – only mix until the wet and dry ingredients are evenly combined.

          Ingredients

          • Melted butter, to grease
          • 110g (¾ cup) plain flour
          • 1 teaspoon baking powder
          • 1 teaspoon ground cinnamon
          • ½ teaspoon ground cardamom
          • 110g (½ cup) caster sugar
          • 3 medium (about 150g each) apples (such as golden delicious, royal gala or pink lady), peeled, cored and cut into 2 cm pieces
          • 80g slivered almonds, toasted
          • 100g butter, melted and cooled
          • 1 egg
          • 2 tablespoons milk
          • 1½ teaspoons natural vanilla essence or extract
          • Vanilla ice-cream or thick cream, to serve

          Method

          1. Preheat the oven to 180°C (160°C fan-forced). Grease a 20cm springform tin with melted butter and line the base with baking paper.
          2. Sift together the flour, baking powder, cinnamon and cardamom into a large bowl. Stir in the sugar, apple and almonds. Use a fork to whisk together the butter, egg, milk and vanilla. Add to the flour mixture and use a spatula to mix until just combined.
          3. Spoon the mixture into the prepared tin and spread evenly with the back of a spoon. Bake in the preheated oven for 35 minutes or until golden and a skewer inserted into the centre comes out clean.
          4. Stand the pie in the tin for 5–10 minutes before removing the sides of the tin. Serve warm in scoops or at room temperature in wedges with ice-cream or cream.

          Baker's Tips

          • This pudding/cake will keep in an airtight container at room temperaturein a cool spot for up to 3 days.

          This recipe is from Anneka's SBS Food online column, Bakeproof: Scandi Baking. CLICK HERE for more Bakeproof recipes.

          Photography by Alan Benson.
          Norwegian Apple Pie (Eplepai)
          Prep 15minBake 18-20minMakes about 18

          Reminiscent of the good old Digestives, these biscuits easily swing between savoury and sweet. Serve them with blue cheese or dip them in dark chocolate to give them the flavour preference you prefer.

          Ingredients

          150g (5¼oz) wholemeal plain flour
          130g (1 cup/4½oz) oat bran
          75g (⅓ cup, firmly packed/2¾oz) brown sugar
          1 teaspoon baking powder
          ½ teaspoon salt
          125g (4½oz) chilled salted butter, cubed
          60ml (¼ cup/2fl oz) milk

          Method

          1. Preheat oven to 180°C/350°F (160°C/315°F). Line two oven trays with non-stick baking paper.
          2. Put the flour, oat bran, brown sugar, baking powder, salt and butter in the bowl of a food processor and process until the mixture resembles breadcrumbs. Sprinkle the mixture with the milk and use the pulse button to process until the mixture starts to come together as a dough. Transfer the mixture to a bowl and bring it together with your hands.
          3. Turn the dough onto a lightly floured surface and use a lightly floured rolling pin to roll out until about 5mm/¼in thick. Use a 6cm/2¼in round cutter to cut the dough into discs and place them on the lined trays about 3cm/1¼in apart. Prick the tops of each biscuit twice with a fork. Re-roll any off cuts and cut out more biscuits.
          4. Bake in preheated oven for 18-20 minutes or until golden around the edges, aromatic and cooked through. Cool on the trays.

          Baker's Tip

          • These biscuits will keep in an airtight container at room temperature for up to 1 week.
          This recipe is from Anneka's SBS Food online column, Bakeproof: Cookies in a hurry. CLICK HERE for more Bakeproof recipes.


          Photography by Alan Benson.
          Oat Biscuits
          Prep 20minBake 20minMakes about 30

          Reminiscent of the traditional and timeless Anzac biscuits, these morish treats have the addition of almond and sesame (for extra crunch) and mandarin (for a surprising flavour twist). This variation is not intended to be disrespectful of the ANZAC spirit – just a modern variation to enjoy with a cuppa and to reflect on the legacy left and sacrifice made by our service men and women.

          Ingredients

          95g (1 cup/3¼oz) rolled oats
          150g (1 cup/5¼oz) plain flour
          90g (1 cup/3oz) desiccated coconut
          220g (1 cup, firmly packed/7¾oz) brown sugar
          95g (¾ cup/3¼oz) slivered almonds
          40g (¼ cup/1½oz) sesame seeds
          Finely grated rind 1 mandarin
          125g (4½oz) salted butter, cubed
          2 tablespoons treacle
          2 tablespoons water
          ½ teaspoon bicarbonate of soda

            Method

            1. Preheat oven to 180°C/350°F (160°C/315°F fan-forced). Line 2 large oven trays with baking paper.
            2. Put the rolled oats, flour, coconut, brown sugar, almonds, sesame seeds and mandarin rind in a large mixing bowl and stir to combine.
            3. Put the butter, treacle and water in a small saucepan and heat over medium heat, stirring occasionally with a wooden spoon, until the butter melts and the mixture is hot. Remove from the heat, add the bicarbonate of soda and stir to combine – the mixture will foam. Add to the dry ingredients and stir with the wooden spoon until evenly combined.
            4. Roll tablespoonfuls of the mixture into balls and place about 5cm/2in apart on the lined trays. Use your fingers or the bottom of a glass to flatten the balls until about 1cm/½in thick. 
            5. Bake in preheated oven for 20 minutes, swapping the trays after 10 minutes, or until golden and cooked through. Remove the biscuits from the oven and cool on the trays. Repeat with any remaining biscuit mixture.

            Baker's Tip

            • These biscuits will keep in an airtight container at room temperature for up to 2 weeks (if they last that long!)
            Oat, Almond & Sesame Biscuits
            Prep 25min (+ 1hr 30min proving time)Bake 25minMakes 8-10 serves

            Predecessor to the modern pizza, focaccia is a simple Italian flatbread that was associated with Christmas Eve and Epiphany for many centuries. This savoury version, studded with fragrant rosemary and mixed olives, makes a fabulous accompaniment to a cheese board, picnic spread or soup.

            Ingredients

            • 600g (4 cups) strong bread or pizza flour, plus extra to dust
            • 3 teaspoons instant dried yeast
            • 2 teaspoons salt
            • 330ml (1⅓ cups) luke warm water
            • 2 tablespoons olive oil, plus extra to grease and 2 tbsp to drizzle
            • 150g mixed olives
            • 2 tablespoons fresh rosemary leaves
            • sea salt flakes, to sprinkle

            Method

            1. To make the dough, combine the flour, yeast and salt in a large bowl and make a well in the centre. Combine the water and oil, add to the flour mixture and use a wooden spoon and then your hands to mix to a soft dough.
            2. Turn the dough onto a lightly floured surface and knead for 5-8 minutes or until it is smooth and elastic and springs back when you push your finger into it. Place the dough in an oiled bowl, turning it to coat lightly with the oil. Cover with plastic wrap and place in a warm, draught-free place for 1 hour or until doubled in size.
            3. Line a large baking tray with baking paper.
            4. Knock back the dough by punching it in the centre with your fist. Turn the dough onto the lined tray and use your hands to press down on it, and to pull and stretch it to form a rough rectangle about 20 cm x 30 cm and 1.5 cm thick. Use your fingertips to press into the surface of the dough to form dimples.
            5. Press the olives and rosemary into the surface flatbread. Drizzle with the extra olive oil and then sprinkle with the salt.
            6. Set aside in a warm draught-free place for 30 minutes or until risen slightly.
            7. Preheat the oven to 220°C (200°C fan-forced).
            8. Bake in the centre of the preheated oven for 25 minutes or until golden and cooked through. Serve warm or at room temperature.

            Baker's Tips

            • This focaccia is best eaten the day it is baked.

            This recipe is from Anneka's SBS Food online column, Bakeproof: Yeast-leavened Flatbreads. CLICK HERE for more Bakeproof recipes.

            Photography by Alan Benson.
            Olive & Rosemary Focaccia
            Prep 30min (+20min resting time)Bake 16-18minMakes about 8

            Just like the ones you buy, these thin, crisp wafers are the perfect addition to any cheese board. Serve them alongside a soft washed-rind cheese, soft feta, nutty cheddar or any number of dips, such as beetroot or baba ghanoush.

            Ingredients

            • 225g (1½ cups) plain bread or pizza flour
            • 1 teaspoon sea salt, crushed plus extra to sprinkle
            • 125ml (½ cup) water
            • 60ml (¼ cup) olive oil, plus extra to roll
            • 2 teaspoons sesame seeds, to sprinkle

            Method

            1. Preheat oven to 180°C (160°C fan forced). Line 2 large oven trays with non-stick baking paper.
            2. Combine the flour and salt in a large mixing bowl and make a well in the centre. Combine the water and olive oil, add to the flour mixture and use a wooden spoon and then your hands to mix to a soft dough.
            3. Turn the dough onto a lightly floured surface and knead for 1 minute or until smooth, elastic and bounces back when you press your finger into it. Wrap the dough in plastic wrap and set aside for 20 minutes to rest.
            4. Divide the dough into 8 portions and roll each in a little extra olive oil to coat lightly. Use your hands to flatten a portion into a rough rectangle and then use a rolling pin to roll out thinly and evenly into a large rectangle about 2mm thick (see Baker’s tip). Place on the lined trays. Repeat with three of the remaining dough portions. Brush the wafers with a little extra olive oil and sprinkle with extra salt and sesame seeds.
            5. Bake the four wafers in preheated oven for 16-18 minutes, swapping the trays around halfway through baking, or until golden and crisp. Cool on the trays. Repeat with the remaining four dough portions to make eight large wafers in total. Break into smaller pieces to serve.

            Baker's Tips

            • The more evenly you can roll the dough, the more evenly it will bake.
            • These wafers will keep in an airtight container or jar at room temperature for up to 1 week

            This recipe is from Anneka's SBS Food online column, Bakeproof: Savoury Crackers.

            CLICK HERE for more Bakeproof recipes.

            Photography by Benito Martin. 

            Olive Oil Wafers
            Prep 1hr (+45min cooling and 1-1hr30min chilling time)Bake 20minMakes 12-14 serves

            If you're a chocoholic this cake is heaven. And if you're not, it's still heaven! Wickedly rich and strikingly handsome, this layered centrepiece demands attention no matter what the celebration.

            Ingredients

            Cake layers
            melted butter, to grease
            250g butter, cubed, softened
            330g (1½ cups) caster sugar
            3 teaspoons natural vanilla essence or extract
            4 eggs
            225g (1½ cups) plain flour
            225g (1½ cups) self-raising flour
            250ml (1 cup) milk
            1 tablespoon instant coffee granules dissolved in 1 tablespoon boiling water, cooled

            Dark chocolate layer
            30g (¼ cup) Dutch cocoa powder, sifted and combined with 60ml (¼ cup) hot tap water, cooled

            Milk chocolate layer
            1½ tablespoons Dutch cocoa powder, sifted and combined with 1½ tablespoons hot tap water, cooled

            Light chocolate layer
            2 teaspoons Dutch cocoa powder, sifted and combined with 2 teaspoons hot tap water, cooled

            Whipped chocolate ganache
            500g good-quality dark chocolate (45-54% cocoa), chopped
            300ml pure (pouring / thin) cream

            Chocolate drip icing
            100g good-quality dark chocolate (45-54% cocoa), chopped
            100ml pure (think / pouring) cream
            2 tablespoons corn syrup

            Method
            1. To make the Cake layers, preheat the oven to 190°C (170°C fan-forced). Grease four shallow 20cm round cake tins with melted butter and line the bases with non-stick baking paper.
            2. Prepare the Dark, Milk and Light chocolate layer mixtures and set aside.
            3. Use an electric mixer to beat the butter, sugar and vanilla in a large mixing bowl until pale and creamy. Add the eggs one at a time, beating well after each addition (the mixture will look curdled at this stage).
            4. Sift together both the flours. Combine the milk and coffee mixture. Add half the flour mixture to the butter mixture and beat on lowest possible speed until just combined. Add the milk and coffee mixture and beat on lowest possible speed until just combined and then beat in the remaining flour mixture until just combined.
            5. Divide the cake batter between four bowls (each will have about 360 g of mixture). Add the Dark chocolate layer mixture to one portion and stir gently to combine. Add the Milk chocolate layer mixture to one portion and stir gently to combine. Add the Light chocolate layer mixture to one portion and stir gently to combine. Leave the fourth portion as it is
            6. Spoon each of the batters into a prepared tin and smooth the surface with the back of a spoon. Bake in preheated oven for 15 minutes. Swap the cake tins around and bake for a further 5 minutes or until a skewer inserted into the centres comes out clean.
            7. Stand the cakes in the tins for 5 minutes before turning onto a wire rack to cool (this will take about 30 minutes).
            8. To make the Whipped chocolate ganache, put the chocolate and cream in a heatproof bowl over a saucepan of simmering water (make sure the bottom of the bowl doesn’t touch the water). Stir often with a metal spoon just until the chocolate melts and the mixture is smooth. Immediately remove the bowl from the saucepan, cover with plastic wrap and place the fridge for 1-1½ hours, stirring briefly about every 5 minutes, or until cooled and thickened to a spreadable consistency. Use an electric mixer fitted with a whisk attachment to whisk the chocolate mixture in a medium bowl on low speed for 1-2 minutes or until light and fluffy (be careful not to over whisk).
            9. To assemble the cake, set aside about a quarter of the Whipped chocolate ganache in a bowl for piping. Place the Dark chocolate cake layer, top side down on a cake stand or serving plate. Spread evenly with about ⅓ cup of the remaining Whipped chocolate ganache. Repeat with the remaining cake layers (from darkest to lightest) with about ⅓ cup of the ganache between each. Spread the remaining buttercream over the top and sides of the cake, using a large palette knife to smooth. Place the cake in the fridge for at least 30 minutes to chill.
            10. To make the Chocolate drip glaze, place the chocolate in a heatproof bowl and set aside. Combine the cream and corn syrup in a small saucepan and heat over a medium heat, stirring frequently, until almost simmering. Pour over the chocolate and set aside for 1 minutes. Stir until smooth and well combined. Place in the fridge for 15 minutes, stirring occasionally, until almost cooled to room temperature.
            11. Spoon the Chocolate drip glaze onto the center of the chilled cake and use the back of a metal tablespoon to spread to cover. Gently push some of the glaze over the edge all the way around to form a drip pattern. Set aside in a cool spot for about 15 minutes or until the glaze is set before cutting.
            Baker's Tips
            • This cake will keep in an airtight container at room temperature in a cool spot for up to 3 days.
            How to decorate a cake with a drip glaze

            There are a few things to keep in mind when creating a luscious glossy drip glaze on a cake.

            Make sure the iced cake has been chilled for at least 30 minutes before decorating with the glaze as this will help the drips down the side of the cake set before reaching the base of the cake.

            Gradually spoon the slightly warm (it should be slightly warmer than room temperature) glaze onto the centre of the cake, allowing it to flow naturally towards the edge.

            Then use the back of a metal tablespoon to carefully ‘push’ the glaze towards the outside, smoothing the top and allowing small amounts of the glaze to flow over the edge and down the side of the cake to form a drip pattern.

            The key is to take it slowly, not add too much glaze at one time and don’t push too firmly with the spoon as the drips will become large and cover more of the side of the cake than you want.


            This recipe is from Anneka's SBS Food online column Bakeproof: Celebration Cakes. Click here for more Bakeproof columns and recipes.


            Photography by Alan Benson.

            Ombre Mocha Layer Cake
            • 1
            • …
            • 9
            • 10
            • 11
            • 12
            • 13
            • …
            • 17

            Follow @bakeclub_australia on Instagram

            Our partners

            SUBSCRIBE!
            contact us
            • info@bakeclub.com.au

            • FOLLOW US
            CUSTOMER INFORMATION
            • FAQ
            • Terms of Use
            • Privacy Policy
            • Terms of Service
            • Refund policy

            © 2025 BakeClub. All Rights Reserved.

            Site by Fruitful Creative.