
- home
- Products
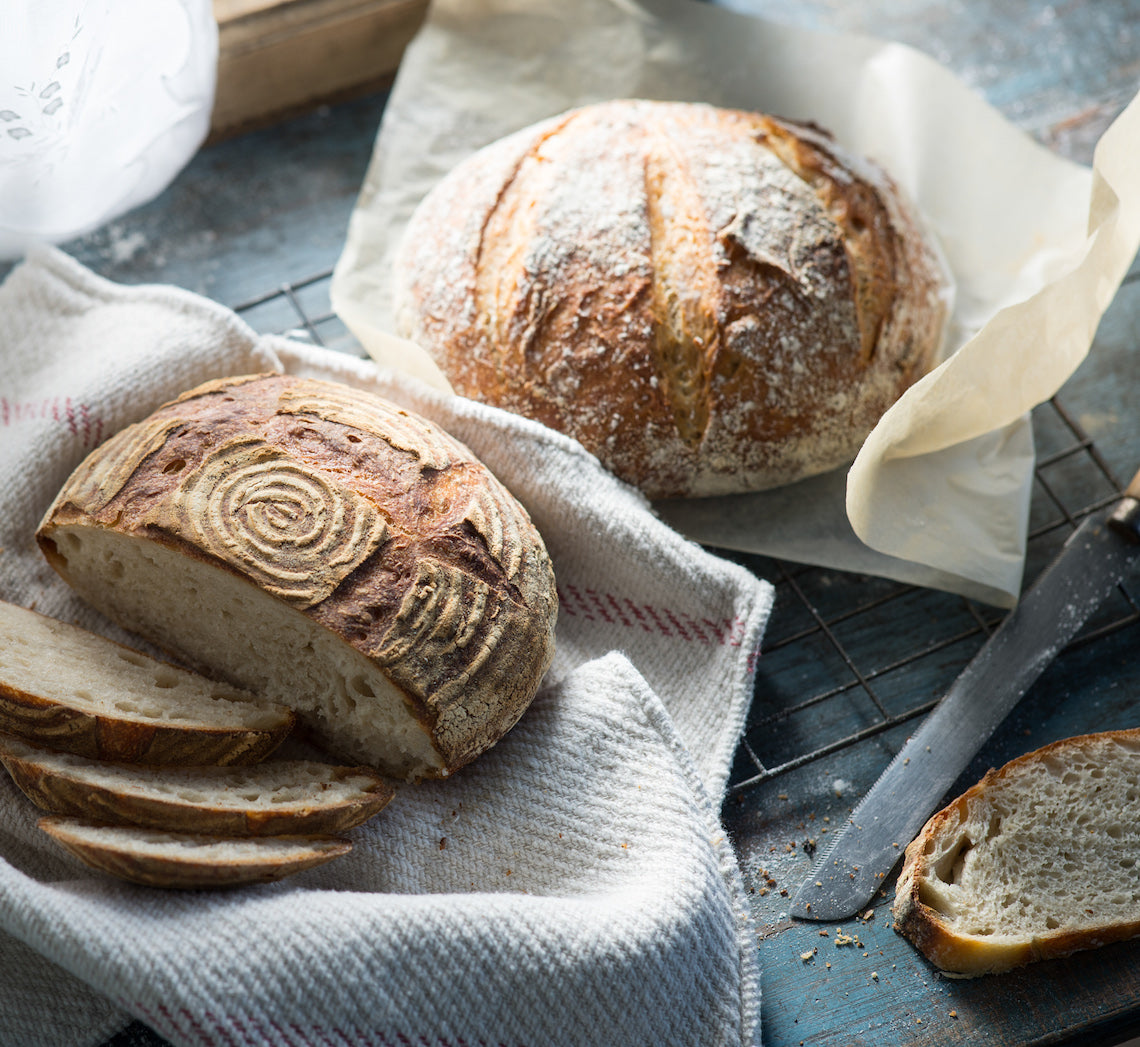
Prep 1hr (+12-14hrs / overnight + 30min standing, 8.5-10hrs proving and 1hr cooling time)Bake 45-50minMakes 2 standard loaves
This is a well-tested recipe to begin your sourdough baking. It's made with white flour but you can use spelt instead.
This recipe is one I have made many times with great results. Before you get started, read over my tips and tricks for making and baking sourdough bread.
It does take at least 24 hours from start to finish but time is what helps create a great loaf of sourdough. I have included some time variations throughout to allow the making of this sourdough fit more easily into your day. This dough is folded six times (not kneaded) with rests in between. Below is a timeline to help you map out your day of baking:
Feed your sourdough starter to get it active, 4–8 hours
↓ ↓
Make levain, stand 12 hours (overnight)
↓ ↓
Mix levain + dough, stand 1 hour
↓ ↓
1st folding, prove 30 minutes
↓ ↓
2nd folding, prove 30 minutes
↓ ↓
3rd folding, prove 30 minutes
↓ ↓
4th folding, prove 30 minutes
↓ ↓
5th folding, prove 30 minutes
↓ ↓
6th folding, prove 1 hour (or up to 4 hours)
↓ ↓
Cut into loaves, prove 1—2 hours
↓ ↓
Shape loaves, prove 2—3 hours
(OR prove 1 hour, then transfer to fridge for 12-14 hours)
↓ ↓
Bake at 240ºC for 20 minutes, then 220ºC for 20-25 minutes
↓ ↓
Cool (1 hour), slice, eat!
Ingredients
Strong bread or pizza flour (12-15% protein content), for dusting
Rice flour, for preparing proving baskets (optional)
Levain
50g active sourdough starter80g (80ml/⅓ cup) lukewarm water
75g (½ cup) strong bread or pizza flour (12-15% protein content)
Dough
500g (500ml/2 cups) lukewarm water700g (4⅔ cups) strong bread or pizza flour (12-15% protein content), plus extra for dusting
2½ teaspoons fine sea salt
Method
- To make the levain, combine the sourdough starter, water and flour (see image 2) in a medium bowl and mix until well combined. Cover with plastic wrap and stand in a warm, draught-free place (approx. 24.5- 28°C) overnight (12-14 hours). The levain should have expanded and be very bubbly and may even double (see image 3) when it is ready to use (see Baker’s Tips #1).
- To make the dough, transfer the levain to a large bowl. Add half the water and use a balloon whisk or spatula to break up the levain until almost smooth. Stir in the remaining water. Add the flour to the levain mixture, sprinkle over the salt, and stir with a wooden spoon until combined and a very shaggy dough forms (see image 4). Cover the bowl with plastic wrap and set aside in a warm, draught-free place (approx. 24.5-28°C) for 1 hour.
- Instead of kneading, you are going to stretch and fold the dough (see Baker’s Tip #2). Leave the dough in the bowl and use your fingertips to pick up the top side of the dough (furthest away from you), lift it up as you stretch it, and then fold it back on itself (see image 5). Turn the bowl a quarter turn and repeat this stretching and folding process three more times, turning the bowl after each fold. Cover with plastic wrap and set aside in a warm, draught-free place (approx. 24.5-28°C) for 30 minutes. Repeat this folding process five more times (which will be 6 foldings in total), resting the dough for 30 minutes between each time you fold (see Baker’s Tip #3). When you begin this process the dough will be unevenly textured and shaggy in appearance but will become less so as you continue to stretch, fold and rest/prove. Once all six folding, stretching and resting processes have been completed, the dough will be very smooth, spongy and elastic (see image 6).
- Once you have stretched and folded the dough a total of 6 times, cover and place in a warm draught-free place (approx. 24.5-28°C) for 1 hour or until well puffed (see Baker’s Tips #4).
- Gently turn the dough out of the bowl onto a well- floured surface, being careful not to deflate it. Use a sharp knife or a pastry scraper to cut the dough in half (see image 7). Use well-floured hands or a pastry scraper to shape each dough portion into a loose round. Cover each dough round with an upturned bowl (large enough so the dough has room to rise) (see image 8) and leave to rest for 1 1⁄2-2 hours or until well puffed.
- Dust 2 clean, loosely woven cloths or tea towels generously with flour and then use your fingers to rub the flour into the cloth (see images 9). Line two 19-22cm (top measurement) round dough proving baskets or colanders with the cloths. If using traditional proving baskets, you don’t need to line them with a cloth (particularly if you want the bread to take on the lovely pattern of the basket), just dust and rub the insides of the baskets generously with rice flour and/or bread flour.
- Dust the top of one of the dough portions with flour. Turn it over and then use a similar folding action in Step 3 to shape into a round loaf, pulling the edges of the dough into the centre so that the dough surface underneath is tight to help shape it, only folding 6 times to help retain as much air as possible (see images 10-11). Gently turn the loaf over again (so that the smooth surface is on top) and use the palms of your hands to shape and even the round, stretching the top surface of the dough towards its base (see image 12). Be firm yet gentle when shaping the dough – you want to form the dough so it holds its shape but not be too forceful that you lose the valuable air bubbles (your technique will improve with practise). Repeat with the remaining dough portion. Dust the top of the loaves with a little more flour and use the palm of your hand to gently spread it over the top and sides to coat. Carefully turn each loaf over and lift into a proving basket or colander, top side down (see Baker’s Tip #5). If using cloths, loosely fold the overhanging edges over the dough.
- Place each of the loaves in their baskets or colanders in sealed plastic bags (see Baker’s Tip #6). Set aside in a warm draught-free place for 2-3 hours to prove or until well risen (see Baker’s Tip #7) (see image 13).
- Preheat the oven to 240ºC (220ºC fan-forced) (read tips here). Line two heavy baking trays with non-stick baking paper (see Baker’s Tips #8).
- Very gently turn a loaf onto a lined tray so that you retain as much air as possible, leaving the second loaf in the proving basket (see Baker’s Tip #9). Use a bread lame or very sharp knife to score the surface of the loaf, about 1.5cm deep, in a pattern of your choice (see image 14). Dip your hand in water and flick it onto the top of the loaf to sprinkle three times. Place the loaf in the oven, thrown a small bowlful of ice cubes into the bottom of the oven and immediately close the door (see Baker’s Tip #10). Bake for 25 minutes.
- Reduce the oven temperature to 220°C (200°C fan-forced) and bake for another 20-25 minutes or until the crust is deeply coloured and the loaves sound hollow when tapped on the base. Transfer the loaves to a wire rack and set aside to cool completely before slicing.
Baking in a Covered Pot
If baking your dough in a covered pot preheat it with the oven. Turn the dough out of the proving basket onto a piece of non-stick baking paper large enough to line the base and sides of the pot. Sprinkle the dough with water as in Step 10. Carefully lift the bread dough into the heated pot and score the top as desired. Cover with the lid and bake in the preheated oven for 25 minutes. Remove the lid and bake, without reducing the oven temperature, for a further 25 minutes or until a deep golden and the loaf sounds hollow when tapped on the base.
If wanting to brown the base crust further, remove the bread from the pot and place directly on the oven rack, without the baking paper, and bake for a further 5-10 minutes.
Spelt sourdough variation
Replace the strong bread or pizza flour with wholemeal spelt flour. Note, because of the lower gluten content of spelt wholemeal flour the resulting bread will be heavier and less ‘holey’ than the basic sourdough loaf. However, it will have a wonderful pleasant earthy flavour.
Baker's Tips
#1. When the levain is ready to use, a small teaspoon of it dropped into a glass of water should rise to the surface. This indicates that the levain is active and strong enough to produce enough carbon dioxide for it to be light enough to float.
#2. Stretching and folding the dough, along with the multiple resting/proving times in this recipe, replaces the kneading process to strengthen the gluten network in the dough, and produces a bread with quite large, uneven
air pockets and a great texture. The dough will be quite sticky and rubbing your fingers with a little water before stretching the dough will help stop it from sticking to them.
#3. It is particularly easy to lose track of how many times you have folded your dough. To make sure you don’t lose track, use a permanent pen to put a mark on the plastic wrap covering your dough, or write on a sticky note attached to the bowl, each time you finish a folding. Always remember to reset your timer too.
#4. In Step 4, you may need to stand/prove the dough for up to 4 hours depending on the proving temperature.
#5. Before adding the dough to the proving baskets or colanders make sure the surface of the dough is well floured – if it isn’t, it is likely to stick and the dough can lose valuable volume when you go to remove it which can result in a densely textured bread.
#6. Recycled plastic shopping bags or large snaplock bags work well to seal the dough in the basket or colander for the last proving stage. Sealing them in the bags means that the surface of the dough won’t dry out during proving. It will also help retain some of the heat generated by the yeast fermenting, helping to create a warm environment for your dough to prove in.
#7. When ready to bake, the dough will have risen by at least 50% and when poked with a finger a small indent will be left which will spring back slightly.
In Step 8, you can prove the loaves for 1-2 hours, or until risen slightly, in a warm draught-free place and then place them in the fridge overnight for 12-14 hours, if you wish. Stand the dough at room temperature in the baskets for 2-4 hours before turning out and baking.
#8. You can also bake the bread in a covered pot. See 'Baking in a Covered Pot' above.
#9. If you don’t have a large oven, it’s a good idea to bake the loaves separately. Leave the second loaf in the proving basket in the fridge while the first one bakes.
#10. If not baking your bread in a covered pot you can create steamy heat either by adding a tray with 1cm of water in the bottom of the oven before preheating it (as mentioned in Step 9) or by quickly throwing a bowlful of ice cubes into the bottom of your oven after adding your loaf and then immediately shutting the door. This will help give your bread the best possible ‘oven spring’ or rise when baking as well as contributing to a thick, crunchy crust (read tips here under 'Baking your Bread' to discover why).
This recipe is part of Anneka's SBS Food Bakeproof: Sourdough online column. For more Bakeproof columns and recipes, click here.
Photography by Alan Benson.
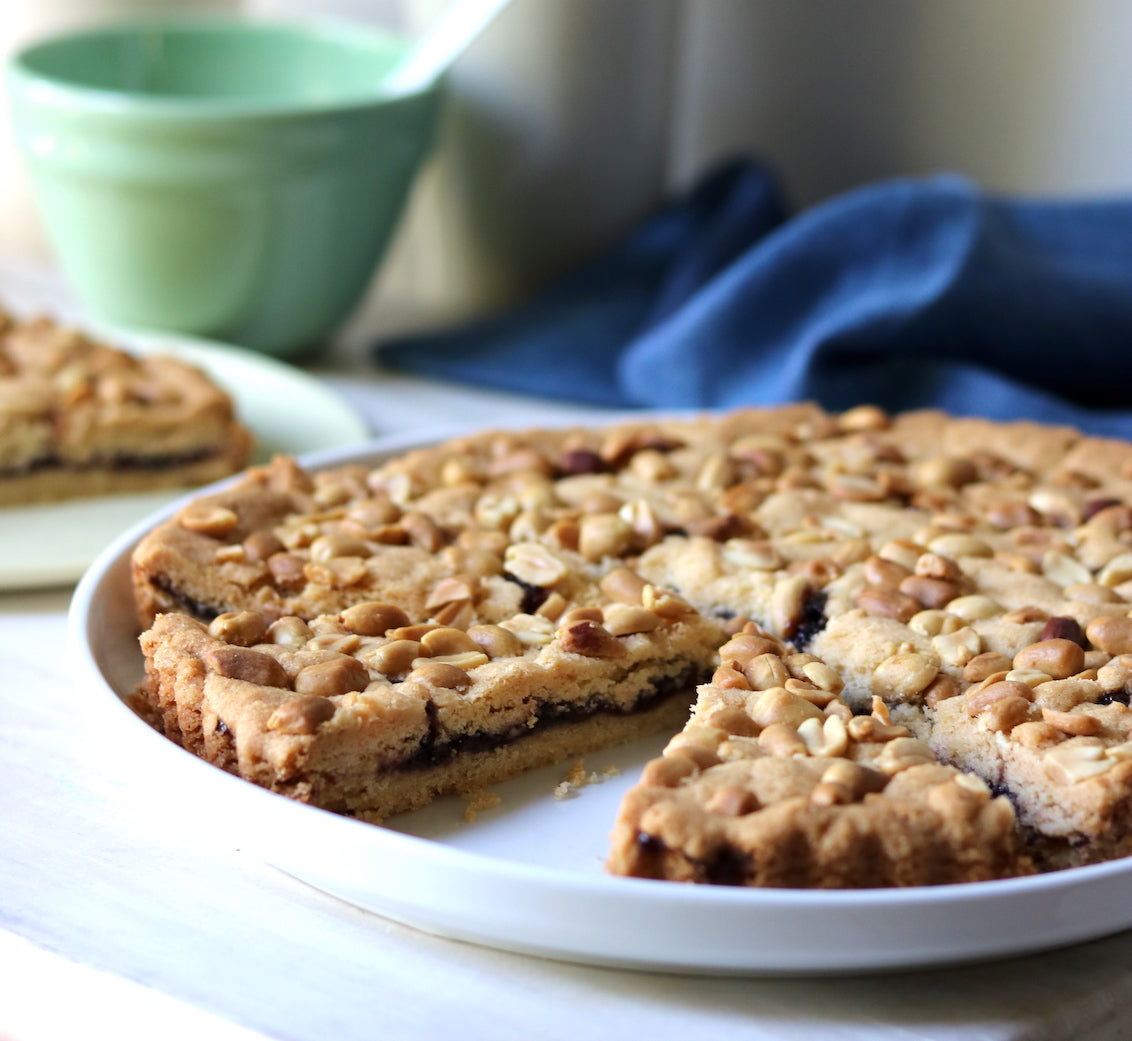
Prep 20min (+cooling time)Bake 35-40minMakes 8-10 serves
I love this tart – a no-fuss, slice-like affair of buttery shortbread layers filled with jam and nuts. Research has revealed no reason why this tart is Belgian, but it brings back vivid childhood memories of my mum, Jocelyn, making it in two enamel plates, throwing them in the oven and then, once cool, covering them with foil to take to a picnic or tennis day. I remember it so clearly when I make the tart now (with a few small alterations) in my own kitchen.
Ingredients
185g (6½oz) salted butter, softened slightly
150g (5¼oz) caster sugar
1 egg yolk
1 teaspoon natural vanilla essence or extract
260g (9¼) plain flour
1 teaspoon baking powder
165g (5¾oz) mixed berry jam (see Baker’s Tips)
70g (½ cup/6oz) unsalted raw peanuts (or nuts of your choice)
Method
- Preheat the oven to 160°C/315°F (140°C/285°F fan-forced).
- Put the butter and sugar in the bowl of a food processor and process until well combined. Add the egg yolk and vanilla and process to combine, scraping down the side of the bowl if necessary. Sift together the flour and baking powder. Add to the butter mixture and use the pulse butter to process until just combined and a soft dough forms.
- Press half of the mixture evenly over the base of an ungreased 23cm/9in tart tin with removable base. Spread evenly with the jam, leaving a 2cm/¾in border. Press portions of the remaining dough between your hands to flatten and press over the jam to cover, patching where necessary. Sprinkle with the peanuts and press into the dough.
- Place the tart tin on a baking tray and bake in preheated oven for 35-40 minutes or until golden and cooked through. Leave the tart to cool in the tin and then serve in wedges.
Baker's Tips
- Mum used to make this tart with apricot jam instead of the mixed berry I have used in this recipe but any jam variety works well – fig, blackberry, raspberry - just pick your favourite.
- This tart will keep in an airtight container at room temperature for up to 4 days.
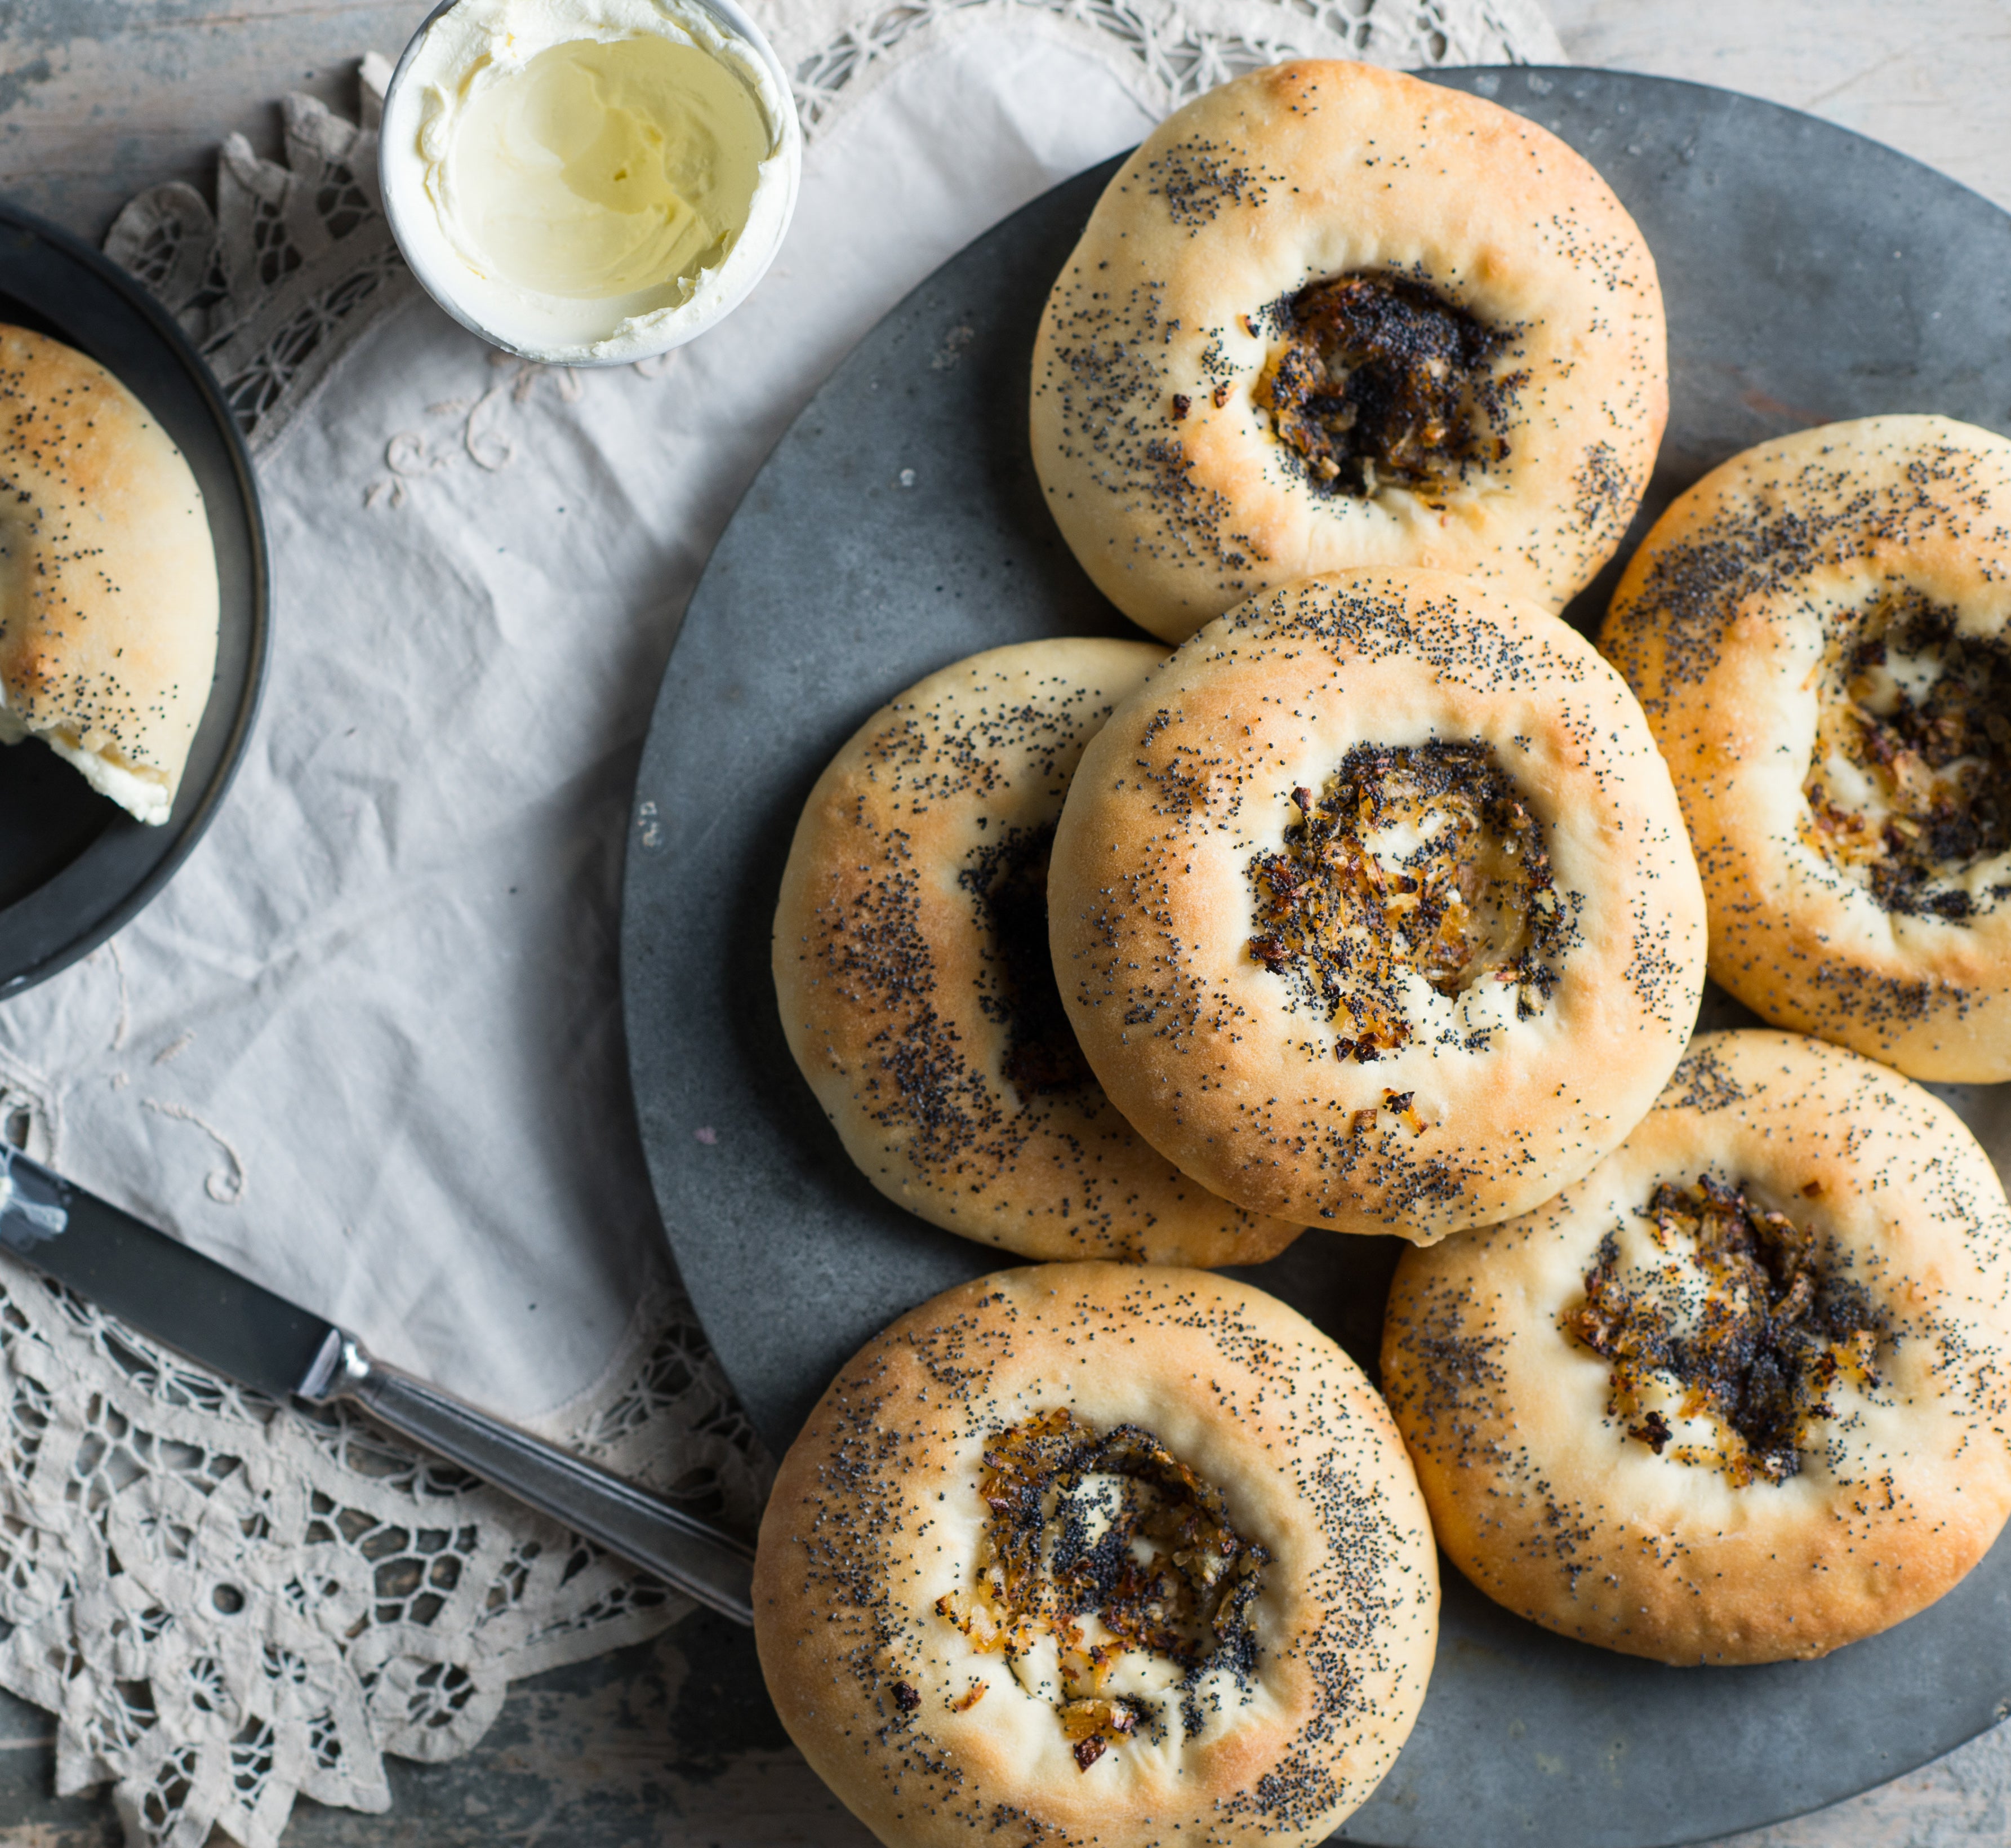
Prep 45min (+ 3hr 15min proving time)Bake 14minMakes about 8
They get their name from where they originated in the city of Białystok in north-eastern Poland. They are best eaten the day they are baked (even better warm) and spread with cream cheese or butter.
Ingredients
500ml (2 cups) lukewarm water
7g (1 sachet) instant dried yeast
2 teaspoons caster sugar
450g (3 cups) strong bread or pizza flour, plus extra to dust
340g (2¼ cups) plain flour
3 teaspoons fine salt
olive oil, to grease
Onion and poppy seed topping
1 tablespoon olive oil
1 medium brown onion, finely diced
½ teaspoon fine salt
2 tablespoons poppy seeds
Method
- Combine 60ml (¼ cup) of the lukewarm water with the yeast, sugar and 2 tablespoons of the bread flour in a small bowl and use a fork to whisk to combine. Set aside in a warm, draught-free place for 5 minutes or until the mixture is frothy.
- Combine the remaining bread flour, plain flour and salt in a large bowl. Combine the yeast mixture with the remaining water, add to the flour mixture and use a wooden spoon and then your hands to mix to a soft dough.
- Turn the dough onto a lightly floured surface and knead for 10 minutes or until it is smooth and elastic and springs back when you push your finger into it (see Baker’s Tips).
- Brush a large bowl with olive oil to grease. Add the dough turning it to coat lightly with olive oil. Cover with plastic wrap and place in a warm, draught-free place for 1½ hours or until doubled in size.
- When the dough has doubled in size knock it back by punching it in the centre with your fist. Recover with plastic wrap and place in a warm, draught-free place for 60 minutes or until doubled in size again.
- Line 2 large oven trays with non-stick baking paper. Turn the dough onto a lightly floured surface and knead briefly to bring the dough together. Divide the dough evenly into 8 equal portions and shape each into a ball. Use your hands to press, pinch and stretch a ball of dough into a disc about 12cm in diameter and 1cm thick. Repeat with the remaining balls of dough, placing them on the lined oven trays about 4cm apart. Cover with plastic wrap and set aside in a warm, draft-free place for 30 minutes or until risen by about half their volume.
- Preheat the oven to 210°C (190°C fan-forced). Meanwhile, to make the onion and poppy seed topping, place the olive oil, onion and salt in a small frying pan over medium heat and cook for 8-10 minutes until the onion is soft and starts to become golden. Remove from the heat.
- Use lightly floured fingertips to make an indent in the centre of the dough discs, leaving a 2cm border around the outside. Spoon the onion mixture into the indents, dividing evenly, and then sprinkle with the poppy seeds. Cover with a slightly damp tea towel and set aside in a warm draught-free place for 15 minutes or until slightly puffed.
- Bake in preheated oven for 12-14 minutes or until lightly golden and cooked through (see Baker’s Tips). Serve warm or at room temperature, spread with cream cheese or butter.
Baker's Tips
- You can also knead the bread dough in step 2 in an electric stand mixer fitted with a dough hook. Knead on lowest possible speed for 5-6 minutes or until smooth, elastic and the dough has come away from the sides of the bowl and the bowl is clean.
- Over-baking the bialy will cause them to become dry, so make sure you remove them from the oven as soon as they are baked through.
- These Bialy are best eaten the day they are made however they do freeze well. Seal in a freezer-proof plastic bag and freeze for up to 3 months. Thaw at room temperature and reheat by wrapping individually in foil and placing in an oven preheated to 160°C (140°C fan-forced) for 10 minutes or until heated through. Serve warm.
This recipe is part of Anneka's SBS Food Bakeproof: Jewish Baking online column. For more Bakeproof columns and recipes, click here.
Photography by Alan Benson.
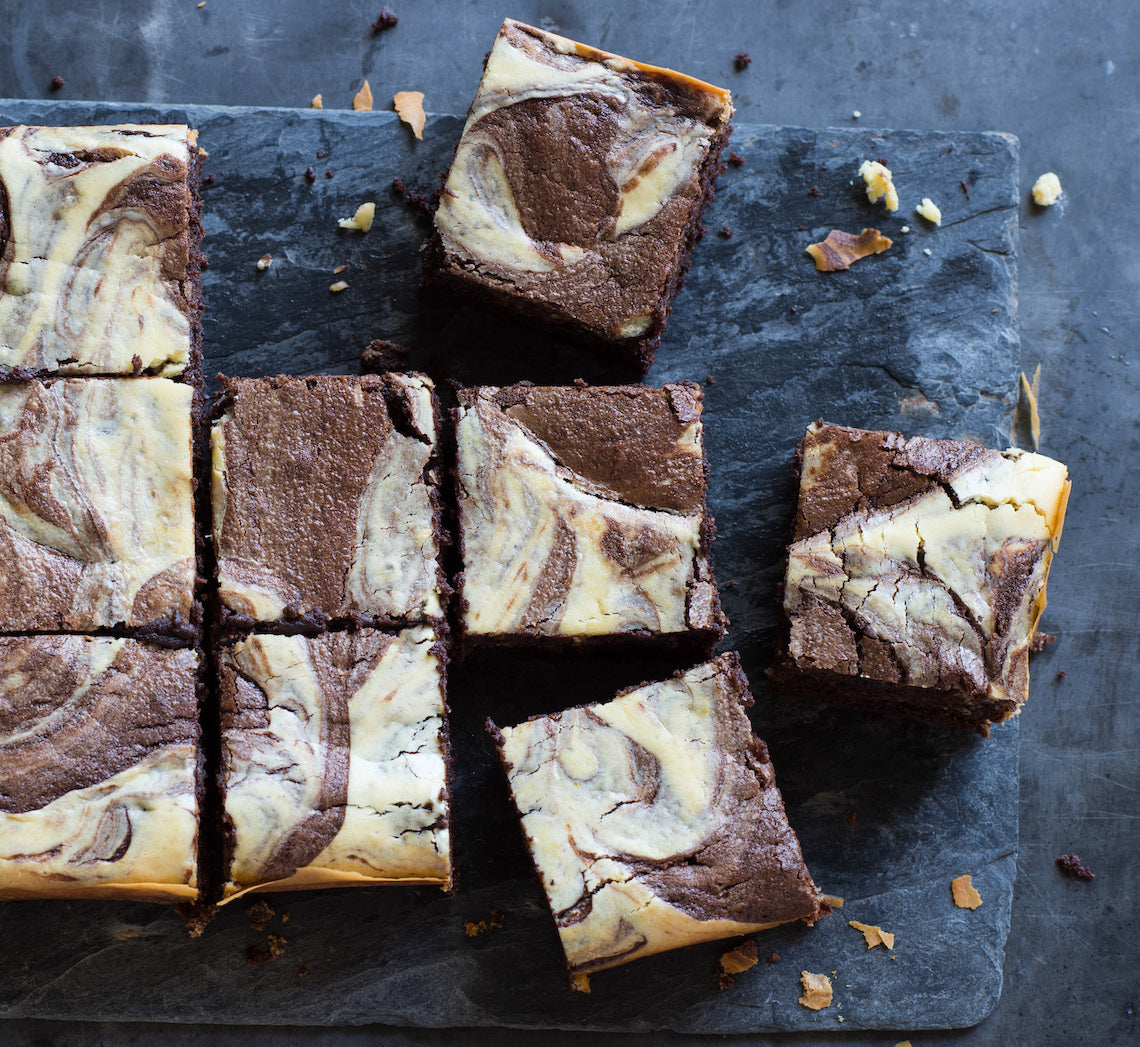
Prep 25min (+ 1hr cooling time)Bake 45-50minMakes about 15
Essentially these fudgy brownies are marbled with an orange-scented cheesecake and they appear far more difficult to make than what they actually are. Perfect with a cuppa or a dollop of cream for dessert these brownies will satisfy any chocolate craving.
Ingredients
Brownie Base
Melted butter, to grease
250g (9oz) good-quality dark chocolate (45-54% cocoa), chopped
150g (5¼oz) salted butter, cubed
165g (¾ cup/5¾oz) caster sugar
3 eggs, at room temperature, lightly whisked
75g (½ cup/2¾oz) plain flour
30g (¼ cup/1oz) cocoa powder
¾ teaspoon baking powder
Cheesecake Topping
200g (7oz) cream cheese, at room temperature
30g (1oz) salted butter, at room temperature
1 tablespoon finely grated orange zest
55g (¼ cup/2oz) caster sugar
1 egg yolk, at room temperature
Method
- Preheat oven to 160ºC/315°F (140ºC/285°F fan-forced). Grease a 16cm x 26cm (6¼in x 10½in) shallow slice tin with melted butter and line the base and long sides with one piece of baking paper.
- To make the Cheesecake Topping, use an electric mixer to beat the cream cheese, butter and orange rind in a medium bowl until creamy and smooth, scraping down the sides of the bowl when necessary. Add the sugar and beat until well combined. Add the egg yolk and beat well. Set aside.
- To make the Brownie Base, place the dark chocolate and butter in a medium heatproof bowl over a saucepan of gently simmering water (don’t let the base of the bowl touch the water). Stir occasionally until chocolate and butter melt and the mixture is smooth. Remove bowl from saucepan. Add the sugar and eggs and use a balloon whisk or wooden spoon to stir until well combined. Sift together the flour, cocoa powder and baking powder. Add to chocolate mixture and stir until just combined.
- Spoon half the Brownie Base mixture into prepared tin and spread evenly. Drop spoonfuls of almost all the Cheesecake Topping randomly over the brownie mixture. Top with spoonfuls of the remaining brownie mixture and then the remaining topping mixture. Tap the tin on the benchtop to settle the mixture. Use a butter knife or palette knife to swirl the two mixtures together to create a marbled effect and then tap on the bench again if necessary.
- Bake in preheated oven for 45-50 minutes or until moist crumbs cling to a skewer inserted in the centre. Remove from the oven and cool in tin on a wire rack (this will take about 1 hour).
- Carefully remove brownie from the tin using the baking paper to lift it out. Cut into portions to serve.
Baker's Tip
- These brownies will keep in an airtight container in the fridge, for up to 5 days. Serve at room temperature.
This recipe is from Anneka's SBS Food online column, Bakeproof: Easy Chocolate Cakes. CLICK HERE for more Bakeproof recipes.
Photography by Alan Benson.
Prep 11/2hr (+ macaron prep)Bake 18-20min (per batch)Makes 10 serves
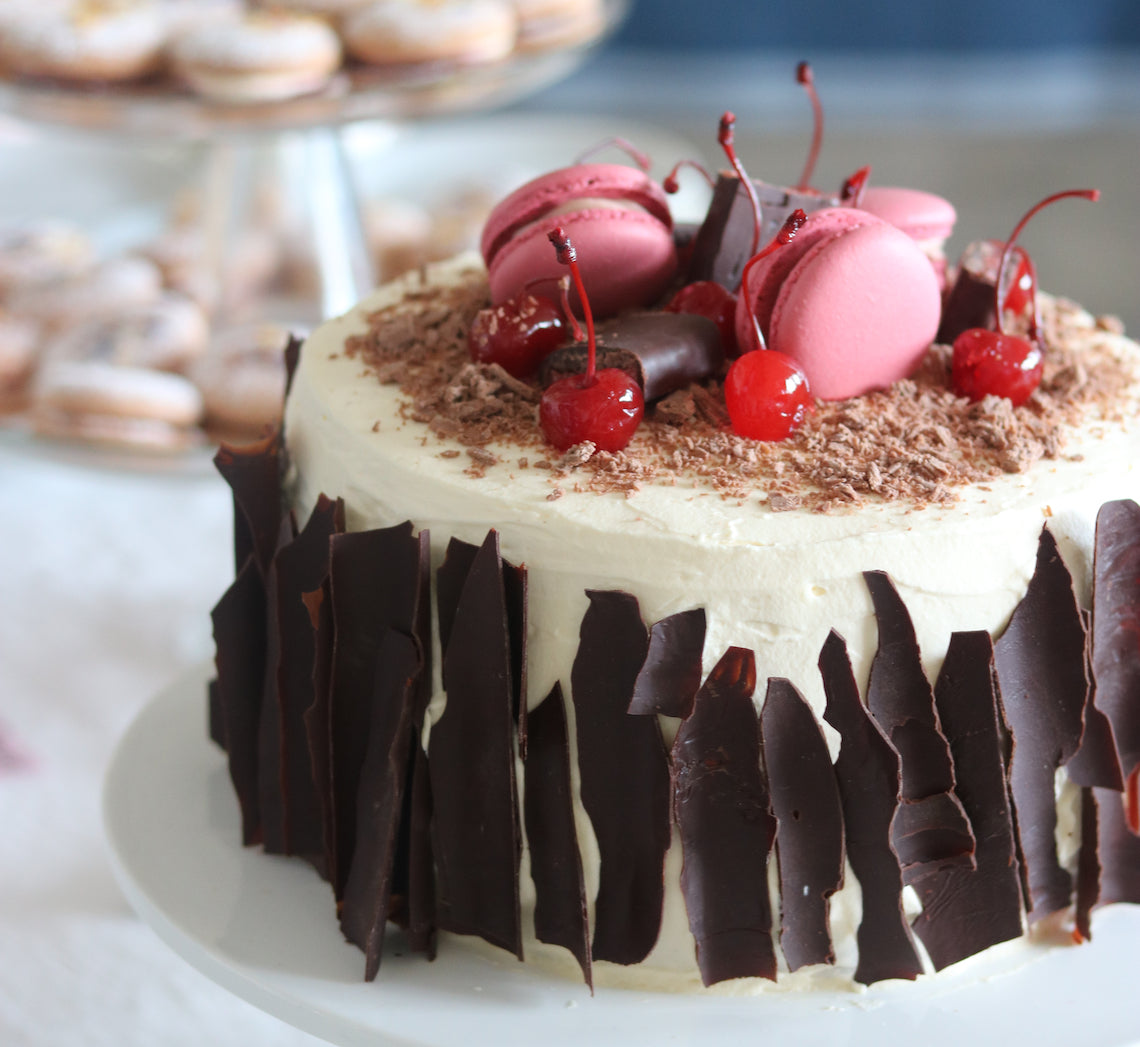
Created by Make Me a Baker student, Allen Au for his graduation, this cake is certainly a show stopper.
Before starting the program Allen had always found making sponge cakes challenging and had almost given up on ever making another again. But, he set himself the challenge of perfecting a sponge and creating a version of Black Forest cake that his wife had always wanted him to. The result was a modern cake bursting with flavour and showcasing Allen's newly-acquired baking skills!
The sponge cake in this recipe is a version of the one students learn to make during the Make Me a Baker program.
Ingredients
Chocolate Sponge Cake (2 layers)
Melted butter, to grease
4 eggs, at room temperature
150g caster sugar
60ml milk
30g salted butter
110g self-raising flour
30g cocoa powder
Chocolate Sponge Cake (1 layer)
Melted butter, to grease
2 eggs, at room temperature
75g caster sugar
30ml milk
15g salted butter
55g self-raising flour
15g cocoa powder
Kirsch Syrup
80g caster sugar
90ml water
60ml kirsch
To Assemble
900ml thickened cream
200g cherry jam
1½ x 680g jars pitted Morello cherries, drained
To Decorate
Chocolate bark (see Baker's tips)
10 Maraschino cherries with stems, drained
2 Cadbury Cherry Ripe double-dipped chocolate bar, cut into 3-4 pieces
1½ Cadbury Flake bar, broken into fine pieces
3 cherry macarons (get Allen's Cherry Macaron recipe HERE)
Chocolate Sponge Cake Layers
- To make the Chocolate sponge cake layers, place the oven rack in the oven so that the cake tins will sit in the middle of the oven and then preheat to 180°C (160°C fan-forced). Brush two 20cm shallow cake tins with melted butter to grease and line the base of each with a sheet of non-stick baking paper. You will need to reuse one of the cake tins to make the third sponge layer later.
- To make the first two layers of sponge, use an electric mixer with a whisk attachment on medium-high speed to whisk the 4 eggs in a large bowl until frothy. Add the sugar a spoonful at a time, whisking well after each addition, until the mixture is very thick and pale (this will take about 8 minutes). Lift the whisk out of the mixture and draw a figure eight. If the trail stays on the surface long enough to finish drawing, then the mixture is ready. If not, continue to whisk for a further minute.
- Meanwhile, heat the milk and butter in a small saucepan over medium heat until almost simmering. Remove from the heat and pour the warm milk mixture down the side of the mixing bowl. Quickly sift the flour and cocoa powder together over the egg mixture and then immediately whisk again with the electric mixer on low speed briefly until the flour mixture is just incorporated (be careful not to overmix). Scrape the base of the bowl and then whisk briefly again, if necessary.
- Divide the mixture evenly between the cake tins (see Baker’s tips) and gently tap the tins on the benchtop three times to settle the mixture. Bake in preheated oven for 18-20 minutes or until the cakes spring back when lightly touched in the centre and start pulling away from the sides of the tins. Remove from the oven and immediately use a small palette knife to loosen the sides of the sponges from the tins and turn onto a wire rack to cool completely.
- Repeat steps 1–4 using the ingredients to make one more layer of sponge.
Kirsch Syrup
- Combine the caster sugar and water in a small saucepan. Stir over medium heat until the sugar dissolves. Bring to the boil and then remove from the heat. Stir in the kirsch. Set aside to cool to room temperature.
To Assemble
- When ready to assemble the cake, use a stand mixer or electric hand mixer with a whisk attachment to whisk the cream until soft peaks form. Place one of the sponge layers on a serving plate or cake stand. Use a pastry brush to generously brush the whole top surface with about one-third of the kirsch mixture. Spread half the jam over the top and then spread with enough whipped cream to create a layer about 1cm thick. Sprinkle with half the drained morello cherries. Repeat with the remaining sponge layers, kirsch syrup, morello cherries and cream layer, finishing with a sponge layer and kirsch syrup.
- Spread the remaining whipped cream over the sides and top of the cake to cover.
- To decorate, attach the chocolate bark to the outside of the cake. Decorate the cake with the Maraschino cherries, chocolate bars, and macarons.
Baker's Tips
- To divide the mixture evenly between the tins, weigh the tins with the mixture in them to make sure they are the same weight.
- To make chocolate bark, spread melted dark chocolate thinly over a piece of baking paper, making sure the width is similar to the height that your final cake will be. Place a second piece of baking paper over the chocolate to cover. Roll the two sheets of baking paper together into a thin cylinder. Secure with bulldog clips or pegs on both ends. Place in the fridge until set and ready to use. To use the chocolate bark, carefully remove the baking paper and break to desired widths.
$100.00/pp
more info- Products -
Bread 101 is a self-paced course and is now open for enrolment.
Discover the secrets of bread baking and demystify the world of baking with yeast in this fun and informative online baking course!
This is a great value for money course! Using Anneka’s tips and tricks will really help improve your bread making and confidence and show you how easy it is to make a range of delicious breads. The [video] session was great for seeing the techniques in action, and the follow up homework was a pleasure to do (and eat!) ... Overall this was an excellent course and all the resources were so useful, I know I will use them again and again.
Vanessa, South Australia
Discover the ins and outs of bread and yeast baking – right in your very own kitchen!
Bread 101 is a fun and informative online baking course that will take you through the basics of bread baking, demystifying the world of baking with yeast.
Anneka Manning will take you through the process and share her more than 35 years of baking experience and knowledge, as well as all her practical tips and tricks.
The course includes a 3-hour masterclass pre-recorded video (which was previously recorded as a Live Session), which enables you to take part in this course entirely at your own pace. Not only does the video include full step-by-step instructions for making a Basic White Milk Bread, as well as variations, but you will have the ability to bake along in your own time and have access to all the questions that were answered during the session.
This virtual masterclass is supported by printable recipes and resources which will become your go-to bread baking kit. Along with the Basic White Milk Bread recipe and variations (including dinner rolls and fruit bread), Anneka also shares a delicious Herb and Cheese pull-apart bread, a wholesome Seeded Wholemeal Loaf and divine Sticky Cinnamon Scrolls.
At the end of this course, you will come away not only with new-found confidence but all the knowledge you need to add bread baking to your list of baking skills!
Dates
Bread 101 is a self-paced course and is now open for enrolment.
Please note: The video included in this course is a pre-recorded 3-hour video of a previous Live Session.
If you're interested in joining in a future LIVE class and would like to be notified when new dates are released, please fill out your details at the bottom of this page.
I had tried making bread and had failures. This course gave me the extra tips and working along in real time helped to see exactly where I should be at rather than relying on a picture ... I learnt a lot and didn't need to leave home!
Mary, Victoria
Cost
$100
Who is this class suitable for?
This class is, quite simply, suitable for everyone – from absolute beginners to more experienced bakers who want to brush up on their bread-making skills. As this class is completed online, it is suitable for students from all over the world.
What will I get?
- A 3-hour pre-recorded masterclass video where you can bake along with Anneka Manning and learn how to make a Basic White Milk Bread, as well as a number of variations
- Membership to BakeClub's exclusive The Kitchen Table online group
- Access to Anneka's 35+ years of baking experience and knowledge through The Kitchen Table and the ability to ask any baking-related questions
- A thorough understanding of how to make bread and how to apply what you’ve learnt to be able to troubleshoot in the future and ensure baking success
- Invaluable printable information sheets and recipes
- Lifetime access to the video and course material
- A chance to (virtually) meet like-minded people and share your baking with The Kitchen Table online group
- Baking confidence, knowledge and skill to use regularly at home
What will I learn?
This class will cover the basics of bread baking and baking with yeast and will include:
- The difference between dried instant and fresh yeast and how to use both
- Demystifying bread-making terminology
- Why gluten is important in bread doughs
- The ins and outs of the kneading method
- How and why you need to prove your dough
- How to create the best 'proving' environment for your dough
- How to use your stand mixer to knead
- Options for glazes and finishes
- Storing your bread
How does a self-paced course work?
This online course is completely self-guided. Upon enrolment, you will gain access to the course content which you can work through at your own pace. You can log on whenever it is convenient for you and watch the video and bake the recipes entirely in your own time. You will have lifetime access to all the recipes, videos and printable information sheets.
There is the option to connect with Anneka and other bakers via Facebook through BakeClub's exclusive The Kitchen Table membership groups. This way you can share your experience and support each other as your confidence and skills grow.
[This] course offered a whole new level of real learning. I loved the explanations of why things are done, along with the opportunity to ask questions. I've followed YouTube videos, but they don't help with adjusting or tailoring recipes for things like the availability of different ingredients or equipment ... [This course] can take your bread game to the next level, turning 'Okay' loaves into 'Is there any more?' loaves!
Sally, Victoria
If you are interested in joining a future LIVE class, please fill out your details below and we will be in touch when new dates are released.

Prep 30minBake 25-30minMakes 10
There’s something deeply comforting about a classic Anzac biscuit – but this version takes it somewhere truly special. By browning the butter first, you unlock a rich, nutty depth that weaves through every bite, enhancing the caramel notes of the sugars and golden syrup. The result is a beautifully balanced biscuit: generously sized, with crisp golden edges, and a slightly soft, chewy centre. It’s a simple twist, but one that transforms a familiar favourite into something a little more indulgent and irresistible.
Ingredients
150g (1 cup/5¼oz) plain flour
120g (1¼ cups/4¼oz) rolled oats (see Baker's Tips)
65g (¾ cup/2¼oz) desiccated coconut
110g (½ cup, firmly packed/4oz) brown sugar
75g (⅓ cup/2¾oz) caster sugar
160g (5¾oz) salted butter, diced
2 tablespoons golden syrup
2 tablespoons (40ml/1⅓fl oz) water
1 teaspoon bicarbonate of soda
1 teaspoon natural vanilla essence or extract
Method
- Preheat oven to 160°C/315°F (140°C/285°F fan-forced). Line 2 large oven trays with baking paper.
- Put the flour, rolled oats, coconut, brown sugar and caster sugar in a large mixing bowl and stir to combine.
- To make the brown butter, place the butter in a small saucepan or frying pan. Heat over medium-low heat until the butter melts and starts to bubble and sizzle. Continue to cook gently over medium-low heat until the butter goes quiet and starts to foam, and the milk solids start to turn a golden brown. During cooking it’s important to stir frequently (a wooden spoon, spatula or whisk will all work well) at the start and then constantly towards the end so that the butter browns evenly and the milk solids don’t get caught on the base of the saucepan and burn. Once the milk solids have turned a deep golden brown and you notice a nutty aroma, remove immediately from the stove and pour the butter into a heatproof bowl – this will stop the butter from browning further and prevent it from becoming bitter.
- Add the golden syrup and water to the hot browned butter and stir to combine. Add the bicarbonate of soda and stir to combine – this mixture will foam. Add to the dry ingredients and stir with the wooden spoon until well combined.
- Roll large spoonfuls of the mixture (75g/2¾oz each) into balls and place 5 on each of the lined trays, allowing plenty of room between them for spreading. Use your fingers to flatten the balls until about 1cm/½in thick and about 8cm/3¼in diameter.
- Place the trays of biscuits in the preheated oven and bake for 12 minutes. Remove the biscuits from the oven and use a 10cm/4in round cutter to draw the edges of a biscuit towards the centre so that the cutter can fit around the biscuit. Then use a gentle rotating motion to shape the biscuit into a uniformed round. Repeat with the remaining biscuits while they are still hot. (See Baker's Tips.)
- Return the biscuits to the oven, swapping the trays, and bake for a further 13-18 minutes or until deep golden and cooked through (the longer they are baked the more crisp they will be once cooled). Remove the biscuits from the oven and allow to cool on the trays.
Baker's Tips
- Rolled oats can vary in thickness and texture between brands. I find Uncle Toby’s oats are thinner and softer than most, and they work particularly well in these biscuits.
- Using a round cutter to reshape the biscuits during baking helps create a more even shape and thickness, so they bake more uniformly. If you prefer, you can skip this step and simply swap the trays after 12 minutes – the biscuit edges will just be a little thinner, crisper and more deeply golden once baked.
- These biscuits will keep in an airtight container at room temperature for up to 1 week.
Prep 25min (+1hr 10min cooling time)Bake 40-45minMakes 8-10 serves
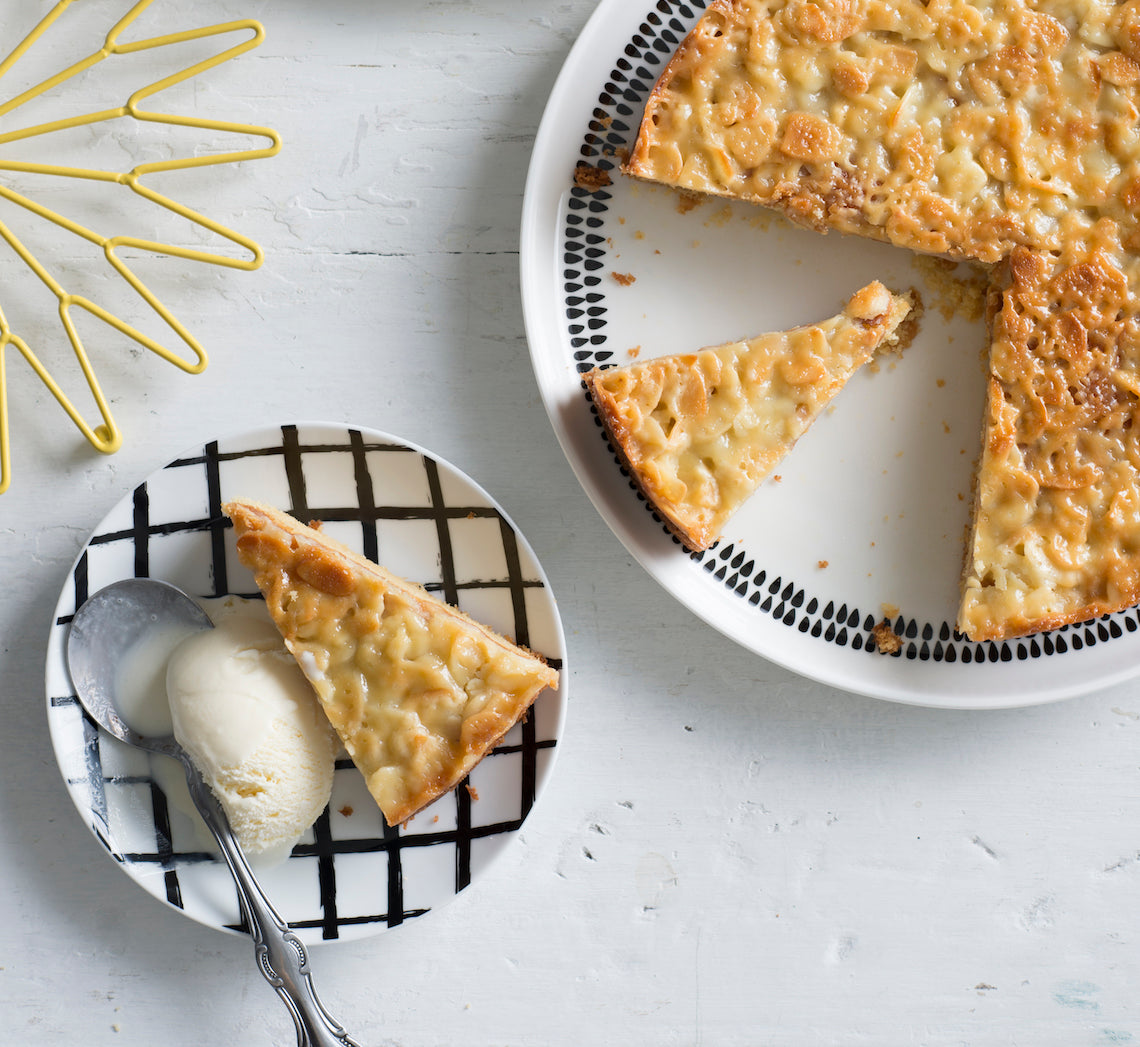
One of Scandinavia’s most loved cakes, both Sweden and Denmark have their own version of this wonderful cake (and, like all great cakes, the origins are unclear). A rich, buttery, moist cake topped with a crisp caramel-almond Florentine-like topping it is simply too good to care too much about its origins!
Ingredients
Melted butter, to grease
50g (5¼oz) butter, at room temperature
110g (½ cup/4oz) caster sugar
1 teaspoon natural vanilla extract or essence
2 eggs, at room temperature
150g (1 cup/5¼oz) plain flour
1 teaspoon baking powder
80ml (⅓ cup/2½fl oz) milk
Vanilla ice-cream or thick cream, to serve
Caramel almond topping
70g (2½oz) butter, cubed
75g (⅓ cup/2½oz) caster sugar
70g (⅔ cup/2½oz) flaked almonds
2½ tablespoons (50ml/1¾fl oz) pure cream
1½ tablespoons plain flour
Method
- Preheat the oven to 170°C/340°F (150°C/300°F fan-forced). Grease a 22cm/8¾in springform tin with melted butter and line the base with non-stick baking paper.
- Use an electric mixer to beat the butter, sugar and vanilla in a large bowl until pale and creamy. Add the eggs one at a time, beating well after each addition. Sift together the flour and baking powder. Add half the flour mixture to the butter mixture and beat on lowest possible speed until just combined. Add the milk and beat on lowest possible speed until just combined. Add the remaining flour mixture and beat on lowest possible speed until just combined.
- Spoon the cake mixture into the prepared tin and smooth with the back of a spoon. Place the tin on a baking tray and bake in preheated oven for 30 minutes or until almost cooked.
- Meanwhile, when the cake has been in the oven for about 20 minutes, make the topping. Combine the butter, sugar, almonds, cream and flour in a medium saucepan. Use a wooden spoon to stir over medium heat until well combined and the sugar has dissolved. Bring to a simmer and cook for 2–3 minutes or until thickened slightly.
- Remove the cake from the oven and increase the temperature to 200°C/400°F (180°C/350°F fan-forced). Quickly pour the caramel almond topping evenly over the top of the cake and then use the back of a metal spoon to spread evenly to cover the top. Return the cake immediately to the oven and bake for a further 10–15 minutes or until the cake is cooked through and the topping is golden brown.
- Remove the cake from the oven and place on a wire rack to cool for 10 minutes. Run a spatula around the outside of the cake to release the topping from the pan. Carefully remove the sides of the pan and set the cake aside for 1 hour or until cooled completely.
- Serve in wedges with ice-cream or cream.
Baker's Tip
- This cake will keep in an airtight container for up to 3 days.
This recipe is from Anneka's SBS Food online column, Bakeproof: Scandi Baking. CLICK HERE for more Bakeproof recipes.
Photography by Alan Benson.

Prep 50minBake 35-40minMakes about 40
When the French profiteroles arrived in Brazil, a bakery in Sao Paulo created its own version – the Carolinas. Instead of filling the profiteroles with vanilla custard, they used pure dulce de leche then it became one of the staples in Sao Paulo bakeries.
This version, created by Make Me a Baker student Ana Moreno for her graduation, includes cream to make them less sweet than the ones you find in Sao Paulo, but still with plenty of dulce de leche to give the authentic taste.
Ingredients
1 quantity Basic Choux Pastry
150g good-quality dark chocolate (45-54% cocoa), chopped into small pieces
Edible gold leaf flakes, to decorate
Dulce de Leche Cream
250ml (1 cup) thickened cream
30g (¼ cup) icing sugar, sifted
1 teaspoon vanilla bean paste
320g (1 cup) dulce de leche
Method
- To make the profiteroles, preheat oven to 200°C (180°C fan-forced). Line 2 large oven trays with non-stick baking paper.
- Spoon the choux pastry into a large piping bag fitted with a 0.9cm (#9) round piping tip. Pipe 3cm rounds onto the lined trays, about 2cm apart. Use a damp fingertip to smooth any peaks on each of the rounds. Sprinkle the lined tray with a little water.
- Bake in preheated oven for 20 minutes or until well puffed and golden. Reduce the oven to 180°C (160°C fan-forced) and bake for a further 15-20 minutes or until golden and crisp on the outside. Remove from the oven and use a 0.7cm (#7) star piping tip to make a hole in the base of each of the hot profiteroles for the steam to escape. Place hole side up on a wire rack and allow to cool completely
- To make the Dulce de Leche Cream, combine the cream, icing sugar and vanilla bean paste in a mixing bowl and use a balloon whisk or hand held beaters with a whisk attachment to whisk on medium-high speed until soft peaks form.
- Spoon dulce de leche into a medium bowl. Add a third of the whipped cream mixture and use a large metal spoon or spatula to fold gently through the dulce de leche to retain as much air as possible until just combined evenly. Add the remaining cream in two more batches folding gently until just combined.
- Place the Dulce de Leche Cream into a pastry bag fitted with a 0.7cm (#7) star or round piping tip. Insert the tip into the hole in the base of a profiterole and fill with the Dulce de Leche Cream.
- To decorate the profiteroles, place the chocolate in a heatproof bowl and set over a saucepan of simmering water (make sure the water doesn’t touch the base of the bowl). Stir occasionally until the chocolate melts and is smooth.
- Dip the tops of each of the filled profiteroles in the melted chocolate to coat and set aside on a wire rack to stand for 10 minutes. Carefully decorate each profiterole with a little edible gold leaf before the chocolate is fully set.
Baker's Tip
- The unfilled profiteroles will keep in an airtight container at room temperature for up to 1 day. They are best eaten the day they are filled with the Dulce de Leche Cream.
Prep 1hr30min (+ cooling time)Bake 3hr20minMakes 10-12 serves
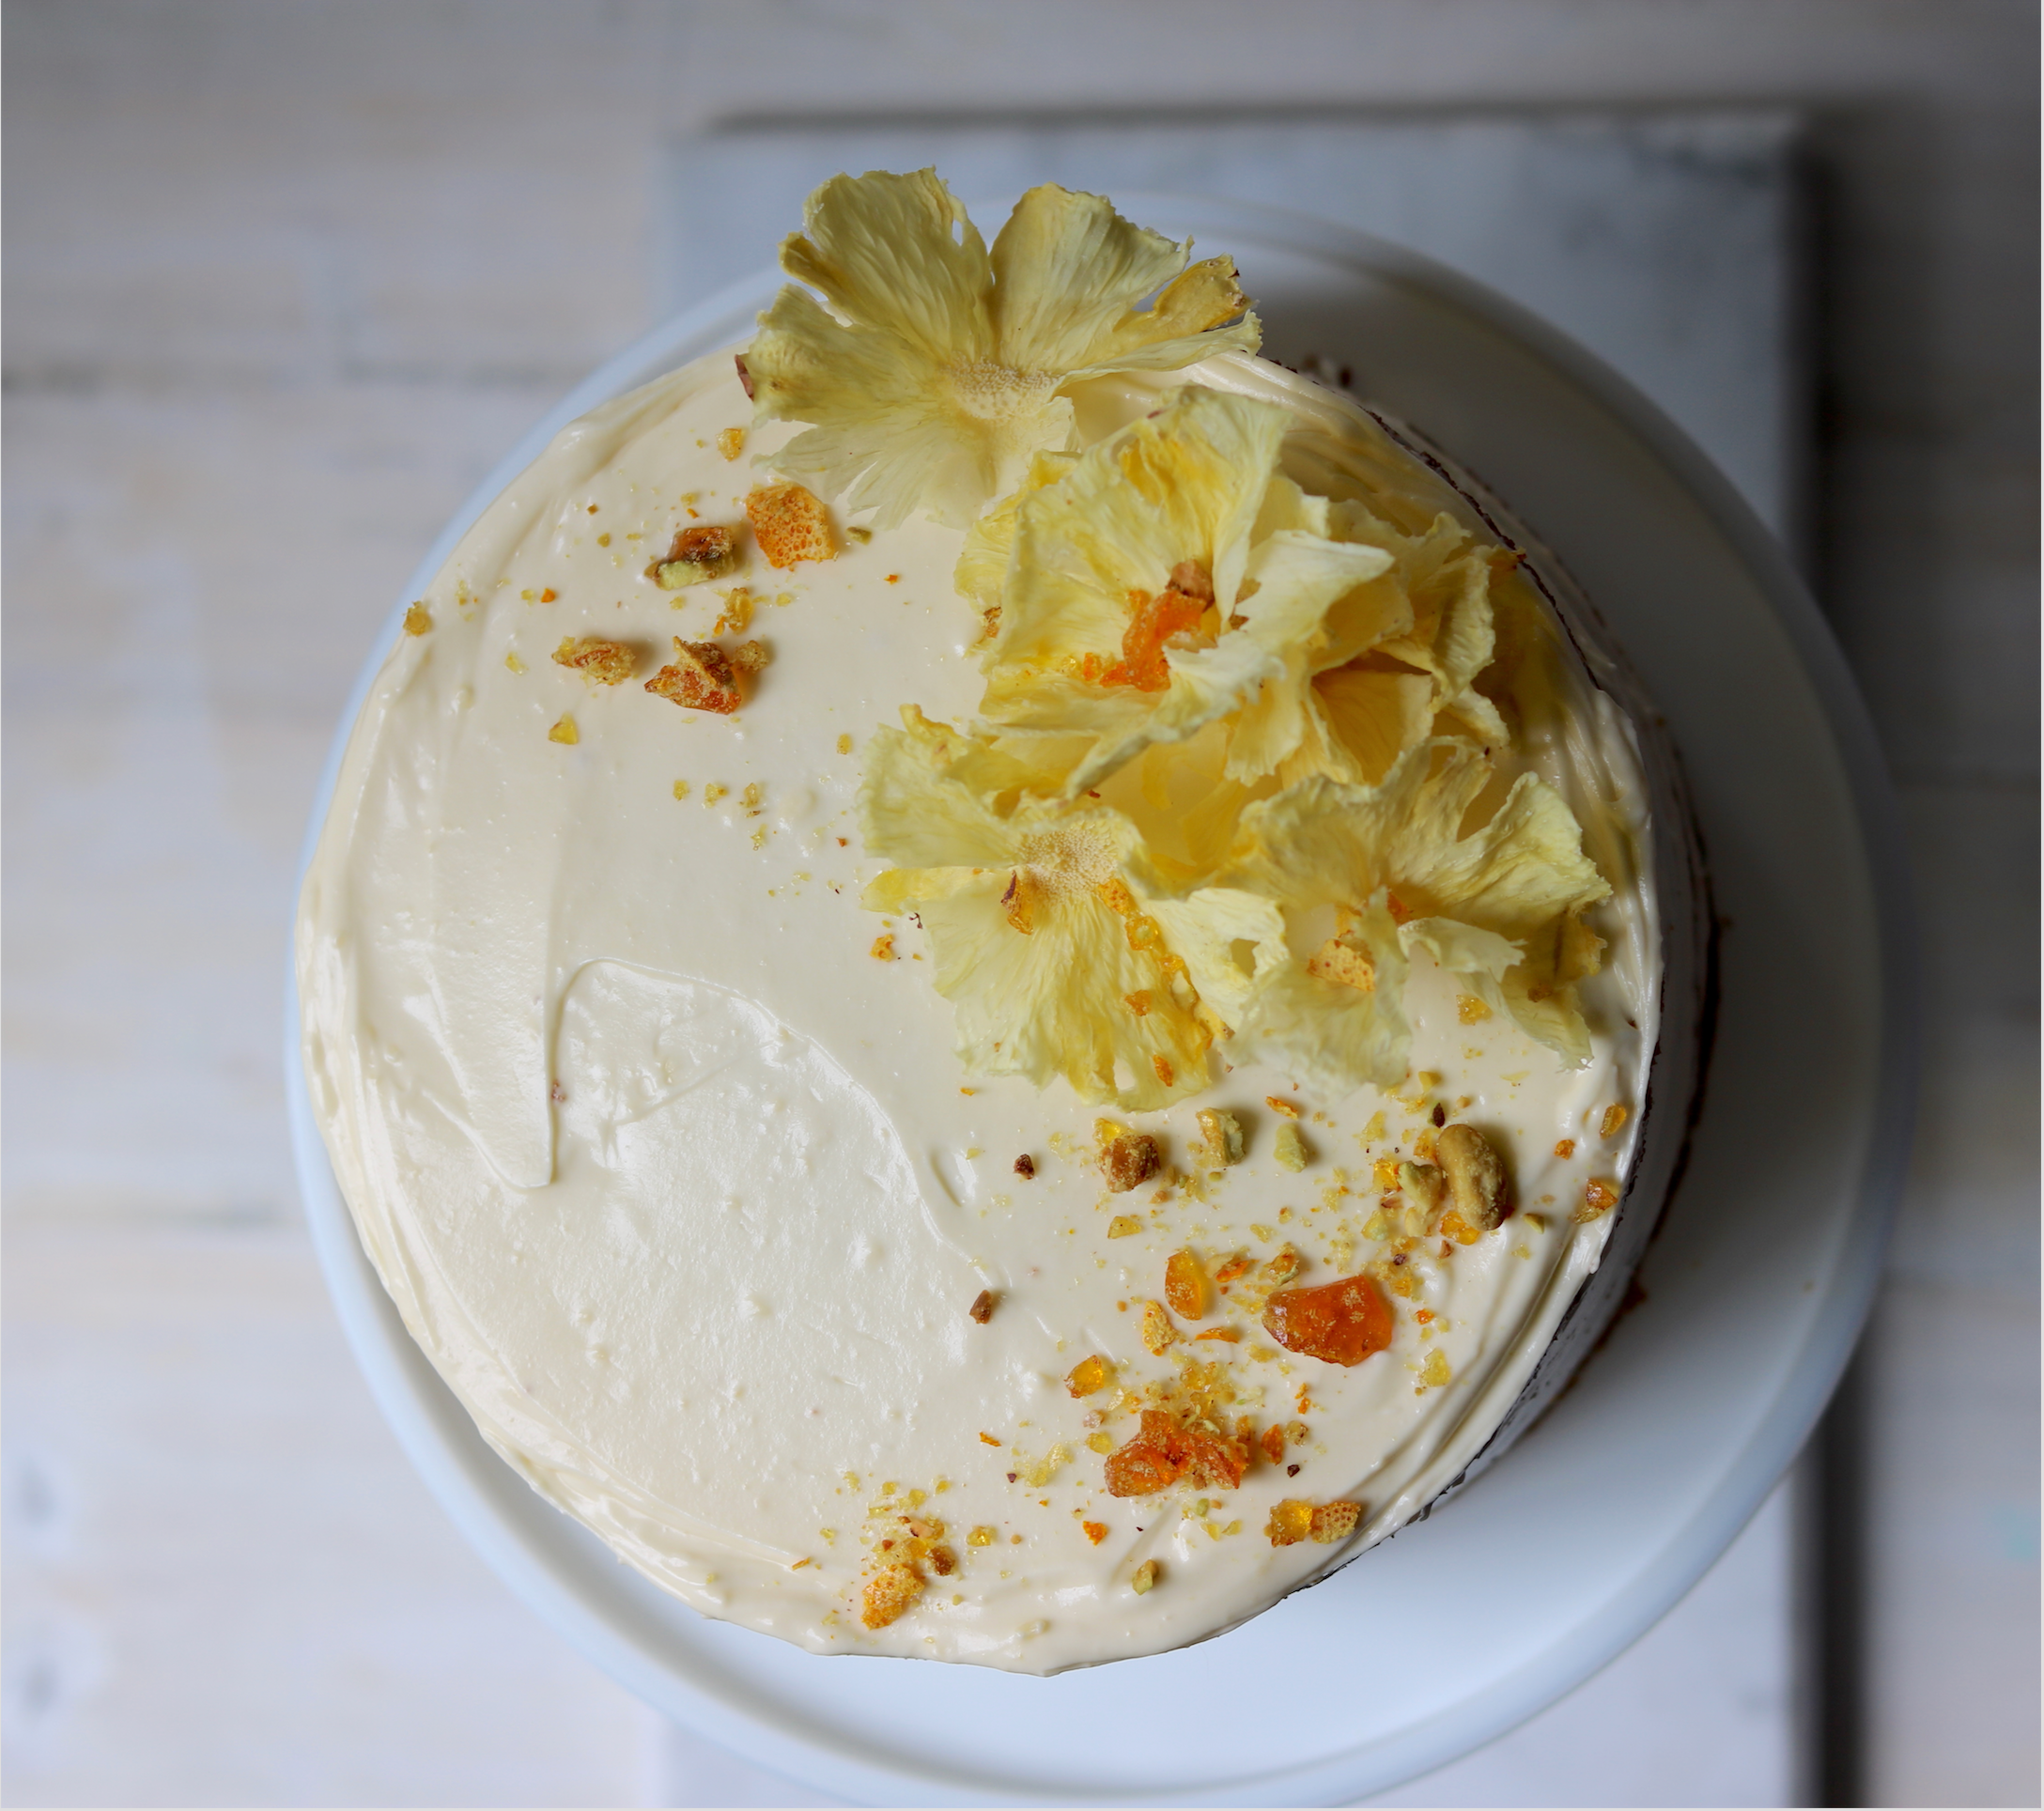
I often create unique cakes for friends to celebrate special occasion and milestones – cakes that reflect their personalities and our friendship. This one was for my close friend, Tina, to celebrate her 50th. It is based on a recipe by well-respected Australian cooking teacher Greta Anna Teplitzky (from her cookbook The Greta Anna Recipes, published by Angus & Robertson in the 1970s). Tina’s mum made it often while she was growing up and it became childhood favourite. I have zhooshed the original up with a dried orange and pistachio praline and some fun dried pineapple flowers to match Tina’s gorgeous, vibrant and creative personality – quite appropriate I think!
Ingredients
Orange and pistachio praline
1 orange
45g (⅓ cup/1½oz) pistachios, lightly toasted
55g (¼ cup/2oz) caster sugar
1½ tablespoons water
Dried pineapple flowers
½ firm, ripe pineapple
Cake layers
300g (2 cups/10½oz) plain flour
2 teaspoons baking powder
1 teaspoon bicarbonate of soda
2 teaspoons mixed spice
300g (10½oz) brown sugar
200ml (7fl oz) light olive oil, plus extra to grease
4 eggs, at room temperature, lightly whisked
2 teaspoons natural vanilla essence or extract
450g (15¾oz) tin pineapple slices in syrup, drained and finely chopped
300g (2 cups, firmly packed/10½oz) coarsely grated carrot
Cream Cheese Frosting
250g (9oz) cream cheese, at room temperature
75g (2¾oz) salted butter, at room temperature
1 teaspoon natural vanilla essence or extract
185g (1½ cups / 6½oz) icing sugar mixture, sifted
Method
- To make the Orange & Pistachio Praline, preheat the oven to 100°C/212°F (80°C/175°F fan-forced). Remove the rind from the orange with a vegetable peeler and then use a small sharp knife to remove any white pith from the rind. Place the rind on a wire rack over an oven tray and place in the preheated oven for 2 hours or until dry and crisp but still bright orange in colour (see Baker’s Tips). Remove from the oven and set aside (leave the oven on). Line an oven tray with non-stick baking paper. Spread the pistachios and dried orange rind close together on the lined tray. Combine the caster sugar and water in a small saucepan and use a wooden spoon to stir over low heat until the sugar dissolves. Increase the heat to medium and bring to the boil. Boil for 8-10 minutes without stirring, brushing down the side of the pan with a pastry brush dipped in water to dissolve any sugar crystals, until the mixture turns a deep caramel. Pour immediately onto the lined tray over the pistachios and rind. Set aside to cool completely (this will take about 30 minutes). When cool, use a mortar and pestle to grind the toffee into a coarse praline. Transfer to an airtight container and set aside (see Baker’s Tips).
- To make the Dried Pineapple Fowers, stand the half pineapple upright on a cutting board and use a large sharp knife to cut off the skin in strips. Use a mandoline slicer to cut the pineapple into very thin rounds (about 1-2mm thick). Use a small sharp knife to remove any remaining dark bits of rind from the slices and then pat both sides with paper towel to remove any excess moisture. Place the slices on a wire rack on an oven tray (see Baker’s Tips). Place in the oven for 2½ hours or until crisp around the edges but still slightly pliable. Remove from the oven and pinch each slice in the center while still warm to form a flower. Set aside to cool and then store immediately in an airtight container until needed (see Baker’s Tips)
- To make the Cake Layers, preheat oven to 180°C/350°F (160°C/315°F fan-forced). Brush two 18cm/7in round cake tins with extra olive oil to lightly grease and line the bases with non-stick baking paper.
- Sift together 150g (1 cup/5 ¼oz) plain flour, 1 teaspoon baking powder, ½ teaspoon bicarbonate of soda and 1 teaspoon mixed spice into a large bowl. Add 150g (5 ¼oz) brown sugar and stir to combine, breaking up any lumps.
- Combine 100ml (3 ½fl oz) of the olive oil, 2 of the eggs, 1 teaspoon vanilla, half the chopped pineapple and 150g (5 ¼oz) of the grated carrot and mix well. Add to the flour mixture and use a spatula or large metal spoon to gently mix until just combined.
- Divide the mixture evenly between the prepared tins and spread with the back of a metal spoon to smooth the surface making a shallow well in the center of each cake. Bake in preheated oven for 25 minutes or until cooked when tested with a skewer.
- Stand the cakes in the tins for 5 minutes before turning onto wire racks to cool (this will take about 1 hour). Repeat with the remaining cake ingredients to make 2 more cake layers.
- To make the Cream Cheese Frosting, use an electric mixer to beat the cream cheese, butter and vanilla until very smooth. Gradually add the icing sugar, beating well after each addition and beat until well combined and very creamy.
- To assemble the cake, first trim the tops of the cake layers if necessary (if the well you made in the mixture before baking was deep enough you won’t have to do this). Place one cooled cake layer, top side up on a cake stand or serving plate. Spread with ½ cup of the Cream Cheese Frosting and then sprinkle with about 1½ tablespoons of the Orange & Pistachio Praline. Continue to layer with the remaining cake layers, spreading each with ½ cup of frosting and sprinkling with about 1½ tablespoons of praline, and finishing with a cake layer, top side down. Spread a thick layer of frosting over the top of the cake, evening the surface with a large palette knife. Spread any remaining icing around the side of the cake to create a ‘naked’ look. Decorate with the Dried Pineapple Flowers and sprinkle with a little of the remaining praline just before serving.
Baker's Tips
- You can dry the orange rind for the praline (in step 1) and the pineapple for the flowers (in step 2) at the same time if you like.
- The praline will keep in an airtight container for up to 2 weeks.
- You will only need 5-6 slices of pineapple to make the dried pineapple flowers for this cake but if you would like to make more, place the slices on an extra wire rack on top of the first one and separate the racks with balls of foil at the corners between them.
- The Dried Pineapple Flowers will keep in an airtight container in a cool spot for up to 4 days. If they soften and lose their shape, return to an oven preheated to 100°C/212°F (80°C/175°F fan-forced) for 20-30 minutes or until crisp around the edges again. Reshape as in step 2.
- This cake will keep in an airtight container in the fridge for up to 3 days. Stand at room temperature for at least 30 minutes before serving.
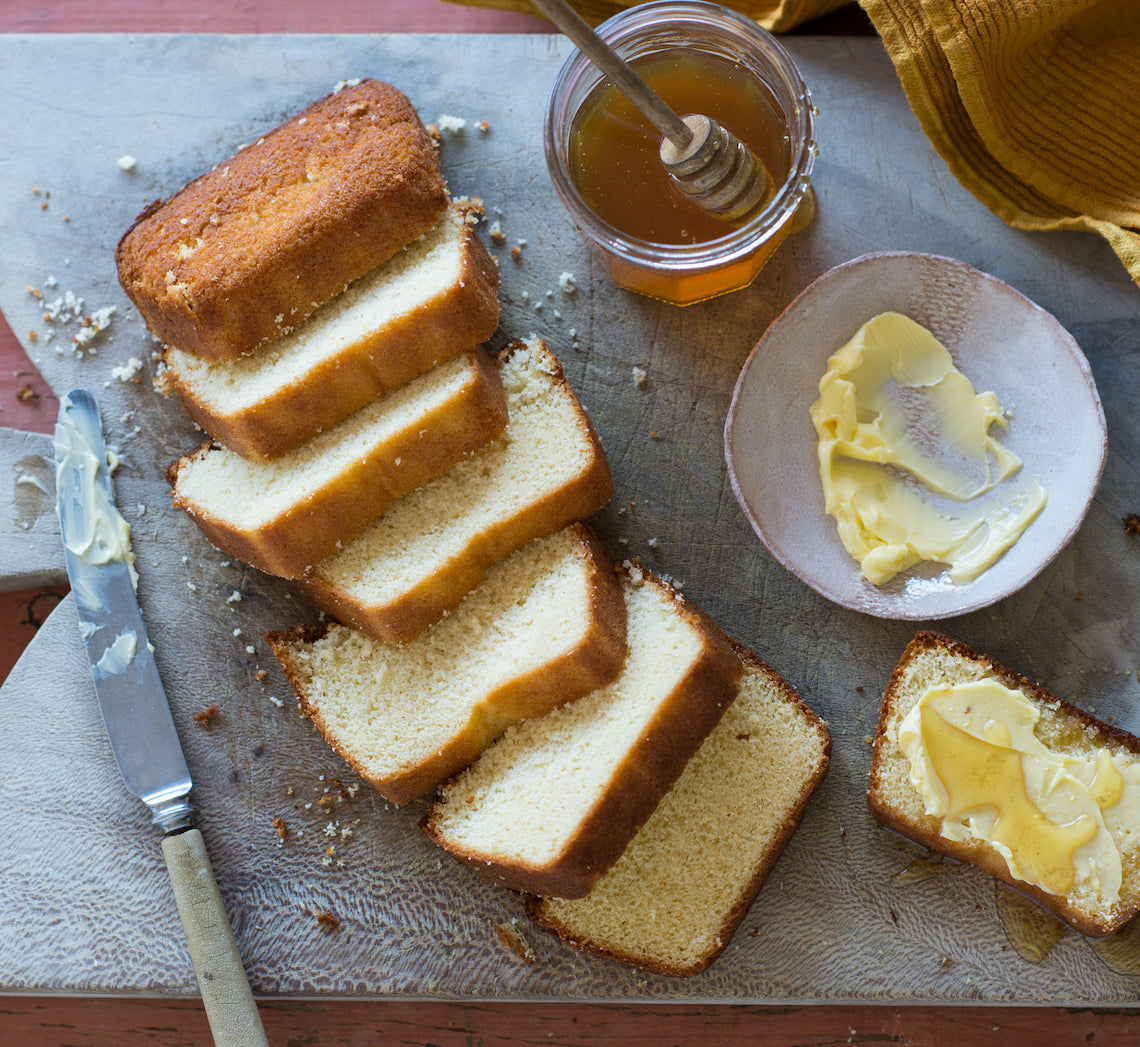
Prep 20min (+overnight chilling time)Bake 30minMakes 2 loaves
A specialty of the Nagasaki area in Japan, this wonderfully simple, honey-scented sponge cake was originally introduced by the Portuguese merchants in the 16th century, with its name originating from Pão de Castela meaning "bread from Castile". This cake defies sponge logic – strong bread flour gives it a "bouncy" texture, but it's still particularly moist and delicate, and becomes more so with time. Don’t be tempted to eat it straight from the oven (believe me, the heavenly honey aromas will tempt you!) – it needs to be wrapped while still warm and kept in the fridge overnight for its texture to be transformed.
Ingredients
- 6 eggs, at room temperature
- 220g (1 cup) caster sugar
- 115g (⅓ cup) honey
- 2 tablespoons warm water
- 200g (1¼ cups) bread flour, sifted twice
- Butter and extra honey, to serve
Honey Glaze
- 1 tablespoon honey
- 2 teaspoons warm water
Method
- Preheat oven to 180°C. Grease two 9 x 19cm (base measurement) loaf pans with butter and line each with two strips of baking paper.
- Use an electric mixer with a whisk attachment to whisk the eggs until frothy. Add the sugar and whisk on medium speed for 6-8 minutes or until the mixture is very thick and pale, has increased by four times its volume and a ribbon trail forms when the whisk is lifted.
- Add the combined honey and water and whisk until just combined.
- Add a third of the twice-sifted bread flour to the egg mixture and whisk on low speed for about 15 seconds or until just combined. Add the remaining flour in two separate batches, whisking on low until just combined as with the first batch, and checking that no flour has been caught in the bottom of the bowl.
- Divide the mixture evenly between the two prepared tins. Bake in preheated oven for 30 minutes or until a skewer inserted into the center comes out clean and the cakes will feel spongy when pressed in the center.
- To make the Honey Glaze, combine the honey and water in a small bowl and stir to combine. Brush the tops of the cakes with the Honey Glaze. Lay two pieces of plastic wrap large enough to wrap each cake on the bench top and turn the hot cakes out directly onto them. Wrap the cakes in the plastic wrap (this will help them retain their moisture), place on a tray, top side down, and put in the fridge, for at least 12 hours or overnight.
- Bring the cake to room temperature before serving in slices on its own or with butter and extra honey, if desired.
Baker's Tips
- This cake will keep at room temperature in an airtight container for up to 5 days.
This recipe is from Anneka's SBS Food online column, Bakeproof: Sponge Cake.
CLICK HERE for more Bakeproof recipes.
Photography by Alan Benson.
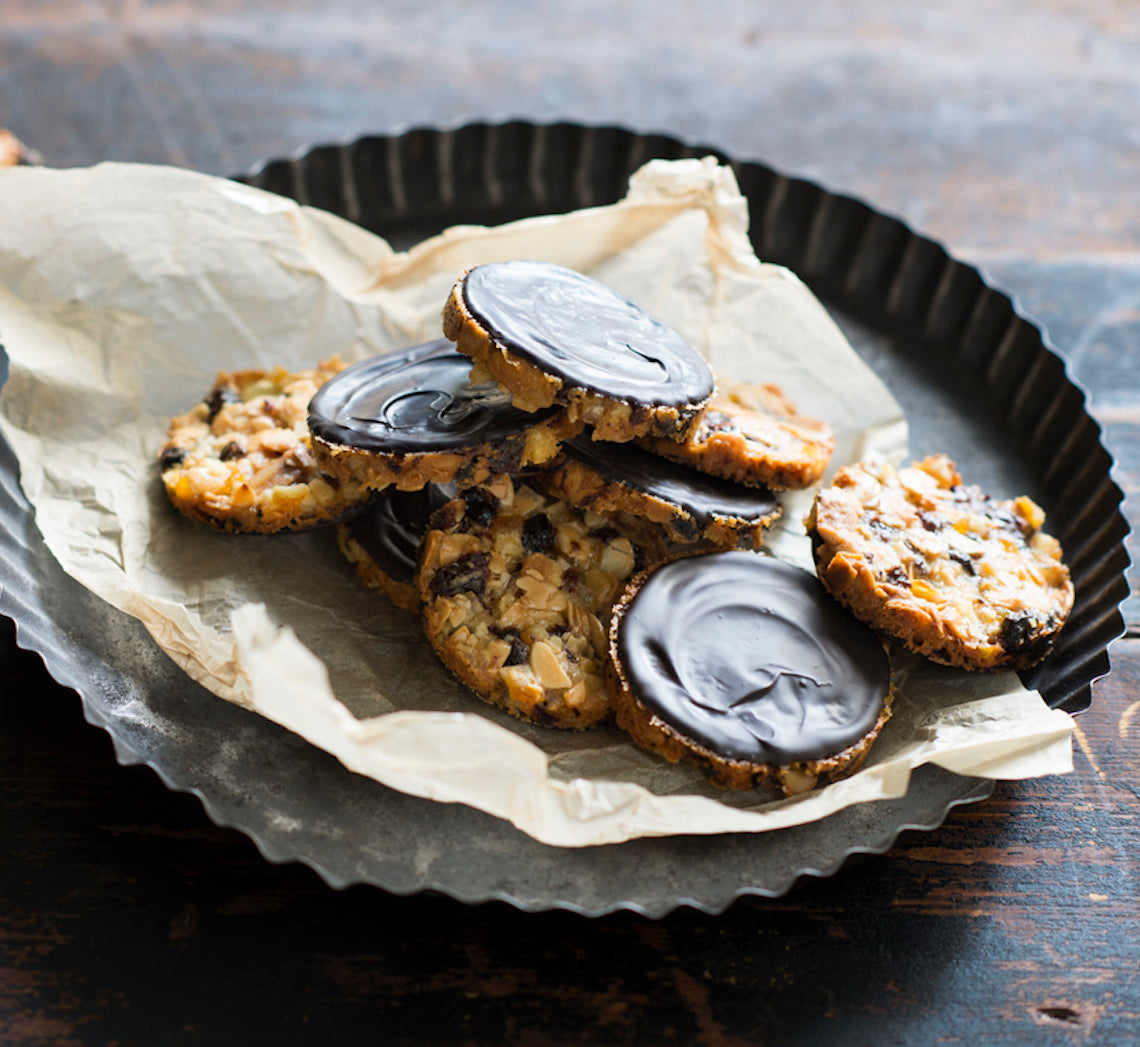
Prep 20minBake 25min(per batch)Makes about 24
Often attributed to the Italians, it is believed that Florentines were actually created in the royal French kitchens in the late 1600s in honour of their Tuscan in-laws, hence their name. Admittedly a little confusing for us, but incredibly flattering for the in-laws!
Ingredients
Melted butter, to grease
200g flaked almonds
150g sour dried cherries, finely chopped
150g candied orange rind, finely chopped
75g (½ cup) plain flour
75g butter, cubed
75g (⅓ cup) caster sugar
115g (80ml/⅓ cup) honey
200g good-quality dark chocolate (70% cocoa), melted and cooled (see Baker's Tips)
Method
- Preheat oven to 160°C (140°C fan-forced).
- Line an oven tray with non-stick baking paper. Brush the inside of six 7.5cm metal egg rings (see Baker's Tips) with a little melted butter to grease and place on the lined oven tray.
- Combine the flaked almonds, dried cherries, candied orange rind and flour in a large bowl and stir to combine evenly. Combine the butter, sugar and honey in a small saucepan and stir over medium heat until the butter just melts and the mixture is well combined. Add to the almond mixture and stir gently with a large metal spoon or spatula until evenly combined.
- Spoon 1½ tablespoons of the mixture into an egg ring to fill half way and use the back of a metal spoon to spread, leaving it a little uneven if you want. Repeat with more mixture and the remaining five egg rings.
- Bake in preheated oven for 25 minutes or until golden and cooked through. Remove from the oven and cool on the trays for 5 minutes before removing the egg rings. Grease the egg rings again with a little more melted butter and repeat with the remaining mixture in three more batches.
- Use a palette knife or the back of a teaspoon to spread a generous amount of melted chocolate over the underside of a florentine to cover. Place on a wire rack, chocolate side up and set aside for 1 hour or until the chocolate sets. Repeat with the remaining cooled florentines.
Baker's Tips
- The longer the chocolate cools the thicker it will become and the more defined the 'swirls' of chocolate will be.
- Non-stick egg rings are perfect to use to make these florentines, but they will still need to be greased.
- These florentines will keep in an airtight container or jar in a cool dark place for up to 2 weeks.
This recipe is from Anneka's SBS Food online column, Bakeproof: Gifts from the Kitchen. CLICK HERE for more Bakeproof recipes.
Photography by Alan Benson.


