
- home
- Products
$50.00/pp
more info- Products -
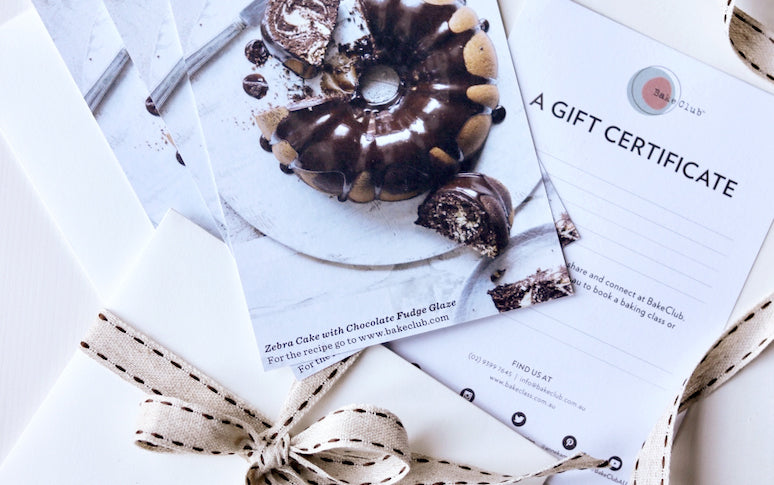
Special offer! Buy a BakeClub & Co. 6-month or 1-year membership Physical Gift Certificate and get a BakeClass book for free! Simply add both to your cart and the offer will be activated at checkout.
The perfect gift for any occasion, a BakeClub Gift Certificate will give someone special an experience to remember!
Gift Certificates can be redeemed for an online class, workshop, Make Me a Baker programs, BakeClub & Co. membership or in our shop.
If you are purchasing a BakeClub & Co. membership for someone else, please include their name and email address in the 'Special delivery requests' box on the next page.
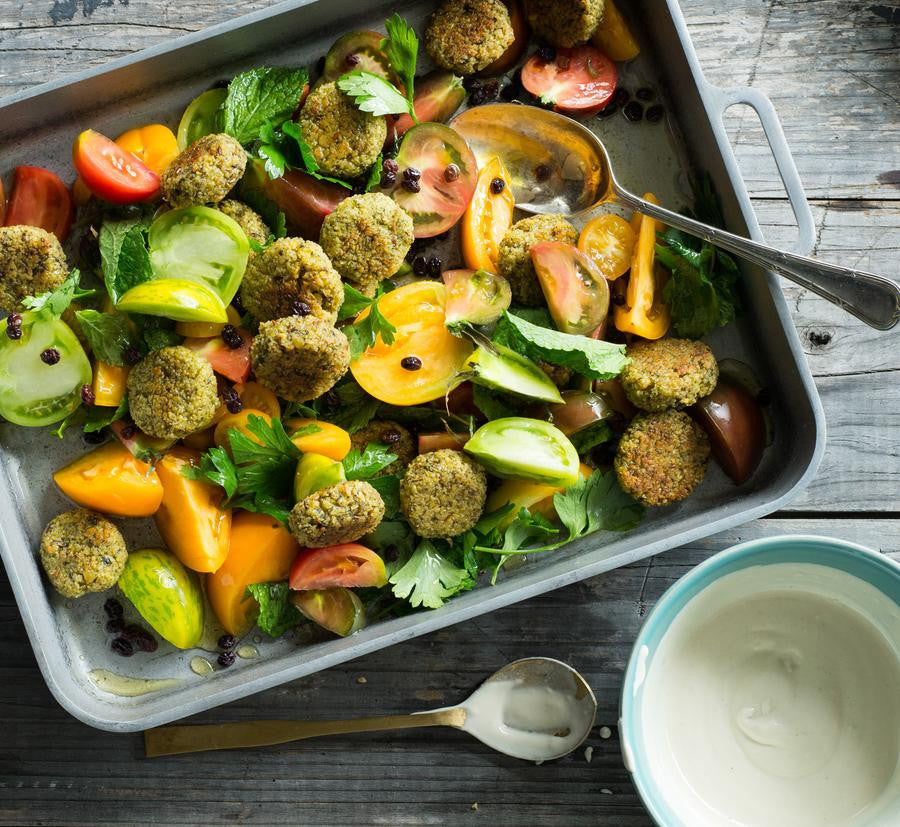
Prep 30minBake 20min Makes 6 serves
Traditionally deep-fried, this lighter version of the much-loved Middle Eastern falafel is baked. Teamed with a fresh herb and tomato salad and tasty tahini dressing, it makes a deliciously light meal.
Ingredients
lemon wedges, to serve
Baked falafel
80ml (⅓ cup) olive oil
300g dried chickpeas, soaked in water for 12-24 hours (see Baker’s tips)
1 cup coarsely chopped flat-leaf parsley
½ cup coarsely chopped coriander
½ cup coarsely chopped mint leaves
6 green shallots, white and pale green part only, sliced
1 garlic clove, crushed
2 tablespoons cumin seeds, toasted
2 teaspoons ground coriander
pinch cayenne pepper
½ teaspoon bicarbonate of soda
¾ teaspoon salt
½ teaspoon freshly ground black pepper
2 tablespoons lemon juice
Tahini sauce
135g (½ cup) tahini (see Baker’s tips)
120-140ml water
1 small garlic clove, crushed
1 tablespoon lemon juice
130g (½ cup) Greek-style natural yoghurt
Tomato & herb salad
500g mixed ripe tomatoes, halved or quartered, depending on the size
⅔ cup flat-leaf parsley leaves
⅔ cup small mint leaves
55g (⅓ cup) currants, soaked in boiling water for 10 minutes and drained
¼ teaspoon sugar
Method
- Preheat oven to 200°C (180°C fan-forced). Brush a large oven tray generously with half the oil.
- To make the baked falafel, place all the ingredients, except the remaining oil, in a food processor and use the pulse button to process until well combined and a rough paste forms. To test if it has been processed enough, press a little of the mixture in your hands. If it holds together, it is ready; if not, process for another 10 seconds and test again.
- Shape tablespoonfuls of the mixture into balls, massaging and pressing with your palms so the mixture holds together. Flatten slightly to form patties about 1 cm thick and 4 cm in diameter. Place on the oiled tray close together. Brush the patties generously with the remaining oil.
- Bake for 15 minutes, then turn the patties over and bake for a further 5 minutes or until golden and crisp on the outside and warmed through.
- Meanwhile, to make the tahini sauce, put the tahini in a medium bowl and gradually stir in the water (it will become thicker before it starts to thin). Stir through the yoghurt, garlic and lemon. Season well with salt and pepper. Cover and chill until required.
- To make the tomato & herb salad, put all the ingredients in a bowl and toss gently to combine.
- Divide the salad among serving plates, top with the falafel and drizzle with the tahini sauce.
Baker's Tips
Remember different batches of dried chickpeas will need various soaking times - the easiest way to tell when they’re ready to use is that they will crush easily when pressed between your fingers.
Use hulled (as opposed to unhulled) tahini to make your sauce for a less bitter flavour.
Photography by Alan Benson. Styling by Sarah O'Brien. Food preparation by Tina McLeish.
This recipe is part of our Bakeproof: Lebanese column.
View previous Bakeproof columns and recipes here.
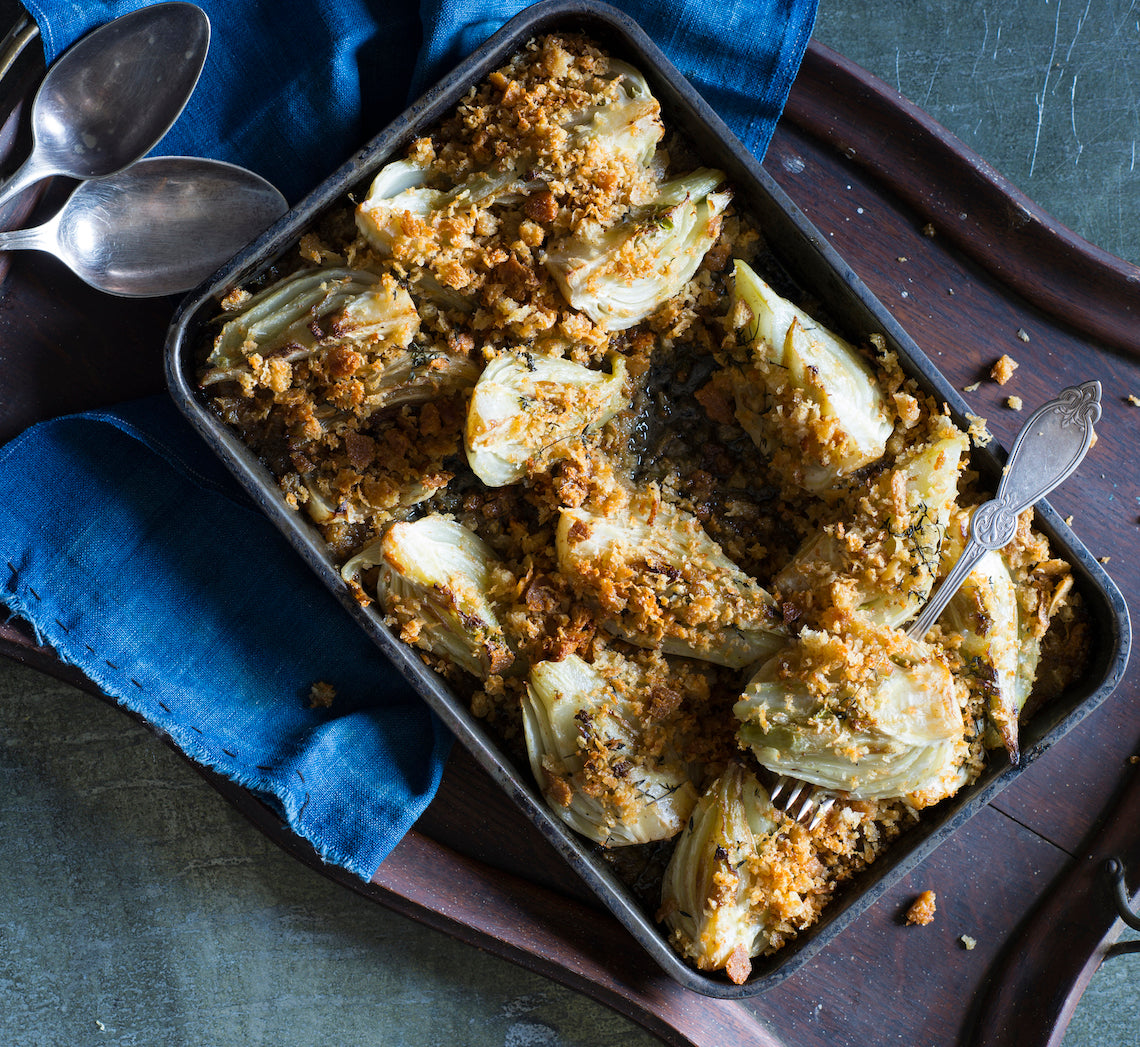
Prep 25minBake 45minMakes 4-6 serves
If you’re not a big fan of fennel then you may just have to reconsider your standing once you have tried this dish. Baked fennel – particularly when teamed with the saltiness of anchovies, the crunch of crisp breadcrumbs and the savouriness of fresh thyme – is one of the best side dishes winter has to offer.
Ingredients
- 2 tablespoons olive oil
5 anchovy fillets, chopped
60g butter
100g coarse sourdough breadcrumbs
2 tablespoons chopped flat-leaf parsley
4 baby fennel bulbs, trimmed, cut into quarters
12 thyme sprigs, leaves picked
250ml (1 cup) good-quality chicken stock
Method
- Preheat the oven to 190°C (180°C fan-forced).
- Heat 1 tablespoon olive oil in a large frying pan over medium heat. Add the anchovies and cook, stirring occasionally, for 2-3 minutes or until the anchovies dissolve. Add 30g of the butter and the breadcrumbs and toss until the breadcrumbs are lightly toasted. Transfer to a bowl, toss through the parsley and set aside.
- Add the remaining oil and butter to the frying pan and heat over medium-high heat until the butter is foaming. Add the fennel in a single layer and cook for 3 minutes each side or until golden and starting to soften.
- Transfer the fennel, in a single layer, to a 2 litre (8 cup) capacity dish, and pour any pan juices over the top. Scatter with the thyme leaves and pour the chicken stock over. Cover with foil and bake for 15 minutes. Remove the foil, sprinkle with the breadcrumbs and bake for a further 20-25 minutes or until the fennel is tender when pierced with a skewer and the breadcrumbs are golden and crisp.
- Serve immediately.
Baker's Tips
- This dish is best eaten straight from the oven, while the fennel is warm and the bread chunks still crisp, however it will keep in an airtight container in the fridge for up to 3 days. Serve at room temperature or reheat at 180°C (160°C fan-forced) for 10 minutes or until heated through.
This recipe is from Anneka's SBS Food online column, Bakeproof: Winter Root Vegetables. CLICK HERE for more Bakeproof recipes.
Photography by Alan Benson.
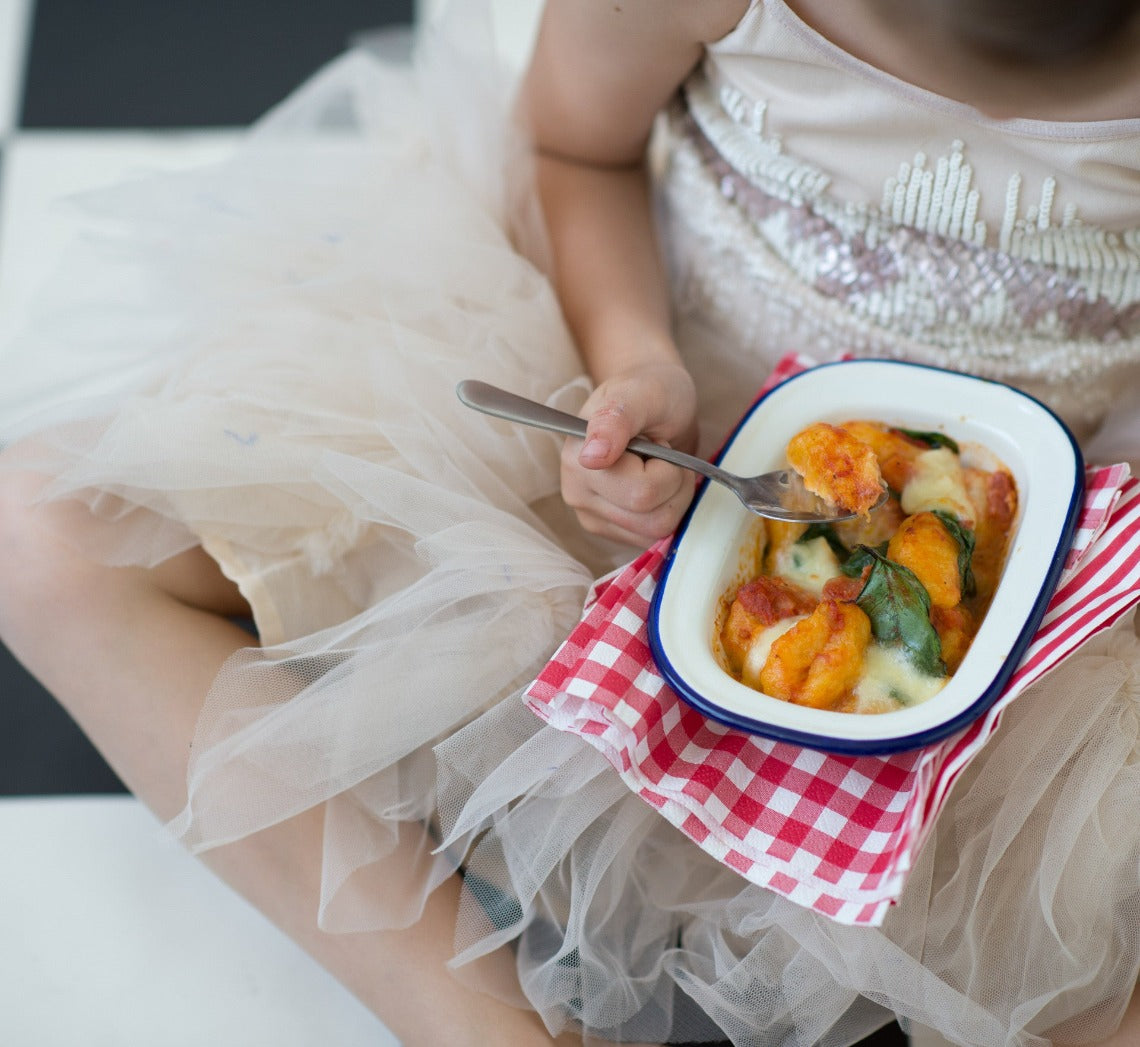
Prep 1hrBake 55minMakes 6 serves
Fun to make and scrumptious to eat, this homemade baked gnocchi combines pumpkin, tomatoes and spinach for a delicious, nutritious meal, made all the more fun by being served in individual dishes.
Ingredients
75g baby spinach
100g bocconcini, thinly sliced
Pumpkin gnocchi
350g unpeeled butternut pumpkin, deseeded and cut into 6 chunks
650g medium Desiree potatoes, unpeeled
salt and freshly ground black pepper, to taste
110g (½ cup) plain flour, plus extra to dust
Tomato sauce
100g bacon rashers, trimmed and chopped
1 garlic clove, crushed
1 x 400g can chopped tomatoes
1 teaspoon sugar
2 tablespoons pouring cream
salt and freshly ground black pepper, to taste
Method
- Preheat oven to 180°C (160°C fan-forced). Line a tray with a clean tea towel and dust lightly with flour.
- Place the pumpkin in an ovenproof dish, cover with foil and bake in preheated oven for 40 minutes or until tender when tested with a skewer. Set aside to cool slightly. Increase the oven temperature to 200°C (180°C fan-forced).
- Meanwhile, put the whole potatoes in a saucepan of water, cover with a lid and bring to the boil over medium heat. Boil for 30 minutes or until the potatoes are tender with tested with a skewer. Drain and set aside until cool enough to handle.
- Next, peel the warm potatoes, return the flesh to the dry saucepan and mash until smooth. Use a metal spoon to press a third of the potatoes through a coarse sieve or fine colander into a large bowl. Repeat with the remaining mashed potato in 2 more batches.
- Remove the pumpkin skin from the flesh and discard. Add the flesh to the potato and mash together. Season well with salt and pepper. Add the flour and use a wooden spoon and then your hands to mix to a firm but slightly sticky dough (adding a little more flour if necessary). Divide the dough into 4 equal portions and roll each out on a lightly floured bench top into a log about 2cm in diameter. Cut the logs into 2cm lengths and then roll each into a small ball. Gently roll each ball, one at a time, over the back of a lightly floured fork to form the gnocchi, placing on the tea towel-lined tray as they are finished.
- To make the tomato sauce, cook the bacon in a small saucepan over medium-high heat for 5 minutes, stirring occasionally, or until starting to colour. Add the garlic and cook for 1 minute or until aromatic. Add the tomatoes and sugar, bring to a simmer and simmer over medium-low heat for 10 minutes or until thickened slightly. Remove from the heat, stir through the cream and season with salt and pepper.
- Bring a large saucepan of salted water to the boil. Add a quarter of the gnocchi and boil for 2 minutes or until they just rise to the surface. Remove from the water immediately with a slotted spoon and place in a colander to drain well before transferring to a large bowl. Repeat with the remaining gnocchi in 3 more batches.
- Add the tomato sauce to the gnocchi with the spinach and gently stir through. Spoon the gnocchi and sauce into 6 x 250ml (1 cup) ovenproof dishes or ramekins, dividing evenly. Top with the bocconcini.
- Bake in preheated oven for 15 minutes or until bocconcini has melted and the sauce is bubbling. Remove from the oven and stand for 5 minutes before serving.
Baker's Tips
- You can also make this baked gnocchi by using 750g bought fresh gnocchi instead of making the pumpkin gnocchi.
- You can also bake this recipe in a 1.5 litre (6 cup) ovenproof dish. The baking time and temperature will be the same.
This recipe is from Anneka's SBS Food online column, Bakeproof: Kids in the Kitchen. CLICK HERE for more Bakeproof recipes.
Photography by Alan Benson.
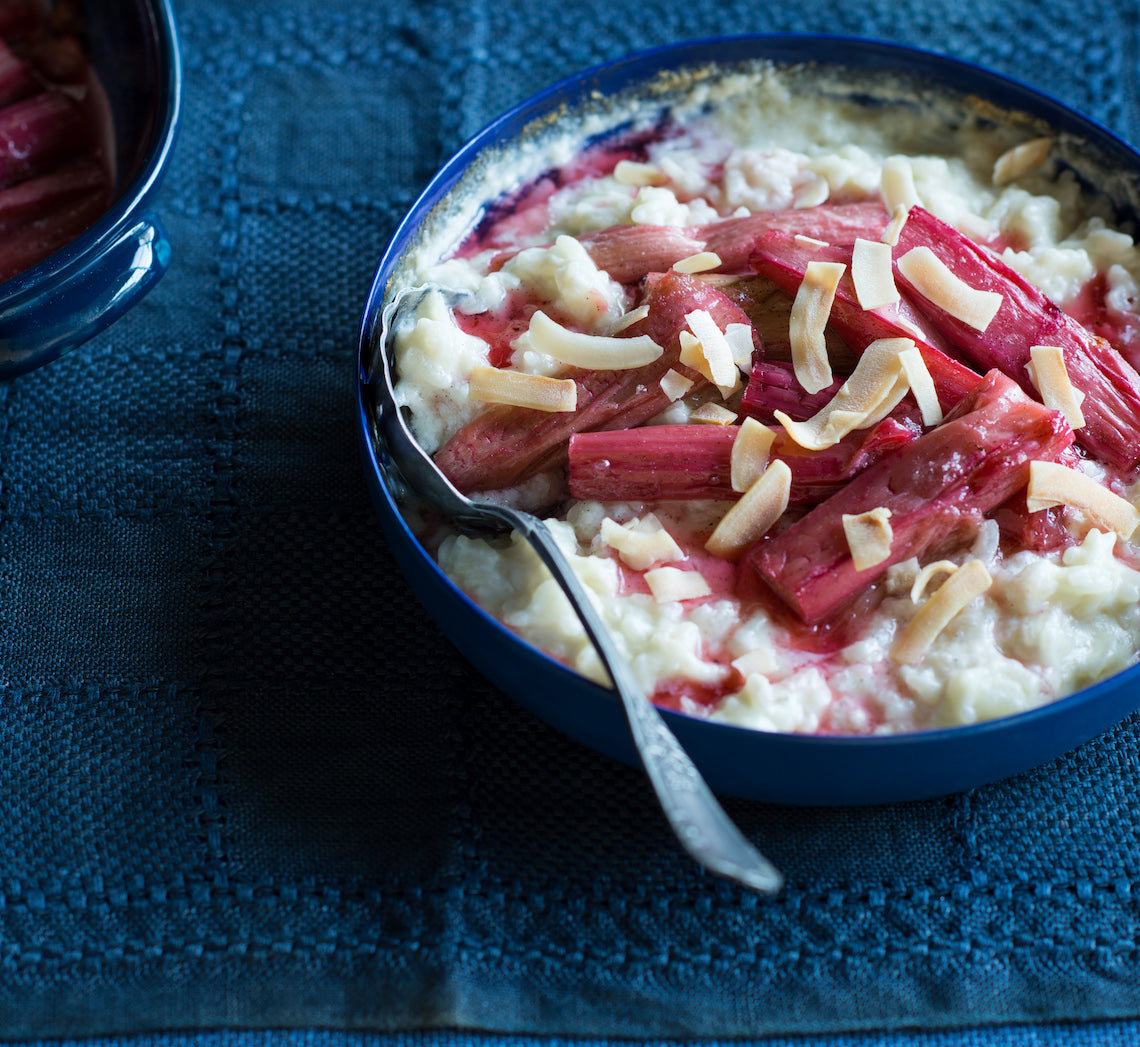
Prep 15minBake 1hr 40minMakes 6-8 serves
Rice pudding is the ultimate in comfort food. Coconut milk gives this version a contemporary twist and when topped with vanilla-baked rhubarb, it is a winter pudding you will want to make time and time again.
Ingredients
melted butter, to grease
110g (½ cup) Arborio rice
375ml (1½ cup) milk
270ml can coconut milk
2 tablespoons caster sugar
10g (2 teaspoons) butter
toasted flaked coconut or roasted coconut chips (see Baker’s Tips), to serve (optional)
Baked rhubarb
1 vanilla bean, split lengthways
75g (⅓ cup) caster sugar
1 bunch rhubarb, trimmed, washed and cut into 7cm lengths (you will have about 550g trimmed weight)
Method
- To make the Baked rhubarb, preheat oven to 200°C. Scrape the seeds from the vanilla bean, place into a medium bowl with the sugar, and toss to evenly combine. Add the rhubarb and toss to coat in the vanilla sugar. Transfer the rhubarb and vanilla bean to an ovenproof dish just large enough to arrange the rhubarb in a single layer. Sprinkle with any remaining vanilla sugar left in the bowl. Cover with foil and bake in preheated oven for 20 minutes. Remove the foil, give the dish a shake and bake for a further 5-10 minutes or until the rhubarb is tender when tested with a skewer. Remove from the oven and set aside while baking the rice pudding.
- Reduce the oven temperature to 160°C. Combine the rice, milk, coconut milk and caster sugar in a bowl. Stir with a fork until well combined. Transfer to a 1-litre (4-cup) ovenproof dish and dot with the butter. Bake, uncovered, in preheated oven for 1 hour–1 hour 10 minutes, whisking occasionally with a fork so the rice cooks evenly, or until the rice is just tender and the pudding is the consistency of a wet risotto.
- Serve the warm rice pudding immediately, topped with the rhubarb. Drizzle with rhubarb syrup and sprinkle with the coconut, if desired.
Baker's Tips
- Roasted coconut chips are available from the dried fruit and nuts section of selected supermarkets.
Photography by Alan Benson.
This recipe is from Anneka's SBS Food online column, Bakeproof: Comfort puddings. CLICK HERE for more Bakeproof recipes.
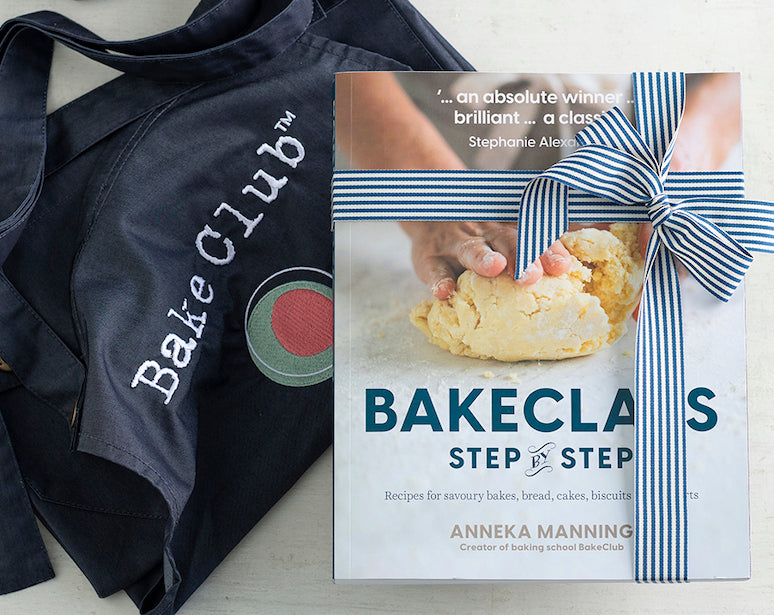
Give the gift of baking!
Our Baker's Bundle is THE perfect gift for a baker (or would-be baker) in your life. The best part is, it really is the gift that keeps giving!
This bundle includes:
- A $100 Gift Certificate which can be used for a BakeClub & Co. Membership or any of our self-paced online courses
- A BakeClass Book ($29.00)
- A BakeClub Apron ($40)
Total RRP = $169.99 + $15 shipping = $184.99
Purchase now and receive a 15% discount – that's the whole bundle (incl. shipping) for $159.50!
Delivery notes:
We can include a special personalised, handwritten note by Anneka in the BakeClass book. Please indicate your Special Message when making your purchase.
Your bundle will be beautifully wrapped and can either be delivered to your door or to the recipient of your choice.
If you have any other special delivery requests, please let us know by detailing them on the order confirmation page.
I'm so excited. Love the world of baking which continues to puzzle and delight; love how precise it is and how the end product is so appreciated; love how it makes me slow down and how much I enjoy the process. Here's cheers to a year of learning.
Vicki, BakeClub & Co. member
Anneka Manning’s BakeClass book is an absolute winner; I was captivated right from the very first page. Anneka's logical approach to baking, dividing the recipes according to the method used, is brilliant. Every item looks mouthwateringly delicious...I guarantee that this book will become a classic.
Stephanie Alexander AO
Anneka, I love learning from your vast experience. I absolutely trust your knowledge and advice. You [do] all the hard work for us, testing all the recipes and perfecting things and this means we don’t waste our time, money and ingredients trying to come up with what works best ... When you teach us and share your knowledge it is just easier and it feels like being given the inside knowledge that isn’t explained in [books and on websites].
Vanessa, BakeClub student
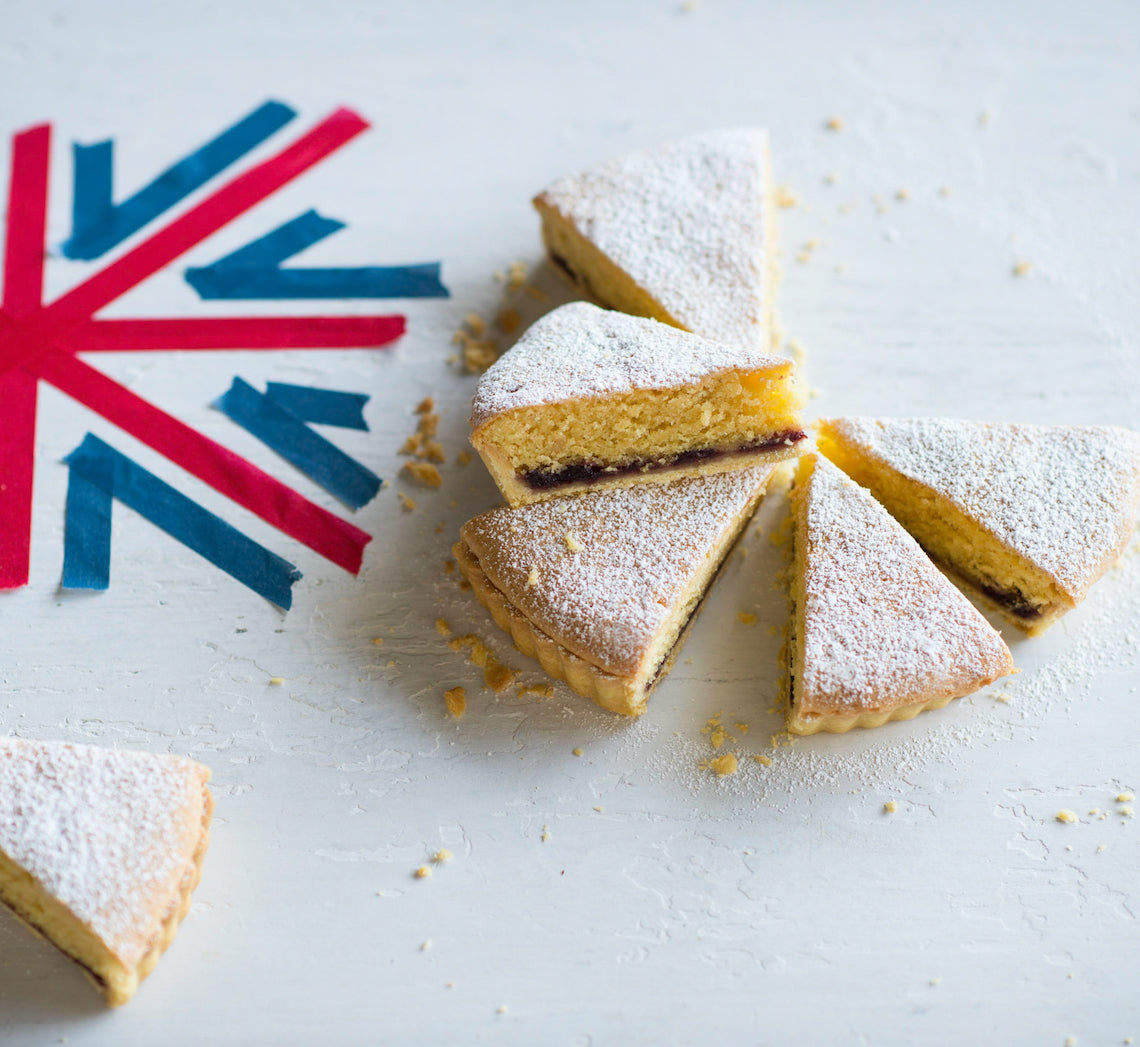
Prep 30minBake 1hr20minMakes about 8-10 serves
Bakewell tart is simply a buttery almond cake in a tart case with a welcome layer of jam in the middle. On first consideration you may not think this combination would work, but take my word for it, it does!
Ingredients
1 quantity sweet shortcrust pastry115g (⅓ cup) raspberry or cherry jam
125g unsalted butter, at room temperature
110g (½ cup) caster sugar
3 drops of almond essence or finely grated zest of 1 lemon
3 eggs
100g (1 cup) almond meal
35g (¼ cup) self-raising flour
icing sugar, to dust
Method
- Preheat oven to 200ºC (180ºC fan-forced).
- Use a lightly floured rolling pin to roll out the pastry on a lightly floured bench top to a round about 3mm thick. Carefully drape the pastry loosely around the rolling pin. Place it over an ungreased round 23cm (base measurement) tart tin with a removable base and then unroll the pastry being careful not to stretch it. Gently lift the edge of the pastry and ease it into the tart tin to line the base and sides and settle it into the corners. Use your fingertips to press it gently into the corners without stretching it. Then, working around the tin, press the pastry into the side using your thumb or finger. Roll the rolling pin over the top of the tart tin to trim any overhanging pastry.
- Place the tart tin on an oven tray. Prick the pastry base with a fork about 12 times. Line the pastry case with baking paper or foil and fill with pastry weights, dried beans or raw rice, making sure they press into the corners and they fill the case. Bake in preheated oven for 15 minutes.
- Remove the pastry case from oven and use the paper or foil to lift the weights out of the case. Return to the oven and bake for a further 15-20 minutes or until cooked through and lightly golden. Remove from the oven.
- Spread the jam evenly over the base of the tart case and set aside. Reduce the oven temperature to 160ºC (140ºC fan-forced).
- Use an electric mixer to beat the butter, sugar and almond essence or lemon zest until pale and creamy. Add the eggs one at a time, beating well after each addition. Combine the almond meal and flour, add to the butter mixture and beat on lowest possible speed until just combined. Spread the mixture evenly over the jam in the tart case.
- Bake in preheated oven for 40-45 minutes or until golden brown and a skewer inserted into the centre comes out clean. Cool in the tin for 10 minutes before removing, dusting with icing sugar and serving warm. Alternatively cool in the tin and serve at room temperature.
Baker's Tips
- This tart will keep in an airtight container at room temperature for up to 2 days.
This recipe is from Anneka's SBS Food online column, Bakeproof: Best of British Baking.
CLICK HERE for more Bakeproof recipes.
Photography by Alan Benson.
$50.00/pp
more info- Products -
Baking Basics is a self-paced online course where you will learn the basics of baking – in your own time, at your own pace.
I totally enjoyed this value for money course which has renewed my love of baking. The recipes were fantastic and I will definitely be baking more from now on, utilising my newly acquired skills. This was a perfect course for me. Just Do It. You won’t look back.
Marlene Davies, Victoria
Learn to bake at home – in your own time!
Baking Basics is a fun and engaging self-paced online course where you will learn the basics of baking – in your own time, at your own pace – all from your own home kitchen!
Guided by Anneka Manning and her more than 35 years of baking experience, this course will cover ingredients, equipment and two simple mixing methods, and is packed full of hints, tips and tricks to make baking easy, more successful and therefore, much more fun!
This course will reconnect you with baking from scratch and emphasise the importance of using our hands to create something not only delicious but ready to share with someone in need of a little connection and care. Through this course, you will learn how baking can be a wonderful grounding and calming exercise that can help to reduce anxiety and stress, while providing endless enjoyment.
Designed to be completed in 14 days (but you can take as long as you like), this is the perfect online course for anyone looking for a structured way to learn how to bake.
Please note: Baking Basics is a condensed version of our Baking Foundations online course so we do not recommend it to those who have already completed Baking Foundations.
How to enrol
Baking Basics is a self-paced course and is now open for enrolment.
I completed this course with my daughter and we learnt so much and really enjoyed it! I was so impressed with the results we achieved. We absolutely loved the experience, can not fault the info, videos and all instructions. Nothing to improve in our eyes!
Nicole, Perth
Cost
$50
Who is this course suitable for?
This course is, quite simply, suitable for everyone, but it is aimed at beginners. As this course is completed online, it is available to students from all over the world.
What will I get?
- 14 downloadable course modules which will include invaluable information sheets, videos, recipes, checklists and infographics
- Baking advice and inspiration from Anneka Manning
- A thorough understanding of the basics of baking and how to use them to ensure baking success
- Membership to BakeClub's exclusive The Kitchen Table online group
- Baking confidence, knowledge and skill to use regularly at home – and the inspiration to get into the kitchen and get baking!
What will I learn?
- The Secrets to Baking Success
- Measuring
- Preparing Your Cake Tins
- The Measure & Mix Method
- The 10 Essential Baking Ingredients
- All About Eggs
- All About Butter
- The Measure & Beat Method
- The Top 10 Essential Baking Tools
- Understanding Your Oven
- Mixing Tools
Which recipes are included?
- Melt & Mix Coconut Chocolate Cake
- Honied Muesli Bars
- Carrot & Parsnip Picnic Loaf
- Classic Walnut Brownies
- Pecan & Cinnamon Oat Biscuits
- Mini Baked Jam Doughnuts
- White Chocolate Butterfly Cakes
- Cherry & Almond Friands
- Zebra Cake
- Easy Vanilla Cake
- Zucchini, Parmesan & Basil Muffins
- Mixed Seed & Fig Crackers
- Rhubarb Sour Cream Crumble Cake
I have never done a cooking course online before and now I would highly recommend it! Though I’ve been baking for a long time I’ve actually never been taught the basics. It was great to start from the beginning and this has improved my baking. You will pick up lots of tips and the recipes are divine. I really enjoyed the course.
Vanessa Hasler, Melbourne
How does a self-paced course work?
This online course is completely self-guided. Upon enrolment, you will gain access to the course content which you can work through at your own pace. You can log on whenever it is convenient for you and complete the modules one day at a time.
You can take 14 days or more to complete the course – it's up to you how quickly you want to work through the content. You will have lifetime access to all the recipes, videos and printable information sheets so you can dip in and out of it whenever it suits you.
There is the option to connect with other bakers via Facebook through BakeClub's exclusive The Kitchen Table membership group. This way you can share your experience and support each other as your confidence and skills grow.
Baking Basics is proudly supported by


$150.00/pp
more info- Products -
Baking Foundations is a fun and engaging self-paced online course that will take you back to the fundamentals of baking.
Anneka's enthusiasm and passion spoke to me and I now feel more confident with my understanding of baking and the actual baking! This course is very well organised and professionally presented...I thoroughly enjoyed each module's information and recipes. I am a fairly competent baker, however I bake the same style of recipes. The Baking Foundations course baked me out of my comfort zone and I thoroughly enjoyed it (as did family and friends!)
Karen, USA
What is Baking Foundations? Watch the video below to find out:
You are invited to Anneka's online kitchen!
Baking Foundations is a self-paced online course that will take you back to the fundamentals of baking – in your own time, at your own pace – all from your own home kitchen!
With Anneka Manning as your guide, you will learn the essentials of baking in a logical, fun and engaging way. Full of tips, tricks and relevant information – suited to the way we bake today – this course will teach you that success in baking always comes back to the foundations.
Made up of info sheets, videos, recipes, checklists and infographics, the course material will be delivered in six modules which you can study and enjoy at your own pace. The course will cover basic ingredients, equipment and mixing methods, exploring all the little things that you may never have been taught.
At the end of this course, you will walk away with all the skills, knowledge and inspiration you need to bake at home with confidence and success!
Please note: Baking Foundations is an extended version of our Baking Basics online course so we do not recommend it to those who have already completed Baking Basics.
How to enrol
Baking Foundations is a self-paced course and is now open for enrolment.
Baking Foundations got me cooking things I had previously thought were complicated and out of my league. Learning the simple mixing methods made the techniques of baking much clearer and simpler, and therefore less daunting. I made some great bakes I might not have tackled before because I had assumed they were more complicated than they really were and I now feel more confident with future bakes.
Alison, Melbourne
Cost
$150
Who is this course suitable for?
This course is, quite simply, suitable for bakers of all skill levels!
- Beginners who want to start their baking journey and set strong foundations for their baking forever;
- Intermediate bakers who would like to strengthen and improve their basic skills and extend their knowledge;
- And experienced, more competent cooks, who would like to fill in all the baking "gaps" and learn things you may never have been taught (you don't know what you don't know, right?)
As this course is completed online, it is suitable for students from all over the world.
What will I get?
- Six downloadable course modules which will include invaluable information sheets, videos, recipes, checklists, infographics and much more to support and inspire your learning
- A thorough understanding of the basics of baking and how to use them to ensure baking success
- Membership to BakeClub's exclusive The Kitchen Table online group
- Baking confidence, knowledge and skill to use regularly at home – and the inspiration to get into the kitchen and get baking!
What will I learn?
Each module will include a combination of baking theory and practical exercises. Fun and engaging tasks will help you put into practise what you have learnt while Anneka's fail-safe recipes will inspire you to roll up your sleeves and get baking!
Module 1: Why Do We Bake?
The first module will explore why we bake (or why we should bake!) including the benefits that reach far beyond the kitchen walls. We will take a look at the ‘nasties’ that you will be able to avoid through your home baking, share personal stories and understand that baking is actually all about connecting.
Module 2: The Secrets to Baking Success
During the second module, you will discover the 10 most important things to do before you start baking to ensure you will be on the most efficient road to baking success. You will also learn how to measure accurately and how to get the most from your recipes.
Module 3: The Measure and Mix Method
The third module will explore the Measure and Mix Method – the perfect starting place if you are new to baking or just want to rebuild your baking skills from the ground up.
Module 4: The Baker’s Pantry
The fourth module is all about understanding the basic ingredients most commonly used in baking. Essential to becoming a good baker, you will learn how to use these ingredients to get the most out of them, creating the ultimate baker’s pantry so that you are well equipped for whenever you want to bake.
Module 5: The Measure and Beat Method
In our fifth module, you will learn the Measure and Beat Method. No-fuss, simple and quick, this method requires an electric mixer and is used for recipes with a high proportion of butter and sugar. Why? We’ll answer that during this module where you will also learn how to make the most out of recipes using this method.
Module 6: The Baker’s Kit
Having a carefully selected collection of utensils and equipment will do a lot for your baking confidence and success. Our final module will include a comprehensive guide to oven settings, mixing tools and essential bakeware.
Anneka is so knowledgable, you find out so much! I wasn't sure how an online baking course would work but I think you do a fabulous job and it works really well. I really enjoyed the variety of recipes we got to cook and it was very interesting to see how they tied into each lesson. I would recommend Baking Foundations!
Sue-Anne, Sydney
How does a self-paced course work?
This online course is completely self-guided. Upon enrolment, you will gain access to the course content which you can work through at your own pace. You can log on whenever it is convenient for you and complete the modules one day at a time.
You can take as long as you need to complete the course – it's up to you how quickly you want to work through the content. You will have lifetime access to all the videos, recipes and printable information sheets so you can dip in and out of it whenever it suits you.
There is the option to connect with other bakers via Facebook through BakeClub's exclusive The Kitchen Table membership group and via Instagram using #bakingfoundations. This way you can share your experience and support each other as your confidence and skills grow.
So, is Baking Foundations for me?
- Would you like to extend, strengthen and improve your baking skills?
- Have you perhaps never considered yourself to be a particularly good baker but you would like to give it a go and see if baking is for you?
- Would you like to be guided and inspired by Anneka's 30+ years of baking experience in your own kitchen?
- Do you have more time on your hands at the moment and keen to learn a new skill?
If any of these sound like you, then Baking Foundations is the course for you!
The course was great. I have not had that much fun in ages, not because I live a boring life but because I learnt genuine skills and gained confidence in baking that I did not expect. When I come back to the Module 1 question, "Why do I bake?", I can now sincerely respond: I bake for my family successfully but also for me as I get great enjoyment from my skills!
Nicole, Newcastle
Baking Foundations is proudly supported by


$275.00/pp
more info- Products -
Baking Foundations Holiday Intensive – a course that will take you back to the fundamentals of baking – will run from 3rd–26th July 2026.
Prefer to take this course as self-paced course?
Anneka's enthusiasm and passion spoke to me and I now feel more confident with my understanding of baking and the actual baking! This course is very well organised and professionally presented...I thoroughly enjoyed each module's information and recipes. I am a fairly competent baker, however I bake the same style of recipes. The Baking Foundations course baked me out of my comfort zone and I thoroughly enjoyed it (as did family and friends!)
Karen, USA
What is Baking Foundations? Watch the video below to find out!
You are invited to Anneka's online kitchen!
Baking Foundations Holiday Intensive is a 3-week guided version of our very popular Baking Foundations online course that will take you back to the fundamentals of baking. This course will still have all the fabulous content of the original 6-week course but will just be compressed – perfect for those wanting to make good use of their holiday downtime or get the kids involved in the kitchen during the school holidays.
With Anneka Manning as your guide, you will learn the essentials of baking in a logical, fun and engaging way. Full of tips, tricks and relevant information – suited to the way we bake today – this course will teach you that success in baking always comes back to the foundations.
Learning in your own kitchen at your own pace, Anneka will help and encourage you along the way. The course will cover basic ingredients, equipment and mixing methods, exploring all the little things that you may never have been taught.
The course will be delivered in 6 modules with 2 modules being released every Friday. Made up of info sheets, videos, recipes, checklists and infographics, you can download and print them off to study and enjoy at your own pace.
After 3 weeks, you will walk away with all the skills, knowledge and inspiration you need to bake at home with confidence and success!
Please note: Baking Foundations is an extended version of our Baking Basics online course so we do not recommend it to those who have already completed Baking Basics.
Dates
3rd – 26th July 2026.
Cost
$275 (50% discount for all BakeClub & Co. Members)
Baking Foundations got me cooking things I had previously thought were complicated and out of my league. Learning the simple mixing methods made the techniques of baking much clearer and simpler, and therefore less daunting. I made some great bakes I might not have tackled before because I had assumed they were more complicated than they really were and I now feel more confident with future bakes.
Alison, Melbourne
Student numbers
We will only be accepting a limited number of bakers for this course so that Anneka can provide personal feedback and get to know you as you embark on your baking journey.
Live Session schedule
During this 3-week course, you’ll enjoy access to two online Live Q&A Sessions with Anneka. These will be an opportunity to ask her any questions that arise as you work through the course content. The dates are:
- Sunday 12th July from 3.00-4.00pm (AEST)
- Saturday 18th July from 10.00–11.00am (AEST)
Who is this course suitable for?
This course is, quite simply, suitable for bakers of all skill levels!
- Beginners who want to start their baking journey and set strong foundations for their baking forever;
- Intermediate bakers who would like to strengthen and improve their basic skills and extend their knowledge;
- And experienced, more competent cooks, who would like to fill in all the baking "gaps" and learn things you may never have been taught (you don't know what you don't know, right?)
As this course is completed online, it is suitable for students from all over the world.
What will I receive?
- Six downloadable course modules filled with invaluable information sheets, step-by-step videos, recipes, checklists, infographics and more – all designed to support and inspire your learning.
- Personal, timely baking guidance, advice and encouragement from Anneka Manning throughout the course.
- Access to a private online forum where you can ask Anneka your baking questions, share your progress and connect with fellow students – learning from and supporting one another along the way.
- Two online Live Sessions with Anneka (see dates above), offering the opportunity to meet other participants and ask additional questions in a supportive, live setting.
- The experience of learning the fundamentals of baking in a welcoming (virtual) community of like-minded bakers.
- Free membership to BakeClub & Co. for the duration of the course
- A thorough understanding of core baking principles – and how to apply them to ensure consistent success.
- Membership to BakeClub’s exclusive The Kitchen Table online group upon completion of the course.
- Lasting baking confidence, knowledge and skills to use regularly at home – along with the inspiration to step into the kitchen and bake with purpose and pleasure.
What will I learn?
Each module will include a combination of baking theory and practical exercises. Fun and engaging tasks will help you put into practise what you have learnt while Anneka's fail-safe recipes will inspire you to roll up your sleeves and get baking!
Module 1: Why Do We Bake?
The first module will explore why we bake (or why we should bake!) including the benefits that reach far beyond the kitchen walls. We will take a look at the ‘nasties’ that you will be able to avoid through your home baking, share personal stories and understand that baking is actually all about connecting.
Module 2: The Secrets to Baking Success
During the second module, you will discover the 10 most important things to do before you start baking to ensure you will be on the most efficient road to baking success. You will also learn how to measure accurately and how to get the most from your recipes.
Module 3: The Measure and Mix Method
The third module will explore the Measure and Mix Method – the perfect starting place if you are new to baking or just want to rebuild your baking skills from the ground up.
Module 4: The Baker’s Pantry
The fourth module is all about understanding the basic ingredients most commonly used in baking. Essential to becoming a good baker, you will learn how to use these ingredients to get the most out of them, creating the ultimate baker’s pantry so that you are well equipped for whenever you want to bake.
Module 5: The Measure and Beat Method
In our fifth module, you will learn the Measure and Beat Method. No-fuss, simple and quick, this method requires an electric mixer and is used for recipes with a high proportion of butter and sugar. Why? We’ll answer that during this module where you will also learn how to make the most out of recipes using this method.
Module 6: The Baker’s Kit
Having a carefully selected collection of utensils and equipment will do a lot for your baking confidence and success. Our final module will include a comprehensive guide to oven settings, mixing tools and essential bakeware.
Anneka is so knowledgable, you find out so much! I wasn't sure how an online baking course would work but I think you do a fabulous job and it works really well. I really enjoyed the variety of recipes we got to cook and it was very interesting to see how they tied into each lesson. I would recommend Baking Foundations!
Sue-Anne, Sydney
How will I get the most out of this course?
To truly benefit from this course, we recommend setting aside 3–4 hours each week to read the content, watch the videos, join the online Live Sessions and bake the recipes. This dedicated time will allow you to build skills steadily and gain the full, far-reaching benefits the course is designed to deliver.
We understand that life can sometimes interrupt the best of plans – which is why you’ll have 6 months’ access to the course content – but consistent time and effort will make all the difference to your progress, confidence and enjoyment in the kitchen.
So, is Baking Foundations for me?
- Will you have a little more time during the holiday period and would love to use that space to enjoy some relaxed baking while building valuable skills?
- Are you keen to keep the kids engaged over the school holidays – and show them the rewards of making food from scratch?
- Would you like to strengthen, extend and refine your baking skills?
- Perhaps you’ve never thought of yourself as a confident baker, but you’re ready to explore what’s possible?
- Would you enjoy a taste of what BakeClub is all about?
- Are you interested in connecting with like-minded people and sharing your love of baking?
If you answered “yes” to any of these questions, then Baking Foundations Holiday Intensive is the course for you.
The course was great. I have not had that much fun in ages, not because I live a boring life but because I learnt genuine skills and gained confidence in baking that I did not expect. When I come back to the Module 1 question, "Why do I bake?", I can now sincerely respond: I bake for my family successfully but also for me as I get great enjoyment from my skills!
Nicole, Newcastle
Baking Foundations is proudly supported by

Prep 40min (+ 30min cooling time)
Bake 25minMakes 6 serves
A childhood classic given a modern twist, this fruity split is the perfect dessert to share with a crowd. Place all the separate elements in the centre of the table and arm your guests with their own bowl and spoon. Ready, set, go!
Ingredients
1 x 500ml (17fl oz) tub good–quality vanilla ice-cream, to serve
Salted peanut honey wafers
35g (¼ cup/1¼oz) plain flour
55g (¼ cup/2oz) caster sugar
85g (¼ cup/3oz) honey, warmed slightly
50g (1¾oz) unsalted butter, melted and cooled
1 egg white
100g (3½oz) salted roasted peanuts, very coarsely chopped
Chocolate fudge sauce
185g (6½oz) good-quality dark chocolate (45-54% cocoa), chopped
185ml (¾ cup/6½fl oz) pouring cream
1 tablespoon (4 teaspoons) honey
Caramelised Honeyed Banana
6 firm, ripe bananas (about 170g/6oz each)
20g (¾oz) salted butter, diced
2 tablespoons (8 teaspoons) honey
Chantilly cream
150ml (5fl oz) thickened cream
1 teaspoon vanilla bean paste
1½ tablespoons (6 teaspoons) icing sugar
Method
- To make the Honey and peanut wafers, preheat the oven to 150°C/300°F (130°C/265°F fan-forced). Line a large oven tray with non-stick baking paper. Place the flour and sugar in a medium bowl. Combine the honey, butter and egg white, add to the dry ingredients and use a balloon whisk to stir until just combined and smooth. Pour the mixture onto the lined tray and use the back of a spoon to spread the mixture evenly as evenly as possibly into a thin 25cmx30cm/10inx12in rectangle. Sprinkle evenly with the peanuts. Bake in the centre of the preheated oven for 25 minutes, turning the tray around after 15 minutes to help bake evenly, or until dark golden and the centre is cooked through. Remove from the oven and cool on the tray (this will take about 30 minutes). Break into large pieces and set aside.
- To make the Chantilly cream, combine the cream, icing sugar and vanilla in a medium bowl and use a balloon whisk or an electric hand mixer with a whisk attachment to whisk the cream until soft peaks form. Transfer to a serving bowl, cover place in the fridge until ready to serve.
- To make the chocolate fudge sauce, combine the chocolate, cream and vanilla in a small saucepan and heat over a medium-low heat, stirring occasionally, until the chocolate melts and the sauce is smooth. Transfer to a heatproof jug, cover and keep warm.
- To make the caramelised honeyed bananas, peel the bananas and cut each in half lengthways. Melt half the butter in a large non-stick frying pan over medium-high heat. Drizzle in half the honey and then add half the banana slices in a single layer. Cook for 2-4 minutes each side or until the bananas are golden and caramelised. Transfer to a serving bowl, wipe out the pan with paper towel and repeat with the remaining butter, honey and banana.
- To serve, place the caramelised banana, wafers, fudge sauce, cream and ice-cream in the centre of the table for guests to assemble their own dessert.
Baker's Tips
- The wafers will keep in an airtight container at room temperature for up to 1 week.
- The chocolate fudge sauce will keep in an airtight jar or container in the fridge for up to 5 days. Reheat in a small saucepan or microwave until smooth and warmed through.
This recipe is part of Anneka's SBS Food Bakeproof: DIY dessert bar online column. For more Bakeproof columns and recipes, click here.
Photography by Alan Benson.
Prep 20-30minMakes 30 profiteroles or 12 average-sized éclairs
Completely unique in the pastry world, choux pastry goes against every rule in the book – eggs are more important than butter, the mixture is heated, and beating, as opposed to 'rubbing', is the method of mixing.
Ingredients
- 150g (1 cup) plain flour
- 185ml (¾ cup) water
- ½ teaspoons salt
- 75g salted butter, diced
- 4 eggs (59g each)
Method
- Sift the flour onto a sheet of baking paper.
- Combine the water, salt and butter in a medium saucepan and heat over medium heat until just boiling. Remove immediately from the heat, add all the flour at once and stir vigorously with a wooden spoon to combine.
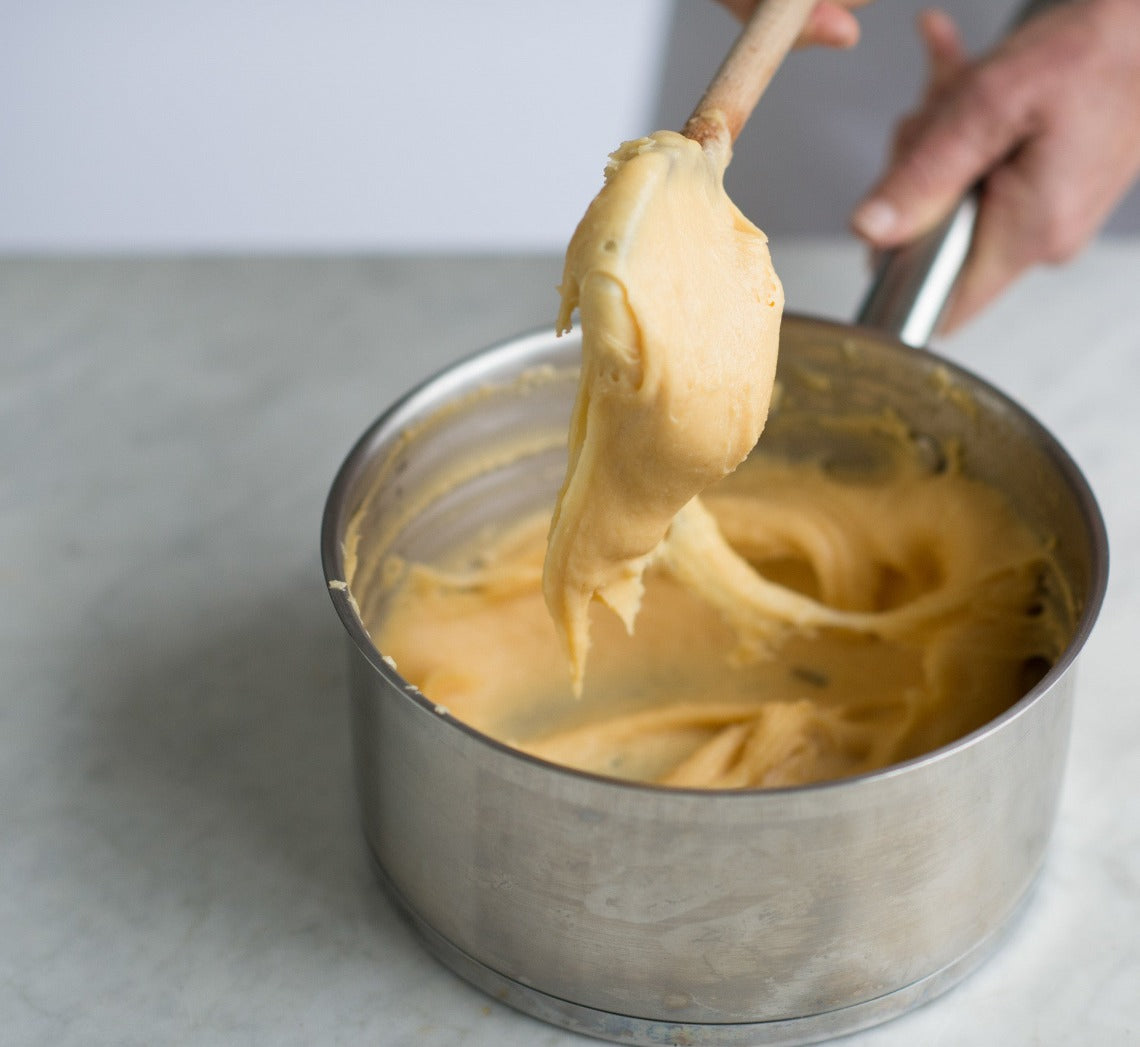
- Return the saucepan to the heat and beat vigorously over a low heat for 30 seconds or until the mixture is smooth and starts to pull away from the sides of the pan and a flour film forms on the bottom of the pan (image 1). Remove the saucepan from the heat and set aside for 3-5 minutes or until cooled slightly.
- Use a fork to whisk together the 3 eggs. Add about one-quarter of the whisked eggs to the flour mixture at a time (image 2), beating well with the wooden spoon after each addition until well combined and the mixture thickens and becomes smooth before adding more (image 3 and 4). Use a fork to lightly whisk the extra egg and gradually add to the flour mixture a teaspoon at a time (image 5) and beating well after each addition until the mixture is thick, shiny and falls heavily from the spoon (image 6). You may not need to use all of the last egg.
- Pipe (as below) and bake immediately, or cover well and keep in the fridge for up to 24 hours before baking as directed. Bring to room temperature before using.
Baker's Tips
Making choux pastry
There are three main things to keep in mind when making choux pastry to ensure success:
- Measure your ingredients accurately, as the key to good choux pastry is a balance between the major ingredients of flour, water and eggs. If there is an imbalance between these, there is a great chance your choux won’t puff, become crisp or turn a golden brown colour.
- Add the egg gradually. The amount of egg needed will vary and is determined by how much can be absorbed by the flour (which can vary slightly from batch to batch). If too much egg is added or if it is added too quickly, the consistency of the choux pastry will be affected, and in turn its ability to rise. Similarly, if not enough egg is incorporated, the choux pastry won’t puff and it will be dense inside. This is because it is the moisture in the egg that is converted to steam in the heat of the oven and that, in turn, creates the air pocket inside. So the more egg, the more the mixture will puff.
- Oven temperature is important. If the oven temperature is too low or if the oven door is opened for too long and valuable heat is lost during baking, your choux pastry won’t rise as well. The same applies if you don’t bake it for long enough.
Piping choux pastry
- Choux pastry can either be spooned or piped onto a baking paper-lined oven tray for baking, depending on the desired result.
- Sprinkle the lined baking tray with a little water before piping or shaping your choux pastry – this creates extra steam in your oven and will help the choux pastry rise and puff.
- Spoon the choux pastry into a large pastry bag filled with a large piping nozzle. Twist the end of the pastry bag to contain the mixture and push it towards the nozzle end and expel any air pockets. Place the twisted end between your index finger and thumb of your writing hand and place the bag in the palm of your hand. Use your other hand to hold the nozzle end and guide it as you pipe.
- Firmly hold the bag about 1 cm above the lined tray and at a slight angle. Press gently with the hand holding the bag, pushing the pastry through the nozzle and moving the bag to create the desired shape. (For profiteroles and small rounds, hold the bag and nozzle directly over the tray, perpendicular to the tray and pipe the desired size.)
- When you reach the desired length, pipe the mixture back onto the shape when finished to avoid a peaked end. Use a damp fingertip to press and neaten any peaks.
- To help create uniformed lengths for éclairs, you can mark lines on the underside of the baking paper with a pencil. For evenly-sized choux puffs, you can mark the lined tray with a flour-dipped cutter of the desired size.
- Bake the choux pastry as directed in the recipe.
Cooling choux pastry
- Perfect choux pastry is puffy and crisp, hollow inside and is a deep golden colour. To help the éclairs and puffs dry out inside you can either split them in half or piece a hole in the base or side before they cool to allow any excess steam to escape.
To make choux pastry with an electric mixer
- Follow the recipe until the point of removing the flour mixture from the heat. Transfer the mixture to the bowl of an electric mixer with a paddle attachment and beat in the 3 eggs, one at a time, beating until well combined and smooth after each addition. Use a fork to lightly whisk the last egg and gradually add to the flour mixture, a teaspoon at a time, beating well after each addition until the mixture is thick, glossy and falls heavily from the spoon. You may not need to use all of the last egg.
This recipe is from Anneka's SBS Food online column, Bakeproof: Choux Pastry.
CLICK HERE for more Bakeproof recipes.
Photography by Alan Benson.


