
BakeClub Blog
Tips & tricks on making your own sourdough bread
Everything you need to know about how to make and bake your own sourdough bread. A straightforward primer to help beginner bakers find their sourdough 'feet' and gain confidence.
How to make your own sourdough starter
Read my practical step-by-step guide on how to make your own sourdough starter and then follow the guidelines on how to feed, maintain, store and use your starter. Then, read on for all my tips on sourdough breadmaking and equipment.
If you would love to be guided through the process of making your own sourdough bread from making your starter through to baking your bread, click here to find out more about our online course BakeSchool: Sourdough.
What is a levain or pre-ferment?
Levain, also known as leaven, can sometimes refer to the sourdough starter itself but it is also used to describe a mixture of sourdough starter, flour and water that is made prior to making the bread dough itself – essentially a pre-ferment.
Creating a levain kickstarts the fermentation and flavour development process, ultimately giving more flavour to your bread, but also helping to create a thicker, chewier crust and an outstanding texture.
A levain is left to prove for 4–24 hours, depending on the recipe, before it is combined with more flour, water and salt to make the bread dough itself.
Kneading
For a dough to have a strong structure so it can hold the bubbles of air or carbon dioxide that the yeast produces during fermentation, the protein in the flour must be converted into gluten. Gluten is developed by hydrating the protein – essentially adding moisture (often water) and making sure it is evenly distributed throughout the dough (often by kneading). Kneading not only develops the gluten but realigns the strands or gluten and strengthens the network to give a stronger structure to the dough.
My Basic sourdough bread recipe uses a stretching and folding process in conjunction with multiple proving times to hydrate the protein and develop the gluten network instead of traditional kneading. Breads made using a stretching and folding process tend to be higher in moisture and therefore softer, and will result in a bread with a great texture with lots of uneven air pockets.
The ideal protein content for flour used in bread making is 11–14%. It is often labelled as strong bread or pizza flour and can be found in the baking section of most supermarkets, but also from delicatessens and specialty food stores.
Proving
Yeast doughs need to be left in a warm, draught-free place to prove after kneading (known as the bulk prove), and usually again after shaping (known as the final prove). Proving ‘exercises’ the strands of gluten, making them stronger and helping to develop the structure of the bread. It also develops flavour.
Yeast is active between 0.5ºC – 54.5ºC (33ºF – 130ºF) but is at its happiest between 25ºC – 28ºC (77ºF – 82ºF). This temperature range is the ultimate for proving bread doughs. The proving time is directly related to the temperature - the warmer the temperature, the quicker the proving time.
If proved above 32ºC (90ºF), unpleasant flavours can develop, so don’t try and quicken the proving process by increasing the proving temperature – your bread won’t like it. Remember, long, slow proving will create a more developed flavour in a bread.
Because yeast is active at temperatures above 0.5ºC (33ºF), you can prove your dough in the fridge. Obviously, the yeast will be less active and fermenting at a slower rate; therefore proving will take longer. It is also interesting to note that a dough proved slowly (often overnight) at temperatures between 4ºC – 12ºC (40ºF – 54ºF) will not only develop more intense sour flavours but also its structure will be stronger, creating a chewier crumb.
To do this, allow the bread to prove at room temperature for 1–3 hours (depending on the recipe) before transferring it to the fridge. It will continue to rise for 3–4 hours after you put it in the fridge as it chills down and then will ferment at a slower rate for the remaining time. Before baking, remove the dough from the fridge and stand in the basket for 1–2 hours to allow the dough to warm slightly before turning out and baking.
The ideal room temperature for proving is between 25ºC – 28ºC (77ºF – 82ºF) and breads proved at this temperature will have a milder flavour than those proved at lower temperatures (as mentioned above). Depending on the weather and the temperature of your kitchen you may need to create a warm micro-environment to prove your dough, particularly on very cold days. There are a number of ways you can do this:
- Pour some hot tap water into a saucepan and place the dough in a covered heatproof bowl over it, making sure the water doesn’t touch the bowl and replacing the hot water as it cools.
- Turn your oven pilot light on to gently heat your oven. Place the dough in a covered heatproof bowl on the middle rack, close the door and leave to prove.
- Place the dough in a covered heatproof bowl on a wooden board on top of a preheated oven or on the open door of an oven set on the lowest possible setting.
- Place the dough in a covered heatproof bowl on a sunny windowsill or a spot outside in dappled sunlight (as long there is no draught).
However, if a dough proves for too long, the yeast will use all the sugar in the dough and the resulting bread will have a pale crust and little flavour.
When finished proving, your dough will generally have doubled in size (although this can vary so make sure you follow your recipe) and it won’t spring back when you gently press a finger into it.
Bannetons (dough proving baskets)
Bannetons, or dough proving baskets, support and help bread hold its shape as the bread proves and rises, particularly if the dough has a high moisture content and is quite soft. Bannetons are made from a variety of different materials but the best ones are those that are porous and allow the dough to breath. If not, the moisture from the dough as it proves can cause it to stick to the basket or cloth.
They can be used either unlined for the pattern of the basket to imprint the dough (pictured below, top left and right) or lined for a smooth finish (pictured below, bottom).

Some come with a permanent cloth lining, but a soft, open-weave tea towel or cloth (preferably linen) can also be used to line a basket.
Alternatively, a colander lined with a tea towel can be used (pictured below, right).
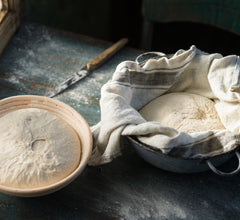
Either way, the basket itself or the cloth that lines it needs to be well dusted with flour and rubbed in well.
It’s also important to make sure that the bread surface itself is well dusted with flour (but not rye flour as this will make it even stickier) before adding it to the basket, which prevents it sticking when it comes to removing it.
When removing the dough from the basket, it can easily collapse and loose valuable air so make sure you unmould it gently, using your fingertips to ease it gently away from the basket if it sticks, to help prevent it from deflating.
Before storing your baskets, make sure they are completely dry (placing them in the sun to dry works well). If you have used them unlined and flour is caught between the ridges, use a skewer to remove the dried flour before storing.
Dividing dough
When dividing dough into small portions to make multiple loaves or small rolls, use a sharp knife or pastry scraper to cut it rather than tear it, which can break and damage the gluten strands that have been created; it also means that you can retain as much air as possible to help create an open texture in your rolls. Weighing the dough portions will help divide it evenly.
Slashing
Bread loaves are often scored with a sharp blade. It isn’t absolutely necessary, but scoring will determine where the bread will split as the loaf expands during baking (rather than cracking randomly) and will help the loaf rise fully.
Use a very sharp knife or single-edged razor blade to mark the slash and then repeat to make a deeper cut. The deeper the cut the more the bread will ‘open’ – generally a 1.5cm-deep cut works well.
Baking your bread
Intense oven temperature and a steamy heat are the two main factors that will guarantee a crunchy, crisp crust typical of sourdough bread:
Oven temperature
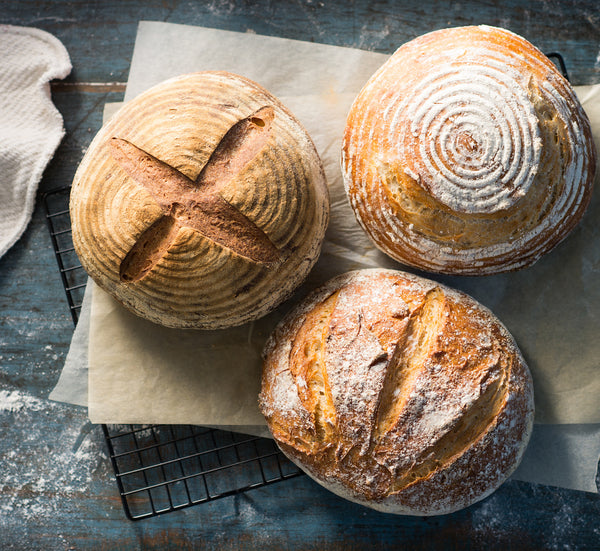
Bread is generally baked at high temperatures but you can control the colour and thickness of your crust by varying the baking temperature and time. The basic sourdough loaves (see main image) can either be baked at 240ºC for 20 minutes before reducing the temperature to 220ºC and baking for a further 15 minutes (as the loaf on the left has been) or for 40—45 minutes at 220ºC (as the two loaves on the right have been).
The initial high temperature will create a loaf with a very dark, thick crust, while the consistent lower temperature will create a loaf with a paler, thinner crust. By baking at different temperatures (and for slightly different times) you can create quite a different crust.
Steamy heat
If a crunchy, shiny crust is what you’re after, steamy heat is what you need. You can introduce steam by spraying a little water from an atomiser or spray bottle straight onto the surface of your bread dough just before adding it to the oven (but only if the dough hasn’t been dusted with flour already).
Alternatively, and the method I prefer, throw a small bowlful of ice cubes onto the hot oven floor straight after you put the bread dough to the oven, then close the oven door.
The extra moisture in the oven will:
- Stop the crust from developing too early and allow the dough to rise and expand to its full capacity.
- Help the enzymes to break down the carbohydrates in the dough into sugar giving the crust a deep golden colour.
- Gelatinise the starches on the surface of the dough creating a beautiful glossy finish.
Pizza stones
Sourdough breads are best baked at high temperatures (low temperatures can cause the bread to rise poorly and have a heavy texture). Using a bread or pizza stone to bake free-form loaves means that heat is transferred to the bread quickly, giving it an instant burst of heat, helping it to rise before the crust starts to set.
Make sure to place your bread or pizza stone in your oven before preheating it so that the stone is hot before you place your bread dough onto it.
It’s a good idea to turn the shaped dough onto an oven tray without sides that has been lined with baking paper so you can easily slide the dough from the tray onto the pizza stone with the help of the baking paper.
Storing your bread
Allow your bread to cool completely before slicing so that the crumb isn’t compressed, resulting in a ‘doughy’ texture.
Sourdough is always best eaten fresh the day it is made; however, it can be stored for 2-3 days and used for toast or refreshed in the oven. It is best stored in a brown paper bag at room temperature to retain the crisp crust.
To freeze rolls, a whole loaf or slices, place in a sealed plastic bag and freeze for up to 3 months. Use slices straight form the freezer or thaw slices, rolls or whole loaves at room temperature.
This blog is part of Anneka's SBS Food Bakeproof: Sourdough online column. For more Bakeproof columns and recipes, click here.
Photography by Alan Benson.


