
- home
- BAKERECIPES
BakeRecipes
Bringing real baking into your home with deliciously simple recipes.
Prep 30min (+15min cooling and 1hr standing time)Bake 15minMakes 20
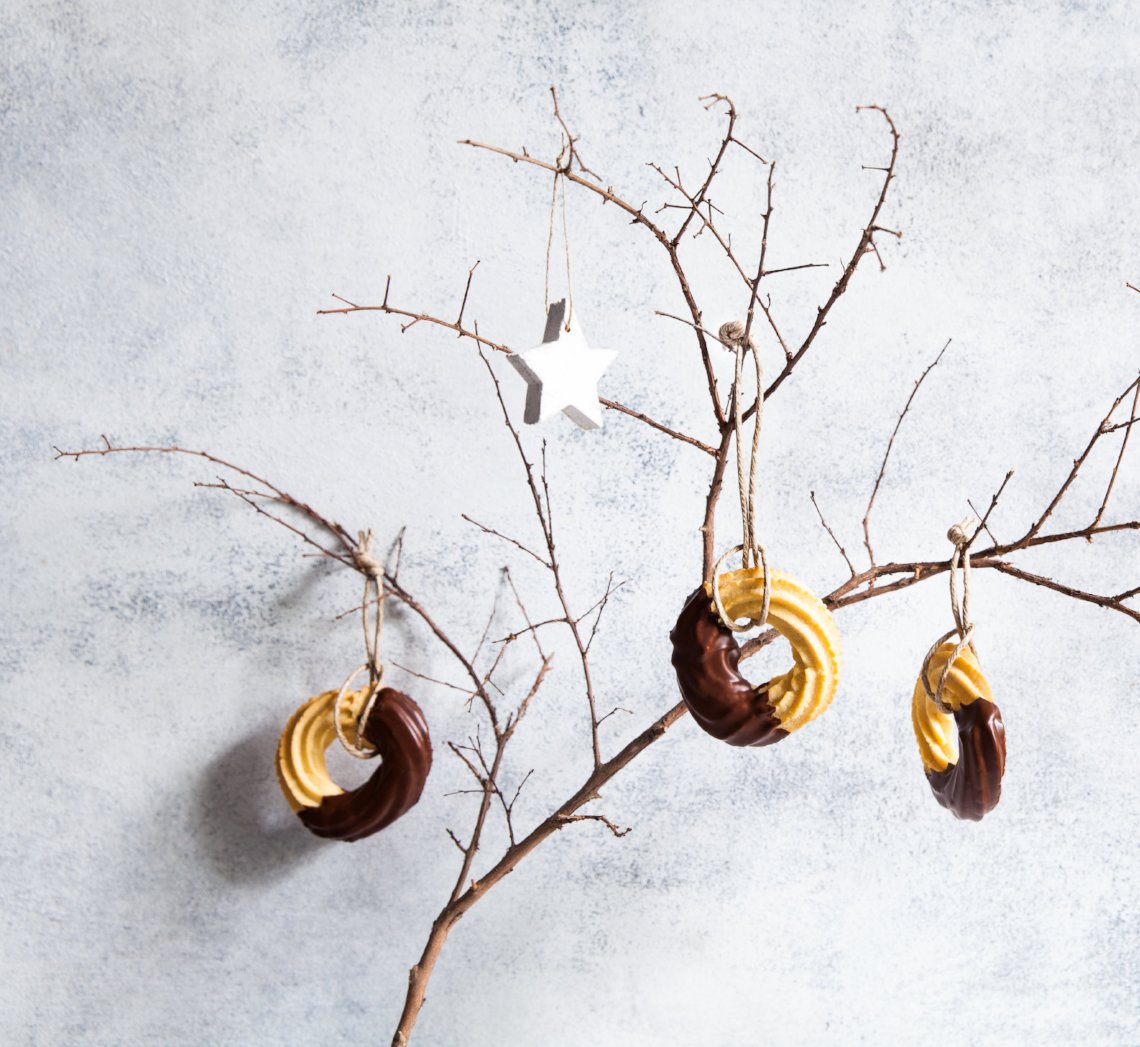
The German word spritzen means to squirt and reflects the way these cookies are shaped – by pushing them through a piping nozzle. The almond meal in the dough gives a lovely soft, almost cakey, texture to these chocolate-dipped cookies that can be piped in various designs, including mini wreaths.
Ingredients
- 250g butter, softened
- 220g (1 cup) caster sugar
- 1½ teaspoon natural vanilla essence or extract
- 3 eggs
- 450g (3 cups) plain flour
- 60g almond meal
- 300g good-quality dark chocolate (45-54% cocoa), chopped
Method
- Preheat oven to 180°C (160°C fan-forced). Line two large oven trays with non-stick baking paper.
- Use an electric mixer to beat the butter, sugar and vanilla until pale and creamy. Add the eggs, one at a time, beating well between each addition. Combine the flour and almond meal. Add to the butter mixture and beat on the lowest possible speed until just combined.
- Spoon half the mixture into a large piping bag fitted with a 13 mm (#13) star nozzle. Pipe 6–7 cm circles onto the lined trays (see Baker’s tips). Repeat with the remaining mixture.
- Bake for 15-18 minutes, swapping the trays halfway through baking, or until pale golden and cooked through. Cool on the trays.
- Place the chocolate in a heatproof bowl over a saucepan of simmering water and heat, stirring occasionally, until melted. Turn off the heat but leave the bowl sitting on top. Dip a cooled cookie into the chocolate to coat half of the cookie. Place back on the lined tray and repeat with the remaining cookies. Tap the trays on the benchtop lightly to settle the chocolate into the grooves of the cookies, then set aside for about 1 hour or until the chocolate sets.
Baker's tips
- You can use a 6–7 cm round cutter as a guide to draw circles onto the underside of the baking paper to help keep your cookies uniform in size.
- These cookies will keep in an airtight container at room temperature for up to 1 week.
This recipe is from Anneka's SBS Food online column, Bakeproof: Festive Cookies.
CLICK HERE for more Bakeproof columns and recipes.
Photography by China Squirrel.
Prep 40min (+1hr cooling and 2hr standing time)Bake 30minMakes 10-12 serves
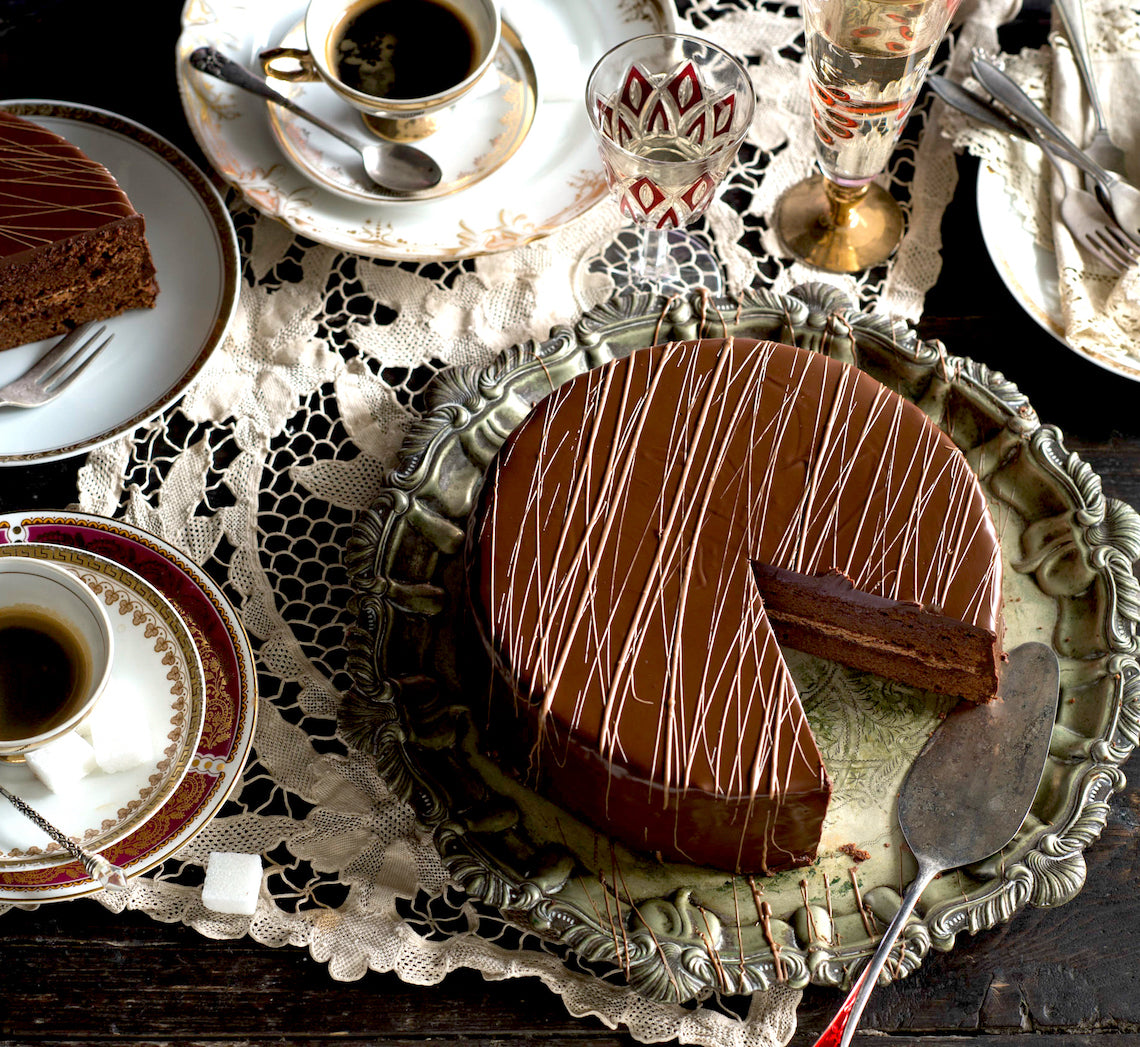
Possibly the most famous cake in the world, and certainly the pride of Austria, Sacher Torte was created by Franz Sacher, a 16-year-old apprentice stepping in for an ill head chef, to impress the guests of Prince Wenzel von Metternich. And as they say, the rest is now cuisine history. This elegant, rich and enticing cake is now loved the world over.
Ingredients
Melted butter, to grease
125g unsalted butter, softened
125g (1 cup) icing sugar, sifted
1½ teaspoons natural vanilla essence or extract
6 eggs, at room temperature, separated
175g good-quality dark chocolate (54% cocoa), chopped, melted and cooled to room temperature
110g (¾ cup) plain flour
110g (½ cup) caster sugar
85g (¼ cup) apricot jam, warmed and sieved
40g good-quality milk chocolate, melted, to decorate
Thick or whipped cream, to serve
Chocolate Glaze
300g good-quality dark chocolate (54% cocoa)
60g butter, cubed
Method
- Preheat oven to 180°C (160°C fan-forced). Brush 2 x shallow 20cm round cake tins with melted butter to grease and line the bases with rounds of non-stick baking paper.
- Use an electric mixer to beat the butter, icing sugar and vanilla until pale and creamy. Add the egg yolks and beat until well combined and creamy. Beat in the cooled melted chocolate until well combined. Use a large metal spoon or spatula to fold in the flour until just combined.
- Use an electric mixer with a whisk attachment to whisk the egg whites in a large clean, dry bowl until soft peaks form. Add the caster sugar and whisk on medium-high speed until thick and glossy and all the sugar has dissolved (see Baker’s tip). Add half the egg white mixture to the chocolate mixture and use a large metal spoon or spatula to fold in to ‘loosen’ the mixture. Add the remaining egg white mixture and fold until just evenly combined.
- Divide the mixture evenly between the tins and use the back of a spoon to smooth the surface. Bake in preheated oven for 30 minutes or until a skewer inserted into the centre of the cakes comes out clean. Stand in the tins for 10 minutes before turning onto a wire rack to cool (this will take about 1 hour).
- Once cool, spread one cake layer with the warmed sieved jam and then top with the second layer, bottom side up. Place the cake on a wire rack over a tray and set aside while making the chocolate glaze.
- To make the chocolate glaze, combine the chocolate and butter in a heatproof bowl and place over a saucepan of barely simmering water (make sure the base of the bowl doesn’t touch the water). Stir occasionally until just melted and combined. Use a plate knife to spread a little of the glaze over the outside of the cake to form a ‘crumb coat’ and to even the surface. Place in the fridge for 20 minutes or until set. Remove from the fridge and carefully pour over the rest of the glaze, allowing it to run down the sides of the cake to coat evenly. Tap the cake, still on the rack, gently on the tray to remove any air bubbles and to settle the glaze. Use a fork to drizzle the milk chocolate over the top of the cake to decorate. Set aside for 2 hours or until the glaze sets. Serve cut into small wedges with cream.
Baker’s Tips
- To test if all the sugar has dissolved, rub a little of the egg white and sugar between two fingers – you will be able to feel if there is still undissolved sugar. Whisk for another minute if not completely dissolved before testing again.
- This cake will keep in an airtight container at room temperature for up to 4 days.
This recipe is from Anneka's SBS Food online column, Bakeproof: Austrian Baking.
CLICK HERE for more Bakeproof columns and recipes.
Photography by Alan Benson.
Prep 25min (+ cooling and chilling time)
This recipe was created by Lisa Frost, one of our Make Me a Baker graduates, to use as part of her Graduation cake recipe. She wanted to create a curd she could use in, and serve with, the vegan cakes she was baking through her baking business, The Naked Lion Co. The result was this egg- and butter-free rich curd that will bring sunshine to any cake or dessert.
Ingredients
125ml (½ cup) strained fresh lemon juice
165-220g (¾-1 cup) caster sugar (depending on sweetness preferred)
40g (⅓ cup) cornflour
Pinch salt
Pinch ground turmeric
20g coconut oil
1 tablespoon coconut cream
Method
- Combine the lemon juice, sugar, cornstarch and salt in a small saucepan. Cook over a medium-high heat, stirring constantly, until it thickens and comes to a simmer.
- Remove from the heat and stir in the turmeric, or enough to reach the rich yellow colour typical of lemon curd. Mix in the coconut oil and then add the coconut cream, a little at a time until the curd reaches a good consistency (it will thicken a little more on cooling).
- Place mixture into a medium bowl. Cover the surface with plastic wrap and set aside to cool. Refrigerate for 3 hours or until well chilled before using.
Baker's Tips
- This lemon curd will keep well in a sealed jar in the fridge for 1-2 weeks.
Prep 25min (+ lemon curd making time)Bake 50minMakes 10-12 serves
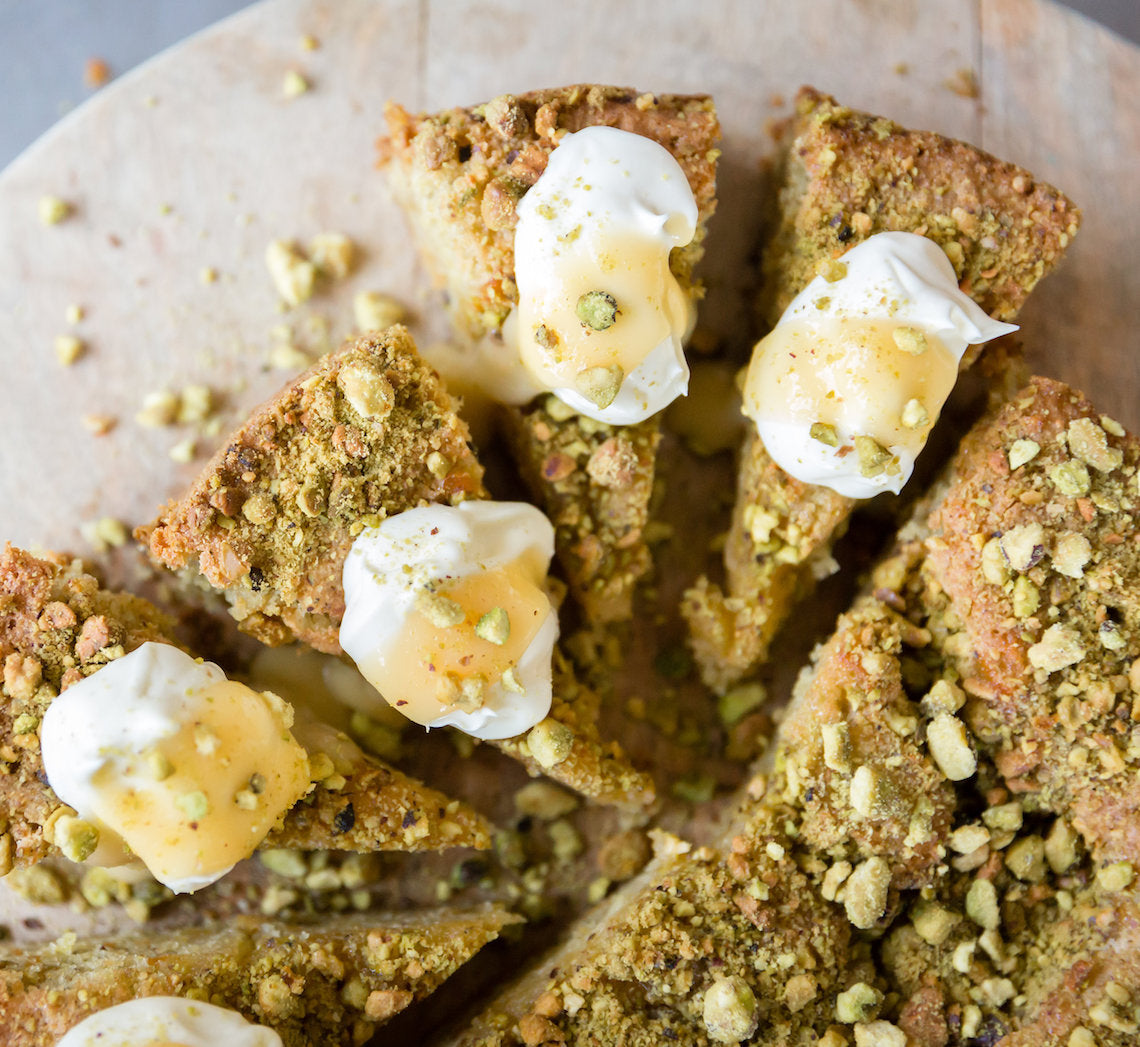
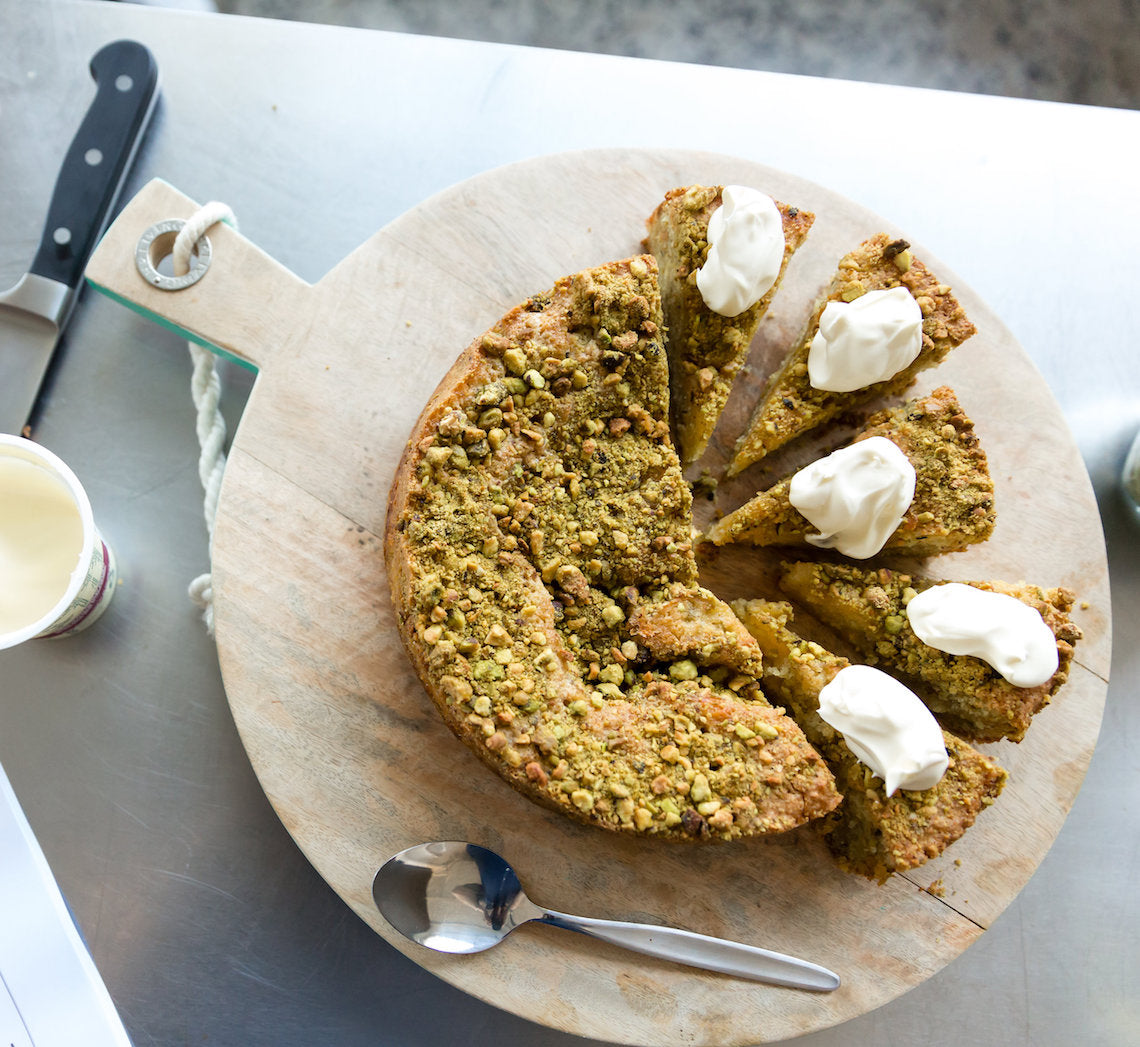
This wonderful cake was created by one of our Make Me a Baker graduates, Lisa Frost, for her graduation ceremony. Mor-ish with a lovely 'wholesomeness', the secret to this wonderful cake is that a layer of Lisa's vegan lemon curd is baked into the cake giving it a fabulously tangy, moist centre.
Ingredients
1 quantity Vegan Lemon Curd, chilled
Double / thick cream, to serve
2 tablespoons coarsely chopped pistachios, to serve
Cake
Cooking oil spray, to grease
160g (1¼ cups) finely chopped pistachios kernels
125g unsalted butter, at room temperature
150g (¾ cup) organic coconut sugar
1½ tablespoons finely grated lemon rind
50g (¼ cup) apple puree
3 eggs, at room temperature
100g (⅔ cup) plain cake flour
1 teaspoon baking powder
Method
- Preheat oven to 180°C (160°C fan-forced). Grease a 22cm round springform tin then line base and sides with 2 layers of baking paper. Spray the side lining paper with oil, avoiding the base of the pan. Place ¼ cup of the pistachios in the pan and rotate pan on its side to coat the side with nuts.
- Use an electric mixer to beat the butter, sugar and lemon rind until pale and creamy, scraping down the side of the bowl when necessary. Mix in the apple puree on low speed. Add the eggs one at a time, beating well after each addition until well combined.
- Sift together the flour and baking powder. Add ⅔ cup of the remaining pistachios and stir to combine. Use a large metal spoon or spatula to fold the dry ingredients into the egg mixture until just combined.
- Spoon the cake mixture into tin, spreading evenly. Drop the tin on the bench to settle the mixture. Spread 1 cup of the chilled curd over batter, spreading evenly. Sprinkle with the remaining pistachios. Cover the surface of the remaining curd with plastic wrap and return to the fridge.
- Bake for 40 minutes. Cover the surface of the cake lightly with a round of baking paper to prevent the nuts from burning and return to the oven for another 10 minutes or until a skewer inserted into the centre comes out clean (the top of the cake will still be slightly wobbly).
- Allow the cake to stand in the pan for at least 10 minutes before removing the side. Serve warm or at room temperature with the cream, remaining lemon curd and pistachios.
Prep 1hr 15min (+ cooling and chilling time)Bake 45-75minMakes 8-10 serves
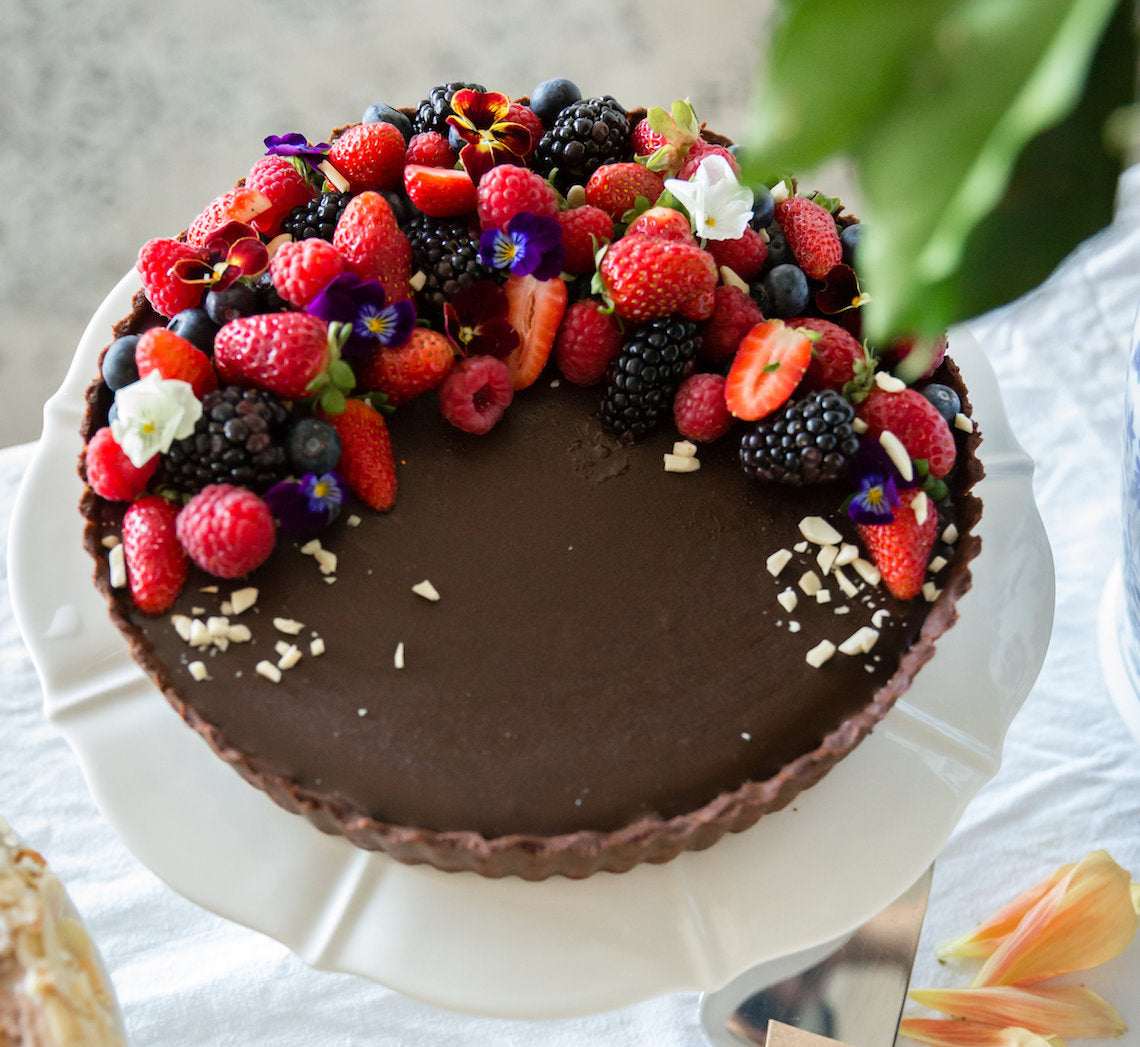
One of our Make Me a Baker graduates, Dimi Jayawardene, baked this beautiful tart at her graduation ceremony – chocolate pastry filled with a chocolate custard and topped with chocolate ganache, it's the definition of decadent!
Ingredients
To Serve
Raspberries, blueberries and strawberries
Slivered almonds
Gold leaf
Edible flowers
Whipped cream
Chocolate Shortcrust Pastry
200g (1⅓ cups) plain flour
Good pinch salt
3 tablespoons icing sugar, sifted
2 tablespoons cocoa powder, sifted
150g chilled unsalted butter, cubed
3-3½ tablespoons iced water
Chocolate Custard Filling
4 egg yolks
1 tablespoon custard powder
2 tablespoons caster sugar
200g good-quality dark chocolate, chopped
300ml thin cream
250ml (1 cup) milk
Chocolate Ganache
125ml (1/2 cup) thickened cream
250g good-quality dark chocolate, chopped
20g butter
2-3 tablespoons Tia Maria, or to taste
Method
- To make the pastry, combine the flour, salt, icing sugar and cocoa powder in a large mixing bowl. Add the chilled butter. With your palms facing upwards, use your fingertips to rub in the butter until the mixture resembles fine breadcrumbs with some larger pieces of butter still visible.
- Sprinkle 3 tablespoons of the iced water over the flour and butter mixture. Use a round-bladed knife in a cutting motion to mix until evenly combined and the mixture starts holding together. Press a little of the mixture between your fingers – if it holds together easily, there is no need to add more water; If it doesn’t add the remaining ½ tablespoon water and combine. The pastry should be soft but not sticky.
- Bring the pastry together with your hands and transfer to a lightly floured, cool bench top. Lightly knead the pastry with your fingertips for about 10 seconds or until it comes together but isn’t completely smooth. Shape the pastry into a disc, wrap well in plastic wrap and place in the fridge for 20 minutes to rest.
- Preheat oven to 200°C (180°C fan-forced). Roll pastry on a lightly floured surface to a 4mm-thick disc. Line the base and side of a 23cm (base measurement) round, fluted tart tin with removable base, pressing into the sides. Roll the rolling pin over the top to trim any excess pastry. Place in the fridge for 15 minutes to rest.
- Place the tart tin on an oven tray. Line the pastry with baking paper and fill with baking beads, or dried rice or beans. Bake in preheated oven for 10-15 minutes. Remove the rice or beans and bake for a further 5-10 minutes or until pastry is just cooked through. Reduce oven temperature to 180°C (160°C fan-forced).
- Meanwhile, to make the Chocolate custard filling, combine the egg yolks, custard powder and sugar in a saucepan. Add the chocolate, cream and milk and place over low heat. Cook, stirring occasionally with a balloon whisk, for 5 minutes or until chocolate melts and mixture is smooth. Remove from heat.
- Pour the chocolate custard mixture into the pastry case (see Baker's Tips). Reduce oven temperature to 180°C (160°C fan-forced) and bake for 20-40 minutes or until custard is just set. (The baking time will depend on your oven and a the depth of your tart tin.) Remove from oven and set aside to cool completely in the tin.
- While the tart is cooling, make the Chocolate ganache. Heat the cream for 30-50 seconds or until bubbling in the microwave. Place the chocolate, butter and Tia Maria in a bowl. Pour the cream into the bowl. Let it sit for 1-2 minutes until chocolate is melted and then start mixing with a small balloon whisk or spoon until the mixture is beautiful and smooth (the butter gives the ganache a lovely glossy look). Pour the ganache over the layer of custard and place in the fridge to set.
- Transfer the tart to a serving plate. Top with berries and slivered almonds, decorate with gold leaf and edible flowers. Serve with whipped cream.
Baker's Tips
- Adding the filling to the pastry cases while still sitting in the oven on the tray will mean you can fill the tart completely and minimise the chance of it spilling when transferring it to the oven.
- This recipe makes one large tart or it can make 8 individual tarts in 10-11cm tins.
- The tart can be made the day before. Leave the decorating for the day of serving.
Prep 15min (+35min cooling time)Bake 20-25minMakes 12
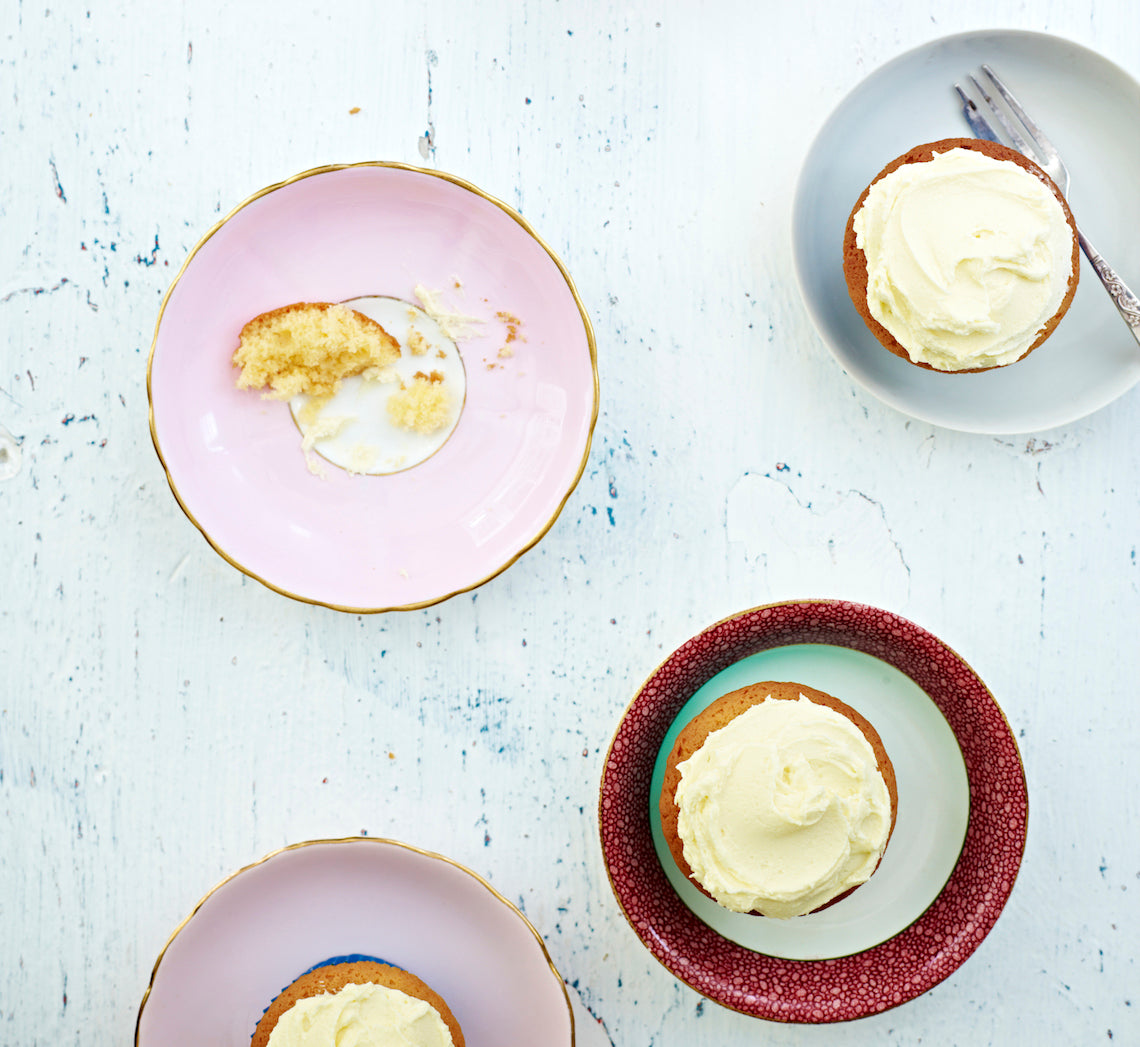
A good basic vanilla cupcake recipe is a must in anyone's repertoire. This one is not only super simple but also incredibly reliable – just make sure your butter is at room temperature and soft enough to make an indent when you press your finger into it lightly. The Vanilla Buttercream quantity will make enough for piping it onto your cupcakes, but if you prefer to spread it you only need to make half the quantity.
Ingredients
185g (1¼ cups) self-raising flour
165g (⅔ cup) caster sugar
125g butter, softened
80ml (⅓ cup) milk
2 eggs, at room temperature
2 teaspoons Queen Natural Vanilla Extract or Essence
Edible sprinkles of your choice (optional)
Vanilla Buttercream
250g salted butter, at room temperature
2 teaspoons Queen Natural Vanilla Extract or Essence
60ml (¼ cup) thickened cream, plus extra if required
350g icing sugar mixture, sifted
Method
- Preheat the oven to 180°C (160°C fan-forced). Line a 12-hole 80ml (⅓ cup) muffin tin with paper cases.
- Place the flour, sugar, butter, milk, eggs and vanilla in a large mixing bowl. Use an electric mixer to beat on low speed until combined. Increase the speed to high and beat for 3 minutes or until the mixture is well combined, creamy and very pale in colour. Spoon the mixture into the paper cases, dividing evenly.
- Bake for 20-25 minutes or until the cupcakes are golden and a skewer inserted into the centre comes out clean. Cool for 5 minutes in the tin, then transfer to a rack to cool completely (this will take about 30 minutes).
- To make the Vanilla buttercream, use an electric mixer to beat the butter and vanilla , scraping down the side of the bowl when necessary, until very pale and creamy. Add the cream and beat on medium speed for 1-2 minutes or until very creamy. Add the icing sugar and beat on low speed until combined. Increase speed to medium-high and beat for 2-3 minutes or until light, creamy and a good spreading or piping consistency. Beat in another tablespoon of cream if the buttercream needs thinning slightly.
- Pipe or spread the buttercream onto the cooled cupcakes and decorate, if desired.
Baker's Tip
- These cupcakes will keep in an airtight container at room temperature in a cool spot for up to 2 days.
Photography by Julie Renouf.

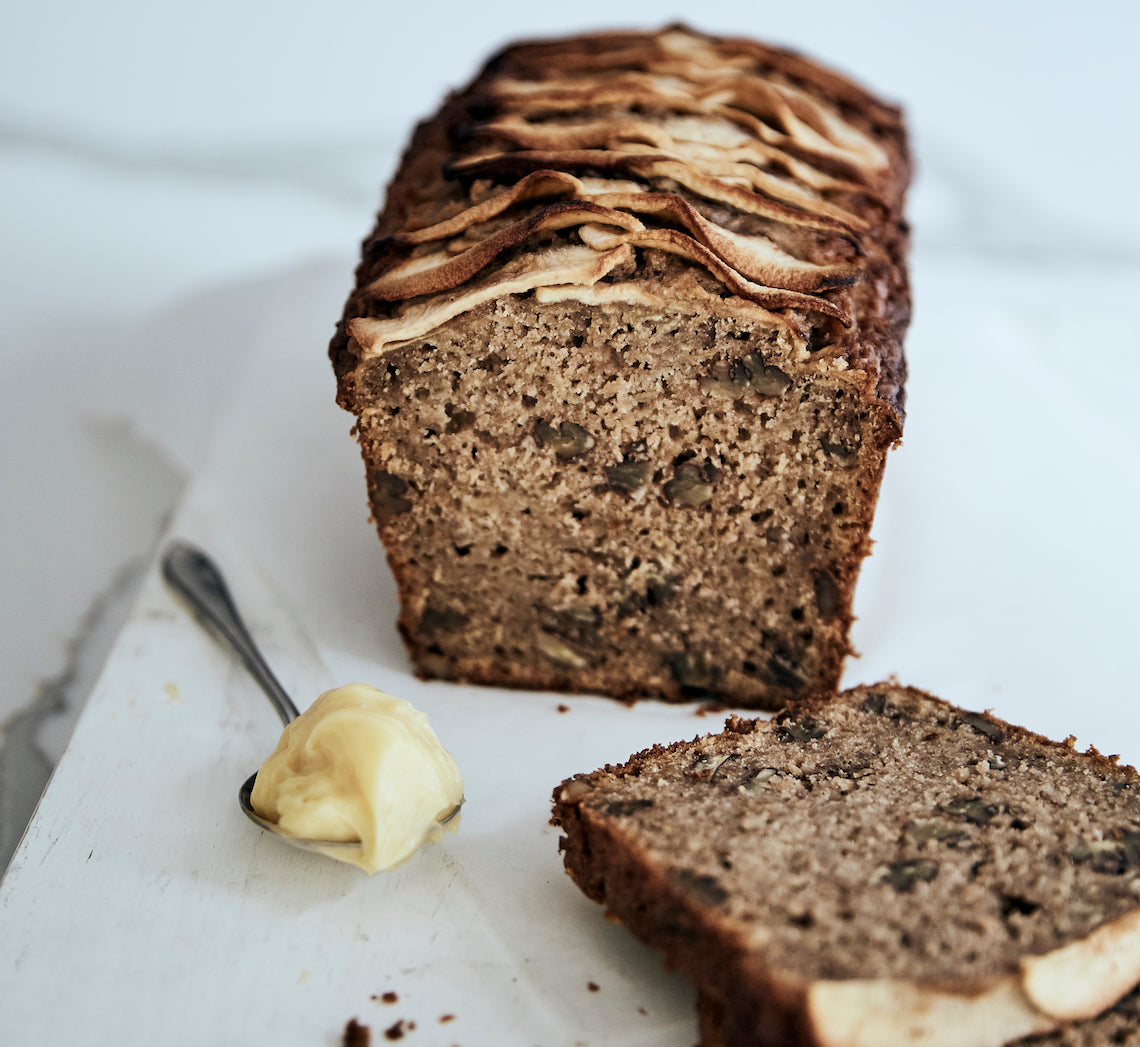
Prep 30minBake 1hr 30minMakes 12 slices
Flavoursome, fruity and deeply satisfying this apple loaf is super simple to whip up. Perfectly teamed with the whipped honey butter, but fresh ricotta and honey also makes a wonderful topping.
Ingredients
Apple Bread
150g (5½oz/1 cup) plain flour
150g (5½oz/1 cup) plain wholemeal flour
2½ teaspoons baking powder
1 teaspoon ground cinnamon
1 teaspoon mixed spice
220g (7¾oz/1 cup, firmly packed) brown sugar
100g (3½oz/1 cup) pecans, toasted and coarsely chopped
4 medium (about 160g/5⅔oz each) Granny Smith, golden delicious, gala or pink lady apples
2 eggs, at room temperature, lightly whisked
125ml (4fl oz/½ cup) sunflower or light olive oil, plus extra to grease
2 teaspoons natural vanilla essence or extract
Whipped Honey Butter
125g (4½oz) salted butter, softened
2 tablespoons floral honey
1 teaspoon natural vanilla essence or extract
Method
- Preheat oven to 180°C/350°F (160°C/315°F fan-forced). Brush a 8.5cm x 17.5cm (3⅓in x 6¾in), base measurement, loaf tin with a little extra oil to grease and line the base and two long sides with one piece of baking paper.
- Sift together the flours, baking powder, cinnamon and mixed spice into a large bowl, returning any husks from the flour to the bowl. Stir in the sugar and pecans.
- Core and then coarsely grate 3 of the apples. Place in a medium bowl. Add the eggs, oil and vanilla and use a fork to whisk together until evenly combined. The apple mixture to the dry ingredients and use a large metal spoon or spatula to fold together until just combined.
- Spoon the mixture into the prepared tin and smooth the surface with the back of a spoon. Peel, quarter, core and thinly slice the remaining apple and arrange on the top of the loaf. Bake in preheated oven for 1 hour 30 minutes or until a skewer inserted into the centre comes out clean. Stand in the tin for 5 minutes before turning onto a wire rack to cool.
- Meanwhile, to make the Whipped Honey Butter, use an electric mixer or a wooden spoon to beat the butter, honey and vanilla essence or extract until pale and creamy. Transfer to a serving dish, cover and set aside in a cool place.
- Cut the apple bread into 2cm/¾in-thick slices. Serve fresh or toasted, spread with the Whipped Honey Butter.
Baker's Tips
- This apple bread will keep in an airtight container at room temperature for up to 3 days.
- This bread is delicious served toasted. If you wish to toast it, make it without the sliced apple on top as it tends to burn during toasting.
- To freeze, cut into slices and either wrap each slice separately in plastic wrap or separate the slices with freezer wrap. Seal in a plastic bag and freeze for up to 3 months. Thaw at room temperature or toast straight from the freezer.
Prep 40min (+ 30min cooling time)Bake 30minMakes 8-10 serves
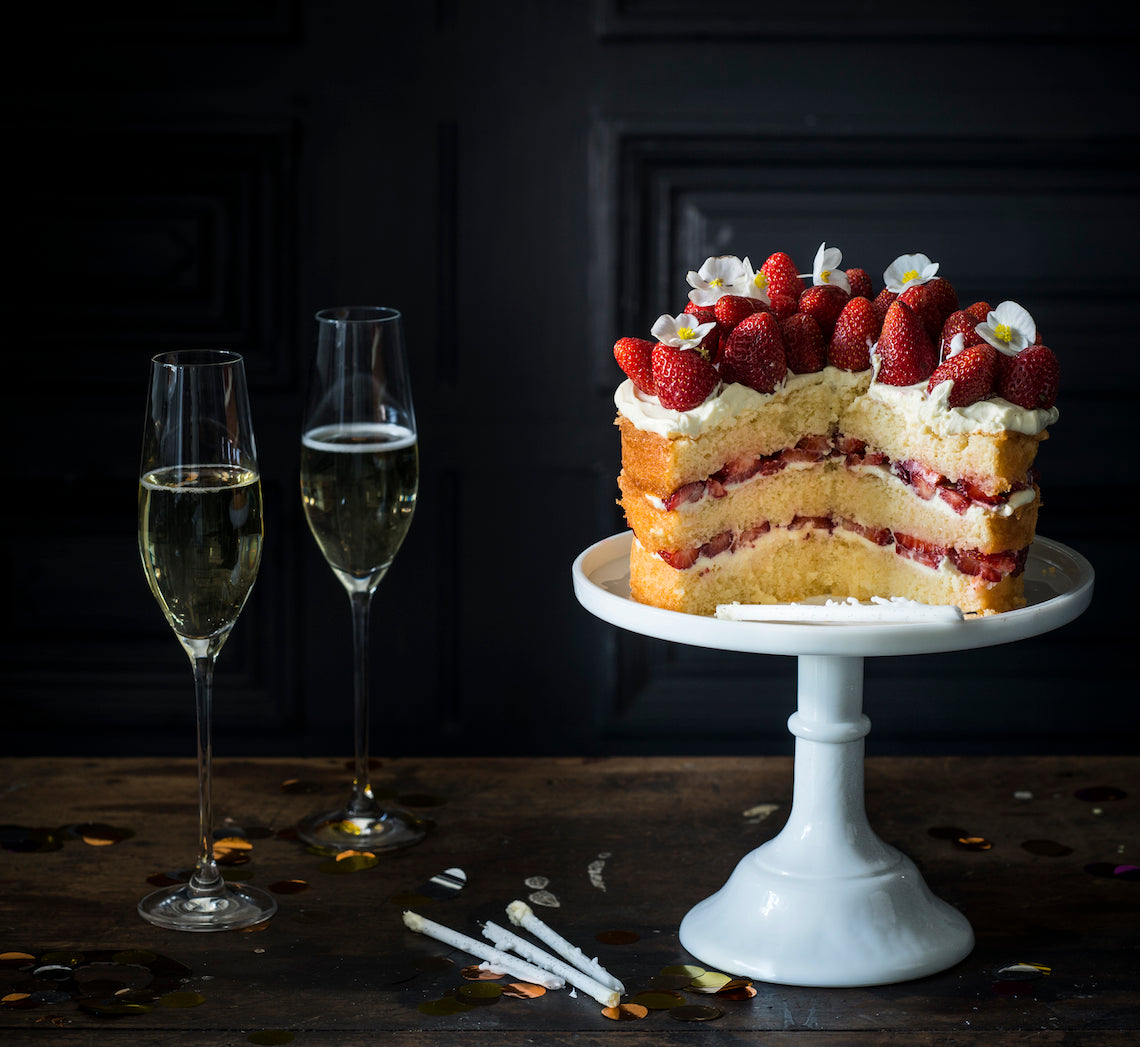
If there ever was a cake that epitomised the flavours of England this would be it! The combination of elderflower, strawberries and gin not only make this chic sponge cake uniquely special but also incredibly lust-worthy.
Ingredients
250g ripe strawberries, hulled and sliced
500g small ripe strawberries, to serve
icing sugar, to dust
fresh elderflowers (optional), to decorate (see Baker’s Tips)
Mascapone cream
185ml pure (thin/pouring) cream
250g mascarpone
2 tablespoons undiluted elderflower cordial /drink concentrate, or to taste
Sponge layers
Melted butter, to grease
4 fresh eggs, at room temperature
1½ teaspoons natural vanilla essence or extract
165g (¾ cup) caster sugar
60ml (¼ cup) milk
30g butter, diced
110g (¾ cup) self-raising flour
30g (¼ cup) cornflour
Elderflower and gin syrup
165ml (¾ cup) undiluted elderflower cordial /drink concentrate
60ml (¼ cup) strained fresh lemon juice
80ml (⅓ cup) gin
Method
- To make the sponge layers, place the oven rack in the oven so that the cake tins will sit in the middle of the oven and then preheat it to 180°C (160°C fan-forced). Brush three 18cm non-stick springform tins with a melted butter to grease.
- Use an electric mixer with a whisk attachment on medium-high speed to whisk the eggs and vanilla in a large bowl until frothy. Add the sugar a spoonful at a time, whisking well between each addition, until the mixture is very thick and pale and the sugar has dissolved (this will take about 8 minutes). Lift the whisk out of the mixture and slowly draw a figure eight, if the trail stays on the surface long enough for you to finish drawing then the mixture is ready. If not, continue to whisk for a further minute and then test again.
- Meanwhile, heat the milk and butter in a small saucepan over medium heat until the butter melts and mixture is almost simmering. Remove from the heat. Pour the hot milk mixture down the side of the bowl then quickly sift the flour and cornflour together over the whole surface of the egg mixture. Immediately whisk briefly again with the electric mixer on low speed, until the flour mixture is just incorporated (make sure there is no flour caught at the bottom of the bowl and be careful not to overmix).
- Divide the mixture evenly between the cake tins and gently tap the tins on the bench top three times to settle the mixture. Bake in preheated oven for 15 minutes or until the cakes are a pale golden colour, spring back when lightly touched in the centre and start pulling away from the sides of the tins. Remove from the oven and stand for 1 minute before turning onto a wire rack over a tray, top side up.
- Meanwhile, to make the Elderflower and gin syrup combine the elderflower cordial /drink concentrate and lemon in a small saucepan and heat over medium heat until hot but not simmering. Remove from heat and stir through the gin.
- Use a skewer to prick the warm sponge layers all over. Gradually pour the hot syrup over the warm cake, allowing it to soak in. Set aside to cool completely (this will take about 30 minutes).
- When ready to assemble, use a hand-held electric mixer with a whisk attachment or a balloon whisk to whisk the cream in a medium mixing bowl on medium-low speed until soft peaks form. Add the mascarpone and elderflower cordial /drink concentrate and whisk on low speed briefly until just combined and thickened to a medium whipped cream consistency. Place one layer of the sponge on a serving plate or cake stand and dollop a third of the mascarpone cream evenly over the top. Use the back of a metal spoon to gently spread the cream from the centre of the cake towards the outside to cover, leaving about a 1cm border around the edge. Then top with half the sliced strawberries. Top with another sponge layer, half of the remaining cream and remaining sliced strawberries. Top with the remaining sponge layer and spread with the remaining cream. Decorate with the whole strawberries.
Baker's Tips
- I used white Waxed Leaf Bergonias to decorate this cake.
- This cake can be assembled about 2 hours before serving. Stand at room temperature in a cool spot.
- The sponge cake layers will keep in airtight container, divided by baking paper, at room temperature for up to 2 days.
How to cut a multi-layer sponge cake
Cakes with multiple layers, especially those made up of various textures such as sponge cakes, can be tricky to cut the traditional way – cutting downwards often squashes the cake, causing the softer filling to ooze unevenly out the side and leaving you with an unsightly mess.
The trick to avoid this, is to use a sharp serrated knife that has a pointed end and is at least the length of the height of the cake.
Insert it into the centre of the cake vertically and use a gentle, slow sawing action to cut the cake. The layers will miraculously stay intact as each slice is cut and removed from the cake.
This recipe is from Anneka's SBS Food online column Bakeproof: Celebration Cakes. Click here for more Bakeproof columns and recipes.
Photography by Alan Benson.

Prep 1hr (+45min cooling and 1-1hr30min chilling time)Bake 20minMakes 12-14 serves
If you're a chocoholic this cake is heaven. And if you're not, it's still heaven! Wickedly rich and strikingly handsome, this layered centrepiece demands attention no matter what the celebration.
Ingredients
Cake layers
melted butter, to grease
250g butter, cubed, softened
330g (1½ cups) caster sugar
3 teaspoons natural vanilla essence or extract
4 eggs
225g (1½ cups) plain flour
225g (1½ cups) self-raising flour
250ml (1 cup) milk
1 tablespoon instant coffee granules dissolved in 1 tablespoon boiling water, cooled
Dark chocolate layer
30g (¼ cup) Dutch cocoa powder, sifted and combined with 60ml (¼ cup) hot tap water, cooled
Milk chocolate layer
1½ tablespoons Dutch cocoa powder, sifted and combined with 1½ tablespoons hot tap water, cooled
Light chocolate layer
2 teaspoons Dutch cocoa powder, sifted and combined with 2 teaspoons hot tap water, cooled
Whipped chocolate ganache
500g good-quality dark chocolate (45-54% cocoa), chopped
300ml pure (pouring / thin) cream
Chocolate drip icing
100g good-quality dark chocolate (45-54% cocoa), chopped
100ml pure (think / pouring) cream
2 tablespoons corn syrup
Method
- To make the Cake layers, preheat the oven to 190°C (170°C fan-forced). Grease four shallow 20cm round cake tins with melted butter and line the bases with non-stick baking paper.
- Prepare the Dark, Milk and Light chocolate layer mixtures and set aside.
- Use an electric mixer to beat the butter, sugar and vanilla in a large mixing bowl until pale and creamy. Add the eggs one at a time, beating well after each addition (the mixture will look curdled at this stage).
- Sift together both the flours. Combine the milk and coffee mixture. Add half the flour mixture to the butter mixture and beat on lowest possible speed until just combined. Add the milk and coffee mixture and beat on lowest possible speed until just combined and then beat in the remaining flour mixture until just combined.
- Divide the cake batter between four bowls (each will have about 360 g of mixture). Add the Dark chocolate layer mixture to one portion and stir gently to combine. Add the Milk chocolate layer mixture to one portion and stir gently to combine. Add the Light chocolate layer mixture to one portion and stir gently to combine. Leave the fourth portion as it is
- Spoon each of the batters into a prepared tin and smooth the surface with the back of a spoon. Bake in preheated oven for 15 minutes. Swap the cake tins around and bake for a further 5 minutes or until a skewer inserted into the centres comes out clean.
- Stand the cakes in the tins for 5 minutes before turning onto a wire rack to cool (this will take about 30 minutes).
- To make the Whipped chocolate ganache, put the chocolate and cream in a heatproof bowl over a saucepan of simmering water (make sure the bottom of the bowl doesn’t touch the water). Stir often with a metal spoon just until the chocolate melts and the mixture is smooth. Immediately remove the bowl from the saucepan, cover with plastic wrap and place the fridge for 1-1½ hours, stirring briefly about every 5 minutes, or until cooled and thickened to a spreadable consistency. Use an electric mixer fitted with a whisk attachment to whisk the chocolate mixture in a medium bowl on low speed for 1-2 minutes or until light and fluffy (be careful not to over whisk).
- To assemble the cake, set aside about a quarter of the Whipped chocolate ganache in a bowl for piping. Place the Dark chocolate cake layer, top side down on a cake stand or serving plate. Spread evenly with about ⅓ cup of the remaining Whipped chocolate ganache. Repeat with the remaining cake layers (from darkest to lightest) with about ⅓ cup of the ganache between each. Spread the remaining buttercream over the top and sides of the cake, using a large palette knife to smooth. Place the cake in the fridge for at least 30 minutes to chill.
- To make the Chocolate drip glaze, place the chocolate in a heatproof bowl and set aside. Combine the cream and corn syrup in a small saucepan and heat over a medium heat, stirring frequently, until almost simmering. Pour over the chocolate and set aside for 1 minutes. Stir until smooth and well combined. Place in the fridge for 15 minutes, stirring occasionally, until almost cooled to room temperature.
- Spoon the Chocolate drip glaze onto the center of the chilled cake and use the back of a metal tablespoon to spread to cover. Gently push some of the glaze over the edge all the way around to form a drip pattern. Set aside in a cool spot for about 15 minutes or until the glaze is set before cutting.
Baker's Tips
- This cake will keep in an airtight container at room temperature in a cool spot for up to 3 days.
How to decorate a cake with a drip glaze
There are a few things to keep in mind when creating a luscious glossy drip glaze on a cake.
Make sure the iced cake has been chilled for at least 30 minutes before decorating with the glaze as this will help the drips down the side of the cake set before reaching the base of the cake.
Gradually spoon the slightly warm (it should be slightly warmer than room temperature) glaze onto the centre of the cake, allowing it to flow naturally towards the edge.
Then use the back of a metal tablespoon to carefully ‘push’ the glaze towards the outside, smoothing the top and allowing small amounts of the glaze to flow over the edge and down the side of the cake to form a drip pattern.
The key is to take it slowly, not add too much glaze at one time and don’t push too firmly with the spoon as the drips will become large and cover more of the side of the cake than you want.
This recipe is from Anneka's SBS Food online column Bakeproof: Celebration Cakes. Click here for more Bakeproof columns and recipes.
Photography by Alan Benson.
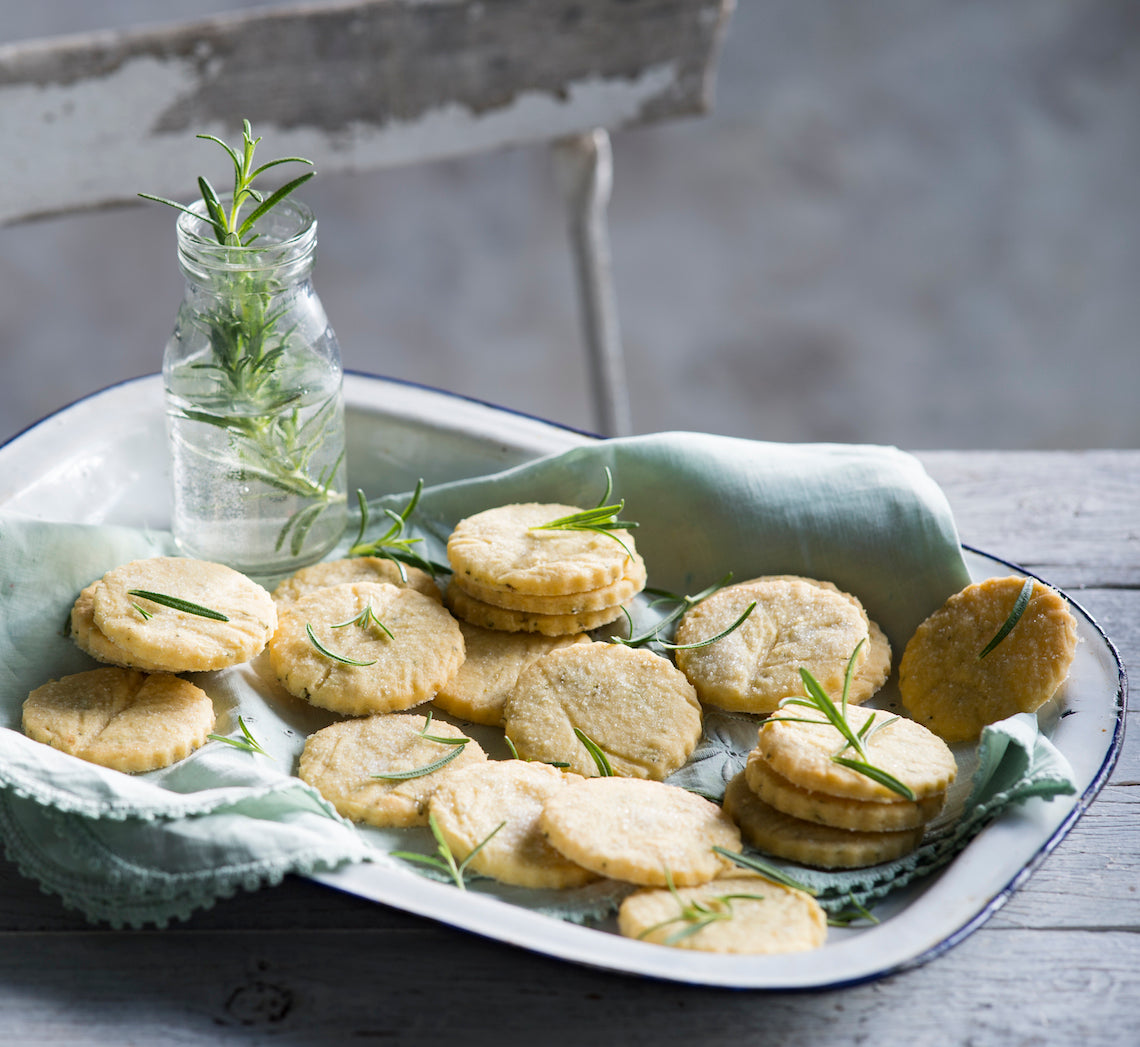
Prep 30min (+ 1hr chilling time)Bake 15-20min (per batch)Makes about 80
Along with lemon, these melt-in-the-mouth biscuits are scented with rosemary’s distinct, yet subtle, earthy and slightly sweet flavour. The clever imprinting of rosemary sprigs of the dough gives a gorgeous finish to these sweet, buttery mouthfuls.
Ingredients
250g (9oz) salted butter, cubed and softened slightly
165g (¾ cup/5¾oz) granulated white sugar, plus 2 tablespoons extra to sprinkle
1 egg yolk
335g (2¼ cups/8¼oz) plain flour
1½ tablespoons finely chopped fresh rosemary (see Baker’s Tips)
1 lemon, rind finely grated
Small rosemary sprigs, to imprint biscuits
Method
- Line 3 large oven trays with baking paper.
- Use an electric mixer with a paddle attachment to beat the butter and sugar for about 1 minute or until starting to become pale and creamy but not too aerated (do not over beat). Beat in the egg yolk, rosemary and lemon until just combined.
- Add the flour to the butter mixture and beat on low speed until just combined and a soft dough forms.
- Divide the dough in half and shape each portion into a disc about 2cm/¾in thick. Wrap separately in plastic wrap and place in the fridge for 30 minutes to chill.
- Use a lightly floured rolling pin to roll a portion of dough out on a lightly floured bench top until 4mm/⅛in thick. Arrange the rosemary sprigs over the dough and lightly roll over with the rolling pin to imprint. Remove the rosemary sprigs and reserve. Use a 4.5cm/1¾in fluted round biscuit cutter to cut the dough into rounds and place on the lined trays, re-rolling, imprinting and cutting out any off cuts. Repeat with the remaining portion of dough. Sprinkle the biscuits liberally with the extra sugar.
- Place the trays in the fridge for 30 minutes to chill.
- Preheat oven to 170°C/340°F (150°C/300°F fan-forced)
- Bake 2 trays of the biscuits in preheated oven for 15-20 minutes, swapping the trays around half way through baking, or until pale golden and cooked through. Cool on the trays. Repeat with the remaining tray of biscuits, baking in the centre of the oven.
Baker's Tips
- Chopping the rosemary with a pinch of sugar will help bring out its aromatic flavours.
- These biscuits will store in an airtight container at room temperature for up to week.
This recipe is from Anneka's SBS Food online column Bakeproof: Christmas Baking with Fresh Herbs. Click here for more Bakeproof columns and recipes.
Photography by Alan Benson.
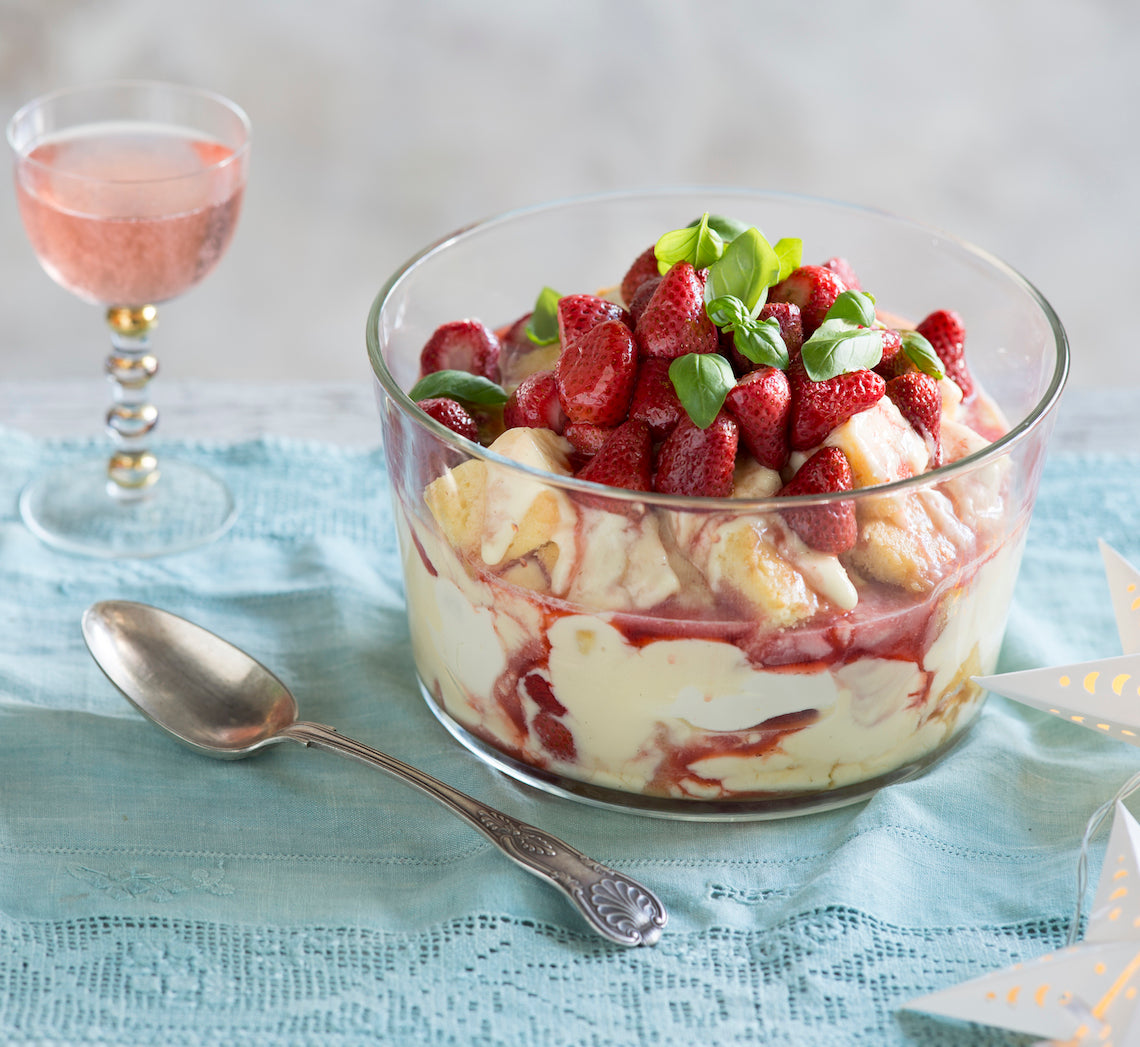
Prep 1hr (+ 2hr cooling time)Bake 30minMakes 10-12 serves
Fragrant, sweet and fresh, basil brings something truly special to this festive trifle. Layers of vanilla buttercake soaked with a basil and lemon syrup, creamy basil-infused custard and roasted strawberries make for a wonderful combination in this impressive dessert… I promise one serve won’t be enough!
Ingredients
125 ml (½ cup) pure (pouring / thin) cream
Small fresh basil leaves, to decorate
Buttercake
110g (¾ cup) self-raising flour
75g (½ cup) plain flour
165g (¾ cup) caster sugar
125g butter, softened
80ml (⅓ cup) milk
2 eggs, at room temperature
1 teaspoon natural vanilla extract or essence
Basil-infused custard
500ml (2 cups) milk
125ml (½ cup) pure (pouring / thin) cream
20 medium fresh basil leaves
75g (⅓ cup) caster sugar
2 tablespoons cornflour, sifted
3 egg yolks, lightly whisked
1 teaspoon natural vanilla essence or extract
Roasted strawberries
1kg strawberries, hulled and halved if large
75g (⅓ cup) caster sugar
Basil and lemon syrup
165g (¾ cup) caster sugar
125ml (½ cup) water
10 medium fresh basil leaves
60ml (¼ cup) strained fresh lemon juice
Method
- To make the Basil-infused custard, put the milk, cream and basil leaves into a medium saucepan. Bring just to a simmer over a medium heat. Remove from heat and stand for 30 minutes to infuse. Remove the basil leaves. Use a balloon whisk to whisk the sugar and cornflour together in a heatproof bowl. Gradually whisk in the milk mixture until smooth and well combined. Whisk in the egg yolks. Return to the heat and stir constantly with the whisk over medium heat until the mixture thickens and just comes to a simmer. Remove from the heat and stir in the vanilla. Pass the custard through a sieve into a heatproof bowl. Cover the surface with plastic wrap and refrigerate for 2 hours or until chilled.
- To make the Buttercake, preheat the oven to 180°C (160°C fan-forced). Grease a 20 x 30 cm (base measurement) shallow cake tin and line the base and two longs sides with one piece of baking paper.
- Place both the flours, sugar, butter, milk, eggs and vanilla in a large mixing bowl. Use an electric mixer to beat on low speed until combined. Increase the speed to medium and beat for 3 minutes or until the mixture is smooth, creamy and very pale in colour. Spoon the mixture into the lined tin and spread evenly using the back of a spoon. Bake in preheated oven for 18-20 minutes or until cooked when tested with a skewer. Cool for 5 minutes in the tin, then turn onto a wire rack to cool.
- To make the Roasted strawberries, preheat oven to 200°C (180°C fan-forced). Toss the strawberries with the sugar in a bowl. Spread over an oven tray in a single layer. Roast in preheated oven for 10 minutes, stirring gently after 5 minutes, or until the strawberries are soft but still holding their shape. Set aside to cool.
- To make the Basil and lemon syrup, combine the sugar and water in a small saucepan and site over medium heat until the sugar dissolves. Add the basil, bring to a simmer and simmer for 5 minutes or until reduced slightly. Stir in the lemon juice. Set aside to cool.
- To assemble the trifle, use a balloon whisk or a hand held electric whisk on medium speed to whisk the cream in a medium bowl until soft peaks form. Cut the buttercake into 3cm cubes and place half of the cake over the base of a 2-3 liter (8-12 cup) serving dish. Drizzle the cake with half the Basil and lemon syrup. Spread half the Basil-infused custard over the top. Spoon half the Roasted strawberries over the custard and then top with all of the whipped cream. Repeat the layering with the remaining ingredients finishing with the roasted strawberries. Decorate with the basil leaves and serve in large scoops.
Baker's Tips
- The butter cake can be made up to 3 days ahead of using. Keep in an airtight container at room temperature.
- The Basil-infused custard, Roasted strawberries and Basil and lemon syrup can all be made up to 3 days ahead of serving. Keep separately in airtight containers in the fridge.
- This trifle can be assembled up to 8 hours ahead of serving. Top with fresh strawberries, dust with icing sugar and decorate with basil just before serving.
This recipe is from Anneka's SBS Food online column Bakeproof: Christmas Baking with Herbs. Click here for more Bakeproof columns and recipes.
Photography by Alan Benson.
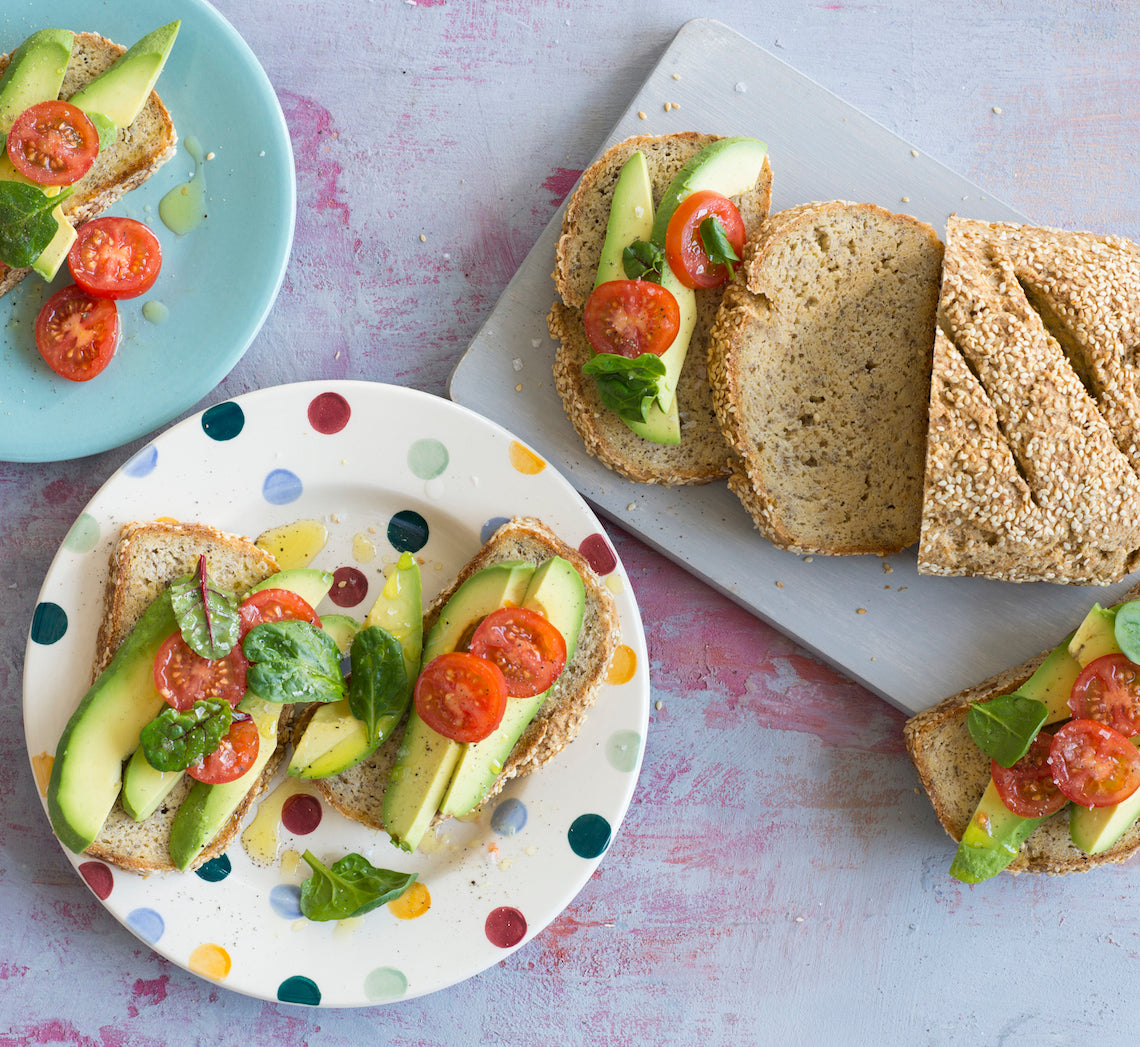
Prep 30min (+1hr30min cooling time)Bake 1hr 10minMakes 1 loaf
This bread is almost the complete opposite of most commercially made gluten-free breads - wonderfully substantial (it won’t ‘dissolve’ in your mouth), moist and flavoursome without containing any gums. The key is the inclusion of psyllium husks and chia seeds to give the dough flexibility and structure in the absence of gluten. It’s great fresh, but toasting really brings out the nuttiness of the flours used.
Ingredients
150g (1 cup) sorghum flour
75g (½ cup) millet flour
70g (½ cup) brown rice flour
65g (½ cup) sweet (glutinous) rice flour
90g (½ cup) fine polenta
1½ teaspoons fine sea salt
625ml (2½ cups) lukewarm water
7g (1 sachet) instant dried yeast
2 tablespoons honey
2 tablespoons light olive oil, plus extra to grease
25g (⅓ cup) psyllium husks
50g (¼ cup) chia seeds
2 tablespoons sesame seeds, to coat and sprinkle
Method
- Combine the sorghum, millet, brown rice and sweet rice flours, polenta and salt in a large bowl.
- Combine 60ml (¼ cup) of the lukewarm water, yeast and 1 teaspoon of the honey in a small dish and whisk to combine with a fork. Set aside in a warm, draught-free place for 5 minutes or until frothy.
- Meanwhile, use a balloon whisk to whisk together the remaining 560ml (2¼ cups) lukewarm water, remaining honey, olive oil, psyllium husks and chia seeds until evenly combined. Set aside for 3 minutes or until the mixture thickens slightly.
- Whisk the yeast mixture into the psyllium husk mixture. Add to the dry ingredients and use a wooden spoon to mix to a soft, slightly sticky dough.
- Cover the bowl with plastic wrap and set aside in a warm, draught-free place for 1½ hours or until risen slightly and is spongy in texture.
- Grease a 11.5cm x 21cm (base measurement) loaf tin with a little extra oil and sprinkle with 1½ tablespoons of the sesame seeds to coat lightly. Turn the dough onto a benchtop, shape into a 20cm log and place in the greased tin. Brush the top with a little water and sprinkle with the remaining sesame seeds. Cover with plastic wrap and set aside and place in a warm, draught-free place for 1 hour or until well risen.
- Preheat the oven to 200°C (180°C fan-forced).
- Use a sharp knife to cut 4 diagonal slits across the top of the loaf. Bake 1 hour and 10 minutes or until golden, cooked through and sounds hollow when tapped on the top.
- Turn the loaf out onto a wire rack and set aside to cool completely - this will take about 1½ hours) before slicing.
Baker's Tips
- This bread is best kept in a cloth or paper bag at room temperature in a cool spot where it will keep for up to 5 days.
- To freeze, place whole or sliced in a sealed freezer bag or airtight container and freeze for up to 3 months. Thaw at room temperature or toast slices straight from the freezer.
This recipe is from Anneka's SBS Food online column Bakeproof: Gluten-free baking. Click here for more Bakeproof columns and recipes.
Photography by Alan Benson.


