
- home
- BAKERECIPES
BakeRecipes
Bringing real baking into your home with deliciously simple recipes.
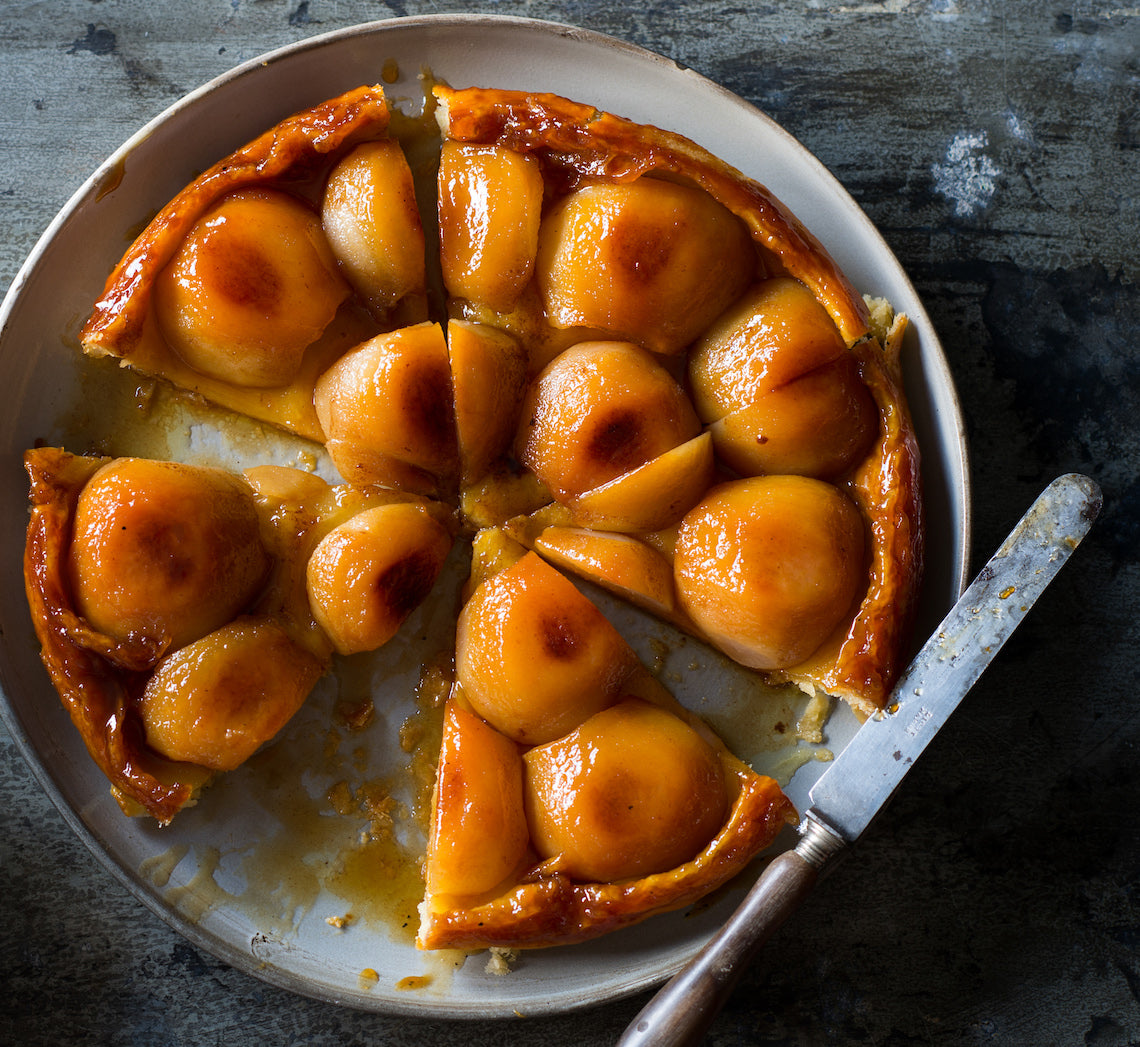
Prep 40min (+20min chilling and 1hr 25min cooling time)Bake 45minMakes 8 serves
Traditionally made with apples, this classic upside-down French tart was created by the Tatin sisters who ran a hotel in France in the early 1900s. If you don't have an ovenproof frying pan, transfer the cooled caramel and pears to a base-lined 22cm round cake tin before covering them with the pastry and baking.
Ingredients
Ground cinnamon, to sprinkle
Vanilla ice-cream, cream or crème fraiche, to serve
1 quantity Shortcrust Pastry
80g (2¾oz) salted butter, cubed
110g (½ cup/4oz) caster sugar
1.1kg (2lb 7oz) small (about 7) pears (such as Josephine), peeled, halved and cored
Method
- Prepare the Shortcrust Pastry.
- Meanwhile, melt the butter in a 20–22cm/8-8¼in(base measurement) heavy-based frypan over medium-high heat. Sprinkle with the sugar and then arrange the pears, cut-side up, in the pan, cutting some of the halves into quarters to fill the gaps. Reduce the heat to medium and cook, uncovered, for 15 minutes or until the liquid becomes a dark caramel and the pears are almost tender and golden underneath. Remove the pan from the heat and set aside for 1 hour 15 minutes or until cooled completely.
- Preheat oven to 190°C/375°F (170°C/340°F fan-forced).
- Use a lightly floured rolling pin to roll the pastry out on a lightly floured bench top to about 5mm/¼in thick and then cut into a circle about 26cm/10½in in diameter. Place the pastry over the cooled pears in the pan and carefully tuck the pastry edge around the fruit and down the side of the pan. Bake in preheated oven for 45 minutes or until the pastry is deep golden and cooked through and the pear juices are bubbling. Remove from the oven and set aside for 10 minutes to cool slightly.
- Place a serving plate with a lip over the top of the tart and invert. Serve immediately cut into wedges and accompanied by ice-cream, cream or crème fraiche.
This recipe is from Anneka's SBS Food online column, The real secrets of French baking.
CLICK HERE for more Bakeproof recipes.
Photography by Alan Benson.
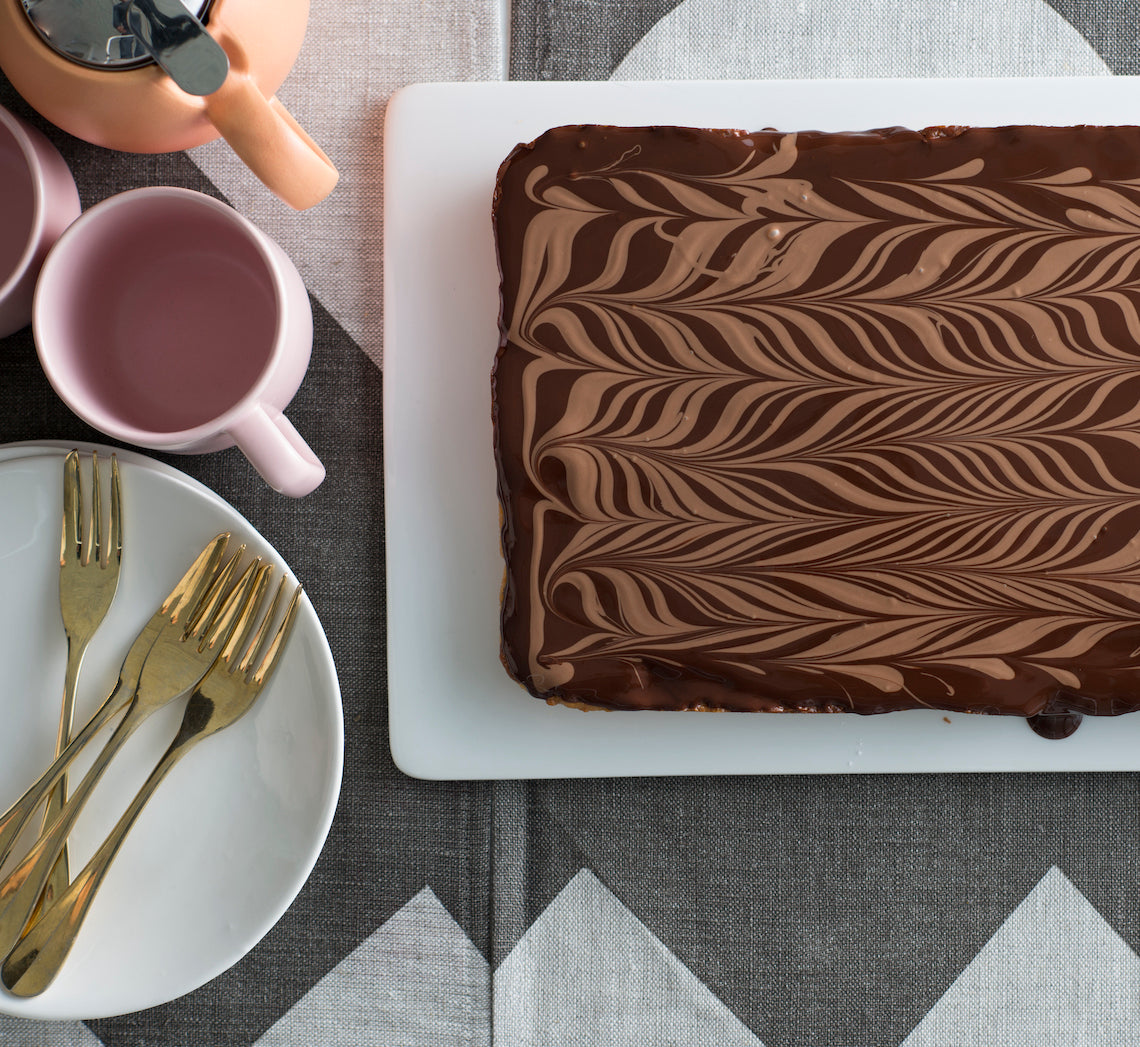
Prep 30min (+1hr cooling and 1hr chilling time)Bake 20minMakes 20 pieces
This has to be the perennial favourite... biscuit base, gooey caramel centre and chocolate topping is a combination made in heaven. This chocolate caramel slice has been given a little makeover with a feather-patterned topping.
Ingredients
110g (¾ cup/4oz) plain flour
½ teaspoon baking powder
30g (⅓ cup/1oz) desiccated coconut
75g (⅓ cup, firmly packed/2¾oz) brown sugar
80g (2¾oz) salted butter, melted
1 teaspoon natural vanilla essence or extract
Caramel filling
395g (13¼oz) tin sweetened condensed milk
110g (½ cup, firmly packed/4oz) brown sugar
1 tablespoon golden syrup
40g (1½oz) salted butter, cubed
Chocolate topping
200g (7oz) good-quality dark chocolate (70% cocoa), chopped
30g (1oz) salted butter, cubed
75g (2¾oz) good-quality milk chocolate
Method
- Preheat oven to 180°C/350°F (160°C/315°F fan-forced). Grease a 16cm x 26cm (6 ¼in x 10½in), base measurement, shallow slice tin and line the base and sides with one piece of non-stick baking paper, cutting into the corners to fit.
- To make the base, combine the flour, baking powder, desiccated coconut and brown sugar in a medium bowl. Add the butter and vanilla and mix well. Crumble evenly over the base of the lined tin and use your hands to press down firmly and cover evenly. Bake in preheated oven for 12-15 minutes or until cooked through and lightly golden. Remove from the oven.
- Meanwhile, to make the Caramel Filling, combine the sweetened condensed milk, brown sugar, golden syrup and butter in a small saucepan and cook over a low heat, stirring constantly, for 10 minutes, or until the sugar dissolves and the mixture thickens slightly (do not boil).
- Pour the hot caramel immediately over the base and use the back of a metal spoon to smooth the surface. Return the slice to the oven and bake for 10 minutes or until the caramel has darkened slightly and starts to bubble around the edges. Remove from the oven and set aside for 1 hour or until cooled completely.
- To make the Chocolate Topping, combine the dark chocolate and butter in a medium heatproof bowl over a saucepan of simmering water (don’t let the water touch the base of the bowl). Stir frequently until the chocolate melts and the mixture is smooth. Pour over the cooled slice and use the back of a metal spoon to cover evenly. Tap the tin on the bench to even the topping and to remove any air bubbles. Melt the milk chocolate in the same way as the dark chocolate and butter in a separate small heatproof bowl. Place the slice with a short side of the tin closest to you. Use a teaspoon to generously drizzle the milk chocolate widthways across the dark chocolate to form horizontal lines. Then use a skewer to run through both the dark and milk chocolate lengthways 5-6 times in alternate directions to form a feather pattern. Place in the fridge for 1 hour or until the chocolate sets.
- Use a warm large sharp knife to cut into pieces to serve.
Baker's Tip
- This slice will keep in an airtight container in the fridge for up to 1 week.
This recipe is from Anneka's SBS Food online column, Bakeproof: Childhood Favourites.
CLICK HERE for more Bakeproof recipes.
Photography by Alan Benson.
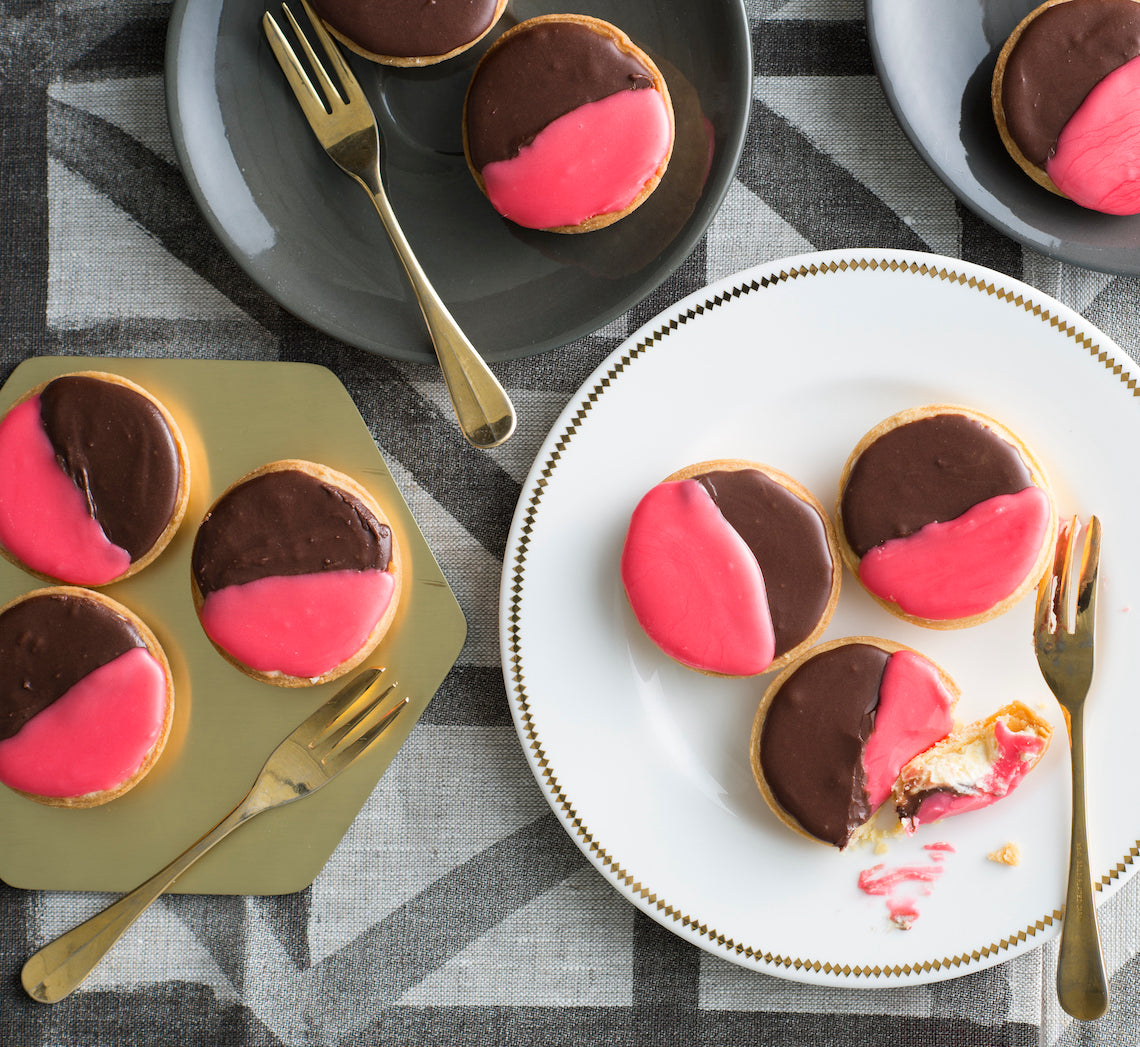
Prep 40min (+30min chilling and 30min cooling time)Bake 20minMakes 12
Dating back almost a century, this Australian creation of a pastry case filled with mock cream (and sometimes a raspberry jam layer) and topped with sickly sweet icing seems to hit a nostalgic chord – we all remember eating them as a child! For a more contemporary twist, we've added an extra colour punch to the pink icing. Remember that chocolate and white, or pink and white are also popular colour combinations.
Ingredients
1 quantity Sweet shortcrust pastry, divided in half before wrapping and chilling as directed
Mock Cream Filling
1 tablespoon boiling water
½ teaspoon gelatine powder
65g (⅓ cup) caster sugar
2 tablespoons milk
125g unsalted butter, softened
1 teaspoon natural vanilla essence or extract
Icing
185g (1½ cups) pure icing sugar
1 tablespoon water, plus 1 teaspoon extra (optional)
2 teaspoons sifted cocoa powder
Pink food colouring
Method
- Unwrap one pastry portion and place on a lightly floured, cool work surface. Gently pat the pastry with the palm of your hand to flatten slightly. Use a lightly floured rolling pin to roll out on a lightly floured surface until 3mm thick. Use an 8cm diameter plain round cutter to cut out 6 circles, re-rolling the pastry if necessary. Line six holes of a 12-hole 80ml ( ⅓ cup) muffin tin (the pastry circles won’t fill the muffin holes completely. Repeat with the remaining pastry portion to line the six remaining muffin holes.
- Prick each pastry case base 3 times with a fork and place in the fridge for 30 minutes. Preheat the oven to 200°C (180°C fan-forced).
- Line each tartlet case with a piece of foil and then fill with dried rice. Blind bake the tart cases for 15 minutes or until the pastry is sealed. Use the foil to lift the rice out of the tartlet cases and bake for a further 5 minutes or until lightly golden and cooked through. Cool the cases in the tin.
- To make the Mock cream filling, put the boiling water in a small ramekin and sprinkle the gelatine over the top. Use a fork to whisk the gelatine into the water and then set aside for about 3 minutes or until the mixture is clear (see Bakers Tips). Meanwhile, combine the sugar and milk in a small saucepan and stir over medium heat until the sugar dissolves. Stir in the gelatine mixture until well combined. Remove from heat and set aside, stirring occasionally so the gelatine doesn't set, for 30 minutes or until cooled to room temperature.
- Use an electric beater to beat the butter and vanilla in a medium bowl until pale and creamy. With the motor running, gradually add the cooled gelatin mixture in a slow steady stream until well combined and fluffy. Divide the Mock cream filling evenly among the pastry cases and smooth the surfaces. Set aside in a cool spot but not in the fridge.
- To make the Icing, sift the icing sugar into a bowl and then stir in the water until smooth (the icing should be a spreadable consistency). Put half the icing into a separate bowl and stir in the cocoa powder and extra teaspoon of water. Colour the remaining portion with 2-4 drops of pink food colouring. Use a palette knife or the back of a teaspoon to spread about a teaspoon of the pink icing over the top of half of each tart. Set aside for 5-10 minutes for the icing to set. Spread about a teaspoon of the chocolate icing over the remaining half of each tart to cover the tops and then set aside for 5-10 minutes for the icing to set. Serve at room temperature.
Baker's Tips
- If the gelatine doesn't dissolve in the boiling water and become clear, add boiling water to a larger heatproof bowl, jug or dish and then sit the ramekin with the gelatine mixture in the water. Stir occasionally until the mixture is clear.
- These tarts will keep in an airtight container in the fridge for up to 4 days. Serve at room temperature.
This recipe is from Anneka's SBS Food online column, Bakeproof: Childhood Favourites. CLICK HERE for more Bakeproof recipes.
Photography by Alan Benson.
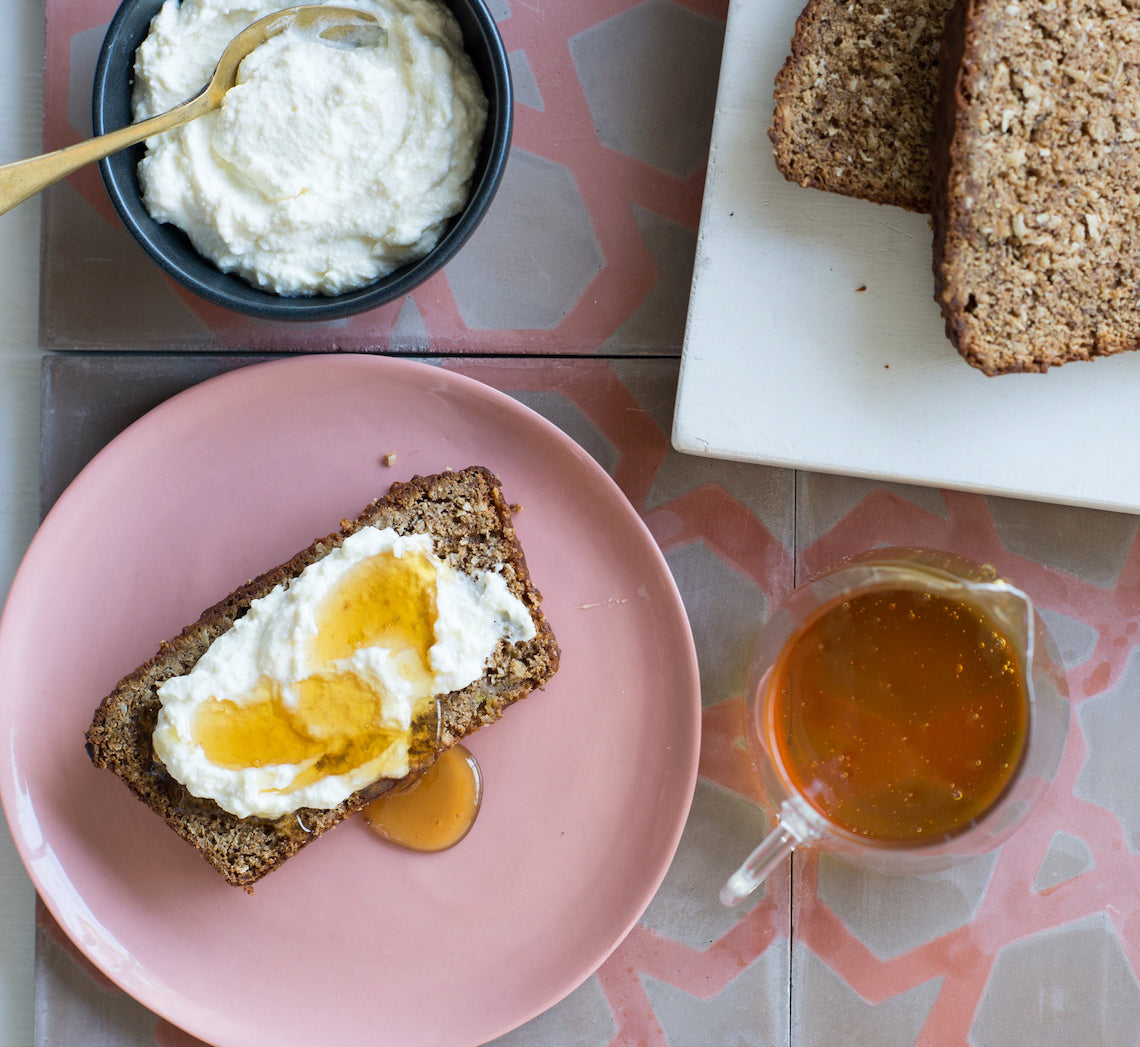
Prep 15minBake 50minMakes 12 serves
This banana bread is heaven. The addition of coconut oil adds a wonderful richness and heavenly aroma that you won’t be able to resist. This loaf also keeps well and becomes more moist and flavoursome with time, so try not to eat it all at once! It's wonderful served on its own or toasted and spread with butter or ricotta and drizzled with honey.
Ingredients
Melted coconut oil, to grease240g (1½ cups) wholemeal spelt flour
1 teaspoon baking powder
1 teaspoon bicarbonate of soda
70g (1 cup) shredded coconut
100g (½ cup) coconut oil, at room temperature
180g (1 cup) coconut palm sugar
1 egg
2 large (about 200g each) very ripe bananas
130g (½ cup) Greek-style natural yoghurt
Method
- Preheat oven to 180°C (160°C fan-forced). Grease a 21 x 10.5cm (base measurement) loaf pan with the melted coconut oil and line the base and two long sides with one piece of non-stick baking paper.
- Sift together the flour, baking powder and bicarbonate of soda into a large bowl, returning any husks to the flour mixture. Stir in the coconut.
- Use an electric mixer to beat the coconut oil and sugar in a mixing bowl until well combined (it will look like wet sand). Add the egg and beat well, scraping down the sides of the bowl if necessary. Mash the bananas, add to the coconut mixture with the yoghurt and beat until well combined. Add the dry ingredients and beat on low speed until just combined.
- Pour the mixture into the prepared tin. Use the back of a spoon to smooth the surface and then tap the tin lightly on the benchtop to settle the mixture. Bake in preheated oven for 45-50 minutes or until golden brown and a skewer inserted into the centre comes out clean. Stand in the tin for 5 minutes before turning onto a wire rack to cool. Serve in slices.
Baker's Tips
- This banana bread will keep in an airtight container at room temperature for up to 4 days.
This recipe is from Anneka's SBS Food online column, Bakeproof: Coconut.
CLICK HERE for more Bakeproof recipes.
Photography by Alan Benson.

Prep 25minBake 45minMakes about 8-10 serves
Dating back to the early British settlers of North America, cobblers are based on seasonal fruits and topped with a wet, scone-like mixture. The result is a simple pie of sorts with the topping resembling cobblestones – thought to be the reason for this homely dessert's name.
Ingredients
- Melted butter, to grease
- 800g (about 5 small) firm ripe pears (such as Williams or Packhams), peeled, cored and cut into eighths
- 1 bunch rhubarb, trimmed and cut into 5cm lengths (you should have about 500g trimmed rhubarb)
- 135g (⅔ cup, firmly packed) brown sugar
- 2 teaspoon natural vanilla extract or essence
- 1½ teaspoon ground cinnamon
- Vanilla ice cream or cream, to serve
Cobbler Topping
- 225g (1½ cups) self-raising flour
- Pinch of salt
- 125g chilled butter, cubed
- 75g (⅓ cup) raw sugar sugar, plus 1 tbsp extra for sprinkling
- 125ml (½ cup) buttermilk, plus extra to glaze
Method
- Preheat the oven to 190°C. Lightly grease a 1.5 litre (6 cup) ovenproof dish with the melted butter.
- Peel, quarter and core the pears. Cut each quarter in half lengthwise and place in a large bowl. Add the rhubarb, sugar, vanilla and cinnamon and toss gently to combine evenly. Transfer to a.
- To make the Cobbler Topping, sift the flour and salt together into a medium bowl. Use your fingertips to rub in the butter until the mixture resembles fine breadcrumbs and the butter is evenly incorporated. Stir in the sugar and make a well in the centre.
- Add the buttermilk to the flour mixture and use a flat-bladed knife to mix with a cutting action until the dough comes together in clumps. Use lightly floured hands to bring the dough together – it will be a sticky dough. Use lightly floured hands to roll into 2 cm balls and place randomly over the top of the fruit.
- Use a pastry brush to lightly brush the top of the cobbler mixture with the extra buttermilk and then sprinkle with the extra raw sugar.
- Bake in preheated oven for 40–45 minutes or until golden brown and the Cobbler Topping is cooked through and the fruit is tender when tested with a skewer. If browning too quickly cover the top with a piece of foil towards the end of baking. Serve warm with ice cream or cream.
Baker's Tips
- The pears can be replaced by apples in this recipe. Cut them into thin wedges before combining them with the rhubarb, sugar, vanilla and cinnamon.
This recipe is from Anneka's SBS Food online column, Bakeproof: Scones.
CLICK HERE for more Bakeproof recipes.
Photography by Alan Benson.
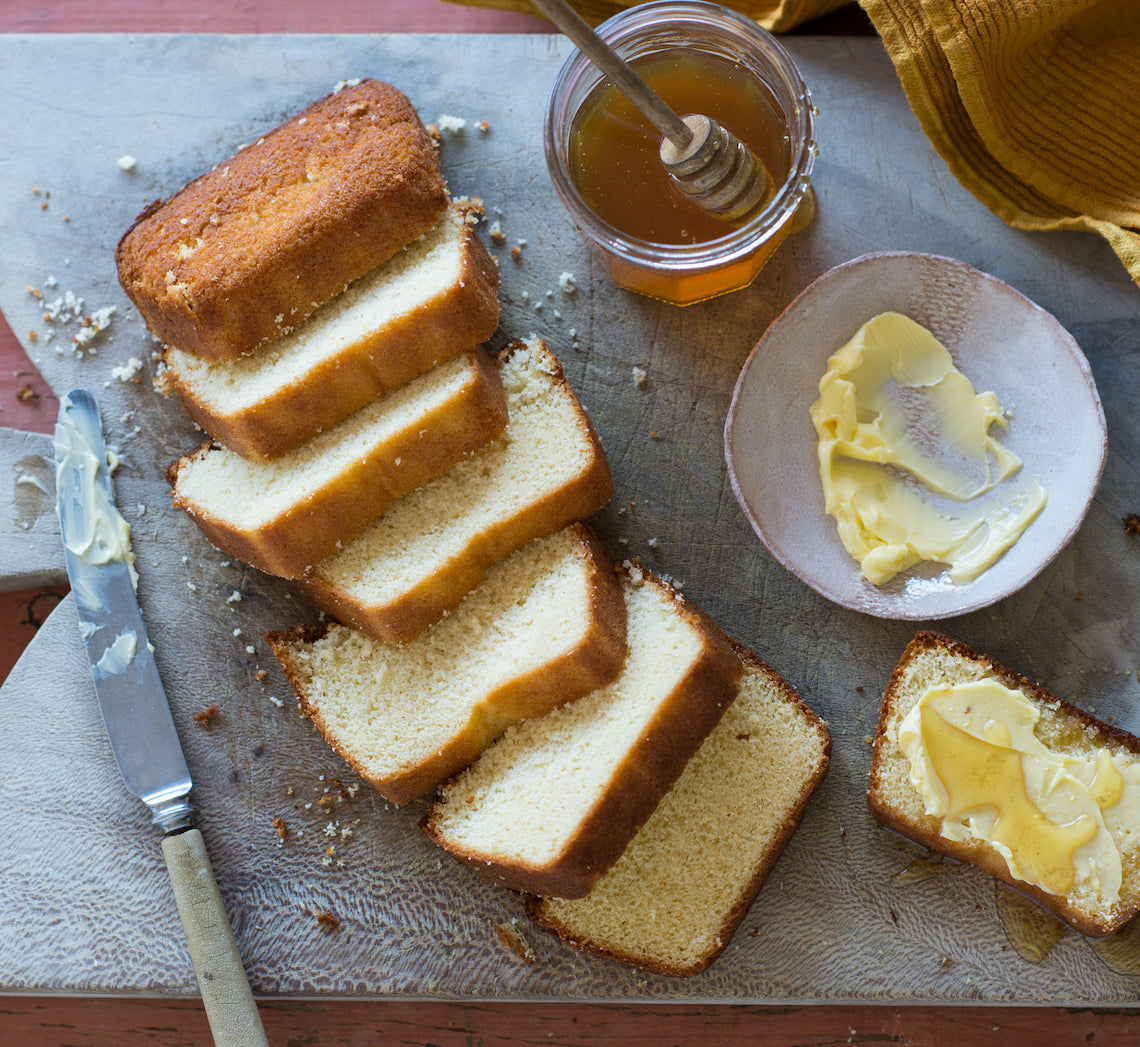
Prep 20min (+overnight chilling time)Bake 30minMakes 2 loaves
A specialty of the Nagasaki area in Japan, this wonderfully simple, honey-scented sponge cake was originally introduced by the Portuguese merchants in the 16th century, with its name originating from Pão de Castela meaning "bread from Castile". This cake defies sponge logic – strong bread flour gives it a "bouncy" texture, but it's still particularly moist and delicate, and becomes more so with time. Don’t be tempted to eat it straight from the oven (believe me, the heavenly honey aromas will tempt you!) – it needs to be wrapped while still warm and kept in the fridge overnight for its texture to be transformed.
Ingredients
- 6 eggs, at room temperature
- 220g (1 cup) caster sugar
- 115g (⅓ cup) honey
- 2 tablespoons warm water
- 200g (1¼ cups) bread flour, sifted twice
- Butter and extra honey, to serve
Honey Glaze
- 1 tablespoon honey
- 2 teaspoons warm water
Method
- Preheat oven to 180°C. Grease two 9 x 19cm (base measurement) loaf pans with butter and line each with two strips of baking paper.
- Use an electric mixer with a whisk attachment to whisk the eggs until frothy. Add the sugar and whisk on medium speed for 6-8 minutes or until the mixture is very thick and pale, has increased by four times its volume and a ribbon trail forms when the whisk is lifted.
- Add the combined honey and water and whisk until just combined.
- Add a third of the twice-sifted bread flour to the egg mixture and whisk on low speed for about 15 seconds or until just combined. Add the remaining flour in two separate batches, whisking on low until just combined as with the first batch, and checking that no flour has been caught in the bottom of the bowl.
- Divide the mixture evenly between the two prepared tins. Bake in preheated oven for 30 minutes or until a skewer inserted into the center comes out clean and the cakes will feel spongy when pressed in the center.
- To make the Honey Glaze, combine the honey and water in a small bowl and stir to combine. Brush the tops of the cakes with the Honey Glaze. Lay two pieces of plastic wrap large enough to wrap each cake on the bench top and turn the hot cakes out directly onto them. Wrap the cakes in the plastic wrap (this will help them retain their moisture), place on a tray, top side down, and put in the fridge, for at least 12 hours or overnight.
- Bring the cake to room temperature before serving in slices on its own or with butter and extra honey, if desired.
Baker's Tips
- This cake will keep at room temperature in an airtight container for up to 5 days.
This recipe is from Anneka's SBS Food online column, Bakeproof: Sponge Cake.
CLICK HERE for more Bakeproof recipes.
Photography by Alan Benson.
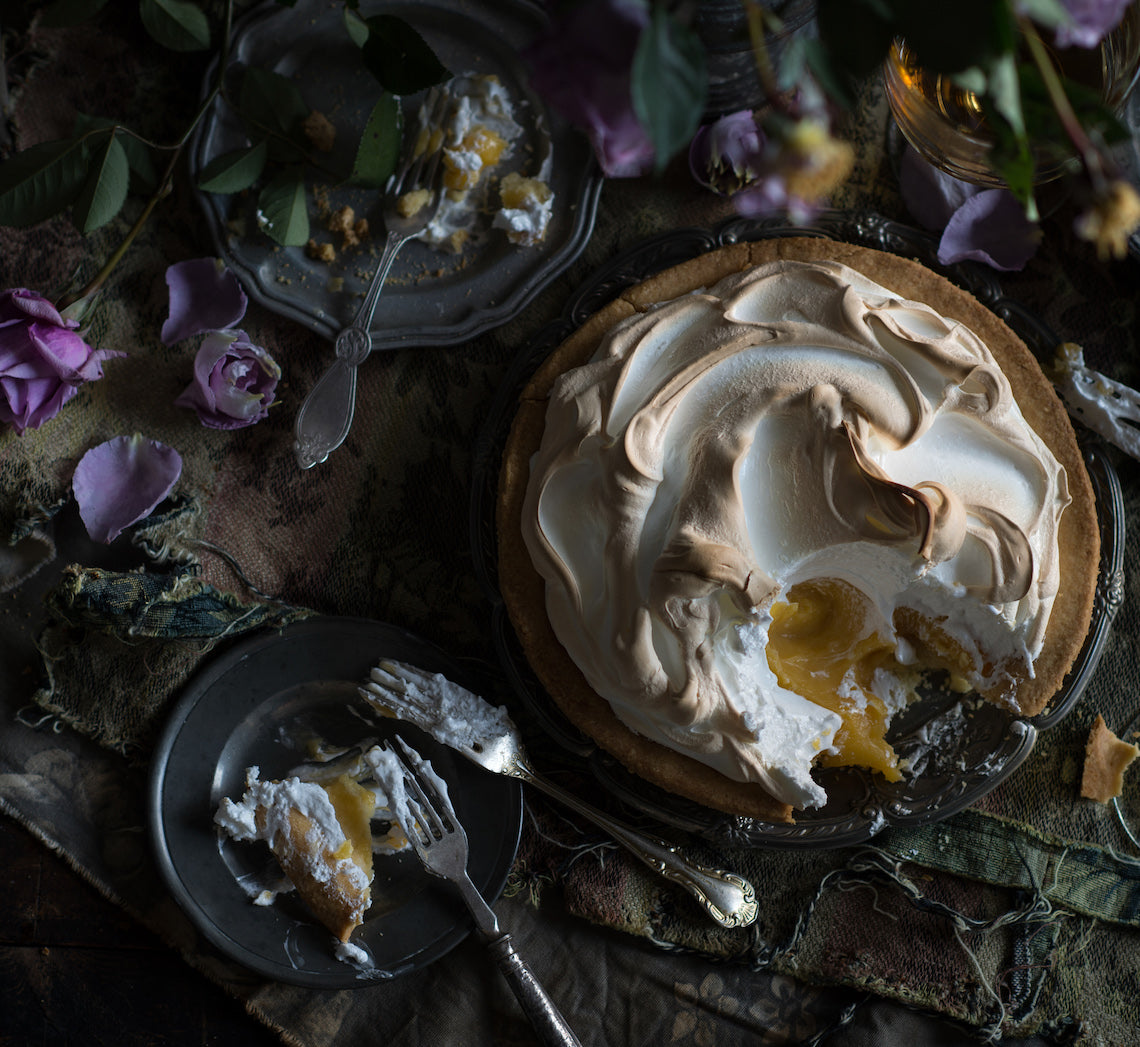
Prep 40min (+pastry making, 30min cooling and 2hr chilling time)
Bake 45-55minMakes 8-10 serves
Sometimes known as lemon chester pudding, lemon meringue pie is a wonderful combination of short, buttery pastry, a tart custard filling and a sweet, fluffy meringue topping. This recipe won’t disappoint!
Ingredients
1 quantity sweet shortcrust pastry, shaped into a disc before wrapping and chilling
Lemon Filling
40g (⅓ cup) cornflour, sifted
200ml strained freshly squeezed lemon juice
80ml (⅓ cup) water
220g (1 cup) caster sugar
6 egg yolks
100g salted butter, diced
Italian Meringue Topping
4 egg whites
220g (1 cup) caster sugar
80ml (1/3 cup) water
Pinch of salt
Method
- Preheat oven to 200°C (180°C fan-forced).
- Use a lightly floured rolling pin to roll out the pastry on a lightly floured bench top to a round about 3mm thick. Line an ungreased 22cm diameter (base measurement), 3cm deep pie plate or tart tin with the pastry. Use a small sharp knife to trim any excess pastry.
- Place the pastry case on an oven tray and use a fork to prick the base about 12 times. Line the pastry case with crumpled baking paper or foil and fill with pastry weights or raw rice, making sure they fill the case. Bake in preheated oven for 20 minutes.
- Remove the pastry case from the oven and use the paper or the foil to lift the weights out of the case. Return the case to the oven and bake for a further 20-25 minutes or until the pastry is cooked through and is golden. Set aside to cool.
- To make the Lemon Filling, place the cornflour in a medium saucepan. Use a balloon whisk to gradually stir in the combined lemon juice and water until smooth and well combined. Stir in the sugar, egg yolks and butter. Stir over medium heat for 3-5 minutes or until the butter melts. Continue to stir over medium-low heat for 5-10 minutes or until the mixture thickens and comes to a simmer. Pour immediately into the pastry shell and use the back of a metal spoon to smooth the surface. Set aside for 30 minutes to cool. Cover and chill for at least 2 hours or until the filling is set.
- When ready to serve, preheat oven to 240°C (220°C fan-forced).
- To make the Italian Meringue Topping, put the egg whites in the bowl of a stand mixer fitted with a whisk attachment. Combine the sugar and water in a small saucepan and stir with a wooden spoon or spatula over low heat until the sugar dissolves. Increase the heat to medium and bring to the boil. Boil for about 10 minutes, occasionally brushing down the side of the pan with a pastry brush dipped in water to dissolve any sugar crystals, until the syrup reaches soft ball stage (115°C on a sugar thermometer). Meanwhile, just before the syrup is ready, whisk the egg whites on high speed until firm peaks form. Remove the syrup from the heat and stand for about 1 minute or until the bubble subside. With the motor running on high speed, gradually add the sugar syrup in a thin steady stream until all the syrup has been incorporated. Add the salt and then continue to whisk on medium speed for another 10 minutes or until the meringue has cooled to room temperature.
- Spread the meringue mixture over the top of the lemon filling, swirling as desired. Bake in preheated oven for 5-10 minutes or until browned on the edges (see Baker’s Tips). Stand for 5 minutes before scooping with a large metal spoon or cutting into wedges with a sharp knife that has been dipped in hot water (see Baker’s Tips).
Baker's Tips
- This pie is best eaten the day it is made.
- If using a tart tin, you can transfer the pastry case to a ovenproof serving plate before adding the filling.
- You can also use a blowtorch to caramelise the meringue topping instead of returning it to the oven in step 7.
- Dipping the spoon or knife in hot water and drying before scooping or cutting will make it easier to portion.
This recipe is from Anneka's SBS Food online column, Bakeproof: Citrus.
CLICK HERE for more Bakeproof recipes.
Photography by Alan Benson.
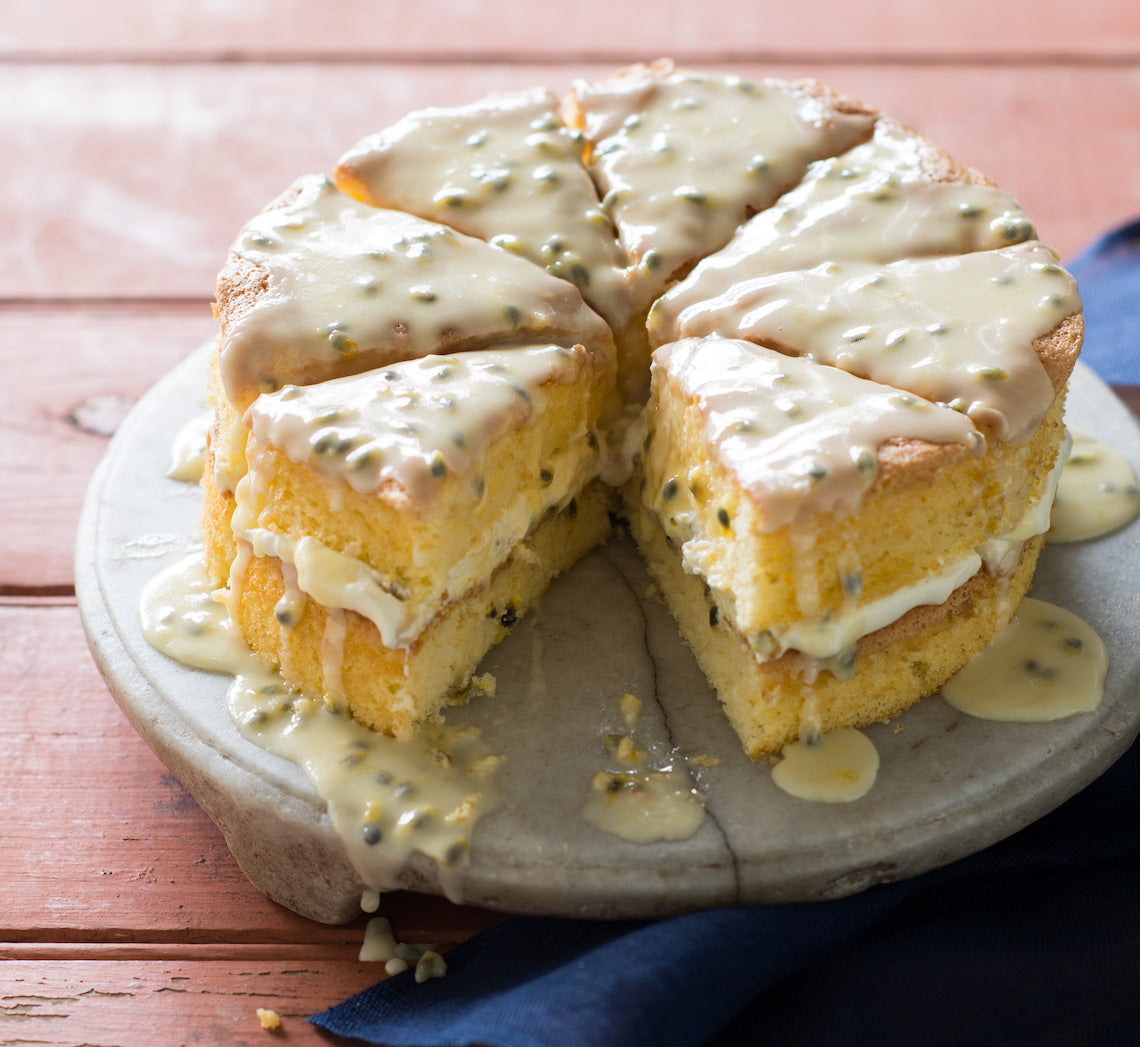
Prep 25min (+cooling time)Bake 18-20minMakes 8-10 serves
This sponge will have you wanting an excuse to make afternoon tea every day. There are two main tricks when making a sponge: don’t over-whisk the mixture once you have added the flour – only whisk it until the mixture is just combined. Also, sponges don’t take long to bake and, if overcooked, will easily become dry, so keep a close eye on them when baking.
Ingredients
160ml (⅔ cup/5¼fl oz) thickened cream
80ml (⅓ cup/2½fl oz) fresh passionfruit pulp
Sponge Layers
Melted butter, to grease
4 x 60g (2oz) fresh eggs, at room temperature
165g (¾ cup/5¾oz) caster sugar
60ml (¼ cup/2fl oz) milk
30g (1oz) salted butter, diced
110g (¾ cup/4oz) self-raising flour, plus extra to dust
30g (¼ cup/1oz) cornflour
Passionfruit Icing
180g (1½ cups/6½oz) pure icing sugar
1½ tablespoons fresh passionfruit pulp
Approx. 3 teaspoons boiling water
Method
- To make the Sponge Layers, place the oven rack in the lower third of the oven and then preheat it to 180°C/350°F (160°C/315°F fan-forced). Brush two 20cm/8in shallow (sandwich) cake tins with a little melted butter to lightly grease. Line the bases with circles of baking paper. Lightly brush the paper with a little more melted butter and then dust the bases and sides of the tins with a little flour to lightly coat, tapping out any excess.
- Use an electric mixer with a whisk attachment on medium-high speed to whisk the eggs in a medium bowl until frothy. Add the sugar a spoonful at a time, whisking well between each addition, until the mixture is very thick and pale and the sugar has dissolved (this will take about 8 minutes). Lift the whisk out of the mixture and draw a figure eight, if the trail stays on the surface long enough for you to finish drawing then the mixture is ready. If not, continue to whisk for a further minutes and then test again.
- Meanwhile, heat the milk and butter in a small saucepan over medium heat until the butter melts and the mixture is almost simmering. Remove from the heat. Pour the hot milk mixture down the side of the bowl with the egg mixture. Quickly sift the flour and cornflour together over the egg mixture and then immediately whisk again with the electric mixer briefly, until the flour mixture is just incorporated (make sure there is no flour caught at the bottom of the bowl and be careful not to overmix).
- Divide the mixture evenly between the cake tins (see Baker’s Tips) and gently tap the tins on the bench top three times to settle the mixture. Bake in preheated oven for 18-20 minutes or until the cakes are a pale golden colour, spring back when lightly touched in the centre and start pulling away from the sides of the tins. Remove from the oven and stand for 1 minute before turning onto a wire rack, top side up (see Baker’s Tips), to cool completely.
- When ready to fill, to make the Passionfruit Icing, sift the icing sugar into a medium bowl. Add the passionfruit pulp and enough boiling water to mix to a thin, spreadable icing. Cover tightly with plastic wrap and set aside. Use an electric mixer with a whisk attachment or a balloon whisk to whisk the cream in a medium mixing bowl until soft peaks form. Use a large metal spoon or spatula to gently fold the passionfruit pulp through the whipped cream until just swirled through. Place one layer of the sponge on a serving plate or cake stand and spread with the passionfruit cream. Top with the remaining sponge layer. Spread the Passionfruit Icing evenly over the top layer of the sponge, allowing it to drip down the sides slightly. Set aside or 20 minutes or until the icing sets before serving in slices.
Baker's Tips
- You will need about 5 large passionfruit for this recipe.
- To divide the mixture evenly between the tins, weigh the tins with the mixture in them to make sure they are the same weight.
- When removing the cakes from the tins, turn them onto a wire rack covered with a tea towel before inverting onto another rack. The tea towel will prevent the rack marking the tops of the cakes.
- The unfilled sponge cakes will keep in an airtight container at room temperature for up to 1 day. Once filled, the cake will keep in an airtight container in the fridge for up to 2 days. Stand at room temperature for at least 30 minutes before serving.
This recipe is from Anneka's SBS Food online column, Bakeproof: Sponge Cake.
CLICK HERE for more Bakeproof recipes.
Photography by Alan Benson.
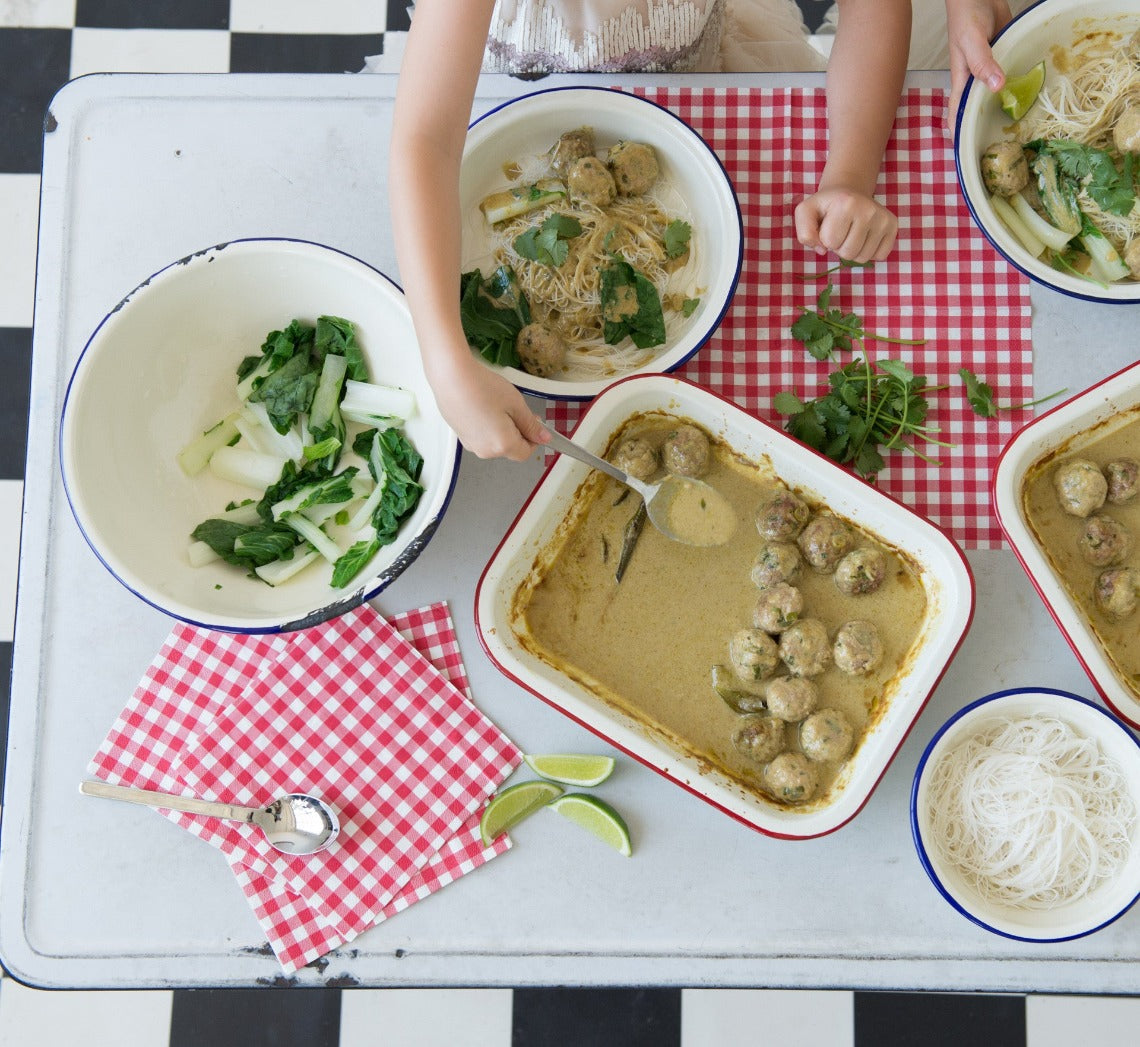
Prep 30minBake 30minMakes 4-6 serves
Any recipe that gets kids rolling balls of mixture will help develop their fine motor skills no matter what their age. Fun to make, these meatballs also encourage independence — put all the components in the middle of the table for everyone to help themselves.
Ingredients
200g dried rice vermicelli, cooked according to packet directions
fresh coriander leaves, lime wedges and steamed asian greens, to serve
Meatballs
500g pork and veal mince (see Baker's Tips)
18g (⅓ cup) panko rice crumbs
2 tablespoons milk
3 teaspoons finely grated fresh ginger
1½ tablespoons finely chopped drained canned water chestnuts
5 green shallots, thinly sliced
⅓ cup finely chopped coriander
Sauce
2 teaspoon peanut oil
3 tablespoons good-quality green curry paste, or to taste (see Baker's Tips)
125ml (½ cup) good-quality chicken stock
500ml (1 cup) water
440ml can coconut milk
4 kaffir lime leaves
2 teaspoons fish sauce, or to taste
1 tablespoon lime juice, or to taste
2 teaspoon grated palm or brown sugar, or to taste
Method
- Preheat oven to 180°C (160°C fan-forced).
- Combine the mince, crumbs, milk, ginger, water chestnuts, green shallots and coriander in a large bowl and mix well with your hands until thoroughly combined. Use damp hands to roll 2 teaspoonfuls of the mixture into balls and place in one layer in a shallow 20cm x 30cm/2.5 litre (10 cup) capacity ovenproof dish. Cover and place in the fridge while making the sauce.
- To make the sauce, combine the peanut oil and curry paste in a medium saucepan and cook over medium-high heat for 2-3 minutes, stirring occasionally, or until aromatic. Add the stock, coconut milk, kaffir lime leaves, fish sauce, lime juice and sugar and bring just to a simmer over medium heat.
- Pour the sauce over the meatballs. Bake in the preheated oven for 30 minutes or until the meatballs are just cooked through. Taste the sauce and adjust seasoning with extra fish sauce, lime just and sugar if desired.
- Divide the noodles among four bowls and spoon over the meatballs and some of the sauce. Top with coriander leaves and serve with lime wedges and steamed Asian greens.
Baker's Tips
- You can also use just pork mince for this recipe.
- You may find you need to use a little less or add a little more green curry paste depending on the brand you use as they can vary greatly in flavour and heat intensity. Keep also in mind your childrens' flavour preferences as you don’t want to make it too hot for their sensitive tastebuds.

Prep 40min (+ 40min cooling and 3-4 hours freezing time)Bake 20minMakes 6 large lamingtons
Rich, decadent, indulgent and insanely large these lamingtons are perfect to serve as a dessert with fresh raspberries or to share with another chocolate lover (but only if you can part with the other half)!
Ingredients
330g (11⅔oz/6 cups) flaked coconut, to coat
Chocolate Buttercake
185g (6½oz/1¼ cups) plain flour
55g (2oz/½ cup) cocoa powder
3 teaspoons baking powder
275g (9¾oz/1¼ cups, firmly packed) brown sugar
125g (4½oz) salted butter, cubed, softened
2 eggs, at room temperature
160ml (5¼fl oz/⅔ cup) water
2 teaspoons natural vanilla extract or essence
Raspberry Swirl Cream
100ml (3½fl oz) pure (thin/pouring) cream
85g (3oz/¼ cup) raspberry jam
2 teaspoons raspberry liqueur (Chambord) or water
Chocolate Ganache
200g (7oz) good-quality dark chocolate (45-54% cocoa), chopped
300ml (10½fl oz) pure (thin / pouring) cream
Method
- To make the Chocolate Buttercake, preheat the oven to 180°C/350°F (160°C/315°F fan-forced). Grease a 20cm x 30cm (8in x 12in), base measurement, shallow cake tin and line the base and two long sides with one piece of baking paper.
- Sift together the flour, cocoa and baking powder in a large mixing bowl. Add the sugar, butter, eggs, water and vanilla. Use an electric mixer to beat on low speed until combined. Increase the speed to medium-high and beat for 3 minutes or until the mixture is well combined, creamy and pale in colour. Pour the mixture into the lined tin and spread evenly using the back of a spoon.
- Bake for 20 minutes or until a skewer inserted in the centre comes out clean. Cool for 5 minutes in the tin, then turn onto a wire rack to cool completely (this will take about 40 minutes).
- To make the Raspberry swirl cream, use a balloon whisk or an electric mixer with a whisk attachment to whisk the cream on medium speed until firm peaks form. Stir together the jam and liqueur or water to thin the jam, add to the cream and use a metal spoon or a spatula to swirl the jam through the cream. Cover and chill until needed.
- Trim the edges of the cooled cake and then cut in half to form two portions, each about 15cm x 20cm (6in x 8in). Spread one portion of the cake with the Raspberry Swirl Cream and top with the remaining cake portion. Freeze for 1 hour or until the cream is firm enough to cut the cake easily.
- Meanwhile, to make the Chocolate ganache, put the chocolate in a heatproof bowl. Bring the cream just to a simmer in a small saucepan. Pour the hot cream over the chocolate and stir with a metal spoon until the chocolate melts and the mixture is smooth.
- Use a sharp serrated knife to cut the layered cake into 6 large portions, about 6.5cm x 7.5cm (2½in x 3in) each. Run a small palette knife around the cut surface of each lamington to remove any excess cream. Return the lamington portions to the freezer for another 2-3 hours or until frozen (see Baker's Tips).
- Spread some of the coconut on a tray or plate. Rest a cake square on a fork, carefully dip into the ganache and then and spoon the ganache over the top and sides to completely coat (see Baker's Tips). Allow any extra ganache to drip off. Roll the cake in the coconut to coat evenly. Place on a wire rack. Repeat with the remaining cake portions, ganache and coconut, adding more coconut as needed.
Baker's Tips
- Freeze the cake before cutting it into portions, and again before coating the portions with chocolate icing. This makes both steps easier, as the cake will be firmer and the cream will be less likely to soften or become difficult to handle.
- The cake portions filled with raspberry cream can be frozen in an airtight container or sealed freezer bag, before coating with chocolate icing, for up to 1 month.
- The ganache should be the consistency of thickened cream when coating the lamingtons. If it becomes too thick while you are coating the cake pieces, sit the bowl over a saucepan of simmering water (don't let the water touch the bottom of the bowl though), and stir until it comes back to the right consistency.
- These lamingtons will keep in an airtight container in the fridge for up to 3 days. Remove them from the fridge at least 1 hour to allow them to come back to room temperature before serving.
Photography by Alan Benson.
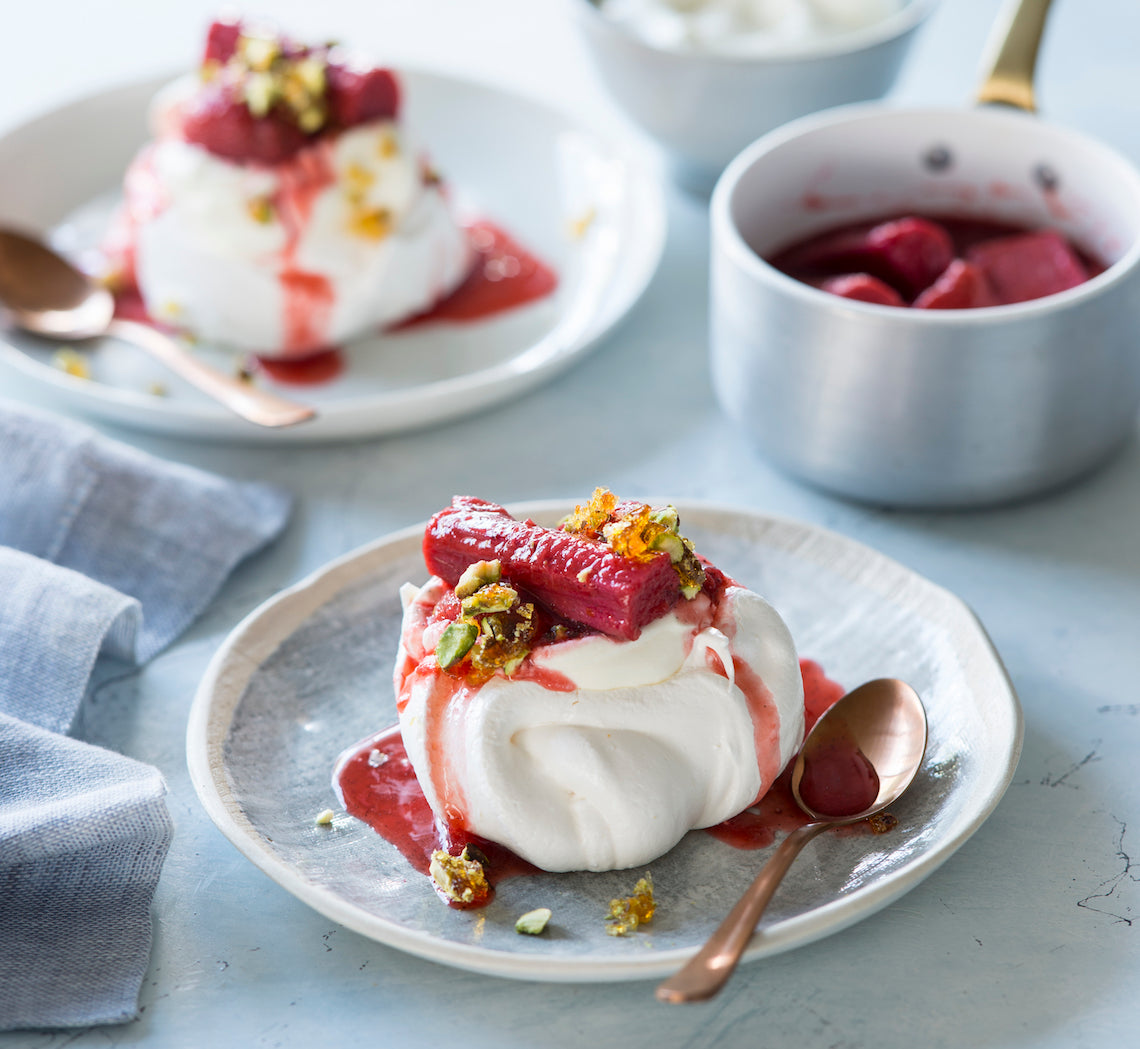
Prep 1hr (+2hr cooling time)
Bake 1hr 35minMakes 8 serves
Delicately flavoured with rosewater, these individual pavlovas make a divine create-your-own dessert. Those who prefer a slightly more casual approach to assembly can opt for an Eaton mess. Simply crush the pavlovas and layer the individual elements in a glass instead!
Ingredients
lime wedges, to serve
Rosewater pavlovas
3 egg whites, at room temperature
165g (¾ cup) caster sugar
2 teaspoons cornflour, sifted
2 teaspoons rosewater
Vanilla-roasted red fruits
500g trimmed rhubarb (about 2 bunches), cut into 6 cm lengths
2 x 250g punnets small strawberries, hulled
2 vanilla beans, split lengthways
150g (⅔ cup) caster sugar
Yoghurt cream
125ml (½ cup) thickened cream, whipped to firm peaks
130g (½ cup) thick Greek-style natural yoghurt
Toffee pistachios
110g (½ cup) caster sugar
60ml (¼ cup) water
75g unsalted pistachio kernels, toasted
Method
- To make the rosewater pavlovas, place the oven rack in the lower third of the oven and preheat it to 110°C. Line an oven tray with non-stick baking paper. Use an electric mixer with a whisk attachment to whisk the egg whites in a large bowl on medium-high speed until soft peaks form. With the motor running, add the sugar a spoonful at a time, whisking well after each addition, until all the sugar has dissolved and the mixture is very thick and glossy (this will take 4-5 minutes). Add the cornflour and rosewater and whisk to combine. Use a spatula to stir the meringue mixture to ‘loosen’ it slightly (this will get rid of any excess air in the mixture and give it a smoother, less ‘foamy’ texture). Use two metal tablespoons to spoon 8 ovals of the meringue mixture on to the lined tray and use the back of a spoon to make in an indent in the centre of each. Bake in the lower third of the preheated oven for 1 hour 15 minutes, until the meringue is crisp and hard to touch, but not coloured. Turn off the oven, leave the door slightly ajar and cool it completely in the oven (this will take about 2 hours).
- To make the toffee pistachios, line an oven tray with non-stick baking paper. Combine the caster sugar and water in a small saucepan and use a wooden spoon to stir over low heat until the sugar dissolves. Increase the heat to medium and bring to the boil. Boil for 8-10 minutes, brushing down the side of the pan with a pastry brush dipped in water to dissolve any sugar crystals, until the mixture turns a deep caramel. Pour immediately onto the lined tray and then sprinkle with the pistachios. Lightly tap the tray 2-3 times on the bench top to settle the pistachios into the toffee and then set aside to cool completely (this will take about 30 minutes). When cool, use the end of a rolling pin to pound the toffee into coarse chunks.
- To make the vanilla-roasted red fruits, preheat the oven to 200°C (180°C fan-forced). Rinse the rhubarb and shake off any excess water. Place in a bowl with the strawberries and sugar. Use a small sharp knife to scrape the seeds from the vanilla bean. Add the bean and the seeds to the rhubarb mixture and toss to combine. Transfer to an ovenproof dish just large enough to hold the fruit in a single layer and cover with foil. Bake in preheated oven for 18-20 minutes or until the rhubarb is just tender and still holding its shape. Remove the foil and set aside to cool.
- To make the yoghurt cream, fold together the whipped cream and yoghurt.
- To serve, place the pavlovas, toffee pistachios, roasted fruit, yoghurt cream and lime wedges in the centre of the table for guests to assemble their own dessert.
Baker's Tips
- The rosewater pavlovas will keep in an airtight container at room temperature for up to 1 week.
- The vanilla-roasted red fruit will keep in an airtight container in the fridge for up to 3 days. Serve at room temperature.
- The toffee pistachios will keep in a sealed jar or airtight container at room temperature for up to 1 month. You may have to pound again to break up before serving.
Photography by Alan Benson. Styling by Jane Hann.
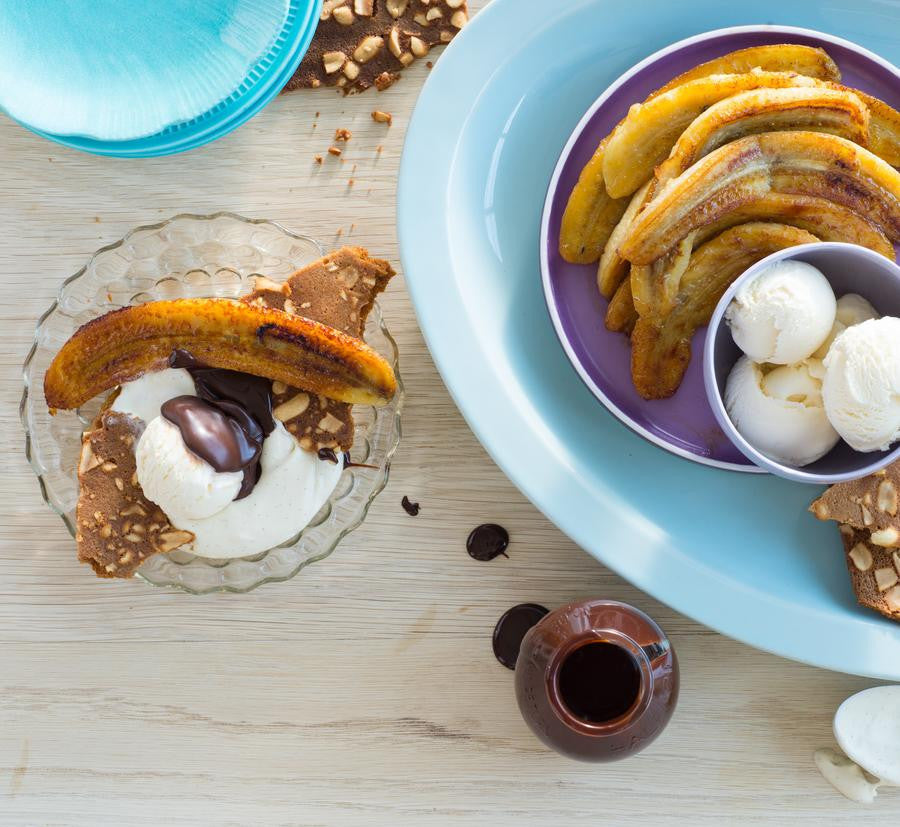
Prep 40min (+ 30min cooling time)
Bake 25minMakes 6 serves
A childhood classic given a modern twist, this fruity split is the perfect dessert to share with a crowd. Place all the separate elements in the centre of the table and arm your guests with their own bowl and spoon. Ready, set, go!
Ingredients
1 x 500ml (17fl oz) tub good–quality vanilla ice-cream, to serve
Salted peanut honey wafers
35g (¼ cup/1¼oz) plain flour
55g (¼ cup/2oz) caster sugar
85g (¼ cup/3oz) honey, warmed slightly
50g (1¾oz) unsalted butter, melted and cooled
1 egg white
100g (3½oz) salted roasted peanuts, very coarsely chopped
Chocolate fudge sauce
185g (6½oz) good-quality dark chocolate (45-54% cocoa), chopped
185ml (¾ cup/6½fl oz) pouring cream
1 tablespoon (4 teaspoons) honey
Caramelised Honeyed Banana
6 firm, ripe bananas (about 170g/6oz each)
20g (¾oz) salted butter, diced
2 tablespoons (8 teaspoons) honey
Chantilly cream
150ml (5fl oz) thickened cream
1 teaspoon vanilla bean paste
1½ tablespoons (6 teaspoons) icing sugar
Method
- To make the Honey and peanut wafers, preheat the oven to 150°C/300°F (130°C/265°F fan-forced). Line a large oven tray with non-stick baking paper. Place the flour and sugar in a medium bowl. Combine the honey, butter and egg white, add to the dry ingredients and use a balloon whisk to stir until just combined and smooth. Pour the mixture onto the lined tray and use the back of a spoon to spread the mixture evenly as evenly as possibly into a thin 25cmx30cm/10inx12in rectangle. Sprinkle evenly with the peanuts. Bake in the centre of the preheated oven for 25 minutes, turning the tray around after 15 minutes to help bake evenly, or until dark golden and the centre is cooked through. Remove from the oven and cool on the tray (this will take about 30 minutes). Break into large pieces and set aside.
- To make the Chantilly cream, combine the cream, icing sugar and vanilla in a medium bowl and use a balloon whisk or an electric hand mixer with a whisk attachment to whisk the cream until soft peaks form. Transfer to a serving bowl, cover place in the fridge until ready to serve.
- To make the chocolate fudge sauce, combine the chocolate, cream and vanilla in a small saucepan and heat over a medium-low heat, stirring occasionally, until the chocolate melts and the sauce is smooth. Transfer to a heatproof jug, cover and keep warm.
- To make the caramelised honeyed bananas, peel the bananas and cut each in half lengthways. Melt half the butter in a large non-stick frying pan over medium-high heat. Drizzle in half the honey and then add half the banana slices in a single layer. Cook for 2-4 minutes each side or until the bananas are golden and caramelised. Transfer to a serving bowl, wipe out the pan with paper towel and repeat with the remaining butter, honey and banana.
- To serve, place the caramelised banana, wafers, fudge sauce, cream and ice-cream in the centre of the table for guests to assemble their own dessert.
Baker's Tips
- The wafers will keep in an airtight container at room temperature for up to 1 week.
- The chocolate fudge sauce will keep in an airtight jar or container in the fridge for up to 5 days. Reheat in a small saucepan or microwave until smooth and warmed through.
This recipe is part of Anneka's SBS Food Bakeproof: DIY dessert bar online column. For more Bakeproof columns and recipes, click here.
Photography by Alan Benson.