
- home
- BAKERECIPES
BakeRecipes
Bringing real baking into your home with deliciously simple recipes.
Prep 25min (+2hr 30min cooling time)Bake 45-50minMakes 12-16 serves
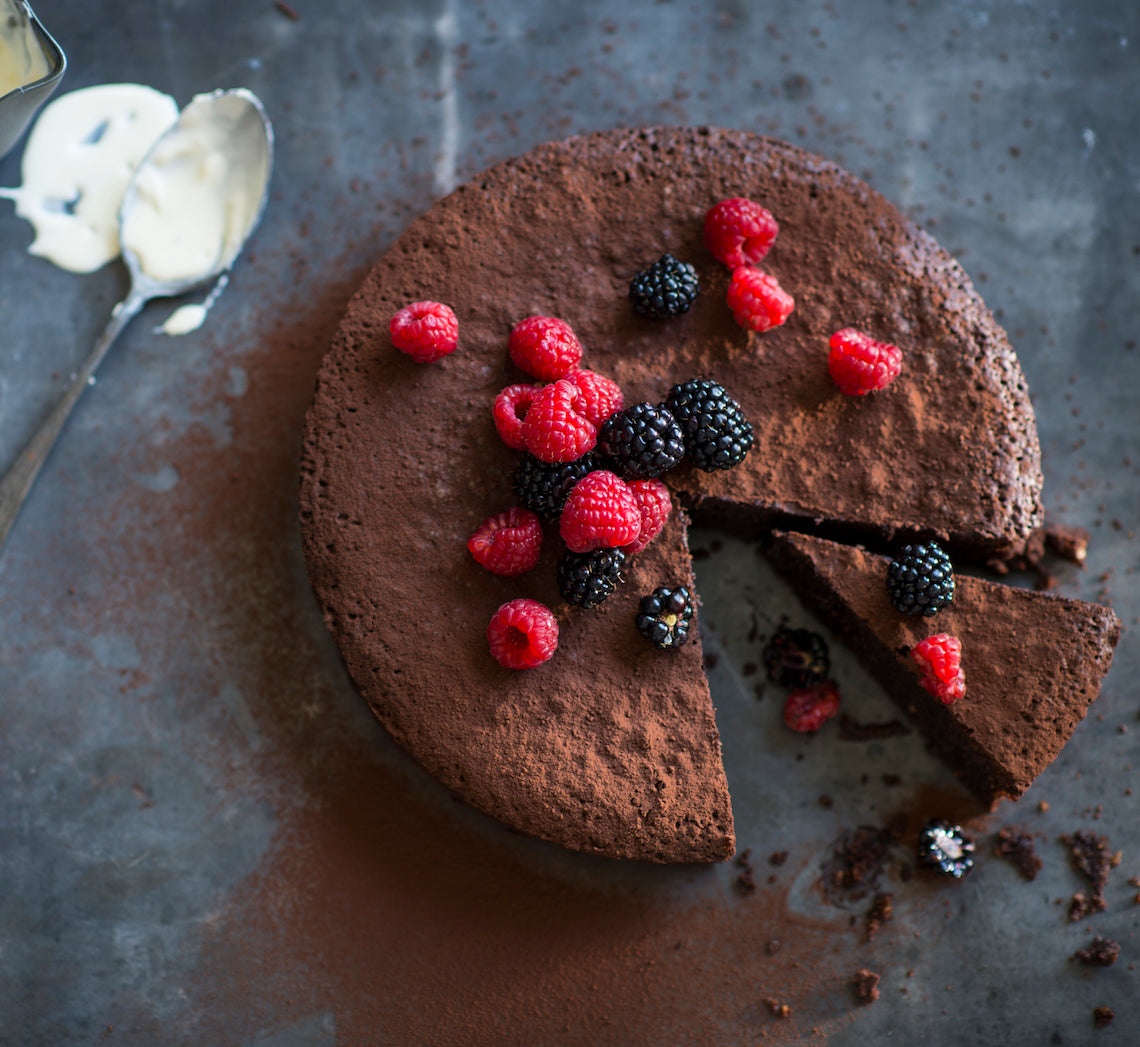
I love this cake. Rich, decadent and completely addictive, it is one of the easiest cakes I have ever made but also one of the most impressive. The toasted hazelnuts give a wonderful 'toasty' undertone, but you can use ground toasted pecans, almonds or pistachios (or a combination of nuts) instead – just take your pick!
Ingredients
Melted butter, to grease
200g (7oz) roasted and peeled hazelnuts
250g (9oz) good-quality dark chocolate (45-54% cocoa), chopped
185g (6½oz) unsalted butter, cubed
40g (1⅓oz/⅓ cup) cocoa powder, sifted
60ml (2fl oz/¼ cup) strong, freshly brewed coffee
6 eggs, at room temperature
275g (9¾oz/1¼ cups) caster sugar
Cocoa powder or icing sugar, to dust
Cream or ice cream, and fresh berries, to serve
Method
- Preheat oven to 180°C/350°F (160°C/315°F fan-forced). Brush a 22cm (8¾in), base measurement, springform tin with the melted butter to grease and line the base with non-stick baking paper. Place the tin on a lined baking tray.
- Process the hazelnuts in a food processor using the pulse button until finely ground. Set aside.
- Combine the chocolate, butter and cocoa powder in a medium heatproof bowl over a saucepan of simmering water (don’t let the base of the bowl touch the water). Heat, stirring occasionally, until melted and smooth. Remove from heat and stir in the coffee. Set aside.
- Use a balloon whisk to mix the eggs and sugar until just combined. Stir in the chocolate mixture and then the ground hazelnuts until evenly combined.
- Pour into the prepared tin and bake in preheated oven for 45-50 minutes or until the centre 10cm (4in) still wobbles slightly when the tin is shaken gently. Remove from the oven and cool in the tin on a wire rack (this will take about 2½ hours).
- Serve dusted with cocoa powder or icing sugar and accompanied by cream or ice-cream, and berries.
Baker's Tips
-
This cake will keep in an airtight container in the fridge for up to 5 days. Bring to room temperature to serve.
Photography by Alan Benson.

Prep 25min (+1hr 30min proving time)Bake 25minMakes 12
An updated version of the traditional favourite, these hot cross buns are studded with chunks of dark chocolate and tart, dried cherries. They're simply too hard to resist – especially when served warm with lashings of butter!
Ingredients
750g (5 cups/1lb 10½oz) strong bread or pizza (high protein) flour (see Baker's Tips)
55g (¼ cup/2oz) caster sugar
2 x 7g sachets (4 teaspoons) instant dried yeast
1½ teaspoons mixed spice
1½ teaspoons ground cinnamon
1 teaspoon salt
150g (1 cup/5¼oz) dried cherries (see Baker's Tips)
75g (½ cup/2¾oz) currants
435ml (1¾ cups/14¾fl oz) milk
60g (2fl oz) salted butter, cubed, plus extra, to grease and serve
2 eggs, at room temperature
1 teaspoon natural vanilla essence or extract
100g (3½oz) good-quality dark chocolate, chopped
Flour paste
75g (½ cup/2¾oz) plain flour
75ml (2½fl oz) water
Glaze
55g (¼ cup/ 2oz) caster sugar
2 tablespoons water
Method
- Put the bread flour, sugar, yeast, mixed spice, cinnamon and salt in a large bowl and mix to combine. Stir through the dried cherries and currants.
- Heat the milk and butter in a small saucepan over medium heat until the butter has just melted and the milk is lukewarm. Whisk one of the eggs with the vanilla and add to the milk mixture. Whisk to combine. Add to the dry ingredients and use a wooden spoon and then your hands to mix to a soft dough.
- Turn out onto a lightly floured bench top. Knead for 8-10 minutes or until smooth and elastic. Lightly grease a clean large bowl with a little butter, add the dough and turn to coat the dough. Cover with plastic wrap and set aside in a warm, draught-free place for 1 hour or until doubled in volumn.
- Line a large baking tray with baking paper. Punch the centre of the dough down with your fist. Turn onto a lightly floured bench top. Knead for 2-3 minutes or until smooth. Knead in the chocolate until evenly combined. Divide the dough into 12 equal portions. Roll each portion into a ball and place on the tray, allowing a little room for spreading. Cover with a damp tea towel and set aside in a warm, draught-free place for 30 minutes or until almost doubled in size.
- Preheat the oven to 180°C/350°F (160°C/315°F fan-forced). Meanwhile, make the Flour Paste. Combine the flour and water in a bowl and beat with a wooden spoon until smooth. Spoon into a small, good-quality snap-lock bag and seal.
- Whisk the remaining egg and brush the tops of the buns with it. Snip a small hole in the corner of the snap-lock bag containing the Flour Paste and pipe crosses on the buns.
- Bake in the preheated oven for 25 minutes or until the buns are cooked and sound hollow when tapped on the base.
- Meanwhile, make the Glaze. Combine the sugar and water in a small saucepan over medium heat and stir until the sugar dissolves. Bring to a simmer and simmer for 1 minute. Transfer the hot cross buns to a wire rack and brush the tops with the glaze. Serve warm, spread with butter.
Baker's Tips
- Bread and pizza flour (also known as 'strong' flour) has a higher gluten content than regular plain flour. This type of flour is more suited to use in yeast-based bread recipes like these buns and will give you a better final texture (the resulting bread will be more 'bread-like' with a slightly chewy texture rather than a fine, cake-like texture). Look for a protein content of around 11-13 percent for the best results with this recipe.
- Dried cherries are available at selected supermarkets, delicatessens, grocery shops and specialty food stores. You can replace them with good-quality dried cranberries.
- These hot cross buns are best eaten the day they are made although they will freeze well. To freeze, wrap in plastic wrap and then seal in an airtight container or freezer bag and freeze for up to 3 months. Thaw them at room temperature or split while still frozen and toast.
Recipe from BakeClass by Anneka Manning (Murdoch Books).
Photography by Alan Benson.
Prep 20min (+pastry making and 30min cooling time)Bake 40minMakes 10
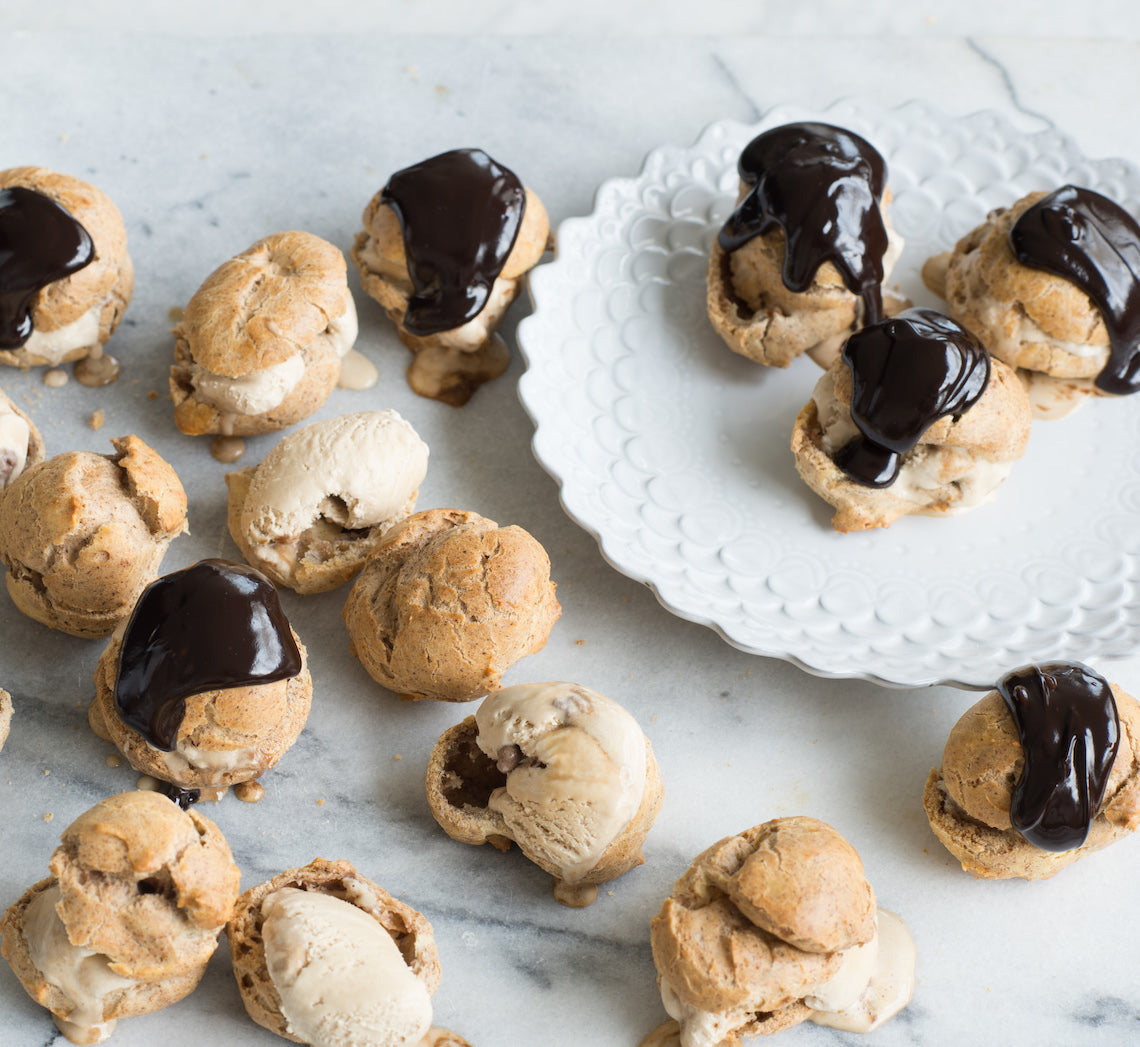
Also called choux a la crème or cream puffs, profiteroles are basically choux pastry balls filled with crème patissiere, whipped cream or, as in these, ice-cream. These profiteroles, a heavenly combination of cinnamon, coffee and chocolate, are just a little bit addictive!
Ingredients
- 1 quantity basic choux pastry
- 2 teaspoons caster sugar
- 2 teaspoons ground cinnamon
- 1 egg, lightly whisked, to glaze
- 1 litre homemade or bought espresso or coffee ice-cream, to serve
Fudge sauce
- 200ggood quality dark chocolate (70% cocoa works well), chopped
- 125ml (½ cup) pouring cream
- 2 tablespoons golden syrup
- 1 teaspoon natural vanilla essence or extract
- ¼ teaspoon salt
Method
- Preheat oven to 200°C. Line 2 large oven trays with non-stick baking paper.
- Use a wooden spoon to beat the sugar and cinnamon into the warm prepared choux pastry until well combined.
- Spoon 30 heaped teaspoonfuls of the choux pastry onto the lined trays about 2cm apart to allow for spreading. Use a damp fingertip to smooth any peaks. Sprinkle the trays with a little water.
- Bake in preheated oven for 20 minutes or until well puffed and golden. Reduce the oven to 180°C and bake for a further 20 minutes. Turn off the oven and leave the puffs to cool in the oven for at least 30 minutes to dry. Remove from the oven and set aside to cool completely.
- Meanwhile, to make the fudge sauce, combine all the ingredients in a small saucepan and stir over low heat until the chocolate melts and the sauce is smooth. Set aside and keep warm.
- To serve, cut each of the cinnamon choux puffs in half and fill each with small scoop of ice-cream. Place three on each serving plate and spoon over the warm chocolate fudge sauce. Serve immediately.
Baker's Tips
- The cinnamon choux puffs can be made up to 3 days ahead of serving. Store in an airtight container at room temperature. Refresh by placing on an oven tray and reheating in an oven preheated to 180°C for 10 minutes. Cool, assemble and serve.
- The chocolate fudge sauce can be made up to 1 week ahead of serving. Keep in an airtight jar or container in the fridge. Reheat in a small saucepan over a low heat, stirring occasionally, until smooth and heated through.
This recipe is from Anneka's SBS Food online column, Bakeproof: Choux Pastry.
CLICK HERE for more Bakeproof recipes.
Photography by Alan Benson.
Prep 20-30minMakes 30 profiteroles or 12 average-sized éclairs
Completely unique in the pastry world, choux pastry goes against every rule in the book – eggs are more important than butter, the mixture is heated, and beating, as opposed to 'rubbing', is the method of mixing.
Ingredients
- 150g (1 cup) plain flour
- 185ml (¾ cup) water
- ½ teaspoons salt
- 75g salted butter, diced
- 4 eggs (59g each)
Method
- Sift the flour onto a sheet of baking paper.
- Combine the water, salt and butter in a medium saucepan and heat over medium heat until just boiling. Remove immediately from the heat, add all the flour at once and stir vigorously with a wooden spoon to combine.
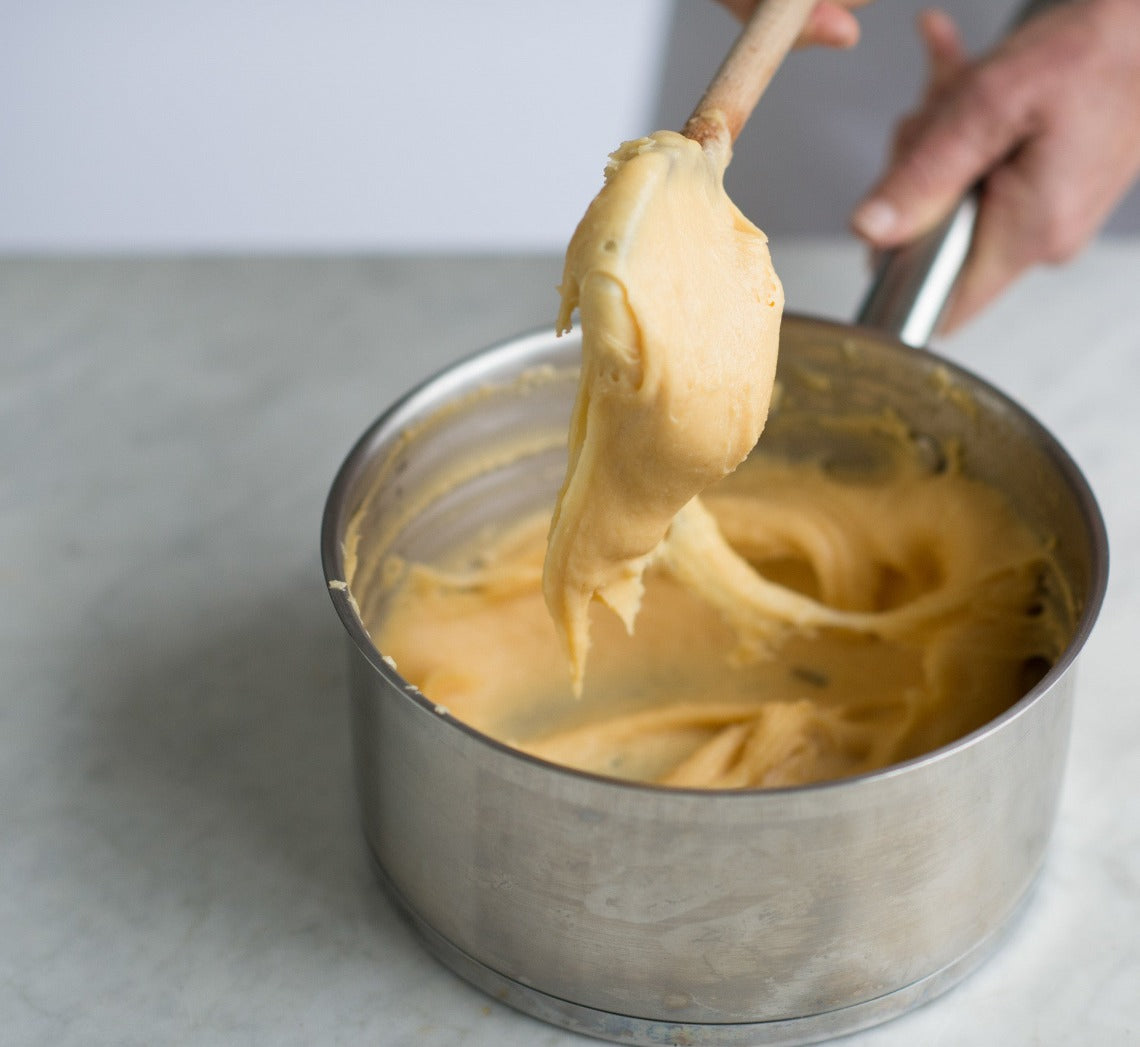
- Return the saucepan to the heat and beat vigorously over a low heat for 30 seconds or until the mixture is smooth and starts to pull away from the sides of the pan and a flour film forms on the bottom of the pan (image 1). Remove the saucepan from the heat and set aside for 3-5 minutes or until cooled slightly.
- Use a fork to whisk together the 3 eggs. Add about one-quarter of the whisked eggs to the flour mixture at a time (image 2), beating well with the wooden spoon after each addition until well combined and the mixture thickens and becomes smooth before adding more (image 3 and 4). Use a fork to lightly whisk the extra egg and gradually add to the flour mixture a teaspoon at a time (image 5) and beating well after each addition until the mixture is thick, shiny and falls heavily from the spoon (image 6). You may not need to use all of the last egg.
- Pipe (as below) and bake immediately, or cover well and keep in the fridge for up to 24 hours before baking as directed. Bring to room temperature before using.
Baker's Tips
Making choux pastry
There are three main things to keep in mind when making choux pastry to ensure success:
- Measure your ingredients accurately, as the key to good choux pastry is a balance between the major ingredients of flour, water and eggs. If there is an imbalance between these, there is a great chance your choux won’t puff, become crisp or turn a golden brown colour.
- Add the egg gradually. The amount of egg needed will vary and is determined by how much can be absorbed by the flour (which can vary slightly from batch to batch). If too much egg is added or if it is added too quickly, the consistency of the choux pastry will be affected, and in turn its ability to rise. Similarly, if not enough egg is incorporated, the choux pastry won’t puff and it will be dense inside. This is because it is the moisture in the egg that is converted to steam in the heat of the oven and that, in turn, creates the air pocket inside. So the more egg, the more the mixture will puff.
- Oven temperature is important. If the oven temperature is too low or if the oven door is opened for too long and valuable heat is lost during baking, your choux pastry won’t rise as well. The same applies if you don’t bake it for long enough.
Piping choux pastry
- Choux pastry can either be spooned or piped onto a baking paper-lined oven tray for baking, depending on the desired result.
- Sprinkle the lined baking tray with a little water before piping or shaping your choux pastry – this creates extra steam in your oven and will help the choux pastry rise and puff.
- Spoon the choux pastry into a large pastry bag filled with a large piping nozzle. Twist the end of the pastry bag to contain the mixture and push it towards the nozzle end and expel any air pockets. Place the twisted end between your index finger and thumb of your writing hand and place the bag in the palm of your hand. Use your other hand to hold the nozzle end and guide it as you pipe.
- Firmly hold the bag about 1 cm above the lined tray and at a slight angle. Press gently with the hand holding the bag, pushing the pastry through the nozzle and moving the bag to create the desired shape. (For profiteroles and small rounds, hold the bag and nozzle directly over the tray, perpendicular to the tray and pipe the desired size.)
- When you reach the desired length, pipe the mixture back onto the shape when finished to avoid a peaked end. Use a damp fingertip to press and neaten any peaks.
- To help create uniformed lengths for éclairs, you can mark lines on the underside of the baking paper with a pencil. For evenly-sized choux puffs, you can mark the lined tray with a flour-dipped cutter of the desired size.
- Bake the choux pastry as directed in the recipe.
Cooling choux pastry
- Perfect choux pastry is puffy and crisp, hollow inside and is a deep golden colour. To help the éclairs and puffs dry out inside you can either split them in half or piece a hole in the base or side before they cool to allow any excess steam to escape.
To make choux pastry with an electric mixer
- Follow the recipe until the point of removing the flour mixture from the heat. Transfer the mixture to the bowl of an electric mixer with a paddle attachment and beat in the 3 eggs, one at a time, beating until well combined and smooth after each addition. Use a fork to lightly whisk the last egg and gradually add to the flour mixture, a teaspoon at a time, beating well after each addition until the mixture is thick, glossy and falls heavily from the spoon. You may not need to use all of the last egg.
This recipe is from Anneka's SBS Food online column, Bakeproof: Choux Pastry.
CLICK HERE for more Bakeproof recipes.
Photography by Alan Benson.
Prep 10minBake 15-18minMakes about 9
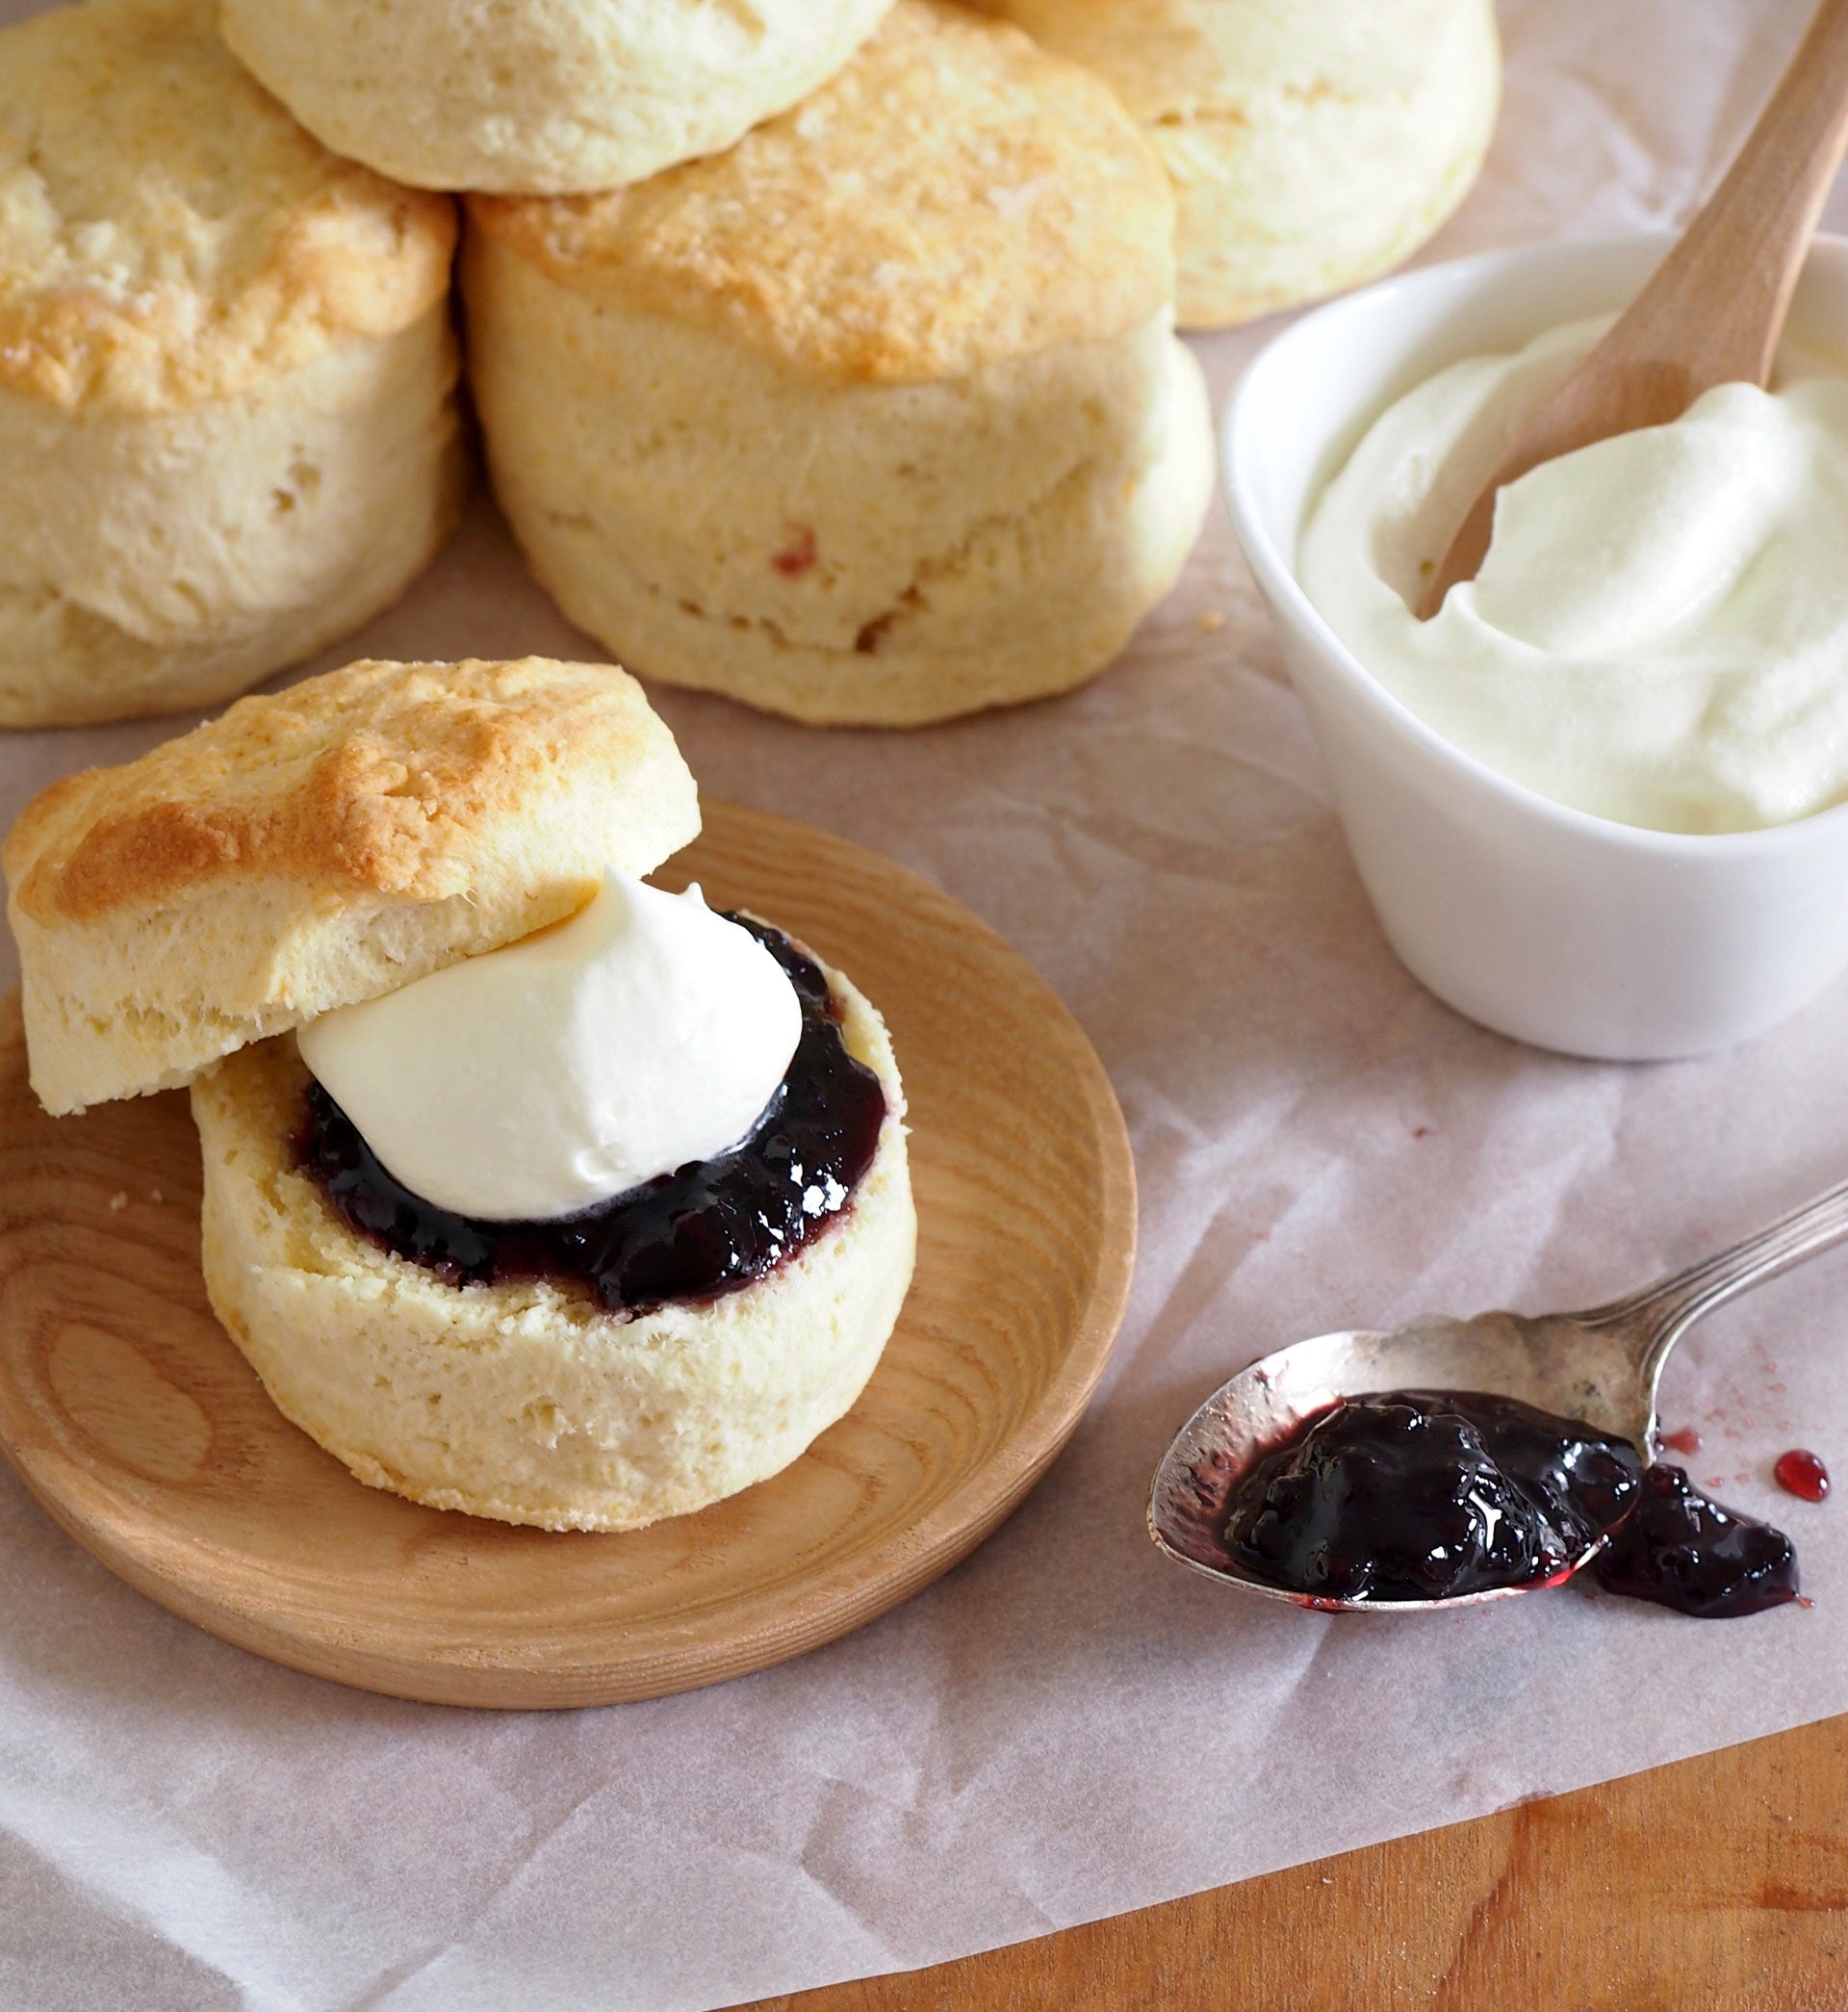
Scones are what I whip up if time is short – they are simple, fast and everyone loves them. The secret to the lightness of these scones is the surprising combination of lemonade and cream (instead of milk) – it may seem a little odd but, believe me, it works!
Ingredients
450g (3 cups) self-raising flour, plus extra, to dustPinch of Salt
80g butter, cubed, softened slightly
125ml (½ cup) lemonade, at room temperature
185ml (¾ cup) pouring cream, plus extra to glaze
Berry jam and whipped cream, to serve
Method
- Preheat the oven to 200°C. Lightly grease a baking tray with butter and then lightly dust with flour, shaking off any excess.
- Put the flour and salt in a medium bowl. Use your fingertips to rub in the butter until the mixture resembles fine breadcrumbs and the butter is evenly incorporated. Make a well in the centre.
- Combine the cream and lemonade, add to the flour mixture and use a flat-bladed knife to mix with a cutting action until the dough comes together in clumps.
- Use lightly floured hands to bring the dough together – it will be soft, but not sticky. Place on a lightly floured surface and knead lightly and briefly (only about 6 times) to bring it together in a smooth ball.
- Use the palm of your hand to flatten the dough out to about 2cm thick. Using a floured 6 cm round cutter, cut the dough into 9 rounds. Gathering the offcuts and, without over handling, pressing out as before, when necessary. Place on the prepared tray, 1-2cm apart. Use a pastry brush to lightly brush the top of each scone with a little extra cream, then dust with a little extra flour.
- Bake in the middle of the preheated oven for 15-18 minutes, until the scones are lightly golden and cooked through; they are ready if they sound hollow when you tap them on the base. Serve warm or at room temperature, split and topped with jam and cream.
Baker's Tips
- These scones are best eaten on the day they are made.
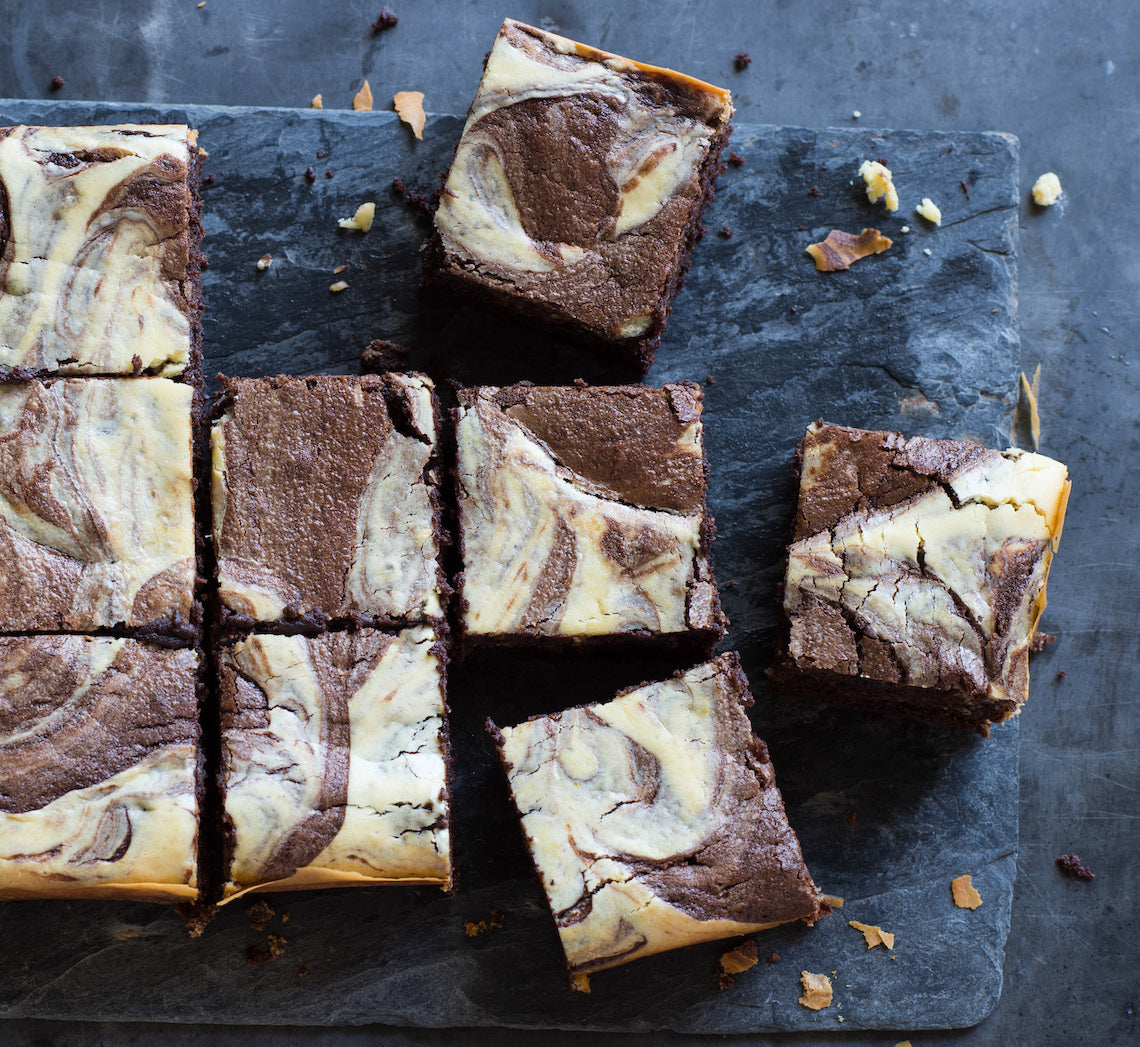
Prep 25min (+ 1hr cooling time)Bake 45-50minMakes about 15
Essentially these fudgy brownies are marbled with an orange-scented cheesecake and they appear far more difficult to make than what they actually are. Perfect with a cuppa or a dollop of cream for dessert these brownies will satisfy any chocolate craving.
Ingredients
Brownie Base
Melted butter, to grease
250g (9oz) good-quality dark chocolate (45-54% cocoa), chopped
150g (5¼oz) salted butter, cubed
165g (¾ cup/5¾oz) caster sugar
3 eggs, at room temperature, lightly whisked
75g (½ cup/2¾oz) plain flour
30g (¼ cup/1oz) cocoa powder
¾ teaspoon baking powder
Cheesecake Topping
200g (7oz) cream cheese, at room temperature
30g (1oz) salted butter, at room temperature
1 tablespoon finely grated orange zest
55g (¼ cup/2oz) caster sugar
1 egg yolk, at room temperature
Method
- Preheat oven to 160ºC/315°F (140ºC/285°F fan-forced). Grease a 16cm x 26cm (6¼in x 10½in) shallow slice tin with melted butter and line the base and long sides with one piece of baking paper.
- To make the Cheesecake Topping, use an electric mixer to beat the cream cheese, butter and orange rind in a medium bowl until creamy and smooth, scraping down the sides of the bowl when necessary. Add the sugar and beat until well combined. Add the egg yolk and beat well. Set aside.
- To make the Brownie Base, place the dark chocolate and butter in a medium heatproof bowl over a saucepan of gently simmering water (don’t let the base of the bowl touch the water). Stir occasionally until chocolate and butter melt and the mixture is smooth. Remove bowl from saucepan. Add the sugar and eggs and use a balloon whisk or wooden spoon to stir until well combined. Sift together the flour, cocoa powder and baking powder. Add to chocolate mixture and stir until just combined.
- Spoon half the Brownie Base mixture into prepared tin and spread evenly. Drop spoonfuls of almost all the Cheesecake Topping randomly over the brownie mixture. Top with spoonfuls of the remaining brownie mixture and then the remaining topping mixture. Tap the tin on the benchtop to settle the mixture. Use a butter knife or palette knife to swirl the two mixtures together to create a marbled effect and then tap on the bench again if necessary.
- Bake in preheated oven for 45-50 minutes or until moist crumbs cling to a skewer inserted in the centre. Remove from the oven and cool in tin on a wire rack (this will take about 1 hour).
- Carefully remove brownie from the tin using the baking paper to lift it out. Cut into portions to serve.
Baker's Tip
- These brownies will keep in an airtight container in the fridge, for up to 5 days. Serve at room temperature.
This recipe is from Anneka's SBS Food online column, Bakeproof: Easy Chocolate Cakes. CLICK HERE for more Bakeproof recipes.
Photography by Alan Benson.
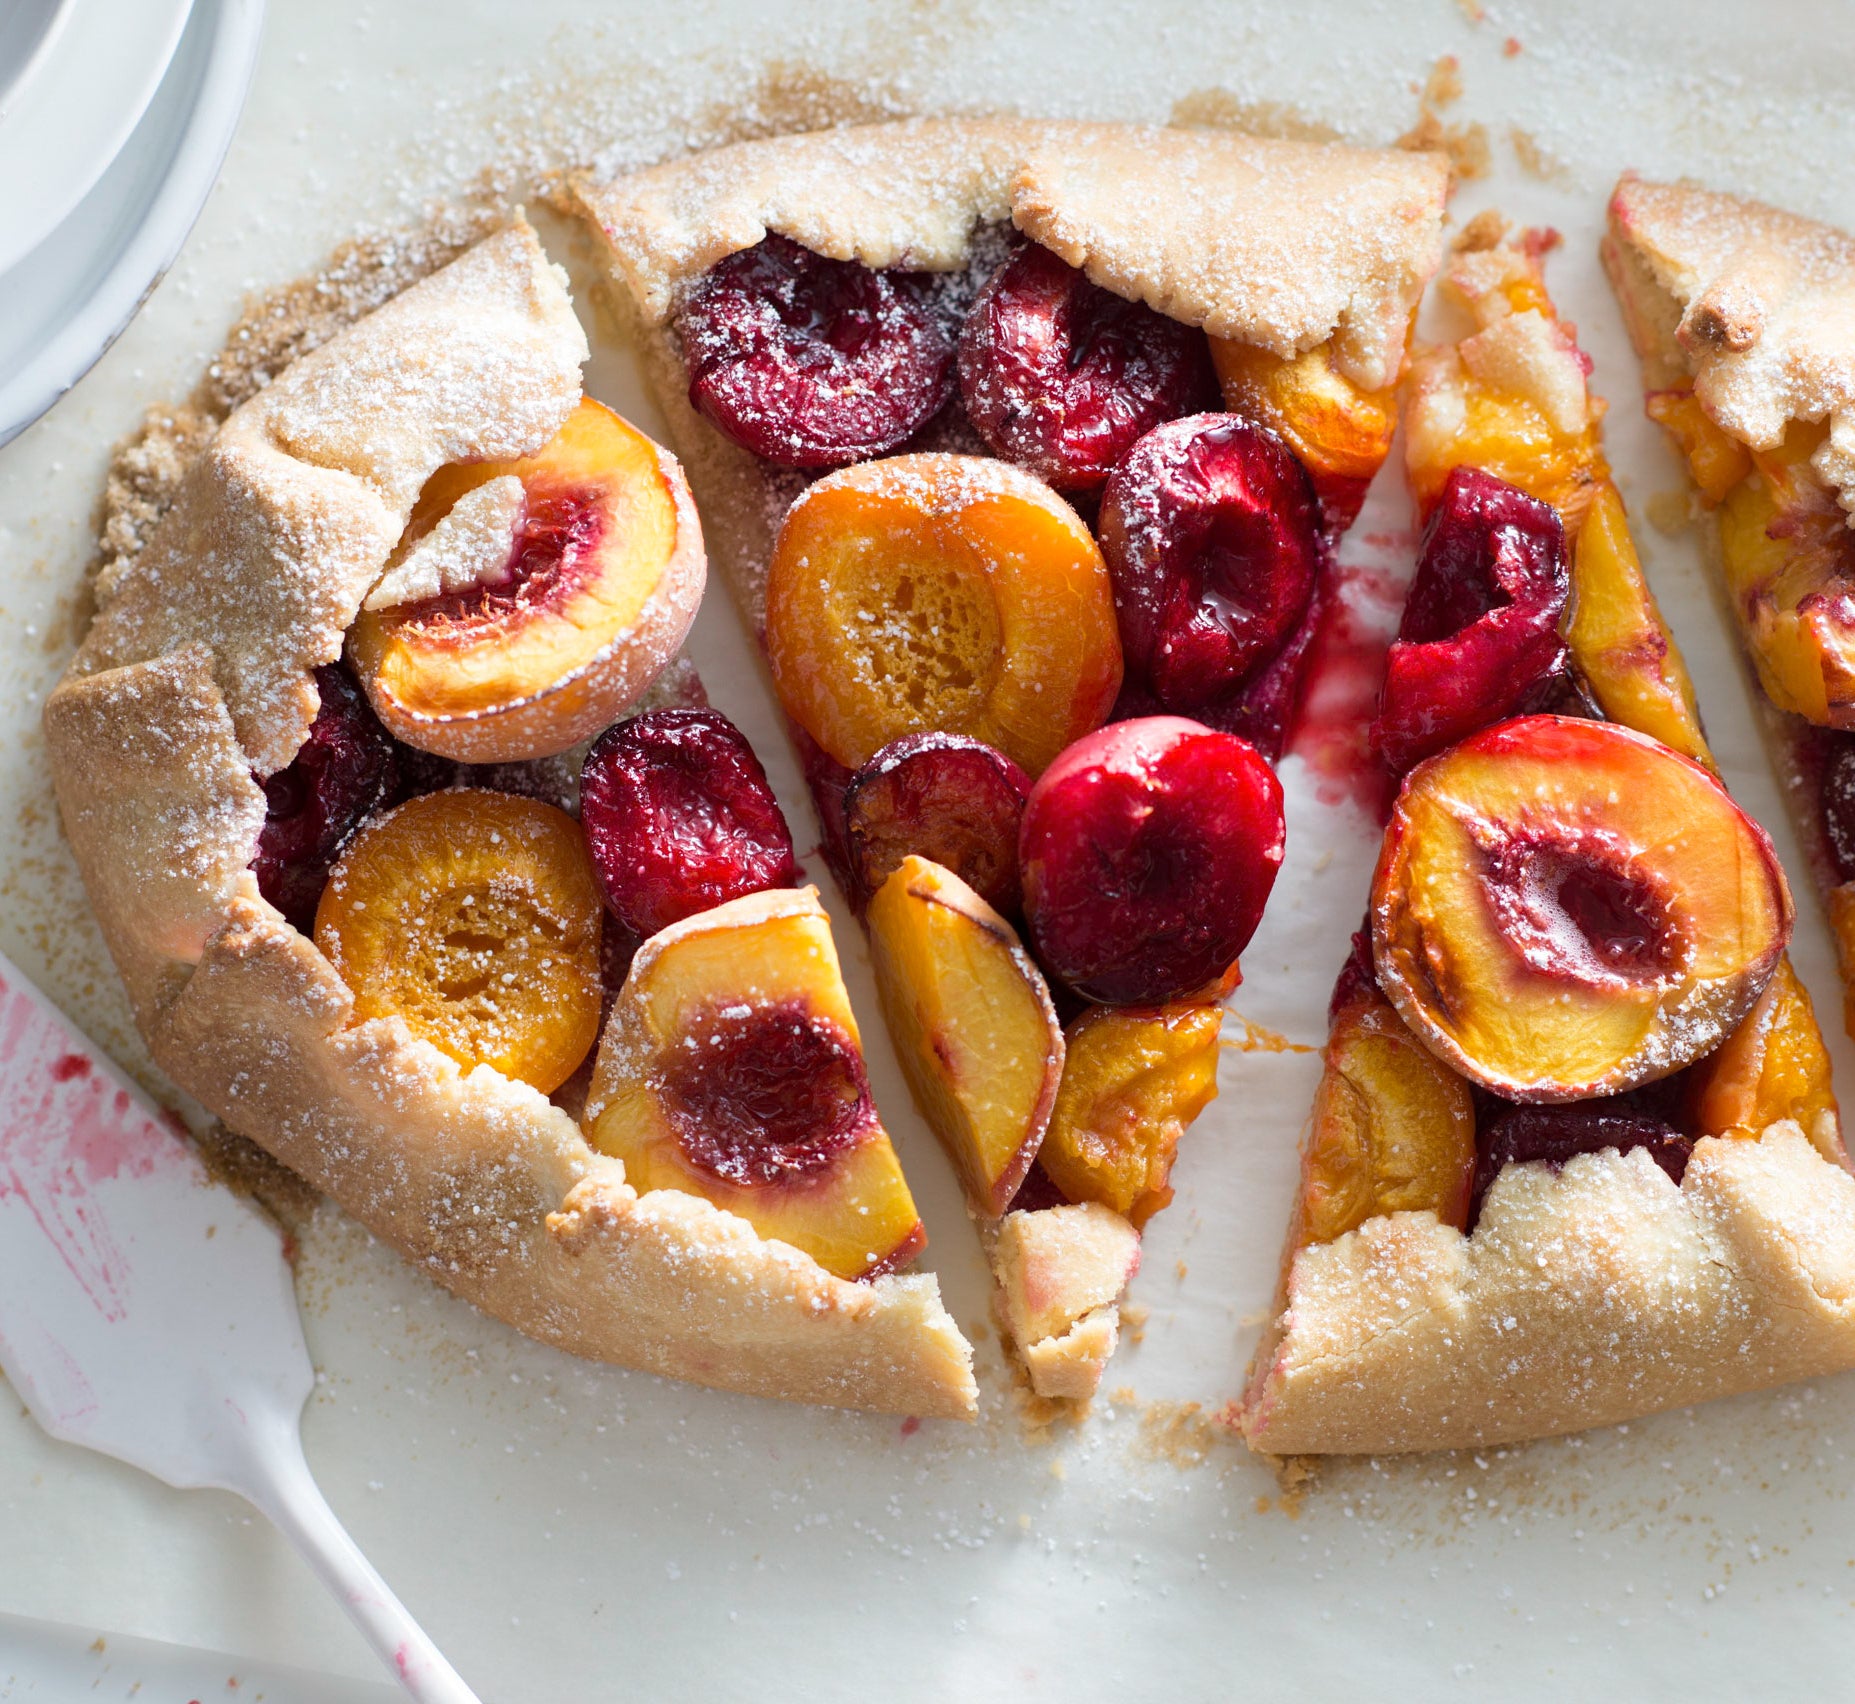
Prep 25min(+ pastry making and chilling time)Bake 50-55minMakes 8-10 serves
This tart is simplicity at its best – a selection of gorgeous summer stone fruit encased in a sweet, easy-peasy pastry. There's no real structure, it's slightly rustic and lets seasonal stone fruits shine. Serve with toffee ice-cream if you can – the combination is sublime.
Ingredients
1 quantity of Sweet Shortcrust Pastry (see Variations)
25g (¼ cup/¾oz) almond meal
700g (1lb 8oz) firm but ripe stone fruit of your choice (such as peaches, nectarines, plums and apricots), halved and pitted
2 tablespoons raw sugar
Icing sugar, to dust (optional)
Good-quality toffee or vanilla ice-cream, to serve
Method
- Preheat oven to 200°C/400°F (180°C/350°F fan-forced).
- Use a lightly floured rolling pin to roll out the pastry on a piece of non-stick baking paper to a rough rectangle about 3mm/⅛in thick. Use the paper to transfer the pastry to a large baking tray. Sprinkle the pastry with the almond meal, leaving a 5cm/2in-wide border around the edge. Arrange the fruit over the almond meal and then fold the pastry border up over the fruit. Sprinkle the upturned border and fruit with the sugar. Bake in preheated oven for 50-55 minutes or until the pastry is golden and crisp.
- Serve warm or at room temperature, dusted with icing sugar, if desired, cut into wedges and accompanied by ice-cream.
Baker's Tip
- This tart is best served warm, but is also great served at room temperature. It will keep covered in the fridge for up to 2 days. Stand at room temperature for about 30 minutes before serving.

Prep 20minBake 30-35minMakes 12
Dense with fruit, studded with macadamias and finished with a thin lemon glaze, these muffins are wholesome yet slightly naughty. Enjoy them at morning or afternoon tea or even for brunch.
Ingredients
150g (1 cup/5¼oz) plain flour
150g (1 cup/5¼oz) wholemeal plain flour
1 tablespoon baking powder
1 teaspoon ground cinnamon
55g (¾ cup/2oz) shredded coconut
75g (½ cup/2¾oz) raw, unsalted macadamia nuts, toasted and coarsely chopped
200g (¾ cup/7¾oz) Greek-style natural yoghurt
80ml (⅓ cup/2½fl oz) light olive oil or sunflower oil
2 eggs, at room temperature
1½ teaspoons natural vanilla extract or essence
Lemon glaze
125g (1 cup/4½oz) pure icing sugar, sifted
1½ tablespoons (30ml/1fl oz) fresh lemon juice
Method
- Preheat the oven to 190°C/375°F (170°C/340°F fan-forced). Line a 12-hole 80ml (⅓ cup/2½fl oz) muffin tray with muffin paper cases.
- Sift together both the flours, the baking powder and cinnamon into a large mixing bowl, returning any husks to the bowl. Stir in the sugar, coconut and macadamias.
- Halve the peaches and remove the stones. Cut each half into 8 wedges. Add to the flour mixture and gently toss to combine evenly.
- Use a fork to whisk together the yoghurt, oil, eggs and vanilla in a bowl or jug. Add to the flour mixture and use a spatula or large metal spoon to fold together until just combined. (Don’t overmix – the batter should still be a little lumpy.)
- Spoon the mixture into the paper cases, dividing evenly. Bake in preheated oven for 30-35 minutes or until the muffins are golden and cooked when tested with a skewer.
- Meanwhile, to make the Lemon glaze, combine the icing sugar and lemon juice in a medium bowl and mix until smooth. Cover and set aside while the muffins finish baking.
- Remove the muffins from the oven and stand for a few minutes in the tin before transferring to a wire rack. Drizzle a little of the lemon glaze over each warm muffin. Serve warm or at room temperature.
Baker's Tips
- The peaches can be replaced with 400g (14oz) of nectarines, plums, apricots, pitted and cut into 8 wedges, or cherries, pitted and halved.
- The wholemeal plain flour can be replaced by 150g (1 cup/5¼oz) wholemeal spelt flour.
- These muffins are best eaten the day they are baked, though they freeze well. Wrap individually in plastic wrap and then seal in a plastic bag or airtight container. Freeze for up to 3 months. Thaw at room temperature.
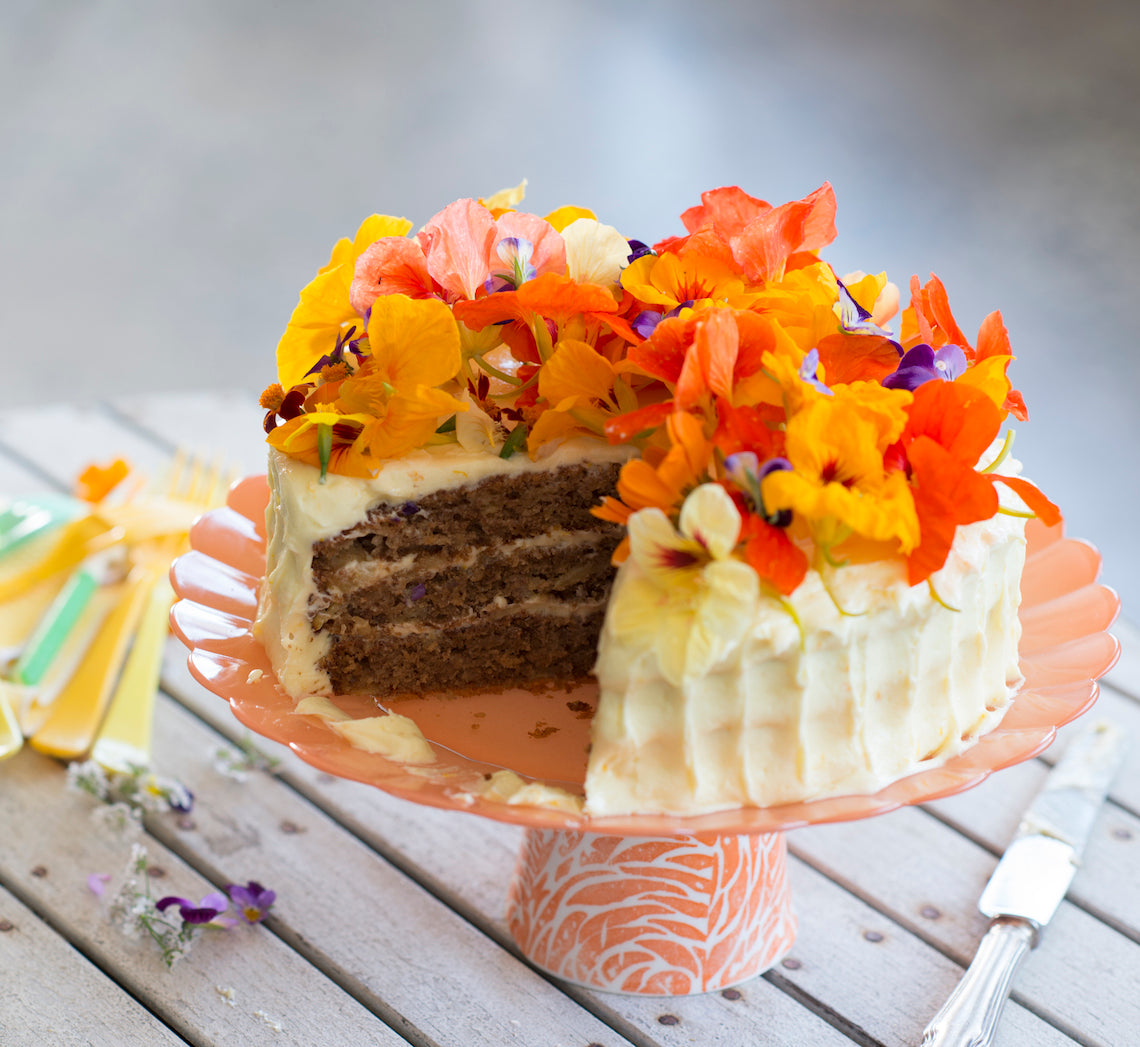
Prep 30minBake 30-35minMakes 12-15 serves
Originating (and excessively popular) in America, Hummingbird cake is a tropical mix of banana and pineapple, and when layered with an orange cream cheese frosting makes a great celebration cake. Sweet and indulgent, a small slice is all that is needed to satisfy.
Ingredients
150g (1 cup) plain flour
75g (½ cup) self-raising flour
½ teaspoon bicarbonate of soda
2 teaspoons ground cinnamon
220g (1 cup, firmly packed) brown sugar
45g (½ cup) desiccated coconut
2 very ripe large bananas (about 250g each)
440g crushed pineapple in natural juice, drained and juice reserved
2 eggs, lightly whisked
185ml (¾ cup) sunflower oil, plus extra to grease
Orange cream cheese frosting
100g unsalted butter, at room temperature
250g cream cheese, at room temperature
1 orange, zest finely grated
375g (3 cups) icing sugar mixture, sifted
Method
- Preheat oven to 180°C (160°C fan-forced). Brush three 20cm round cake tins with extra sunflower oil to lightly grease and line the bases with non-stick baking paper.
- Sift together the plain and self-raising flours, bicarbonate of soda and cinnamon. Add the brown sugar and coconut and stir to combine, breaking up any lumps.
- Mash the banana and combine with the drained pineapple, 80 ml (⅓ cup) of the reserved pineapple syrup, eggs and oil. Add to the flour mixture and use a wooden spoon or spatula to mix until just combined.
- Divide the mixture evenly among the prepared tins and spread with the back of a metal spoon to smooth the surface. Bake in preheated oven for 30-35 minutes or until cooked when tested with a skewer.
- Stand the cakes in the tins for 5 minutes before turning onto wire racks to cool (this will take about 1 hour).
- Meanwhile, to make the Orange cream cheese frosting, use an electric mixer to beat the cream cheese, butter and orange zest until very smooth. Gradually add the icing sugar, beating well after each addition and beat until well combined and really creamy. Divide the Orange cream cheese frosting evenly among 3 bowls.
- Take one portion of the Orange cream cheese frosting and use a palette knife to spread half over one cake layer. Top with a second cake layer and spread with the remaining frosting of the first portion. Top with the remaining cake layer. Spread another portion of frosting over the sides and the remaining portion over the top of the cake. Sprinkle with the pecans to decorate
Baker's Tips
- This cake will keep in an airtight container in the fridge for up to 4 days. Stand at room temperature for about 30 minutes before serving.
This recipe is from Anneka's SBS Food online column, Bakeproof: Cakes for Crowds. CLICK HERE for more Bakeproof recipes.
Photography by Alan Benson.

Prep 30min (+2hr cooling time and overnight freezing)Bake 1hrMakes 12-15 serves
There is something wonderful about ice-cream cakes. This one is a layer of cheat's strawberry ice-cream sandwiched with orange-scented pistachio meringue. It makes a wonderful dessert for any summer celebration.
Ingredients
1 litre (3½pt) good-quality vanilla ice cream
Strawberries, hulled and halved, to serve
Coarsely chopped pistachio kernels, to serve
Edible flowers (optional), to serve
Strawberry sauce
500g (1lb 2oz) strawberries, hulled and sliced
2 tablespoons (40g/1½oz) caster sugar
1 tablespoon (4 teaspoons) fresh lemon juice
2 teaspoons rosewater, to taste (optional)
Pistachio meringue discs
4 egg whites, at room temperature
220g (1 cup/7¾oz) caster sugar
45g (⅓ cup/1½oz) ground pistachios
1 orange, rind finely grated
Method
- Preheat oven to 150°C/300°F (130°C/265°F fan-forced). Mark two 20cm/8in circles on 2 pieces of non-stick baking paper. Turn the paper over and line two oven trays.
- To make the Pistachio meringue discs, use an electric mixer with a whisk attachment to whisk the egg whites until soft peaks form. With the motor running, gradually add the sugar, whisking well after each addition, until very thick and glossy and the sugar has dissolved. Whisk in the orange rind. Use a large metal spoon or spatula to fold in the ground pistachios until evenly combined. Divide the mixture between the two trays and use a palette knife or the back of a metal spoon to spread to fill the two marked circles.
- Reduce the oven temperature to 100°C/200°F (80°C/175°F fan-forced) and bake for 1-1¼ hours, swapping the trays halfway through baking, or until crisp on top. Turn off the oven and allow the discs to cool in the oven (this will take about 2 hours).
- Meanwhile, to make the Strawberry sauce, combine the strawberries, sugar and lemon juice in a medium saucepan and cook over low heat, stirring occasionally until the sugar dissolves. Bring to to a simmer and simmer for 5 minutes or until syrupy but the strawberries still hold some of their shape. Strain the sauce through a sieve set over a heatproof bowl. Transfer to strawberry pieces in a bowl and stir the rose water through the sauce. Cover both with plastic wrap and place in the fridge to cool.
- When ready to assemble the cake, line the base and sides of a 22cm/8¾in springform tin with non-stick baking paper. Place a pistachio disc in the base of the lined tin, trimming to fit if necessary.
- Scoop the ice cream into a large bowl and set aside for 5 minutes at room temperature to soften slightly. Add the cooled strawberry pieces to the ice cream and use a large metal spoon or spatula to briefly fold together to form a rough swirl pattern. Working quickly, spoon the ice cream immediately into the prepared tin over the meringue disc and use the back of a metal spoon to press down to remove any air pockets and smooth the surface. Cover the ice cream with the remaining meringue disc, trimming to fit if necessary. Cover with plastic wrap and freeze overnight.
- To serve, remove the cake from the springform tin and place on a serving plate. Top with strawberries and sprinkle with chopped pistachios and edible flowers, if using. Spoon over some of the strawberry sauce. Serve in wedges with the remaining strawberry sauce passed separately.
Baker's Tips
- This cake will keep covered in the freezer for up to 2 weeks.
- The strawberry sauce will keep in an airtight container in the fridge for up to 3 days. Alternatively freeze it for up to 1 month and thaw in the fridge.
This recipe is from Anneka's SBS Food online column, Bakeproof: Cakes for Crowds.
CLICK HERE for more Bakeproof recipes.
Photography by Alan Benson.
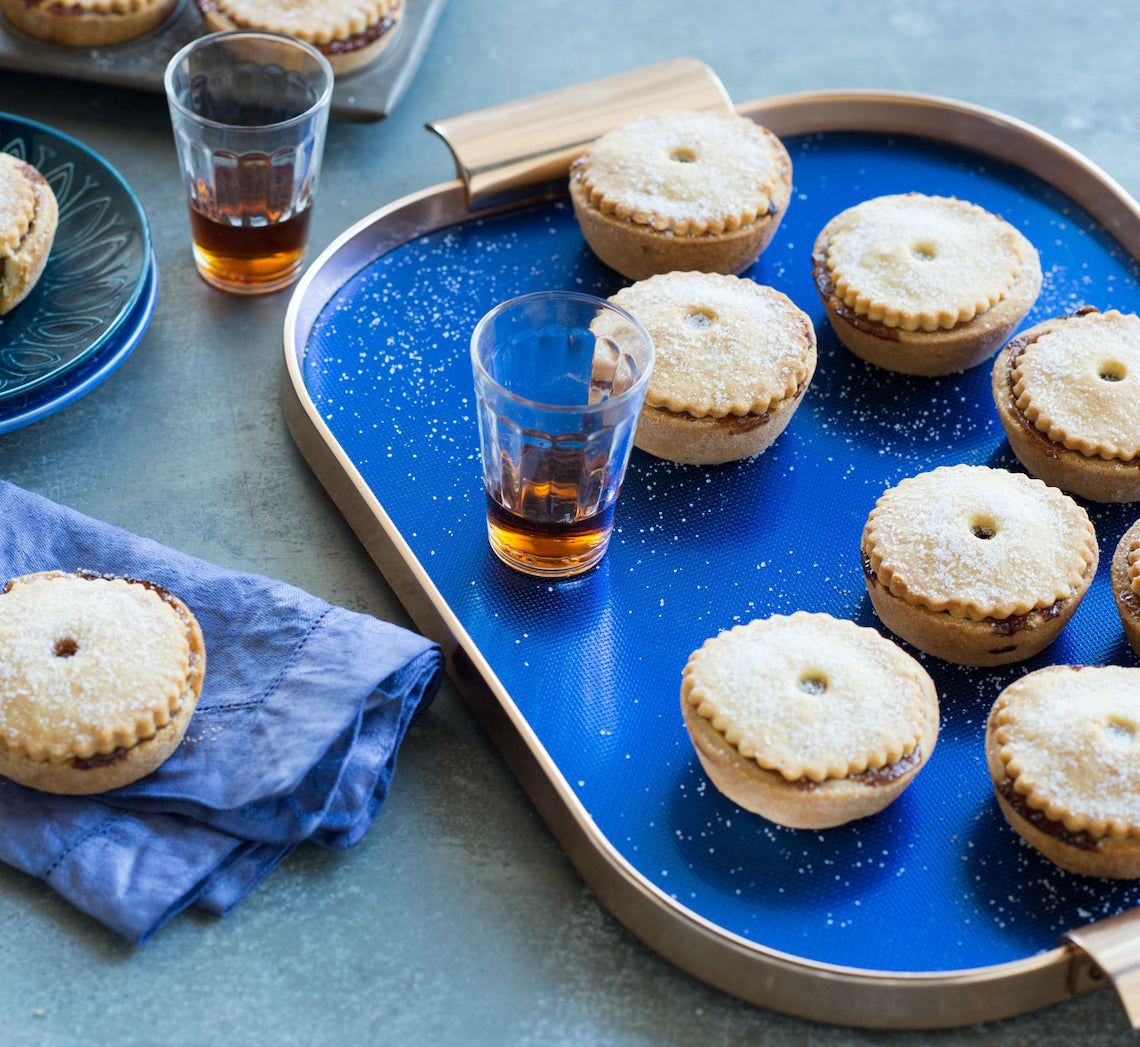
Prep 50min (+20min chilling and 50min cooling time)Bake 35minMakes about 20
According to a Middle Ages custom, if you eat a mince pie every day from Christmas day until Twelfth Night (6 January) you will have happiness for the whole year – what a wonderful excuse to indulge in these spiced, fruit-filled pies. Eat them at room temperature or straight from the oven with ice-cream, cream or brandy sauce.
You will need two 12-hole 80 ml (⅓ cup) muffin tins for this recipe.
Ingredients
Granulated sugar, to sprinkle
Fruit mince
2 small (about 150g each) Granny Smith apples, peeled, cored and coarsely grated
130 g (¾ cup) sultanas
115g (¾ cup) currants
130g (¾ cup) seedless raisins
75g (½ cup) mixed peel or chopped glace apricots
50g (⅓ cup) chopped blanched almonds
125ml (½ cup) brandy or apple cider
1 orange, zest finely grated and juiced
1 lemon, zest finely grated and juiced
2 teaspoons mixed spice
½ teaspoon ground ginger
¼ teaspoon ground cloves
100g (½ cup, loosely packed) dark brown sugar
60g unsalted butter, coarsely grated
Sweet shortcrust pastry
600g (4 cups) plain flour
125g (1 cup) icing sugar, sifted
1 teaspoon baking powder
½ teaspoon salt
300g chilled unsalted butter, diced
2 egg yolks
80-100ml iced water
Method
- To make the fruit mince, combine the grated apple, dried fruit, mixed peel, almonds, brandy or cider, orange and lemon zest and juice, and the spices in a medium saucepan. Cook over low heat, stirring occasionally for 20 minutes or until the excess liquid has evaporated. Remove from heat and set aside for 40 minutes or until cooled to room temperature.
- Meanwhile, to make the pastry, place the flour, icing sugar, baking powder and salt in a medium mixing bowl. Add the chilled butter. With your palms facing upwards, use your fingertips to rub in the butter until the mixture resembles coarse breadcrumbs. Use a fork to whisk together the egg yolks and 80 ml (⅓ cup) of the iced water and then sprinkle over the flour and butter mixture. Use a round-bladed knife in a cutting motion to mix until evenly combined and the mixture starts holding together. Press a little of the mixture between your fingers: if it holds together easily, there is no need to add more water. If it doesn’t, add the remaining 1 tbsp (20 ml) water and combine. The pastry should be soft but not sticky. Bring the pastry together with your hands and transfer to a lightly floured, cool bench top. Lightly knead the pastry with your fingertips for about 30 seconds or until smooth and soft. Divide pastry into three portions. Shape each into a disc, wrap separately in plastic wrap and place in the fridge for 20 minutes to rest.
- Preheat oven to 190°C (170°C fan-forced). Stir the sugar and butter through the cooled fruit mince.
- Use a lightly floured rolling pin to roll out one portion of the pastry to 3 mm thick. Use a 9 cm plain round cutter to cut out 10 rounds, re-rolling the offcuts if needed and line 10 x 80ml (⅓ cup) muffin tin holes, pressing into the sides and base with your fingertips (the pastry won’t reach to the top of the holes). Repeat with another portion of pastry to make another 10 pastry shells. Divide the fruit mince evenly among the pastry shells. Roll out the remaining pastry portion until 5 mm thick and use a 6.5 cm fluted round cutter to make the pie tops, re-rolling the off-cuts if needed. Use the end of a 7 mm piping nozzle to cut out a circle in the centre of each lid. Place a lid on top of each pie, and use your fingertips to gently ease the pastry out to meet the pastry case bases. Sprinkle each pie with a little granulated sugar.
- Bake in preheated oven for 35 minutes or until the pastry is deep golden and cooked through. Remove from the oven and stand in the tin for 10 minutes to cool slightly before transferring to a wire rack. Serve warm or at room temperature. Sprinkle with a little more granulated sugar, if desired.
Baker's Tips
- These pies will keep in an airtight container at room temperature for up to 1 week.
- To reheat, place the pies back in the muffin holes and place in an oven preheated to 170°C (150°C fan-forced) for 10-15 minutes or until heated through.
This recipe is from Anneka's SBS Food online column, Bakeproof: Traditional Christmas Baking. CLICK HERE for more Bakeproof recipes.
Photography by Alan Benson.
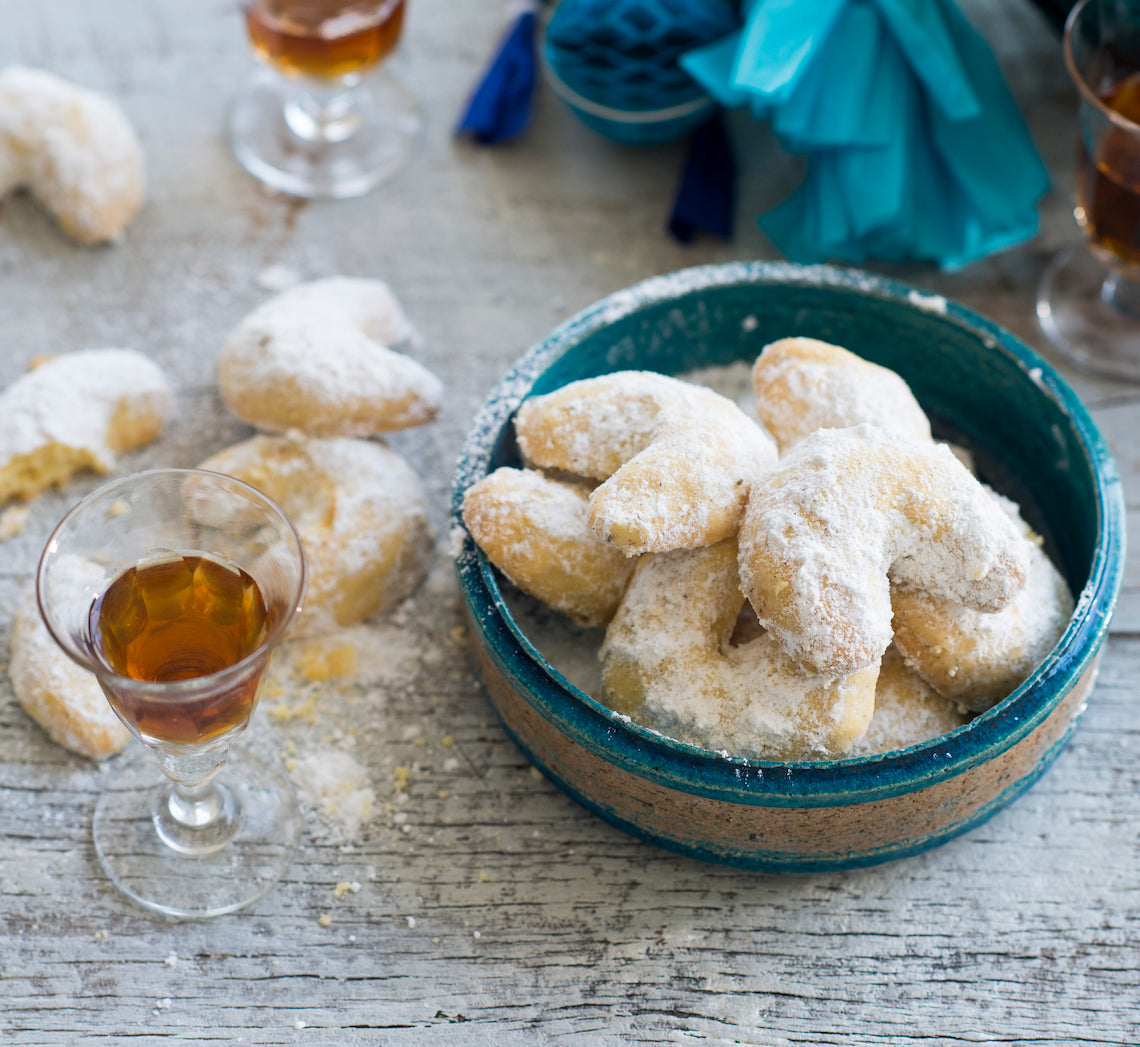
Prep 40min (+ 30min cooling time)Bake 25-30minMakes about 24
Originating in Vienna, Austria, these vanilla sugar-coated biscuits are traditionally shaped like a ‘kipfler’ or horseshoe. While they’re a Christmas favourite, they’re also popular across Eastern Europe – including Germany, Hungary, Slovakia, Romania and the Czech Republic – and closely resemble the well-known Greek Kourabiedes. Buttery and almond-rich, they make a lovely gift.
Ingredients
185g (6½oz) unsalted butter
60g (½ cup/2oz) icing sugar mixture, plus 60g (½ cup/2oz) extra to coat
1 teaspoon natural vanilla essence, extract or bean paste
2 egg yolks
225g (1½ cups/8oz) plain flour
50g (½ cup/1¾oz) almond meal
1 vanilla bean
Method
- Preheat oven to 160°C/315°F (140°C/285°F). Line two large oven trays with non-stick baking paper.
- Use an electric mixer to beat the butter, icing sugar mixture and vanilla until pale and creamy. Add the egg yolks and beat until well combined.
- Combine the flour and almond meal, add to the butter mixture and beat on lowest possible speed until just combined and a dough forms.
- Shape level tablespoonfuls of the mixture into small logs about 6cm ( 2¼in) long and then taper the ends and shape into a crescent shape. Place on the lined trays about 2cm ( ¾in) apart. Bake in preheated oven for 25-30 minutes or until pale golden and cooked through.
- Meanwhile, halve the vanilla bean lengthways, use a small sharp knife to scrape the seeds out and add to the extra icing sugar mixture in a medium bowl. Use your fingertips to rub the vanilla seeds through the icing sugar evenly.
- When the biscuits are cooked, remove from the oven and then toss while still warm, one at a time, through the vanilla icing sugar to coat (see Baker’s Tips). Cool completely on a wire rack.
Baker's Tips
- These biscuits will keep in an airtight container at room temperature for up to 1 week.
- Reserve any remaining vanilla sugar and use to sprinkle over the biscuits just before serving if you wish.
This recipe is from Anneka's SBS Food online column, Bakeproof: Traditional Christmas Baking.
CLICK HERE for more Bakeproof recipes.
Photography by Alan Benson.


