
- home
- International Recipes
Recipe Collections
- International Recipes -
Travel the world with these recipes!
Prep 30minBake 20min Makes 6 serves
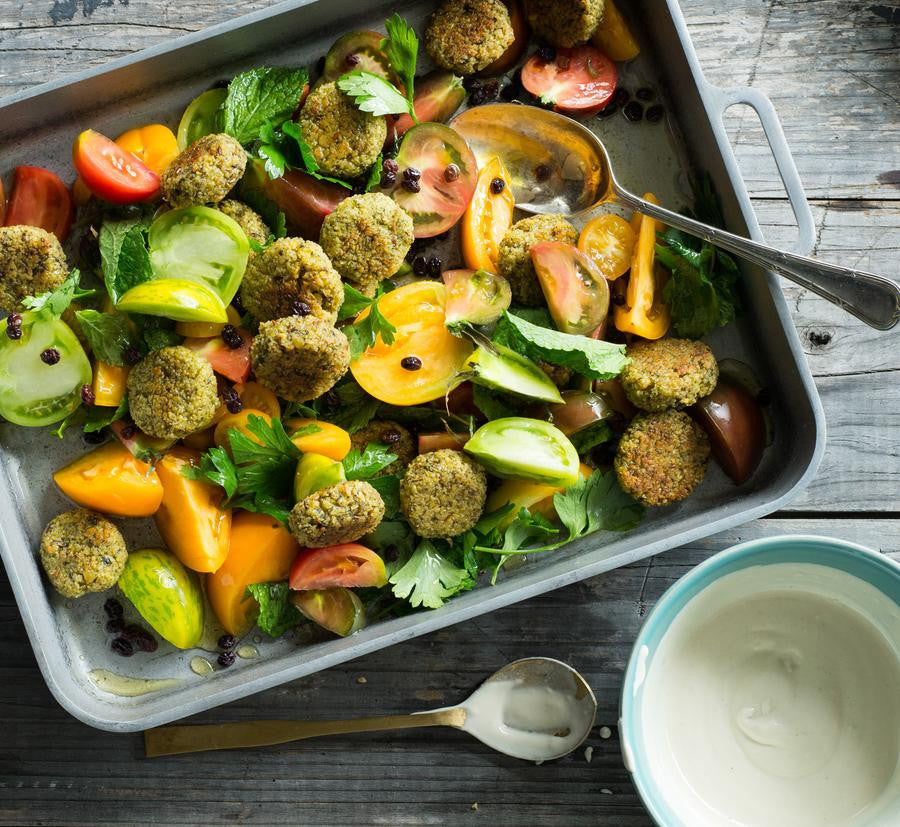
Traditionally deep-fried, this lighter version of the much-loved Middle Eastern falafel is baked. Teamed with a fresh herb and tomato salad and tasty tahini dressing, it makes a deliciously light meal.
Ingredients
lemon wedges, to serve
Baked falafel
80ml (⅓ cup) olive oil
300g dried chickpeas, soaked in water for 12-24 hours (see Baker’s tips)
1 cup coarsely chopped flat-leaf parsley
½ cup coarsely chopped coriander
½ cup coarsely chopped mint leaves
6 green shallots, white and pale green part only, sliced
1 garlic clove, crushed
2 tablespoons cumin seeds, toasted
2 teaspoons ground coriander
pinch cayenne pepper
½ teaspoon bicarbonate of soda
¾ teaspoon salt
½ teaspoon freshly ground black pepper
2 tablespoons lemon juice
Tahini sauce
135g (½ cup) tahini (see Baker’s tips)
120-140ml water
1 small garlic clove, crushed
1 tablespoon lemon juice
130g (½ cup) Greek-style natural yoghurt
Tomato & herb salad
500g mixed ripe tomatoes, halved or quartered, depending on the size
⅔ cup flat-leaf parsley leaves
⅔ cup small mint leaves
55g (⅓ cup) currants, soaked in boiling water for 10 minutes and drained
¼ teaspoon sugar
Method
- Preheat oven to 200°C (180°C fan-forced). Brush a large oven tray generously with half the oil.
- To make the baked falafel, place all the ingredients, except the remaining oil, in a food processor and use the pulse button to process until well combined and a rough paste forms. To test if it has been processed enough, press a little of the mixture in your hands. If it holds together, it is ready; if not, process for another 10 seconds and test again.
- Shape tablespoonfuls of the mixture into balls, massaging and pressing with your palms so the mixture holds together. Flatten slightly to form patties about 1 cm thick and 4 cm in diameter. Place on the oiled tray close together. Brush the patties generously with the remaining oil.
- Bake for 15 minutes, then turn the patties over and bake for a further 5 minutes or until golden and crisp on the outside and warmed through.
- Meanwhile, to make the tahini sauce, put the tahini in a medium bowl and gradually stir in the water (it will become thicker before it starts to thin). Stir through the yoghurt, garlic and lemon. Season well with salt and pepper. Cover and chill until required.
- To make the tomato & herb salad, put all the ingredients in a bowl and toss gently to combine.
- Divide the salad among serving plates, top with the falafel and drizzle with the tahini sauce.
Baker's Tips
Remember different batches of dried chickpeas will need various soaking times - the easiest way to tell when they’re ready to use is that they will crush easily when pressed between your fingers.
Use hulled (as opposed to unhulled) tahini to make your sauce for a less bitter flavour.
Photography by Alan Benson. Styling by Sarah O'Brien. Food preparation by Tina McLeish.
This recipe is part of our Bakeproof: Lebanese column.
View previous Bakeproof columns and recipes here.

Prep 20minBake 20minMakes about 30
These simple shortbread-like biscuits, subtly scented with orange blossom water, are incredibly more-ish. They are just as good when flavoured with vanilla or rosewater, to taste, too.
Ingredients
125g (4½oz) salted butter, softened
90g (¾ cup) icing sugar, sifted
1 tablespoon orange blossom water, or to taste
200g (1⅓ cup) plain flour, sifted
30 whole blanched almonds
Method
- Preheat oven to 160°C/315°F (140°C/285°F fan-forced). Line two baking trays with non-stick baking paper.
- Use an electric mixer to beat the butter, icing sugar and orange blossom water until pale and creamy. Add the flour and mix on lowest possible speed until just combined and forms a dough.
- Roll 2 teaspoonfuls of the mixture into balls and place on the lined trays. Press a whole almond into each biscuit to flatten slightly.
- Bake the biscuits for 20 minutes, swapping the trays halfway through baking, or until pale golden and cooked through. Cool on the trays.
Baker's Tip
- These biscuits will keep in an airtight container for up to 1 week.
This recipe is from Anneka's SBS Food online column, Bakeproof: Lebanese Baking.
CLICK HERE for more Bakeproof recipes.
Photography by Alan Benson.
Prep 50min (+1hr 30min proving time)Bake 1hr 5minMakes about 36
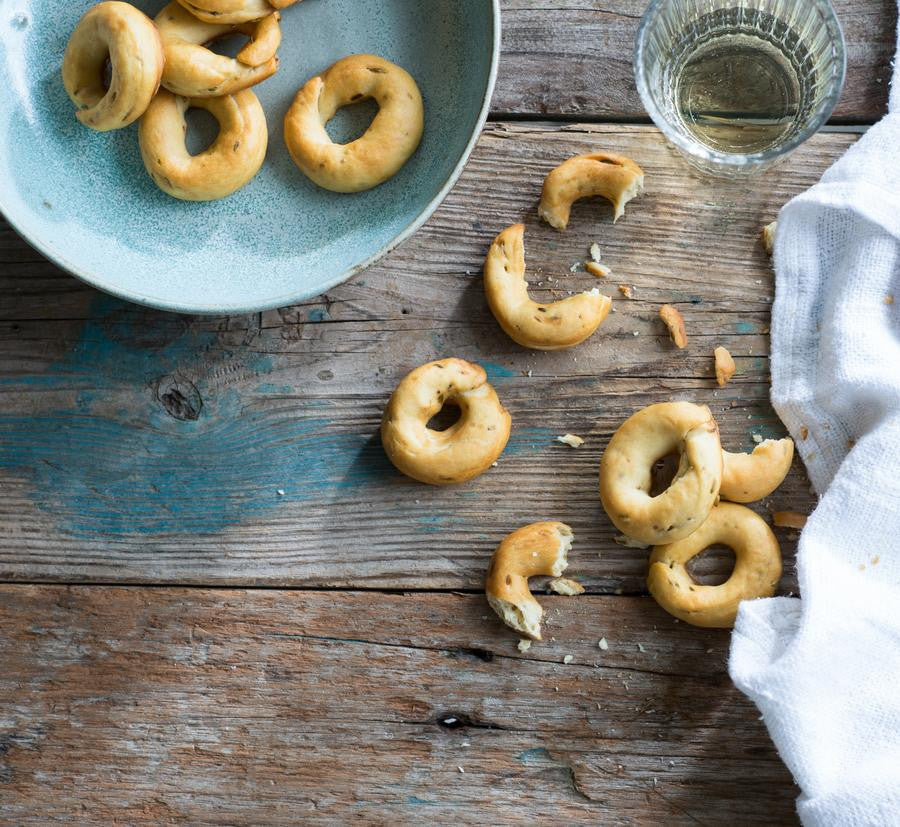
Traditionally served as a stuzzichini (an appetiser snack), these cute, crisp, fennel-scented biscuits hail from the Puglia region in the heel of Italy’s boot. Traditionally associated with Easter you will also often find them served throughout the year alongside an aperitif for dunking.
Ingredients
80ml (⅓ cup) lukewarm water
1 teaspoon dried yeast
60ml (¼ cup) extra virgin olive oil
60ml (¼ cup) dry white wine
300g (2 cups) bread or pizza flour, plus extra to dust (see Baker's Tips)
1 tablespoon fennel seeds, coarsely crushed
1 teaspoon freshly ground black pepper
1 teaspoon salt
1 tablespoon bicarbonate of soda
Method
- Combine the water and yeast in a jug, stir to combine and set aside in a warm draught-free place for 5 minutes or until frothy.
- Add the olive oil and wine to the yeast mixture. Combine the flour, fennel seeds, pepper and salt in a large bowl, make a well in the centre and add the yeast mixture. Use a wooden spoon and then your hands to mix to a soft dough. Turn the dough onto a lightly floured surface and knead for 5-8 minutes or until it is smooth and elastic and springs back when you push your finger into it.
- Place the dough in an oiled bowl, turning it to coat lightly with the oil. Cover with plastic wrap and place in a warm, draught-free place for 1 hour or until almost doubled in size.
- Line two large oven trays with non-stick baking paper.
- Knock back the dough by punching it in the centre with your fist. Turn onto a lightly floured surface and knead for 1-2 minutes or until it returns to its original volume.
- Divide the dough into 12 even portions. Roll each portion into a rope about 30cm long and then cut each into three shorter lengths, each about 10 cm long. Roll each length until 15cm long. Join the ends of each length, pinching to seal, to form rings. Place on the lined oven trays, leaving a little room for rising between each, cover with plastic wrap or a slightly damp tea towel and set aside in a warm, draught-free place for about 30 minutes or until well puffed.
- Preheat oven to 180°C (160°C fan-forced). Fill a large saucepan or large deep frying pan with water until about 8cm deep. Add the bicarbonate of soda and bring to the boil.
- Reduce the heat so that the water is simmering. Working quickly, carefully add 6 of the rings to the boiling water. Once they rise to the surface (this will only take a few seconds) use a slotted spoon to transfer the rings, one at a time, back to the lined oven trays, allowing any excess water to drain away. Repeat with the remaining rings in 5 more batches.
- Bake in preheated oven for 25 minutes or until dark golden, swapping the trays after 12 minutes. Reduce the oven temperature to 110°C (90°C fan-forced) and continue to bake for a further 40 minutes, swapping the trays after 20 minutes, or until crisp all the way through. Cool on the trays.
Baker's Tips
- Bread and pizza flour (also known as ‘strong’ flour) has a higher gluten-content than regular plain flour. This type of flour is more suited to use in yeast-based bread recipes like these biscuits and will give you a better texture that will have more ‘bite’ rather than a fine cake-like crumbly texture.
- These biscuits will keep in an airtight container at room temperature for up to 2 weeks.
- The butter for this recipe needs to be soft enough to spread but not so soft that is starts melting when you spread it.
- This bread is best eaten on the day it is made but will keep in an airtight container for up to 2 days.
Prep 50min (+10min cooling, 15min chilling and 2hrs proving time)Bake 30minMakes 12 serves
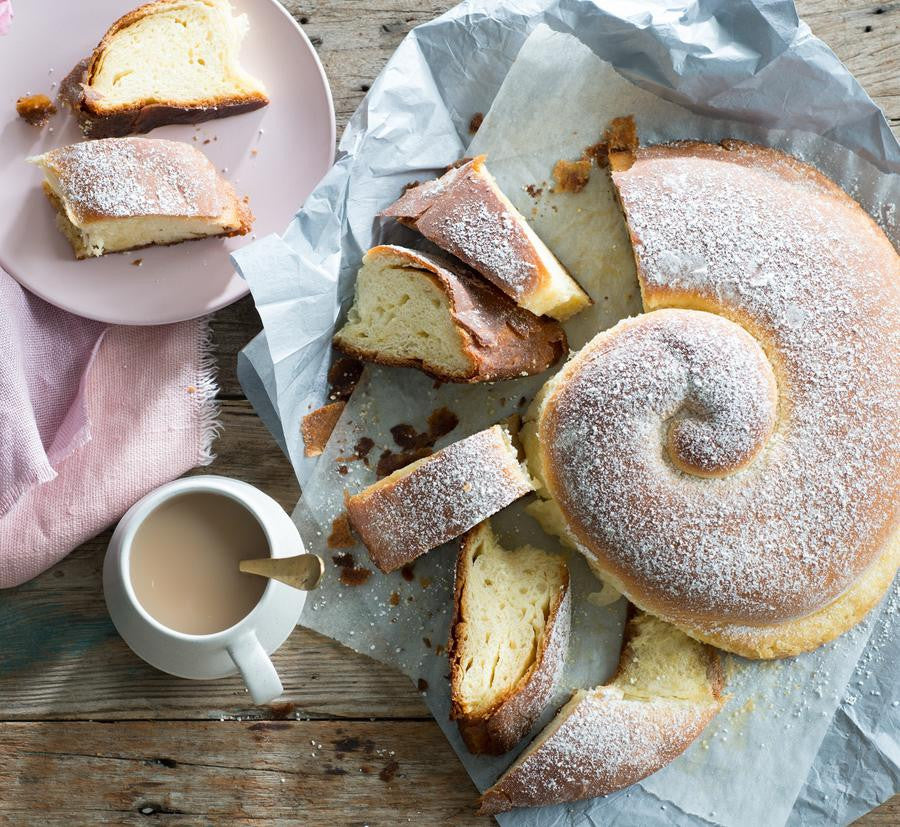
This amazing Spanish bread is reminiscent of the croissant from neighbouring France – traditionally layered with lard (although I make mine with butter) this brioche-like bread has a wonderful flakiness and rich buttery flavour that is simply too hard to resist. Originally from the Isle of Mallorca it is traditionally served at festivals and celebrations such as Easter however, these days, it is often found on the breakfast table – trust me, it really is too good to keep for special occasions!
Ingredients
200ml (7fl oz) lukewarm milk
1 x 7g sachet (2 teaspoons) instant dried yeast
110g (½ cup/4oz) caster sugar
2 eggs, at room temperature
450g (3 cups/15¾oz) strong bread or pizza (high-protein) flour, plus extra to dust (see Baker's Tips)
¼ teaspoon fine salt
Melted butter, to grease
200g (7oz) salted butter, cubed, softened (see Baker’s Tips)
Icing sugar, to dust
Method
- Combine the milk, yeast and 1 teaspoon of the sugar in a jug. Stir to combine and set aside in a warm draught-free place for 5 minutes or until frothy. Add the eggs and use a fork to whisk to combine.
- Combine the flour, remaining sugar and salt in the bowl of a stand mixer. On low speed gradually add the milk mixture and knead with a dough hook. Continue to knead on low speed for 6-8 minutes or until the dough is smooth and elastic.
- Brush a medium bowl with melted butter to grease. Place the dough in the bowl, turning it to coat lightly with the butter. Cover with plastic wrap and place in a warm, draught-free place for 1 hour or until doubled in volume.
- Line a large oven tray with non-stick baking paper.
- When the dough has doubled in size knock it back by punching it in the centre with your fist. Turn onto a lightly floured surface and knead for 1-2 minutes or until it returns to its original volume.
- Use a lightly floured rolling pin to roll out the dough on a lightly floured surface to a 45cm/18in square. Working quickly, use a palette knife to carefully spread the butter all over the dough to cover evenly, leaving a 2cm/¾in border. Roll up the dough into a roll to enclose the butter and then press the ends to seal. With an end closest to you, gently roll out the dough again to a rectangle about 60cm/24in long and 15cm/6in wide, dusting the dough with a little flour if the butter breaks through. Starting from a long end, roll up the dough again to form a long roll.
- Loosely coil the roll onto the lined baking tray. Cover with a slightly damp tea towel and chill for 15 minutes. Remove form the fridge and set aside in a warm draught-free place for 1 hour or until well risen.
- Preheat oven to 180°C/350°F (160°C/315°F fan-forced).
- Bake the Ensaïmada in preheated oven for 30 minutes or until cooked through and golden. Place the baking tray on a wire rack and set aside on the tray for at least 10 minutes to cool slightly before serving warm or cool completely. Serve dusted liberally with icing sugar.
Baker's Tips
- The butter for this recipe needs to be soft enough to spread but not so soft that is starts melting when you spread it.
- This bread is best eaten on the day it is made but will keep in an airtight container for up to 2 days.
This recipe is from Anneka's SBS Food online column Bakeproof: Easter Treats. Click here for more Bakeproof columns and recipes.
Photography by Alan Benson.

Prep 1hr15min (+2hr chilling and 1hr cooling time)Bake 1hr20minMakes 10 serves
This blissful combination of sponge cake, cream, meringue, dulce de leche and peaches takes its name from a native Uruguayan bird – apparently the meringues resemble the features of a chaja bird. I must admit I find it hard to see the resemblance and feel this wonderful cake has been dealt a slight disservice in its naming!
Ingredients
400g (14oz) tin sliced peaches in juice
55g (¼ cup/2oz) caster sugar
2 tablespoons peach-flavoured liqueur or schnapps
300ml (10¼fl oz) thickened cream
1 teaspoon natural vanilla essence or extract
2 x 20cm/8in sponge cakes
225g (¾ cup/8oz) dulce de leche, warmed gently to a spreadable consistency
Meringues
2 egg whites (from 60g/2oz eggs)
110g (½ cup/4oz) caster sugar
1 teaspoon vanilla essence
Method
- To make the Meringues, combine the egg whites and sugar in a medium heatproof bowl (preferably metal) and place over a saucepan of simmering water, ensuring the bowl doesn’t touch the water. Stir with a spatula or small whisk until the sugar dissolves and the mixture is hot to touch (about 55-60°C on a sugar thermometer). Be careful not to allow the egg whites to cook.
- Transfer the egg white mixture to the bowl of an electric mixer (see Baker’s Tips). Whisk the egg white mixture with a whisk attachment on medium-high speed until very thick and glossy and the mixture has cooled to room temperature. Whisk in the vanilla and cornflour.
- Fill a large piping bag fitted with a 4B star (or #11/11mm/½in round) piping nozzle with the meringue mixture. Holding the piping nozzle about 1cm/½in above the tray, pipe small rosettes (or 'kisses') about 2.5cm/1in in diameter and 2cm apart on the lined tray.
- Bake in a preheated oven for 60-70 minutes or until the meringues are crisp, hard to touch and peel away from the tray easily, but are not coloured. Remove the meringues from the oven and place immediately in an airtight container lined with absorbent paper.
- Drain the peach slices, reserving 100ml (3½fl oz) of the juice. Set the peach slices aside. Combine the reserved juice in a small saucepan with the sugar and stir over low heat until the sugar dissolves. Bring to a simmer and simmer gently for 2 minutes to reduce slightly. Remove from the heat and stir in the peach-flavoured liqueur or schnapps.
- Use an electric mixer with a whisk attachment on medium-low speed or a balloon whisk to whisk the cream and vanilla until soft peaks form.
- To assemble the cake, turn the sponge layers upside down and brush with half the peach syrup. Turn the sponges right side up and brush with the remaining syrup. Place one layer on a serving plate and spread with half the dulce de leche. Spread with half of the whipped cream. Crumble over about 12 of the meringues and then top with the reserved peach slices. Cover with the remaining sponge layer. Spread the top with the remaining dulce de leche and then the remaining cream. Decorate the top with the remaining meringues. Serve immediately.
Baker's Tips
- The assembled cake, without the meringues on top, will keep in the fridge for up to 3 hours before serving. Stand at room temperature for 30 minutes before serving.
- The fan-forced setting is often too intense for baking meringues and will cause them to crack. If this is the case with your oven, opt for the conventional setting. However, if the meringues do crack when using the convention setting, your oven may be running a little hot and next time reduce the temperature by 5-10°C (41-50°F) as this will often help prevent them from cracking.
- If you don't have a small bowl for your mixer, first whisk the egg white mixture with a balloon whisk until it is foamy and doubled in volume before whisking with the stand mixer. This will make the whisking of the egg white mixture more efficient in a standard size bowl.
- Allowing the egg white mixture to come to room temperature before whisking will reduce the time it will take to whisk it to a meringue.
- The meringues will keep in an airtight container at room temperature for up to 1 week.
This recipe is from Anneka's SBS Food online column, Bakeproof: Latin American Cakes.
CLICK HERE for more Bakeproof recipes.
Photography by Alan Benson.
Prep 15minBake 12-15min (per batch)Makes about 20
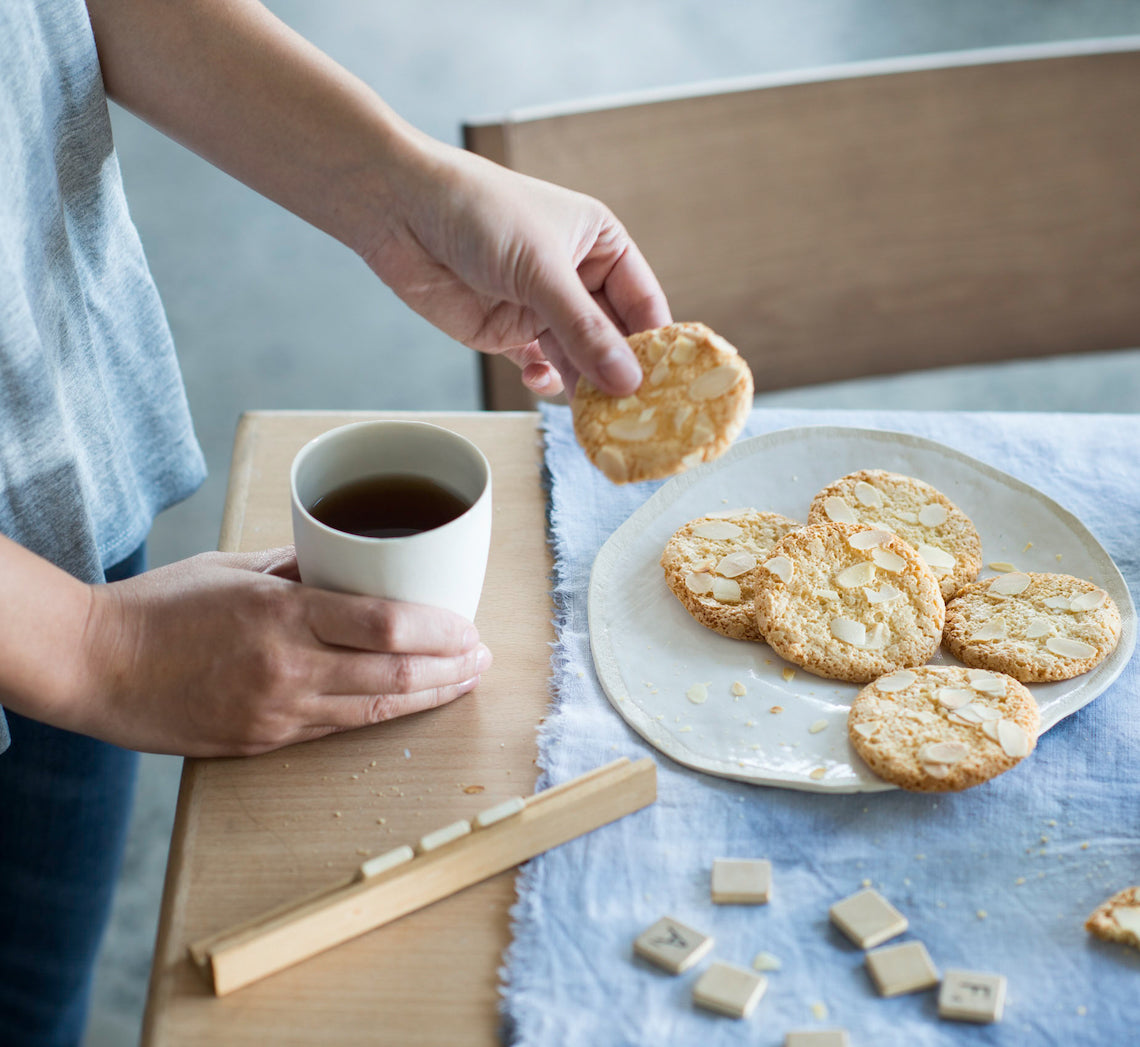
These macaroons are commonly crumbled and used in the traditional Danish Lagkage (layer cake), a traditional Danish birthday cake. They are wonderfully crisp on the outside while being mor-ishly soft on the inside and are truly addictive as a ‘sweet’ treat. While not traditional, I’ve taken the liberty of adding a sprinkling of flaked almonds for extra texture.
Ingredients
100g almond meal100g pure icing sugar, sifted
Good pinch of bicarbonate of soda
2 egg whites, at room temperature
Pinch of salt
25g (¼ cup) flaked almonds, to sprinkle
Method
- Preheat the oven to 180°C. Line a large baking tray with non-stick baking paper.
- Put the almond meal, icing sugar and bicarbonate of soda in a medium bowl and mix until evenly combined.
- Use an electric mixer with a whisk attachment to whisk the egg whites and salt in a medium clean, dry bowl until stiff peaks form. Add the almond meal and icing sugar mixture and use a spatula or large metal spoon to fold together until evenly combined.
- Use two metal teaspoons to spoon slightly heaped spoonfuls of the mixture onto the lined tray about 4 cm apart to allow for spreading. Sprinkle with the flaked almonds and then bake in the third top of the preheated oven for 12-15 minutes or until golden and aromatic.
- Cool the macaroons on the tray. Repeat with the remaining mixture to make about 20 macaroons in total.
Baker's Tips
- These macaroons will keep in an airtight container at room temperature for up to 1 week.
This recipe is from Anneka's SBS Food online column, Bakeproof: Danish Baking. CLICK HERE for more Bakeproof recipes.
Photography by Alan Benson.
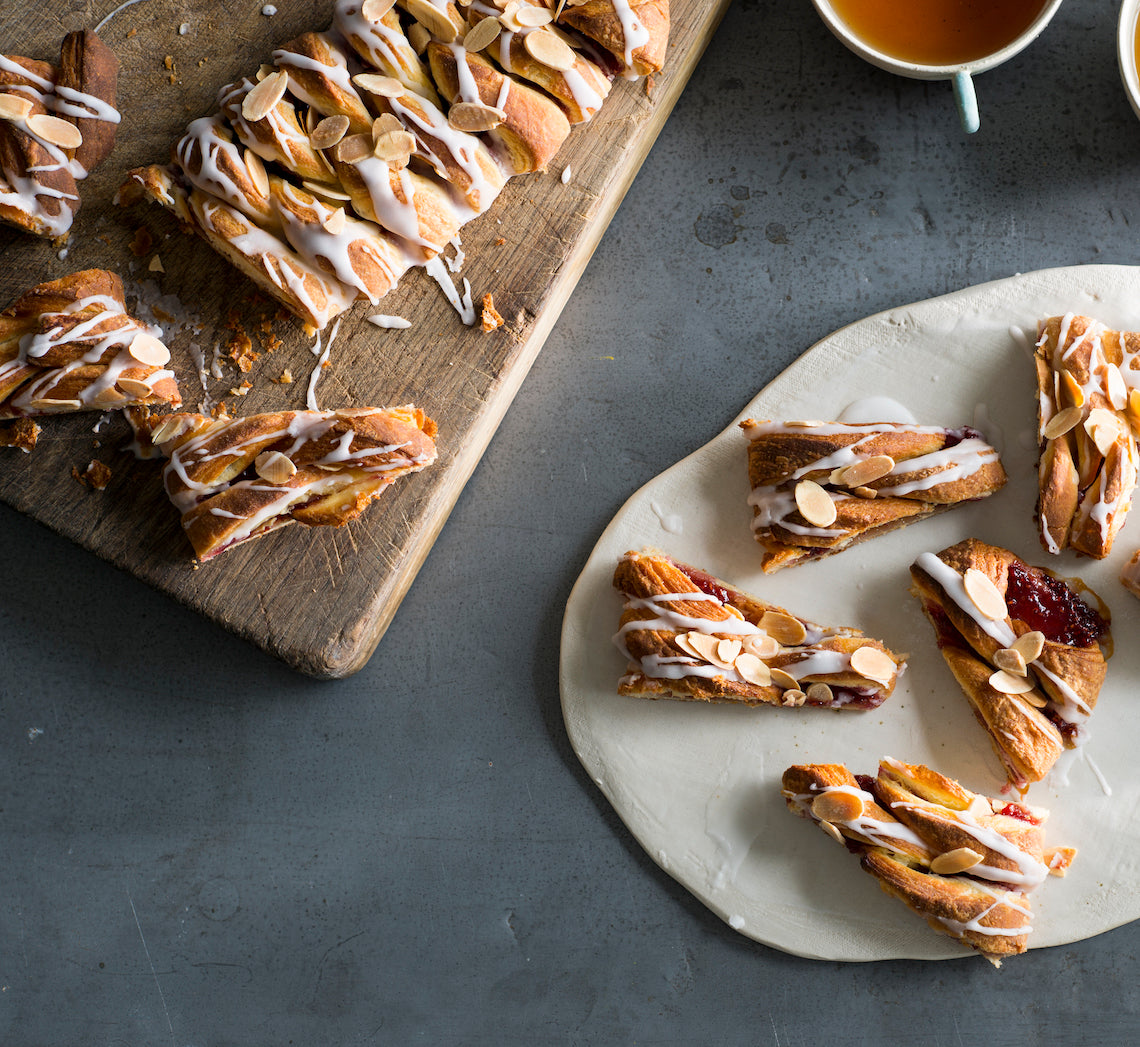
Prep 30min (+overnight +45min resting timeBake 20-25minMakes 12
Danish pastries are possibly Denmark’s most well-recognized food specialty, even though it is Austria that should actually be credited for originally creating them! Traditionally based on a leavened puff pastry (basically a puff pastry made with a yeast dough) the making of them is quite an involved process. Luckily, the pastry used here is a short-cut one with chunks of butter already incorporated into the pastry when initially mixed which cuts out the process of interleaving it with the pastry dough as you fold it – if you haven’t made puff pastry before, this is a great recipe to start with.
Ingredients
- 125ml (½ cup) lukewarm milk
- 7g (1 sachet) dried yeast
- 250g (1⅔ cups) plain flour
- 185g butter, chilled and cut into 2 cm cubes
- 1 egg, at room temperature, lightly whisked
- 2 tablespoons caster sugar
- ¼ teaspoon ground cardamom
- 5 tablespoons good-quality raspberry jam
- 2 tablespoons flaked almonds, toasted, to decorate
Icing
- 125g (1 cup) pure icing sugar
- 1 tablespoon boiling water
- ¼ teaspoon natural almond extract
Method
- Put the milk in a large bowl and sprinkle the yeast over the top. Set aside for 5 minutes.
- Put the flour and butter into the bowl of a food processor and use the pulse button to process until the butter is cut into 1 cm pieces (make sure your don’t process any further). Transfer to a large bowl.
- Add the egg, sugar and cardamom to the milk mixture and stir to combine. Add the flour and butter mixture and use a wooden spoon and then your hands to mix until it is just combined. Cover the bowl with plastic wrap and place in the fridge overnight.
- Turn the dough onto a lightly floured surface and bring together with your hands. Knead for 30 seconds or until smooth. Shape into a rectangle and then use a lightly floured rolling pin to roll the out until about 40 x 25cm, keeping the edges as straight as possible. With a long side nearest to you, fold the right third of the dough in to cover the centre third and then fold the left side in also. Turn the dough clockwise a quarter turn. Fold the dough into thirds as before to make a small rectangle. Flip the dough over on the bench and repeat the rolling and folding process again. You will finish with a small rectangle. Wrap well in plastic wrap and chill for 30 minutes.
- Preheat the oven to 200°C. Line a baking tray with non-stick baking paper.
- Roll out the pastry with a lightly floured rolling pin on a lightly floured surface to a rectangle about (30 x 35cm) and about 5mm thick. Cut in half to make two 15 x 35cm rectangles. Spread the raspberry jam down the centre to cover the centre third of both rectangles. Cut the pastry diagonally into 2cm-wide strips down both sides of the jam and then fold the strips, alternating form each side, into the centre over the jam. Transfer the pastries on the lined tray. Cover loosely with a slightly damp tea towel and set aside in a warm, draught-free place for 15 minutes or until the pastry is ‘puffy’.
- Bake in preheated oven for 20-25 minutes or until the pastry is golden, crisp and cooked through. Remove from oven and cool on the tray.
- To make the Icing, put the icing sugar in a medium bowl and stir in the water and almond extract to make a smooth pouring consistency. Drizzle over the cooled pastry and sprinkle with the almonds and set aside to set. Serve at room temperature cut into slices.
Baker's Tips
- This Danish Pastry is best eaten the day it is baked but will keep in an airtight container for up to 2 days.
This recipe is from Anneka's SBS Food online column, Bakeproof: Danish Baking.
CLICK HERE for more Bakeproof recipes.
Photography by Alan Benson.
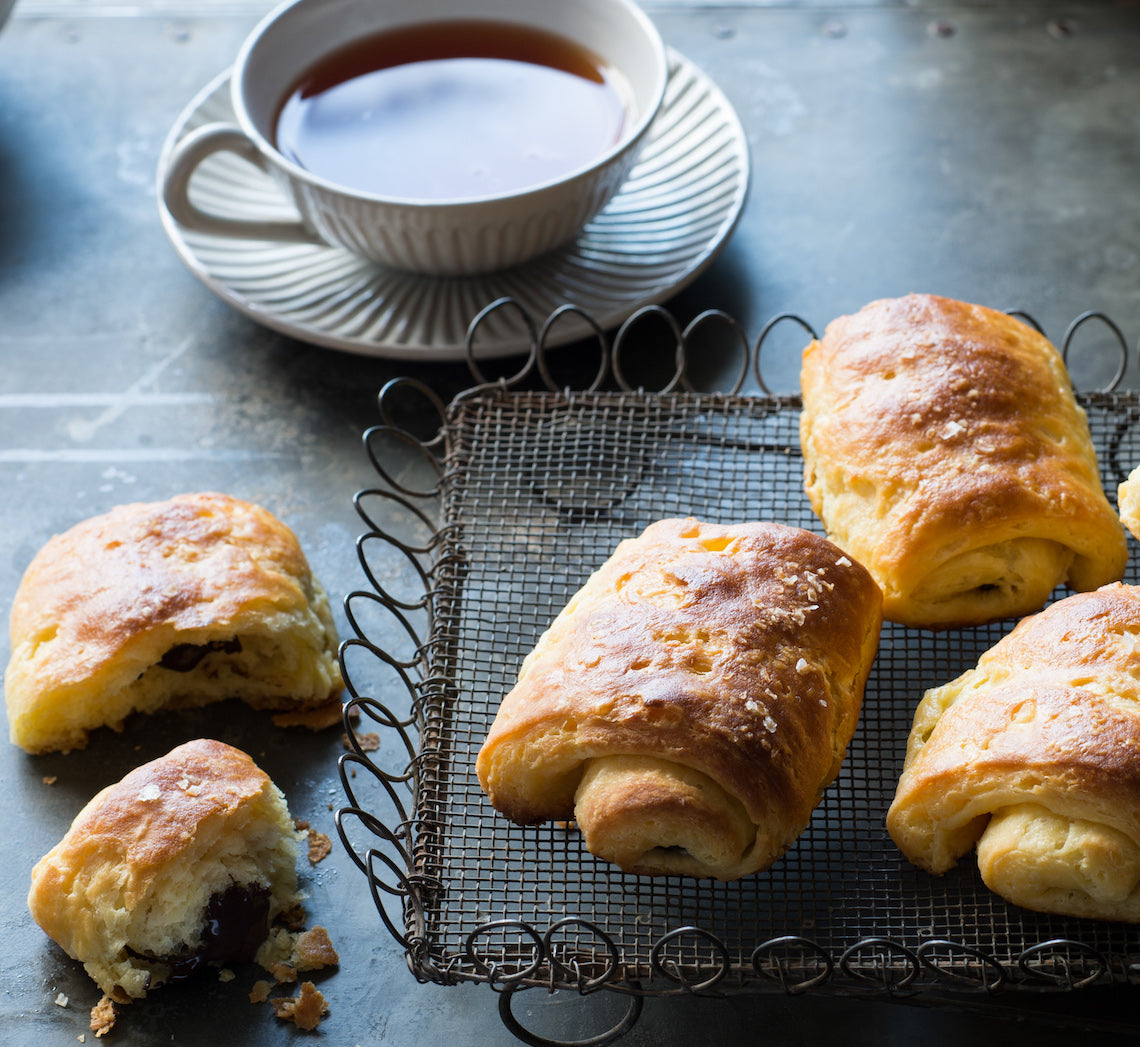
Prep 40min (+ overnight proving and 30min chilling time)Bake 25minMakes 8
At their best warm from the oven, these classic French pastries are based on the same pastry as a croissant, known as a leavened puff pastry (basically a puff pastry with yeast). These pain au chocolat uses a cheat’s pastry of sorts and gives a similar, less refined, result as the traditionally-made pastry, without the hassle of having to interleave the butter with the pastry dough as you fold it. The light sprinkling of sea salt flakes adds a surprising yet pleasant contrast to the sweetness of the chocolate centre.
Ingredients
125ml (½ cup/4fl oz) lukewarm milk
2 teaspoons (7g/¼oz 1 sachet) instant dried yeast
250g (1⅔ cups/9oz) bread flour (see Baker's Tips), plus extra to dust
185g (6½oz) chilled butter, cut into 2cm cubes
1 egg, at room temperature, lightly whisked,
2 tablespoons caster sugar
125g 4½oz) good-quality dark chocolate, chopped
1 extra egg, lightly whisked with 2 teaspoons milk, to glaze
Sea salt flakes (optional), to sprinkle
Icing sugar (optional), to dust
Method
- Put the milk in a medium bowl, sprinkle the yeast over the top and stir with a fork. Set aside for 5 minutes.
- Put the flour and butter into the bowl of a food processor and use the pulse button to process until the butter is cut into rough 1cm/½in pieces (make sure you don’t process any further). Transfer to a large bowl.
- Add the egg and sugar to the milk mixture and stir to combine. Add to the flour and butter mixture and use a wooden spoon and then your hands to mix until it is just combined and a soft dough forms. Cover the bowl with plastic wrap and place in the fridge overnight.
- Turn the dough onto a lightly floured surface and bring together with your hands. Knead briefly or until just smooth but the butter pieces are still visible. Shape into a rectangle and then use a lightly floured rolling pin to roll out until about 25cmx40cm/10inx16in, keeping the edges as straight as possible. With a long side nearest to you, fold the right third of the dough in to cover the centre third and then fold the left side in also. Turn the dough clockwise a quarter turn. Fold the dough into thirds as before to make a small rectangle.
- Flip the dough over on the bench so that the open edge is now underneath and repeat the rolling and folding process again as in step 4. You will finish with a small rectangle. Wrap well in plastic wrap and chill for 30 minutes.
- Preheat the oven to 190°C/375°F (170°C/340°F fan forced). Line a large baking tray with non-stick baking paper.
- Roll out the pastry with a lightly floured rolling pin on a lightly floured surface to a 30cm/12in square, about 5mm/¼in thick. Cut in half to make two 15cmx30cm/6inx12in rectangles, and then cut each into quarters so you end up with eight 7.5cmx15cm/3inx6in rectangles. Divide the chocolate evenly between the rectangles, placing it across the shorter end of each. Starting from the short end with the chocolate, roll the dough around the chocolate to form a roll. Place on the lined tray, seam-side down, and flatten slightly with the palm of your hand. Cover loosely with a slightly damp tea towel and set aside in a warm, draught-free place for 15 minutes or until the pastry has risen slightly and is ‘puffy’.
- Brush the pastries lightly with the egg and milk glaze and sprinkle with a little sea salt flakes, if desired. Bake in preheated oven for 25 minutes or until the pastry is golden, crisp and cooked through. Serve warm or at room temperature sprinkled with icing sugar, if desired.
CLICK HERE for more Bakeproof recipes.
Photography by Alan Benson.


