
- home
- BAKERECIPES
BakeRecipes
Bringing real baking into your home with deliciously simple recipes.

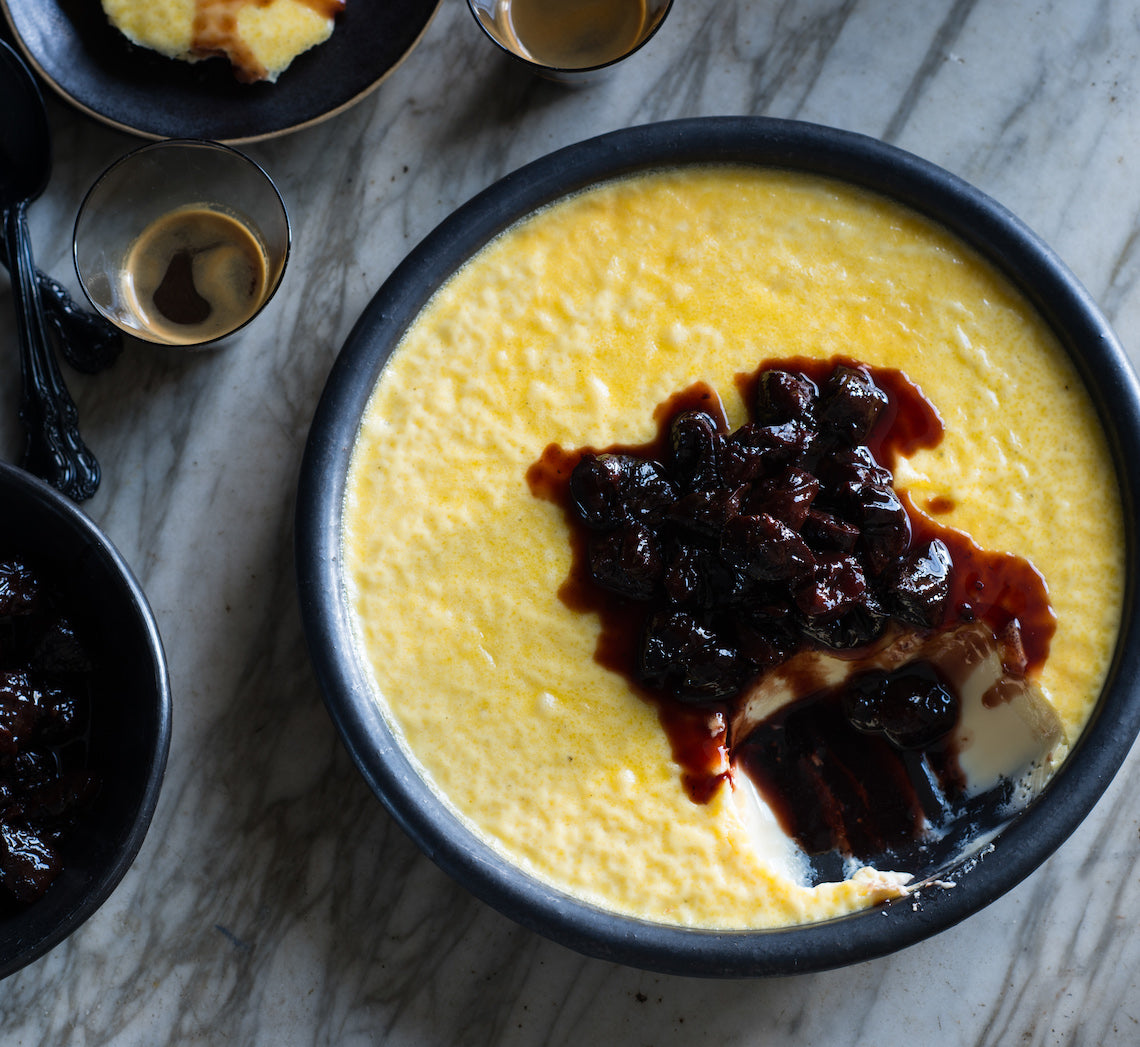
Takes 2hr (+30min for the fruit)Makes a cake for 6–8 and approximately 800g (1lb 12oz) fruit and syrup
Coconut Sugar Pavlova Roll
Reasons why my meringue preference is for a roll over a classic dome: 1. The crust quotient (CQ) is higher. More crunch balances the soft inside and creamy parts. 2. No shaping surprises with a flat pavlova. The proud dome you shape with meringue can sometimes end up baking into an askew beret! 3. Faster! No slooowww cool down keeping you from putting a slice of pavlova on your plate a minute longer than necessary.
Ingredients
Cooking oil spray
300g (10½oz) caster (superfine) sugar
70g (2½oz) coconut sugar
5g (⅛oz/½ teaspoon) vanilla paste
5g (⅛oz) cornflour (cornstarch)
5g/ml (⅛oz) white or apple-cider vinegar
2g (¹⁄₁₆oz/¼ teaspoon) fine sea salt
225g (8oz) egg white (from approx. 12 eggs)
2g (¹⁄₁₆oz/¼ teaspoon) cream of tartar
600g/ml (1lb 5oz) cream (45% milkfat)
1 × batch Spiced Grilled Blood Plums (below), chilled
Method
- Preheat the oven to 140°C (285°F). Lightly spray a flat and heavy 30cm × 40cm (12in × 15¾in) shallow baking tray with cooking oil, then lay a piece of baking paper on the tray, to cover the entire surface. Don’t spray again.
- Weigh the caster sugar into a small bowl with a small scoop. Weigh the coconut sugar separately. Next, weigh the vanilla, cornflour vinegar and salt together and stir together, then set aside. Coconut sugar impedes getting a stiff meringue structure, so we will add it at the end – when the meringue is strong.
- Put the egg white and cream of tartar in the bowl of an electric stand mixer. Using the whisk attachment, whip on speed 8 (under high) for 3–5 minutes. Once the whites have changed from foamy to stiff and white, start adding the caster sugar, 1 tablespoon at a time, over 3 minutes to make a very shiny and rigid meringue.
- Turn the mixer off and add the coconut sugar. Slowly turn the mixer on, increasing up to speed 8 (under high) for 5 seconds. Stop the mixer and add the cornflour/vinegar mixture. Re-whip for 5 seconds. Take the bowl off the mixer and use your fingers to push the meringue off the whisk back into the bowl. Give it a final and thorough mix with a plastic spatula so the colour is a uniform pale malt brown. Don’t worry that the meringue has sugary speckles.
- Scrape the mix out onto the prepared baking tray. Using an offset spatula, smooth it evenly over the tray, leaving a 1.5cm (½ in) border around the edges to allow for some expansion during baking. Bake for 1 hour until the top feels like a crunchy pillow that cracks when gently pressed. Remove and allow to cool at room temperature on the tray, until ready to roll (see Baker's Tips). Moving it off the tray while it’s hot makes the sheet prone to breaking.
- While the meringue cools, whip the cream to billowy soft and cut most of the grilled plum pieces into smaller pieces (four pieces per plum half). Reserve a few slices or whole pieces for the top.
- To roll, lay two overlapping pieces of plastic wrap on the work surface to make a sheet slightly larger than the meringue sheet. Carefully flip the meringue sheet off the tray, with the shortest side closest to you, and peel off the baking paper. The meringue should now be crunchy top side down and the underside, now exposed, should feel soft and a little sticky.
- Keeping the short side closest to you, evenly spread 400g (14 oz) of the cream over the meringue, but only smooth a light smear over the 2cm (¾ in) strip at the top of the sheet. This will become the seal, so it’s best not to overload it with cream that will ooze out upon rolling. Scatter the grilled plums evenly over the cream (except for the strip along the top). Tear the pieces up a little if they are too big, as big pieces make a lumpy roll.
- Take a firm hold of the plastic wrap closest to you and use a repetitive ‘lift and roll’ motion to gradually roll the meringue, until you do a final full roll to reach the end, with the seam underneath. Form a spine of reserved cream then plum pieces. Drizzle the reserved syrup on top.
Baker's Tips
-
Takes: Two hours from start to serve. Or you can bake the meringue sheet the day before and fill the next day
- Keeps: Always best served just after rolling. When filled, this will keep refrigerated for 1 day, well covered or in an airtight container. Unfilled, the meringue will hold for up to 3 days, but give it a 10 minute re-crisp in a 140°C (285°F) oven, then cool before filling.
- Overbaked meringue will be uber-crisp and unbending, threatening to snap. To repair, place the cream and fruit on the sheet and chill for an hour, then roll. If your meringue is underbaked, bake the meringue sheet for another 20 minutes at 140°C (285°F), even if you do this the day after. If the sheet has cracked irreparably, stack large shards with the cream and fruit in an avant-garde (but totally meant it) way.
Adaptrix
Other fruit:
- Use a similar weight of raspberries or strawberries in place of the plums. The Sumac blackberries are also incredible here!
- Toffeed bananas are a year-round fruity friend … and add fresh passionfruit to bring the zing.
- Roasted quinces or toffee figs are my autumnal go-to, and coconut is such a bosom buddy to them both. With quince, this roulade is beyond next level.
Spiced Grilled Blood Plums
These plums are another example of Christine Manfield’s (tysm) dessert genius! The grill char imparts a seductive smokiness. The syrup floods them while warm and they absorb all the honey sweetness and glorious spices and fresh citrus zing. These plums love to be served with chocolate mousse, panna cottas or store-bought gelato. I can’t help falling in love with this recipe every time the syrup sizzles on the fruit.
Ingredients
750g (1lb 11oz) blood plums, still firm, not yieldingly ripe (around 8)
30g (1oz) demerara sugar
Spiced syrup
1 orange
1 lemon
100g (3½oz) caster (superfine) sugar
40g (1½oz) honey
40g/ml (1½oz) cold water
4 star anise
2 whole allspice berries few grinds black pepper
1–2 fresh bay leaves (optional)
Method
- To start the spiced syrup, peel four wide strips each from the orange and the lemon and place into a small, non-reactive saucepan. Set the fruit aside (you’ll add their juice to the syrup later).
- Add the remaining syrup ingredients to the saucepan. Bring to the boil over a medium–high heat, stirring at first to loosen the sugar. When it boils, turn it down to a simmer and cook for 3–4 minutes until syrupy like maple syrup. Remove from the heat and cool to room temperature.
- While the syrup cools, heat your grill (broiler) to High (100%). Cut the plums in half, following their natural seam. Twist and pull apart and remove the stone (if it doesn’t prise out easily, cut around it with a small, pointy knife). Place the plums, cut-side up, on a non-reactive, ovenproof, shallow-lipped tray (or line a tray with foil). Sprinkle the demerara sugar evenly over the plums, then grill for 10–12 minutes, until the cut side has blistered and some have a collar of blackened flesh (see Baker's Tips).
- Remove the plums from the grill. Squeeze the juice from the orange and lemon into the syrup and pour over the plums. Adding the juice when the syrup has cooled will retain the fresh acidity. Overheated juice loses vibrancy.
- Allow to stand for 30 minutes, turning once in the syrup. Cool to room temperature before using.
Baker's Tips
- Takes: 30 minutes. Can be served warm or cool to fill the Coconut sugar pavlova roll
- Keeps: Chilled for up to 4 days. Can be frozen after that and defrosts pretty well!
- If you don’t have a grill, halve the plums, remove the stones and set in a baking tray. Scatter the sugar on the cut sides and caramelise with a blowtorch until dark brown. If the plums are large and still firm, bake for 10–15 minutes in a 180°C (360°F) oven until they soften but hold their shape.
Adaptrix
Peaches, nectarines
- Substitute in any peak-season ripe stone fruit. Exclude apricots from grilling – they need a gentle and less scorching treatment.
This is an edited extract from Beatrix Bakes: Another Slice by Natalie Paull (Hardie Grant Books, RRP $50.
Photographer: © Rochelle Eagle 2024
You can read more about what Natalie is baking this winter here.
Prep 20minBake 35-40 minMakes 8 serves
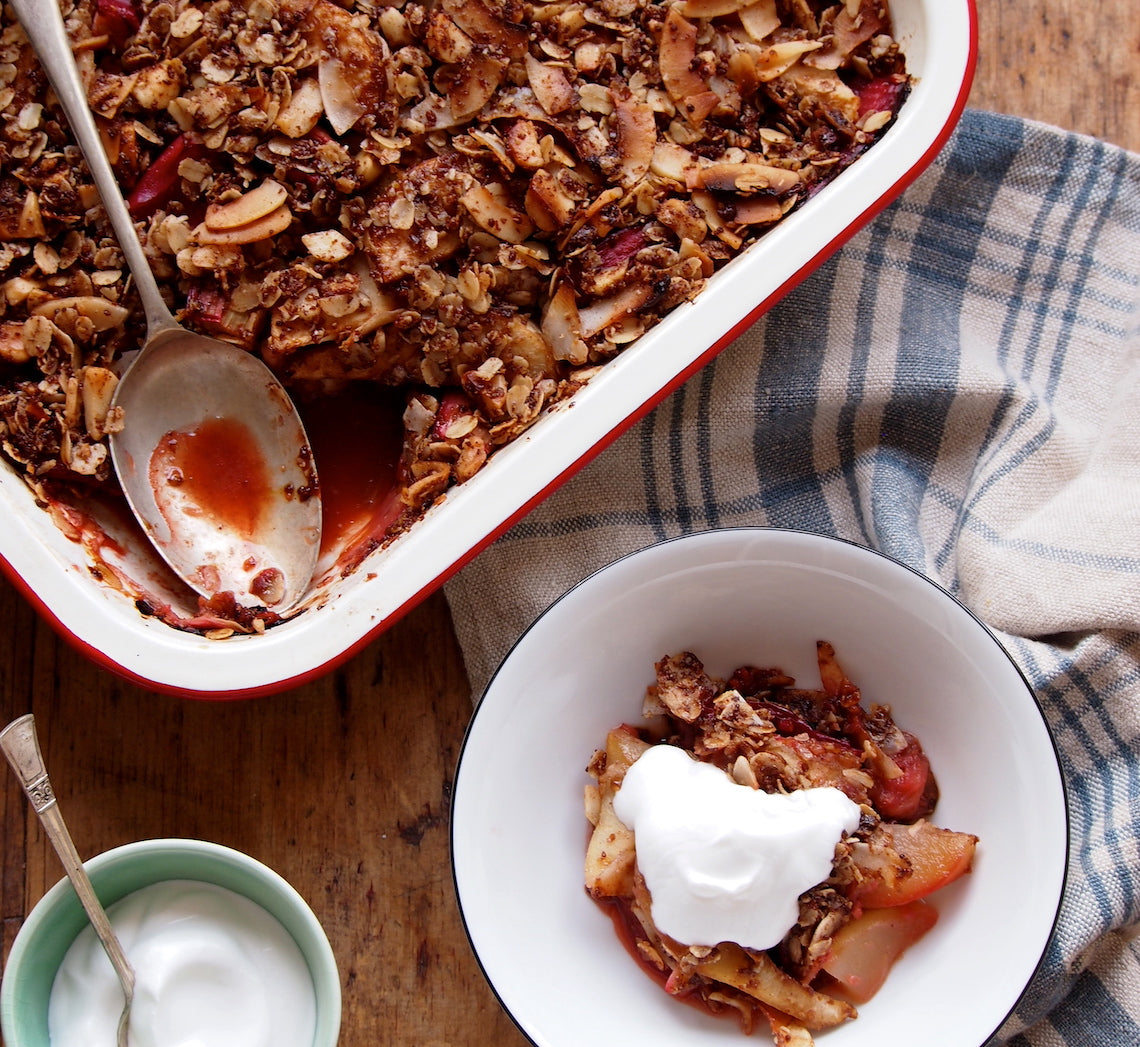
Rhubarb and pear make wonderful partners and when teamed with a coconut and macadamia nut crumble topping in this dessert it brings sunshine to the table. The coconut sugar lends a lovely rich caramel flavour but can be replaced by brown sugar if you wish.
Ingredients
1 bunch rhubarb, trimmed and cut into 4cm lengths (you should have about 500g trimmed and chopped rhubarb)
750g (about 4) firm ripe pears (such as Josephine, Williams or Packhams)
2 tablespoons coconut or brown sugar
Coconut or Greek-style yoghurt, to serve
Crumble Topping
50g (½ cup) rolled oats
30g (½ cup) flaked coconut
55g (⅓ cup) macadamia nuts, coarsely chopped
50g coconut or brown sugar
2 tablespoons LSA (ground linseeds, sunflower seeds and almonds)
1½ teaspoons ground cinnamon
60ml (¼ cup ) sunflower or light olive oil
½ teaspoons natural vanilla essence or extract
Method
- Preheat the oven to 180ºC (160°C fan-forced).
- To make the Crumble Topping, place oats, flaked coconut, macadamias, sugar, LSA and cinnamon in a bowl, mix to combine. Combine the oil and vanilla, drizzle over the oat mixture and toss to combine evenly. Set aside.
- Peel, quarter and core the pears and then cut each quarter lengthwise into three slices. Place the pear slices, rhubarb and sugar in a large bowl and toss gently to combine. Transfer to a 1.5 litre (6 cup) ovenproof dish. Sprinkle with the Crumble Topping.
- Bake in preheated oven for 35-40 minutes until the crumble is crisp and golden and the fruit is tender when tested with a skewer.
- Serve warm or at room temperature with the coconut yoghurt.
Baker's Tips
- Store any leftover crumble in the ovenproof dish covered with plastic wrap or in an airtight container in the fridge for up to 3 days. Serve cold or reheat in an oven preheated to 180°C (160°C fan-forced) for 10-15 minutes or until heated through.
- This crumble can also be baked in eight 185ml (¾ cup) ramekins or ovenproof dishes at 180°C (160°C fan-forced) for 25-30 minutes.
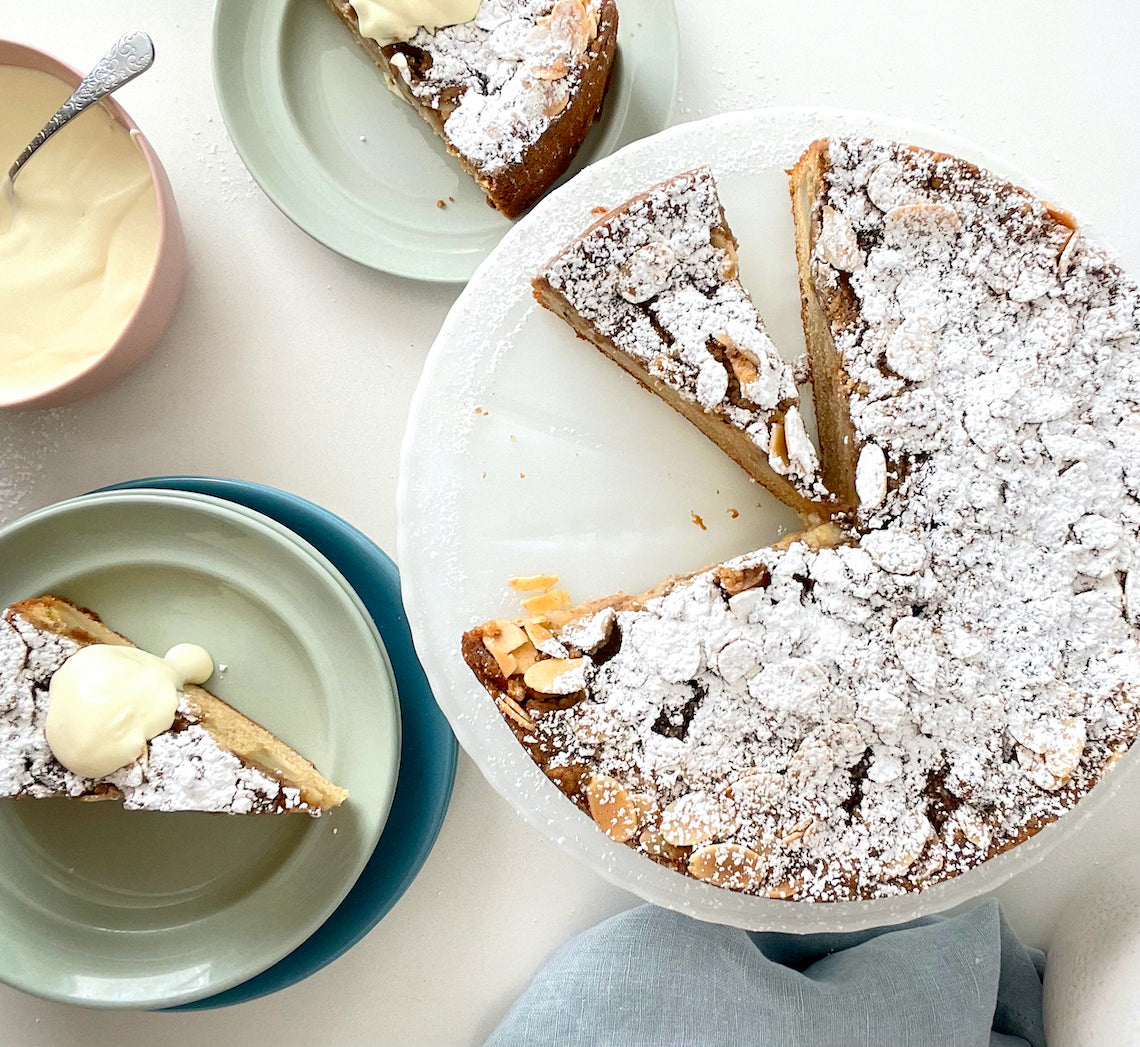
Prep 30min (+5min standing time)Bake 1hr 5min-1hr 15minMakes 10-12 serves
This is one of my favourite cakes – ever! Not only is it super easy to whip up and can be made with a whole variety of different fruits (you can replace the pears with the same quantity of plums, firm ripe nectarines or peaches for example), but it is also incredibly versatile when it comes to serving it. It not only makes for the perfect morning or afternoon tea cake but it is also wonderful served warm with lashings of cream or ice cream for dessert. I’ve also been known to eat the leftovers for breakfast (which I would also highly recommend!)
Ingredients
Melted butter, to grease
185g (1¼ cups/6½oz) self-raising flour
165g (⅔ cup, firmly packed/5¾oz) brown or raw caster sugar, plus 1 tablespoon extra
125g (4½oz) salted butter, at room temperature
85g (⅓ cup/3oz) sour cream
2 eggs, at room temperature
1½ teaspoons natural vanilla extract or essence
2 (about 200g/7oz each) firm but ripe Williams pears, cored and each cut into 12 wedges
Icing sugar, to dust
Cream or ice cream, to serve (optional)
Crumble Topping
50g (⅓ cup/1¾oz) plain flour
55g (¼ cup, firmly packed/2oz) brown or raw caster sugar
1 teaspoon ground cinnamon
60g (2oz) salted butter, chilled, diced
50g (½ cup/1¾oz) flaked almonds
Method
- Preheat oven to 170°C/340°F (150°C/300°F fan-forced). Grease a 21cm (81⁄4in), base measurement, springform tin with melted butter and line the base with non-stick baking paper.
- To make the Crumble Topping, combine the flour, sugar, and cinnamon in a medium bowl. Use your fingertips to quickly rub in the butter just until the mixture resembles coarse breadcrumbs (it will be quite moist). Stir in the almonds. Cover and put in the fridge while making the cake.
- To make the cake, place the flour, sugar, butter, sour cream, eggs and vanilla in a large mixing bowl. Use an electric mixer fitted with a paddle attachment to beat on low speed until combined. Increase the speed to high and beat for 3 minutes or until the mixture is well combined, very pale in colour and silky smooth in texture. Spoon the mixture into the prepared tin and smooth the surface with the back of a spoon.
- Toss the pear wedges with the extra 1 tablespoon sugar. Arrange the pears evenly over the top of the cake and then press gently into the batter. Sprinkle with the prepared Crumble Topping to cover.
- Bake in preheated oven for 65-75 minutes (the baking time will depend on how juicy the pears are) or until a skewer inserted into the centre comes out clean. Stand the cake in the tin for 5 minutes before transferring, still on the base of the tin, to a wire rack. Serve warm or at room temperature on its own or accompanied by cream or ice cream, if desired.
Variation
Brown Butter Pear Crumble Cake: Replace the butter in the cake with 125g (4½oz) brown butter, solidified but softened. Replace the butter in the crumble with 60g (2oz) browned butter, chilled and diced.
Prep 2hrBake 40-45minMakes 12-15 serves
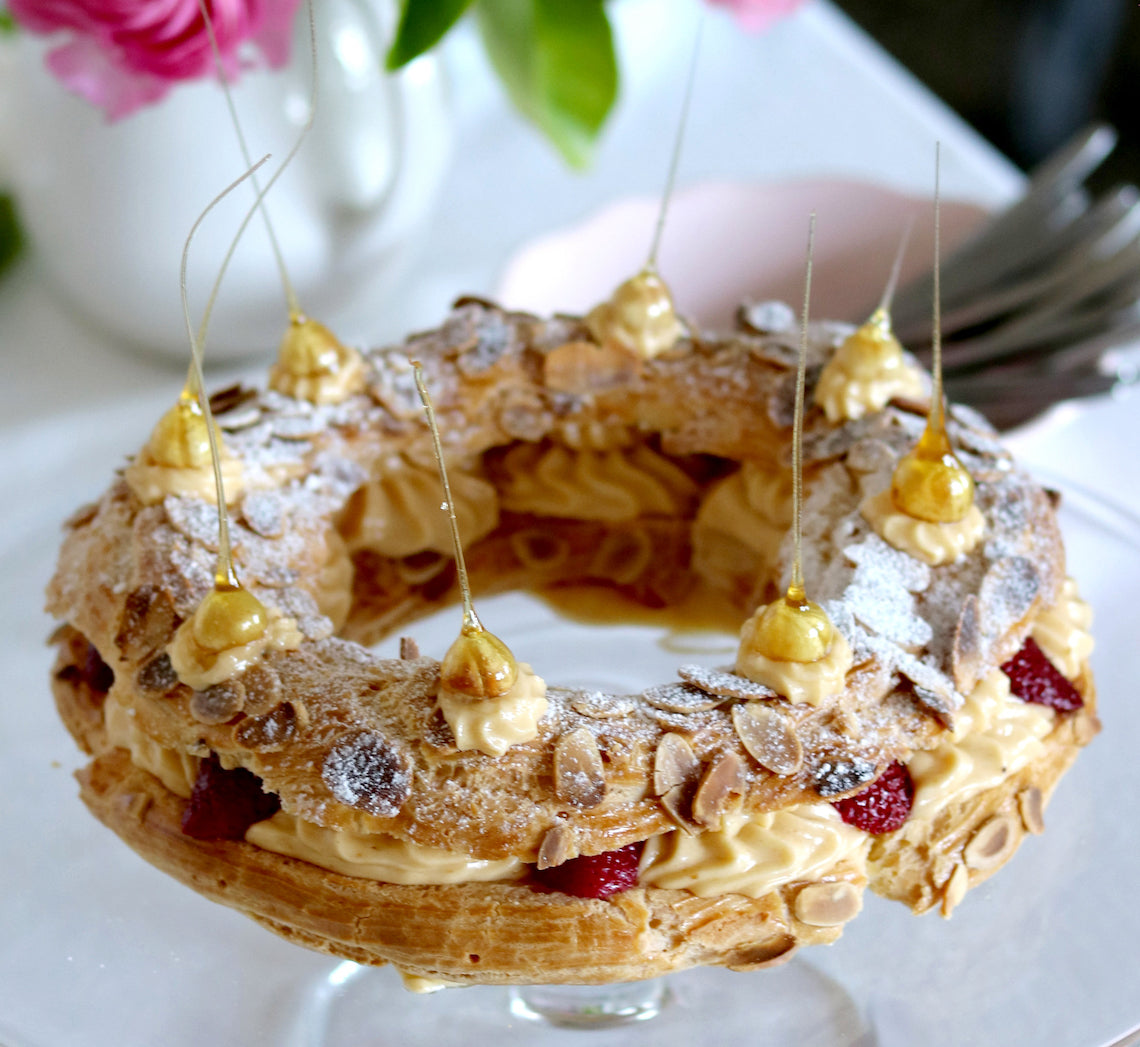
Created by Make Me a Baker student Janine Cowen for her Graduation, this classic dessert has been elevated by the addition of a divine hazelnut praline crème mousseline filling and roasted rosewater strawberries.
"I picked the recipe because it is something I have always wanted to taste and try to bake, but I've never had the confidence to tackle such a complex recipe or even the know-how to make choux pastry. Reading all of the elements was overwhelming at first, but being able to calmly break it down and methodically follow the steps to produce the final dessert was so satisfying. It has opened up a whole world of challenging multi-element recipes for me to try," says Janine
Janine also suggests, when in season, roasting quartered fresh figs with a little brown sugar to replace the strawberries.
Ingredients
1 quantity Basic Choux Pastry
1 egg yolk, whisked with a dash of water, to brush
30g flaked almonds
Icing sugar, to dust
Crème Pâtissière (original recipe from Mastering the Art of Baking by Anneka Manning, Murdoch Books)
1 vanilla bean, split lengthways and seeds scraped
250ml (1 cup) full-cream milk
250g (1 cup) pure (thin/pouring) cream
4 egg yolks
150g caster sugar
2 tablespoons plain flour
1 tablespoon cornflour
Crème Mousseline
225g unsalted butter, softened
Praline Paste (Janine used a recipe from Serious Eats by Kristina Razon)
Toffeed Hazelnuts (based on a recipe from The Pastry School cookbook by Julie Jones)
20 whole hazelnuts
220g (1 cup) caster sugar
100ml water
Roasted Strawberries
400g ripe but firm larger strawberries, hulled and halved
2 teaspoons caster sugar
4 drops rosewater essence
Small pinch fine salt
Method
-
To make the Crème Pâtissière, combine the vanilla seeds, milk and cream in a medium saucepan and bring just to a simmer over a medium heat. Remove from heat. Use a balloon whisk or electric mixer with a whisk attachment to whisk the egg yolks and sugar together in a heatproof bowl until thick and pale. Sift together the flour and cornflour, then whisk into the yolk mixture until smooth and well combined. Gradually whisk in the milk mixture until smooth and well combined. Return to the saucepan. Stir constantly with a balloon whisk over a medium heat until the mixture comes to a simmer. Simmer, stirring constantly with the whisk, for 2 minutes. Remove from heat and pass the crème pâtissière through a sieve into a heatproof bowl. Cover the surface of the crème pâtissière with plastic wrap or a round of baking paper and refrigerate for 2 hours or until well chilled before using.
-
To make the Toffeed Hazelnuts, gently insert a toothpick into the base of each hazelnut (being careful not to split them). Cover a benchtop under a cupboard or shelf with foil to catch the dripping caramel. Place a strip of double-sided sticky tape or Blu Tack on the bottom edge of a cupboard or shelf (this will hold the hazelnuts by the toothpicks). Fill your kitchen sink or a large bowl with about 3cm of water. Combine the caster sugar and water in a small saucepan and use a wooden spoon to stir over low heat until the sugar dissolves. Increase the heat to medium and bring to the boil. Boil, occasionally brushing down the side of the pan with a pastry brush dipped in water to dissolve any sugar crystals, until the mixture turns a deep caramel. Remove immediately from the heat and place the saucepan base in the water until the bubble subside to stop it from cooking. Remove the saucepan from the water and set aside for 1-2 minutes near the lined bench or until the caramel thickens enough to coat the hazelnuts. One at a time and holding the toothpick, carefully dip the hazelnuts into the caramel and then stick the toothpick to the cupboard or shelf using the sticky tape or Blue Tack so that the caramel drips onto the foil and a tail forms. It may take a few hazelnuts before the caramel has thickened enough for a good tail to form. Let the caramel set (it will take about 10-15 minutes) before gently removing the toothpicks from the hazelnuts. Place in an airtight container separated by baking paper.
-
To make the Roasted Strawberries, preheat the oven to 200°C (180°C fan-forced) and line an oven tray with non-stick baking paper. Place the strawberries in a large bowl and sprinkle with the caster sugar, rosewater essence and salt. Toss gently to coat evenly and then spread the strawberries, cut side down, evenly on the lined tray. Roast in preheated oven for 10 minutes or until starting to soften but still holding their shape. Place in an airtight container in the fridge until required (see Baker’s Tips).
-
To make the choux pastry ring, draw a 12cm diameter circle on a piece of non-stick baking paper. Turn the paper upside down, line a baking tray with it, and use a little of the choux pastry to stick the baking paper to the tray. Preheat the oven to 200°C (180°C fan-forced).
-
Spoon the choux pastry into a large piping bag fitted with a 13mm (6B) French star piping nozzle. Using the marked paper as a guide, pipe a ring of choux pastry onto the lined tray. Pipe another ring of pastry around the outside of the first one, so that they just touch. Finally pipe a third circle of pastry over the gap between the two bottom pastry rings. Bruch the rings gently with the egg wash and then sprinkle with the flaked almonds. Bake in preheated oven for 35 minutes. Reduce the oven temperature and bake for a further 25 minutes or until the pastry is puffed, golden and dry.
-
Immediately transfer the pastry ring to a wire rack and use a skewer to piece the ring on top about 8 times (this will allow the excess steam trapped inside to escape while it cools). See Baker’s Tips.
-
Meanwhile, to make the Crème Mousseline, use an electric mixer with a paddle beater to beat the butter until very pale and creamy, scraping down the side of the bowl when necessary. Add the Praline Paste and beat on medium speed until well combined. Gradually add the Crème Pâtissière, about ¼ cup at a time, and beat on medium speed after each addition until well combined, scraping the bowl when necessary. Replace the paddle beater with the whisk attachment and whisk on medium speed for about 3 minutes or until the mousseline is light and airy. Transfer about three quarters of the Crème Mousseline to a piping bag fitted with a 15mm French star piping nozzle (see Baker’s Tips).
-
Use a large sharp serrated knife to carefully cut the pastry ring in half horizontally. Remove any uncooked dough with your fingertips. Set the top aside. Pipe rosettes of the Crème Mousseline into the base of the pastry ring about 2cm apart. Then pipe another, slightly smaller, rosette on top of each Place a strawberry half, cut side down, between each of the Crème Mousseline rosettes, placing them so they overlap the edge of the pastry ring base and peek out once the lid is placed on top. Gently place the pastry ring lid on top and then dust with icing sugar.
-
Place the remaining Crème Mousseline in a piping bag fitted with a 5mm French star piping nozzle and pipe eight small rosette at even intervals on the top of the pastry ring. Choose the best eight Toffeed Hazelnuts and carefully place one on top of each of the piped rosettes to decorate. Serve immediately.
Baker's Tips
- The Crème Pâtissière can be made up to 3 days before using. Place in an airtight container or a bowl and cover the surface with plastic wrap and keep in the fridge.
- The Roasted Strawberries can be made up to 3 days before using. Place in an airtight container in the fridge.
- The pastry ring can be made up to a day ahead. Keep in an airtight container at room temperature. To refresh before filling, place on a lined oven tray in an oven preheated to 180°C (160°C fan-forced) for 10 minutes. Allow to cool before using.
- In warmer weather, the Crème Mousseline may become a little soft. If so, before piping place it into the fridge until it firms enough to be a good piping consistency before continuing with the recipe.
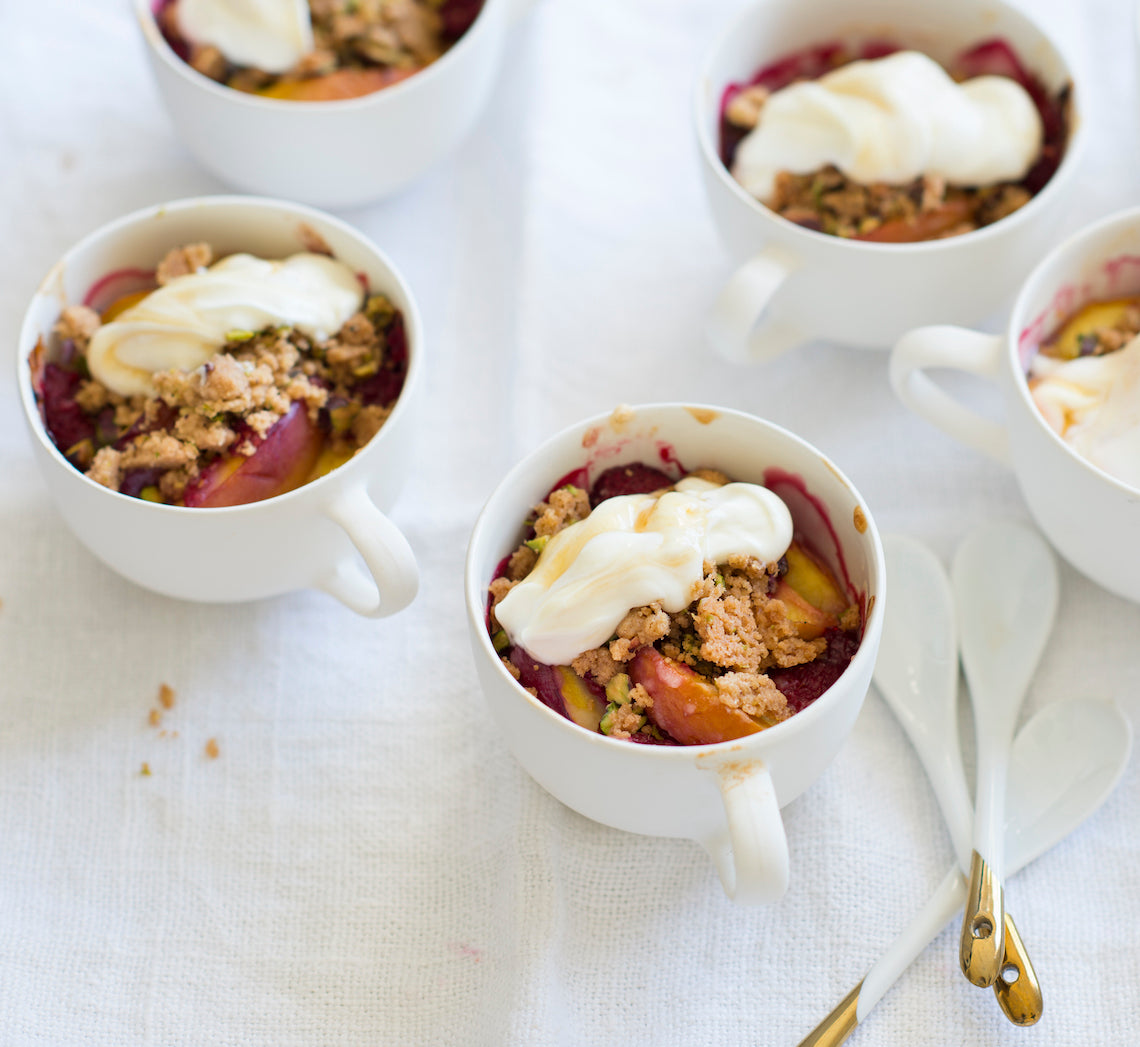
Prep 25minBake 40minMakes 6 serves
We often think of crisps and crumbles as winter desserts, but please don’t pigeon-hole them! This combination of sweet nectarines and tart raspberries, subtly flavoured with rosewater, topped with a pistachio 'crisp' topping and served with honey-flavoured yoghurt is a sublime summer dessert. Any leftovers are good for breakfast!
Ingredients
750g white or yellow nectarines
300g fresh or frozen raspberries or blueberries
55g (¼ cup) caster sugar
3 teaspoons rosewater, or to taste
1½ tablespoons plain flour
Pistachio topping
75g (½ cup) plain flour
55g (¼ cup) caster sugar
1 teaspoon ground cinnamon
80g chilled butter, diced
50g pistachio kernels, chopped, toasted
Honey yoghurt
200g tub Greek-style yoghurt
1 tablespoon pure honey, or to taste
Method
- Preheat oven to 190°C (170°C fan-forced).
- To make the Pistachio topping, combine the flour, sugar and cinnamon in a medium bowl. Use your fingertips to rub in the butter until the mixture begins to resemble coarse breadcrumbs. Stir in the pistachios.
- Halve the nectarines and remove the stones. Cut each half into 4 wedges. Combine with the sugar, rosewater and flour and toss to combine. Add the raspberries and toss gently to combine evenly. Divide the fruit mixture evenly among 6 x 250 ml (1 cup) ramekins or ovenproof dishes. Sprinkle the pistachio crisp topping over the fruit to cover.
- Bake in preheated oven for 35-40 minutes or until the fruit is tender when pierced with a skewer and the topping is crisp and golden.
- Meanwhile, to make the Honey yoghurt, stir the yoghurt and honey in a medium bowl until combined. Cover and refrigerate until required.
- Serve the crisp warm or at room temperature with the honey yoghurt.
Baker's Tips
- You can also bake this crisp in a 1.5 litre (6 cup) ovenproof dish. Bake for 50 minutes.
This recipe is from Anneka's SBS Food online column, Bakeproof: Stone Fruit.
CLICK HERE for more Bakeproof recipes.
Photography by Alan Benson.

Prep 50minBake 35-40minMakes about 40
When the French profiteroles arrived in Brazil, a bakery in Sao Paulo created its own version – the Carolinas. Instead of filling the profiteroles with vanilla custard, they used pure dulce de leche then it became one of the staples in Sao Paulo bakeries.
This version, created by Make Me a Baker student Ana Moreno for her graduation, includes cream to make them less sweet than the ones you find in Sao Paulo, but still with plenty of dulce de leche to give the authentic taste.
Ingredients
1 quantity Basic Choux Pastry
150g good-quality dark chocolate (45-54% cocoa), chopped into small pieces
Edible gold leaf flakes, to decorate
Dulce de Leche Cream
250ml (1 cup) thickened cream
30g (¼ cup) icing sugar, sifted
1 teaspoon vanilla bean paste
320g (1 cup) dulce de leche
Method
- To make the profiteroles, preheat oven to 200°C (180°C fan-forced). Line 2 large oven trays with non-stick baking paper.
- Spoon the choux pastry into a large piping bag fitted with a 0.9cm (#9) round piping tip. Pipe 3cm rounds onto the lined trays, about 2cm apart. Use a damp fingertip to smooth any peaks on each of the rounds. Sprinkle the lined tray with a little water.
- Bake in preheated oven for 20 minutes or until well puffed and golden. Reduce the oven to 180°C (160°C fan-forced) and bake for a further 15-20 minutes or until golden and crisp on the outside. Remove from the oven and use a 0.7cm (#7) star piping tip to make a hole in the base of each of the hot profiteroles for the steam to escape. Place hole side up on a wire rack and allow to cool completely
- To make the Dulce de Leche Cream, combine the cream, icing sugar and vanilla bean paste in a mixing bowl and use a balloon whisk or hand held beaters with a whisk attachment to whisk on medium-high speed until soft peaks form.
- Spoon dulce de leche into a medium bowl. Add a third of the whipped cream mixture and use a large metal spoon or spatula to fold gently through the dulce de leche to retain as much air as possible until just combined evenly. Add the remaining cream in two more batches folding gently until just combined.
- Place the Dulce de Leche Cream into a pastry bag fitted with a 0.7cm (#7) star or round piping tip. Insert the tip into the hole in the base of a profiterole and fill with the Dulce de Leche Cream.
- To decorate the profiteroles, place the chocolate in a heatproof bowl and set over a saucepan of simmering water (make sure the water doesn’t touch the base of the bowl). Stir occasionally until the chocolate melts and is smooth.
- Dip the tops of each of the filled profiteroles in the melted chocolate to coat and set aside on a wire rack to stand for 10 minutes. Carefully decorate each profiterole with a little edible gold leaf before the chocolate is fully set.
Baker's Tip
- The unfilled profiteroles will keep in an airtight container at room temperature for up to 1 day. They are best eaten the day they are filled with the Dulce de Leche Cream.
Prep 20min (+cooling time)Bake 35-40minMakes 8-10 serves
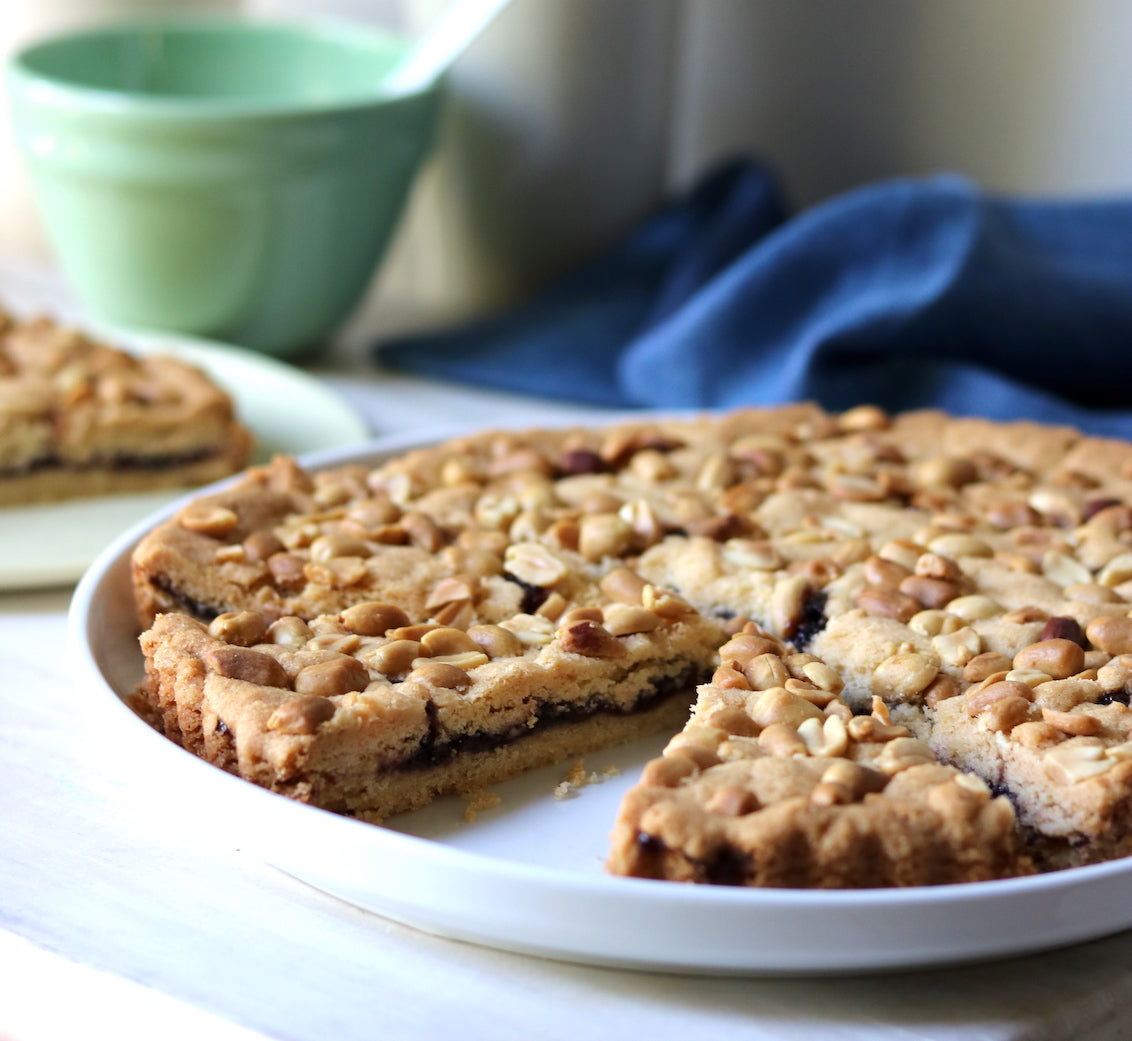
I love this tart – a no-fuss, slice-like affair of buttery shortbread layers filled with jam and nuts. Research has revealed no reason why this tart is Belgian, but it brings back vivid childhood memories of my mum, Jocelyn, making it in two enamel plates, throwing them in the oven and then, once cool, covering them with foil to take to a picnic or tennis day. I remember it so clearly when I make the tart now (with a few small alterations) in my own kitchen.
Ingredients
185g (6½oz) salted butter, softened slightly
150g (5¼oz) caster sugar
1 egg yolk
1 teaspoon natural vanilla essence or extract
260g (9¼) plain flour
1 teaspoon baking powder
165g (5¾oz) mixed berry jam (see Baker’s Tips)
70g (½ cup/6oz) unsalted raw peanuts (or nuts of your choice)
Method
- Preheat the oven to 160°C/315°F (140°C/285°F fan-forced).
- Put the butter and sugar in the bowl of a food processor and process until well combined. Add the egg yolk and vanilla and process to combine, scraping down the side of the bowl if necessary. Sift together the flour and baking powder. Add to the butter mixture and use the pulse butter to process until just combined and a soft dough forms.
- Press half of the mixture evenly over the base of an ungreased 23cm/9in tart tin with removable base. Spread evenly with the jam, leaving a 2cm/¾in border. Press portions of the remaining dough between your hands to flatten and press over the jam to cover, patching where necessary. Sprinkle with the peanuts and press into the dough.
- Place the tart tin on a baking tray and bake in preheated oven for 35-40 minutes or until golden and cooked through. Leave the tart to cool in the tin and then serve in wedges.
Baker's Tips
- Mum used to make this tart with apricot jam instead of the mixed berry I have used in this recipe but any jam variety works well – fig, blackberry, raspberry - just pick your favourite.
- This tart will keep in an airtight container at room temperature for up to 4 days.
Prep 20min(+ 1hr cooling time)Bake 35-40minMakes 10 serves
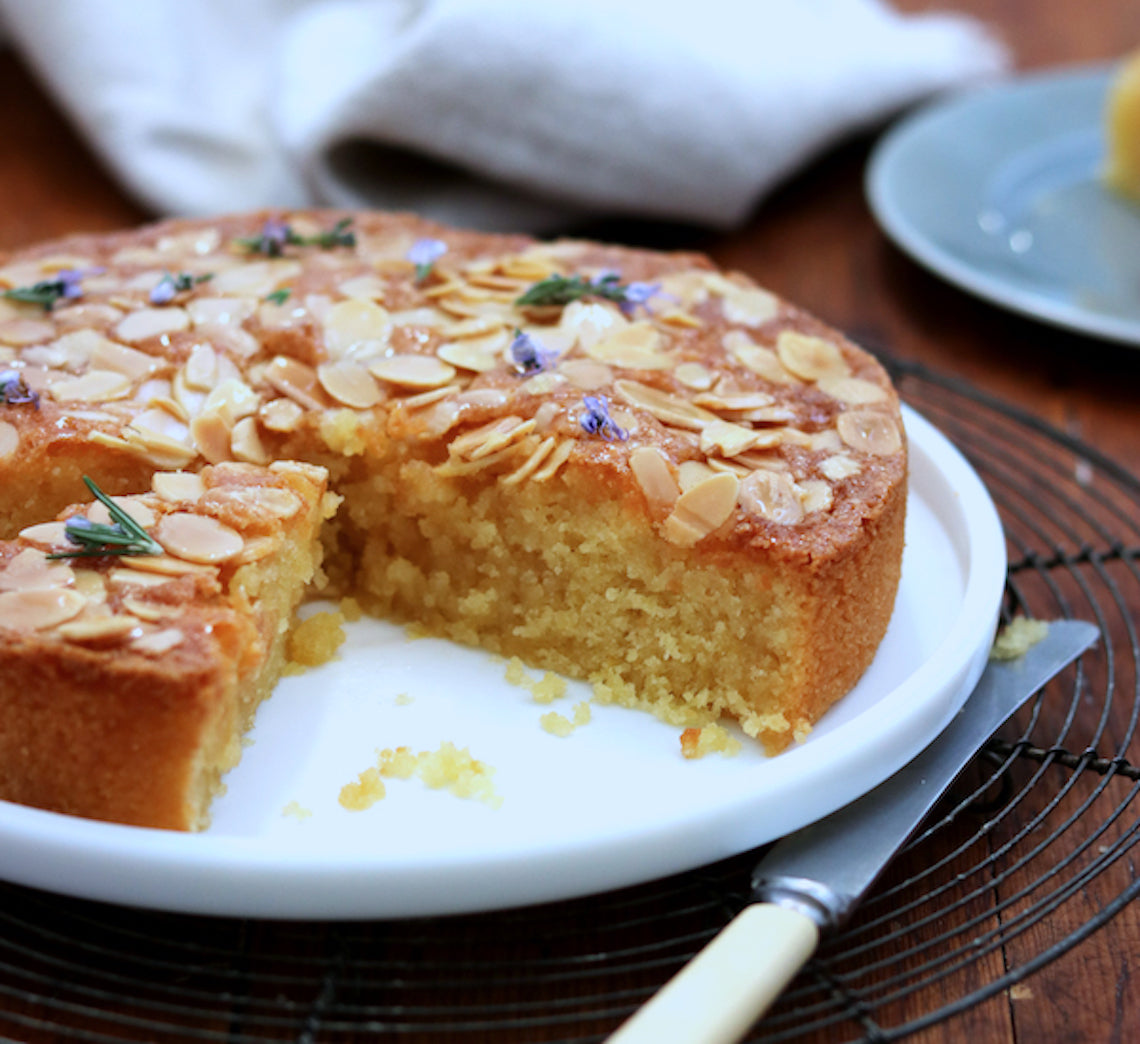
Inspired by the wild rosemary found growing on the Gallipoli peninsula and the symbolic wearing of sprigs as a sign of remembrance for those who have made the ultimate sacrifice, this cake is the perfect way to pay your respects through your baking on Anzac Day. It's a simple cake, made special by the rosemary-infused syrup and is equally good accompanied by a cup of tea or lashings of cream or vanilla ice-cream for dessert (particularly when served while still warm)!
Ingredients
Olive oil, to grease
150g (5¼oz) caster sugar
125g (4½oz) almond meal
75g (½ cup/2¾oz) self-raising flour
180ml (¾ cup/6fl oz) olive oil
3 eggs, at room temperature
2 lemons, rind finely grated
40g (1½oz) flaked almonds
Fresh rosemary flowers (optional), to decorate
Lemon & Rosemary Syrup
60ml (¼ cup/2fl oz) strained fresh lemon juice
60ml (¼ cup/2fl oz) water
110g (½ cup/4oz) caster sugar
4 x 10cm sprigs fresh rosemary
Method
- Preheat oven to 180°C/350°F (160°C/315°F fan-forced). Brush a 20cm/8in spring form tin with olive oil and line the base with non-stick baking paper.
- Combine the sugar, almond meal and flour in a large bowl. Whisk together the olive oil, eggs and lemon rind until well combined. Add to the almond meal mixture and use a balloon whisk or spatula to stir until just evenly combined.
- Pour into the prepared tin and spread with the back of a spoon. Sprinkle evenly with the flaked almonds. Bake in preheated oven for 35-40 minutes or until a skewer inserted in the centre comes out clean. Stand the cake in the tin for 5 minutes before turning transferring to a wire rack sitting over a tray.
- Meanwhile, to make the Lemon & Rosemary Syrup, combine the lemon juice, water and sugar in a small saucepan and stir over medium heat until the sugar dissolves. Add the rosemary sprigs, bring to a simmer and simmer for 5 minutes or until reduced by about half.
- Slowly pour the hot syrup over the warm cake, allowing it to soak in as much as possible. Cool to room temperature (this will take about 1 hour). Decorate with the rosemary flowers (if using) and serve in slices.
Baker's Tip
- This cake will keep in an airtight container at room temperature in a cool spot for up to 3 days.

Prep 2 hours (+ 4 hours chilling time)Bake 30-40 minMakes 18 serves
These divine desserts petite gateaux were created by Rachel Hunt, one of our Make Me a Baker students for her graduation. A crisp, nutty, meringue base is topped with a mirror-glazed, ever-so-light honey-infused mousse surrounding a floral lavender jelly. Using a number of techniques, this recipe showcases all the fantastic new skills and confidence Rachel gained over the course of our 6-month program and, lucky for you, she’s sharing it so you can make them at home! Rachel uses 18 x 30mm and 60mm (top measurement) half sphere silicon moulds however other shapes/sizes can be used.
Ingredients
Lavender Jelly- 6 fresh unsprayed lavender heads or 2 teaspoons
dried culinary lavender, plus extra to decorate - 250ml (1 cup) water
- 110g (1/2 cup) sugar
- 1½ teaspoons powdered gelatin
- 2½ tablespoons cold water
- Purple food colour (optional)
- 5 eggs, separated
- 40g butter, diced
- 135g good-quality white chocolate chips (like Callebaut)
- 60ml (¼ cup) good-quality honey
- 2 teaspoons powdered gelatin
- 2 tablespoons cold water
- 300ml thickened cream
Hazelnut Meringue
- Vegetable oil, to grease
- 150g hazelnut meal or peeled toasted hazelnuts
- 7 large egg whites
- ½ teaspoon white wine vinegar
- 385g (1¾ cups) caster sugar
Mirror Glaze
- 2 tablespoon powdered gelatin
- 250ml (1 cup) cold water
- 330g (1½ cups) caster sugar
- 160ml (2/3 cup) sweetened condensed milk
- 2 cups good-quality white chocolate chips (like Callebaut)
Method
- To make the lavender jelly, combine the sugar and 250ml water in a small saucepan and stir over a low heat until sugar dissolves. Bring to the boil. Remove from the heat and add the lavender. Set aside to cool to room temperature.
- When the syrup is almost cool, place the cold water in a small heatproof bowl or dish and sprinkle the gelatin over. Set aside for 5 minutes or until the gelatin is fully rehydrated. Sit the bowl or dish into another bowl of hot water and stir until dissolved and the mixture is clear.
- Strain the jelly syrup through a sieve to remove the lavender. Transfer the gelatin mixture to a medium bowl and stir in the syrup until well combined.
- Tint the jelly syrup with purple food colouring if desired. Place 18 x 30mm (top measurement) half-sphere silicon moulds on a tray and pour in the jelly syrup (there will be some syrup left over and you can set it in other moulds or glasses if you wish). Place in the fridge to chill for at least 4 hours, or until well set.
- To make the honey mousse, lightly whisk the egg yolks and combine in a medium saucepan with the butter, chocolate and honey. Stir over low heat until the chocolate is just melted (be careful not to overheat). Transfer mixture to a large bowl.
- Place the cold water in a small heatproof bowl or dish and sprinkle the gelatin over. Set aside for 5 minutes or until the gelatin is fully rehydrated. Sit the bowl or dish into another bowl of hot water and stir until dissolved and the mixture is clear. Stir gelatin mixture into the chocolate mixture until combined. Cover and cool to room temperature, stirring occasionally.
- Use an electric mixer with a whisk attachment or a hand-held balloon whisk to whisk the cream in a medium bowl until soft peaks form. Fold the cream into the cooled chocolate mixture until just combined. Whisk the egg whites with a clean whisk in a large bowl until soft peaks form. Add half the egg whites into the chocolate mixture and gently fold through. Add the remaining egg whites and gently fold through until just combined.
- Place 18 x 60mm (top measurement) half sphere moulds on a tray and pour in the mousse mixture to fill each until almost full. Remove the lavender jelly domes from the smaller moulds and press into the centre of each individual mousse, ensuring the mousse completely covers the jelly. If the jelly isn't completely covered, add a little more mousse. If necessary, scrape a palette knife across the top of the moulds so that the base of the mousse domes will be level. Chill for at least 4 hours, or until set.
- To make the hazelnut meringue, preheat the oven to 180°C (160°C fan forced). Lightly grease 2 oven trays and line with non-stick baking paper.
- If using whole toasted hazelnuts grind the nuts with 1 tablespoon of the caster sugar in a food processor until fine but still with some texture.
- Use an electric mixer with a whisk attachment to whisk the egg whites and vinegar until soft peaks form. Add the caster sugar 1 tablespoon at a time, whisking well after each addition. Once half the sugar has been added start adding the rest in larger quantities, whisking well after each addition, until stiff, glossy peaks form. Use a metal spoon or spatula to fold the hazelnuts through the meringue. Spoon the meringue onto the prepared trays and spread evenly in a rectangle until about 1-1½cm thick. Bake in preheated oven for 30-40 minutes until a crisp crust forms. Remove from the oven and cool for 20 minutes on the trays and then transfer them to wire racks, still on the baking paper, to cool completely. Carefully remove the baking paper and transfer to a cutting board. Use a 6cm round cutter to cut discs from the meringue sheets. Set aside in an airtight container.
- To make the mirror glaze, place 80ml (1/3 cup) of the cold water into a small bowl or dish and sprinkle the gelatin over. Set aside for 5 minutes or until the gelatin is fully rehydrated.
- Combine the remaining water, sugar and condensed milk in a small saucepan over a medium heat. Stir occasionally until the mixture begins to bubble. Remove from the heat, add the gelatin mixture and stir until fully dissolved. Add the white chocolate chips and stir slowly until melted. Pour the mixture through a sieve into a large jug and set aside to cool to room temperature.
- Remove the petit gateaux domes from the fridge and place on a wire rack over a larger oven tray to catch the drips. Carefully and slowly pour the glaze over ensuring the domes are completely covered. Sprinkle dried lavender on top to decorate if desired.
- Set aside at room temperature for at least 20 minutes or until the glaze is set.
- Use a palette knife to transfer the mousse domes to the hazelnut meringue discs and serve.
Baker's Tips
- The mousse domes will keep in an airtight container in the fridge for up to 2 days.
- The Hazelnut meringue will keep in an airtight container at room temperature for up to 1 week.
Rachel took inspiration for her creation from:
https://www.deliciousmagazine.co.uk/
https://www.womensweeklyfood.com.au/
https://chelsweets.com
https://ballymaloe.ie/content/ballymaloe-recipes
Photography by Alan Benson.
Prep 1hr (+ 2hr cooling time)Bake 30minMakes 10-12 serves
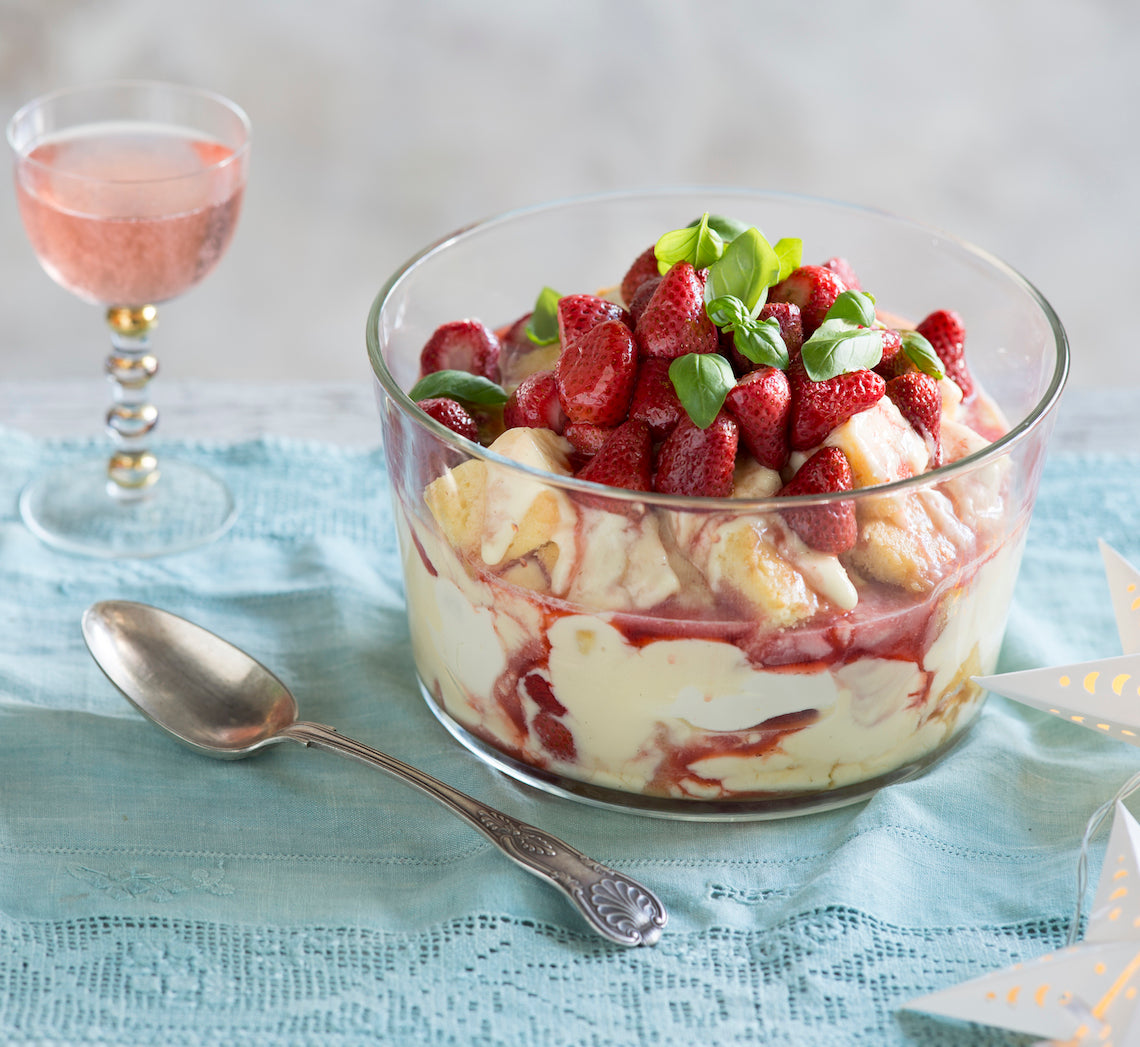
Fragrant, sweet and fresh, basil brings something truly special to this festive trifle. Layers of vanilla buttercake soaked with a basil and lemon syrup, creamy basil-infused custard and roasted strawberries make for a wonderful combination in this impressive dessert… I promise one serve won’t be enough!
Ingredients
125 ml (½ cup) pure (pouring / thin) cream
Small fresh basil leaves, to decorate
Buttercake
110g (¾ cup) self-raising flour
75g (½ cup) plain flour
165g (¾ cup) caster sugar
125g butter, softened
80ml (⅓ cup) milk
2 eggs, at room temperature
1 teaspoon natural vanilla extract or essence
Basil-infused custard
500ml (2 cups) milk
125ml (½ cup) pure (pouring / thin) cream
20 medium fresh basil leaves
75g (⅓ cup) caster sugar
2 tablespoons cornflour, sifted
3 egg yolks, lightly whisked
1 teaspoon natural vanilla essence or extract
Roasted strawberries
1kg strawberries, hulled and halved if large
75g (⅓ cup) caster sugar
Basil and lemon syrup
165g (¾ cup) caster sugar
125ml (½ cup) water
10 medium fresh basil leaves
60ml (¼ cup) strained fresh lemon juice
Method
- To make the Basil-infused custard, put the milk, cream and basil leaves into a medium saucepan. Bring just to a simmer over a medium heat. Remove from heat and stand for 30 minutes to infuse. Remove the basil leaves. Use a balloon whisk to whisk the sugar and cornflour together in a heatproof bowl. Gradually whisk in the milk mixture until smooth and well combined. Whisk in the egg yolks. Return to the heat and stir constantly with the whisk over medium heat until the mixture thickens and just comes to a simmer. Remove from the heat and stir in the vanilla. Pass the custard through a sieve into a heatproof bowl. Cover the surface with plastic wrap and refrigerate for 2 hours or until chilled.
- To make the Buttercake, preheat the oven to 180°C (160°C fan-forced). Grease a 20 x 30 cm (base measurement) shallow cake tin and line the base and two longs sides with one piece of baking paper.
- Place both the flours, sugar, butter, milk, eggs and vanilla in a large mixing bowl. Use an electric mixer to beat on low speed until combined. Increase the speed to medium and beat for 3 minutes or until the mixture is smooth, creamy and very pale in colour. Spoon the mixture into the lined tin and spread evenly using the back of a spoon. Bake in preheated oven for 18-20 minutes or until cooked when tested with a skewer. Cool for 5 minutes in the tin, then turn onto a wire rack to cool.
- To make the Roasted strawberries, preheat oven to 200°C (180°C fan-forced). Toss the strawberries with the sugar in a bowl. Spread over an oven tray in a single layer. Roast in preheated oven for 10 minutes, stirring gently after 5 minutes, or until the strawberries are soft but still holding their shape. Set aside to cool.
- To make the Basil and lemon syrup, combine the sugar and water in a small saucepan and site over medium heat until the sugar dissolves. Add the basil, bring to a simmer and simmer for 5 minutes or until reduced slightly. Stir in the lemon juice. Set aside to cool.
- To assemble the trifle, use a balloon whisk or a hand held electric whisk on medium speed to whisk the cream in a medium bowl until soft peaks form. Cut the buttercake into 3cm cubes and place half of the cake over the base of a 2-3 liter (8-12 cup) serving dish. Drizzle the cake with half the Basil and lemon syrup. Spread half the Basil-infused custard over the top. Spoon half the Roasted strawberries over the custard and then top with all of the whipped cream. Repeat the layering with the remaining ingredients finishing with the roasted strawberries. Decorate with the basil leaves and serve in large scoops.
Baker's Tips
- The butter cake can be made up to 3 days ahead of using. Keep in an airtight container at room temperature.
- The Basil-infused custard, Roasted strawberries and Basil and lemon syrup can all be made up to 3 days ahead of serving. Keep separately in airtight containers in the fridge.
- This trifle can be assembled up to 8 hours ahead of serving. Top with fresh strawberries, dust with icing sugar and decorate with basil just before serving.
This recipe is from Anneka's SBS Food online column Bakeproof: Christmas Baking with Herbs. Click here for more Bakeproof columns and recipes.
Photography by Alan Benson.
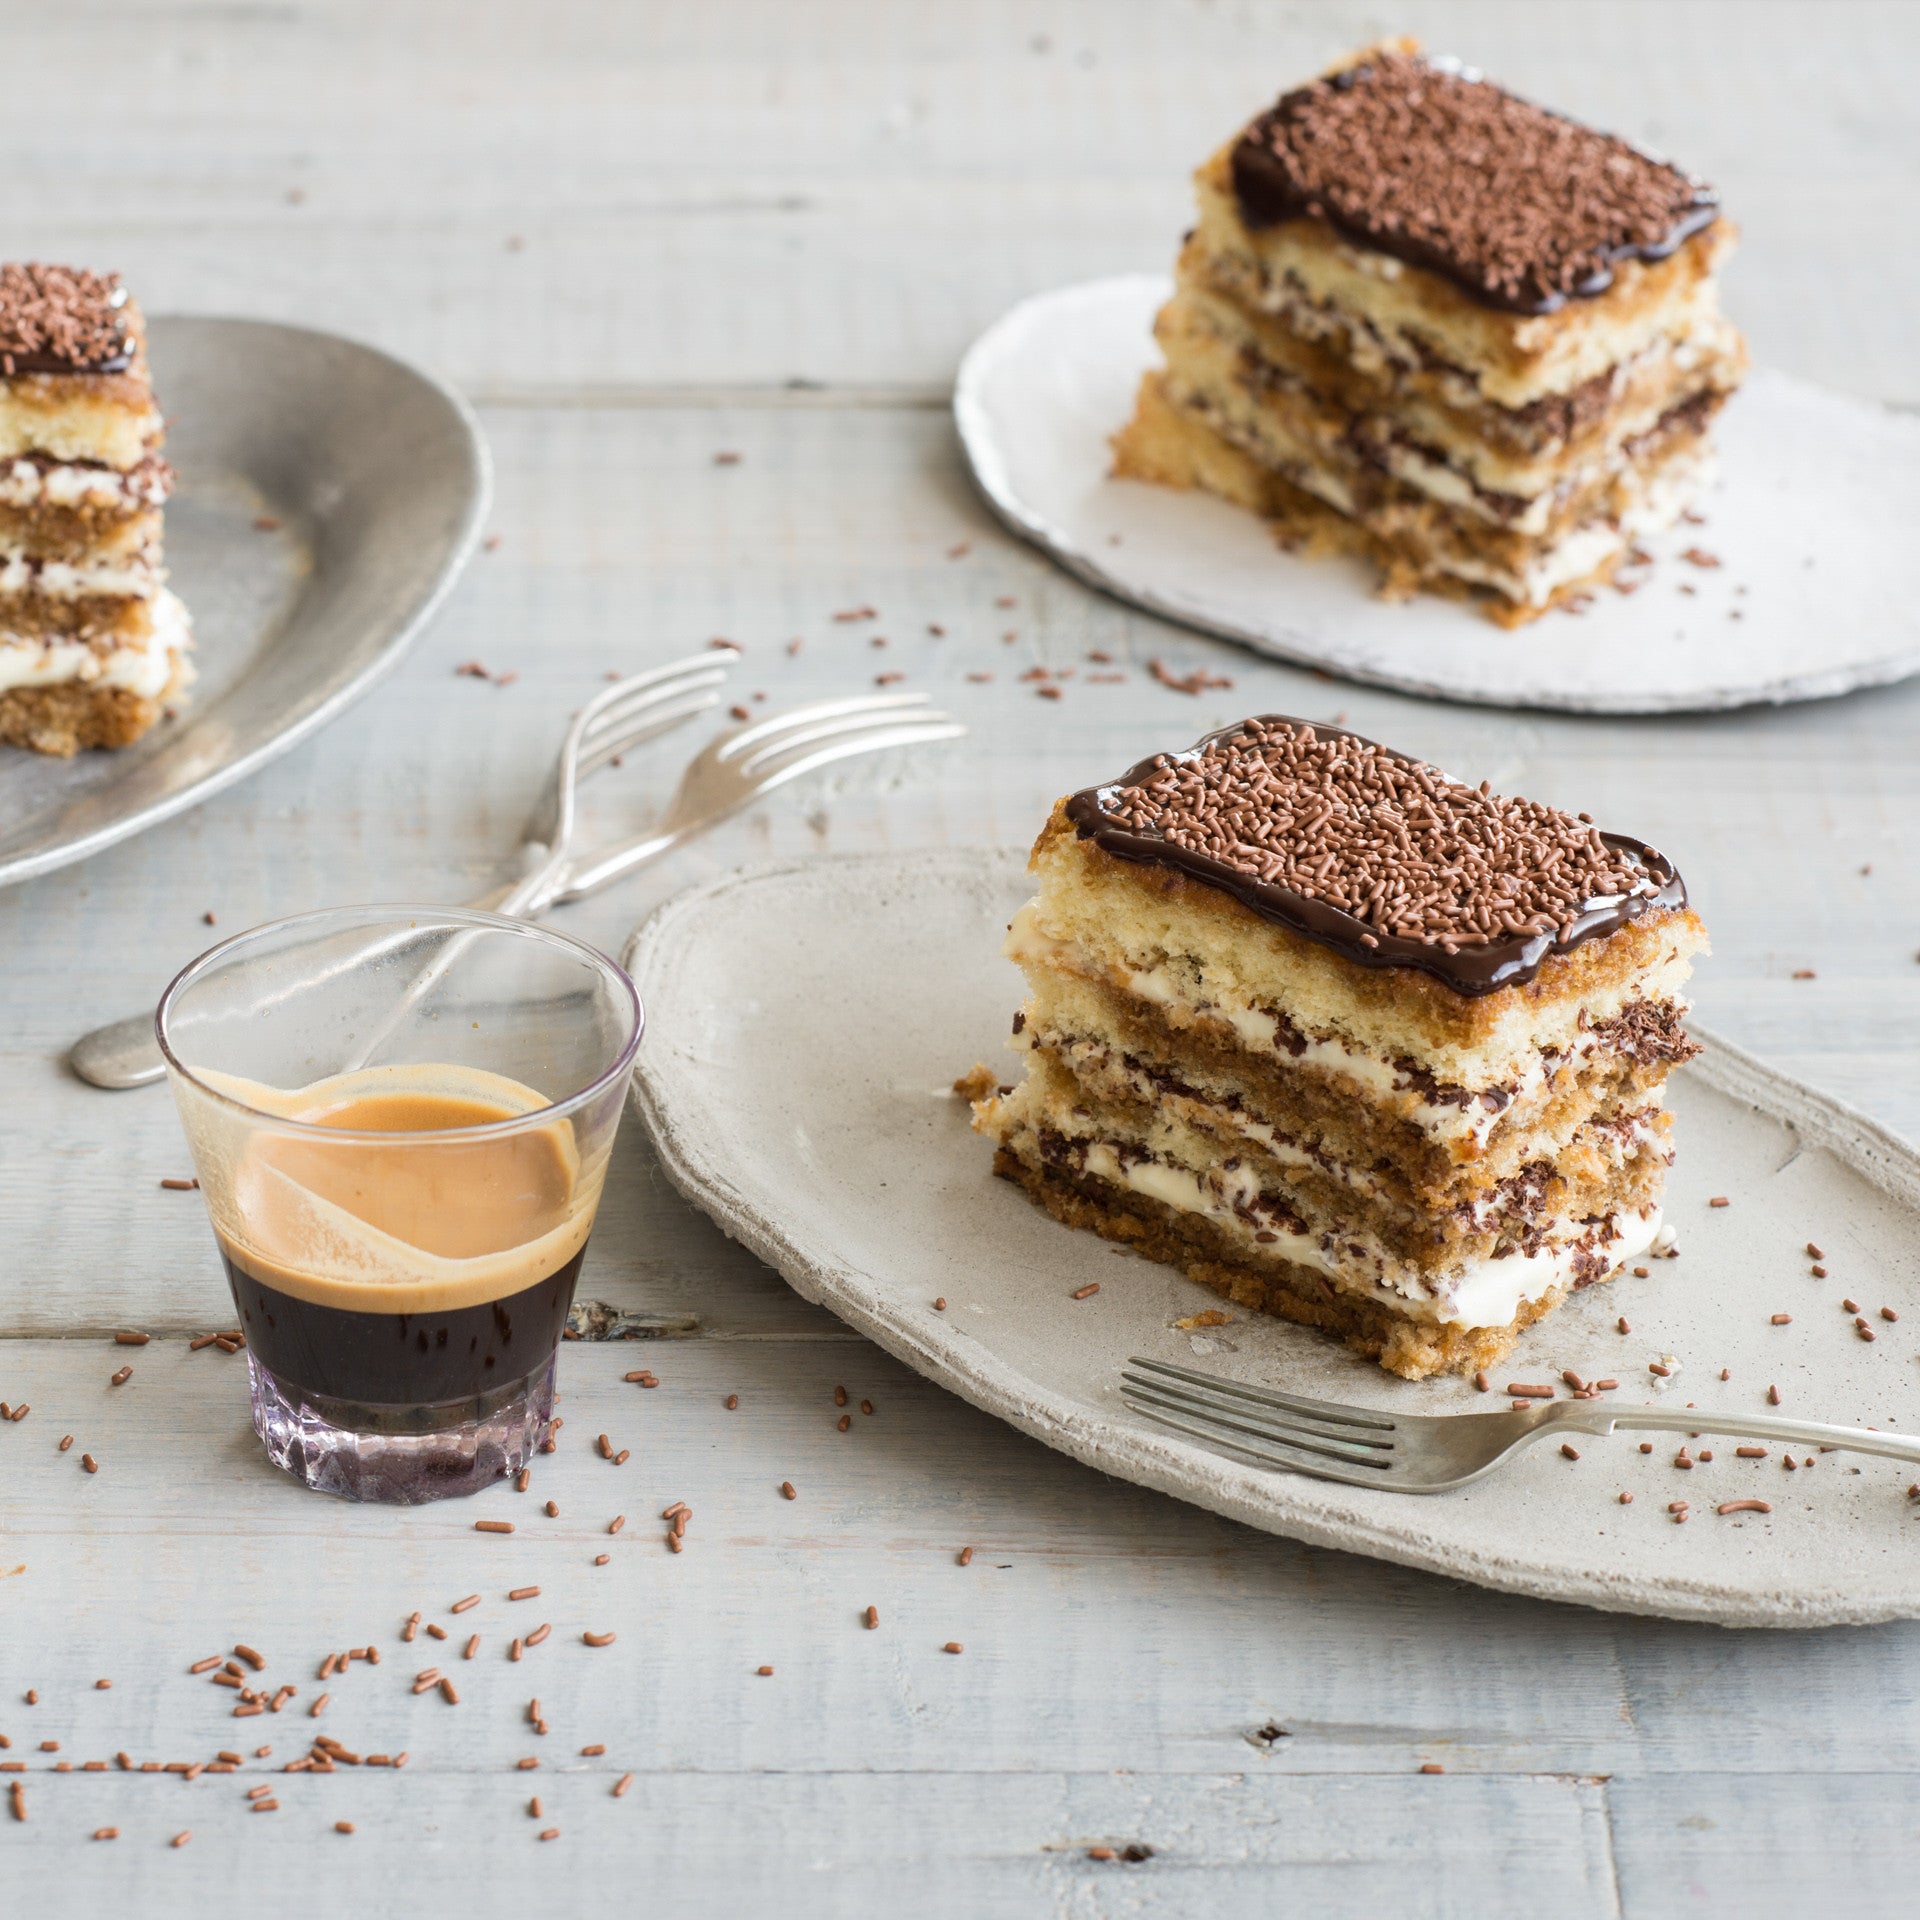
Prep 40min (+2hr 30min chilling and 20min cooling time)Bake 15minMakes 8 serves
This Italian classic is taken to a whole new level as elegant individual dessert cakes with a rich chocolate topping... Just serve with a fork!
Ingredients
185ml (¾ cup) strong freshly brewed coffee60ml (¼ cup) Marsala
75g good-quality dark chocolate (70% cocoa), grated
Chocolate dollar fives, to sprinkle (optional)
Sponge Layers
Melted butter, to grease4 eggs, at room temperature
165g (¾ cup) caster sugar
60ml (¼ cup) milk
20g butter
110g (¾ cup) self-raising flour, plus extra to dust
30g (¼ cup) cornflour
Mascarpone mixture
150ml thickened cream90g (⅔ cup) icing sugar, sifted
125g mascarpone
Chocolate ganache
250g good-quality dark chocolate (54% cocoa), chopped80ml (⅓ cup) pouring cream
Method
- To make the Sponge Layers, place the oven rack in the lower third of the oven and then preheat it to 180°C (160°C fan-forced). Brush two 30cm x 20cm shallow cake tin with a little melted butter to lightly grease and hen line the base and sides with one piece of baking paper, cutting into the corners to fit.
- Use an electric mixer with a whisk attachment on high speed to whisk the eggs and sugar in a large bowl until until the mixture is very thick and pale (this will take about 5 minutes). Lift the whisk out of the mixture and draw a figure eight, if the trail stays on the surface long enough for you to finish drawing then the mixture is ready. If not, continue to whisk for a further minutes and then test again.
- Heat the milk and butter in a small saucepan over medium heat just until the butter melts. Remove from the heat. Sift the flour and cornflour together over the egg mixture. Immediately pour the warm milk mixture down the side of the bowl and whisk again with the electric mixer briefly, until the flour mixture is just incorporated (be careful not to over mix).
- Divide the mixture evenly between the prepared tins, and use a spatula or the back of a spoon to spread evenly. Gently tap the tins on the bench top three times to settle the mixture. Bake in preheated oven for 12-14 minutes or until the cake is a pale golden colour, spring back when lightly touched in the centre and start pulling away from the sides of the tin. Remove from the oven and stand for 2 minutes before turning onto a wire rack to cool completely (this will take about 20 minutes).
- Line the base and sides of a 16cm x 26cm cake tin with two strips of non-stick baking paper allowing the paper to overhand the sides by about 10cm.
- To make the mascarpone mixture, use an electric mixer with a whisk attachment to whisk the cream and icing sugar on medium speed until soft peaks form. Add the mascarpone and whisk until firm peaks just form.
- Cut each of the sponge in half. Combine the coffee and Marsala. Place one sponge layer on the base of the prepared tin and sprinkle with a quarter of the coffee mixture. Spread with a third of the Mascarpone mixture (about ½ cup) and then sprinkle with a third of the grated chocolate. Continue to layer with the remaining sponge, coffee mixture, grated chocolate and mascarpone mixture, finishing with a sponge layer sprinkled with the remaining coffee and Marsala mixture. Cover with plastic wrap and place in the fridge for at least 2 hours or until firm enough to cut.
- Use the overhanging baking paper to remove the tiramisu from the tin and transfer to a cutting board. Use a sharp knife trim the edges and then cut into 8 portions about 4.5cm x 7cm each and place on a wire rack over a tray. Return to the fridge while making the Chocolate ganache
- To make the Chocolate ganache, combine the chocolate and cream in a heatproof bowl and place over a saucepan of barely simmering water (make sure the base of the bowl doesn’t touch the water). Stir occasionally until just melted and combined.
- Remove the cakes from the fridge and place on a wire rack. Pour a little of the Chocolate ganache over each cake, spreading it to cover the top. Sprinkle with the chocolate Dollar Fives if using and return to the fridge for 30 minutes or until the ganache is set before serving.
Baker's Tips
- These Tiramisu cakes will keep in an airtight container in the fridge for up to 3 days.
This recipe is from Anneka's SBS Food online column, Bakeproof: Little Cakes. CLICK HERE for more Bakeproof recipes.
Photography by Alan Benson.
Prep 20min (+1day macerating, 30min cooling and 1-2hr chilling time)Bake 40-50minMakes 10-12 serves
The secret to a silky smooth baked custard is the balance of eggs to milk and cream and gentle baking. This velvety one is teamed with macerated prunes for a memorable dessert.
Ingredients
Baked custard
500ml (2 cups/17fl oz) milk
500ml (2 cups/17fl oz) pouring cream
1 vanilla bean, split lengthways and seeds scraped, or 1½ teaspoons vanilla bean paste
5 x 60g/2oz eggs, at room temperature
110g (½ cup/4oz) caster sugar
Macerated prunes
250ml (1 cup/9fl oz) port
400g (14oz) prunes, pitted and halved
Method
- To make the Macerated Prunes, heat the port in a small saucepan over medium heat until hot but not simmering. Pour over the prunes in a heatproof bowl, cover and set aside to macerate for at least 1 day.
- Preheat oven to 160°C/315°F (140°C/285°F fan-forced). Brush a shallow 2-litre (8-cup/3.5-pt) ovenproof dish with the melted butter to lightly grease and place in a large roasting pan or ovenproof dish.
- Combine the milk, cream and vanilla bean and seeds in a medium saucepan and heat over low heat until almost simmering. Use a balloon whisk to whisk the eggs and sugar until well combined. Gradually whisk in the hot milk mixture. Strain the custard into a large jug and then pour into the greased dish. Add enough boiling water to the roasting pan to reach halfway up the sides of the dish.
- Bake in preheated oven for 40-50 minutes (see Baker’s tips) or until set on top but the custard still wobbles slightly when the dish is shaken gently. Remove from the oven and transfer to a wire rack to cool for 30 minutes. Place the custard in the fridge for 1-2 hours or until cooled completely.
- Serve the custard in spoonfuls accompanied by the macerated prunes with some of the port.
Baker's Tips
- The baking time will depend on the depth of your dish – the deeper the dish the longer the baking time will be. Always check your custard after 40 minutes though and return to the oven for another 5-10 minutes if it’s not ready.
- This custard will keep covered in the fridge for up to 2 days. Stand at room temperature for 30 minutes before serving.
This recipe is from Anneka's SBS Food online column, Bakeproof: Comforting Custard.
CLICK HERE for more Bakeproof recipes.
Photography by Alan Benson.


