- home
- BAKERECIPES
BakeRecipes
Bringing real baking into your home with deliciously simple recipes.

Prep 2hrBake 40-45minMakes 12-15 serves
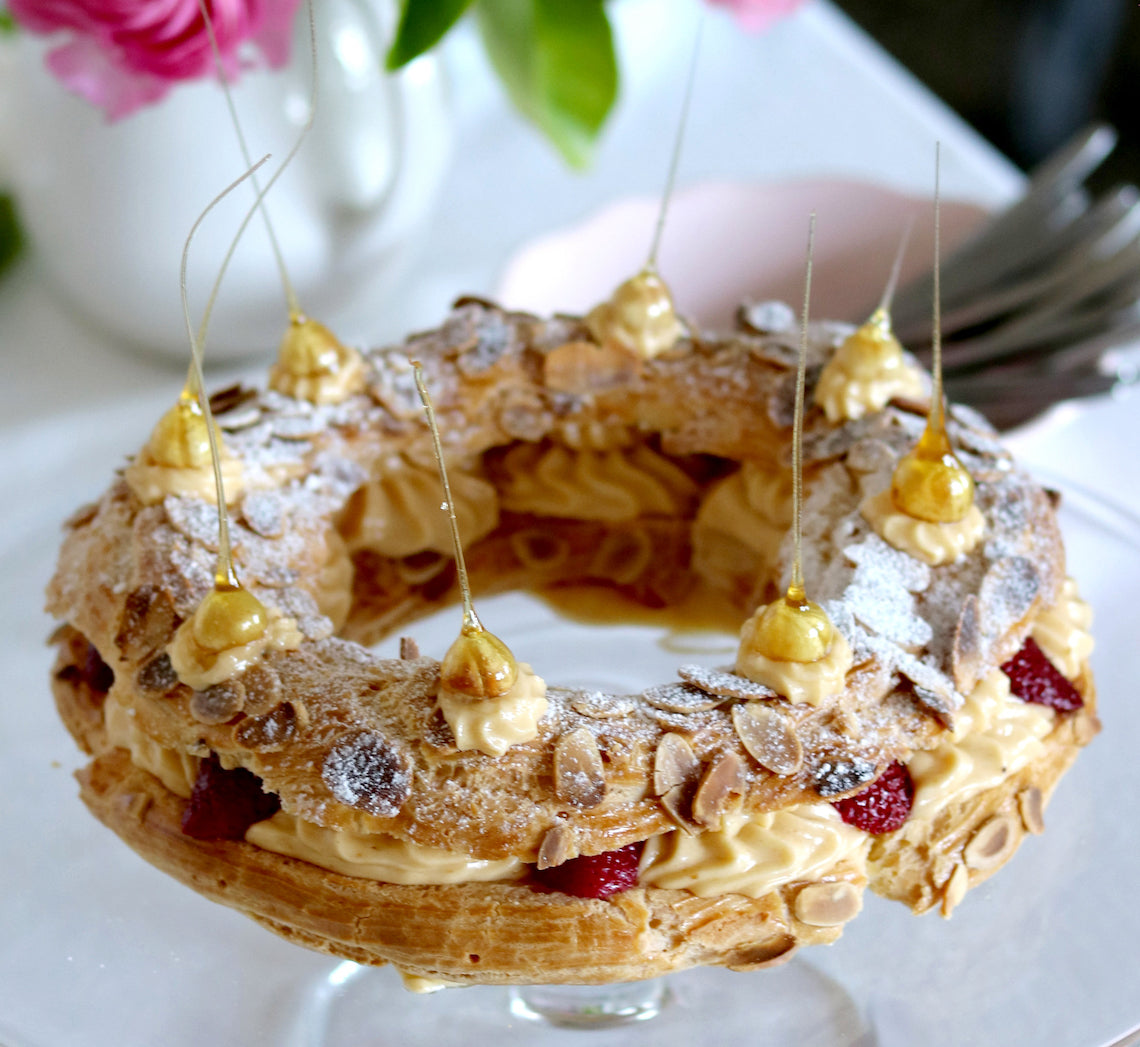
Created by Make Me a Baker student Janine Cowen for her Graduation, this classic dessert has been elevated by the addition of a divine hazelnut praline crème mousseline filling and roasted rosewater strawberries.
"I picked the recipe because it is something I have always wanted to taste and try to bake, but I've never had the confidence to tackle such a complex recipe or even the know-how to make choux pastry. Reading all of the elements was overwhelming at first, but being able to calmly break it down and methodically follow the steps to produce the final dessert was so satisfying. It has opened up a whole world of challenging multi-element recipes for me to try," says Janine
Janine also suggests, when in season, roasting quartered fresh figs with a little brown sugar to replace the strawberries.
Ingredients
1 quantity Basic Choux Pastry
1 egg yolk, whisked with a dash of water, to brush
30g flaked almonds
Icing sugar, to dust
Crème Pâtissière (original recipe from Mastering the Art of Baking by Anneka Manning, Murdoch Books)
1 vanilla bean, split lengthways and seeds scraped
250ml (1 cup) full-cream milk
250g (1 cup) pure (thin/pouring) cream
4 egg yolks
150g caster sugar
2 tablespoons plain flour
1 tablespoon cornflour
Crème Mousseline
225g unsalted butter, softened
Praline Paste (Janine used a recipe from Serious Eats by Kristina Razon)
Toffeed Hazelnuts (based on a recipe from The Pastry School cookbook by Julie Jones)
20 whole hazelnuts
220g (1 cup) caster sugar
100ml water
Roasted Strawberries
400g ripe but firm larger strawberries, hulled and halved
2 teaspoons caster sugar
4 drops rosewater essence
Small pinch fine salt
Method
-
To make the Crème Pâtissière, combine the vanilla seeds, milk and cream in a medium saucepan and bring just to a simmer over a medium heat. Remove from heat. Use a balloon whisk or electric mixer with a whisk attachment to whisk the egg yolks and sugar together in a heatproof bowl until thick and pale. Sift together the flour and cornflour, then whisk into the yolk mixture until smooth and well combined. Gradually whisk in the milk mixture until smooth and well combined. Return to the saucepan. Stir constantly with a balloon whisk over a medium heat until the mixture comes to a simmer. Simmer, stirring constantly with the whisk, for 2 minutes. Remove from heat and pass the crème pâtissière through a sieve into a heatproof bowl. Cover the surface of the crème pâtissière with plastic wrap or a round of baking paper and refrigerate for 2 hours or until well chilled before using.
-
To make the Toffeed Hazelnuts, gently insert a toothpick into the base of each hazelnut (being careful not to split them). Cover a benchtop under a cupboard or shelf with foil to catch the dripping caramel. Place a strip of double-sided sticky tape or Blu Tack on the bottom edge of a cupboard or shelf (this will hold the hazelnuts by the toothpicks). Fill your kitchen sink or a large bowl with about 3cm of water. Combine the caster sugar and water in a small saucepan and use a wooden spoon to stir over low heat until the sugar dissolves. Increase the heat to medium and bring to the boil. Boil, occasionally brushing down the side of the pan with a pastry brush dipped in water to dissolve any sugar crystals, until the mixture turns a deep caramel. Remove immediately from the heat and place the saucepan base in the water until the bubble subside to stop it from cooking. Remove the saucepan from the water and set aside for 1-2 minutes near the lined bench or until the caramel thickens enough to coat the hazelnuts. One at a time and holding the toothpick, carefully dip the hazelnuts into the caramel and then stick the toothpick to the cupboard or shelf using the sticky tape or Blue Tack so that the caramel drips onto the foil and a tail forms. It may take a few hazelnuts before the caramel has thickened enough for a good tail to form. Let the caramel set (it will take about 10-15 minutes) before gently removing the toothpicks from the hazelnuts. Place in an airtight container separated by baking paper.
-
To make the Roasted Strawberries, preheat the oven to 200°C (180°C fan-forced) and line an oven tray with non-stick baking paper. Place the strawberries in a large bowl and sprinkle with the caster sugar, rosewater essence and salt. Toss gently to coat evenly and then spread the strawberries, cut side down, evenly on the lined tray. Roast in preheated oven for 10 minutes or until starting to soften but still holding their shape. Place in an airtight container in the fridge until required (see Baker’s Tips).
-
To make the choux pastry ring, draw a 12cm diameter circle on a piece of non-stick baking paper. Turn the paper upside down, line a baking tray with it, and use a little of the choux pastry to stick the baking paper to the tray. Preheat the oven to 200°C (180°C fan-forced).
-
Spoon the choux pastry into a large piping bag fitted with a 13mm (6B) French star piping nozzle. Using the marked paper as a guide, pipe a ring of choux pastry onto the lined tray. Pipe another ring of pastry around the outside of the first one, so that they just touch. Finally pipe a third circle of pastry over the gap between the two bottom pastry rings. Bruch the rings gently with the egg wash and then sprinkle with the flaked almonds. Bake in preheated oven for 35 minutes. Reduce the oven temperature and bake for a further 25 minutes or until the pastry is puffed, golden and dry.
-
Immediately transfer the pastry ring to a wire rack and use a skewer to piece the ring on top about 8 times (this will allow the excess steam trapped inside to escape while it cools). See Baker’s Tips.
-
Meanwhile, to make the Crème Mousseline, use an electric mixer with a paddle beater to beat the butter until very pale and creamy, scraping down the side of the bowl when necessary. Add the Praline Paste and beat on medium speed until well combined. Gradually add the Crème Pâtissière, about ¼ cup at a time, and beat on medium speed after each addition until well combined, scraping the bowl when necessary. Replace the paddle beater with the whisk attachment and whisk on medium speed for about 3 minutes or until the mousseline is light and airy. Transfer about three quarters of the Crème Mousseline to a piping bag fitted with a 15mm French star piping nozzle (see Baker’s Tips).
-
Use a large sharp serrated knife to carefully cut the pastry ring in half horizontally. Remove any uncooked dough with your fingertips. Set the top aside. Pipe rosettes of the Crème Mousseline into the base of the pastry ring about 2cm apart. Then pipe another, slightly smaller, rosette on top of each Place a strawberry half, cut side down, between each of the Crème Mousseline rosettes, placing them so they overlap the edge of the pastry ring base and peek out once the lid is placed on top. Gently place the pastry ring lid on top and then dust with icing sugar.
-
Place the remaining Crème Mousseline in a piping bag fitted with a 5mm French star piping nozzle and pipe eight small rosette at even intervals on the top of the pastry ring. Choose the best eight Toffeed Hazelnuts and carefully place one on top of each of the piped rosettes to decorate. Serve immediately.
Baker's Tips
- The Crème Pâtissière can be made up to 3 days before using. Place in an airtight container or a bowl and cover the surface with plastic wrap and keep in the fridge.
- The Roasted Strawberries can be made up to 3 days before using. Place in an airtight container in the fridge.
- The pastry ring can be made up to a day ahead. Keep in an airtight container at room temperature. To refresh before filling, place on a lined oven tray in an oven preheated to 180°C (160°C fan-forced) for 10 minutes. Allow to cool before using.
- In warmer weather, the Crème Mousseline may become a little soft. If so, before piping place it into the fridge until it firms enough to be a good piping consistency before continuing with the recipe.

Prep 50minBake 35-40minMakes about 40
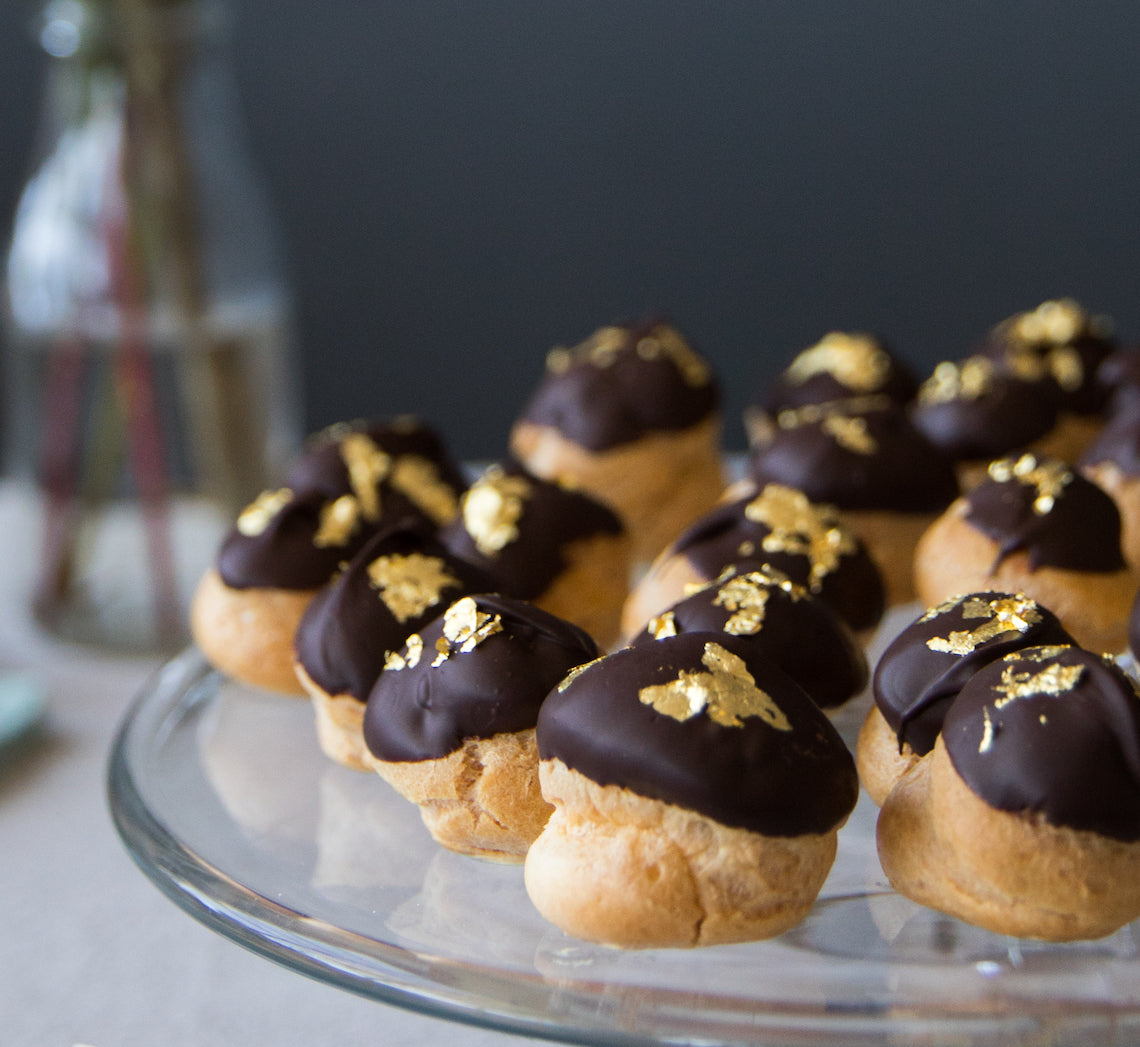
When the French profiteroles arrived in Brazil, a bakery in Sao Paulo created its own version – the Carolinas. Instead of filling the profiteroles with vanilla custard, they used pure dulce de leche then it became one of the staples in Sao Paulo bakeries.
This version, created by Make Me a Baker student Ana Moreno for her graduation, includes cream to make them less sweet than the ones you find in Sao Paulo, but still with plenty of dulce de leche to give the authentic taste.
Ingredients
1 quantity Basic Choux Pastry
150g good-quality dark chocolate (45-54% cocoa), chopped into small pieces
Edible gold leaf flakes, to decorate
Dulce de Leche Cream
250ml (1 cup) thickened cream
30g (¼ cup) icing sugar, sifted
1 teaspoon vanilla bean paste
320g (1 cup) dulce de leche
Method
- To make the profiteroles, preheat oven to 200°C (180°C fan-forced). Line 2 large oven trays with non-stick baking paper.
- Spoon the choux pastry into a large piping bag fitted with a 0.9cm (#9) round piping tip. Pipe 3cm rounds onto the lined trays, about 2cm apart. Use a damp fingertip to smooth any peaks on each of the rounds. Sprinkle the lined tray with a little water.
- Bake in preheated oven for 20 minutes or until well puffed and golden. Reduce the oven to 180°C (160°C fan-forced) and bake for a further 15-20 minutes or until golden and crisp on the outside. Remove from the oven and use a 0.7cm (#7) star piping tip to make a hole in the base of each of the hot profiteroles for the steam to escape. Place hole side up on a wire rack and allow to cool completely
- To make the Dulce de Leche Cream, combine the cream, icing sugar and vanilla bean paste in a mixing bowl and use a balloon whisk or hand held beaters with a whisk attachment to whisk on medium-high speed until soft peaks form.
- Spoon dulce de leche into a medium bowl. Add a third of the whipped cream mixture and use a large metal spoon or spatula to fold gently through the dulce de leche to retain as much air as possible until just combined evenly. Add the remaining cream in two more batches folding gently until just combined.
- Place the Dulce de Leche Cream into a pastry bag fitted with a 0.7cm (#7) star or round piping tip. Insert the tip into the hole in the base of a profiterole and fill with the Dulce de Leche Cream.
- To decorate the profiteroles, place the chocolate in a heatproof bowl and set over a saucepan of simmering water (make sure the water doesn’t touch the base of the bowl). Stir occasionally until the chocolate melts and is smooth.
- Dip the tops of each of the filled profiteroles in the melted chocolate to coat and set aside on a wire rack to stand for 10 minutes. Carefully decorate each profiterole with a little edible gold leaf before the chocolate is fully set.
Baker's Tip
- The unfilled profiteroles will keep in an airtight container at room temperature for up to 1 day. They are best eaten the day they are filled with the Dulce de Leche Cream.

Prep 20min (+pastry making and 30min cooling time)Bake 40minMakes 10
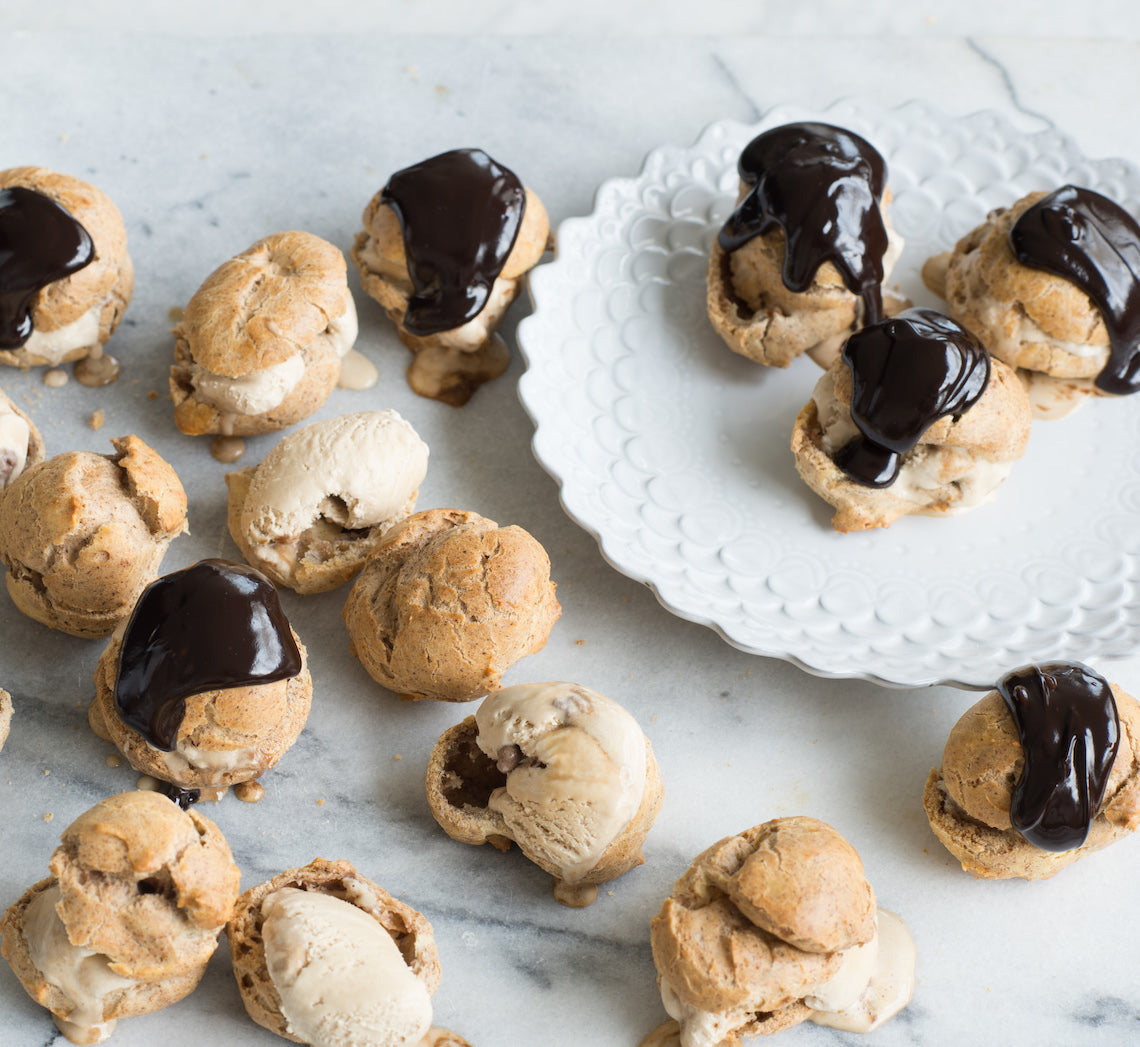
Also called choux a la crème or cream puffs, profiteroles are basically choux pastry balls filled with crème patissiere, whipped cream or, as in these, ice-cream. These profiteroles, a heavenly combination of cinnamon, coffee and chocolate, are just a little bit addictive!
Ingredients
- 1 quantity basic choux pastry
- 2 teaspoons caster sugar
- 2 teaspoons ground cinnamon
- 1 egg, lightly whisked, to glaze
- 1 litre homemade or bought espresso or coffee ice-cream, to serve
Fudge sauce
- 200ggood quality dark chocolate (70% cocoa works well), chopped
- 125ml (½ cup) pouring cream
- 2 tablespoons golden syrup
- 1 teaspoon natural vanilla essence or extract
- ¼ teaspoon salt
Method
- Preheat oven to 200°C. Line 2 large oven trays with non-stick baking paper.
- Use a wooden spoon to beat the sugar and cinnamon into the warm prepared choux pastry until well combined.
- Spoon 30 heaped teaspoonfuls of the choux pastry onto the lined trays about 2cm apart to allow for spreading. Use a damp fingertip to smooth any peaks. Sprinkle the trays with a little water.
- Bake in preheated oven for 20 minutes or until well puffed and golden. Reduce the oven to 180°C and bake for a further 20 minutes. Turn off the oven and leave the puffs to cool in the oven for at least 30 minutes to dry. Remove from the oven and set aside to cool completely.
- Meanwhile, to make the fudge sauce, combine all the ingredients in a small saucepan and stir over low heat until the chocolate melts and the sauce is smooth. Set aside and keep warm.
- To serve, cut each of the cinnamon choux puffs in half and fill each with small scoop of ice-cream. Place three on each serving plate and spoon over the warm chocolate fudge sauce. Serve immediately.
Baker's Tips
- The cinnamon choux puffs can be made up to 3 days ahead of serving. Store in an airtight container at room temperature. Refresh by placing on an oven tray and reheating in an oven preheated to 180°C for 10 minutes. Cool, assemble and serve.
- The chocolate fudge sauce can be made up to 1 week ahead of serving. Keep in an airtight jar or container in the fridge. Reheat in a small saucepan over a low heat, stirring occasionally, until smooth and heated through.
This recipe is from Anneka's SBS Food online column, Bakeproof: Choux Pastry.
CLICK HERE for more Bakeproof recipes.
Photography by Alan Benson.

Prep 20-30minMakes 30 profiteroles or 12 average-sized éclairs
Completely unique in the pastry world, choux pastry goes against every rule in the book – eggs are more important than butter, the mixture is heated, and beating, as opposed to 'rubbing', is the method of mixing.
Ingredients
- 150g (1 cup) plain flour
- 185ml (¾ cup) water
- ½ teaspoons salt
- 75g salted butter, diced
- 4 eggs (59g each)
Method
- Sift the flour onto a sheet of baking paper.
- Combine the water, salt and butter in a medium saucepan and heat over medium heat until just boiling. Remove immediately from the heat, add all the flour at once and stir vigorously with a wooden spoon to combine.
- Return the saucepan to the heat and beat vigorously over a low heat for 30 seconds or until the mixture is smooth and starts to pull away from the sides of the pan and a flour film forms on the bottom of the pan (image 1). Remove the saucepan from the heat and set aside for 3-5 minutes or until cooled slightly.
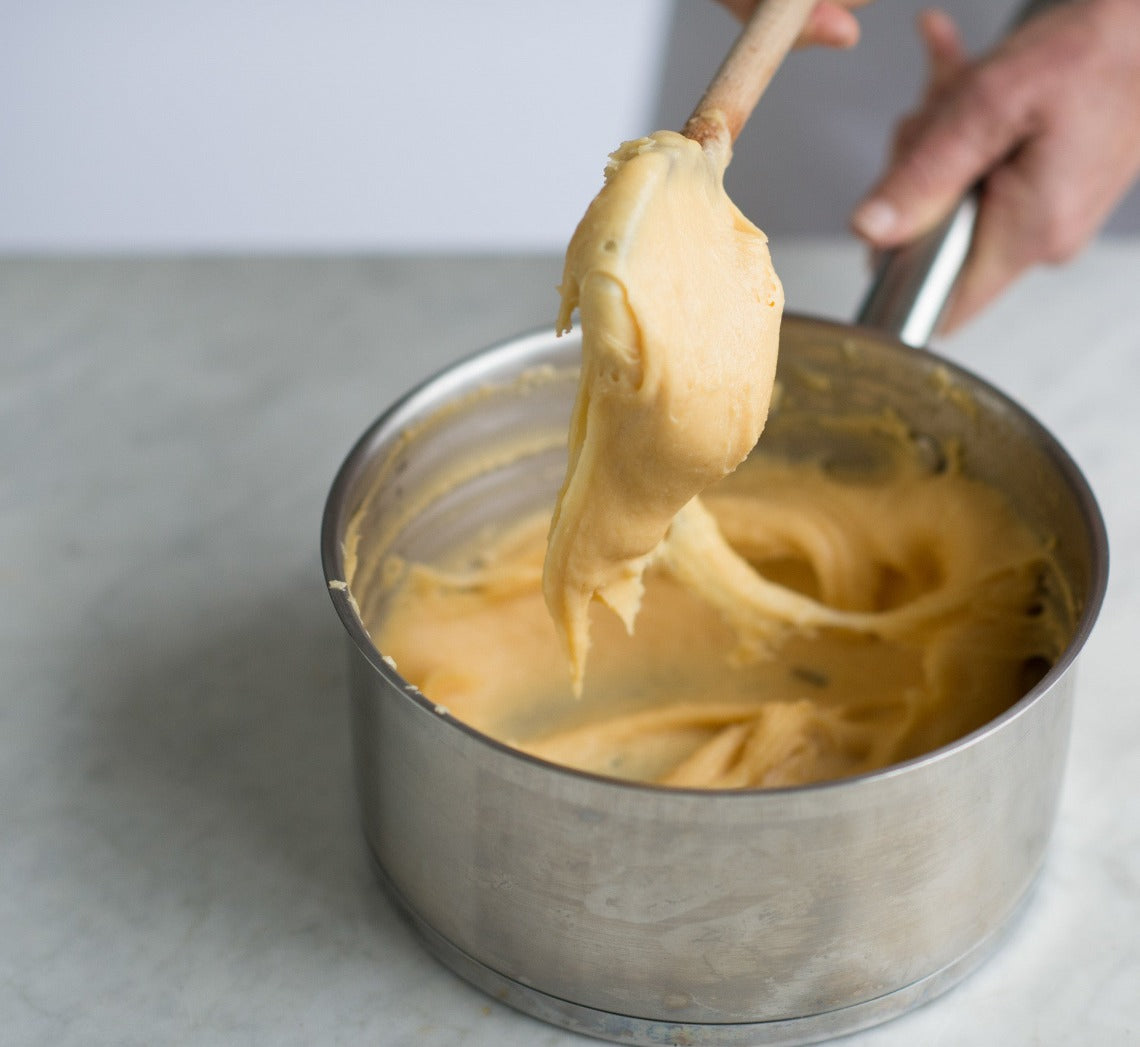
- Use a fork to whisk together the 3 eggs. Add about one-quarter of the whisked eggs to the flour mixture at a time (image 2), beating well with the wooden spoon after each addition until well combined and the mixture thickens and becomes smooth before adding more (image 3 and 4). Use a fork to lightly whisk the extra egg and gradually add to the flour mixture a teaspoon at a time (image 5) and beating well after each addition until the mixture is thick, shiny and falls heavily from the spoon (image 6). You may not need to use all of the last egg.
- Pipe (as below) and bake immediately, or cover well and keep in the fridge for up to 24 hours before baking as directed. Bring to room temperature before using.
Baker's Tips
Making choux pastry
There are three main things to keep in mind when making choux pastry to ensure success:
- Measure your ingredients accurately, as the key to good choux pastry is a balance between the major ingredients of flour, water and eggs. If there is an imbalance between these, there is a great chance your choux won’t puff, become crisp or turn a golden brown colour.
- Add the egg gradually. The amount of egg needed will vary and is determined by how much can be absorbed by the flour (which can vary slightly from batch to batch). If too much egg is added or if it is added too quickly, the consistency of the choux pastry will be affected, and in turn its ability to rise. Similarly, if not enough egg is incorporated, the choux pastry won’t puff and it will be dense inside. This is because it is the moisture in the egg that is converted to steam in the heat of the oven and that, in turn, creates the air pocket inside. So the more egg, the more the mixture will puff.
- Oven temperature is important. If the oven temperature is too low or if the oven door is opened for too long and valuable heat is lost during baking, your choux pastry won’t rise as well. The same applies if you don’t bake it for long enough.
Piping choux pastry
- Choux pastry can either be spooned or piped onto a baking paper-lined oven tray for baking, depending on the desired result.
- Sprinkle the lined baking tray with a little water before piping or shaping your choux pastry – this creates extra steam in your oven and will help the choux pastry rise and puff.
- Spoon the choux pastry into a large pastry bag filled with a large piping nozzle. Twist the end of the pastry bag to contain the mixture and push it towards the nozzle end and expel any air pockets. Place the twisted end between your index finger and thumb of your writing hand and place the bag in the palm of your hand. Use your other hand to hold the nozzle end and guide it as you pipe.
- Firmly hold the bag about 1 cm above the lined tray and at a slight angle. Press gently with the hand holding the bag, pushing the pastry through the nozzle and moving the bag to create the desired shape. (For profiteroles and small rounds, hold the bag and nozzle directly over the tray, perpendicular to the tray and pipe the desired size.)
- When you reach the desired length, pipe the mixture back onto the shape when finished to avoid a peaked end. Use a damp fingertip to press and neaten any peaks.
- To help create uniformed lengths for éclairs, you can mark lines on the underside of the baking paper with a pencil. For evenly-sized choux puffs, you can mark the lined tray with a flour-dipped cutter of the desired size.
- Bake the choux pastry as directed in the recipe.
Cooling choux pastry
- Perfect choux pastry is puffy and crisp, hollow inside and is a deep golden colour. To help the éclairs and puffs dry out inside you can either split them in half or piece a hole in the base or side before they cool to allow any excess steam to escape.
To make choux pastry with an electric mixer
- Follow the recipe until the point of removing the flour mixture from the heat. Transfer the mixture to the bowl of an electric mixer with a paddle attachment and beat in the 3 eggs, one at a time, beating until well combined and smooth after each addition. Use a fork to lightly whisk the last egg and gradually add to the flour mixture, a teaspoon at a time, beating well after each addition until the mixture is thick, glossy and falls heavily from the spoon. You may not need to use all of the last egg.
This recipe is from Anneka's SBS Food online column, Bakeproof: Choux Pastry.
CLICK HERE for more Bakeproof recipes.
Photography by Alan Benson.


