- home
- BAKERECIPES
BakeRecipes
Bringing real baking into your home with deliciously simple recipes.
Prep 30min (+2hr cooling time)Bake 40-45minMakes about 20-24 pieces
Hailing from Siena in the Tuscan region of Italy, panforte (‘strong bread’ when translated to English) is a delectable combination of dried fruits, nuts, spices, honey and, if you are lucky, chocolate. It is believed to date back to the 13th Century and was originally a form of tax paid to a local monastery. Like many traditional recipes, there are many variations with each often being a well-guarded family recipe – however I will share this one with you!
Ingredients
- Melted butter, to grease
- 2 sheets confectioner's rice paper (see Baker's Tips)
- 75g (½ cup) plain flour
- 40g (⅓ cup) cocoa powder
- 1 teaspoon ground cinnamon
- ½ teaspoon freshly ground black pepper
- 70g (½ cup) dried pitted dates, coarsely chopped
- 80g (½ cup) prunes, coarsely chopped
- 80g glace apricots, chopped
- 155g (1 cup) unsalted roasted macadamias, coarsely chopped
- 160g (1 cup) blanched almonds, coarsely chopped
- 70g (½ cup) unsalted pistachio kernels
- 100g dark chocolate, chopped
- 1½ tablespoon finely grated orange rind
- 175g (½ cup) honey
- 110g (½ cup) caster sugar
- 2 tablespoon water
- 1 teaspoon natural vanilla essence or extract
- Icing sugar or extra cocoa powder, to dust
Method
- Preheat oven to 170°C (150°C fan-forced).
- Brush a shallow round 20cm (base measurement) tin with melted butter to grease and then line the base with a circle of rice paper, cutting the sheets to fit. Line the sides with a strip of non-stick baking paper.
- Sift the flour, cocoa and spices into a large bowl, then stir in the fruit, nuts, chocolate and orange rind. Set the bowl on a folded teatowel (see Baker's Tips).
- Put the honey, sugar and water in a small saucepan. Stir over low heat, without boiling, until the sugar dissolves. Bring to the boil and simmer, uncovered and without stirring, for 5 minutes. Immediately pour the hot syrup and vanilla over the fruit and nut mixture and, working quickly, stir with a wooden spoon until well combined. Press mixture firmly and evenly into prepared tin.
- Bake for 40-45 minutes or until firm to touch in the centre. Cool in the pan sitting on a wire rack (this will take about 2 hours).
- Remove from pan and dust liberally with icing sugar or cocoa. Serve in thin wedges.
Baker's Tips
- Confectioner's rice paper sheets are available from Asian grocers, delicatessens and specialty food stores. Don't confuse it with Asian rice paper, used to make rice paper rolls.
- Before adding the hot syrup to the fruit and nut mixture, place a tea towel under the bowl to stop it from slipping when mixing.
- To make individual panforte, grease eight 8cm (base diameter) loose-bottomed tart tins with oil spray or melted butter and line the bases witha circle of edible rice paper. Divide the mixture among the tins and press down firmly. Bake for 25-30 minutes.
- This panforte will keep wrapped well in plastic wrap in a cool spot for up to 1 month.
This recipe is from Anneka's SBS Food online column, Bakeproof: Gifts from the Kitchen.
CLICK HERE for more Bakeproof recipes.
Photography by Alan Benson.
Prep 30min (+3days soaking and overnight cooling time)Bake 2hr 30minMakes 20 serves
This is Colombia’s version of a rich fruit cake. Dense with prunes, raisins and figs, generously spiked with both rum and port, and cleverly flavoured with aromatic spices, it is hard to stop at one piece. Traditionally dulce quemado (sweet burnt brown sugar), either homemade or bought, is used to sweeten this cake, but molasses makes a perfectly acceptable substitute as I've done in this recipe.
You will need to start this cake at least 6 days before baking.
Ingredients
200g (1 cup) pitted prunes
170g (1 cup) seedless raisins
80ml (⅓ cup) port, plus 80ml (⅓ cup) extra
60ml (¼ cup) dark rum, plus 60ml (¼ cup) extra
80g (½ cup) blanched almonds
50g (½ cup) pecans
melted butter, to grease
200g (1 cup) tenderised figs or drained figs in syrup (see Baker's Tips), finely chopped
250g butter, at room temperature
275g (1¼ cups) caster sugar
2 teaspoons vanilla essence
5 eggs, at room temperature
250g (1⅔ cups) plain flour
1 teaspoon baking powder
½ teaspoon ground cinnamon
¼ teaspoon ground nutmeg
¼ teaspoon ground cloves
¼ teaspoon salt
2 tablespoons molasses (see Baker's Tips)
Method
- Process the prunes and raisins in a food processor using the pulse button until chopped. Transfer to a bowl and stir in the port and rum. Cover and set aside for at least 3 days to soak (see Baker's Tips).
- Preheat oven to 170°C (150°C fan-forced). Grease a deep round 20 cm cake tin with melted butter and line the base and sides with non-stick baking paper.
- Process the almonds and pecans in a food processor until chopped. Add to the prune mixture with the figs and stir to combine evenly. Use an electric mixer to beat the butter, sugar and vanilla until pale and creamy, scraping down the sides of the bowl when necessary. Add the eggs one at a time, beating well after each addition.
- Sift together the flour, baking powder, spices and salt. Add to the butter mixture and beat on lowest possible speed until just combined. Add the molasses and beat on low until just combined. Use a wooden spoon to stir in the fruit and nut mixture until evenly combined.
- Spoon the mixture into the prepared tin, pressing well into the corners, and then smooth the surface with the back of a spoon. Cover the tin with a piece of foil and then bake in preheated oven for 2 hours and 25 minutes to 2 hours and 35 minutes or until cooked when tested with a skewer.
- Remove from the oven and stand in the tin for 10 minutes before turning onto a wire rack. Combine the extra port and rum and brush over the top of the cake. Wrap the warm cake in plastic wrap and then foil and set aside overnight to cool.
- Store for at least 3 days at room temperature before serving.
Baker's Tips
- The prunes and raisins require 3 days or more to soak, so you could start the soaking one weekend and cook the cake the next.
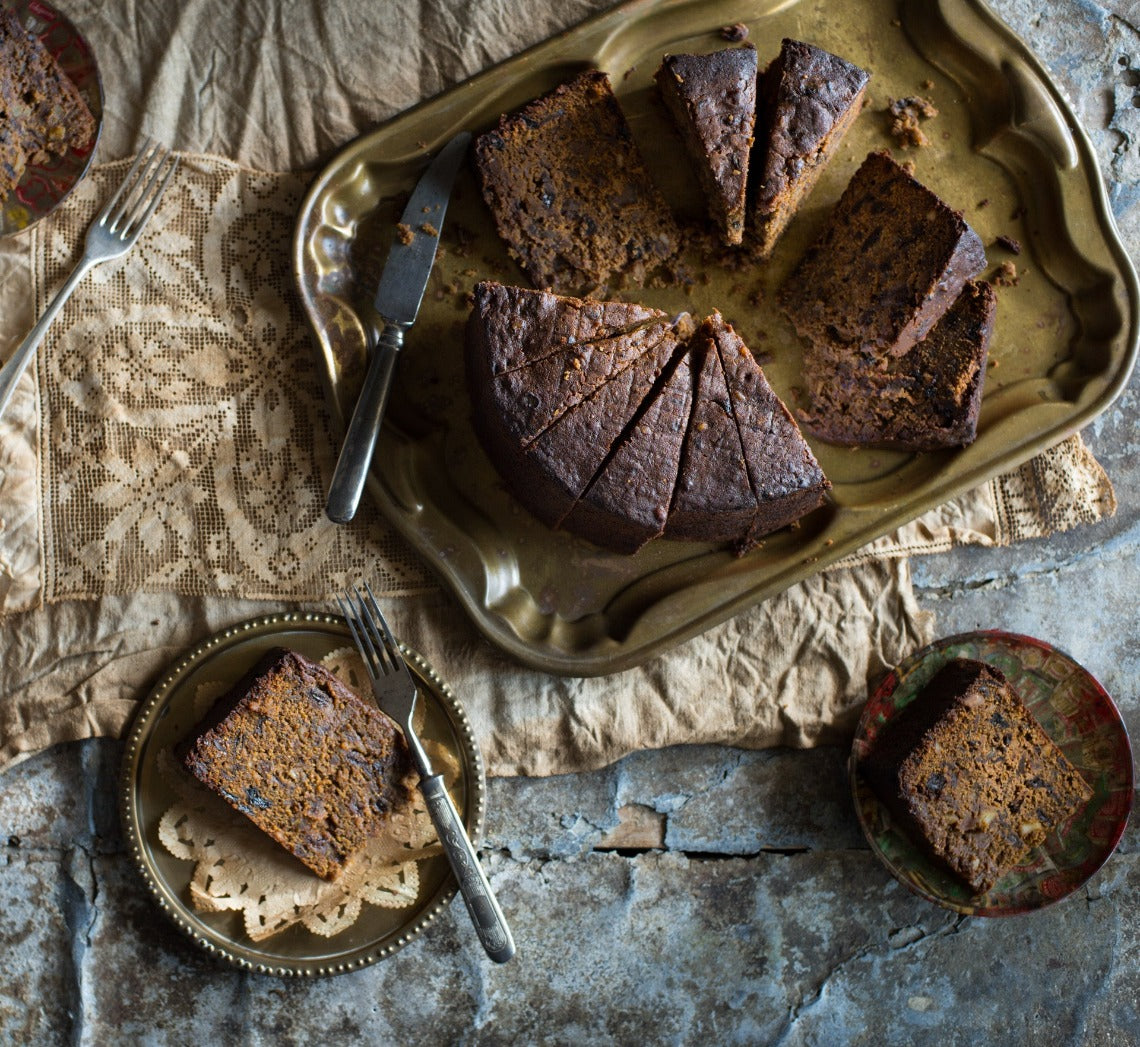
- Dulce quemado (sweet burnt brown sugar) is traditionally used in this cake and is considered more important than the alcohol or spices to add flavour. It not only adds a rich colour but also a sweet/bitter flavour to the cake. It can be home made or bought, although outside of Latin America it can be hard to track down. Molasses makes a good substitute.
- This cake will keep wrapped well in plastic wrap and sealed in an airtight container in a cool spot, but not in the fridge, for up to 3 months.
- To make the lattice pattern on the top of the cake as we have, turn the cake upside down on a cake rack after cooling and press down firmly. Turn the cake 90 degrees and press again.
This recipe is from Anneka's SBS Food online column, Bakeproof: Latin American Cakes.
CLICK HERE for more Bakeproof recipes.
Photography by Alan Benson.
Prep 30min (+3hr chilling and 2hr cooling time)Bake 35minMakes 12 serves
Immensely well-loved in Latin America, a recipe for this wonderfully milky cake appeared on the label of Nestle’s sweetened condensed milk cans in the 1940s, possible explaining why its popularity has spread so widely in this part of the world.
Ingredients
Sponge cake
5 eggs, at room temperature
220g (1 cup) caster sugar
125g butter, melted
150g (1 cup) plain flour
75g (½ cup) self-raising flour
1 teaspoon natural vanilla essence or extract
Milk mixture
395g tin sweetened condensed milk
150ml evaporated milk
250ml (1 cup) full-cream milk
Method
- Preheat the oven to 180°C (160°C fan-forced). Grease a 20cm x 30cm (base measurement) shallow cake tin or lamington pan and line the base and two longs sides with one piece of non-stick baking paper.
- Use an electric mixer with a whisk attachment to whisk the eggs on high speed until combined. Gradually add the sugar, about ¼ cup at a time, whisking well after each addition. Once all the sugar has been added, whisk on high for a further 4 minutes or until the mixture is very thick and a ribbon trail forms when the whisk is lifted. Reduce the mixer speed to low and gradually add the melted butter, whisking until just incorporated. Sift together the plain and self-raising flours. Add to the egg mixture in three separate batches, whisking on low speed between each addition until just combined and scraping the bottom of the bowl when necessary to make sure all the flour is incorporated.
- Pour batter into the prepared tin and gently tap it on the bench three times to remove any excess air bubbles. Bake in preheated oven for 30-35 minutes or until the cake is firm when touched in the centre and a skewer inserted in the centre comes out clean. Just before the sponge is ready, make the Milk mixture by combining the sweetened condensed milk, evaporated milk and milk in and bowl and stirring with a balloon whisk until well combined. Transfer to a jug.
- Remove the sponge from the oven and stand in the tin for 3 minutes before inverting onto a tray with a lip. Use a skewer to prick holes all over the surface of the cake and all the way through. Pour the milk mixture evenly and slowly over the warm cake, allowing it to soak it up. Stand at room temperature until cool (this will take about 2 hours) and then refrigerate, uncovered, for 3 hours or overnight. Cut into pieces to serve (see Baker's Tips).
Baker's Tips
- For an extra rich cake you can top it with 375 ml (1½ cups) thickened cream that has been whisked to soft peaks with 2 tablespoons of sifted icing sugar and 1 teaspoon of natural vanilla essence or extract before serving.
- This cake will keep covered in the fridge for up to 3 days.
This recipe is from Anneka's SBS Food online column, Bakeproof: Latin American Cakes.
CLICK HERE for more Bakeproof recipes.
Photography by Alan Benson.
Prep 45min (+30min cooling time per batch)Bake 45minMakes 12-14 serves
This pretty cake, with its heavenly orange blossom-scented frosting, is currently one of my favourite 'special occasion' cakes – particularly for birthday celebrations. The cake layers are baked in two batches but if you are lucky enough to have four cake pans that can fit in your oven all at once, feel free to make the mixture in one lot and bake them all together.
Ingredients
Melted butter, to grease
Orange poppy seed cake layers
3 oranges
3 tablespoons poppy seeds
125g (½ cup) sour cream
250g butter, cubed, at room temperature
300g (1⅓ cups) caster sugar
4 eggs
350g (2⅓ cups) plain flour
3 teaspoons baking powder
Candied orange rind
3 oranges
220g (1 cup) caster sugar
250ml (1 cup) water
Orange blossom water buttercream
250g butter, at room temperature
375g (3 cups) icing sugar, sifted
3-4 teaspoons orange blossom water (or to taste)
Method
- To make the cake layers, preheat the oven to 180°C. Grease two shallow 20cm (base measurement) round cake tins with melted butter and line the bases with rounds of non-stick baking paper.
- Finely grate the rind from the oranges and set aside. Juice the fruit and measure 125ml (½ cup), reserving the rest for another use. Divide the juice evenly between two medium bowls. Add half the poppy seeds and half the sour cream to each. Set aside.
- Use an electric mixer to beat 125g of the butter, 150g of the sugar and half the orange rind until pale and creamy. Add 2 of the eggs, one at a time and beating well after each addition. Sift together 175g of the flour and 1½ teaspoon of the baking powder. Fold half the flour mixture through the butter mixture until just combined. Fold through one quantity of the poppy seed mixture and then the remaining flour mixture until just combined.
- Divide the cake mixture evenly between the prepared cake tins and use the back of a metal spoon to smooth the surfaces. Bake in the preheated oven for 20-25 minutes or until a skewer inserted into the centre of the cakes come out clean. Stand in the tins for 5 minutes before turning onto wire racks, topside down, to cool (this will take about 30 minutes).
- Repeat with the remaining poppy seed mixture and ingredients to make two more cake layers.
- Meanwhile, to make the candied orange rind, use a vegetable peeler to remove the rind from the oranges in wide strips. Use a small sharp knife to remove any white pith from the rind. Combine the sugar and water in a small saucepan and stir over low heat until the sugar dissolves. Add the orange rind strips and bring to a simmer. Simmer, without stirring, for 10-15 minutes or until the rind is translucent. Use a fork to transfer the rind from the syrup to a wire rack. Set aside. Reserve the syrup.
- To make the orange blossom water buttercream, use an electric mixer to beat the butter, icing sugar and orange blossom water in a medium bowl until very pale and creamy. Cover and set aside at room temperature.
- To assemble the cake, place a cake layer, topside down, on a serving plate or cake stand. Spread with a little of the buttercream and then top with another layer of cake. Continue to layer with some of the remaining buttercream and cake layers, finishing with a cake layer. Spread a thin layer of buttercream around the outside of the cake so that the cake layers show through. Spread the remaining buttercream on top, swirling as desired. Decorate with the candied orange rind and drizzle with some of the remaining syrup just before serving.
Baker's Tips
- This cake will keep in an airtight container at room temperature for up to 3 days.
This recipe is from Anneka's SBS Food online column, Bakeproof: Citrus.
CLICK HERE for more Bakeproof recipes.
Photography by Alan Benson.
Prep 20min (+1day macerating, 30min cooling, 1-2hr chilling time)Bake 50minMakes 10-12 serves
The secret to a silky smooth baked custard is the balance of eggs to milk and cream and gentle baking. This velvety one is teamed with macerated prunes for a memorable dessert.
Ingredients
Baked custard
500ml (2 cups) milk
500ml (2 cups) pouring cream
1 vanilla bean, split lengthways and seeds scraped
5 eggs, at room temperature
110g (½ cup) caster sugar
Macerated prunes
250ml (1 cup) port
400g prunes, pitted and halved
Method
- To make the macerated prunes, heat the port in a small saucepan over medium heat until hot but not simmering. Pour over the prunes in a heatproof bowl, cover and set aside to macerate for 1 day.
- Preheat oven to 160°C (140°C fan-forced). Brush a shallow 2-litre (8-cup) ovenproof dish with the melted butter to lightly grease and place in a large roasting pan or ovenproof dish.
- Combine the milk, cream and vanilla bean and seeds in a medium saucepan and heat over low heat until almost simmering. Use a balloon whisk to whisk the eggs and sugar until well combined. Gradually whisk in the hot milk mixture. Strain the custard into a large jug and then pour into the greased dish. Add enough boiling water to the roasting pan to reach halfway up the sides of the dish.
- Bake in preheated oven for 40-50 minutes (see Baker’s tips) or until set on top but the custard still wobbles slightly when the dish is shaken gently. Remove from the oven and transfer to a wire rack to cool for 30 minutes. Place the custard in the fridge for 1-2 hours or until cooled completely.
- Serve the custard in spoonfuls accompanied by the macerated prunes with some of the port.
Baker's Tips
- The baking time will depend on the depth of your dish – the deeper the dish the longer the baking time will be. Always check your custard after 40 minutes though and return to the oven for another 5-10 minutes if it’s not ready.
- This custard will keep covered in the fridge for up to 2 days. Stand at room temperature for 30 minutes before serving.
This recipe is from Anneka's SBS Food online column, Bakeproof: Comforting Custard.
CLICK HERE for more Bakeproof recipes.
Photography by Alan Benson.
Prep 20min (+1hr cooling time)Bake 1hrMakes about 16
Lemon bars are one of those ‘clever’ slices that combines a simple shortbread-like base and an intensely-tart/sweet lemon topping to create a memorable mouth puckering moment – old-fashioned yet slightly sophisticated, all at the same time.
Ingredients
Base
150g (1 cup) plain flour
50g (¼ cup) caster sugar
150g chilled butter, diced
1 teaspoon natural vanilla essence or extract
Topping
3 eggs, at room temperature
165g (¾ cup) caster sugar
1 tablespoon finely grated lemon rind
125ml (½ cup) strained freshly squeezed lemon juice
2 tablespoons flour
Method
- Preheat oven to 180°C. Grease a 16cm x 26cm (base measurement) slice tin with butter and line the base and sides with one piece of non-stick baking paper, cutting into the corners to fit.
- To make the base, combine the flour, sugar, butter and vanilla in the bowl of a food processor and process until mixture is evenly combined and just starts to come together. Tip mixture into the prepared tin and use your hands to press it evenly over the base. Bake in preheated oven for 20 minutes or until it is golden around the edges.
- To make the topping, use a balloon whisk to whisk together the eggs, sugar and lemon rind and juice until well combined. Add the flour and stir until just combined. Pour the topping over the warm base and return to the oven for 15-20 minutes or until the topping is just set in the center.
- Cool the slice in the tin on a wire rack (this will take about 1 hour). Use the baking paper to lift the slice from the tin. Cut into bars and dust with icing sugar to serve.
Baker's Tips
- These bars will keep in an airtight container in a cool spot (but not in the fridge) for up to 3 days.
This recipe is from Anneka's SBS Food online column, Bakeproof: Citrus.
CLICK HERE for more Bakeproof recipes.
Photography by Alan Benson.
Prep 30min (+20min resting time)Bake 16-18minMakes about 8
Just like the ones you buy, these thin, crisp wafers are the perfect addition to any cheese board. Serve them alongside a soft washed-rind cheese, soft feta, nutty cheddar or any number of dips, such as beetroot or baba ghanoush.
Ingredients
- 225g (1½ cups) plain bread or pizza flour
- 1 teaspoon sea salt, crushed plus extra to sprinkle
- 125ml (½ cup) water
- 60ml (¼ cup) olive oil, plus extra to roll
- 2 teaspoons sesame seeds, to sprinkle
Method
- Preheat oven to 180°C (160°C fan forced). Line 2 large oven trays with non-stick baking paper.
- Combine the flour and salt in a large mixing bowl and make a well in the centre. Combine the water and olive oil, add to the flour mixture and use a wooden spoon and then your hands to mix to a soft dough.
- Turn the dough onto a lightly floured surface and knead for 1 minute or until smooth, elastic and bounces back when you press your finger into it. Wrap the dough in plastic wrap and set aside for 20 minutes to rest.
- Divide the dough into 8 portions and roll each in a little extra olive oil to coat lightly. Use your hands to flatten a portion into a rough rectangle and then use a rolling pin to roll out thinly and evenly into a large rectangle about 2mm thick (see Baker’s tip). Place on the lined trays. Repeat with three of the remaining dough portions. Brush the wafers with a little extra olive oil and sprinkle with extra salt and sesame seeds.
- Bake the four wafers in preheated oven for 16-18 minutes, swapping the trays around halfway through baking, or until golden and crisp. Cool on the trays. Repeat with the remaining four dough portions to make eight large wafers in total. Break into smaller pieces to serve.
Baker's Tips
- The more evenly you can roll the dough, the more evenly it will bake.
- These wafers will keep in an airtight container or jar at room temperature for up to 1 week
This recipe is from Anneka's SBS Food online column, Bakeproof: Savoury Crackers.
CLICK HERE for more Bakeproof recipes.
Photography by Benito Martin.
Prep 25min (1hr cooling time)Bake 1hrMakes 8 serves
Spiked with chunks of crystalised ginger this luscious crème brûlée custard makes a divine tart filling. I have to confess, that this is one of my all-time favourite desserts!
Ingredients
50g crystalised ginger, cut into small pieces (about 8 mm)
2 tablespoons sugar, to sprinkle
Crème brûlée filling
250ml (1 cup) pouring cream
1 vanilla bean, split lengthways and seeds scraped
3 egg yolks
55g (¼ cup) caster sugar
Method
- Preheat oven to 200°C (180°C fan-forced). Use a lightly floured rolling pin to roll out the pastry on a lightly floured bench top to a rectangle about 3mm thick. Carefully drape the pastry loosely around the rolling pin. Place it over an ungreased 2.5cm deep, 34.5cm x 11.5cm (base measurement) tart tin with a removable base and then unroll the pastry being careful not to stretch it. Gently lift the edge of the pastry and ease it into the tart tin to line the base and sides and settle it into the corners. Use your fingertips to press it gently into the corners without stretching it. Then, working around the tin, press the pastry into the side using your thumb or finger. Roll the rolling pin over the top of the tart tin to trim any overhanging pastry.
- Place the tart tin on an oven tray. Prick the pastry base with a fork about 12 times. Line the pastry case with baking paper or foil and fill with pastry weights, dried beans or raw rice, making sure they press into the corners. Bake in preheated oven for 20 minutes.
- Remove the pastry case from oven and use the paper or foil to lift the weights out of the case. Return to the oven and bake for a further 20 minutes or until golden and cooked through.
- Meanwhile, combine the cream and vanilla bean and seeds in a medium saucepan and bring almost to a simmer over medium heat. Remove from heat and set aside. Use a balloon whisk to whisk together the egg yolks and sugar until well combined. Gradually stir in the hot cream mixture (don’t over-mix – you don’t want it to be frothy). Strain the custard into a heatproof jug.
- Remove the tart case form the oven and reduce the oven temperature to 160°C (140C fan-forced). Sprinkle the base evenly with the ginger and then pour the warm custard immediately into the hot tart case. Carefully return to the oven and bake for a further 20-25 minutes or until the custard is just set and it still wobbles slightly in the centre when the tin is shaken gently.
- Remove the tart from the oven and set aside on a wire rack for at least 1 hour or until cooled to room temperature.
- To serve, sprinkle the top of the tart evenly with the sugar and use a blowtorch to caramelise the sugar until a deep golden. Stand for 5 minutes for the toffee to set before serving.
Baker's Tips
- This tart will keep in an airtight container in the fridge for up to 2 days. Stand at room temperature for 30-60 minutes to bring back to room temperature before serving.
This recipe is from Anneka's SBS Food online column, Bakeproof: Comforting Custard.
CLICK HERE for more Bakeproof recipes.
Photography by Alan Benson.
Prep 30min (+30-60min standing time)Bake 1hr 10minMakes 10-12 serves
Indulgent is the one word (and possibly the only) that comes to mind when describing this dessert. Custardy bread, pecans, bananas and a rich caramel sauce combine to make this one very decent over-the-top offering.
Ingredients
600g day-old sourdough or crusty loaf, cut into 1cm-thick slices, crusts partially removed
60g butter, softened
3 ripe medium bananas (about 200 g each), thinly sliced
100g pecans, toasted and coarsely chopped
4 eggs 110g (½ cup) caster sugar
500ml (2 cups) milk
375ml (1½ cups) pouring cream
2 teaspoons natural vanilla essence or extract
Vanilla ice-cream, to serve
Caramel sauce
100g (½ cup, lightly packed) brown sugar
115g (⅓ cup) golden syrup
40g butter
125ml (½ cup) pouring cream
Method
- Preheat oven to 170°C (150°C fan-forced). Brush a deep 2-litre (8-cup) ovenproof dish with melted butter to grease.
- Spread the bread slices with the butter. Top half of the slices with the banana and then cover with the remaining bread slices. Cut each ‘sandwich’ diagonally into half. Arrange the layered bread in the ovenproof dish, allowing it the stick up a little, and then sprinkle with the pecans.
- Use a balloon whisk to whisk together the eggs, sugar, milk, cream and vanilla until well combined. Pour evenly over the bread in the dish and set aside for 30-60 minutes or until the bread has absorbed all the custard.
- Meanwhile, to make the caramel sauce, combine the sugar, golden syrup and butter in a small saucepan. Stir over low heat until the sugar dissolves. Bring to a simmer and simmer for 2-3 minutes or until thickened slightly.
- Sprinkle the pudding with the remaining pecans, pour over half the caramel sauce (reserve the remaining sauce) and bake in preheated oven for 1 hour and 10 minutes or until the top is golden and the custard is set.
- Meanwhile, add the cream to the remaining caramel sauce and stir over medium heat until well combined and heated through.
- Remove the pudding from the oven and stand for 5 minutes before serving with the warm Caramel sauce and ice cream.
Baker's Tips
- This bread and butter pudding will keep covered in the fridge for up to 2 days. Serve at room temperature or cover with foil and warm gently in an oven preheated to 150°C (130°C fan-forced for 10-20 minutes (depending on the portion size).
This recipe is from Anneka's SBS Food online column, Bakeproof: Comforting Custard.
CLICK HERE for more Bakeproof recipes.
Photography by Alan Benson.
Prep 20minBake 30minMakes about 30
These "very Moroccan" cookies are dead-easy to make, but still special with the addition of orange flower water. They have a crisp macaroon-like character that softens and becomes chewy the longer they're kept.
Ingredients
240g (1½ cups) blanched almonds, plus 30 extra to decorate (optional)125g (1 cup) pure icing sugar, plus 2 tablespoons extra to coat
1 teaspoon baking powder
3 egg yolks
2 teaspoons orange flower water
Method
- Preheat oven to 180°C (160°C fan-forced). Line two large oven trays with non-stick baking paper.
- Spread the almonds on one of the baking trays and toast in preheated oven, shaking the tray occasionally, for 8-10 minutes or until lightly golden and aromatic. Set aside for 5 minutes to cool slightly.
- Use a food processor to process the almonds until finely ground. Transfer to a medium mixing bowl.
- Sift together the icing sugar and baking powder over the almond meal. Add the egg yolks and orange flower water and use an electric mixer to beat until well combined and a soft dough forms. Roll heaped teaspoonfuls of the mixture into balls. Roll in the extra icing sugar to coat lightly and then place on the lined oven trays about 5cm apart. Flatten the balls until about 1cm thick and then press a whole extra almond into the center of each, if desired.
- Bake in preheated oven for 20 minutes, swapping the trays around halfway through baking, or until lightly golden around the edges and cracked on top. Remove from the oven and cool on the trays.
Baker's Tips
- These ghoribas will keep in an airtight container at room temperature for up to 2 weeks.
- For a slightly soft centre bake these biscuits for only 16 minutes.
This recipe is from Anneka's SBS Food online column, Bakeproof: Moroccan Spice.
CLICK HERE for more Bakeproof recipes.
Photography by Alan Benson.
Prep 15minBake 35minMakes about 15
Wickedly rich, this gluten-free brownie can match it with the best of them. Fudgy, rich and studded with tart raspberries, you won't be able to stop at just one piece!
Ingredients
Coconut oil, to grease150g gluten-free, good-quality dark chocolate, chopped
100g (½ cup) coconut oil
135g (¾ cup) coconut sugar
2 eggs, at room temperature, light whisked
60ml (¼ cup) coconut milk
1 teaspoon natural vanilla essence or extract
30g (¼ cup) cocoa powder
2 tablespoons coconut flour
¾ teaspoon gluten-free baking powder
50g (½ cup) almond meal
150g frozen raspberries
Pure icing sugar, to dust (optional)
Method
- Preheat oven to 160°C (140°C fan-forced). Grease a 16cm x 26cm shallow slice tin with coconut oil and line the base and long sides with one piece of baking paper.
- Place the dark chocolate and coconut oil in a medium heatproof bowl over a saucepan of simmering water (don't let the base of the bowl touch the water). Stir occasionally until chocolate and coconut oil melt and the mixture is smooth. Remove bowl from the saucepan.
- Add the sugar, eggs, coconut milk and vanilla to chocolate mixture and use a balloon whisk to stir until well combined. Sift together the cocoa powder, coconut flour and baking powder into a bowl, add the almond meal and stir to combine. Add to chocolate mixture and stir with a spatula until just combined. Add the frozen raspberries and fold gently until just combined.
- Pour mixture into prepared tin and use the back of a metal spoon to spread evenly. Bake in preheated oven for 35 minutes or until moist crumbs cling to a skewer inserted in the centre. Cool in tin and then chill for at least 1 hour (see Baker's Tips).
- Remove brownie from the tin using the baking paper to carefully lift it out. Cut into portions and serve dusted with icing sugar, if desired.
Baker's Tips
- These brownies are a little more fragile than normal fudge brownies and will be easier to cut if you chill them for at least an hour before removing from the tin to cut.
- These brownies will keep in an airtight container in the fridge for up to 5 days. Serve straight from the fridge or stand at room temperature for 30 minutes before serving.
This recipe was originally published in Anneka's SBS Food online column, Bakeproof: Coconut.
Click here for more Bakeproof recipes.
Photography by Alan Benson.
Prep 25minBake 35minMakes 8-10 serves
This traditional English pudding is quintessential nursery food – nurturing, soul-warming and economical. Feel free to replace the mixed berry jam with raspberry, plum or strawberry to ensure the sweet but subtle middle layer suits your tastes.
Ingredients
500ml (2 cups) milk55g (¼ cup) caster sugar
30g butter, diced
Finely grated zest of 1 lemon
5 egg yolks
2½ teaspoons natural vanilla essence or extract
150g (2½ cups, lightly packed) fresh white breadcrumbs
85g (¼ cup) mixed berry jam (see Baker’s Tips)
1 tablespoon icing sugar, to dust
Meringue topping
3 egg whites
Pinch of salt
110g (½ cup) caster sugar
1 teaspoon natural vanilla extract or essence
Method
- Put the milk, sugar, butter and lemon zest in a medium saucepan and stir over medium heat until the sugar dissolves and the butter melts. Use a balloon whisk to whisk the egg yolks in a medium heatproof bowl until smooth. Gradually add the warm milk mixture, whisking constantly until well combined. Stir in the vanilla and breadcrumbs.
- Pour the custard mixture into a shallow 1-litre (4-cup) ovenproof dish. Set aside for 15 minutes for the bread to soak up some of the custard.
- Preheat oven to 170ºC (150ºC fan-forced).
- Place the ovenproof dish into a roasting pan or larger ovenproof dish. Add enough boiling water to the roasting pan or larger ovenproof dish to reach halfway up the sides of the dish with the custard mixture to create a water bath or bain-marie. Bake in preheated oven for 20-25 minutes or until the custard has almost set but still wobbles slightly when touched on the top. Remove from the oven and remove the custard dish to a wire rack. Set aside for 20 minutes or until cooled slightly (stop here if pre-preparing your pudding, see Baker's Tips).
- Increase the oven temperature to 190ºC (170ºC fan-forced).
- To make the meringue, use an electric mixer with a whisk attachment to whisk the egg whites and salt until soft peaks form. With the motor running, gradually add the sugar, a spoonful at a time, and whisk until the sugar has dissolved completely and the mixture is thick and glossy. Whisk in the vanilla.
- Carefully spread the jam over the top of the custard (see Baker's Tips). Spread the meringue mixture over the jam to cover, swirling as desired.
- Bake in preheated oven for 10 minutes or until the meringue is lightly golden (see Baker’s tips). Serve immediately.
Baker's Tips
- If your jam is a little thick you can warm it in a small saucepan over a low heat, stirring often, until runny, to make it easier to spread.
- You can cover the bottom of the roasting pan or larger ovenproof dish with a folded tea towel to stop the dish with the custard sliding around when transferring it to and from the oven.
- You can make this pudding up to the end of step 4 (note in method) up to 2 days before serving. Stand the puddings at room temperature for 30 minutes before continuing with the recipe.
- You can caramelise the meringue topping with a blowtorch instead of baking it a second time for a more ‘dramatic’ effect if you wish.
This recipe is from Anneka's SBS Food online column, Bakeproof: Best of British Baking.
CLICK HERE for more Bakeproof recipes.
Photography by Alan Benson.