BakeRecipes
Sourdough starter
Prep 5 days
A practical, step-by-step guide with tips, tricks and timelines to making your own sourdough starter and baking with it.
This method is logical and simplified for beginner bakers to follow (and expert bakers to hone). While the process of making this starter is a little lengthy (at least 5 days) it isn’t difficult, if you follow the steps and take note of my tips.
The detailed steps are below, but here is a nifty quick reference to keep you on track:
Day 0
125g flour + 125g water, stand for 48 hours
↓ ↓
Day 2
1st feeding: 125g starter + 125g flour + 125g water, stand for 24 hours
↓ ↓
Day 3
2nd feeding: 125g starter + 125g flour + 125g water, stand for 24 hours
↓ ↓
Day 4
3rd feeding: 125g starter + 125g flour + 125g water, stand until doubled in size (8—24 hours)
↓ ↓
Day 5
If not doubled in size, feed every 12 hours until doubled in 8 hours or less
↓ ↓
Use 'active' starter OR store at room temperature or in fridge.
Sourdough starter method - Day 0
A young starter is quite sensitive so when establishing your sourdough starter it is important to follow the process (measuring the flour and water accurately, feeding at the suggested times, etc.) But once mature and strong, it will have more flexibility and will be more resilient to changes so don’t worry too much if you occasionally miss a feeding by a day or so or if your quantities are slightly out - just get back on track as soon as you can and your starter will bounce back.
Ingredients
Starter
125g organic wholemeal flour (see Baker’s Tips #1 and Variations)
125g bottled water, at room temperature (see Baker’s Tips #2 and #3)
To feed the starter
unbleached organic plain flour (see Baker’s Tips #1)
bottled water, at room temperature
Method
Day 0
- Place the wholemeal flour and water in a medium bowl and stir until well combined.
- Weigh a clean, dry jar with a lid that you are going to store your sourdough starter in and note the weight down (see Baker’s Tips #4).
- Transfer the flour mixture to the jar, seal and set aside in a warm draught-free place (see Baker’s Tips #5) for 48 hours (see Baker’s Tips #6).
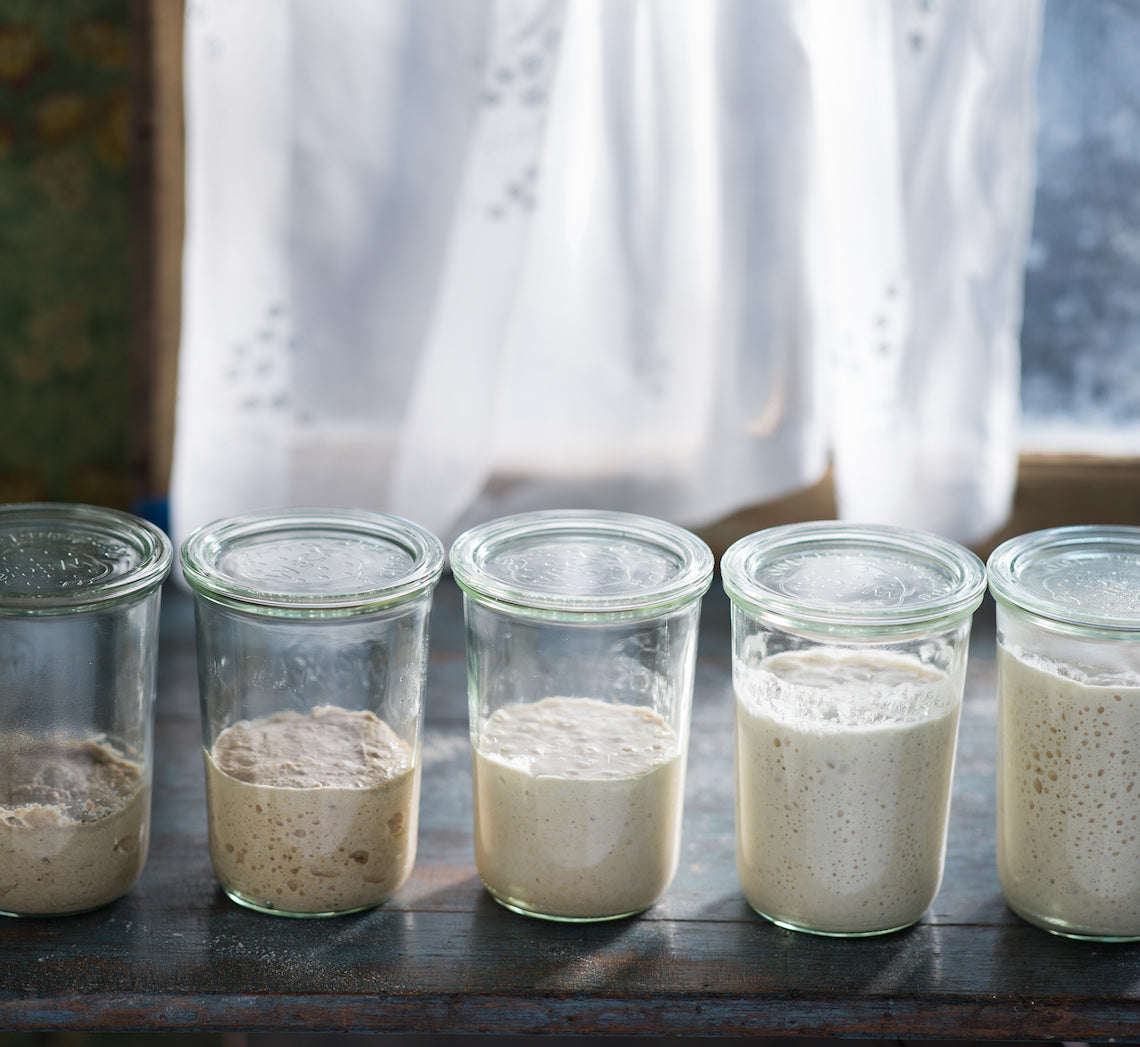
After 12 hours (see images, jar 1, from left), there won’t be much change in your mixture although a few bubbles may start to appear through the side of the jar.
After 48 hours (see images, jar 2, from left), the starter may have risen just a little and a dark skin would have formed. There may be a few bubbles on the surface and also noticeable through the side of the jar – but not always. Proceed to the first feeding.
If you don't see these signs, set aside for another 24 hours – if there are no signs of activity by then, just continue with the first feeding. The aroma will be quite unpleasant.
Variations
Rye sourdough starter: replace the wholemeal flour with 100g rye flour (and feed with unbleached organic plain flour).White sourdough starter: replace the wholemeal flour with 125g unbleached plain flour (and feed with unbleached organic plain flour).
Baker's Tips
#1. In my experience, I’ve had the best results with starting a sourdough starter with organic wholemeal flour and then switching to unbleached organic plain flour for feeding until it is established. Once mature, you can then just switch to regular plain flour or bread flour for feeding, or even occasionally feed it with wholemeal flour again to add a little ‘nuttiness’ to its flavour.
#2. Use bottled water (or water that is filtered and has been allowed to stand uncovered for at least 4 hours for the chlorine to dissipate) to give your sourdough starter the best possible chance of success.
#3. It’s a good idea to embrace measuring both your flour and water in grams when making and maintaining your sourdough starter. It is the most accurate way of measuring and will give you the best possible chance of success.
#4. A sourdough starter can be mixed and kept in a non-reactive container such as a glass jar. Look for one that has straight sides and a reasonable sized mouth to make mixing easy. This starter recipe will need a jar that has a capacity of at least 1 litre (4 cups) and, before making your starter, ensure that it is very clean and dry. It’s a good idea to note the weight of your jar so that it is easy to calculate how much sourdough starter you need to remove and discard every time you feed it.
#5. The ideal temperature for proving sourdough starter is between 21°C-23.5°C (70ºF-74ºF). Don’t be tempted to keep the starter at higher temperatures to accelerate the process as it won’t necessarily mean you will get a better result. Higher temperatures can encourage more ‘bad’ bacteria to grow than the ‘good’ ones, which will ultimately ruin the starter. If your kitchen is cold, I find placing it under the stove rangehood with the light on or on top of the fridge gives a warm (but not too warm), consistent temperature.
#6. After each feeding, it’s a good idea to mark the side of the jar with tape (or an elastic band) so you can see how much it grows in the specified time.
Sourdough starter method - Day 2
First feeding after 48 hours
- Remove and discard all but 125g of the sourdough starter from the jar.
- Add 125g plain flour and 125g water to the jar and stir well to combine.
- Use a clean spatula to scrape the sides of the jar down to clean (see Baker’s Tips #7).
- Seal the jar and set aside in a warm, draught-free place for 24 hours.
After the first feeding and rise, the starter would have risen slightly (up to 50%) (see images, jar 3, from left) and random bubbles will be visible on the surface as well as through the side of the jar indicating the wild yeast is active and starting the multiply.
Baker's Tips
#7. Make sure you scrape down the side of the jar after every feed – this will make it easier to see how much the starter has risen each time.
Sourdough starter method - Day 3
Second feeding after 24 hours
- Remove and discard all but 125g of the sourdough starter from the jar.
- Add 125g plain flour and 125g water to the jar and stir well to combine.
- Use a clean spatula to scrape the sides of the jar down to clean.
- Seal the jar and set aside in a warm, draught-free place for 24 hours.
After the second feeding and rise there will be more visible bubbles but they will be smaller and more uniform (see images, jar 4, from left). The aroma will be less pungent and a little sweeter.
Sourdough starter method - Day 4
Third feeding after 24 hours
- Remove and discard all but 125g of the sourdough starter from the jar.
- Add 125 g plain flour and 125g water to the jar and stir well to combine.
- Use a clean spatula to scrape the sides of the jar down to clean.
- Seal the jar and set aside in a warm, draught-free place until doubled in size (8-24 hours, depending on the strength of your sourdough).
Sourdough starter method - Day 5
Depending on the strength of your sourdough and how quickly it ferments it may double in size in less than 24 hours. You may also notice that once it doubles it starts to lose volume and falls back on itself indicating that it needs regular feeding from this point.
If your starter has not doubled in 24 hours or less, continue the discarding and feeding process every 12 hours until it has the ability to double in size in 8 hours or less. When it does, it is now "active" and ready to use, or store in the fridge to be used at a later date (see Baker’s Tips #8).
Baker's Tips
#8. A young starter is quite sensitive so when establishing your sourdough starter it is important to follow the process (measuring the flour and water accurately, feeding at the suggested times, etc.) But once mature and strong, it will have more flexibility and will be more resilient to changes so don’t worry too much if you occasionally miss a feeding by a day or so or if your quantities are slightly out - just get back on track as soon as you can and your starter will bounce back.
What's that smell? Aroma changes in sourdough starter
When making and establishing a sourdough starter you will notice that the aromas it gives off change quite considerably from one day to the next. This is because the bacteria present is changing and ‘settling’.
To start, in the first day or so, it can smell quite foul but will mellow with subsequent feedings and over time the smell will become slightly tangy and sweet and then more sour. You will also notice once the sourdough starter has matured and is more stable, the aroma will become more consistent too.
The aroma will also change depending on where it is in the feeding cycle once established, mature and healthy; it will have a slightly sweet scent when first fed, and will become more sour as it stands and ripens ready for use.
Sourdough starters can be unpredictable
Remember all sourdough starters are different. There are so many things that can vary while making a sourdough starter (including the type of wild yeast and bacteria present, the temperature the starter is held at, etc.) and ultimately this will affect how long it takes for your starter to become mature.
Sometimes, a starter may seem to be on the right track and then, for whatever reason, it doesn’t progress at all. If yours doesn’t reflect the exact description above, don’t lose heart, be patient and keep repeating the feeding process every 12 hours until your starter reflects the Day 5 description before you move onto maintaining, storing and using it.
How to use your sourdough starter in your baking
To make sure your sourdough starter is strong and 'active' enough to use in baking, you will need to feed, maintain and store it. Click here to find out how.
Once your starter is ready to use, this Basic sourdough bread recipe is a well-tested recipe to begin your sourdough baking.
This recipe is part of Anneka's SBS Food Bakeproof: Sourdough online column. For more Bakeproof columns and recipes, click here.
Photography by Alan Benson.