
- home
- BAKERECIPES
BakeRecipes
Bringing real baking into your home with deliciously simple recipes.
Prep 11/2hr (+ macaron prep)Bake 18-20min (per batch)Makes 10 serves
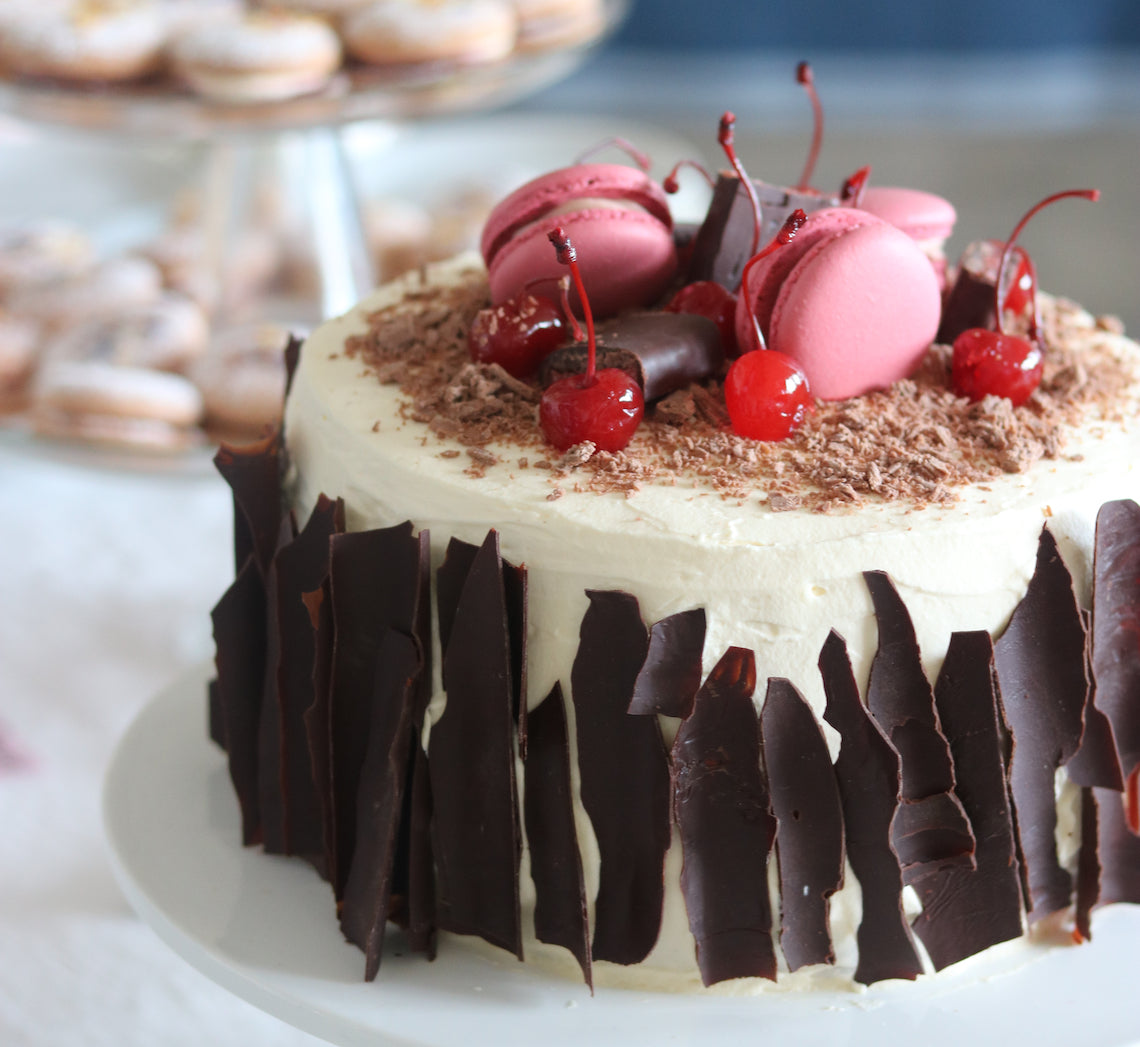
Created by Make Me a Baker student, Allen Au for his graduation, this cake is certainly a show stopper.
Before starting the program Allen had always found making sponge cakes challenging and had almost given up on ever making another again. But, he set himself the challenge of perfecting a sponge and creating a version of Black Forest cake that his wife had always wanted him to. The result was a modern cake bursting with flavour and showcasing Allen's newly-acquired baking skills!
The sponge cake in this recipe is a version of the one students learn to make during the Make Me a Baker program.
Ingredients
Chocolate Sponge Cake (2 layers)
Melted butter, to grease
4 eggs, at room temperature
150g caster sugar
60ml milk
30g salted butter
110g self-raising flour
30g cocoa powder
Chocolate Sponge Cake (1 layer)
Melted butter, to grease
2 eggs, at room temperature
75g caster sugar
30ml milk
15g salted butter
55g self-raising flour
15g cocoa powder
Kirsch Syrup
80g caster sugar
90ml water
60ml kirsch
To Assemble
900ml thickened cream
200g cherry jam
1½ x 680g jars pitted Morello cherries, drained
To Decorate
Chocolate bark (see Baker's tips)
10 Maraschino cherries with stems, drained
2 Cadbury Cherry Ripe double-dipped chocolate bar, cut into 3-4 pieces
1½ Cadbury Flake bar, broken into fine pieces
3 cherry macarons (get Allen's Cherry Macaron recipe HERE)
Chocolate Sponge Cake Layers
- To make the Chocolate sponge cake layers, place the oven rack in the oven so that the cake tins will sit in the middle of the oven and then preheat to 180°C (160°C fan-forced). Brush two 20cm shallow cake tins with melted butter to grease and line the base of each with a sheet of non-stick baking paper. You will need to reuse one of the cake tins to make the third sponge layer later.
- To make the first two layers of sponge, use an electric mixer with a whisk attachment on medium-high speed to whisk the 4 eggs in a large bowl until frothy. Add the sugar a spoonful at a time, whisking well after each addition, until the mixture is very thick and pale (this will take about 8 minutes). Lift the whisk out of the mixture and draw a figure eight. If the trail stays on the surface long enough to finish drawing, then the mixture is ready. If not, continue to whisk for a further minute.
- Meanwhile, heat the milk and butter in a small saucepan over medium heat until almost simmering. Remove from the heat and pour the warm milk mixture down the side of the mixing bowl. Quickly sift the flour and cocoa powder together over the egg mixture and then immediately whisk again with the electric mixer on low speed briefly until the flour mixture is just incorporated (be careful not to overmix). Scrape the base of the bowl and then whisk briefly again, if necessary.
- Divide the mixture evenly between the cake tins (see Baker’s tips) and gently tap the tins on the benchtop three times to settle the mixture. Bake in preheated oven for 18-20 minutes or until the cakes spring back when lightly touched in the centre and start pulling away from the sides of the tins. Remove from the oven and immediately use a small palette knife to loosen the sides of the sponges from the tins and turn onto a wire rack to cool completely.
- Repeat steps 1–4 using the ingredients to make one more layer of sponge.
Kirsch Syrup
- Combine the caster sugar and water in a small saucepan. Stir over medium heat until the sugar dissolves. Bring to the boil and then remove from the heat. Stir in the kirsch. Set aside to cool to room temperature.
To Assemble
- When ready to assemble the cake, use a stand mixer or electric hand mixer with a whisk attachment to whisk the cream until soft peaks form. Place one of the sponge layers on a serving plate or cake stand. Use a pastry brush to generously brush the whole top surface with about one-third of the kirsch mixture. Spread half the jam over the top and then spread with enough whipped cream to create a layer about 1cm thick. Sprinkle with half the drained morello cherries. Repeat with the remaining sponge layers, kirsch syrup, morello cherries and cream layer, finishing with a sponge layer and kirsch syrup.
- Spread the remaining whipped cream over the sides and top of the cake to cover.
- To decorate, attach the chocolate bark to the outside of the cake. Decorate the cake with the Maraschino cherries, chocolate bars, and macarons.
Baker's Tips
- To divide the mixture evenly between the tins, weigh the tins with the mixture in them to make sure they are the same weight.
- To make chocolate bark, spread melted dark chocolate thinly over a piece of baking paper, making sure the width is similar to the height that your final cake will be. Place a second piece of baking paper over the chocolate to cover. Roll the two sheets of baking paper together into a thin cylinder. Secure with bulldog clips or pegs on both ends. Place in the fridge until set and ready to use. To use the chocolate bark, carefully remove the baking paper and break to desired widths.
Prep 15minBake 30-40minMakes 1kg
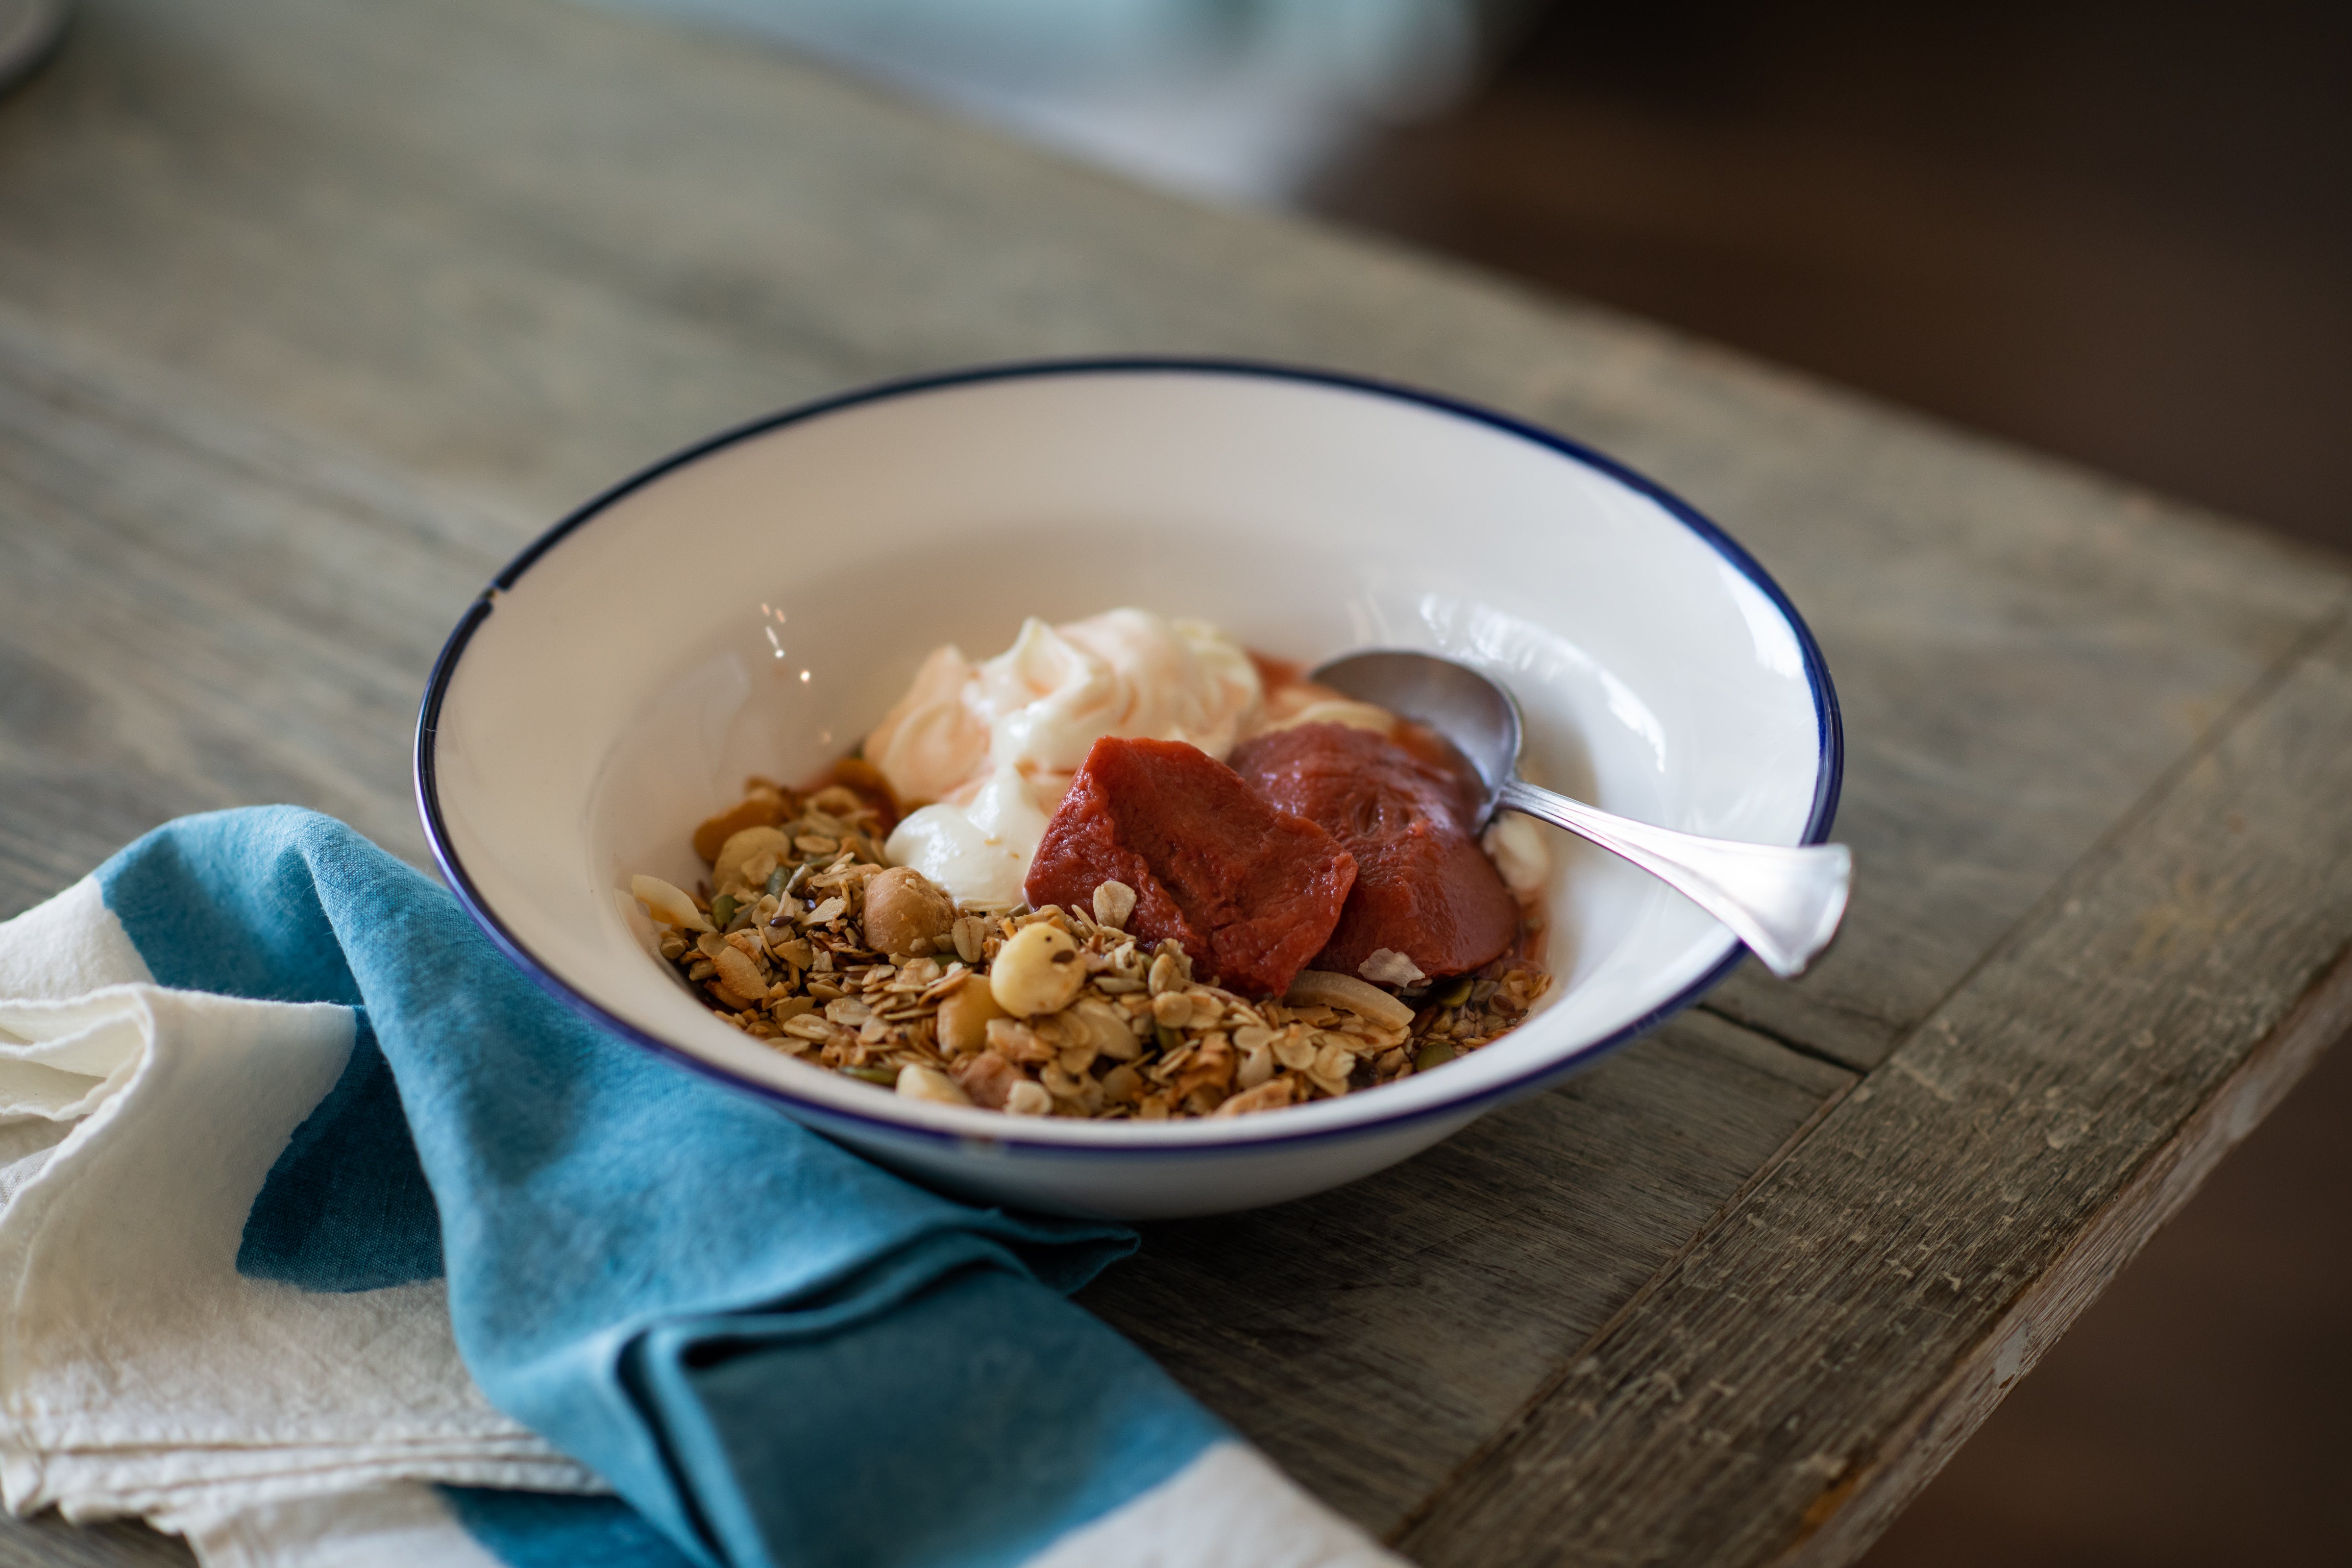
Scrumptious and satisfying, this granola recipe is one that Make Me a Baker graduate, Sarah Taylor, serves at her cafe Six Smith in Cronulla on Sydney's southern beaches. If you would like to serve it just as Sarah does, greek-style yoghurt and seasonal fruit, such as oven-baked rhubarb, pears or apples, will make the perfect accompaniment.
Ingredients
275g rolled oats
75g sunflower seeds
75g coconut chips / flakes
75g shredded coconut
75g pepitas
25g white chia seeds
25g black chia seeds
25g poppy seeds
200g unsalted macadamias
60g maple syrup
60g almond oil
Method
- Preheat the oven to 170°C (150°C fan-forced).
- Combine all ingredients except the maple syrup and almond oil in a large bowl. Set aside.
- Heat the maple syrup and almond oil in a small saucepan over a low heat until warmed through and and combined. Pour over the rolled oats mixture and mix thoroughly until combined and evenly coated.
- Spread the oat mixture evenly over 2 medium shallow baking trays and bake in preheated oven for 30-40 minutes, stirring every 10 minutes, until golden and aromatic.
Baker's tip
- This granola will keep well in an airtight container or jar for up to 4 weeks.
Prep 25minBake 30-35minMakes 12
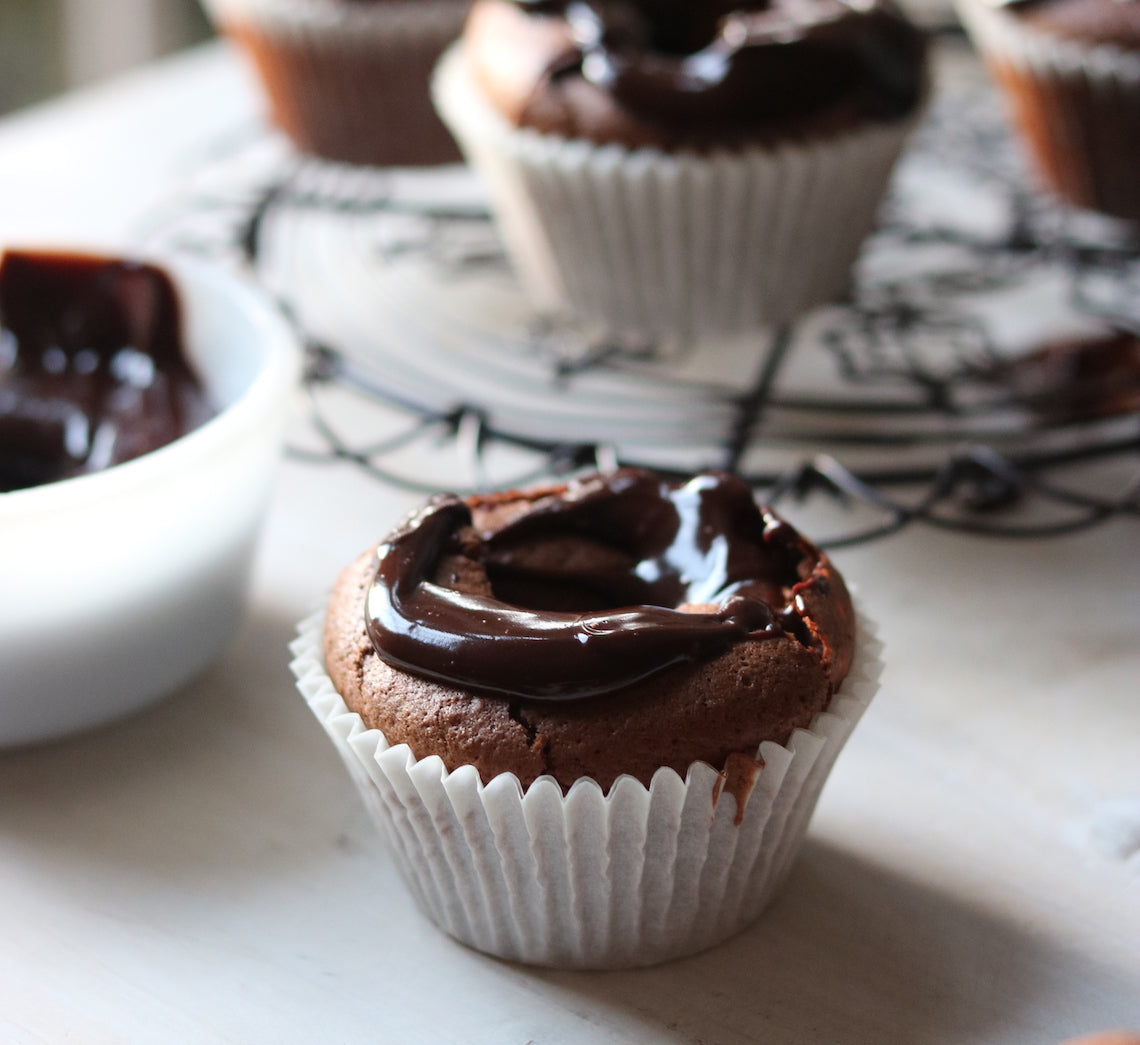
Drizzled with an oozing chocolate ganache, these cupcakes are wickedly rich (but light in texture) and have a surprise of intense raspberry tartness hidden right in the middle!
Don't worry, you haven't done anything wrong – these cupcakes are meant to have a hole in the centre... Because the mixture is flourless, the raspberry jam sinks during baking creating a crater of sorts, giving them their name.
Ingredients
180g good-quality dark chocolate (45% or 70% cocoa), chopped (see Baker's Tips)
125g butter, cubed
60ml (1/4 cup) water
220g (1 cup) brown sugar, plus 2 tablespoons extra
85g (3/4 cup) hazelnut meal
25g (1/4 cup) desiccated coconut
3 eggs, at room temperature, separated
85g (1/4 cup) raspberry jam
Chocolate ganache
180g good-quality dark chocolate (45% cocoa), finely chopped
60ml (1/4 cup) pure (pouring) cream
Method
- Preheat the oven to 180°C (160°C fan-forced). Line a 12-hole 80ml (⅓ cup) muffin tin with paper cases.
- Combine the chocolate, butter and water in a medium saucepan and stir over a low heat until melted and smooth. Remove from heat, add the sugar, hazelnut meal, coconut and egg yolks and stir well with a wooden spoon until well combined and any lumps have broken up. Transfer the mixture to a large bowl.
- Place the egg whites in a clean, dry medium bowl and use electric beaters with a whisk attachment to whisk until soft peaks form. Add the extra 2 tablespoons of brown sugar and whisk until thick and glossy. Add a large spoonful of egg white mixture to the chocolate mixture and use a large metal spoon or spatula to fold in – this will ‘loosen’ the mixture. Add the remaining egg white mixture and fold in until just combined.
- Divide the mixture among the prepared muffin holes. Place a teaspoon of raspberry jam in the centre of each cupcake and press down gently until the jam is in line with the top the cupcake mixture. Bake in preheated oven for 30-35 minutes or until the top of the cupcakes feels set and crumbs cling to a skewer inserted into the side of a cupcake. Remove the cupcakes from the oven, and stand in the tray for at least 5 minutes before transferring to place a wire rack and cool completely.
- To make the Chocolate Ganache, place the chocolate in a heatproof bowl. Place the cream in a small saucepan and heat over medium heat, stirring occasionally, until the cream almost comes to a simmer. Pour the hot cream over the chocolate and set aside to stand for 3 minutes. Stir the chocolate and cream mixture until the chocolate melts and the mixture is smooth. Set aside, stirring occaiosnally until thickened to a thick pouring consistency (see Baker's Tips).
- Drizzle a generous spoonful of ganache on the tops of the cupcakes around the hole in the centre, allowing it to dribble over the sides and down into the hole. Set aside for about 30 minutes or until the ganache sets before serving.
Baker's Tips
- Using 70% cocoa chocolate in the cupcakes will give them a more intense chocolate flavour.
- The ganache will take between 15 minutes and about 11/2 hours to reach the right consistency for drizzling depending on the weather. If it is a really hot day you can put the ganache in the fridge to help it thicken - just make sure you stir it often so lumps don't form.
- These cupcakes will keep in an airtight container in a cool spot (but not in the fridge) for up to 3 days.
Prep 20min (+20min cooling time)Bake 18-20minMakes about 40
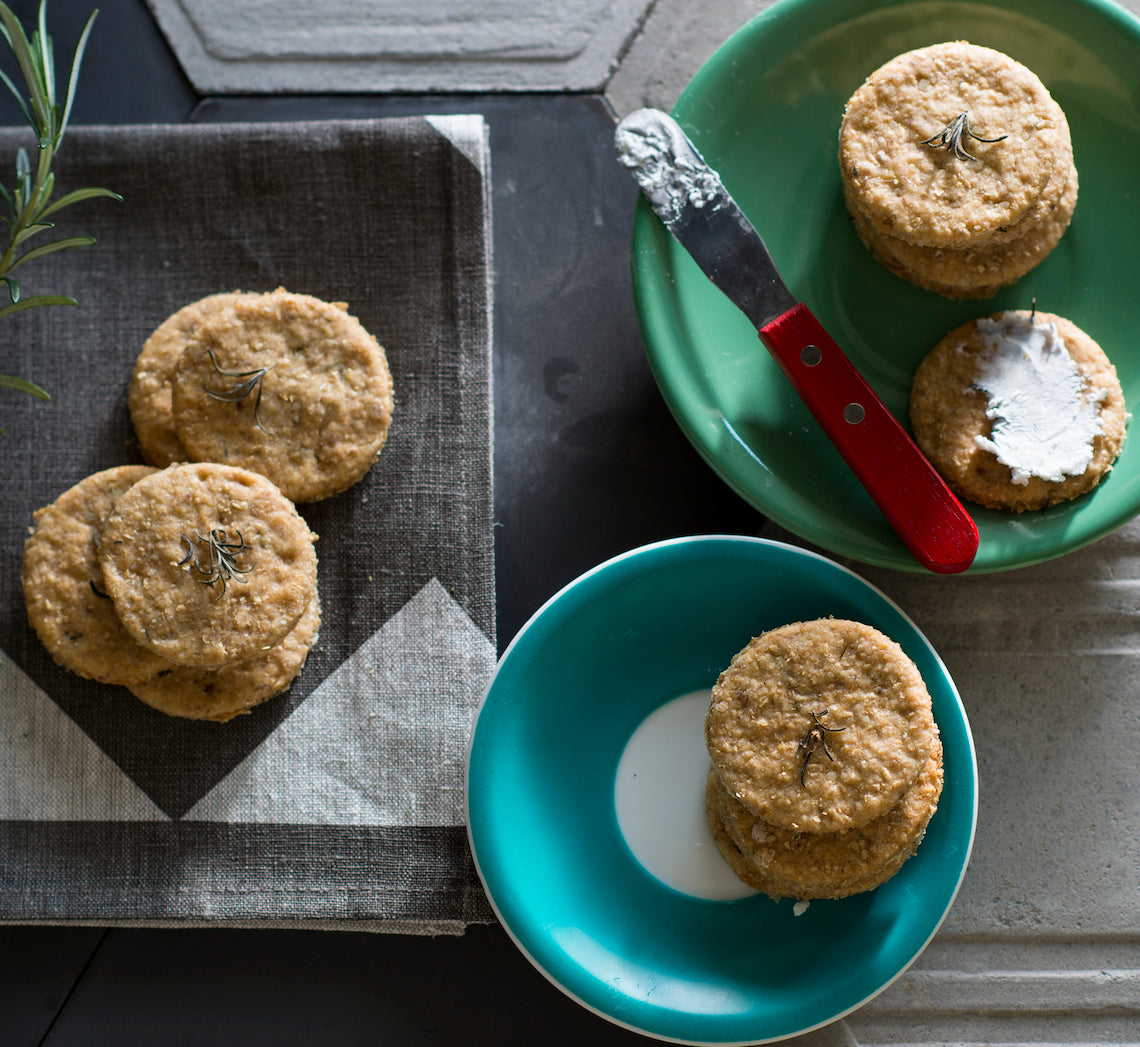
These crackers have a lovely nuttiness (thanks to both the wholemeal flour and walnuts) to them, perfect to serve with a creamy blue-vein cheese. They would also make a great gift, sealed in an airtight jar and accompanied by some cheese and a good bottle of red.
Ingredients
225g (1½ cups) plain wholemeal flour, plus extra for dusting100g walnuts, coarsely ground
2 teaspoons finely chopped rosemary, plus 2 teaspoons extra leaves, to sprinkle
1 teaspoon sea salt flakes, crushed
½ teaspoon baking powder
125ml (½ cup) water
2 tablespoons olive oil
1 tablespoon honey, warmed slightly
Method
- Preheat oven to 180°C (160°C fan-forced). Line 2 large oven trays with non-stick baking paper.
- Combine the flour, walnuts, rosemary, salt and baking powder in a large mixing bowl. Combine the water, olive oil and honey and use a fork to mix. Add the water mixture to the dry ingredients and use a wooden spoon and then your hands to mix to a soft dough.
- Turn the dough onto a lightly floured surface and knead briefly until smooth. Divide the dough in half and use a lightly floured rolling pin to roll out one portion until 5mm thick. Use a 6cm round cutter to cut out discs and place on the lined trays about 2cm apart. Repeat with the remaining dough portion and any offcuts. Sprinkle the crackers with the extra rosemary leaves to garnish, and press lightly so they stick.
- Bake in preheated oven for 18-20 minutes, swapping the trays around halfway through baking, or until golden and cooked through. Cool on the trays.
Baker's Tips
- These crackers will keep in an airtight container or jar at room temperature for up to 1 week.
This recipe is from Anneka's SBS Food online column, Bakeproof: Savoury Crackers.
CLICK HERE for more Bakeproof recipes.
Photography by Benito Martin.
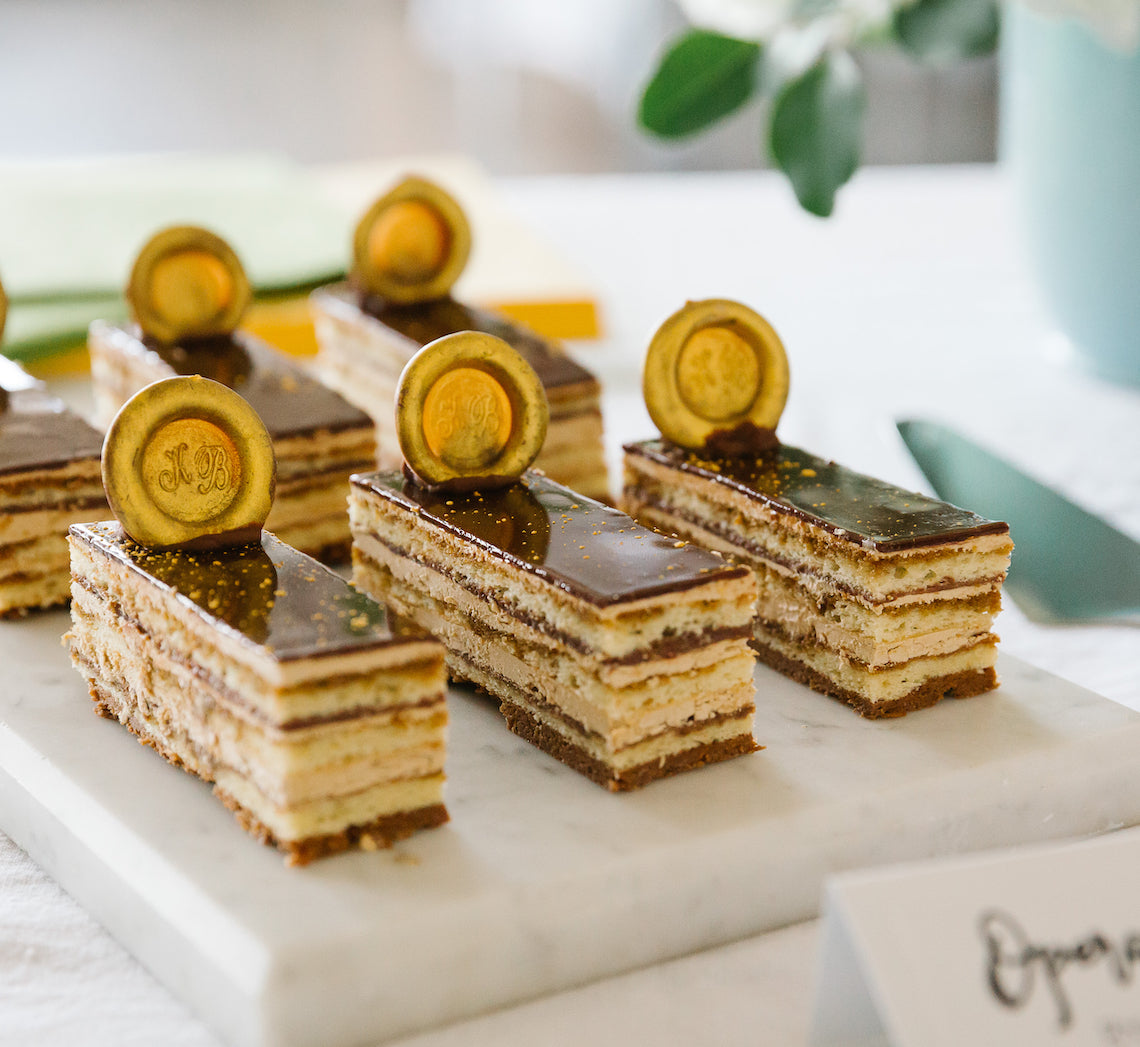
Prep 2hr (+ cooling time)Bake 8-10minMakes 18 serves
Created by Make Me a Baker student, Karthika Biju for her graduation, this stunning cake brings together numerous techniques learnt throughout the 6-month course. A real challenge, this dessert is an exquisite combination of chocolate and coffee-infused layers of almond sponge, ganache, chocolate croustillant, hazelnut praline and Swiss meringue buttercream. Karthika finished each portion of cake with gold dust and leaf and also personalised them with a chocolate disc monogramed with her initials. Not for the faint-hearted baker, this recipe is nothing short of a challenge but the results will definitely reflect the effort.
Ingredients
Edible gold leaf and dust, to decorateJoconde (Almond Sponge)
Melted butter, to grease5 eggs, at room temperature
140g almond meal
140g soft icing sugar mixture
30g plain flour
5 egg whites
30g caster sugar
¼ teaspoon salt
30g unsalted butter, melted
Coffee Syrup
160ml (2/3 cup) water100g caster sugar
3 teaspoons instant coffee powder
Hazelnut Praline Paste
125g whole raw hazelnuts75g caster white sugar
2 teaspoons water
¼ teaspoon salt
Chocolate Croustillant
40g good-quality dark chocolate (45% cocoa), chopped or callets30g Hazelnut Praline Paste
70g Paillette Feuilletine (see Baker’s Tips)
Chocolate Ganache
160g good-quality dark chocolate (45% cocoa), chopped or callets160ml (2/3 cup) thickened cream
Swiss Meringue Coffee Buttercream
4 egg whites, at room temperature200g caster sugar
1/2 teaspoon salt
250g unsalted butter, at room temperature
Coffee extract, to taste
Chocolate Glaze
6.6g gelatine leaves250ml (1 cup) chilled water
125ml (1/2 cup) room temperature water
225g caster sugar
150g good-quality dark chocolate (70% cocoa), callets or chopped
30g cocoa powder, sifted
65ml pure cream (35% butterfat)
Monogramed Chocolate Discs
70g good-quality dark chocolate (45% cocoa), callets or choppedEdible gold lustre paint (See Baker’s Tips)
Wax seal (kept in freezer for at least 45 minutes)
Joconde (Almond Sponge Cake)
- To make the Joconde, preheat the oven to 200°C (180°C fan-forced). Brush two 23cm x 33cm shallow baking trays with melted butter and line the base and sides of each with one piece of non-stick baking paper, cutting into the corners to fit.
- Sift the almond meal and icing sugar into a large bowl. Add the whole 5 eggs and use an electric hand mixer to mix until the mixture is creamy. Stir in the flour until just combined.
- Use an electric mixer with a whisk attachment on medium speed to whisk the egg whites and salt in a large clean bowl until soft peaks form. Gradually whisk in the sugar and continue to whisk until stiff peaks form. Use a spatula or large metal spoon to fold the egg whites through the almond mixture. Add the melted butter and fold gently together.
- Divide the batter evenly between the prepared tins. Bake in preheated oven for 8-10 minutes until lightly golden and cooked through. Cool in the tins.
- Carefully turn the cooled cakes onto a cutting board and cut each into one 20cm square and one 10cm x 20cm rectangle.
Coffee Syrup
- To make the Coffee Syrup, place the water, sugar and coffee into a small saucepan and stir over medium heat until the sugar dissolves. Bring to the boil then remove from heat and set aside to cool completely.
Caramel
- Place the sugar and water in a saucepan over low heat. Leave it to heat until the sugar has melted. Do not stir. Continue cooking until it has turned a golden caramel.
- Meanwhile, fill your sink with cold water. Once the caramel is ready, dip the base of the saucepan in the cold water for a few seconds to stop the cooking process. Set the pan on a towel on the bench.
Hazelnut Praline Paste
- To Make the Hazelnut Praline Paste, reduce the oven temperature to 180°C (160°C fan-forced) and roast the hazelnuts for 10-15 minutes, stirring them every 5 minutes, or until aromatic and the skins start to crackle.
- Wrap the warm hazelnuts in a tea towel and set aside to steam for 10 minutes. Use the tea towel to rub to hazelnuts against it and each other to remove the skins.
- Line an oven tray with non-stick baking paper or a silicone mat. Place the sugar and water in a small heavy-based saucepan and stir over medium heat until the sugar dissolves. Bring to a simmer and simmer over medium heat, brushing down the sides of the saucepan with a pastry brush dipped in water to remove any sugar crystals from the sides of the pan, until a deep golden toffee forms. Remove from the heat add the toasted skinned hazelnuts but don’t stir. Pour immediately onto the lined tray and set aside to cool completely.
- When the toffee is cool, break into small pieces. Add about a quarter of the toffee shards to a food processor bowl and process until ground. With the motor running, add the remining toffee shards and process until ground. Add the salt and continue to process until a smooth paste with a peanut butter consistency forms (see Baker’s Tips).
Chocolate Hazelnut Croustillant
- To make the Chocolate Croustillant, place the chocolate in a heatproof bowl and place over a saucepan of barely simmering water (don’t let the base of the bowl touch the water). Stir occasionally until melted and smooth.
- Add Pailleté Feuilletine and Hazelnut Praline Paste to the melted chocolate and stir to combine. Spread the croustillant over the 20cm square layer of sponge cake on the board. Place in the fridge to set
Chocolate Ganache
- To make the Chocolate Ganache, place the chocolate in a heatproof bowl. Heat cream in a small saucepan over medium heat and bring just to the boil.
- Pour the cream over the chocolate and set aside for 1 minute. Stir until smooth. Set aside to cool at room temperature, stirring occasionally, until it thickens to a peanut butter consistency (see Baker’s Tips).
Coffee Buttercream
- To make the Coffee Buttercream, combine the egg whites, sugar and salt in a medium heatproof bowl. Place the bowl over a pan of simmering water (don’t let the base of the bowl touch the water). Use a balloon whisk to stir until the sugar dissolves. Continue to stir until the mixture reaches 70°C on a thermometer.
- Transfer the mixture to the bowl of a stand mixer and whisk on high speed with the whisk attachment until the mixture is very thick and glossy and has cooled completely to room temperature.
- Replace the whisk with the paddle attachment and gradually add the room temperature butter a tablespoon at a time, beating well on medium-high speed after each addition, before adding the next lot. Once all the butter has been incorporated, beat in the coffee extract.
Cake Assembly
- Remove the croustillant-coated sponge cake layer from the fridge and carefully flip it onto a on a another cutting board with chocolate croustillant facing down. Brush the sponge with about a third of the coffee syrup and then spread with half of the coffee buttercream. Place the two 10cm x 20cm sponge layers side by side on top to cover and brush with half of the remaining coffee syrup.
- Reserve about 1/4 cup of the ganache and spread the sponge evenly with the remaining chocolate ganache. Top with the remaining layer of sponge cake and brush well with the remining coffee syrup. Spread with the remaining buttercream to cover and even the surface using an offset spatula or cake scraper. Cover and refrigerate the cake for at least 2 hours or overnight.
Monogramed Chocolate Discs
- Line a tray with non-stick baking paper. Remove the wax seal from the freezer and place in a bowl of ice.
- Melt the chocolate in the microwave for 10 seconds bursts on high, stirring well after each burst until the chocolate is completely melted. Spoon the chocolate into a zip-lock bag and cut a small hole in one corner. Working quickly, pipe the chocolate onto the lined try to form three discs, each about the size of a dollar coin. Immediately use the chilled wax seal to imprint the chocolate discs, holding on each for 5 seconds. Place the seal back in the ice (see Baker’s Tips) and repeat with the remaining chocolate making and imprinting three discs at a time. Set aside at room temperature to set and firm.
- Once set use a small paintbrush to paint each disc with edible lustre gold paint to coat.
Chocolate Glaze
- When ready to glaze the cake, carefully transfer the cake to a rack over a tray lined with baking paper. Return to the fridge.
- To make the Chocolate Glaze. Place the gelatine sheets in a bowl and add 250ml (1 cup) of the chilled water to cover. Set aside.
- Place the chocolate in a medium heatproof bowl. Combine the remaining 125ml (1/2 cup) water in a small saucepan with the sugar. Stir over medium heat until the sugar dissolves. Bring to the boil and boil gently, brushing down the sides of the pan with a pastry brush dipped in water to dissolve any sugar crystals, until the syrup reaches 104°C on a thermometer.
- Remove the syrup from the heat and pour over the chocolate. Stir until the chocolate melts and the mixture is smooth. Sift the cocoa powder over the chocolate mixture and use a balloon whisk to stir until combined and smooth. Add the cream and stir until the mixture cools to 60°C on a thermometer.
- Use your hands to squeeze as much water as possible from the gelatine sheets and add to the warm chocolate mixture. Stir until dissolved.
- Transfer the mixture to a jug anduse a stick blender to blend until the mixture is emulsified and smooth. Strain the glaze through a fine mesh sieve.
- Once the glaze cools to 32°C on a thermometer pour it immediately over the chilled cake to create a smooth surface, allowing any excess to drip down the sides. Refrigerate for about 1 hour or until the glaze is set.
To Serve
- Use a hot, dry knife trim the edges of the cake and then cut into 18 pieces (each about 7cm x 3cm). Transfer to a serving plate. Soften the reserved Chocolate Ganache by heating in 10 second bursts on high and stirring between each burst until smooth. Cool until almost a piping consistency. Spoon into a piping bag fitted with a small star nozzle. Pipe a rosette of ganache at the end of each cake portion and rest a Monogramed Chocolate Disc against the rosette to hold it. Decorate with gold leave and dust as desired.
Baker's Tips
- Paillette Feuilletine is fine broken shards of Crêpes Dentelle (a crisp biscuit made from rolled crêpes)and is used to add texture to confections and desserts. It is available from specialty food stores and French delicatessens.
- Edible lustre gold paint is available from specialty cake decorating shops and suppliers and some craft stores.
- The Hazelnut Praline Paste will be coarse crumbs in the beginning, but it will eventually get smooth with processing. Don’t add water to thin the mixture but a little vegetable oil can be added to reach the right consistency is needed.
- The longer the Chocolate ganache stands at room temperature the thicker it will become. It is ready to use when it becomes a peanut butter-like consistency. If left for too long, it will become too thick to spread.
- The wax seal must be left in the ice between imprinting the discs for it to work effectively and not stick to the chocolate.
Karthika based this recipe on one from https://www.homecookingadventure.com.
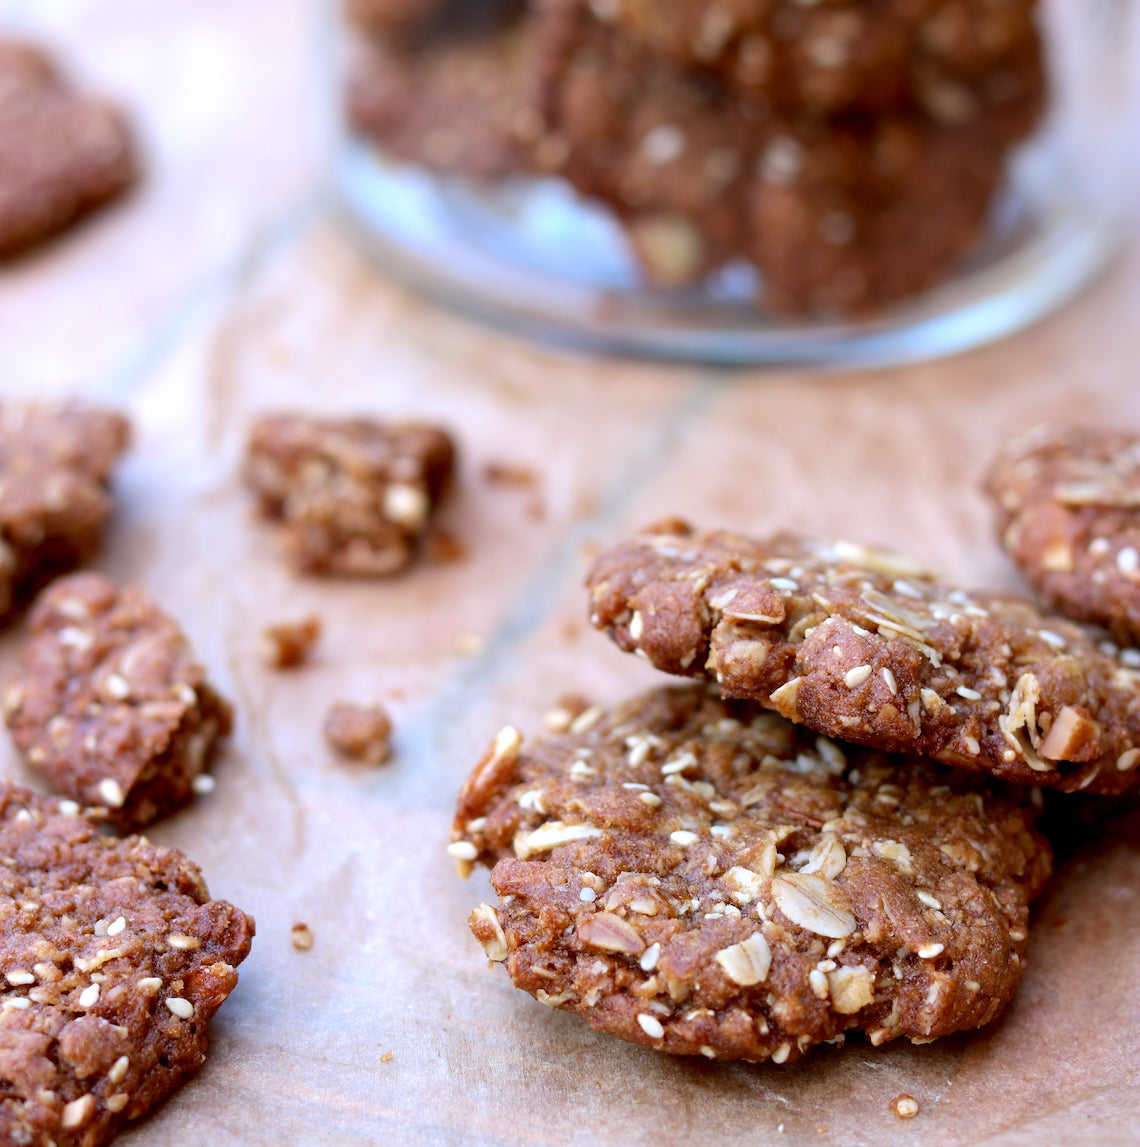
Prep 20minBake 20minMakes about 30
Reminiscent of the traditional and timeless Anzac biscuits, these morish treats have the addition of almond and sesame (for extra crunch) and mandarin (for a surprising flavour twist). This variation is not intended to be disrespectful of the ANZAC spirit – just a modern variation to enjoy with a cuppa and to reflect on the legacy left and sacrifice made by our service men and women.
Ingredients
95g (1 cup) rolled oats
150g (1 cup) plain flour
90g (1 cup) desiccated coconut
220g (1 cup, firmly packed) brown sugar
95g (¾ cup) slivered almonds
40g (¼ cup) sesame seeds
Finely grated rind 1 mandarin
125g butter, cubed
2 tablespoons treacle
2 tablespoons water
½ teaspoon bicarbonate of soda
Method
- Preheat oven to 180°C (160°C fan-forced). Line 2 large oven trays with baking paper.
- Put the rolled oats, flour, coconut, brown sugar, almonds, sesame seeds and mandarin rind in a large mixing bowl and stir to combine.
- Put the butter, treacle and water in a small saucepan and heat over medium heat, stirring occasionally with a wooden spoon, until the butter melts. Remove from the heat, add the bicarbonate of soda and stir to combine – the mixture will foam. Add to the dry ingredients and stir with the wooden spoon until evenly combined.
- Roll tablespoonfuls of the mixture into balls and place about 5cm apart on the lined trays. Use your fingers or the bottom of a glass to flatten the balls until about 1cm thick.
- Bake in preheated oven for 20 minutes, swapping the trays after 10 minutes, or until golden and cooked through. Remove the biscuits from the oven and cool on the trays. Repeat with any remaining biscuit mixture.
Baker's Tip
- These biscuits will keep in an airtight container at room temperature for up to 2 weeks (if they last that long!)
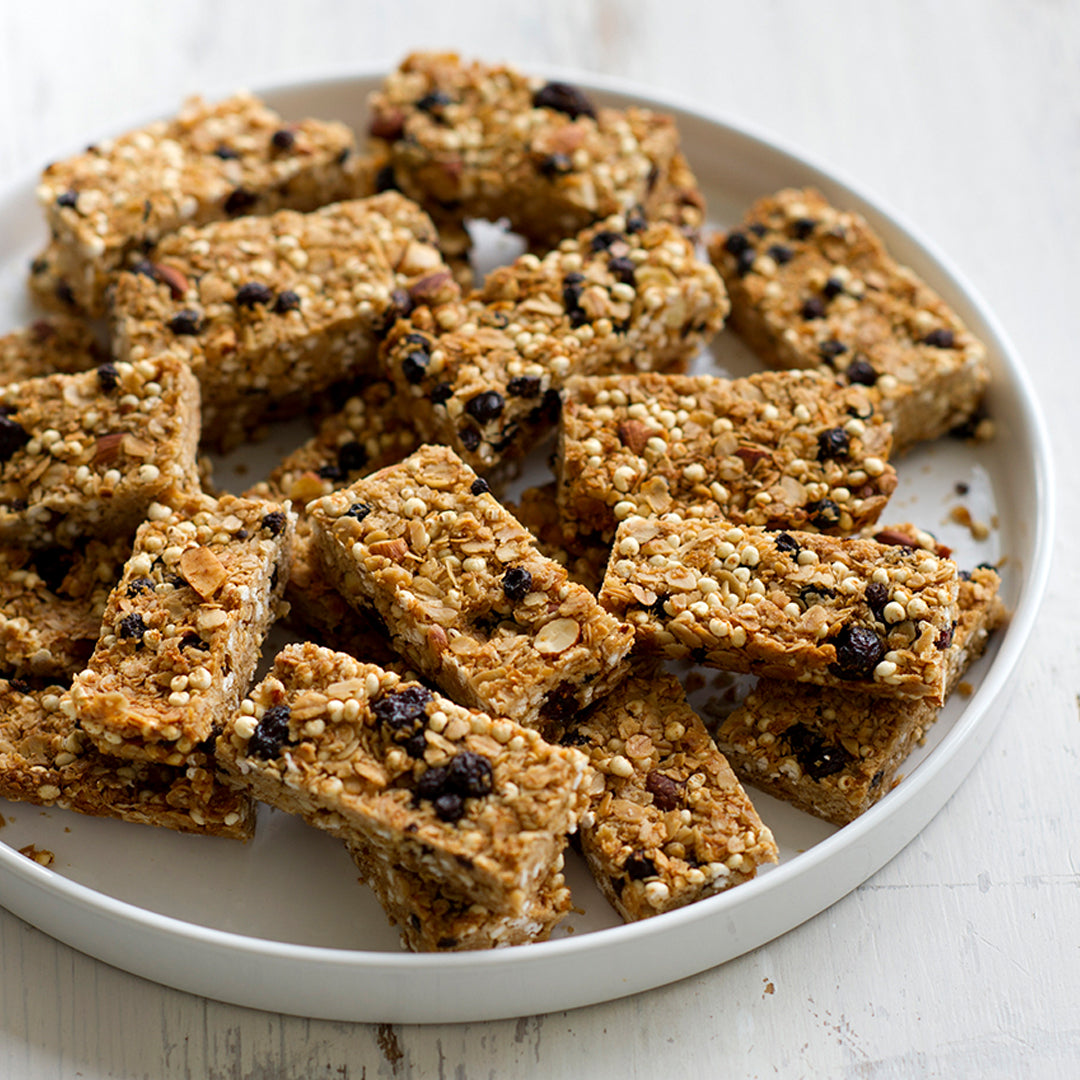
Prep 15min (+ cooling time)Bake 45-55minMakes about 24
Knowing what is going into your muesli bars is the key to good ones – it makes them so much healthier and tastier.
Ingredients
260g (180ml / ¾ cup) good-quality honey
125ml (½ cup) sunflower oil or light olive oil
250g (2½ cups) rolled oats
30g (1½ cups) puffed millet
45g (½ cup) desiccated coconut
1½ teaspoon ground cinnamon
55g (⅓ cup) sweetened dried cranberries
75g (½ cup) currants
80g (½ cup) raw almonds, coarsely chopped (see Baker’s Tips)
Method
- Preheat the oven to 140ºC (120°C fan-forced). Lightly grease a shallow 20 x 30cm (base measurement) slice tin and line the base and sides with non-stick baking paper.
- Put the honey and oil in a small saucepan over medium heat and stir until well combined and heated through. Set aside.
- Put the rolled oats, millet, coconut, cinnamon, cranberries, currants and almonds in a large bowl and mix to combine evenly. Add the honey mixture and stir to combine well. Using damp hands, press the mixture firmly into the lined tin. Press the mixture with the back of a spoon to make the surface smooth and even.
- Bake for 45–55 minutes or until the surface is dark golden brown all over. Cool completely in the tin before cutting into 24 bars with a sharp knife.
Baker's Tips
- For a nut-free version, substitute the almonds with ⅓ cup sunflower seeds or pepitas (pumpkin seeds).
- These muesli bars will keep in an airtight container at room temperature for up to 1 week. Alternatively they also freeze well for up to 3 months – wrap individual bars in plastic wrap and then seal in an airtight container or freezer bag. Thaw at room temperature.
- For extra-crisp muesli bars, store in an airtight container in the fridge.

Prep 2 hours (+ 4 hours chilling time)Bake 30-40 minMakes 18 serves
These divine desserts petite gateaux were created by Rachel Hunt, one of our Make Me a Baker students for her graduation. A crisp, nutty, meringue base is topped with a mirror-glazed, ever-so-light honey-infused mousse surrounding a floral lavender jelly. Using a number of techniques, this recipe showcases all the fantastic new skills and confidence Rachel gained over the course of our 6-month program and, lucky for you, she’s sharing it so you can make them at home! Rachel uses 18 x 30mm and 60mm (top measurement) half sphere silicon moulds however other shapes/sizes can be used.
Ingredients
Lavender Jelly- 6 fresh unsprayed lavender heads or 2 teaspoons
dried culinary lavender, plus extra to decorate - 250ml (1 cup) water
- 110g (1/2 cup) sugar
- 1½ teaspoons powdered gelatin
- 2½ tablespoons cold water
- Purple food colour (optional)
- 5 eggs, separated
- 40g butter, diced
- 135g good-quality white chocolate chips (like Callebaut)
- 60ml (¼ cup) good-quality honey
- 2 teaspoons powdered gelatin
- 2 tablespoons cold water
- 300ml thickened cream
Hazelnut Meringue
- Vegetable oil, to grease
- 150g hazelnut meal or peeled toasted hazelnuts
- 7 large egg whites
- ½ teaspoon white wine vinegar
- 385g (1¾ cups) caster sugar
Mirror Glaze
- 2 tablespoon powdered gelatin
- 250ml (1 cup) cold water
- 330g (1½ cups) caster sugar
- 160ml (2/3 cup) sweetened condensed milk
- 2 cups good-quality white chocolate chips (like Callebaut)
Method
- To make the lavender jelly, combine the sugar and 250ml water in a small saucepan and stir over a low heat until sugar dissolves. Bring to the boil. Remove from the heat and add the lavender. Set aside to cool to room temperature.
- When the syrup is almost cool, place the cold water in a small heatproof bowl or dish and sprinkle the gelatin over. Set aside for 5 minutes or until the gelatin is fully rehydrated. Sit the bowl or dish into another bowl of hot water and stir until dissolved and the mixture is clear.
- Strain the jelly syrup through a sieve to remove the lavender. Transfer the gelatin mixture to a medium bowl and stir in the syrup until well combined.
- Tint the jelly syrup with purple food colouring if desired. Place 18 x 30mm (top measurement) half-sphere silicon moulds on a tray and pour in the jelly syrup (there will be some syrup left over and you can set it in other moulds or glasses if you wish). Place in the fridge to chill for at least 4 hours, or until well set.
- To make the honey mousse, lightly whisk the egg yolks and combine in a medium saucepan with the butter, chocolate and honey. Stir over low heat until the chocolate is just melted (be careful not to overheat). Transfer mixture to a large bowl.
- Place the cold water in a small heatproof bowl or dish and sprinkle the gelatin over. Set aside for 5 minutes or until the gelatin is fully rehydrated. Sit the bowl or dish into another bowl of hot water and stir until dissolved and the mixture is clear. Stir gelatin mixture into the chocolate mixture until combined. Cover and cool to room temperature, stirring occasionally.
- Use an electric mixer with a whisk attachment or a hand-held balloon whisk to whisk the cream in a medium bowl until soft peaks form. Fold the cream into the cooled chocolate mixture until just combined. Whisk the egg whites with a clean whisk in a large bowl until soft peaks form. Add half the egg whites into the chocolate mixture and gently fold through. Add the remaining egg whites and gently fold through until just combined.
- Place 18 x 60mm (top measurement) half sphere moulds on a tray and pour in the mousse mixture to fill each until almost full. Remove the lavender jelly domes from the smaller moulds and press into the centre of each individual mousse, ensuring the mousse completely covers the jelly. If the jelly isn't completely covered, add a little more mousse. If necessary, scrape a palette knife across the top of the moulds so that the base of the mousse domes will be level. Chill for at least 4 hours, or until set.
- To make the hazelnut meringue, preheat the oven to 180°C (160°C fan forced). Lightly grease 2 oven trays and line with non-stick baking paper.
- If using whole toasted hazelnuts grind the nuts with 1 tablespoon of the caster sugar in a food processor until fine but still with some texture.
- Use an electric mixer with a whisk attachment to whisk the egg whites and vinegar until soft peaks form. Add the caster sugar 1 tablespoon at a time, whisking well after each addition. Once half the sugar has been added start adding the rest in larger quantities, whisking well after each addition, until stiff, glossy peaks form. Use a metal spoon or spatula to fold the hazelnuts through the meringue. Spoon the meringue onto the prepared trays and spread evenly in a rectangle until about 1-1½cm thick. Bake in preheated oven for 30-40 minutes until a crisp crust forms. Remove from the oven and cool for 20 minutes on the trays and then transfer them to wire racks, still on the baking paper, to cool completely. Carefully remove the baking paper and transfer to a cutting board. Use a 6cm round cutter to cut discs from the meringue sheets. Set aside in an airtight container.
- To make the mirror glaze, place 80ml (1/3 cup) of the cold water into a small bowl or dish and sprinkle the gelatin over. Set aside for 5 minutes or until the gelatin is fully rehydrated.
- Combine the remaining water, sugar and condensed milk in a small saucepan over a medium heat. Stir occasionally until the mixture begins to bubble. Remove from the heat, add the gelatin mixture and stir until fully dissolved. Add the white chocolate chips and stir slowly until melted. Pour the mixture through a sieve into a large jug and set aside to cool to room temperature.
- Remove the petit gateaux domes from the fridge and place on a wire rack over a larger oven tray to catch the drips. Carefully and slowly pour the glaze over ensuring the domes are completely covered. Sprinkle dried lavender on top to decorate if desired.
- Set aside at room temperature for at least 20 minutes or until the glaze is set.
- Use a palette knife to transfer the mousse domes to the hazelnut meringue discs and serve.
Baker's Tips
- The mousse domes will keep in an airtight container in the fridge for up to 2 days.
- The Hazelnut meringue will keep in an airtight container at room temperature for up to 1 week.
Rachel took inspiration for her creation from:
https://www.deliciousmagazine.co.uk/
https://www.womensweeklyfood.com.au/
https://chelsweets.com
https://ballymaloe.ie/content/ballymaloe-recipes
Photography by Alan Benson.
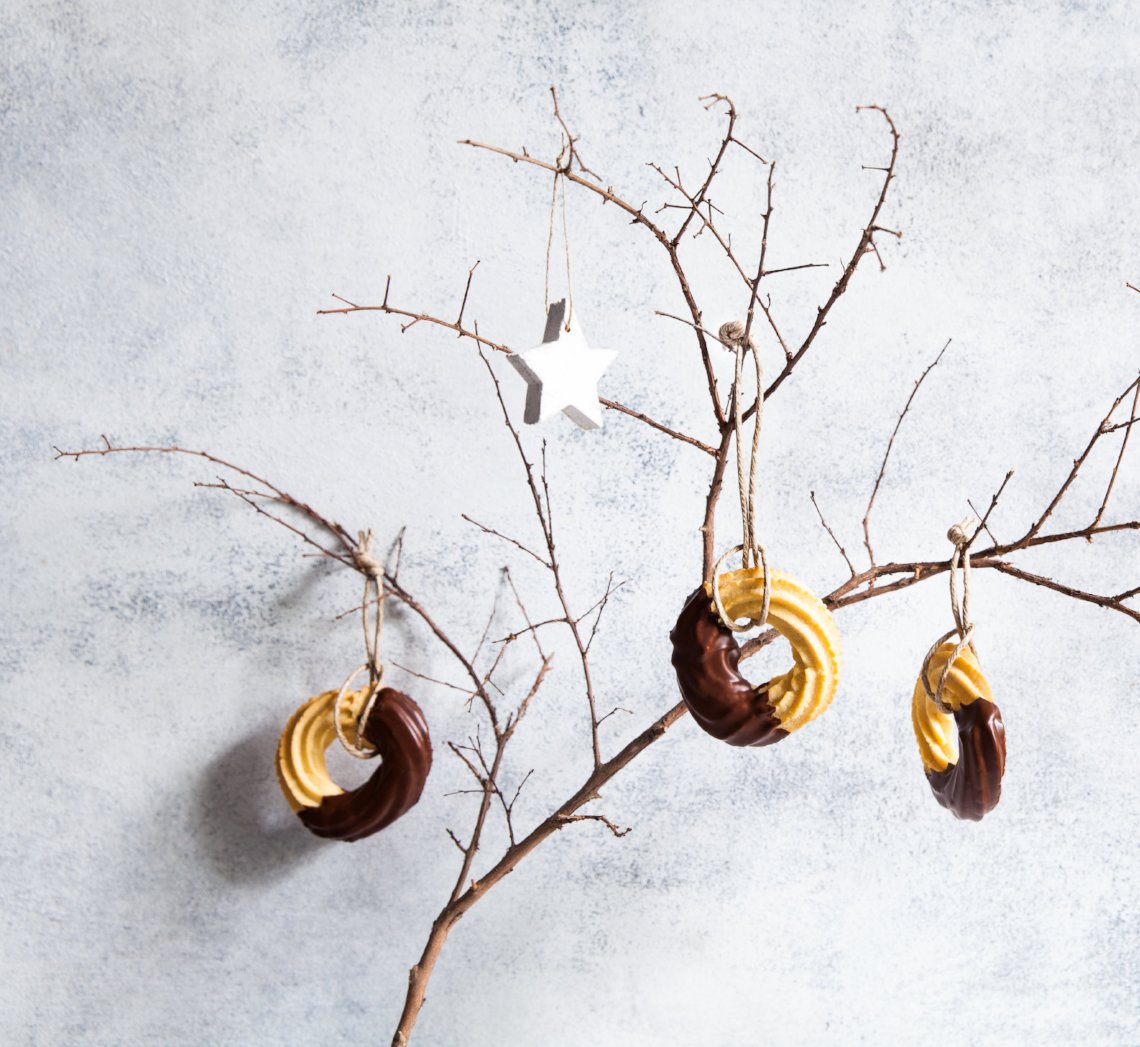
Prep 30min (+15min cooling and 1hr standing time)Bake 15minMakes 20
The German word spritzen means to squirt and reflects the way these cookies are shaped – by pushing them through a piping nozzle. The almond meal in the dough gives a lovely soft, almost cakey, texture to these chocolate-dipped cookies that can be piped in various designs, including mini wreaths.
Ingredients
- 250g butter, softened
- 220g (1 cup) caster sugar
- 1½ teaspoon natural vanilla essence or extract
- 3 eggs
- 450g (3 cups) plain flour
- 60g almond meal
- 300g good-quality dark chocolate (45-54% cocoa), chopped
Method
- Preheat oven to 180°C (160°C fan-forced). Line two large oven trays with non-stick baking paper.
- Use an electric mixer to beat the butter, sugar and vanilla until pale and creamy. Add the eggs, one at a time, beating well between each addition. Combine the flour and almond meal. Add to the butter mixture and beat on the lowest possible speed until just combined.
- Spoon half the mixture into a large piping bag fitted with a 13 mm (#13) star nozzle. Pipe 6–7 cm circles onto the lined trays (see Baker’s tips). Repeat with the remaining mixture.
- Bake for 15-18 minutes, swapping the trays halfway through baking, or until pale golden and cooked through. Cool on the trays.
- Place the chocolate in a heatproof bowl over a saucepan of simmering water and heat, stirring occasionally, until melted. Turn off the heat but leave the bowl sitting on top. Dip a cooled cookie into the chocolate to coat half of the cookie. Place back on the lined tray and repeat with the remaining cookies. Tap the trays on the benchtop lightly to settle the chocolate into the grooves of the cookies, then set aside for about 1 hour or until the chocolate sets.
Baker's tips
- You can use a 6–7 cm round cutter as a guide to draw circles onto the underside of the baking paper to help keep your cookies uniform in size.
- These cookies will keep in an airtight container at room temperature for up to 1 week.
This recipe is from Anneka's SBS Food online column, Bakeproof: Festive Cookies.
CLICK HERE for more Bakeproof columns and recipes.
Photography by China Squirrel.
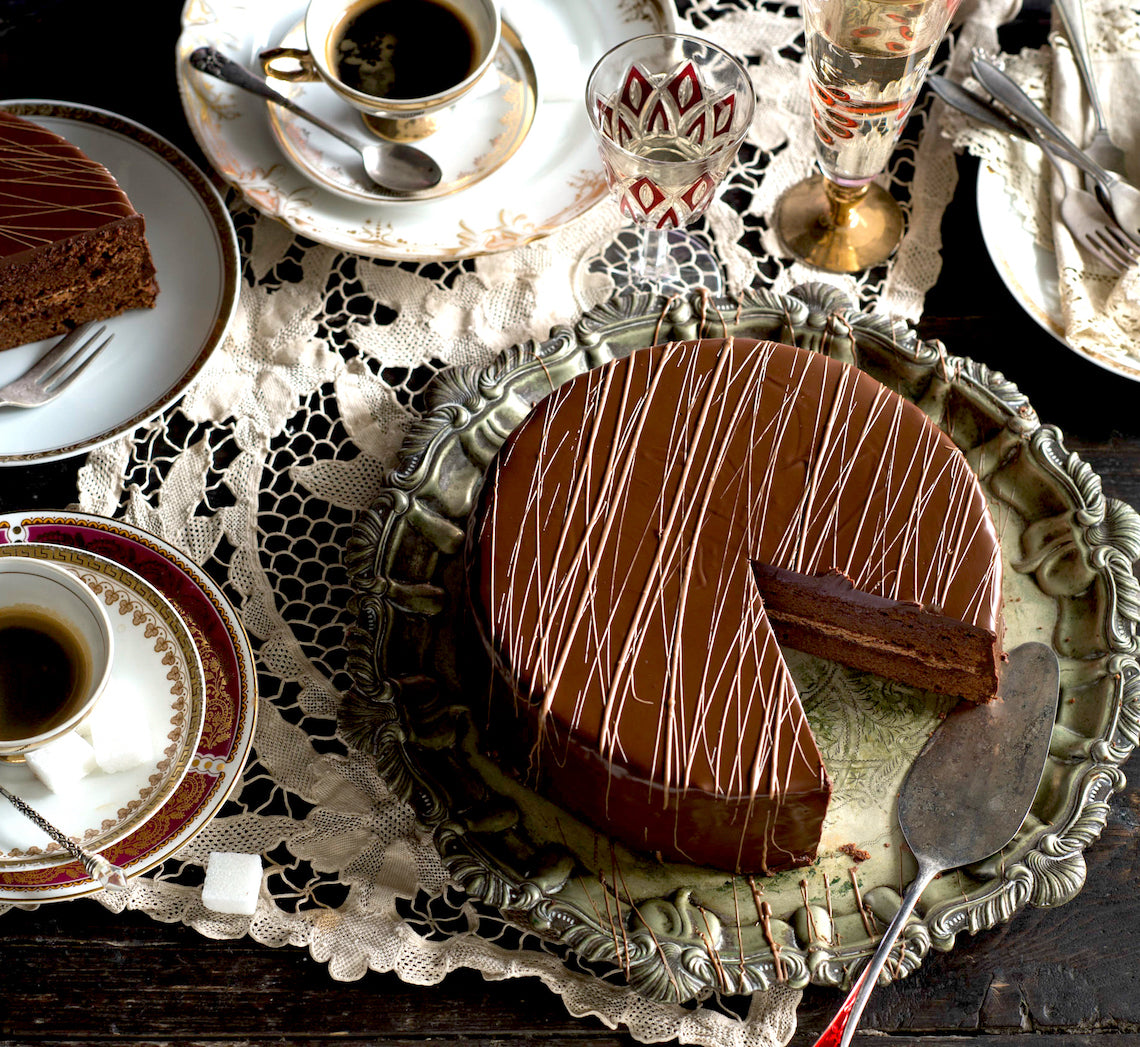
Prep 40min (+1hr cooling and 2hr standing time)Bake 30minMakes 10-12 serves
Possibly the most famous cake in the world, and certainly the pride of Austria, Sacher Torte was created by Franz Sacher, a 16-year-old apprentice stepping in for an ill head chef, to impress the guests of Prince Wenzel von Metternich. And as they say, the rest is now cuisine history. This elegant, rich and enticing cake is now loved the world over.
Ingredients
Melted butter, to grease
125g unsalted butter, softened
125g (1 cup) icing sugar, sifted
1½ teaspoons natural vanilla essence or extract
6 eggs, at room temperature, separated
175g good-quality dark chocolate (54% cocoa), chopped, melted and cooled to room temperature
110g (¾ cup) plain flour
110g (½ cup) caster sugar
85g (¼ cup) apricot jam, warmed and sieved
40g good-quality milk chocolate, melted, to decorate
Thick or whipped cream, to serve
Chocolate Glaze
300g good-quality dark chocolate (54% cocoa)
60g butter, cubed
Method
- Preheat oven to 180°C (160°C fan-forced). Brush 2 x shallow 20cm round cake tins with melted butter to grease and line the bases with rounds of non-stick baking paper.
- Use an electric mixer to beat the butter, icing sugar and vanilla until pale and creamy. Add the egg yolks and beat until well combined and creamy. Beat in the cooled melted chocolate until well combined. Use a large metal spoon or spatula to fold in the flour until just combined.
- Use an electric mixer with a whisk attachment to whisk the egg whites in a large clean, dry bowl until soft peaks form. Add the caster sugar and whisk on medium-high speed until thick and glossy and all the sugar has dissolved (see Baker’s tip). Add half the egg white mixture to the chocolate mixture and use a large metal spoon or spatula to fold in to ‘loosen’ the mixture. Add the remaining egg white mixture and fold until just evenly combined.
- Divide the mixture evenly between the tins and use the back of a spoon to smooth the surface. Bake in preheated oven for 30 minutes or until a skewer inserted into the centre of the cakes comes out clean. Stand in the tins for 10 minutes before turning onto a wire rack to cool (this will take about 1 hour).
- Once cool, spread one cake layer with the warmed sieved jam and then top with the second layer, bottom side up. Place the cake on a wire rack over a tray and set aside while making the chocolate glaze.
- To make the chocolate glaze, combine the chocolate and butter in a heatproof bowl and place over a saucepan of barely simmering water (make sure the base of the bowl doesn’t touch the water). Stir occasionally until just melted and combined. Use a plate knife to spread a little of the glaze over the outside of the cake to form a ‘crumb coat’ and to even the surface. Place in the fridge for 20 minutes or until set. Remove from the fridge and carefully pour over the rest of the glaze, allowing it to run down the sides of the cake to coat evenly. Tap the cake, still on the rack, gently on the tray to remove any air bubbles and to settle the glaze. Use a fork to drizzle the milk chocolate over the top of the cake to decorate. Set aside for 2 hours or until the glaze sets. Serve cut into small wedges with cream.
Baker’s Tips
- To test if all the sugar has dissolved, rub a little of the egg white and sugar between two fingers – you will be able to feel if there is still undissolved sugar. Whisk for another minute if not completely dissolved before testing again.
- This cake will keep in an airtight container at room temperature for up to 4 days.
This recipe is from Anneka's SBS Food online column, Bakeproof: Austrian Baking.
CLICK HERE for more Bakeproof columns and recipes.
Photography by Alan Benson.
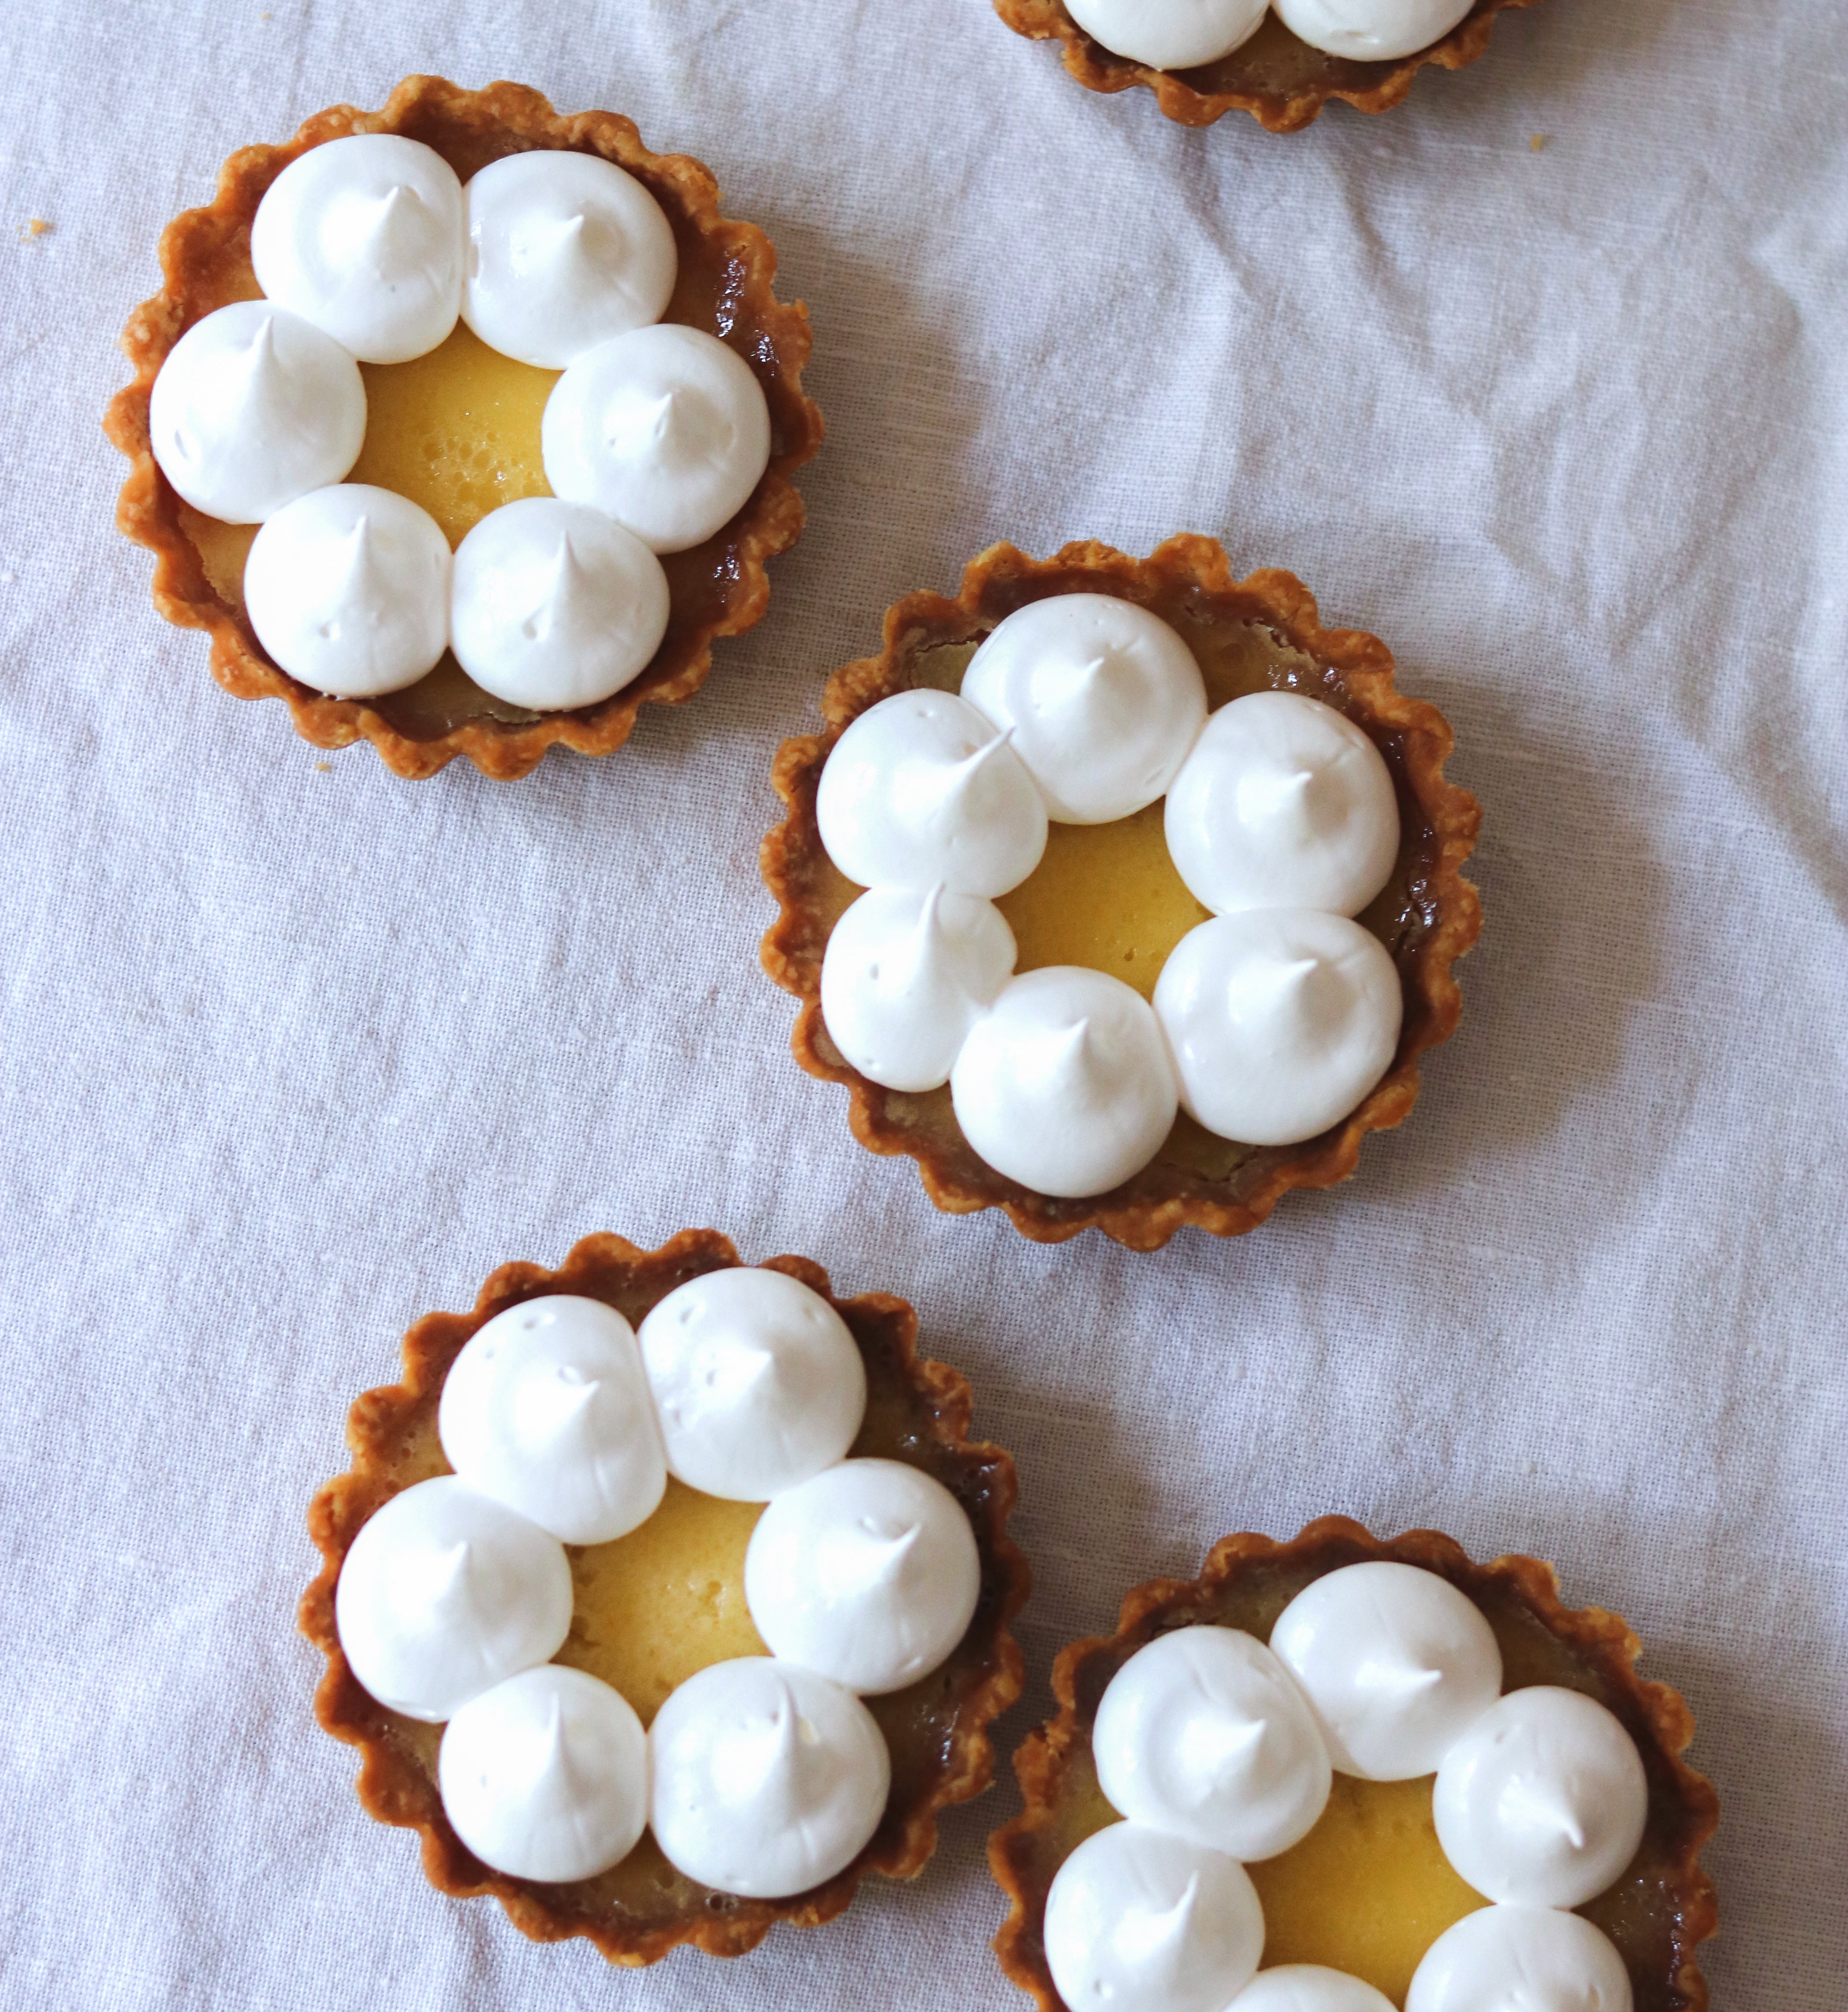
Prep 40min (+ pastry making time)Bake 35minMakes 10
Italian meringue makes an elegant topping for these classic tarts. You can caramelize the meringue lightly with a blow torch to add a delicate, slightly burnt caramel flavour to complement the sweetness of the meringue and sourness of the lemon filling if you wish.
Ingredients
1 quantity Sweet Shortcrust Pastry, rolled into a log about 15cm long before wrapping and chilling as directed
Icing sugar (optional), to sprinkle
Cream or ice cream, to serve
Filling
2 eggs110g (½ cup) caster sugar
125ml (½ cup) pouring (thin) cream
100ml strained fresh lemon juice
Italian Meringue
4 egg whites, at room temperature220g (1 cup) caster sugar
60ml (¼ cup) water
Method
-
Preheat the oven to 200°C (180°C fan-forced).
-
Remove the pastry from the fridge and cut into 10 even slices. Gently pat a pastry portion on a lightly floured benchtop with the palm of your hand to fatten slightly. Use a lightly floured rolling pin to roll out to a disc about 3mm thick. Line a 6.5cm (base measurement), 2cm deep, tart tin with removable base, with the pastry, pressing it into the side and corners with your thumb and/or fingertips. Roll the rolling pin over the top of the tart tin to trim any excess pastry. Repeat with the remaining pastry portions to make 10 tart cases in total.
-
Place the tart cases on an oven tray. Use a fork to prick the pastry base of each about 4 times. Line the pastry cases with squares of greaseproof paper or foil and fill with pastry weights, dried beans or raw rice, making sure they press into the corners and fill the cases. Bake in preheated oven for 10 minutes.
-
Remove the tart cases from the oven and use the paper or the foil to remove the weights from the cases. Return the cases to the oven and bake for a further 5-10 minutes or until the pastry is just cooked through and looks dry.
-
Meanwhile, to make the filling, use a fork to whisk the eggs, sugar, cream and lemon juice together until well combined. Strain the mixture into a jug. Pour the filling into the hot pastry cases while still in the oven (see Baker's Tips), dividing evenly. Reduce the oven temperature to 160°C (140°C fan-forced) and bake for a further 10 minutes or until the filling has just set in the centre but still wobbles slightly when shaken. Cool the tarts in the tins.
-
To make the Italian Meringue, put the egg whites in the bowl of a stand mixer fitted with a whisk attachment. Combine the sugar and water in a small saucepan and stir with a wooden spoon over low heat until the sugar dissolves. Increase the heat to medium and bring to the boil. Boil for about 10 minutes, occasionally brushing down the side of the pan with a pastry brush dipped in water to dissolve any sugar crystals, until the syrup reaches hard ball stage (120°C on a sugar thermometer).
-
Meanwhile, just before the syrup is ready, whisk the egg whites on high speed until firm peaks form. Remove the syrup from the heat and stand for a bout 1 minute or until the bubble subside. With the motor running on high speed, gradually add the sugar syrup in a thin steady stream until all the syrup has been incorporated. Continue to whisk on medium speed for another 10 minutes or until the meringue has cooled to room temperature.
-
Spoon the meringue mixture into a large piping bag fitted with a #13 (1.3cm) plain or #11 (1.1cm) star nozzle. Pipe small rounds of meringue over the surface of the tarts to cover. Use a blow torch to lightly caramelize the meringue if desired.
-
Dust with icing sugar, if desired and serve with cream or ice cream.
Baker's Tips
- Adding the filling to the pastry cases while still sitting in the oven will mean you can fill the tarts completely and minimise the chance of it spilling when transferring it to the oven.
- These tarts will keep in an airtight container in the fridge for up to 2 days (although the pastry will soften slightly on keeping). Bring to room temperature to serve.
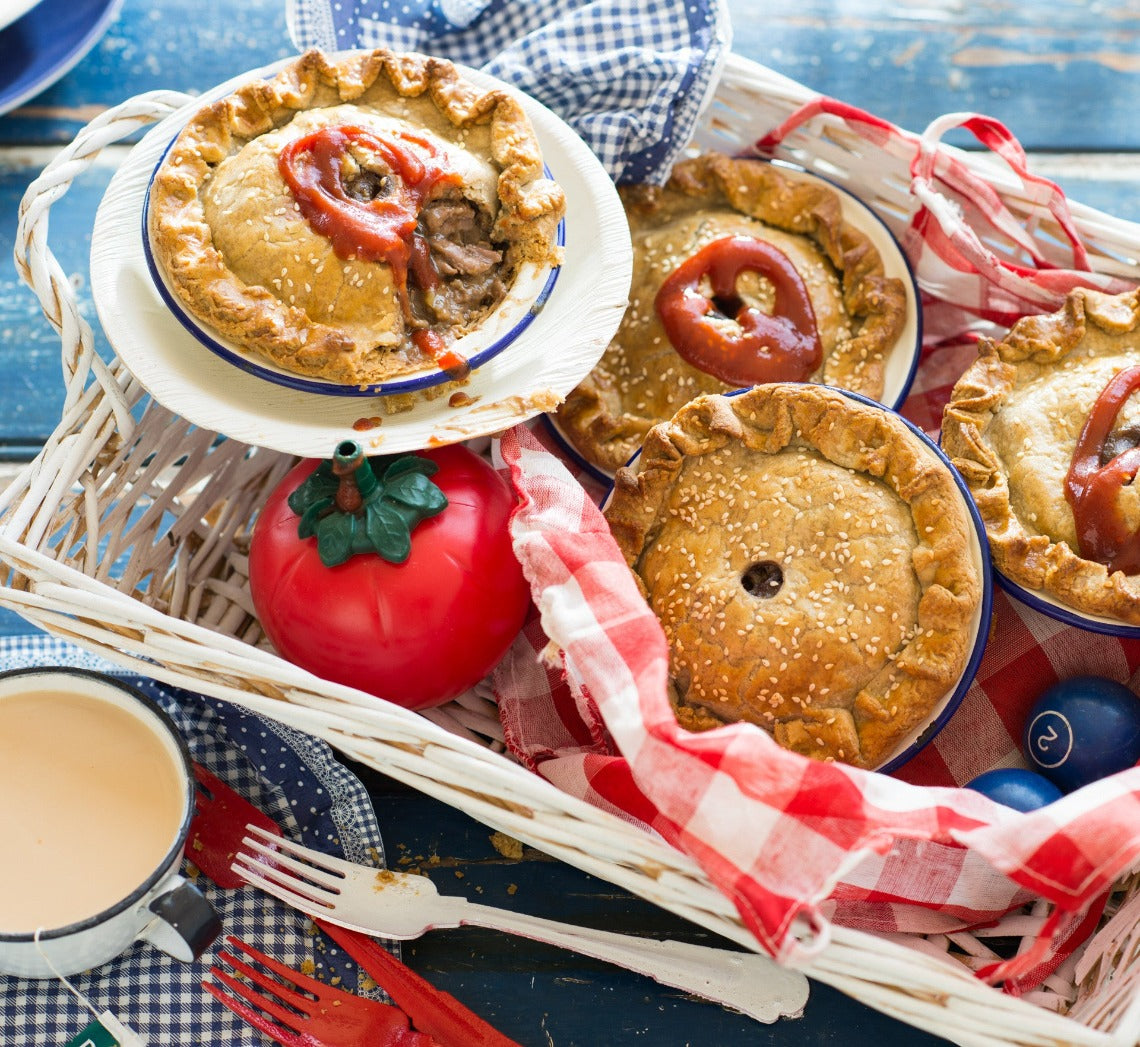
Prep 1hr (+2hr cooling and 5min standing time)Bake 2hr 30minMakes 6 serves
The addition of allspice, shiitake mushrooms, ginger and oyster sauce give these good old Aussie pies a subtle, but truly delicious, Chinese twist.
Ingredients
3 quantities shortcrust pastry (each with the addition of 1 teaspoon ground allspice added with the flour), each made separately and shaped into a disc before wrapping and chilling (see Baker's Tips)
1 egg, lightly whisked
sesame seeds, to sprinkle
Filling
1kg trimmed chuck steak, cut into 2cm chunks
35g (¼ cup) plain flour
60ml (¼ cup) peanut oil
2 small brown onions, chopped
200g shiitake mushrooms, sliced
2 garlic cloves, finely chopped
3 teaspoons finely grated ginger
250ml (1 cup) good-quality beef stock
500ml (2 cups) water
2 tablespoons oyster sauce, or to taste
Method
- Place the chuck steak in a large bowl, sprinkle with the flour and toss to coat.
- Heat 1 tablespoon of the oil in a large heavy-based saucepan over a high heat and cook half the steak chunks, stirring occasionally, for about 5 minutes or until sealed. Remove from the pan, scraping any cooked-on bits from the base, and set aside. Repeat with another tablespoon oil and the remaining steak.
- Clean the pan if necessary. Add the remaining 1 tablespoon oil, onion and shiitake mushrooms and cook over a medium-high heat, stirring occasionally, for 5 minutes or until the onion and mushrooms start to soften. Reduce the heat to medium, add the garlic and ginger and cook for a further 1 minute, stirring occasionally, or until aromatic. Return the steak to the pan with the stock, water and 1 tablespoon of the oyster sauce and bring to a simmer.
- Reduce heat to low and simmer, covered, for 30 minutes, stirring occasionally. Uncover and then simmer for a further 30 minutes to 1 hour, stirring frequently or until the meat is tender and the liquid has reduced and thickened to a thick sauce consistency. Stir in the remaining oyster sauce, taste and adjust seasoning by adding a little more oyster sauce if necessary. Transfer the mixture to a heatproof bowl, cover and place in the fridge, stirring occasionally, until cooled to room temperature (this will take about 2 hours).
- When ready to assemble the pies, preheat oven to 220°C (200°C fan-forced). Brush 6 x 10.5cm (base measurement) x 14cm (top measurement) metal or foil pie dishes. Unwrap the pastry discs and divide each into quarters. Shape a quarter into a disc and use a lightly floured rolling pin to roll the pastry on a lightly floured bench top into a round until about 3mm thick and about 15cm in diameter. Repeat with the remaining discs. Use an upturned pie dish to cut out pie lids from 6 of the rolled pastry rounds. Use the end of a 1cm piping nozzle or a small sharp knife to cut a small steam hole in the centre of each pie lid.
- Gently ease the the uncut pastry discs into the pie dishes and use your fingertips to press the pastry gently into the corners without stretching it — it will overhang the dishes slightly. Divide the steak mixture between the pastry cases to fill. Place a lid over the mixture to cover each pie, brush the edge of each lid with the whisked egg and then fold the excess pastry from the bases over the top of the lids, crimping with your fingertips or pressing with a fork together to seal. Brush the top of each pie lightly with some of the remaining egg wash and sprinkle with sesame seeds.
- Reduce the oven to 200°C (180°C fan-forced) and bake the pies in preheated oven for 45-50 minutes or until the pastry is cooked through and a deep golden. Stand the pies in the dishes for 5 minutes before turning out and serving.
Baker's Tips
- Don't be tempted to make the 3 quantities of pastry all at once. Making them separately makes the pastry easier to handle and will give you a better final result.
Photography by Alan Benson.Save


